My Truth with WSL 2 in Windows 10

I’ve seen many blog posts looking for specific information on setting up WSL 2 in Windows 10 and especially, on a virtual machine. But, I always end up a little short and figuring out by myself through trial-and-error.

Microsoft WSL 2 Installation documentation page is helpful for most part. But was meant for a physical installation. ()

Let me shared what I found and hope it serves you well.

My Experience

First, I love WSL (Windows Subsystem for Linux)! It’s a great addition to Windows 10, and everyone should learn how to use it.

To get started, follow the instructions on how to get your WSL 1 Linux Distro installed. And, begin with installing Ubuntu 18.04.

Now, get Docker Desktop (), which can be installed in Windows 10 RTM Build 18363 with WSL 1. For the most part, you can start working with docker containers.

To use WSL 2 with Docker Tech Preview, you need Windows 10 Insider build 18917 (or higher). Execute the following command in either DOS or PowerShell console:

wsl -l -v

If it doesn’t work, then it means you still using WSL 1, and it can’t be set to WSL 2. This might be due to the OS is not a Windows Insider version. In WSL 1, the version ‘-v’ parameter is only available for Windows Insider OS.

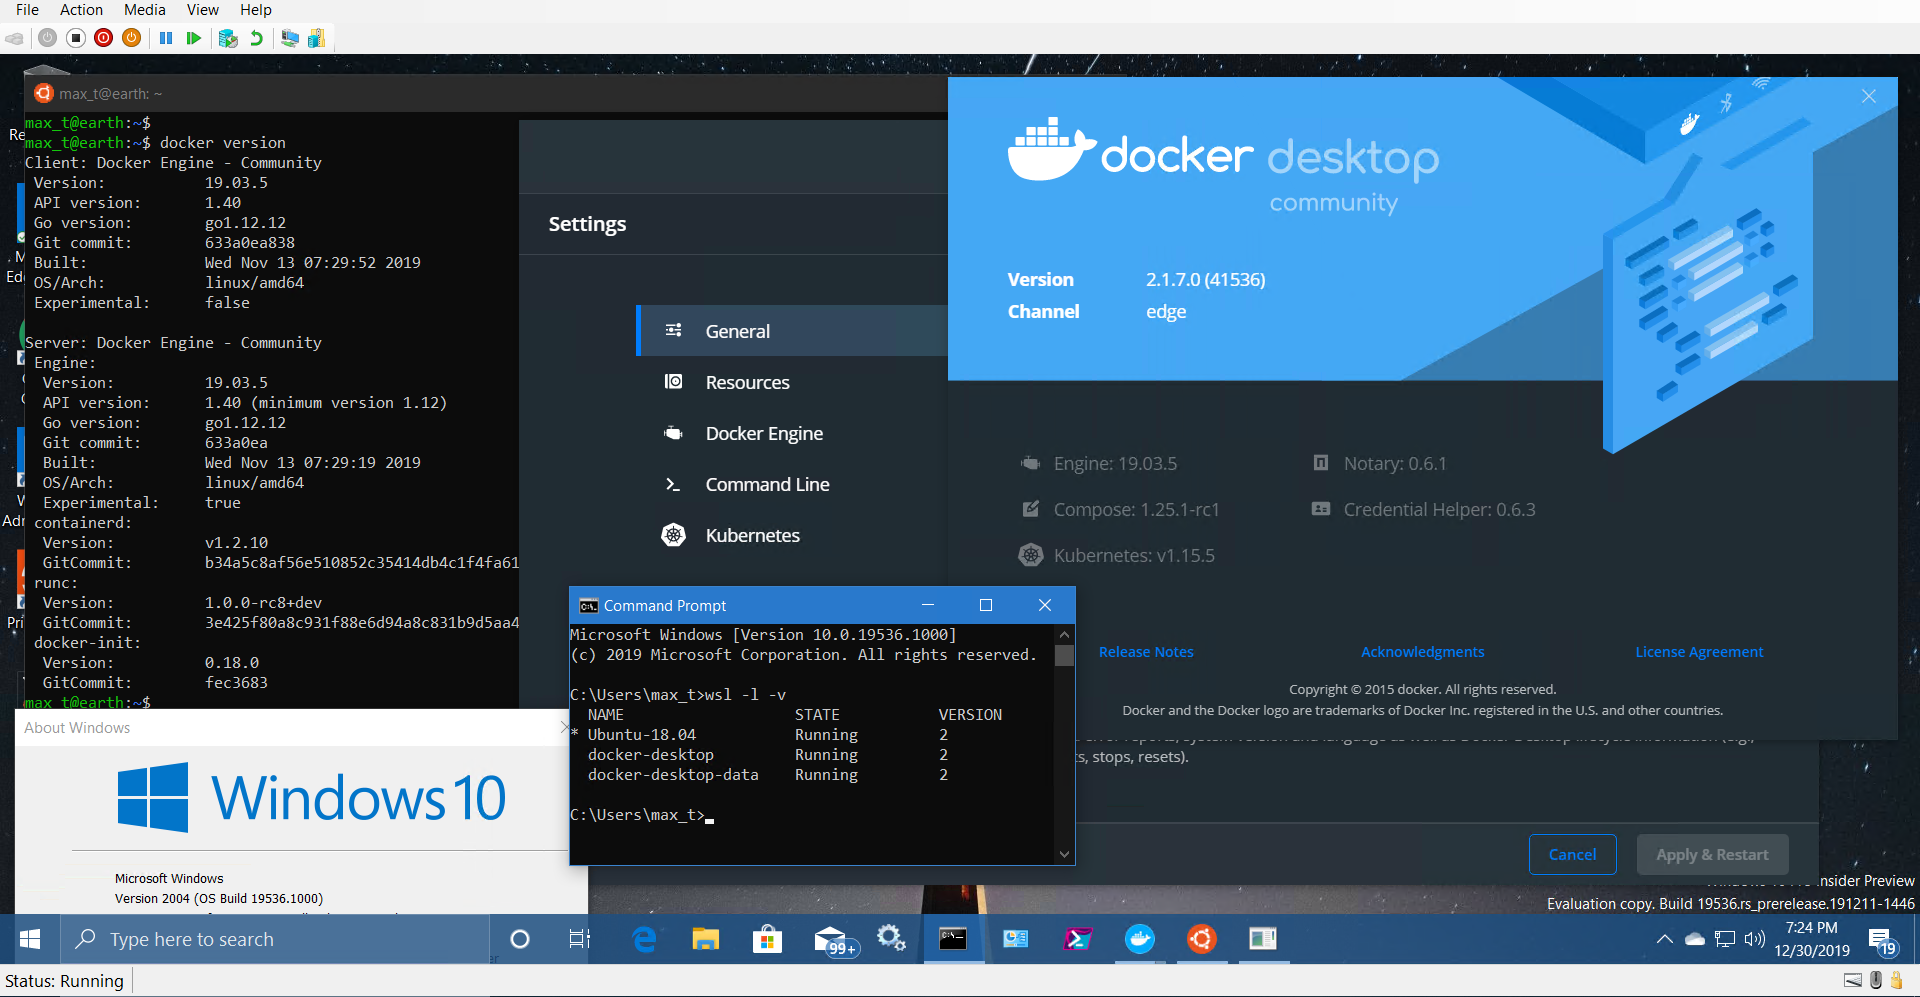
Now, If it works, then you’ll get the following response:

prompt, use the following command to change from WSL 1 to WSL 2:

wsl --set-default-version Ubuntu-18.04 2

wsl -l -v

if you still can’t set the WSL distro to version 2, it means you’re not using Windows Insider build.

WSL 2 in Virtual Machine

You need to build a virtual machine with the latest Windows 10 Insider build. If you have tried the previous instructions and didn’t work, then to fix the issue run the PowerShell cmdlet on the Hyper-V host (outside the VM):

Set-VMProcessor -VMName [HyperV-VMName] -ExposeVirtualizationExtensions $true

You can use the Get-VMProcessor cmdlet to verify the changes made to the property “ExposeVirtualizationExtensions.” In this case, should show the value change to “True” as shown below:

Get-VMProcessor -VMName [HyperV-VMName] | Format-List

Make sure the virtual machine is restart after making the changes.

What about setting up WSL 2 on an Azure virtual machine? WSL 2 can’t be set up in an Azure virtual machine. You don’t have access to the Azure parent Hyper-V host to use the Set-VMProcessor cmdlet.

Although the Set-VMProcessor cmdlet is not mentioned in the main WSL 2 installation page, you’ll find it hidden in the WSL 2 FAQ page ().

Remember, this cmdlet is very important if you want to set up WSL 2 on a virtual machine in your physical Hyper-V Host.

The Good Stuff – Docker Desktop WSL 2 Tech Preview

First, make sure all of the above settings are in place. This means that you were able to set WSL 2 as the “Default Version” on your favorite Linux Distro.

Open your favorite console, PowerShell, then verify WSL 2 is set by executing the following command:

wsl -l -v

Then, follow the instructions to install the Docker WSL 2 Tech Preview – “Docker Desktop WSL 2 backend“:

At the time of this post, the download Docker Desktop Edge version should be 2.1.7.0.

Note: If you’re on version 2.1.6.0, upgrading to 2.1.7.0, will fail to start. Ignore it! Then, proceed to “Install Update” to complete installation and reboot.


Configure Docker for WSL 2

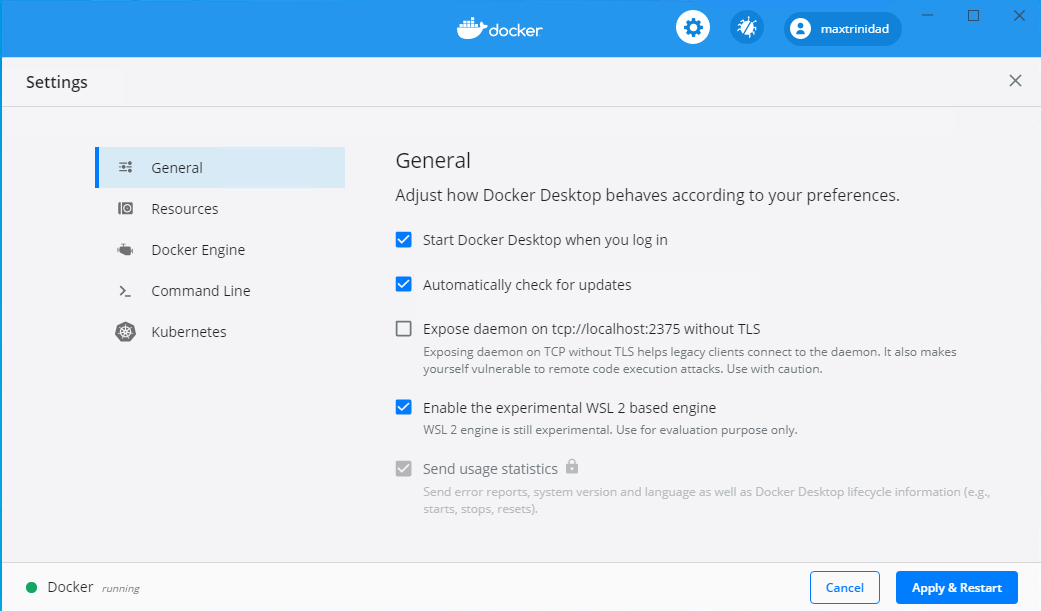
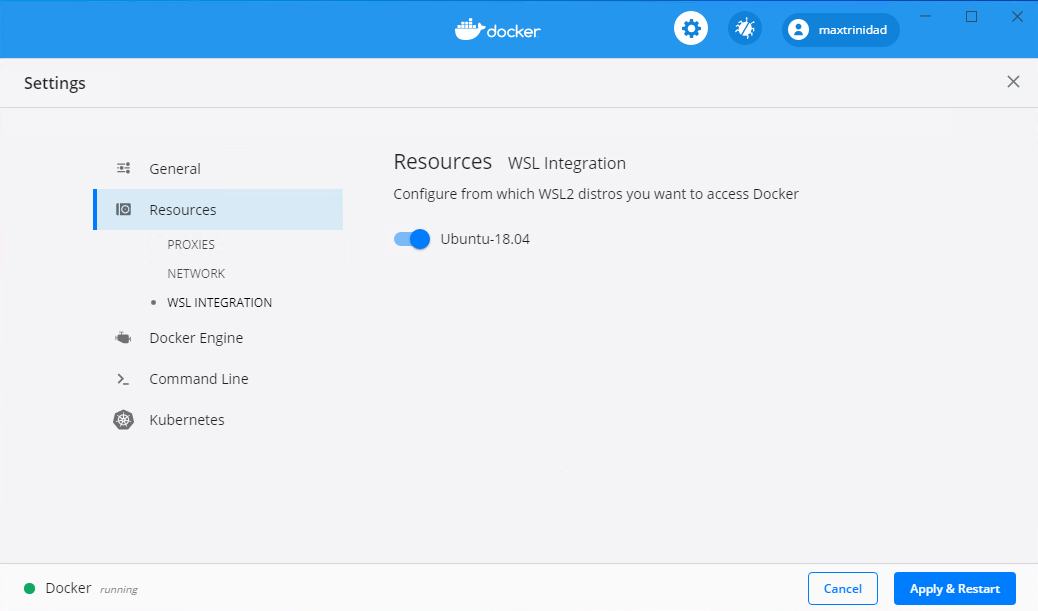
Although Docker is running in the background, you still need to complete configuring Docker to work in WSL 2.

Continue to follow the instruction from the “Docker Desktop WSL 2 backend – Install” section, and you’re done.

Failure to properly configure Docker to WSL 2, you’ll get the following error:

Now, you can start building and working with Docker containers in WSL 2.

Have fun!

PowerShell 7 Release Candidate Is Here!!

The moment everyone has been waiting for some time is here, PowerShell Release Candidate is available for download. This a “Go Live” release officially supported in production by Microsoft.

Everyone in the Microsoft PowerShell Team, with the help of the community, has done an excellent job with the evolution of this new version of PowerShell. Read all about it on the PowerShell DevBlogs recent post “Announcing the PowerShell 7.0 Release Candidate“.

Make sure to read all previous posts as they perfectly outlined under the “Why is PowerShell 7 so awesome?” section of the release candidate post.

Also, it’s not a bad idea to download the recent .NET 3.1 SDK and check out the updated Docker Core SDK Images.

And, have you try:

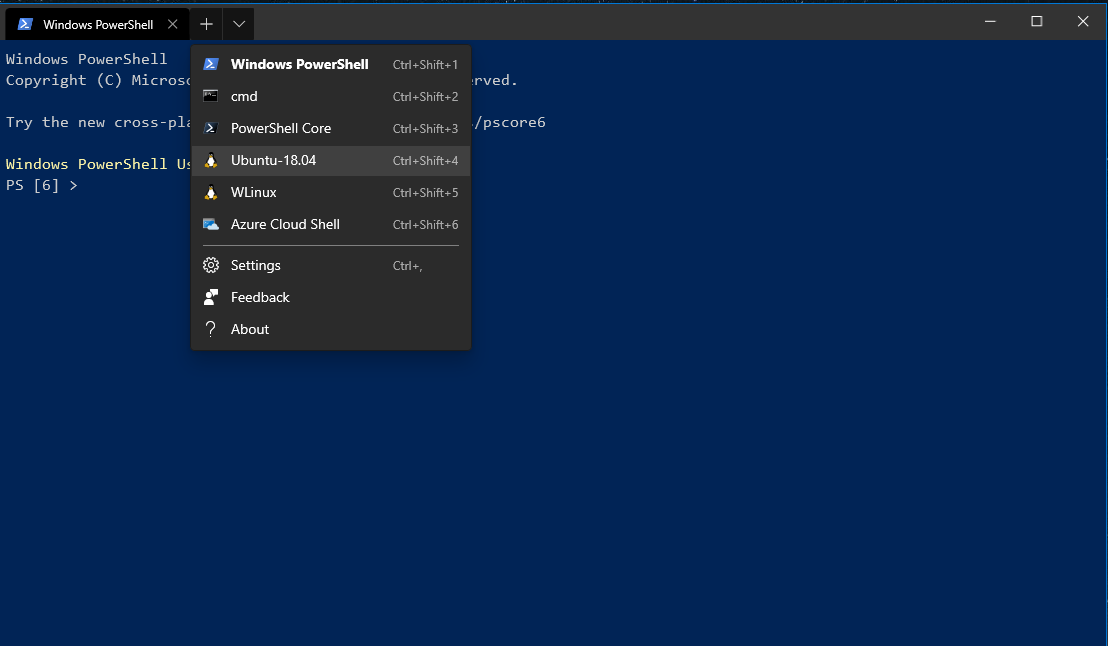
1. Windows Terminal – Access all of your Windows Shells from one application.

2. Docker Tech Preview – Get the latest Docker Tech Preview for WSL 2.

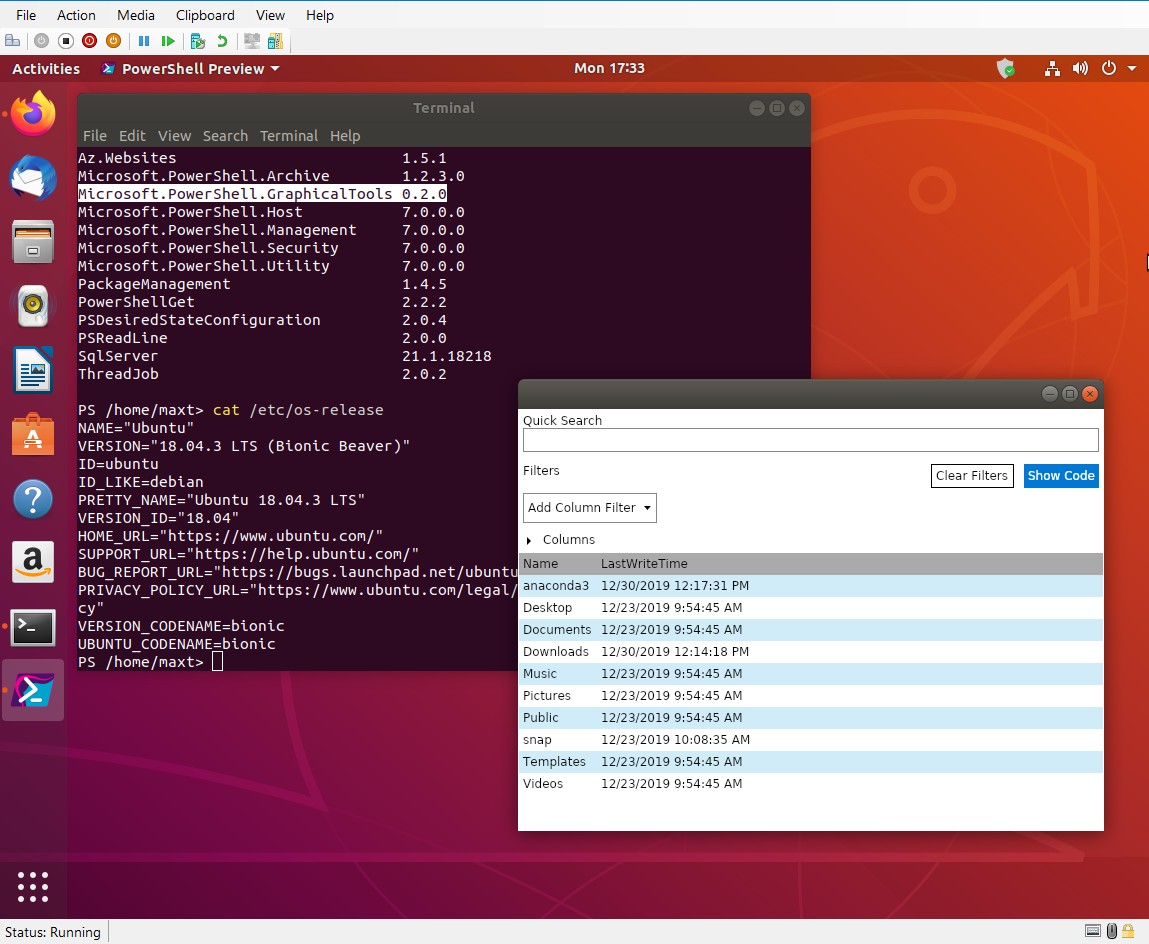
3. Out-Gridview – Specially developed to work in PowerShell 7 non-Windows, as well as in Windows OS. (Module: Microsoft.PowerShell.GraphicalTools – PowerShell Gallery)

This is just a few items to keep in mind. It will help you to be a productive DevOps and System Administrator.

At Coders Cafe: PowerShell – Introduction to SQL Server Containers

I’ll be presenting at the South Florida .NET User Group Coders Cafe on Tuesday, August 8th, 6:30 PM. Location: Cendyn Spaces, Boca Raton.

Topic: PowerShell – Introduction to SQL Server Containers

Description: This session will be covering the basic of working with Containers and PowerShell Core. We’ll be taking the steps of creating a SQL Server 2019 container in an Ubuntu 18.04 Linux system. Then, will be using PowerShell Core to connect to the SQL Server containers to extract information.


Interested in attending this session, click here to register.

PowerShell – Docker Setup for Windows 10 WSL Ubuntu 18.04 with VMware Workstation

The purpose of this blog post is to show how to setup Docker Community Edition in a Windows 10 with VMware Workstation to be use in Windows Subsystem for Windows (WSL).

There are a few blog post that helped me figure out what’s needed to get this to work and I’ll be sharing these links at the end of this post.

My current environment

My current environment consist of the following components:

  • Windows 10 Build 17763
  • VMware Workstation Pro 12
  • *Oracle Virtualbox 5.2
  • WSL – Ubuntu 18.04
  • SQL Server 2017 Developer Edition
  • Windows PowerShell (v5.1.17763.316)
  • PowerShell Core GA v6.3.1 (both Windows and Linux)
  • PowerShell Core Preview v6.2.0-preview.4 (both Windows and Linux)

*Note: This is not the latest version  of Virtualbox but it’s still supported.

Remember, the purpose of this environment is to build a “developer sandbox” that can allow me to learn and work with Docker containers.

What’s needed!

Because I’m using VMware Workstation instead of Hyper-V, there are a few things need to be in place to make this work. Windows 10 need to have the following:

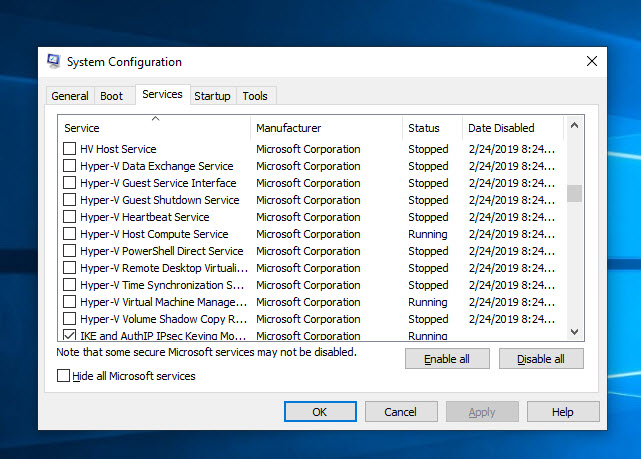
  • All Hyper-V services need to be disable by using “System Configuration” tool.

  •  Install VMWare Workstation Pro. (https://www.vmware.com/products/workstation-pro.html)
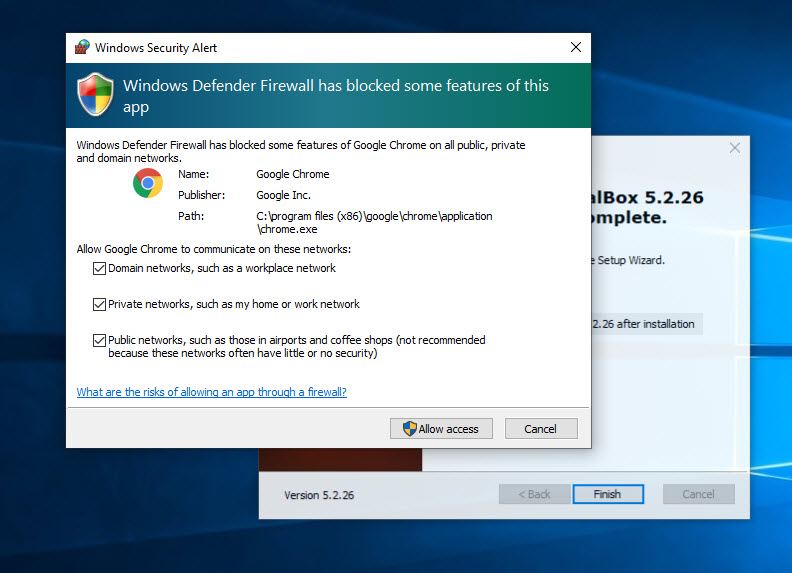
  •  Install Oracle Virtualbox version 5.2. (https://www.virtualbox.org/wiki/Download_Old_Builds_5_2)

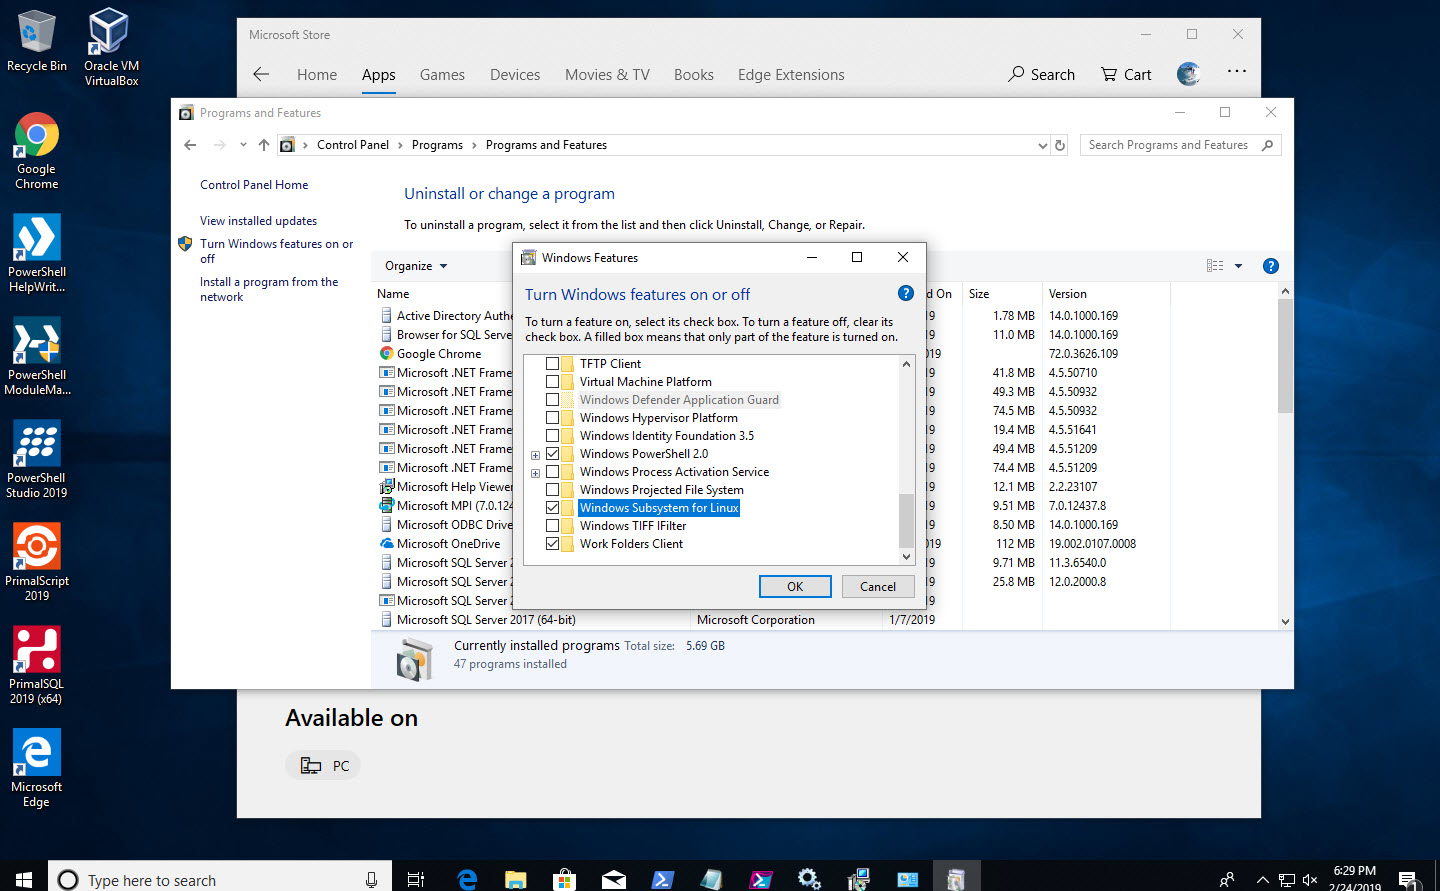
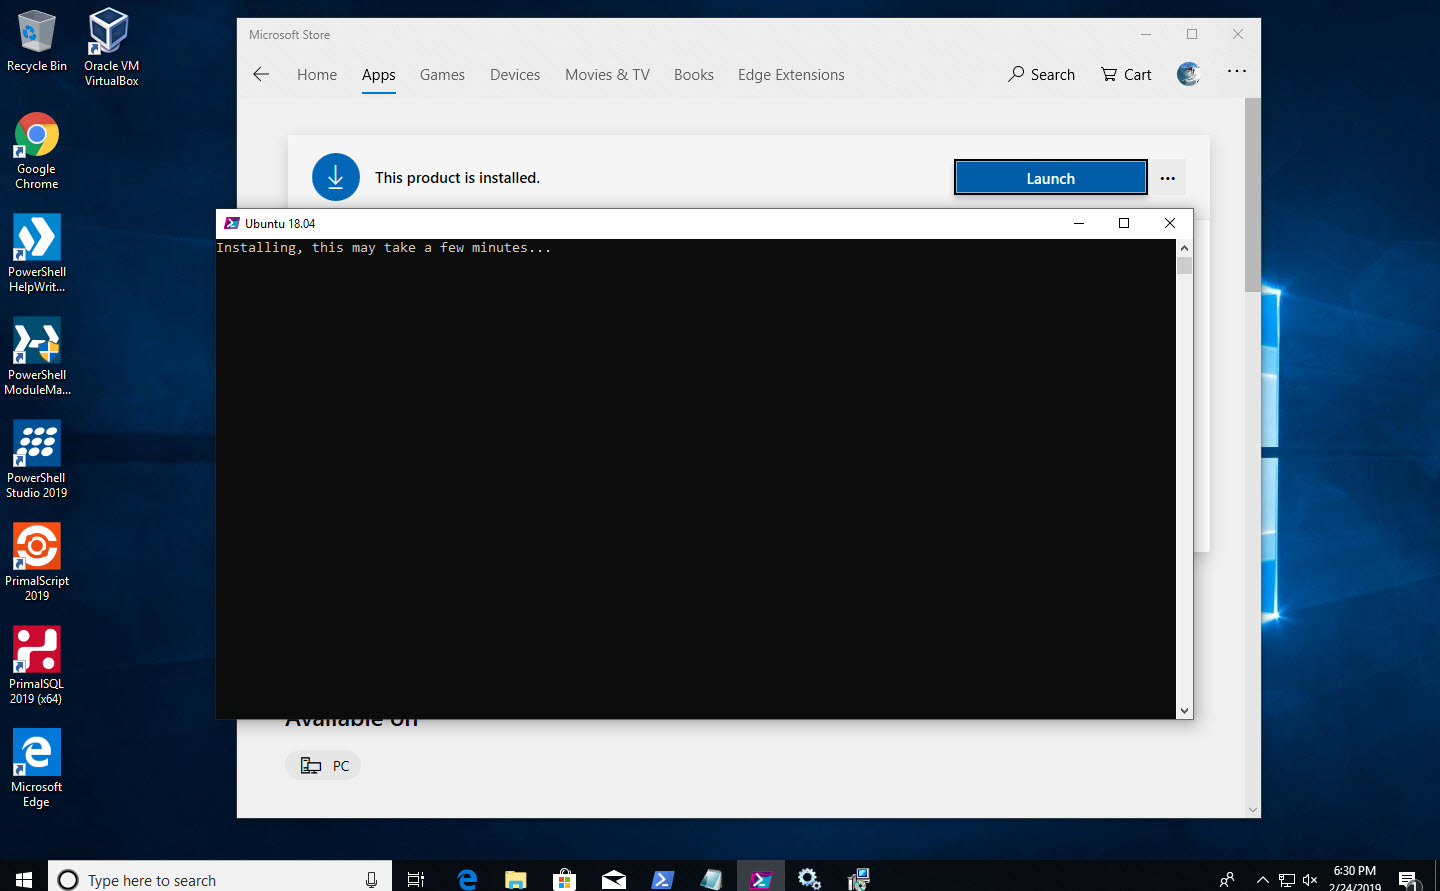
  •  Install from the Microsoft Store, WSL – Ubuntu 18.04.

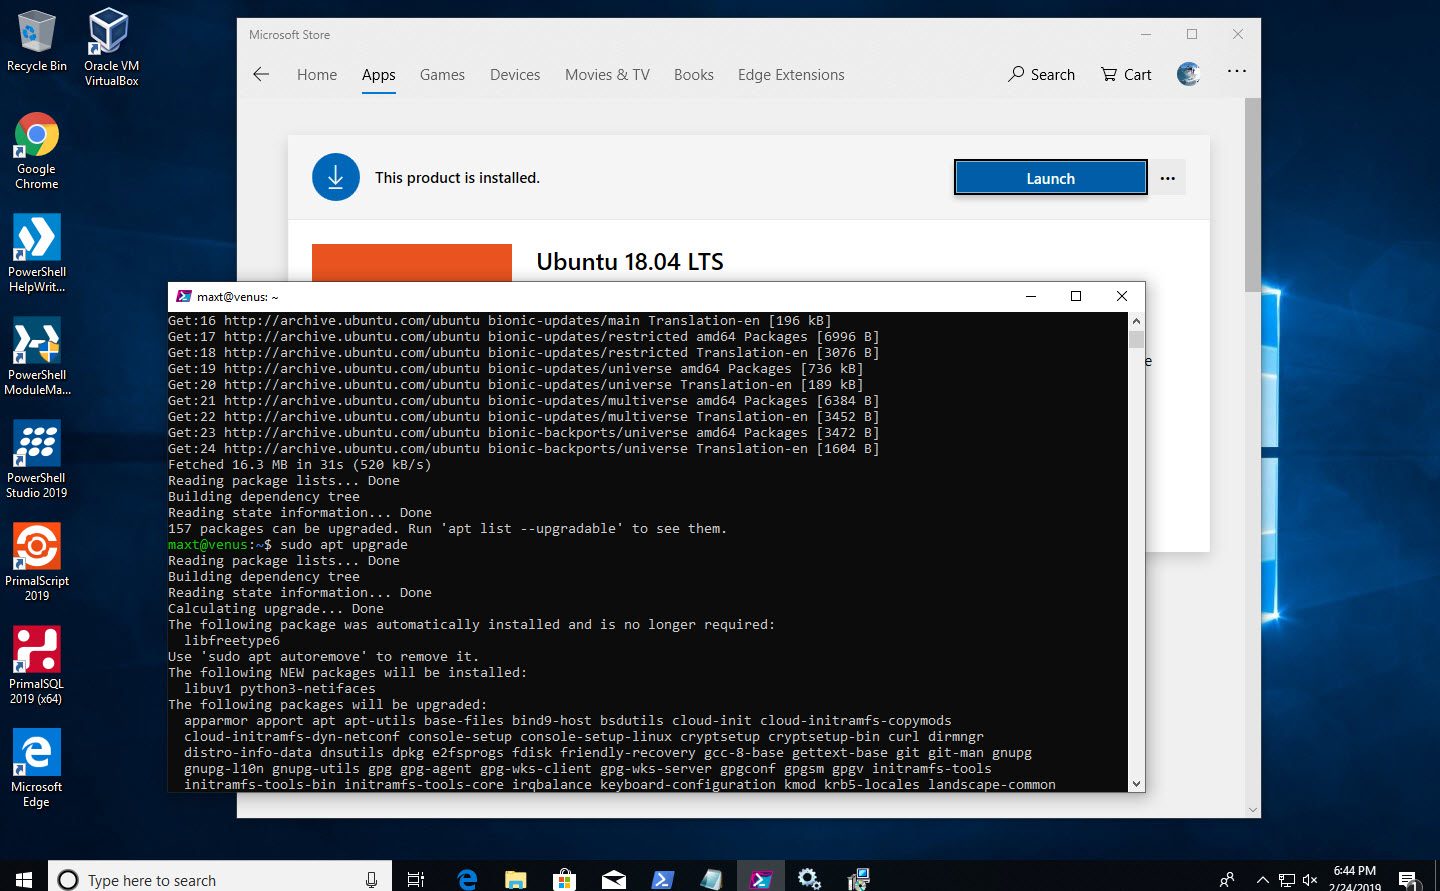
  • And, make sure to run “sudo apt update” and “sudo apt upgrade” because images are not updated with latest components.

Installing PowerShell Components

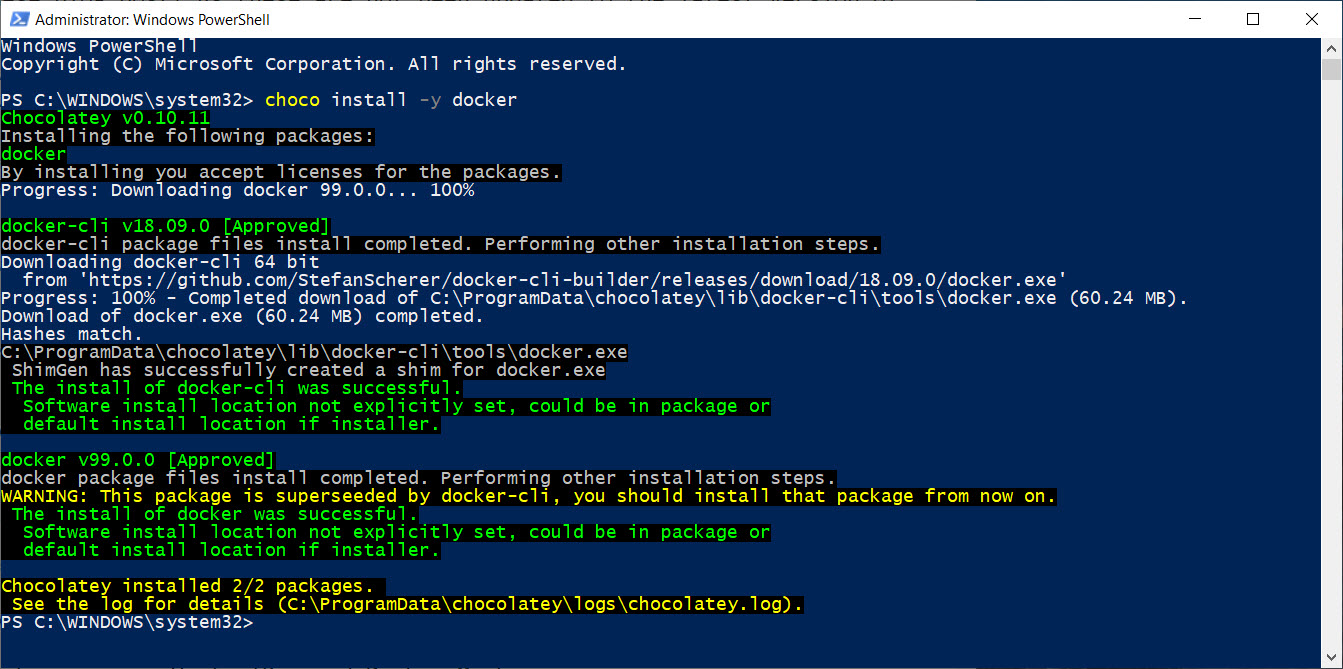
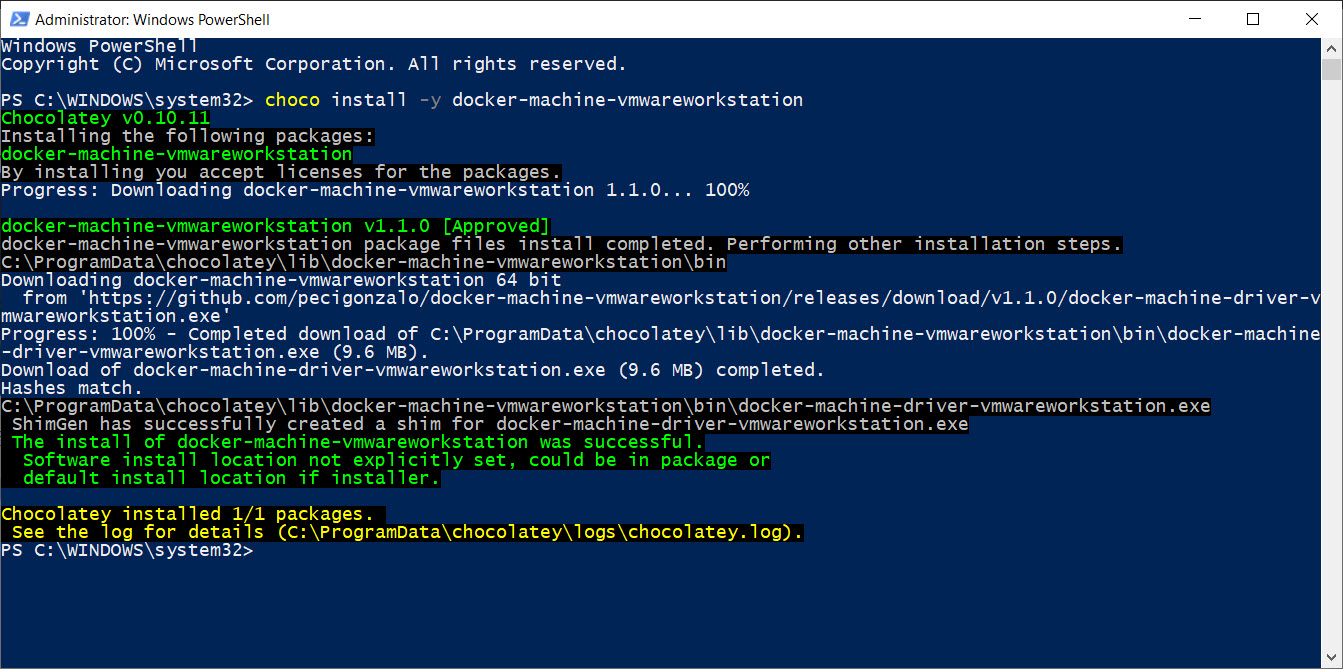
Next, the following Docker components packages from Chocolatey need to be install using Windows PowerShell with administrator privileges:

* Install docker

choco install -y docker

* Install docker-machine-vmwareworkstation

choco install -y docker-machine-vmwareworkstation

Getting WSL Ready for Docker

Now, open the “WSL – Ubuntu 18.04” Linux console and execute the following *commands:

sudo apt update

sudo apt upgrade

*Note: You’ll need to run these two commands manually to keep your Linux distribution up-to-date.

At this point, follow the Docker installation instructions for “Docker-CE for Ubuntu 18.04“. But, in a nutshell, here’s the shortcut:

sudo apt-get install \
apt-transport-https \
ca-certificates \
curl \
gnupg-agent \
software-properties-common

curl -fsSL https://download.docker.com/linux/ubuntu/gpg | sudo apt-key add -

sudo add-apt-repository \
"deb [arch=amd64] https://download.docker.com/linux/ubuntu \
$(lsb_release -cs) \
stable"

sudo apt-get update

sudo apt install docker-ce

sudo usermod -aG docker maxt

exit

At this point. make sure to reopen the WSL linux console.

Setup Docker-Machine in Windows

Back in Windows PowerShell, the next steps show the way to have Docker work in “WSL – Ubuntu 18.04“. Starting with Windows PowerShell console, execute the following commands:

docker-machine --native-ssh create -d vmwareworkstation default
docker-machine create docker-host

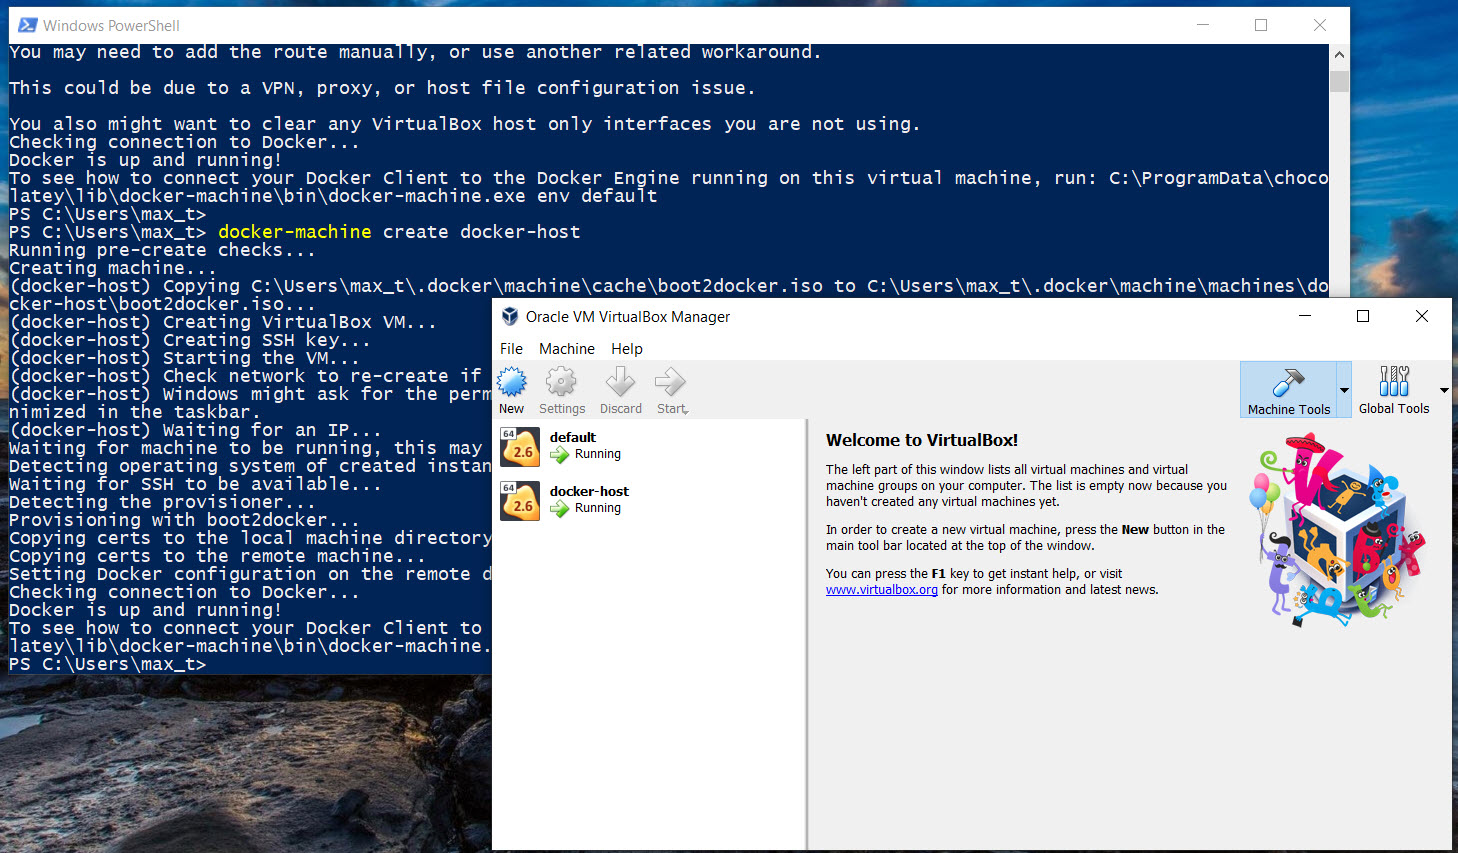
These commands should complete without any errors. At the same time, two virtual machines: “default” and “docker-host” will be created and running in *Virtualbox.

*Note: These two *NEED* to be running in order for docker to work with WSL. At the same time, both VMware Workstation and Virtualbox need to be installed or this will not work

To check that for the Docker-Machine environment(s) are working, use the following command:

docker-machine ls

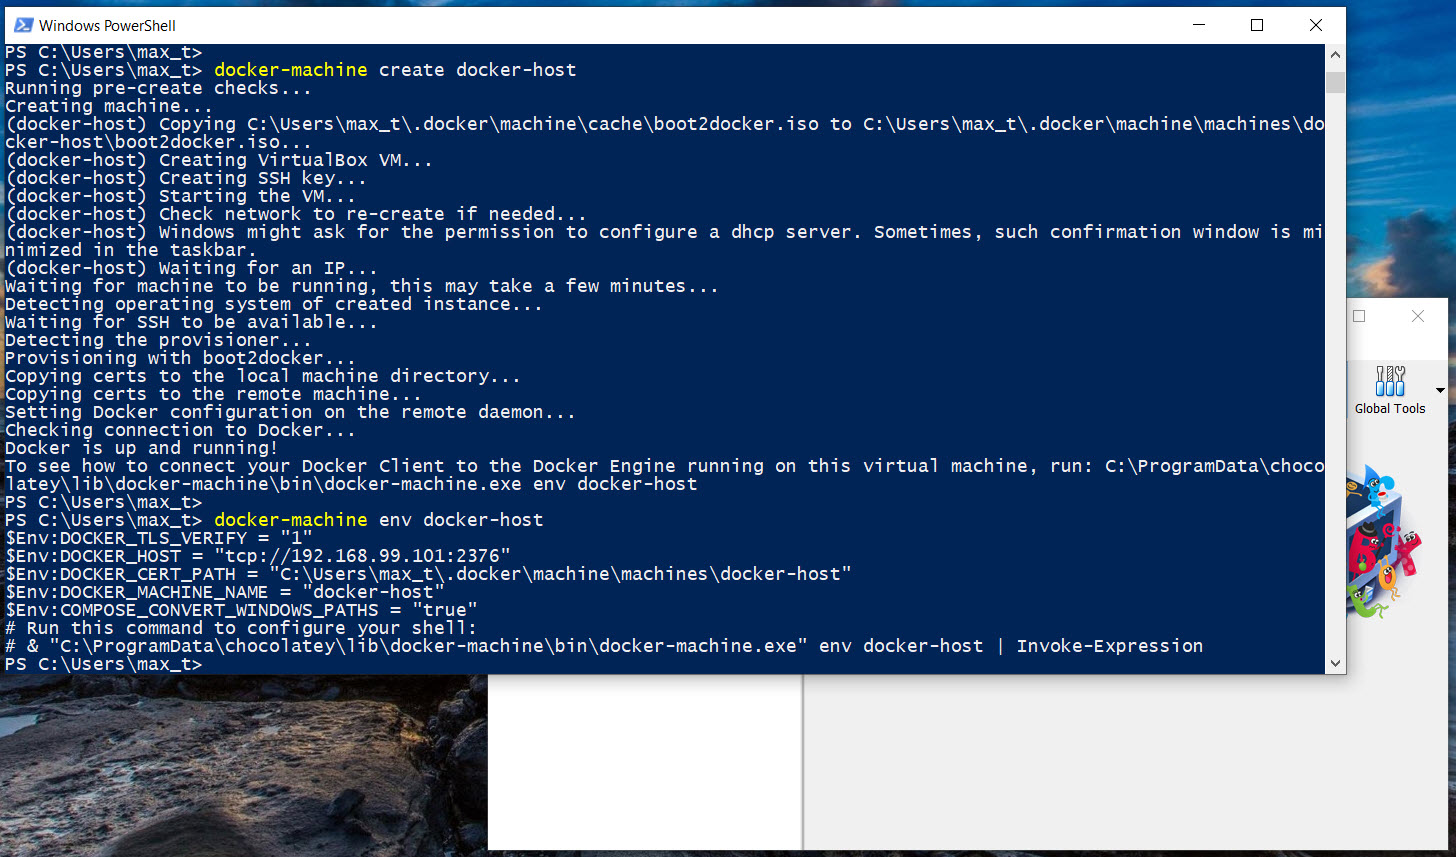
Next, execute the following command to write down “docker-host” environment results to be copied into the Linux user ~/.bashrc file.

docker-machine env docker-host
PS C:\WINDOWS\system32> docker-machine.exe env default
$Env:DOCKER_TLS_VERIFY = "1"
$Env:DOCKER_HOST = "tcp://192.168.220.xxx:2376"
$Env:DOCKER_CERT_PATH = "C:\Users\max_t\.docker\machine\machines\default"
$Env:DOCKER_MACHINE_NAME = "default"
$Env:COMPOSE_CONVERT_WINDOWS_PATHS = "true"
# Run this command to configure your shell:
# & "C:\ProgramData\chocolatey\lib\docker-machine\bin\docker-machine.exe" env default | Invoke-Expression

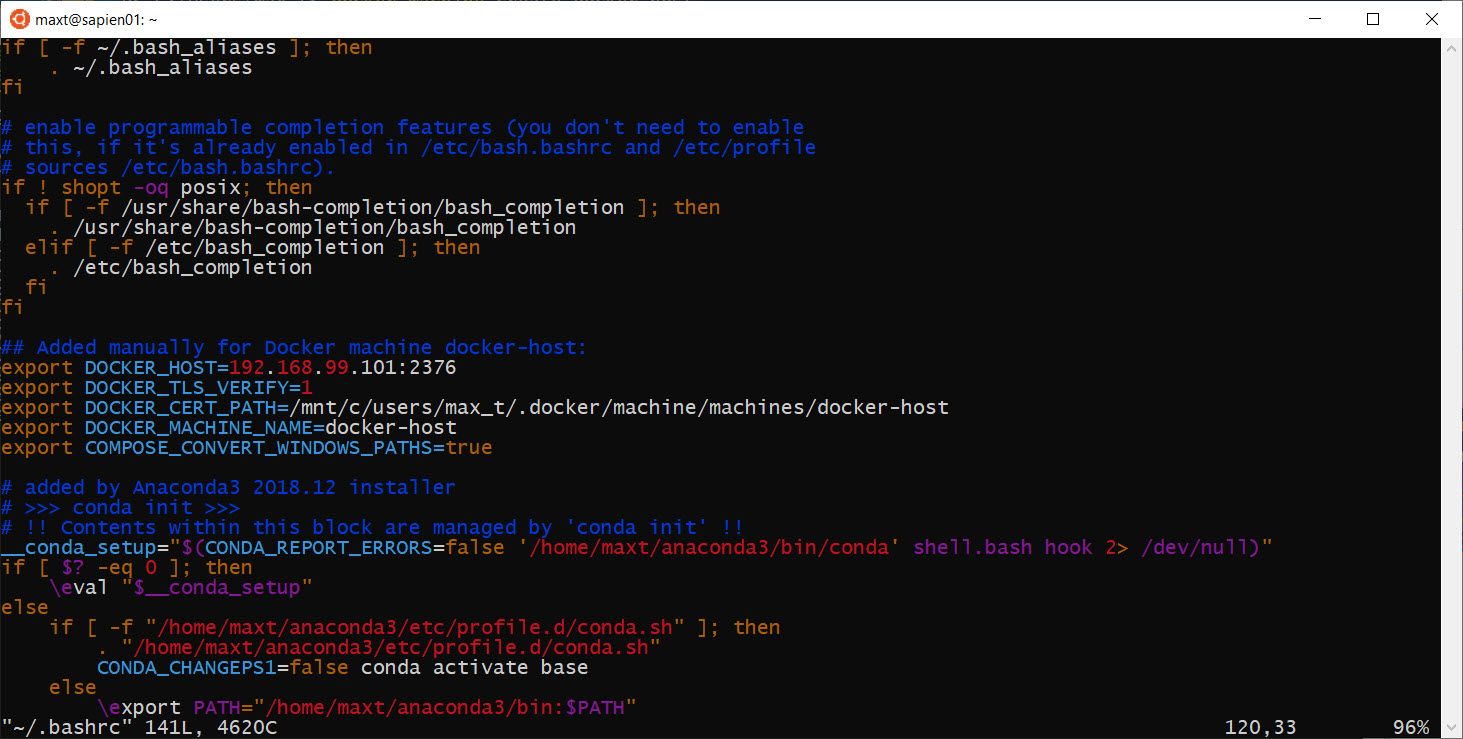
Open a “WSL – Ubuntu 18.04 console to edit the user “~/.bashrc” file, to add the following Docker variables:

## Added manually for Docker machine docker-host:
export DOCKER_HOST=192.168.99.xxx:2376
export DOCKER_TLS_VERIFY=1
export DOCKER_CERT_PATH=/mnt/c/users/max_t/.docker/machine/machines/docker-host
export DOCKER_MACHINE_NAME=docker-host
export COMPOSE_CONVERT_WINDOWS_PATHS=true

sudo vim ~/.bashrc

Reopen the “WSL – Ubuntu 18.04 console.

Testing Docker in WSL

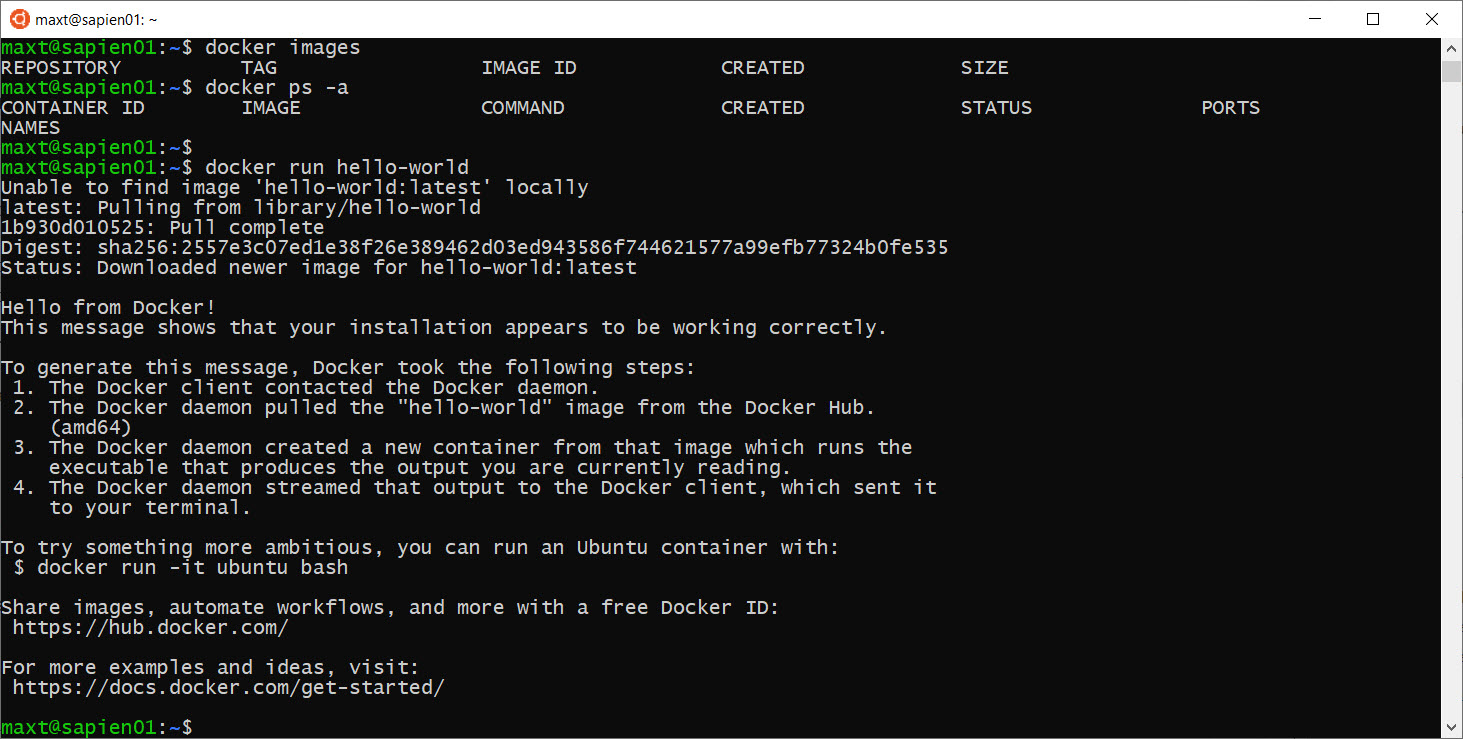
Now, I can test Docker in my “WSL – Ubuntu 18.04 console session. Open PowerShell Core console, and execute the following command to run the Docker Hello-World demo:

docker run Hello-World

This command download (or pull) the Docker image, then run the Hello-World container. If everything work as expected, then it will display the following text.

To check both Docker image(s) and/or container(s) in WSL , use the following commands: (Picture

# - Check for all pulled images in system:
docker images

# - Check the status of active containers:
docker ps -a

As you can see there no issues executing Docker command lines in Linux PowerShell Core.

To see the full list of docker command line help available click on the following link.

After all this is done! Docker working in my WSL environment.

Limitations

YES! There are limitations. This is a workaround on the issue of using Docker without Hyper-V. And, this will allow you to:

  • Pull images
  • Update containers
  • Save images

In my environment, I found limitations working with Docker Network using WSL which can impact Windows Docker-Machine VM “docker-host” interface. This issue can force you to rebuild both VM interfaces: “default” and “docker-host“.

Make sure to learn how to commit, save, and reload Docker images.  Don’t lose your changes!

So, if you have either VMware Workstation and/or Oracle Virtualbox, consider investing the time creating a Linux virtual machine and then install Docker CE.

Summary

We have accomplished setting up Docker containers in *Windows 10 “WSL – Ubuntu 18.04” using both Windows PowerShell and PowerShell Core in Linux. So, using Oracle Virtualbox v5.2 with VMware Workstation is a required component to make this work.

*Note: These post is meant for people to make Docker work in WSL Linux.

Also, if you’re familiar with PowerShell, Docker commands can execute without any issues. Now, I can use my favorite editor SAPIEN’s PowerShell Studio to build my automation scripts with docker commands.

What’s Next?

Try downloading other Docker images, like SQL Server 2017 and SQL Server 2019. This is the quickest way for providing a built solution using containers.

Learn about Docker Compose, and Kubernetes as these can be use in the Cloud environment as well.

Go and Explores the possibilities of provisioning solutions to your organization!

Resource links

PowerShell Working with Windows Azure VMs

This blog describe the essentials to get you started with building Windows Azure Virtual Machines.  This is slightly different from the previous blogs on Windows Azure SQL Database Servers.  As a refresher, in order to use PowerShell with Windows Azure, you need to create and install a Certificate key.  Then, it will enable PowerShell to work with Windows Azure commands.

Check the links provided for creating and uploading the Certificate Key on my previous blog: http://www.maxtblog.com/2013/08/getting-ready-with-windows-azure-sql-database-server-powershell-and-smo-part-12/

For most part, PowerShell can be use without going back the Azure web Portal.  Of course, the portal will be the first way to get you subscribe and start using Windows Azure.
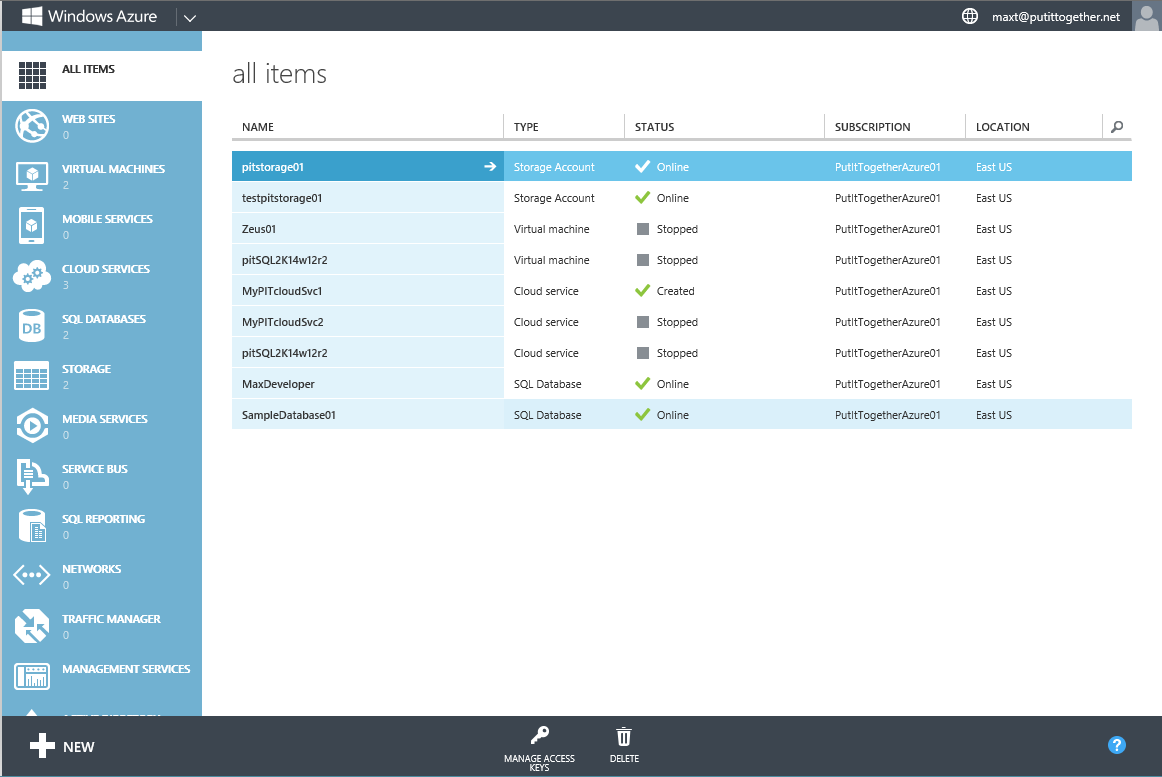
WindowsAzurePortal01

Then, you can try using PowerShell to automate some of it tasks.  Don’t forget to download the PowerShell Azure Command from the following link:
http://www.windowsazure.com/en-us/downloads/
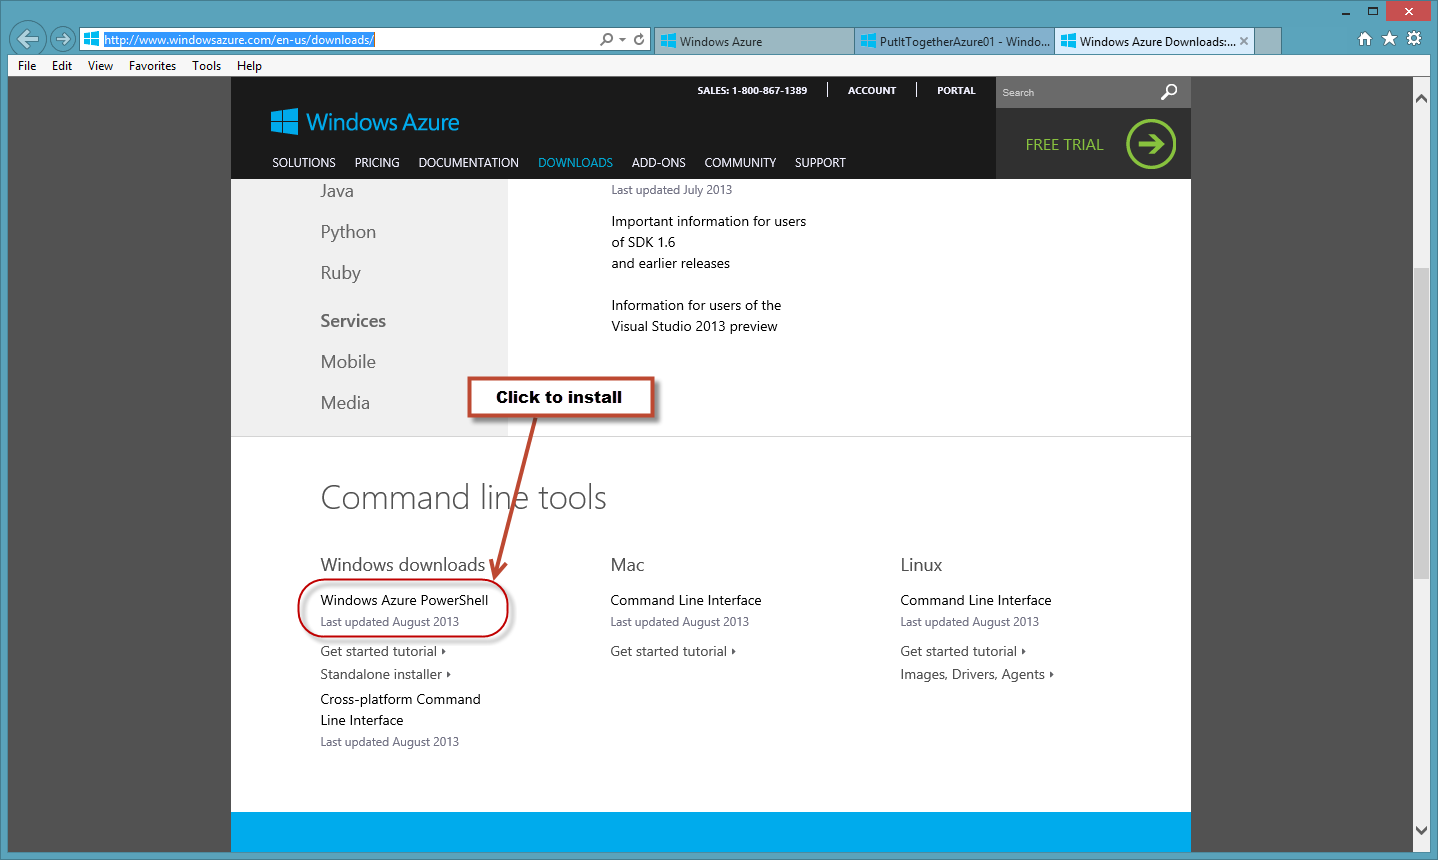
WindowsAzureDownloadPosh

So, after the Azure subscription has been activated and the certificate key uploaded to azure then PowerShell is all set.  Then, remember to check periodically for PowerShell Azure module updates.

When working with Powershell, loading the “Azure” module is not required. As you typed and execute the command, PowerShell by default will autoload the module.  This way there’s no need to use the “Import-Module xxxxx” command.

But, what’s the sequence for building an Azure VM using PowerShell?  I’m presenting the way I’ve done it.  This is just a suggestion.  Please feel free to use this as a possible guideline.

Here’s the order of the samples scripts I’m providing for building an Azure VM:

1. Create a new Storage Account.
2. Reconnect to Azure with the “Current Storage Account”.
3. Search and Select the Windows Azure pre-built VM.
4. Create the Azure VM.
5. Stopping the Azure VM.

The following scripts will get you started.  I recommend to read the help documentation for any of the PowerShell Azure commands shown in this blog.  It’s possible to find something that may be needed.

Create a new Storage Account

Before building a new Azure VM, an Storage Account need to be created first. One of the requirement for the account name is that it has to be in lowercase or the following message will be displayed:

[sourcecode language=”powershell”]
## – Create a Storage Container:
New-AzureStorageAccount `
-StorageAccountName "Testpitstorage01" `
-Label "TestPIT01" `
-Location "East US";
## – Error Message:
"New-AzureStorageAccount : "An exception occurred when calling the ServiceManagement API. HTTP Status Code: 400.
Service Management Error Code: BadRequest. Message: The name is not a valid storage account name. Storage account
names must be between 3 and 24 characters in length and use numbers and lower-case letters only.. Operation Tracking
ID: 983e38b290134b24a15b0ec46d89fc5a."
At line:1 char:1
+ New-AzureStorageAccount `
+ ~~~~~~~~~~~~~~~~~~~~~~~~~
+ CategoryInfo          : CloseError: (:) [New-AzureStorageAccount], ServiceManagementClientException
+ FullyQualifiedErrorId : Microsoft.WindowsAzure.Management.ServiceManagement.StorageServices.NewAzureStorageAccou
ntCommand"
[/sourcecode]

When this command runs successfully, it will also create the both Primary and Secondary “Azure Storage Account” keys automatically.
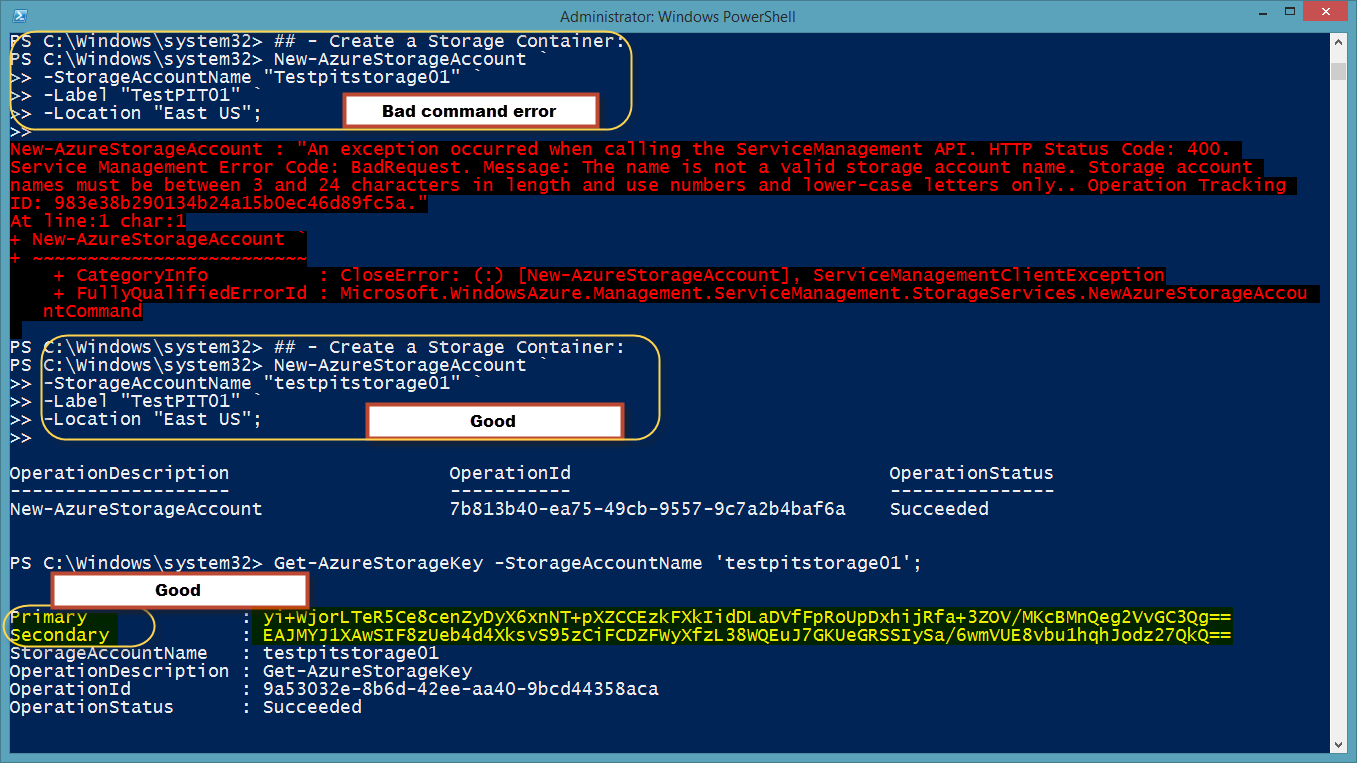
WindowsAzureStorageAcct

At the same time, don’t forget to pick the Windows Azure location where the Storage Account is going to be create.  To list all locations available use the “Get-AzureLocation” command.

[sourcecode language=”powershell”]
## list of all Azure locations:
Get-AzureLocation
[/sourcecode]
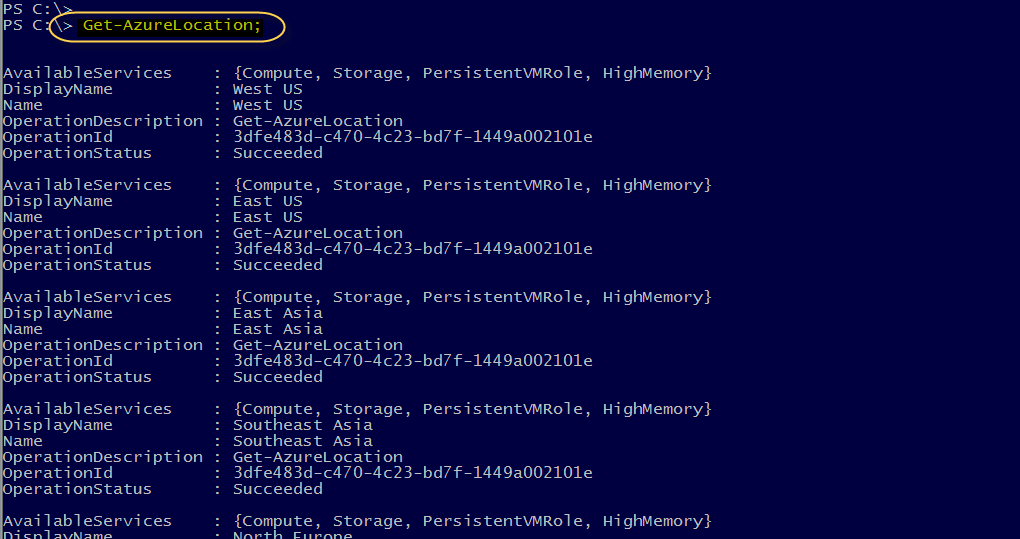
WindowsAzureLocations

If there’s a need to list all Storage Account then use the “Get-AzureStorageAccount” command using the

[sourcecode language=”powershell”]
## list of all Azure Storage Account(s):
Get-AzureStorageAccount
[/sourcecode]
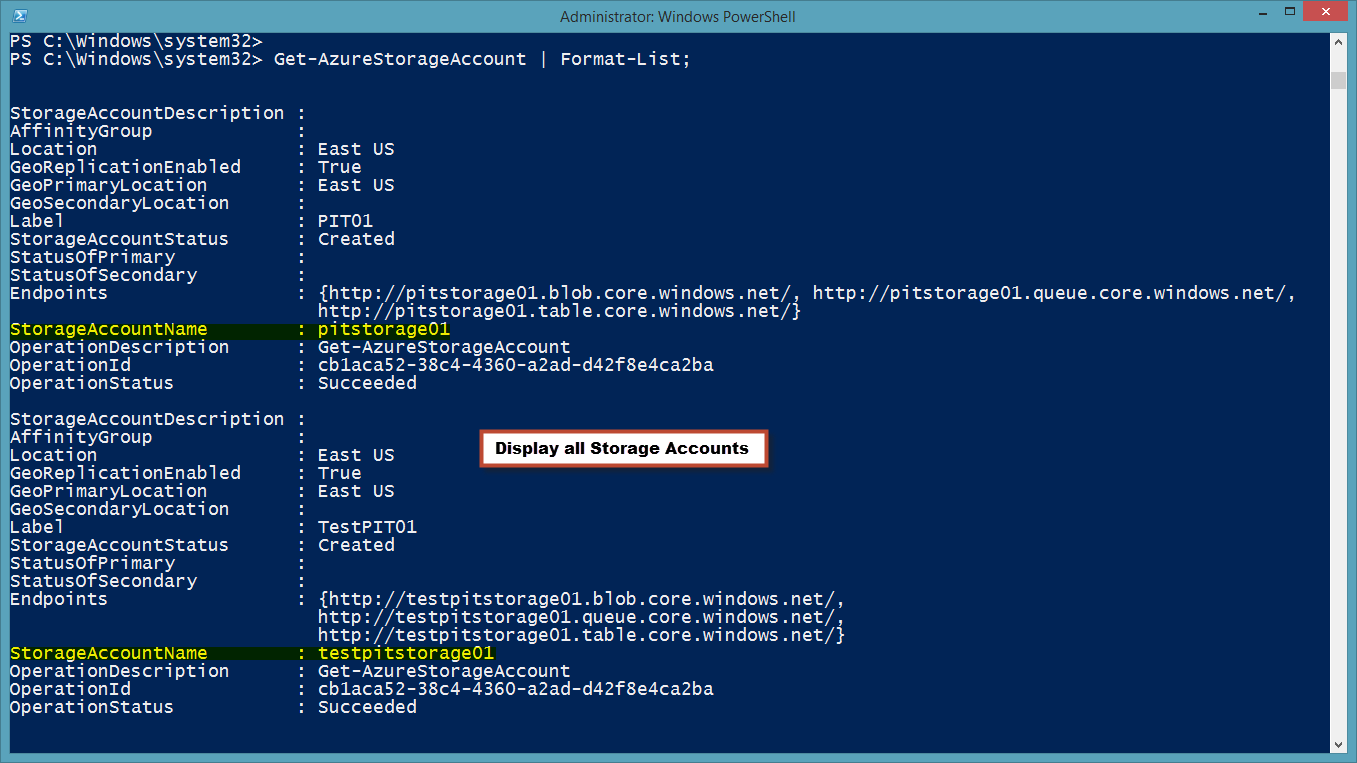
WindowsAzureStorageAcctlist

Reconnect to Azure with the “Current Storage Account”

After you got everything set for PowerShell to connect to Windows Azure then you need to create the “Storage Account “. There’s one noticeable difference between the Azure SQL and the Virtual machine.  Azure Virtual Machines need a  Storage Account.  This is done using the “Set-AzureSubscription” with the “-ContainerStorageAccount” parameter.

[sourcecode language=”powershell”]
Set-AzureSubscription `
-SubscriptionName "PutItTogetherAzure01" `
-SubscriptionId $subID -Certificate $myCert -CurrentStorageAccount ‘pitstorage01’;
[/sourcecode]

This section help set the Azure Subscription to the “Current Storage Account” which maybe optional.  I included this section because I started using my subscription to create only Azure SQL Database Server and I didn’t need any Storage Account.

Then, use the “Get-AzureSubscription” command to view all Azure Subscription values.
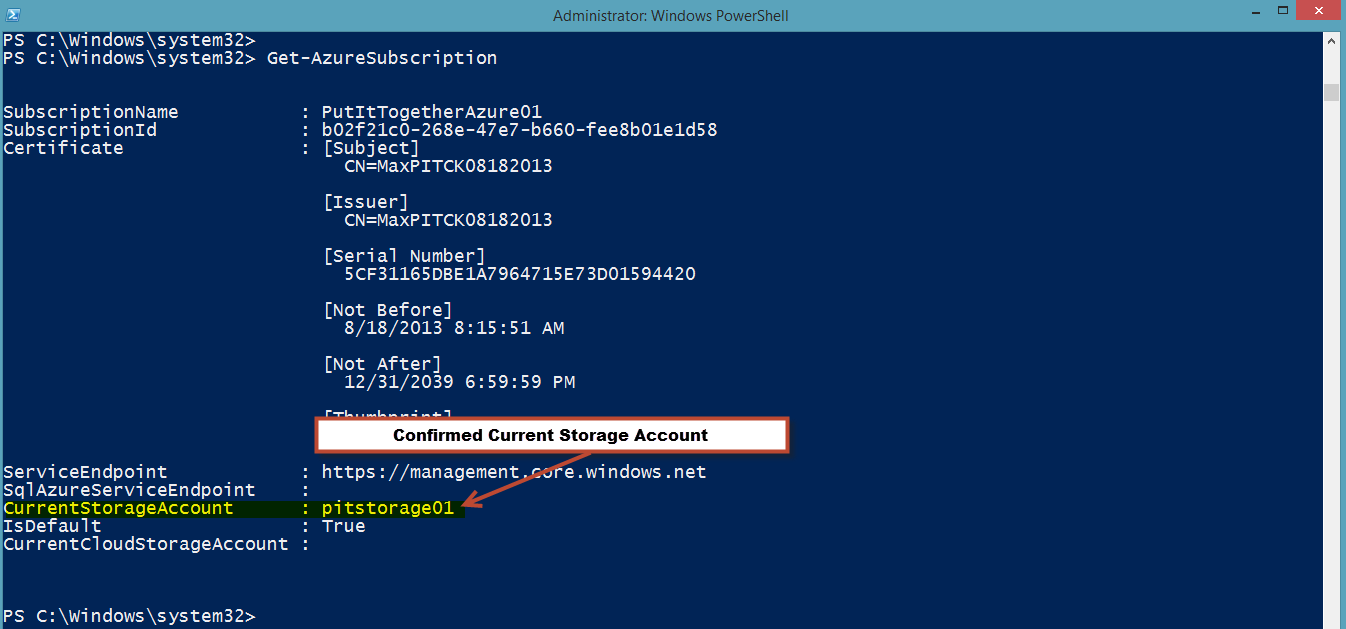
WindowsAzureSubscription

Search and Select the Windows Azure pre-built VM

For search the list of available Azure pre-built VM’s we use the “Get-AzureVMimage” command.  Here’s one creative approach for searching and select the VM imagename using the PowerShell V3 enhanced “Out-GridView” command with the ‘-PassThru’ parameter.  By creating a PowerShell variable “$x” we can store the value select from the “Out-GridView” and pass it to the “New-AzureQuickVM” command to build the VM.  Check the following example:

[sourcecode language=”powershell”]
## – Get and Select from the list of Azure VM Images:
$x = get-azurevmimage `
| Where-Object{$_.OS -match ‘WINDOWS’} `
| select label, imagename `
| Out-GridView -PassThru;
[/sourcecode]

This way we can pick and choose the image. Then, we use the variable with the member property that holds the name: $x.ImageName.   Remember to use the oneliner “$x | Get-Member” to view all variable member objects.

WindowsAzureGetMember

Create the Azure VM (Caution w/Service Name)

At the same time it will need to be provide a “Service Name”.  The “New-AzureQuickVM” help documentation mention that this is either a new one or existing one.  The following is an example of a new VM with a new ServiceName “MyPITcloudSvc2“:

[sourcecode language=”powershell”]
New-AzureQuickVM -Windows `
-AdminUsername ‘maxt’ -Password ‘$Mypwd01’ `
-ServiceName "MyPITcloudSvc2" -Name ‘Zeus01’ `
-ImageName $x.ImageName -Location "East US" `
-InstanceSize "Small";
[/sourcecode]

But, trying to use an existing ‘-ServiceName “MyPITcloudSvc1’ it gave the following error:

[sourcecode language=”powershell”]
## – Create a new ServiceName:
New-AzureService `
-ServiceName "MyPITcloudSvc1" `
-Label "MyPITcloudService" `
-Location "East US";

## – Create VM – It will create a new VM using an existing ServiceName:
## – (but it won’t work)
New-AzureQuickVM -Windows `
-AdminUsername ‘maxt’ -Password ‘$Mypwd01’ `
-ServiceName "MyPITcloudSvc1" -Name ‘Thor01’ `
-ImageName $x.ImageName
-Location "East US" `
-InstanceSize "Small";
## – Error Message:
">>New-AzureQuickVM : Service already exists, Location cannot be specified.
At line:1 char:1
+ New-AzureQuickVM -Windows `
+ ~~~~~~~~~~~~~~~~~~~~~~~~~~~
+ CategoryInfo          : CloseError: (:) [New-AzureQuickVM], ApplicationException
+ FullyQualifiedErrorId : Microsoft.WindowsAzure.Management.ServiceManagement.IaaS.PersistentVMs.NewQuickVM"
[/sourcecode]

It’s possible this is a bug!  In the help documentation shows that either a new of existing ServiceName can be use:

-ServiceName <string>
Specifies the new or existing service name.

Required?                    true
Position?                    named
Default value
Accept pipeline input?       false
Accept wildcard characters?  false

So, for now just provide a non-existing Service Name for the new Azure VM.

WindowsAzureVms

Stopping the Azure VM

Now during your Azure Trial version, if you want to slow down the charges, then you can stop the active VM(s) by executing the following two ways:

1. Just using the “Stop-AzureVM” command.

[sourcecode language=”powershell”]
## – Stop VM Service(s):
Stop-AzureVM -ServiceName "MyPITcloudSvc2" -Name "Zeus01";
[/sourcecode]

2. Or, by piping the result of “Get-AzureVM” to “Stop-AzureVM” command.

[sourcecode language=”powershell”]
## – Get-AzureVM to pipe to Stop VM Service(s):
Get-AzureVM -ServiceName "MyPITcloudSvc2" -Name "Zeus01" `
| Stop-AzureVM;
[/sourcecode]
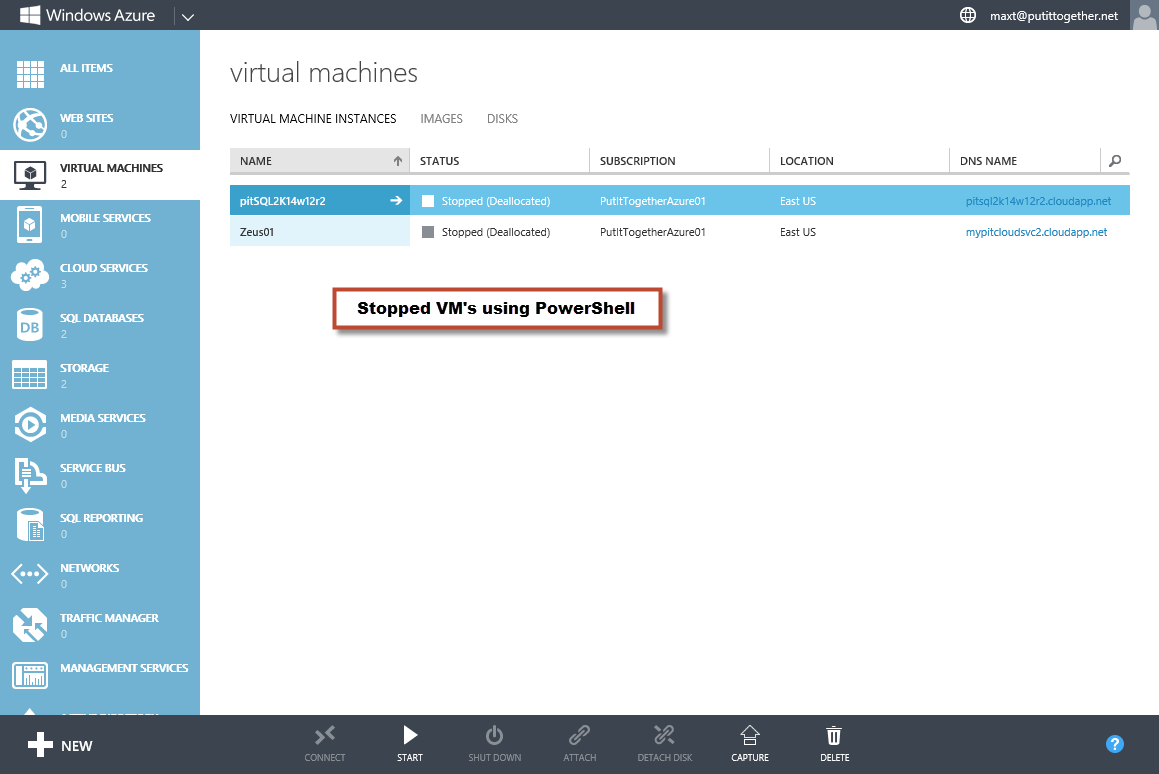
WindowsAzureStopVMs

Please keep in mind, that I haven’t discuss anything about the creating network items and/or affinity group to established connectivity between the Azure VMs.  At least this information will help in getting started.

I hope you all find this information useful!  There will be more coming soon.

Maximo Trinidad (MVP Windows PowerShell)
AKA Mr. PowerShell

Orlando IT Pro Camp Keiser University 3/23/2013 – Presentation

Here’s the “Getting Started with Windows 8 PowerShell” presentation plus one sample script to get you started.

Topic description:  This is an introduction session on how to work with PowerShell 3.0 in Windows 8.  I will cover find PowerShell, how to create your PowerShell shorcuts, updating PowerShell help documentation, and briefly covering the some of the enhancements in the ISE editor.

Click on the following link:

Thanks and keep participating with the IT Community!

“Windows 8 PowerShell and Hyper-V 3.0 Preview” Slide deck and samples

Last weekend at the “ITPro Camp Saturday” in Sarasota Forida was great event.  Thanks to everyone for participating, and taking the precious time on a Saturday to learn about new and current technologies.  It was a GREAT!!

Here’s my “Windows 8 PowerShell and Hyper-V 3.0 Preview”presentation and demo scripts use during the session:

Please, don’t hesitate to contact me if you have any questions.

Thanks You!

YES!! Windows Management Framework (WMF/PowerShell) 3.0 CTP2 is here.

YES!!  It’s another great accomplishment from the Microsoft PowerShell Team.  Just released on December 2nd 2011 this CTP (Community Technology Preview) come with fixes and more enhancements.  Please CHECK out PowerShell ISE, is really showing some progress.

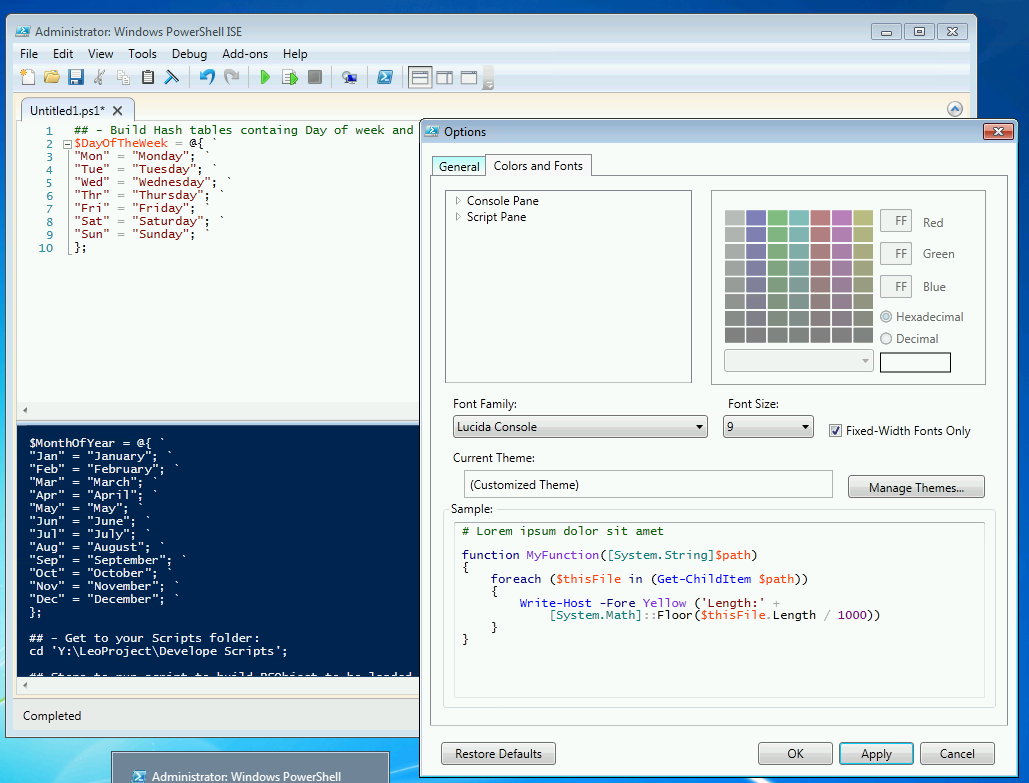
PowerShell ISE V3 CTP2 Customizable Themes

Get it herehttp://www.microsoft.com/download/en/details.aspx?id=27548

First thing!!!  READ:> IMPORTANT!!  YOU NEED TO UNINSTALL WMF 3.0 CTP1!  Or, suffer the consequences.

But, it you’re one of the few experiencing Windows 8 Preview and using Hyper-V 3.0 then you can create another VM for a clean CTP2 installation experience.  Or, just use the VM shapshot to to back and forth between version.  So, take a pick.

This version comes with some documentation, so make sure to ready it.  Also, don’t be afraid to submit bug reports at: https://connect.microsoft.com/PowerShell/. (you need to have a Live ID)

For example, I just put in a suggestion to include the ability to “Comment-In” and “Comment-Out” block of code: https://connect.microsoft.com/PowerShell/feedback/details/711231/ise-v3-need-to-be-able-to-comment-a-series-of-lines-in-a-block-of-code

*Hint*Hint*:  

  1. When running scripts, I notice there has been changes to how the “Set-ExecutionPolicy” behaves.  I’m used to set my execution policy to “RemoteSigned“, but for this version now I had to changed it to “Unrestricted”. (more test to be done)
  2. Also, don’t forget to execute the “Update-Help” as soon as you open PowerShell.  This is working for most part.

There will be more to come soon.

Windows 8 Hyper-V 3.0 – My Personal 8 Tips for the Newbie

Well, Here’s some tips to those who are first timers with Windows 8 Server (or Client) Preview edition.  I have to say, after been using the previous version of Hyper-V, I’m very happy for what i’ve seen so far in Windows 8 Server with Hyper-V 3.0.  As I finally completed updating/rebuilding all my VM’s for upcoming PowerShell and SQL Servers presentations, I have compiled 8 tips that might help the newbies get started using Microsoft Virtualization Technology.
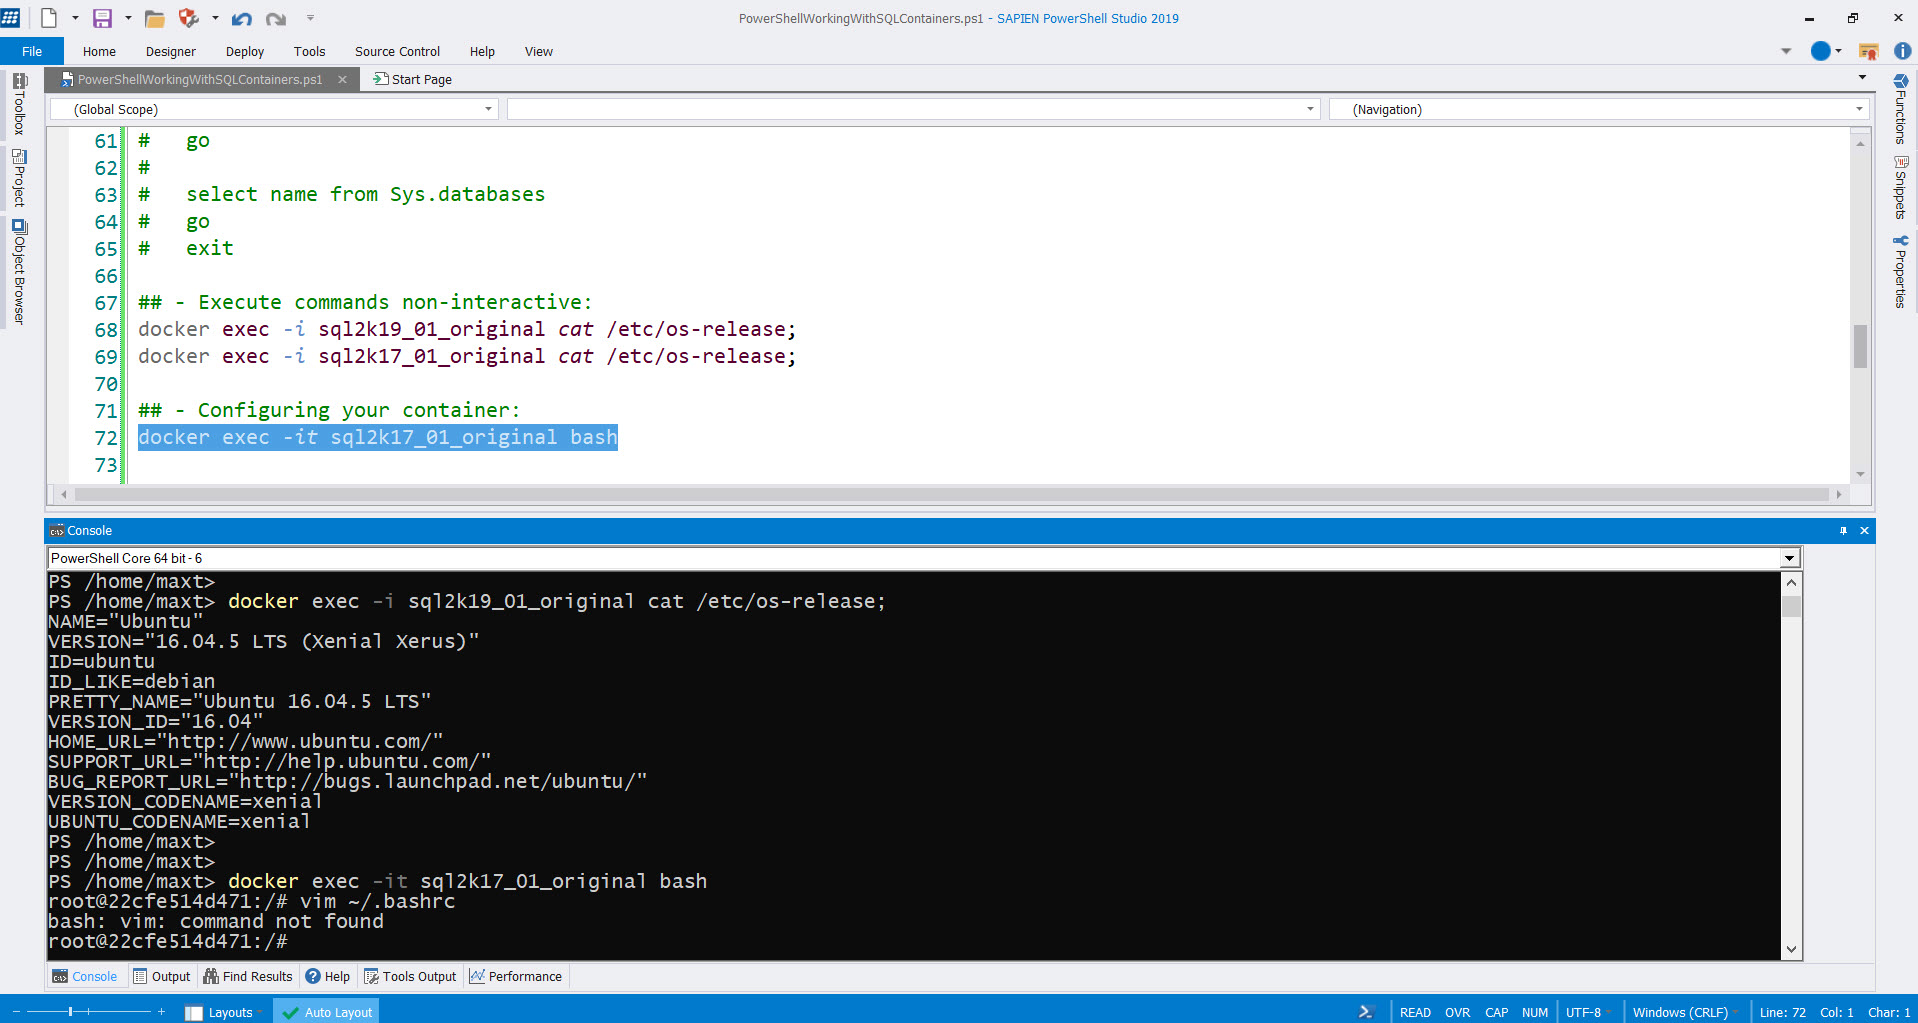
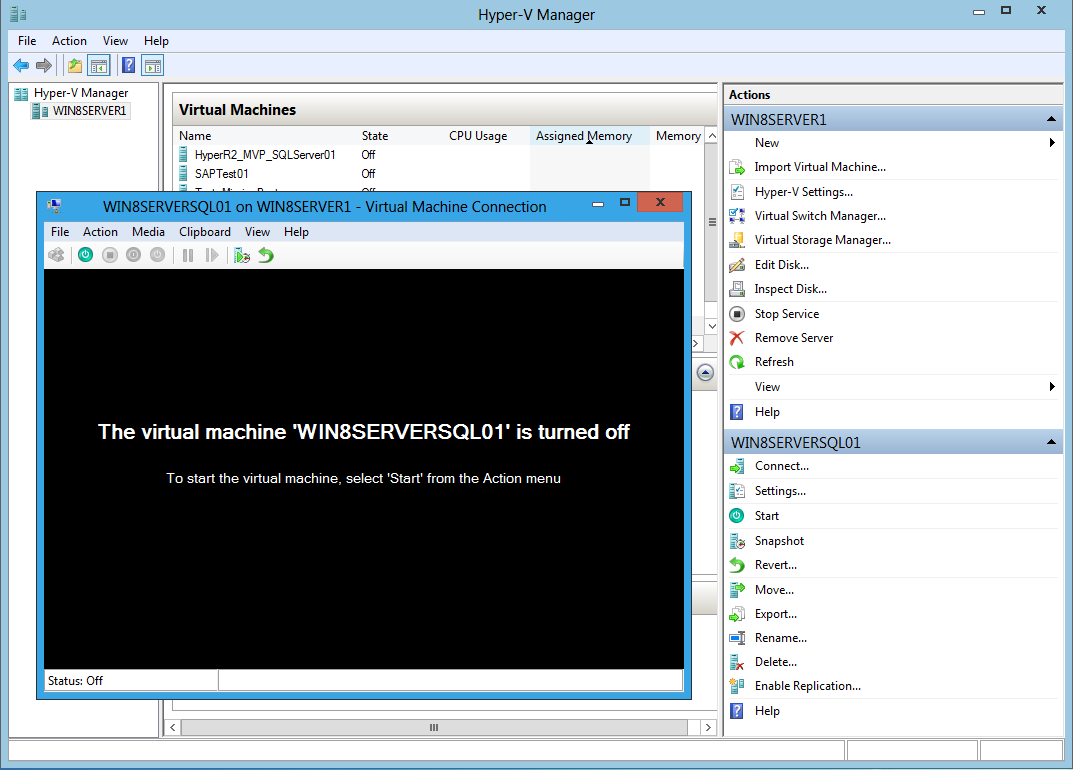
From the Hyper-V Manager console, click on the VM Connect option to work with your VM's.

Tip #1 – Memory is important

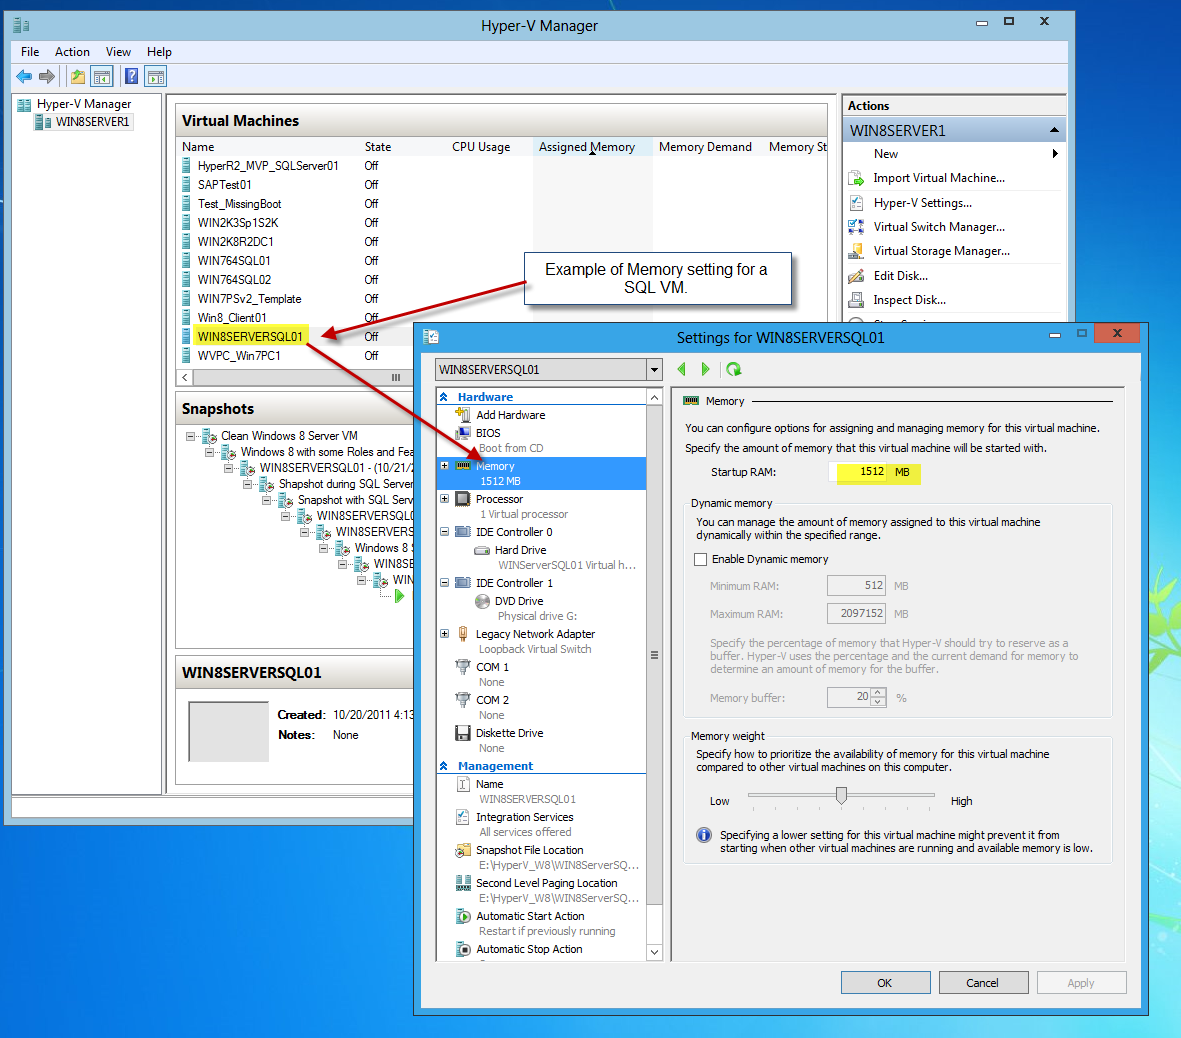
Yes, I totally agree with this one.  After I upgraded my memory from 4GB to 8GB, all my VM’s are working OK.  I have experience giving 1.5GB to a Virtual SQL machine is ideal for development.

VM Memory Setting

Tip #2 – Enabling Hyper-V

First, There’s some differences between Hyper-V 3.0 server and Client.  But, let me be clear, that every machine might be different.  In my case, I have a 4 year old HP Pavilion dv7-* Entertainment laptop with Virutalization option enabled. I created a dual boot Windows 8 Server and Client version.

On the Windows 8 Server enabling “Hyper-V” role using the new “Server Manager” Dashboard was easy.  But, in my case, I had to manually enable “Hyper-V Core” on my Windows 8 client by turning it “ON” in Windows Features.  Here’s the command:

C:\Dism /online /enable-feature /featurename:Microsoft-Hyper-V

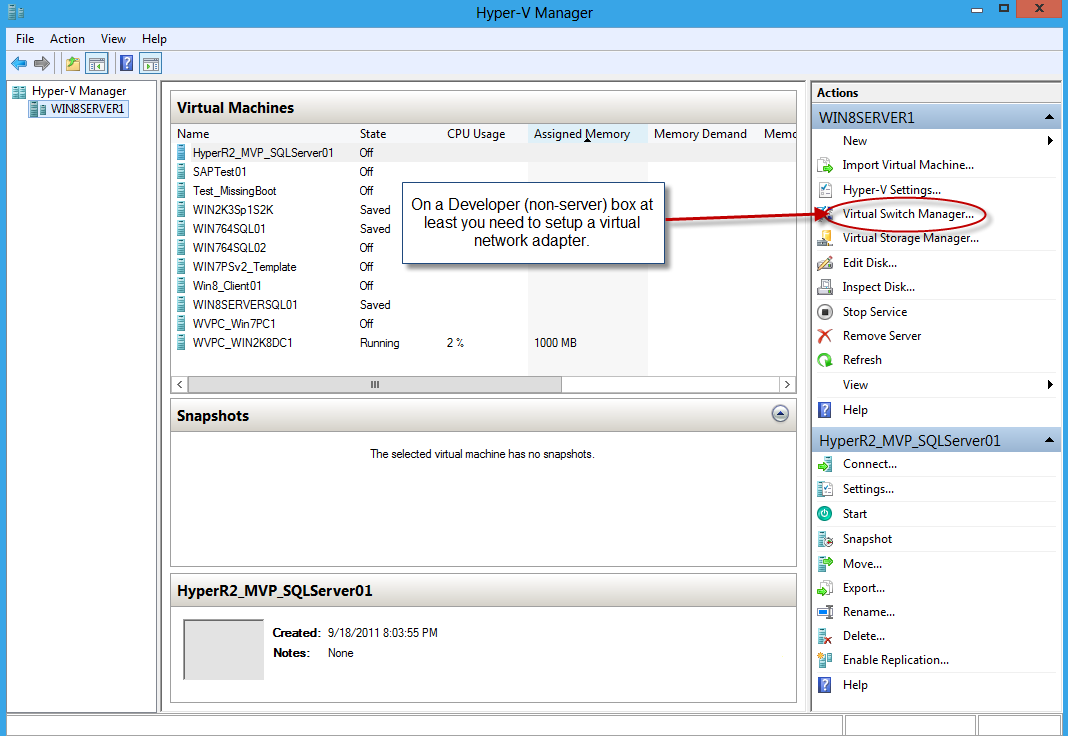
Tip #3 – Create your Hyper-V 3.0 Virtual Network Switch

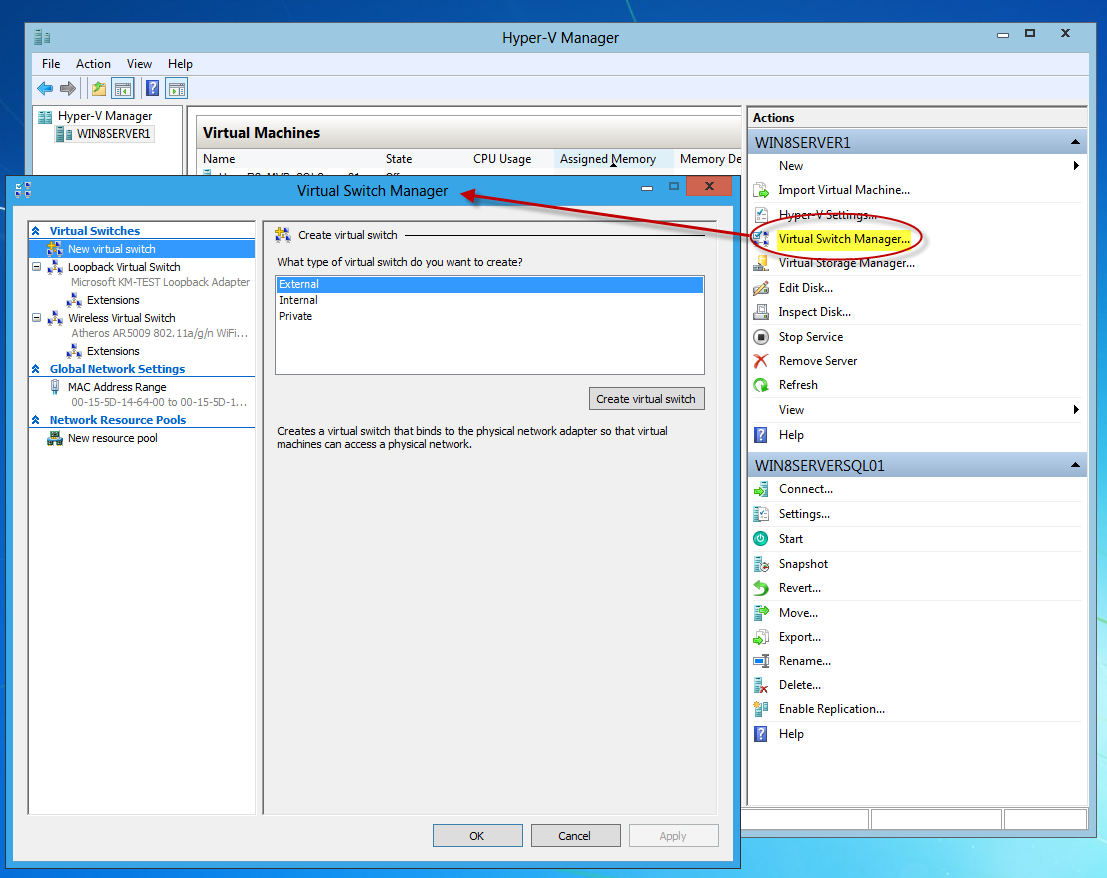
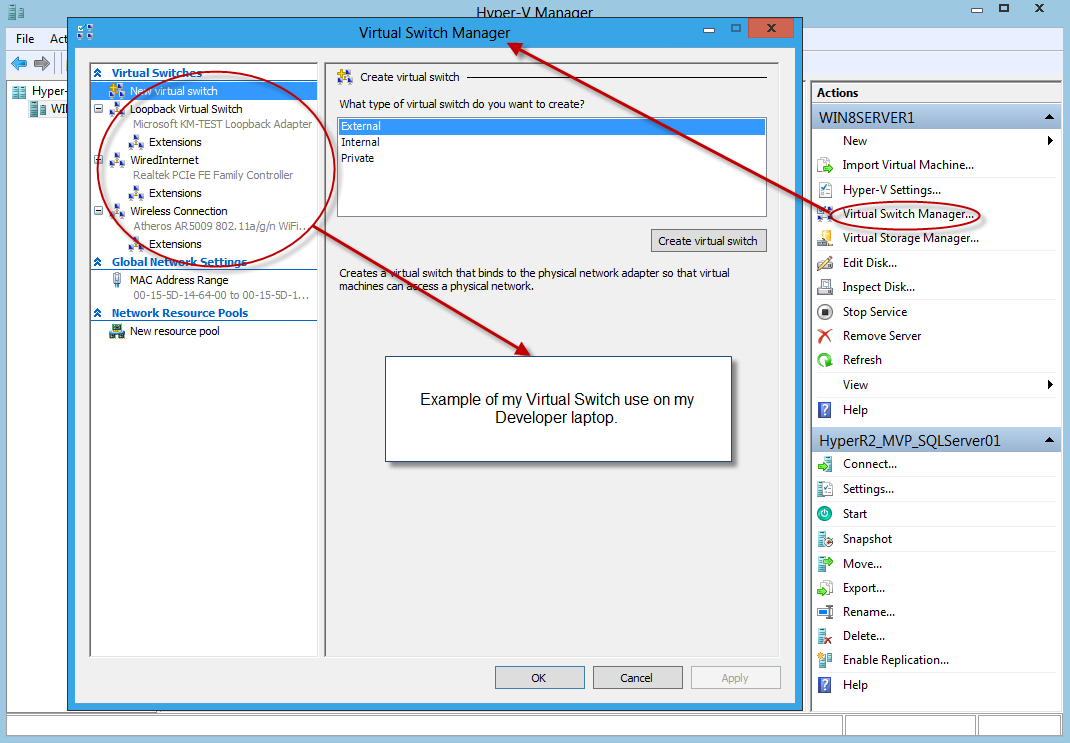
This is very Important and one this you need to setup your Virtual Network connections in either Server or Client. Open “Hyper-V Manager” and look the “Virtual Switch Manager”.

Hyper-V Virtual Switch Settings

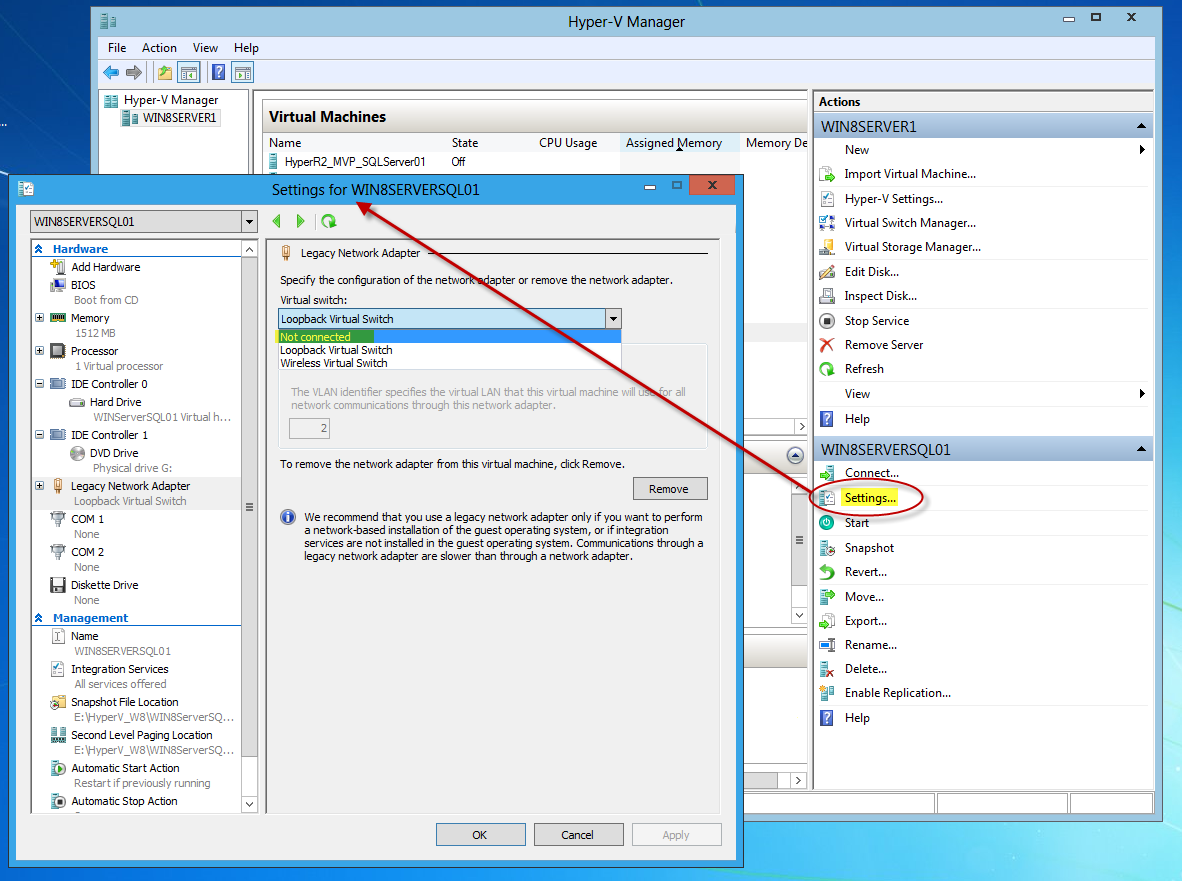
As you can see in my picture, I have a Loopback adapter Virtual Switch (External), and a Wireless Virtual Swtich(Externa) both setup as Legacy Adapters).   These two combination works great when VM’s talk to each other and, at the same time, have access to the internet for Windows Update.  Keep in mind, you can disable the wireless by going into the VM Settings option, going into the “Legacy Network Adapter”, and changing the “Virtual Switch” to “not Connected”.

VM Settings menu - Changing Virtual Switch to "Not Connected"

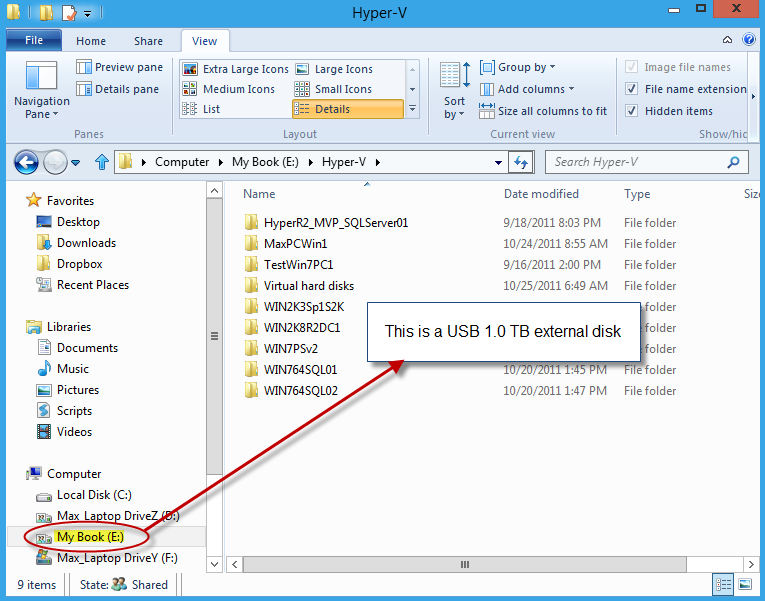
Tip #4 – Don’t need a SAN Storage

FYI. Hyper-V 3.0 will allow you to create your VM’s practically anywhere.  In my case, I have an External USB 1.o TB Storage drive.  This is good new because you don’t need a SAN storage unit, and can save Vm’s outside your Physical server drives.

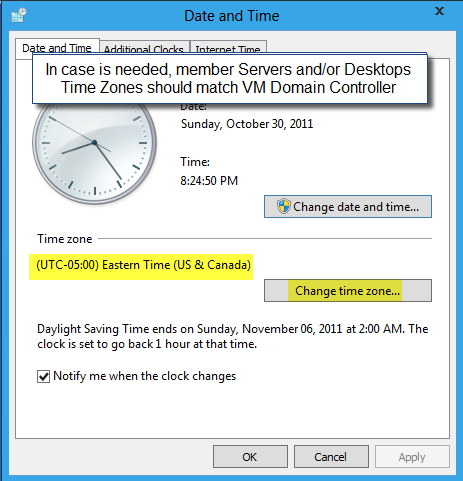
Tip #5 – Set VM’s TimeZone correctly

This might be only in my case, but after creating my VM’s and trying to connect them to join my Virtual Domain Controller, I experience connectivity issues between my VM’s due to their Time Zones not been the same.  So, If you have a Virtual Domain Controller, make sure both Time Zone machines are the same.

Here’s an interesting link on “Time Synchronization in Hyper-V” (by the “Virtual PC Guy’s Blog”) you may find useful: http://blogs.msdn.com/b/virtual_pc_guy/archive/2010/11/19/time-synchronization-in-hyper-v.aspx

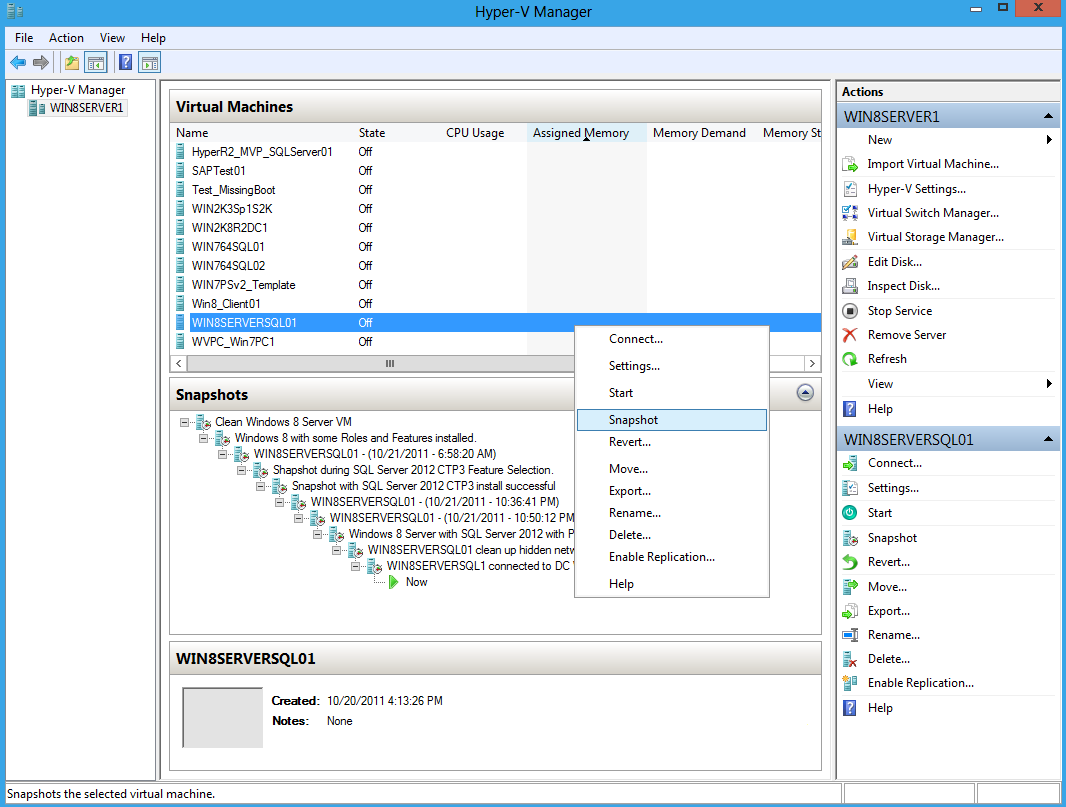
Tip #6 – Learn to use the VM Snapshot Feature

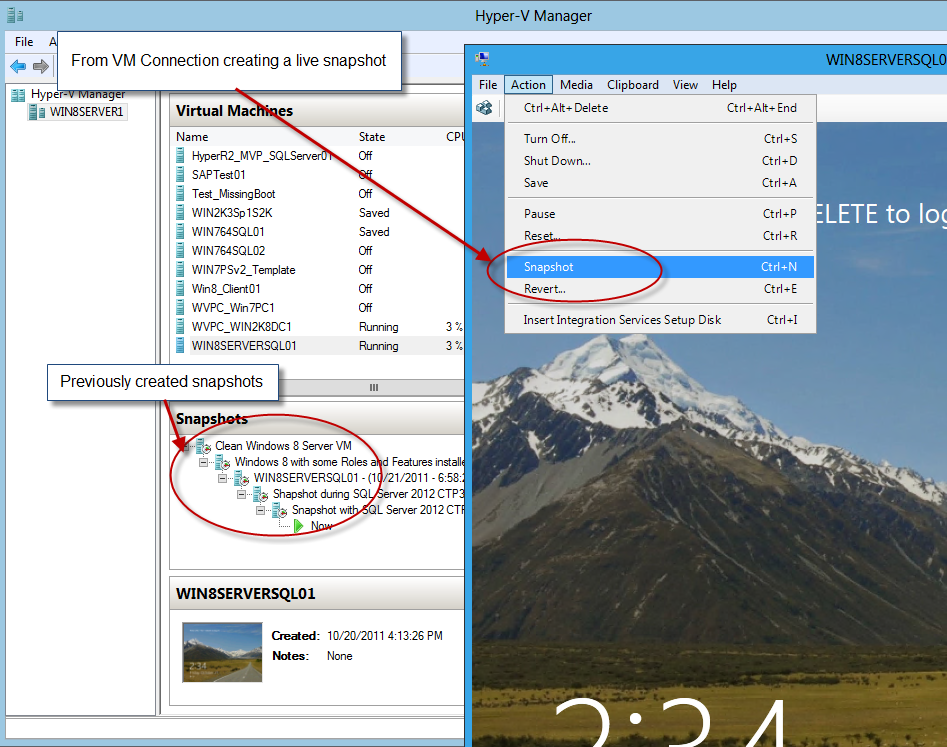
Yes! This feature is a life saver.  It can help you troubleshoot VM issues by you taking the snapshot of a VM machine before doing any irreversible updates that could force you start over to rebuild the machine over.  It’s perfect when creating multiple scenarios for in test machines and adding descriptions to it.  Also, you can also revert to a previous snapshot, or apply the changes.

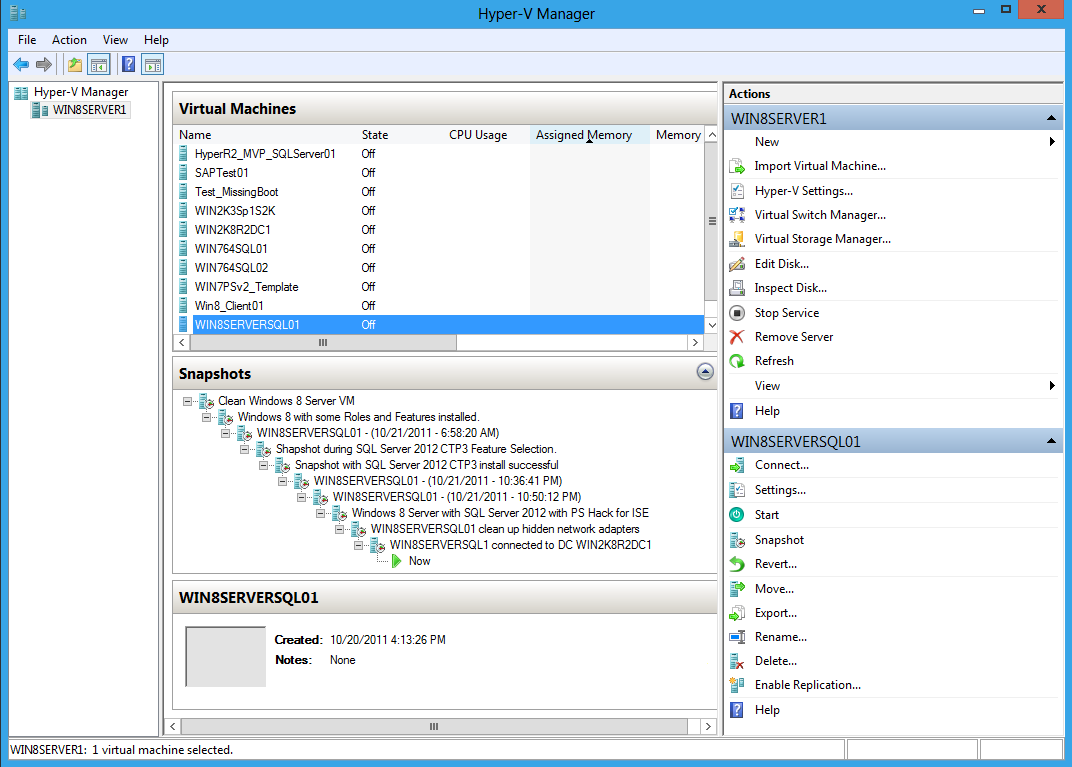
List of a server Snapshot showing different stages during a SQL Server Installation
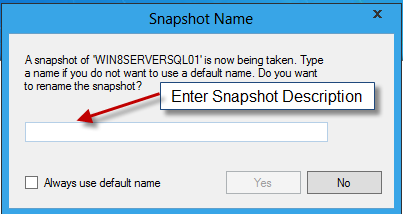
Adding a Description to your Snapshot


Tip #7 – Bringing Legacy Microsoft VM to Hyper-V3

If you want to move all your existing VM’s from: Virtual PC, Windows Virtual PC, and Hyper-V, just remember to uninstall all “Virtual Components”, or “Integration Services” to prevent any misbehaviour in your VM.  Then, you will be able to install the Hyper-V 3.0 “Integration Services” so that Hyper-V can manager your VM’s services such as: Snapshot, Start, Shutdown, or Save.

*hint*: I have experience some issues with Windows Servers 2008, and Windows 2003 SP1 after mvoing them to Hyper-V 3.0.  The mouse won’t work even after installing “Integration Services”.

Tip #8 – Start using Use PowerShell

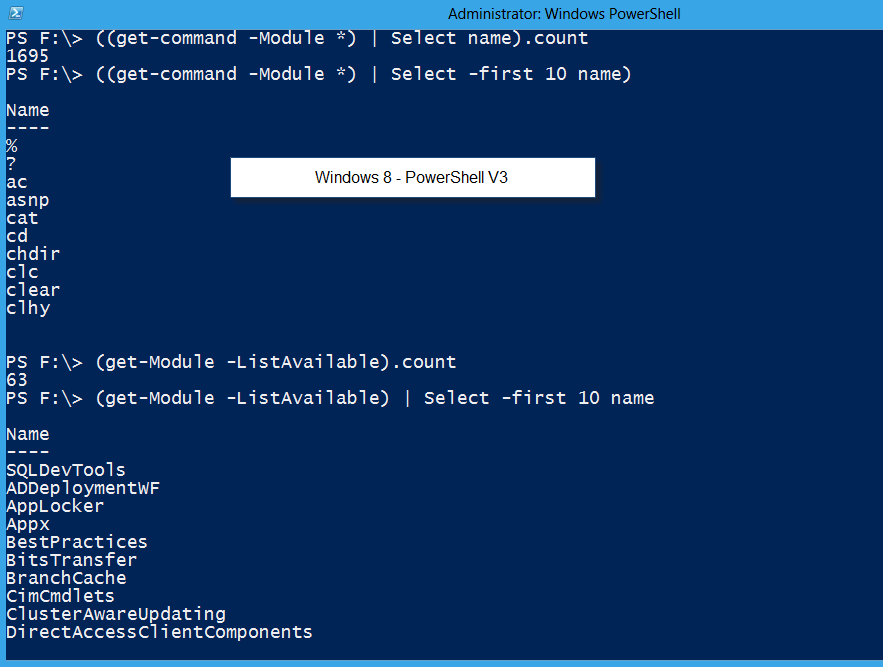
Yes! YES! This is your opportunity to start using PowerShell.  You can user the Hyper-V module and start managing your VM’s.  Also, don’t forget that PowerShell comes with over 1695 and about  63 Modules.  Keep in mind,  This numbers will varies depending on the enabled Windows features and/or installed Server Applications containing PowerShell modules.

Here’s some one-liners command you may want to try get the estimate numbers of PowerShell commands and modules:

1. Get total number of available  commands and list their names:

(get-command -Module *).count; (get-command -Module *) | Select name;

2. Get total numbers of available (installed) Modules, and list their names:

(get-Module -ListAvailable).count; (get-Module -ListAvailable) | Select name;

I hope this information is helpful.  That’s it for now!

Creating a Standalone Windows 8 Server Virtual Machine with SQL Server 2012 CTP3

Here’s how I build my version of a standalone workgroup Windows 8 Server Virtual Machine(VM) with SQL Server 2012 (“Denal;i”) CTP3. When you create this VM, make sure to give enough memory.

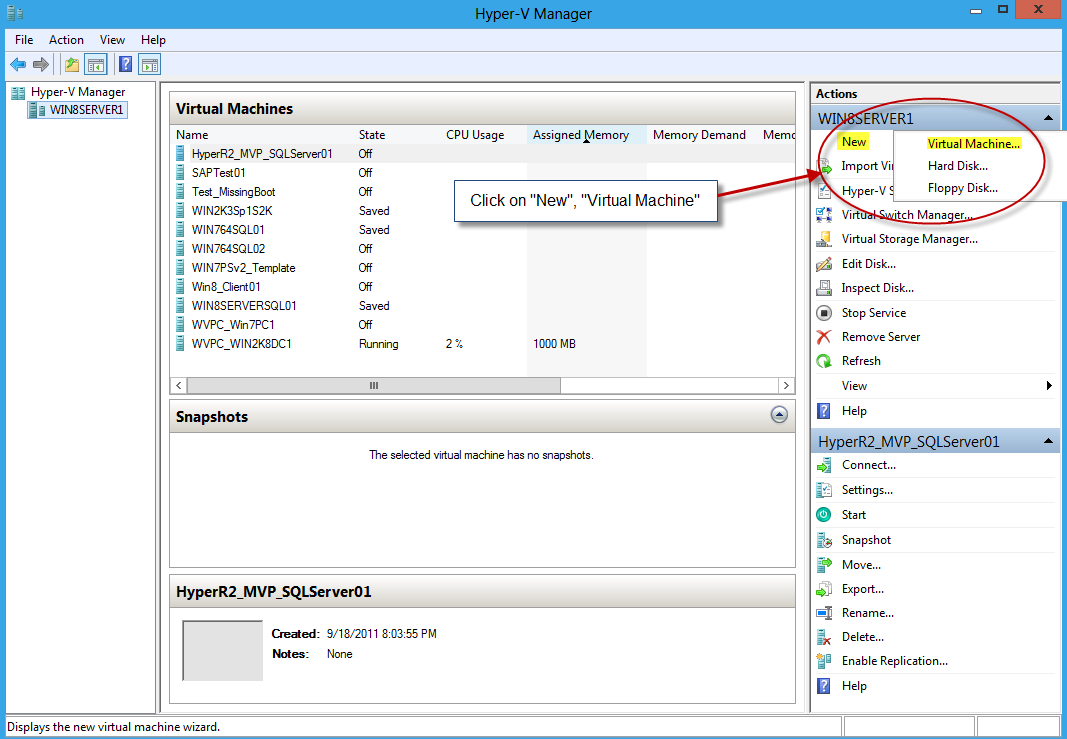
How-To create a VM in Hyper-V Manager console:

I’m not going deep on this topic but the Hyper-V Manager GUI it’s easy to use.  I’m assuming you already got an *.ISO image of both: Windows 8 Server Preview and SQL Server 2012 CTP3.  If not you’ll have to find it at Microsoft website and/or your MSDN/Technet subscribtion.

Before Creating your new Virtual machine:

Keep in mind, you’ll need to setup you Hyper-V environment.  Meaning, if you’re using a laptop and/or a desktop computer (not a server),  still you need to make sure it meets the Hyper-V requirements or it won’t work.

So, at least you will need to use the “Virtual Switch Manager…” to assist you setting up your virtual network card to use by any VM you create.

Notice, in my environment, I have created three virtual network adapters:

  1. Wired Internet
  2. Wireless Internet
  3. Loopback

The first two adapters serve my purpose to be able to connect to my physical machine Internet connection so I can do windows update.  The loopback adapter is for my internal network connection to my virtual Domain Controller.

*Hint*: In order to allow your VMs to access your external wireless adapter, you need to enable in “Server Manager” the “Wireless LAN Service” feature before you create the virtual wireless adapter.

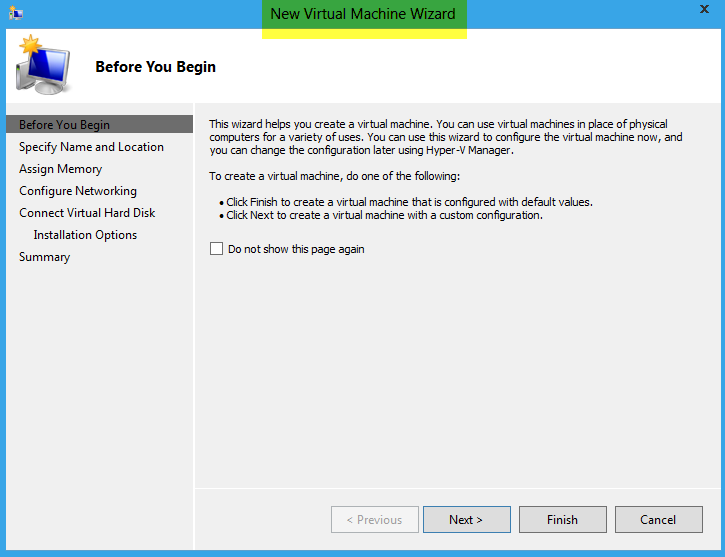
Now, you are ready to create a New Virtual machine, and just follow the wizard:

The “New Virtual Machine Wizard” will help you configured everything you need.   Make sure you create this VM with enough memory.  In my case I assigned 1.5GB of memory.

Opening your Virtual Machine Connection:

There’s two ways to open your VM Connection in your “Hyper-V Manager” console:

  1. By double-clicking at the actual virtual name.
  2. Or, double-click at the actual virtual machine preview pane at the bottom left side of the “Hyper-V” console.

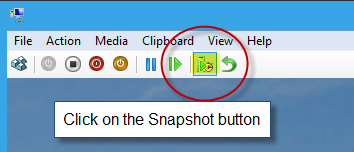
Now that your connection GUI is open, it’s a good time to start doing a VM Snapshot in case you need to go back and troubleshoot in case of problems. Here’s some pictures on How-To create a VM Snapshot:

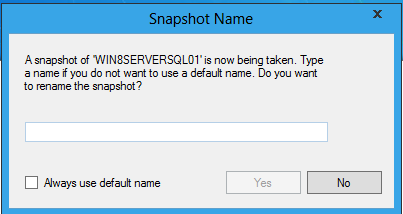
If a Snapshot box asking to add a Name to your snapshot, go ahead and do it.  This box only comes when there has been changes done to your VM.

Now, Ready for SQL Installation.

Installing SQL Server 2012 (“Denali”) CTP3:

After building the virtual server, if you try to immediately install SQL Server 2012, it won’t work.  And, when you try to run the setup.exe, you won’t have access to the “SQL Server Installation Center” to view the “Hardware and Software Requirements” information.

Check SQL Server Requirements:

So first, you may want to check this link to read about what’s required to install this new version of SQL Server: http://msdn.microsoft.com/en-us/library/ms143506(v=SQL.110).aspx

Need Role(s) and Feature(s):

In order to make my SQL Server installation work, I had to open Windows 8 “Server Manager” and follow the wizard to do the following steps:

  1. Install the Application Server Role (you can add more roles as you need during this process).
  2. Then, you need to add the following features: (again, you can add additional features as needed)
    a. Enable the .NET Framework 3.5
    b. Enable the PowerShell ISE

After doing this steps, then I was able to get the SQL Server setup to work and allow me to start my installation.  Use the VM Connect GUI to allow you to attached the SQL Server  *.ISO image for your VM to start the SQL Server Installation.

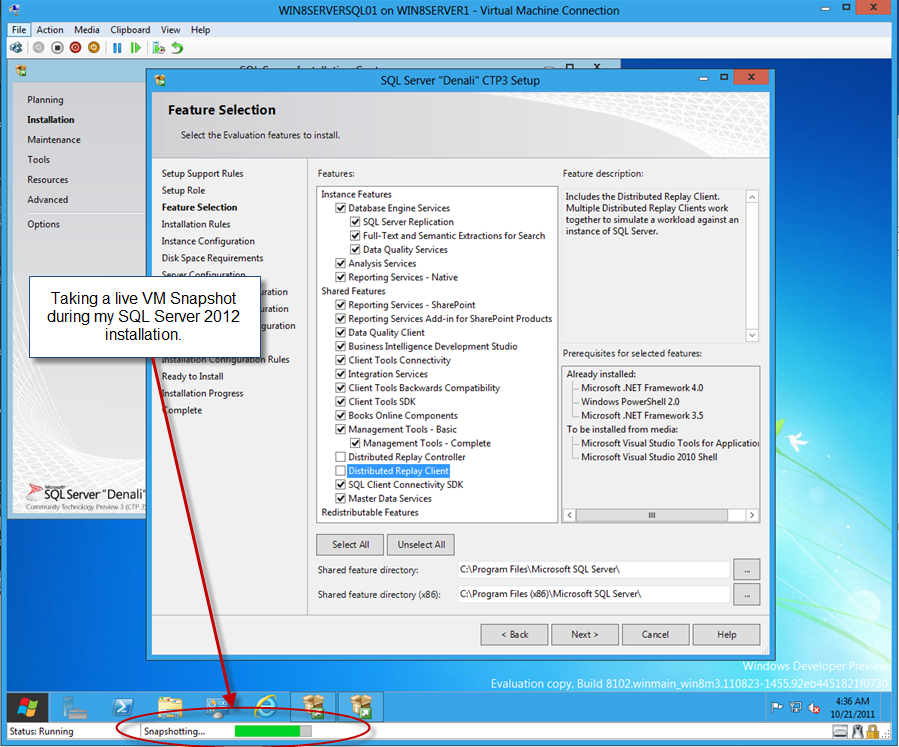
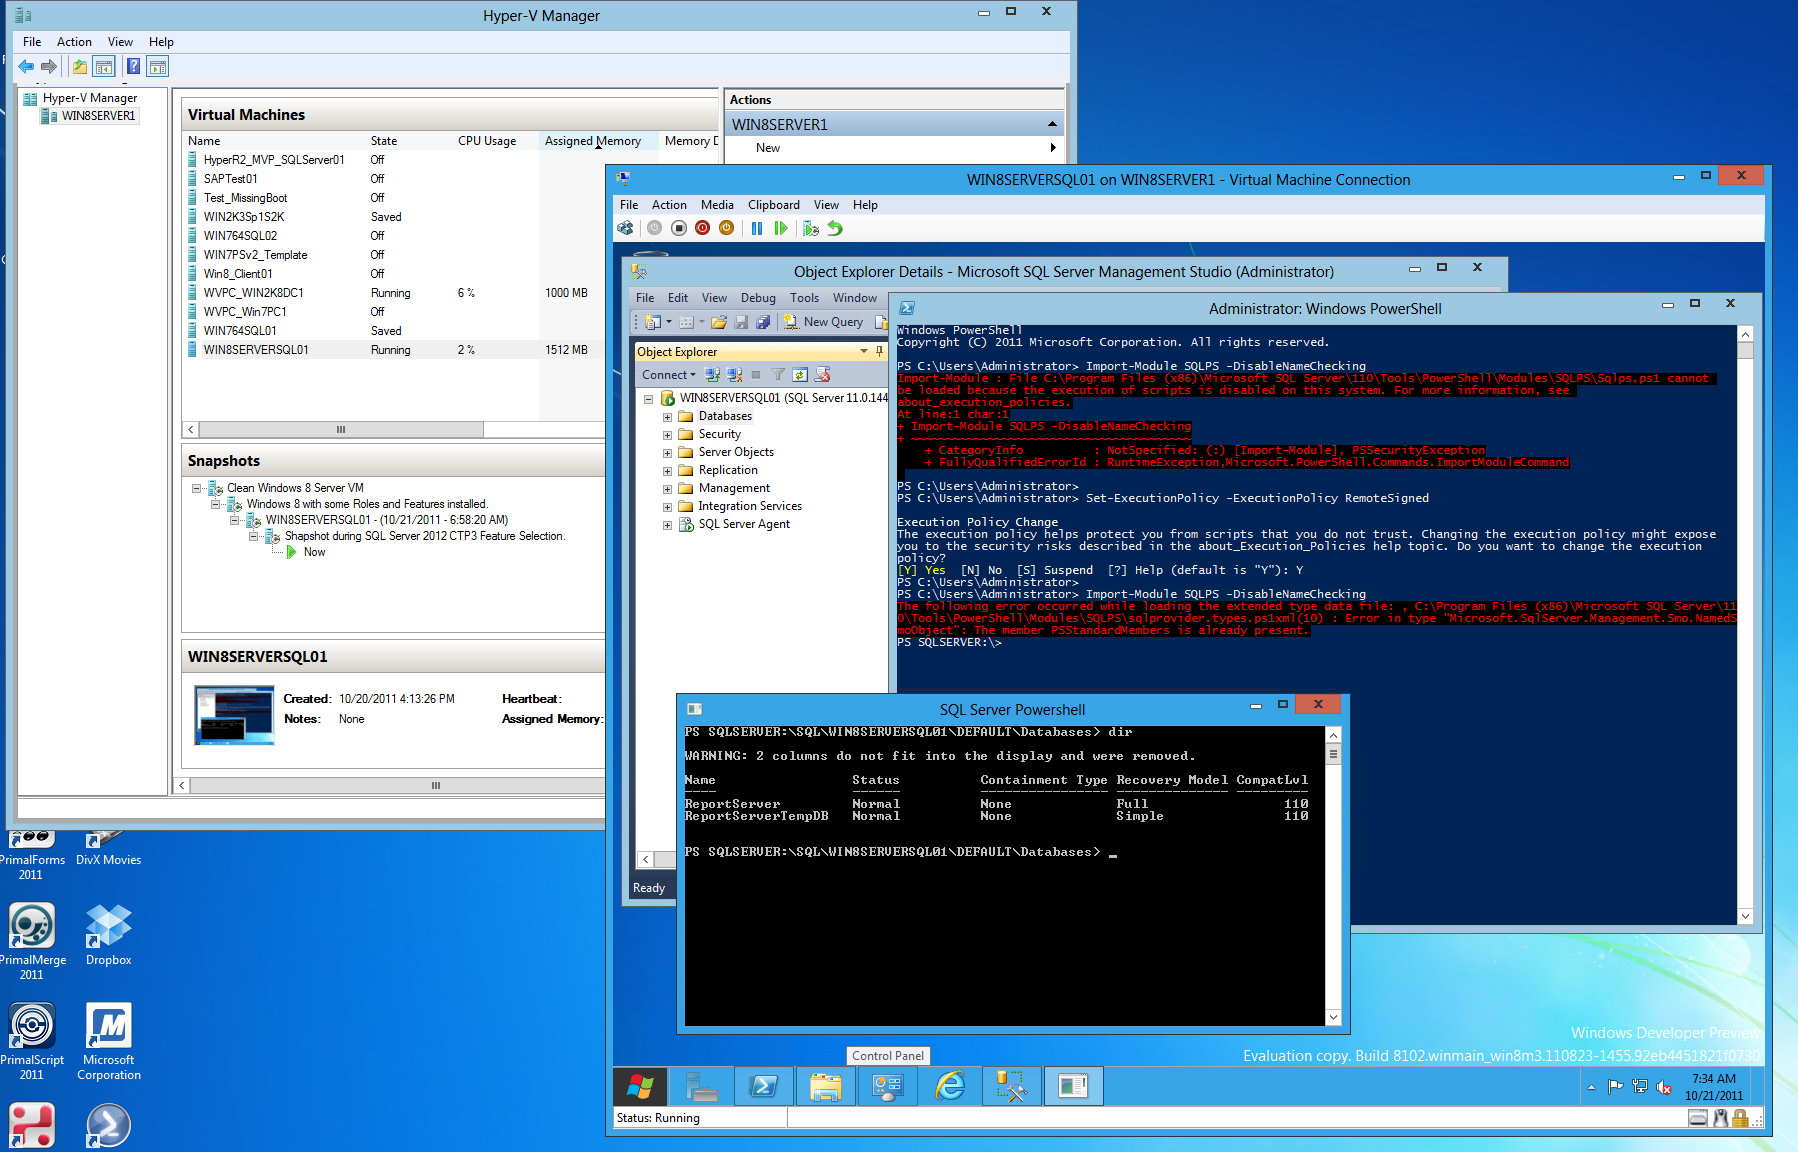
I’m not going to show all the SQL Server installation screens but here’s to show that I’m able to proceed with the installation.

On the previuos picture, notice that I selected most of the features to install except the for the two Distributed Replay services. At the same time, I took a live snapshot of my VM before the actual installation process.

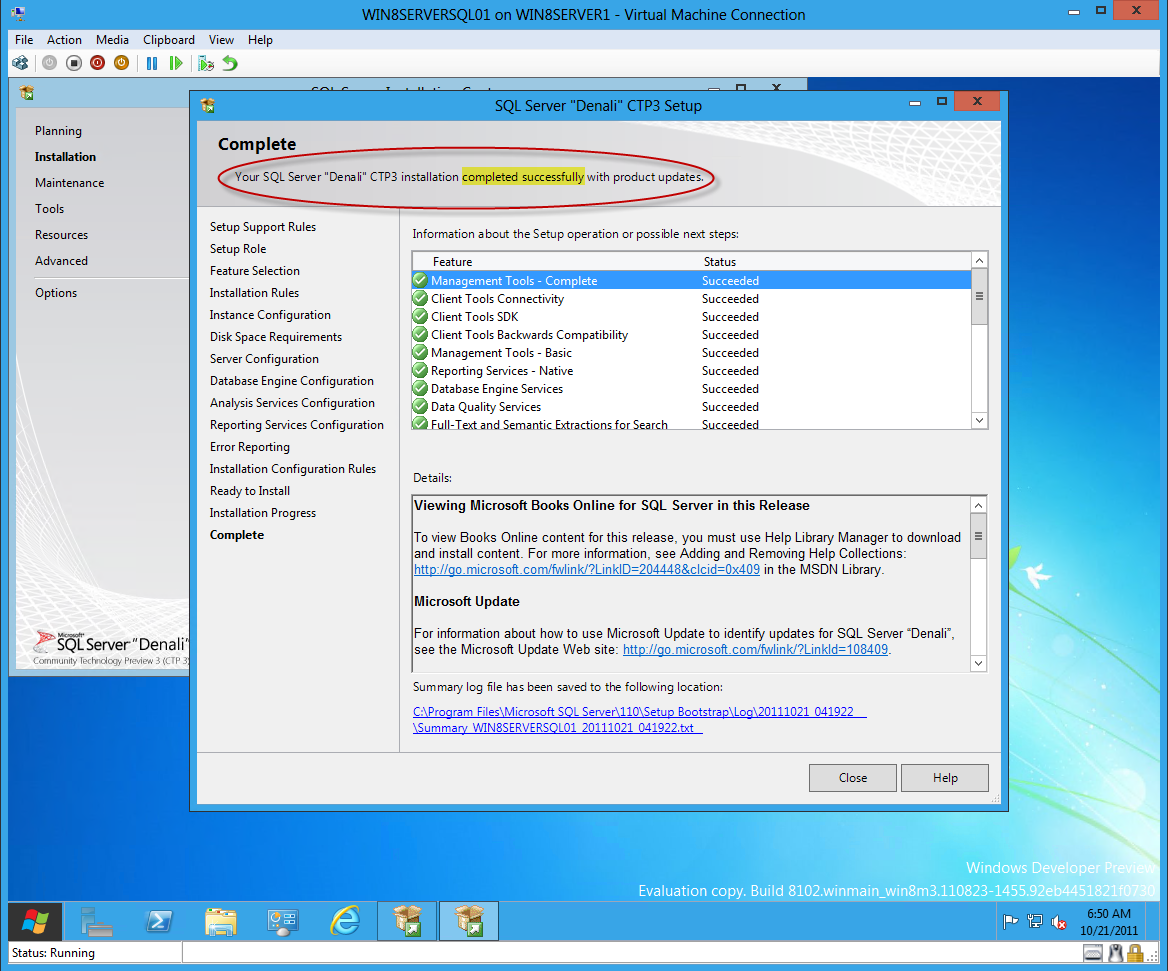
Installation Completed Successfully:

Yes! I got my SQL Server 2012 installed without a glitch!

Testing SQL PowerShell:

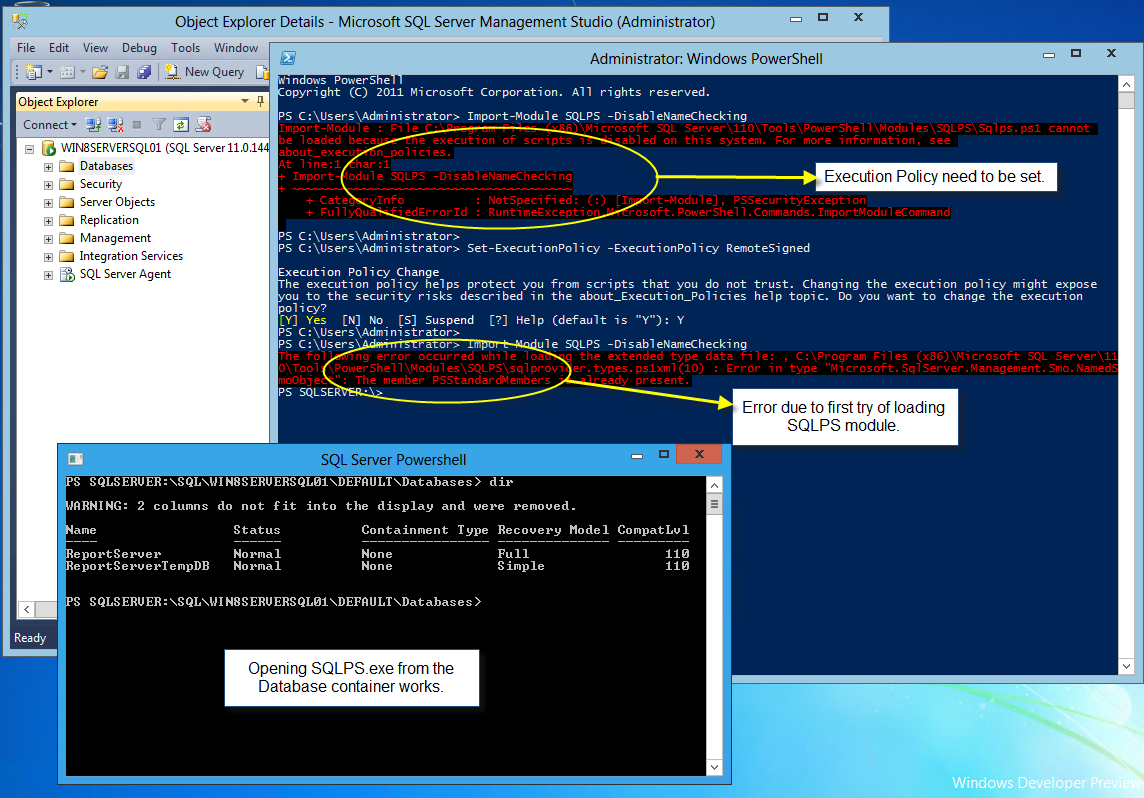
Now, I immediately testing the PowerShell SQLPS module. I was so excited that forgot to do something first.  Here’s my result of my first try:

Yes! I forgot to set my “Set-ExecutionPolicy” to “RemoteSigned“, then close and reopen my Windows Console.  I also I was able to SQLPS.exe from SSMS Database option just to test that there’s no errors.  So, everything works at least for now.

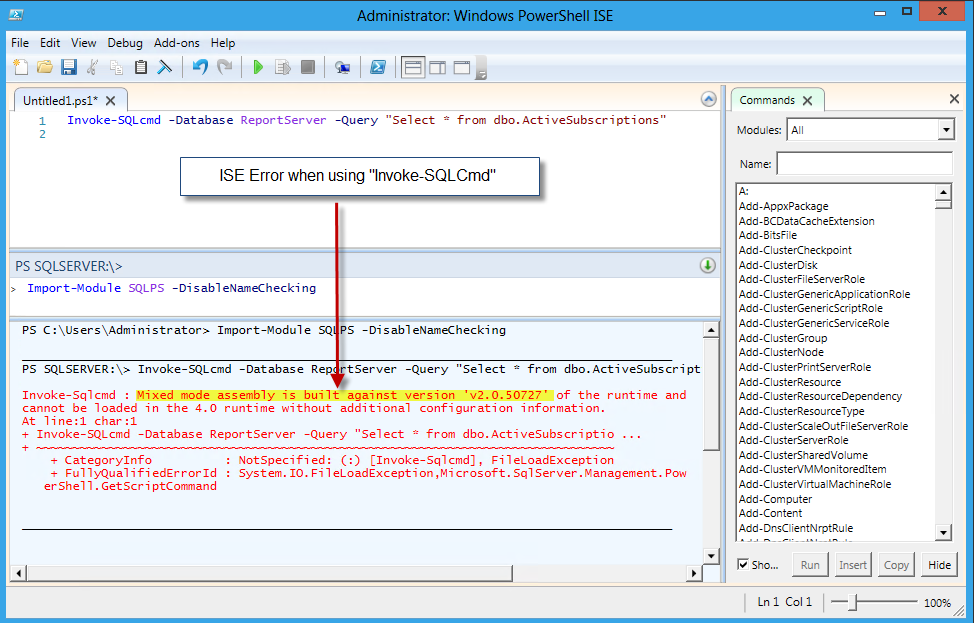
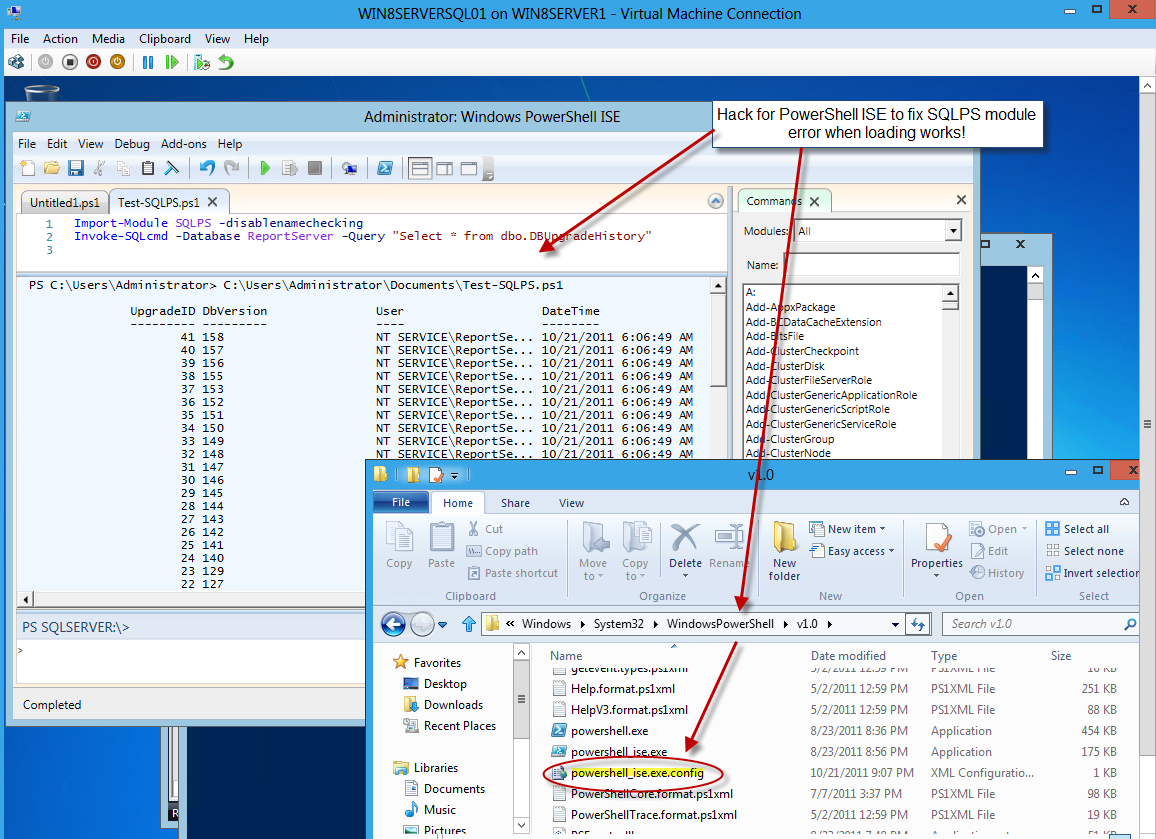
Ooops! Except for PowerShell ISE.  Yes! If you try to do an “Import-Module SQLPS -DisableNameChecking” then you get an error:

Don’t Worry!  PowerShell ISE is not the only editor.  You can still use Notepad to create/modify your script(s).  Or, just try downloading one of the free community editors from: SAPIEN, and PowerGUI just to name a few.

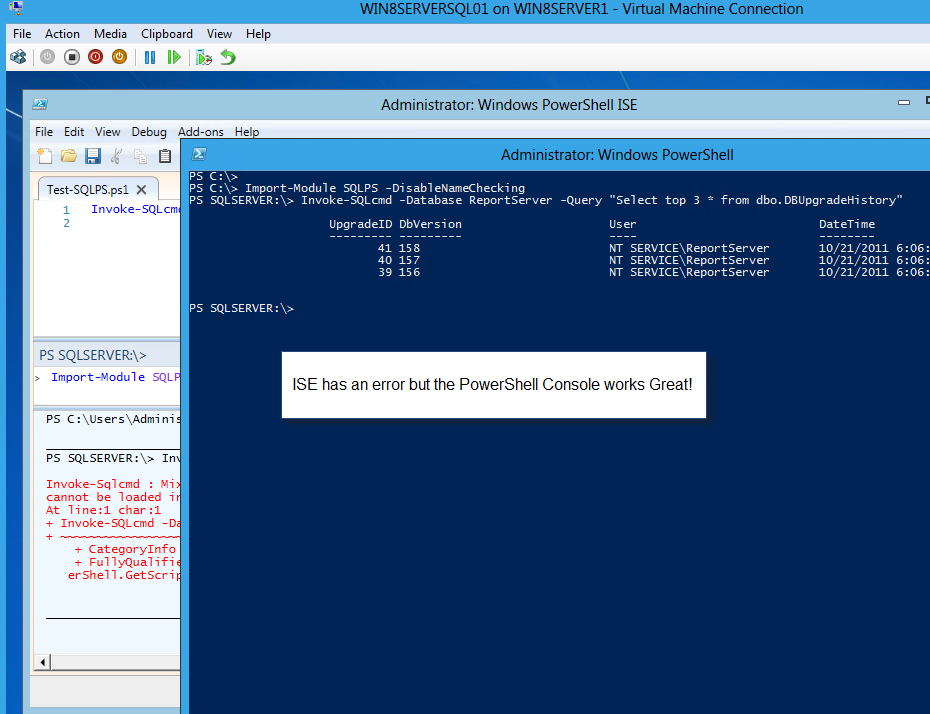
To test SQLPS I use the following command line:

Invoke-SQLcmd -database ReportServer -Query “Select top 3 * from dbo.DBUpgradeHistory

Final comments:
I know I may have skip some steps but the bulk on How-To create Window 8 Server VM in shown in this blog.  One important thing to keep in mind, these are still Community Technologies Preview (CTP) and it will change.

So, Don’t be afraid to try it!  This is why we have the ability to create Virtual Machines in our own developement machines.  Again, take advantage of Hyper-V.

The opportunity we have is to learn from them, assist giving feedback, and MOST IMPORTANT, it help us to stay ahead in upcoming technologies.

Enjoy, Learn, and Collaborate!

Bonus!!… Bonus!!

If you want a HACK to fix the PowerShell ISE that here it is: (Hack provided by one of our PowerShell MVP’s – Joel “Jaykul” Bennett
http://HuddledMasses.org
http://PowerShellGroup.org
)

  1. Go to you x:\Windows\System32\WindowsPowerShell folder (make sure to access this folder “As an Administrator” or it won’t work)
  2. Create a blank text filename: powerShell _ise.exe.config (Yes! this file extension is “.config”)
  3. Then, add the following XML lines, and save the file when done:
(Updated: 10/26/2011 – I missed the “runtime” section)

<configuration>
<startup useLegacyV2RuntimeActivationPolicy=”true”>
<supportedRuntime version=”v4.0″ />
</startup>
<runtime>
<loadFromRemoteSources enabled=”true”/>
</runtime>
</configuration>

Reopen PowerShell ISE and try to use the “Invoke-SQLcmd” command.

That’s it!