SSMS Version 17.4 no more SQLPS Module

It was just a matter of time, as it was already mention in previous SSMS (SQL Server Management Studio) documentation that SQLPS module was going to be deprecated and replace with the new SQLServer module.

See SSMS download information at: https://docs.microsoft.com/en-us/sql/ssms/download-sql-server-management-studio-ssms

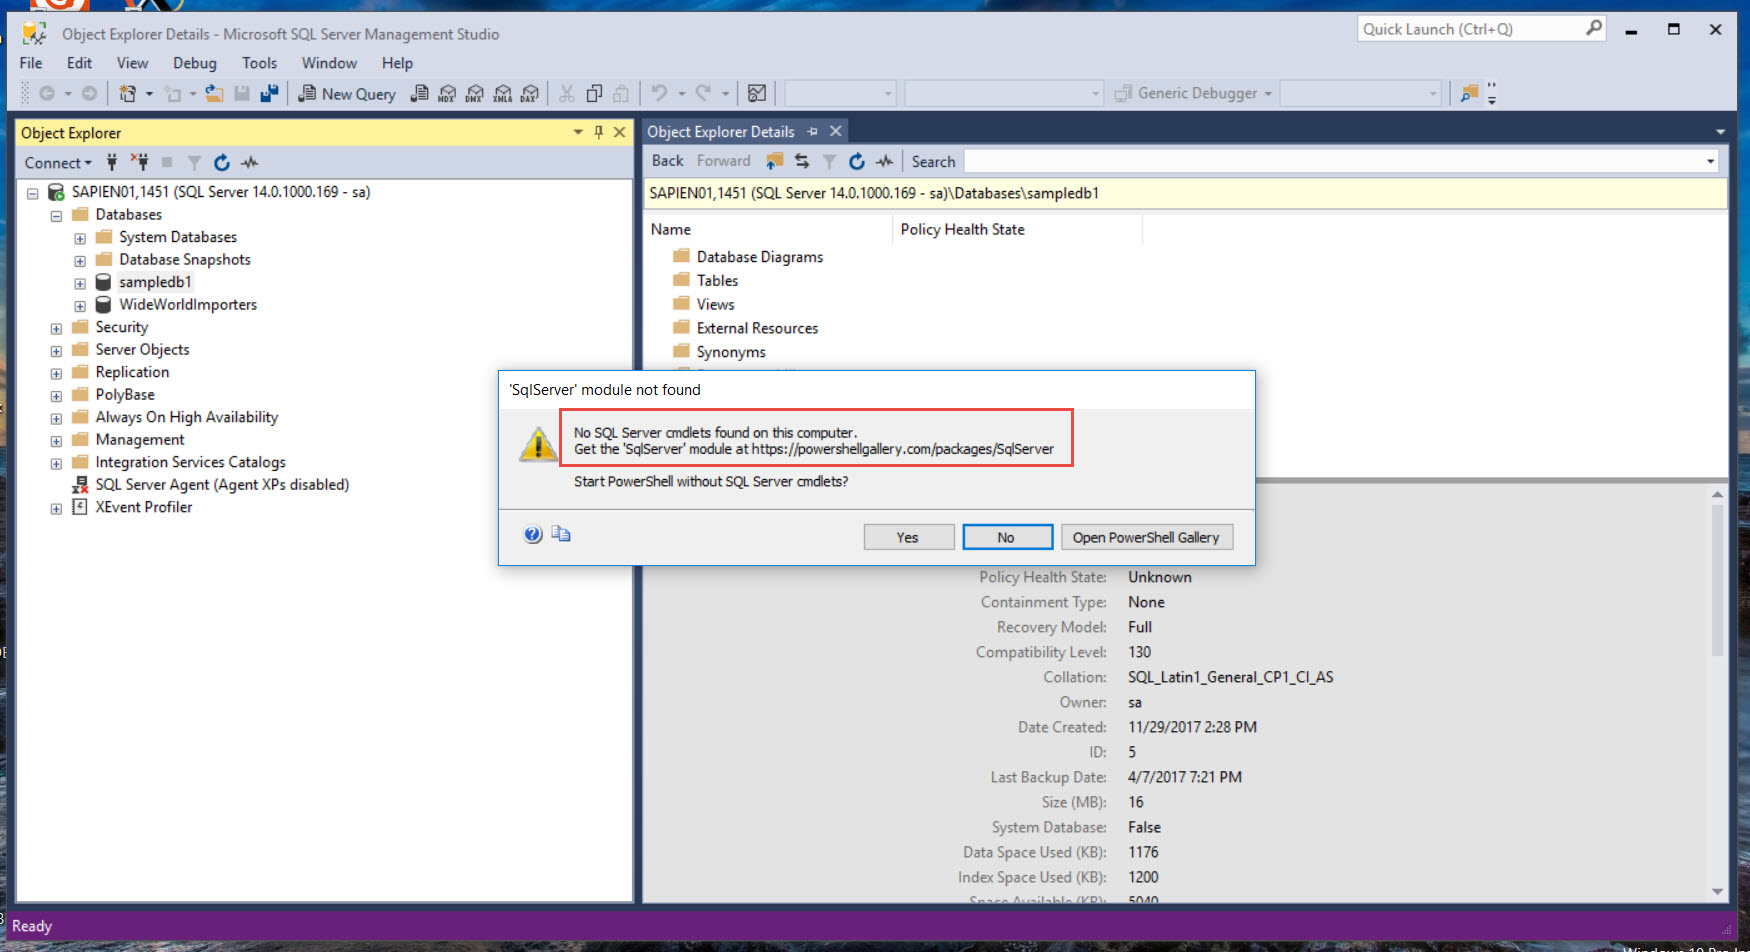
After SSMS Version 17.4 was release back in December, SQLPS module is no longer available. So, if you try to use the “Start PowerShell” from any of the database object, you’ll get the message “No SQL Server cmdlets found…” popup message.

New SQLServer PowerShell Module

But, no worries! Both the SSMS link and the popup message tell you where to get the new *SQLServer PowerShell module as is a separate installation from the PowerShell Gallery.

PowerShell Gallery SQLServer PowerShell Module, Get here: https://www.powershellgallery.com/packages/SqlServer/21.0.17199

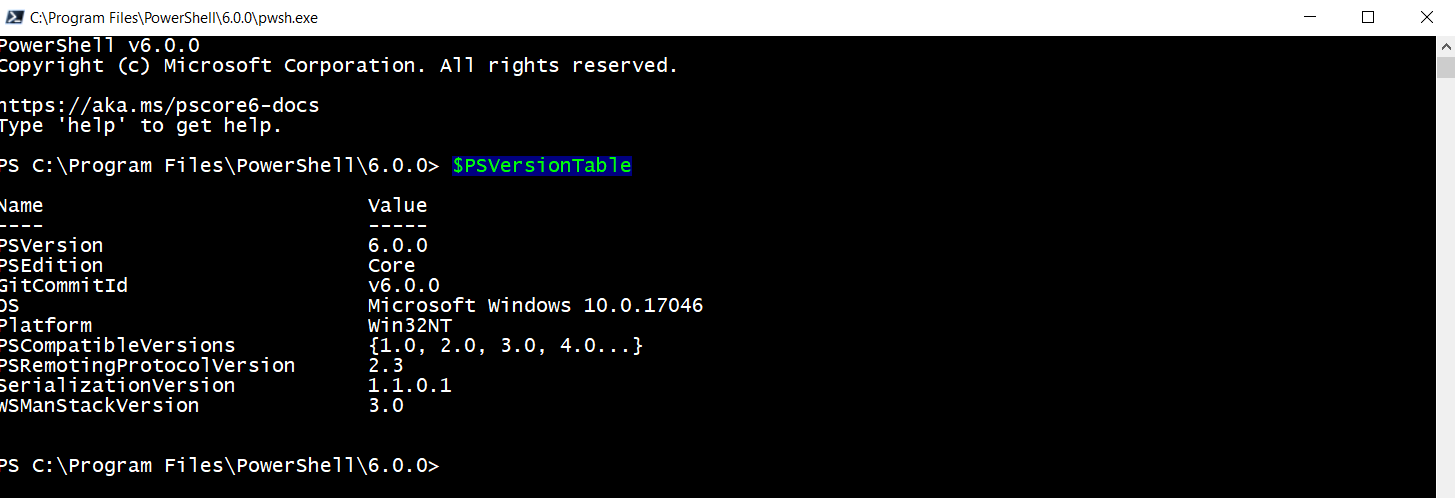
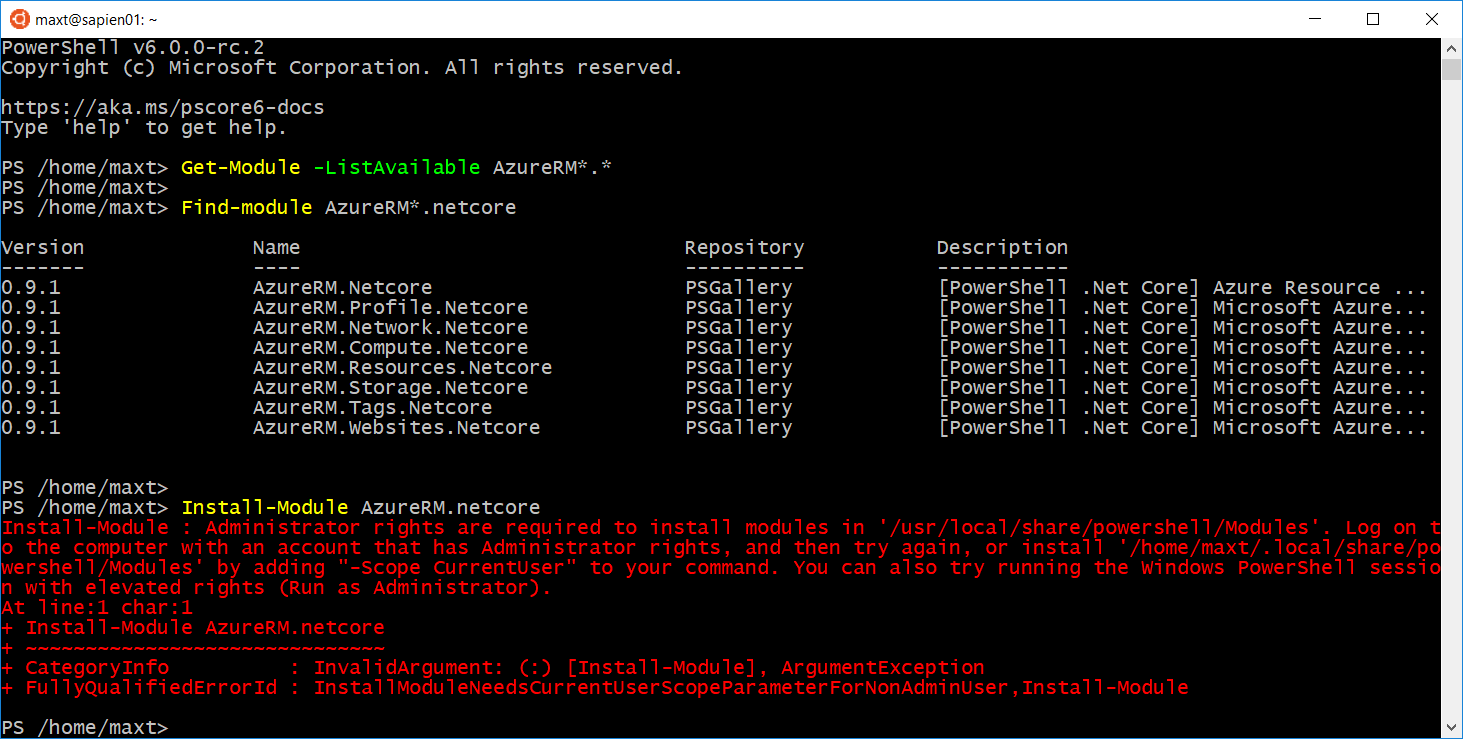
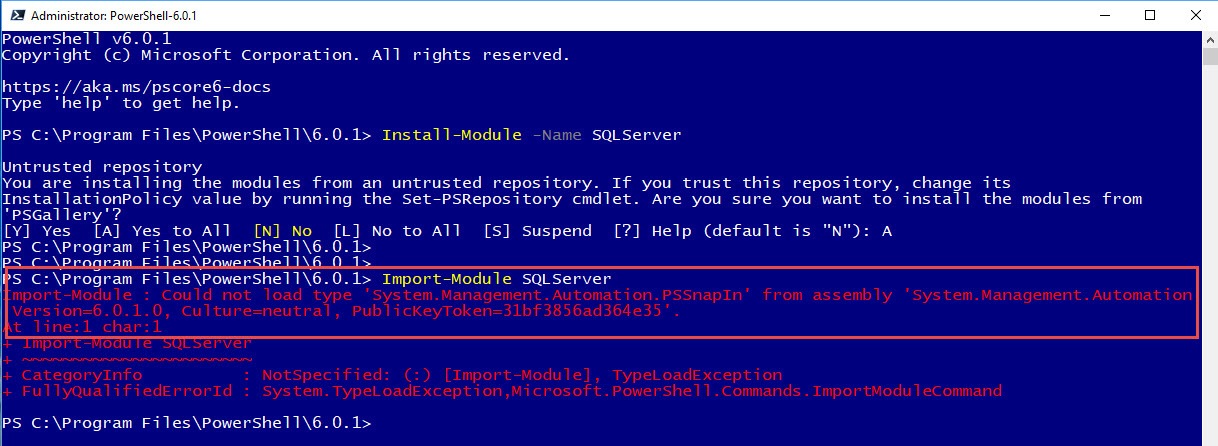
One thing to point out, this module is only meant to be use on Windows PowerShell.

In other words, it will not work in PSCore6.

Housekeeping Needed

Now, there’s the chance previous SSMS installations have left the older SQLPS PowerShell Module in the system.

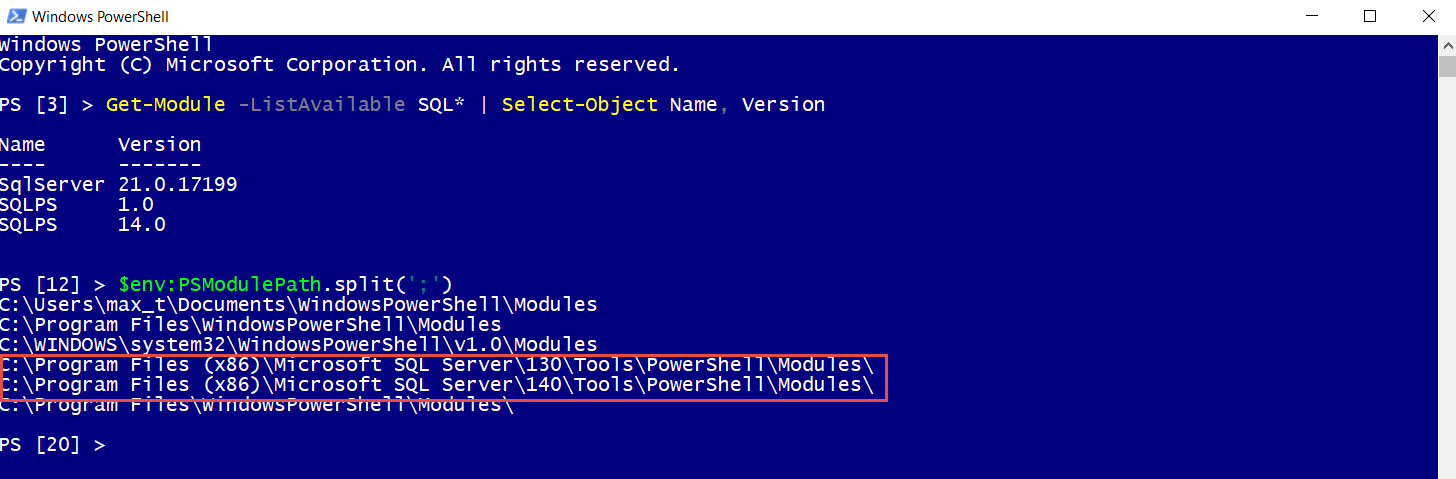
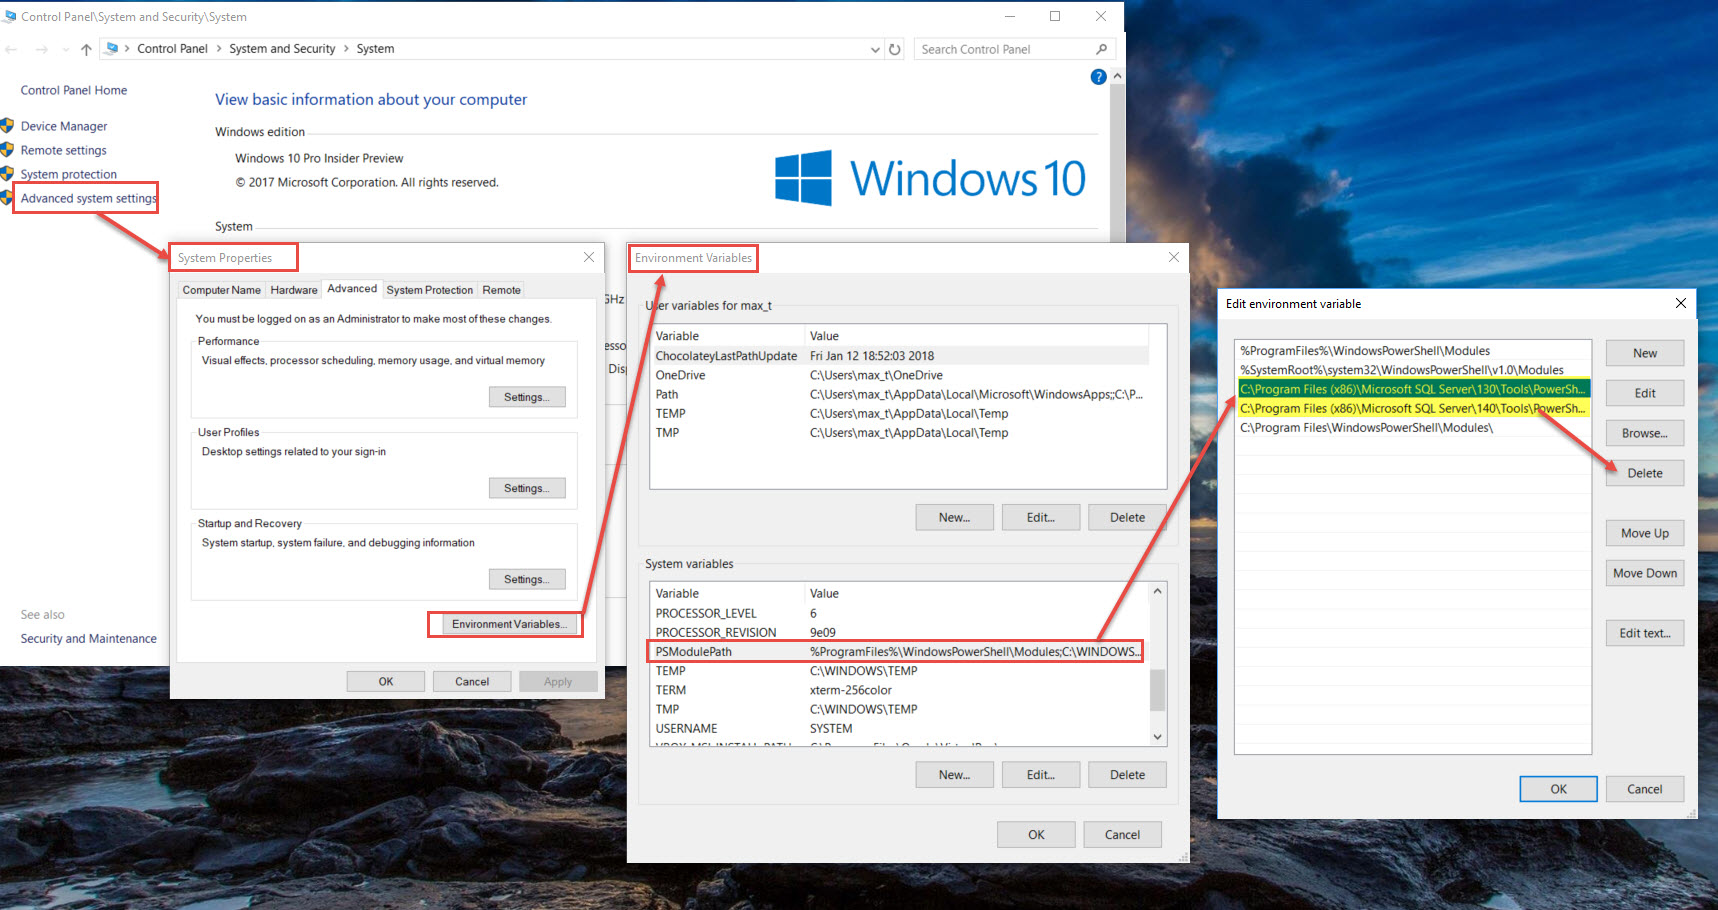
As is shown in the previous image, the variable $env:PSModulePath contains the path to the existing SQLPS module(s).

Either, remove the path manually using PowerShell, or thru the GUI System “Environment Variable“.

Or better yet, if you’re using SAPIEN Technologies, Inc. “PowerShell Studioproduct, the n use the Cache Editor feature to manage your existing PowerShell Modules. Check out the blog post and video about this feature at:
https://www.sapien.com/blog/2017/12/07/powershell-studio-feature-nugget-refreshing-local-cache-powershell-cmdlets-and-modules/

Video featuring PowerShell Studio Cache Editor

Option for PSCore

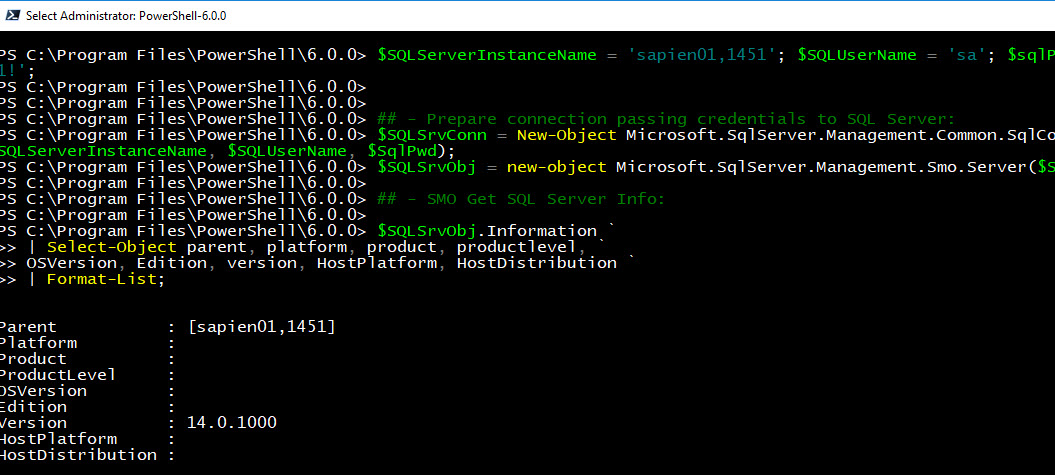
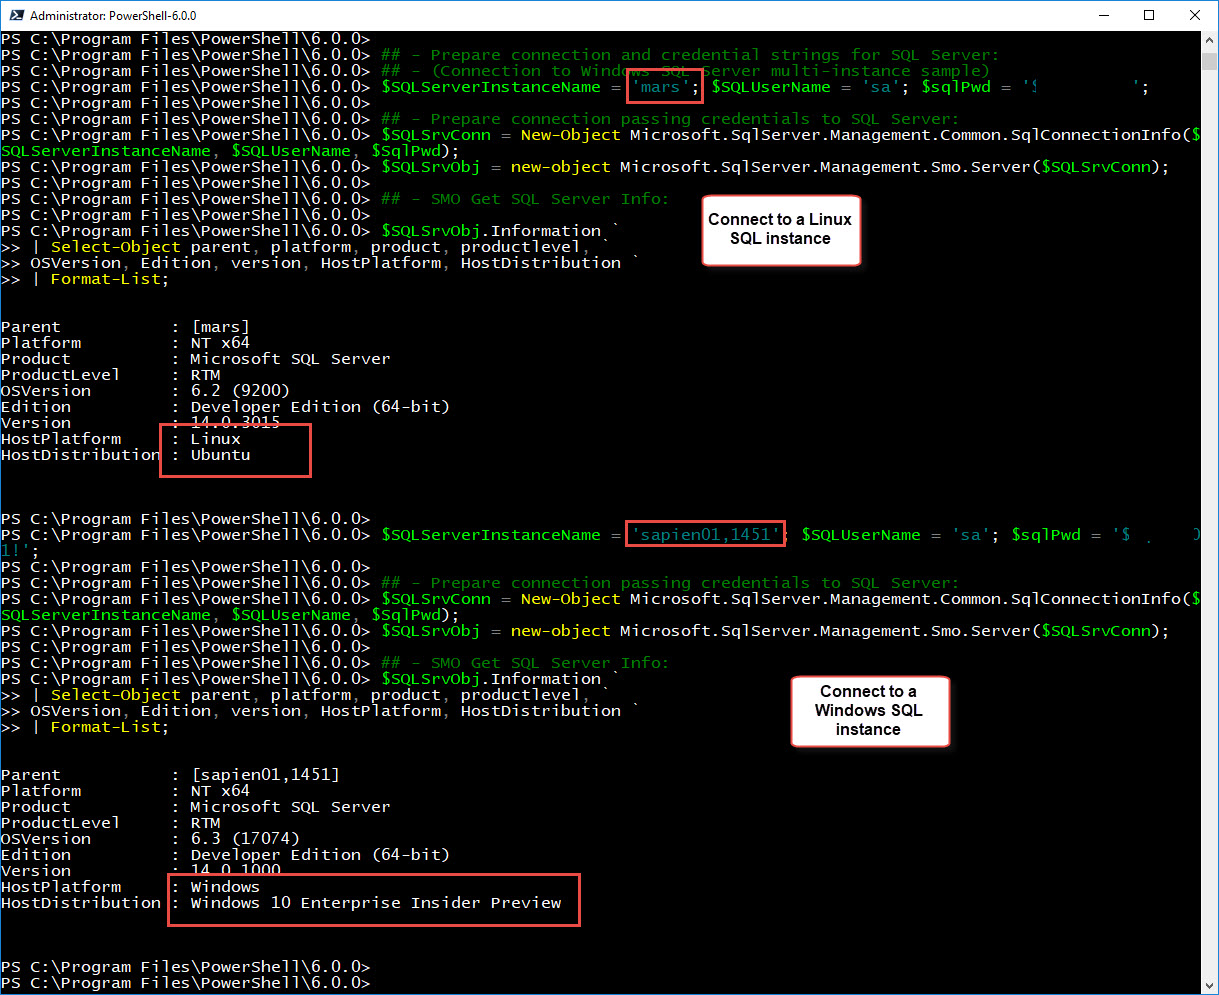
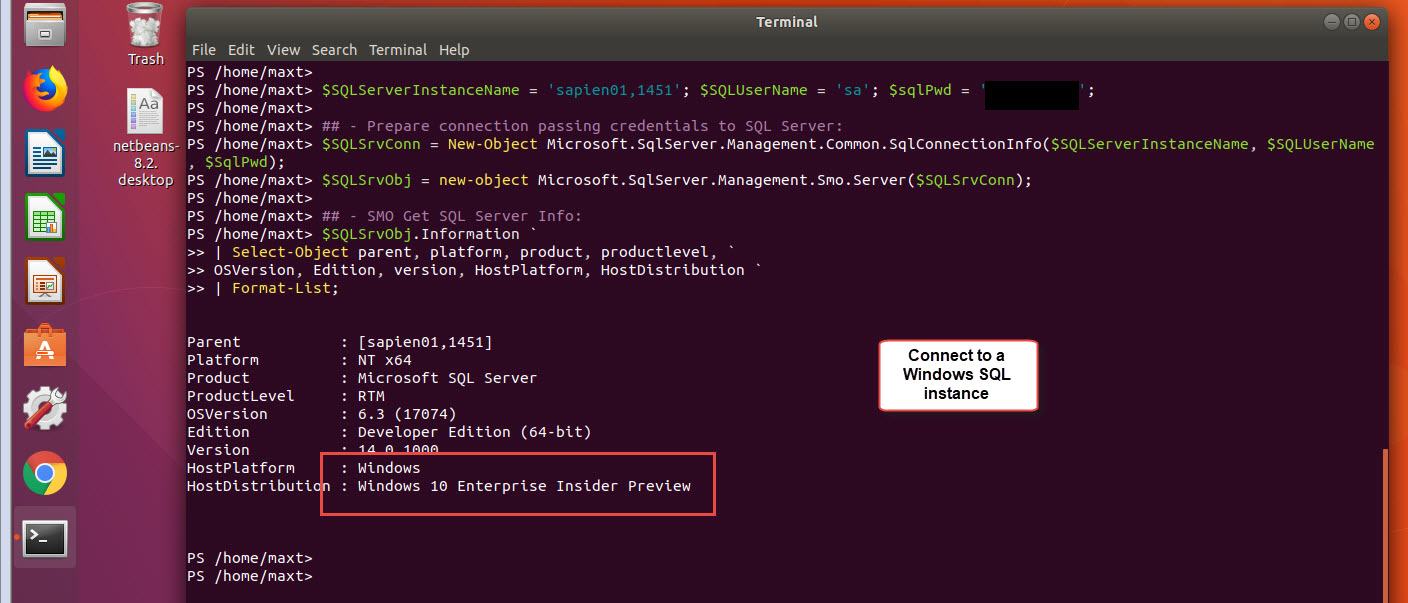
The only way to use PSCore6 to work with SQLServer cross-platform, is using the SMO (SQLServer Management Objects) for .NETCore, which is available in NuGet. For more information in how to install it, check my blog post at:
http://www.maxtblog.com/2017/11/streamlining-sql-server-management-objects-smo-in-powershell-core/

The only downside, you need to create the script from scratch. There’s plenty of documentation about SMO to overcome this hurdle. Most important, you are  sharpen your PowerShell scripting skills.

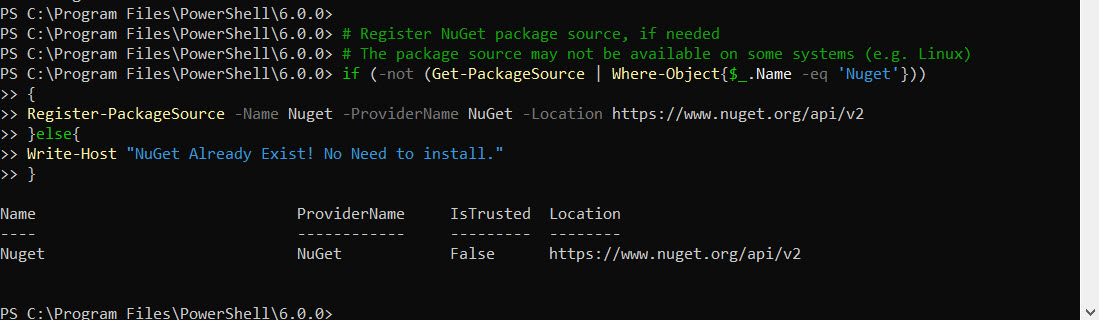
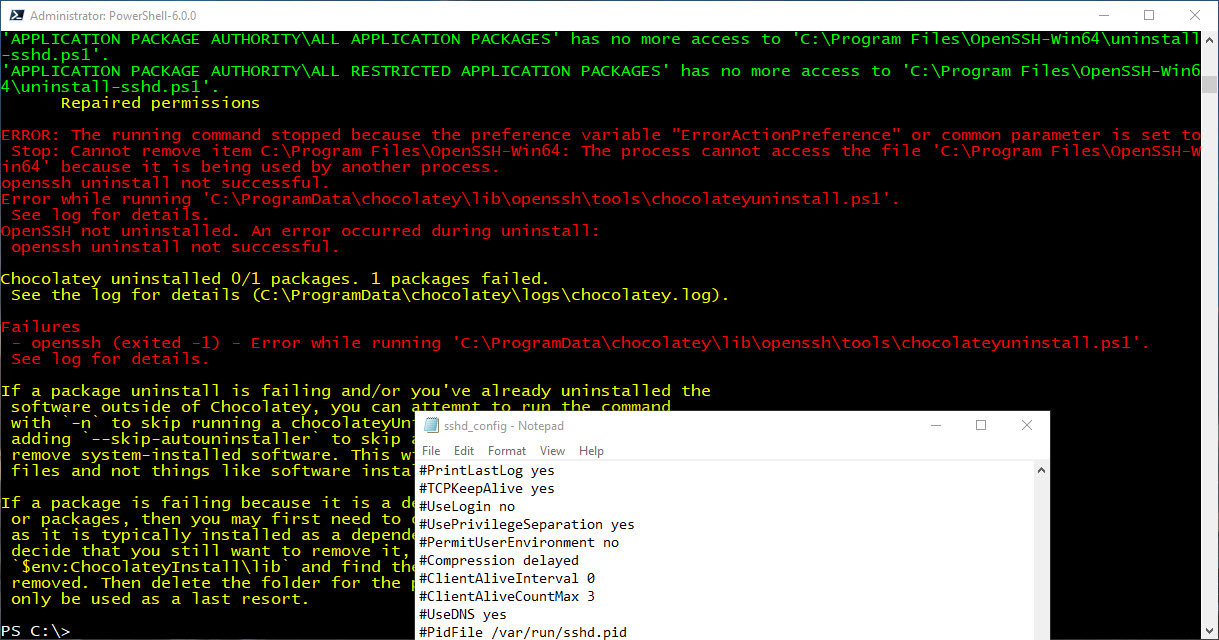
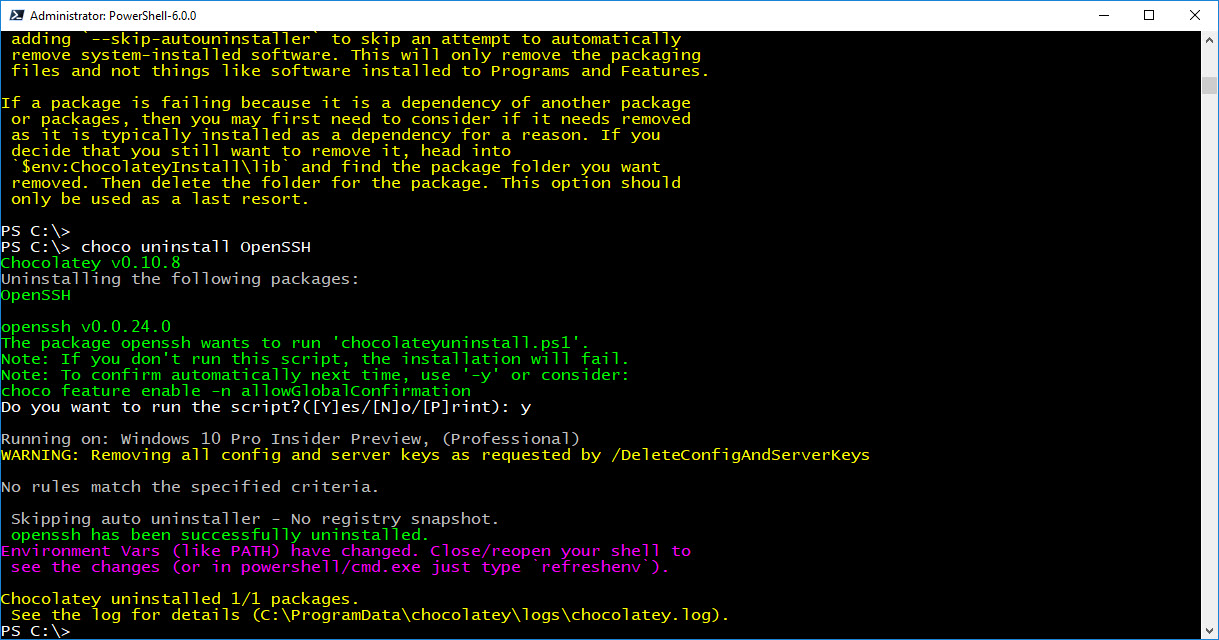
Don’t forget that before install any artifacts from PowerShell Gallery, NuGet, or Chocolatey the console shell need to be open “as an Administrator“.

Be Bold!! Learn PowerShell Core!!

PSCore6 – Version 6.0.1 is out of the oven!

Yes! Go and get while it still hot.  The Microsoft PowerShell Team is making it happen and they are not stopping.

Need to know more about the PSCore Roadmap, the check this link: https://blogs.msdn.microsoft.com/powershell/2018/01/24/powershell-core-6-1-roadmap/

Keep mind, that it always take few hour for some of the links to be update.  So, the quick way to download the latest version is to go directly to the “Release“page: https://github.com/PowerShell/PowerShell/releases

Then, select the OS version for PSCore.

While we await for Ubuntu (or other) Repositories gets the latest update, you can use the debian installation format after downloading the file :

sudo dpkg -i *.deb 

Don’t forget to always update the help documentation using “Update-Help -force” with Administrator privileges.

Also, notice that previously installed PowerShellGalley Modules remains installed.

Be Bold!! Learn PowerShell Core!!


PSCore6 – Nuget Microsoft.SqlServer.SqlManagementObjects latest Package (v140.17218.0) Broken

This is the SMO (SqlServer Management Objects) package use to create PSCore6 scripts to connect and manage SQL Server on Windows, Linux, and Azure.

But today, I found out the latest version “140.17218.0″ is broken. I had to rolled back to use an older version “140.17199.0” to get it to work again.

You can find the information about this package in this link:
https://www.nuget.org/packages/Microsoft.SqlServer.SqlManagementObjects

This NuGet SMO package version is built on .NETCore 2.0 for PSCore6, and will not install in Windows PowerShell.

Installing SMO Package

To *install the previous SMO package version “140.17199.0“, use the following command:

[sourcecode language=”powershell”]
Install-Package Microsoft.SqlServer.SqlManagementObjects -RequiredVersion ‘140.17199.0’

[/sourcecode]

*Note: Need to install as an Administrator.

If  the newer SMO version “140.17218.0” is installed then it will not connect. There are no errors, or failures displayed.  (See image)

This issue has been reported to NuGet SMO owners and hopefully will be resolved soon.

Testing SMO in PSCore6

Here’s the PSCore6 script for SMO testing. The script will work in both Windows and Linux.

[sourcecode language=”powershell”]
## – Help find and save the location of the SMO dll’s in a PowerShell variable:
$smopath = `
Join-Path ((Get-Package Microsoft.SqlServer.SqlManagementObjects).Source `
| Split-Path) (Join-Path lib netcoreapp2.0)

# Add types to load SMO Assemblies only:
Add-Type -Path (Join-Path $smopath Microsoft.SqlServer.Smo.dll)
Add-Type -Path (Join-Path $smopath Microsoft.SqlServer.ConnectionInfo.dll)

## – Prepare connection and credential strings for SQL Server:
## – (Connection to Windows SQL Server multi-instance sample)
$SQLServerInstanceName = ‘System01,1451’; $SQLUserName = ‘sa’; $sqlPwd = ‘$Mypwd01!’;

## – Turn ON below for Linux:
## – (Connection to Linux SQL Server multi-instance sample)
# $SQLServerInstanceName = ‘LinuxSystem02’; $SQLUserName = ‘sa’; $sqlPwd = ‘$Mypwd01!’;

## – Prepare connection passing credentials to SQL Server:
$SQLSrvConn = New-Object Microsoft.SqlServer.Management.Common.SqlConnectionInfo($SQLServerInstanceName, $SQLUserName, $SqlPwd);
$SQLSrvObj = new-object Microsoft.SqlServer.Management.Smo.Server($SQLSrvConn);

## – SMO Get SQL Server Info:
$SQLSrvObj.Information `
| Select-Object parent, platform, product, productlevel, `
OSVersion, Edition, version, HostPlatform, HostDistribution `
| Format-List;

## – End of Code

[/sourcecode]

Most Important

In order for this to work, NuGet needs to be installed first. The following *code block will help to check if it’s already installed. And, if not, then it will install NuGet in PSCore6.

[sourcecode language=”powershell”]
# Register NuGet package source, if needed
# The package source may not be available on some systems (e.g. Linux)
if (-not (Get-PackageSource | Where-Object{$_.Name -eq ‘Nuget’}))
{
Register-PackageSource -Name Nuget -ProviderName NuGet -Location https://www.nuget.org/api/v2
}else{
Write-Host "NuGet Already Exist! No Need to install."
}

[/sourcecode]

*Note: Thanks to the SMO guys for providing this code block to get me started testing.

Also, if you already installed the buggy NuGet SMO version, remember to use the following command to uninstall the package:

[sourcecode language=”powershell”]
uninstall-package Microsoft.SqlServer.SqlManagementObjects

[/sourcecode]

I’m hoping this blog post will help in any way.

Be Bold!! Learn PowerShell Core!!

Installing PowerShell Core in Server Core

In the following Virtual machine scenario, I got one Server Core with Active Directory (Build 16299) and Windows 10 (Build 16299) joined to my new domain. Both Build 16299.
On my Windows client I create a shared folder named “SharedFiles”, where I copy over the latest MSI version of PowerShell Core “PowerShell-6.0.0-win-x64.msi”.

Then, on the Server Core I’m going to create a map drive to my Windows client shared folder to then run the MSI installation from Windows PowerShell Console.

Install Steps

Here are the steps on Server Core Command Prompt:

1. Open Windows PowerShell:

[sourcecode language=”powershell”]
## – Start PowerShell:
PowerShell

[/sourcecode]

2. Map network drive to Windows Client shared folder, then change drive:

[sourcecode language=”powershell”]
## – Map network drive:
New-PSDrive -Name “m” -PSProvider “FileSystem” -Root “\\systemname\sharedfolder”;

## – Change to drive to “m:” and verify the MSI file is there:
m:
dir

[/sourcecode]

3. At the “m:” drive, execute the installation with the following command:

[sourcecode language=”powershell”]
## – Start installing PowerShell Core:
msiexec /i .\PowerShell-6.0.0-win-x64.msi /q

[/sourcecode]

4. As this is a silent installation, so give it a few minutes, then exit to the command prompt
[sourcecode language=”powershell”]
## – type “exit” to get back to the command prompt
exit

## – Change directory to PowerShell Core, and execute pwsh.exe:
cd “C:\Program Files\PowerShell\6.0.0”
pwsh

[/sourcecode]

Setting ExecutionPolicy and Update Help

It has become a routine that after first time openning Powershell, that we need to: 1) set the ExecutionPolicy, and update the help documentation:

So, setting the execution policy, pick the one you need. The most common ones are: “RemoteSigned”, “ByPass”, “AllSigned”, “Unrestricted”.

[sourcecode language=”powershell”]
## – Example setting ExecutionPolicy as “RemoteSigned”
Set-ExecutionPolicy -ExecutionPolicy “RemoteSigned”;

[/sourcecode]

Then, its very important to update the help documentation. I had the tendency to always include to parameter “-Force“:

[sourcecode language=”powershell”]
## – Updating Help documentation:
Update-Help -Force

[/sourcecode]

And, you’re ready to work with PowerShell Core on Server Core.

Oh! How to uninstall PowerShell Core

Let go a little further. Here are the steps to successfully uninstall PowerShell Core on Server Core.
Open Windows PowerShell, make a list of all installed products using Get-WMIObject command:

[sourcecode language=”powershell”]
## – Listing installed products
get-wmiobject Win32_Product `
Select IdentifyingNumber, Name, LocalPackage `
| Format-Table -AutoSize;

[/sourcecode]

This will confirmed PowerShell Core is installed. Pay close attention to the “IdentifyingNumber” property which is really the product GUID.

Now, we can proceed to uninstall PowerShell Core. There are two way to execute a product MSI uninstall:

1. Providing the installation path with filename:

[sourcecode language=”powershell”]
## – Executing Uninstall MSI silently and write to log file: (Using filename)
msiexec.exe /x “c:\filename.msi” /qn /lv “C:\msilogfile.log”

[/sourcecode]

2. Using the IdentifyingNumber (Product GUID) listed when executing the Get-WMIObject:

[sourcecode language=”powershell”]
## – Executing Uninstall MSI silently and write to log file: (Using Product GUID)
msiexec.exe /x ‘{11111111-1111-1111-1111-11111111111X}’dir /qn /lv “C:\msilogfile.log”

[/sourcecode]

Image below doing MSI uninstall using GUID:

Both examples, include the use to write to a log file “C:\msilogfile.log“, along with the necessary switches to uninstall and execute silently. (Above switches are lowercase)

Additional Information

Check the following links on:

1. Installing MSI files with PowerShell: https://kevinmarquette.github.io/2016-10-21-powershell-installing-msi-files/

2. Report or check any issues with PowerShell Core: https://github.com/PowerShell/PowerShell/issues

3. PowerShell Core Reach GA (Generally Available) status: https://blogs.msdn.microsoft.com/powershell/2018/01/10/powershell-core-6-0-generally-available-ga-and-supported/

Be Bold!! Learn PowerShell Core!!

PSCore 6.0.0 – Upgrading/Uninstalling OpenSSH in Windows

This is all done with Chocolatey Package Manager for Windows. The following commands are important to know:

1. Information about the package:
choco info OpenSSH

2. Upgrade installed package:
choco upgrade OpenSSH

3. Remove installed package:
choco uninstall OpenSSH

4. Seach for a package:
choco search OpenSSH

Now, this is very important to know as these packages gets update without any notice and avoiding upgrades could impact the system.

As of the writing of this post, the latest version of Win32 OpenSSH is v0.0.24.0.

[sourcecode language=”powershell”]
## – Chocolatey package information command:
choco info OpenSSH

[/sourcecode]

Keep in mind, all these steps need to be executed with administrator privileges.

Upgrading Win32 OpenSSH

The upgrade process should be enough to get the package to the latest build. Now, I notice my latest upgrade step, I found files that shouldn’t be in the folder.

[sourcecode language=”powershell”]
## – Chocolatey upgrade package command:
choco upgrade OpenSSH

[/sourcecode]

So, take the time to verify and confirm everything is installed as expected. Don’t forget to document and/or save any file, such as: sshd_config.

Uninstalling/Installing Win32 OpenSSH

In the other hand, it doesn’t hurt to uninstall everything, check there are no files left in the folder, and that event the folder was removed. In other words, a clean installation will be perfect.

Before uninstalling, I would recommend a few extra steps, such as:

1. Stop SSH services: sshd and ssh-agent

[sourcecode language=”powershell”]
## – Stopping SSH Services:
Stop-Service sshd
Stop-Service ssh-agent

[/sourcecode]

2. Proceed to uninstall SSH services and change directory:

[sourcecode language=”powershell”]
## – Execute uninstall ssh services script from the OpenSSH folder:
.\uninstall-sshd.ps1
cd c:\
[/sourcecode]

3. Before, doing the uninstall step, make sure there are no process using OpenSSH that may have open file(s).

[sourcecode language=”powershell”]
## – Execute uninstall command:
choco uninstall OpenSSH

[/sourcecode]


Sample of the uninstall error due to an open file:

In this case, just rerun the uninstall step. The goal is to have everything removed including folders.

Now, you’re ready to do a clean installation of Win32 OpenSSH.
Please refer to the following blog post which I have recently added few thing I missed last time: http://www.maxtblog.com/2017/12/powershell-core-updated-setup-openssh-in-windows-and-linux/

For information about Chocolatey The package manager for Windows:
https://chocolatey.org/

Be Bold!! Learn PowerShell Core!!

Welcome PowerShell Core 6.0.0 GA

Yes! Today the Microsoft PowerShell Team with the help of the community has made PowerShell CoreGenerally Available” and “Supported“. Feel free to read their blog post at:
https://blogs.msdn.microsoft.com/powershell/2018/01/10/powershell-core-6-0-generally-available-ga-and-supported/

Get It Now

Of course, there are little housekeeping to do, such as download links still pointing to the older version. But, while they fix the links, you go straight to the “Release” page to individually download the file: https://github.com/PowerShell/PowerShell/releases

Also, on the Linux distribution side, I found out that the auto upgrade stop working. So the following steps will help you install PowerShell Core 6.0.0 in Linux Ubuntu found in the Github “How To Install” link.

Ubuntu Power

Windows 10 WSL

If you have Windows 10 WSL (Ubuntu) install use the same instruction for Ubuntu 16.04:

[sourcecode language=”bash”]
# Import the public repository GPG keys
curl https://packages.microsoft.com/keys/microsoft.asc | sudo apt-key add –

# Register the Microsoft Ubuntu repository
curl https://packages.microsoft.com/config/ubuntu/16.04/prod.list | sudo tee /etc/apt/sources.list.d/microsoft.list

# Update the list of products
sudo apt-get update

# Install PowerShell
sudo apt-get install -y powershell

# Start PowerShell
pwsh

[/sourcecode]

So, in either Windows or Linux, must important is to remove/uninstall the previous version. Then, install PowerShell Core 6.0.0.

Remember

Please file any PowerShell Core issues (not Windows PowerShell) in Github at: https://github.com/PowerShell/PowerShell/issues

So, in order to properly address any Windows PowerShell issues, has to be reported on UserVoice at: https://windowsserver.uservoice.com/forums/301869-powershell

As stated in the landing page under “Windows PowerShell vs PowerShell Core” section.

Follow PowerShell Core in Tweeter using #PSCore6 tag.

Simple way to get AzureRM VM Status

This is one of the beauty of PowerShell as you can always find the way simplify your code. In the case of getting the AzureRM virtual machine status using the Get-AzureRMVM cmdlet, everyone has been a little misleaded. It seems at that this command won’t give you the VM status unless you use the ‘-Status‘ parameter.

So, if you don’t use this parameter it won’t display the “PowerState” property, which in fact is the “Status” we all are looking for.

Simplicity

In order to properly display the status of any VM in Azure using AzureRM Get-AzureRMVM cmdlet, then use the following one-liner to do it:

[sourcecode language=”powershell”]
## – Display Status of existing VM’s:
get-AzureRmVM -ResourceGroupName azResourceEast01 -Status `
| Select-Object Name, PowerState;

## – Or, change the Property Label from “PowerState” to “Status”:
get-AzureRmVM -ResourceGroupName azResourceEast01 -status `
| Select-Object Name, @{ label = “Status”; Expression = { $_.PowerState } };

[/sourcecode]

Of course, this will also work in PowerShell Core. (The sample posted is showing Windows 10 Ubuntu)

Additional Information

The following AzureRM versions can be installed from the PowerShell Gallery:

1. For Windows PowerShell: AzureRM Version 5.1.1
2. For PowerShell Core (Windows, Linux,…): AzureRM.Netcore Version 0.9.1

Keep in mind, when installing PowerShell Modules from PowerShell Gallery in Linux need administrator permissions. Open PowerShell using “sudo pwsh“, then proceed to execute “Install-Module AzureRM.Netcore” one-liner.

Then, connect to Azure and execute the command. (Previously shown)