More Discover PowerShell – How about Help with PowerShell Variables?

Finally got this last function working in order and created a new module: “DiscoverPowershell” with all three Show-Help* functions:

1. Show-HelpPowerShellCommand – Meant to select one module at the time and then multiple commands.
2. Show-HelpAboutPowerShellTopic – Multi-select can be applied.
3. Show-HelpPowerShellObject (New) – Multi-select can be applied.
Check out the first two functions on my previous blog.

In the module I tweak is just a little bit but the functionality stay the same. Basically, you can select multiple Item(s) in the Out-Gridview and display the results.

Here’s the link to download and install the module folder “DiscoverPowerShell“: https://onedrive.live.com/redir?resid=7FD7082276C66197!30947&authkey=!AKkr99vUvdqDKCw&ithint=file%2c.zip

*Note: Module requirements: PowerShell V4 (or greater) on Windows 7, Windows 8.1 and Windows 2012 R2.

Here’s the third function: Show-HelpPowerShellObject

[sourcecode language=”powershell”]
function Show-HelpPowerShellObject
{
<#
.SYNOPSIS
Function to list all PowerShell Variable objects in your current session.

.DESCRIPTION
This function will display in the ‘Out-Gridview’ a list of all PowerShell Variable objects in your
session. Press the Crtl-Key and select the PowerShell variable you want to Display information.

.PARAMETER No Parameter(s) required.

.EXAMPLE
Show-HelpPowerShellObject
#>

[CmdletBinding()]
Param ()

[Array] $selItem = $null; [Array] $myObj = $null;
While ($selItem -eq $null)
{
$selItem = Get-Variable `
| Select name, @{ Label = ‘objectType’; Expression = { $_.GetType(); } }, value `
| Sort-Object Name | Out-GridView -PassThru -Title "Select the PSVariable Object";
If ($selItem -eq $null) { break };
[Array] $myObj = $null;
ForEach ($myObj in $selItem.Name)
{
((get-variable $myObj).Value) | get-member `
| Out-GridView -Title (‘Displaying Selected PSObject – $’ + "$myObj");
};
If ($myObj -eq $null) { break };
$selItem = $null;
}
};
[/sourcecode]

Copy/Paste code
Copy/Paste code
Multi-select items
Multi-select items
Selected items displayed and back to list

It’s all about having fun with PowerShell!!

Nice DOTNETZIP Integration with PowerShell

Let me share a script I built two years ago, and I just created a function for it named “New-ZipFile“. Basically, this PowerShell function script will create a blank zipped file and copy the files to it. At the same time if you run it again (after updating an existing file) will overwrite the file any existing files previously on the existing zipfile. Also, there’s no prompt.

This is an example of what PowerShell can provide at an excellent tool for providing creative solutions. Also the community is very active is helping everyone.

I agree that sometime is not easy but definitely not impossible. And there’s lots of other possible good alternative. But, using PowerShell let you customized your solution with an opportunity for enhancements giving you some level of control over what you want to accomplish.

I’m using the DOTNETZIP from Codeplex for this example. By the way, they provide good documentation on how to use the API’s. (hint: copy all the “Tools” folder to “Program Files (x86)\DotNetZip\..” folder)

You can download DOTNETZIP at the following link: http://dotnetzip.codeplex.com/

Here’s the sample script. Just change the variables values to your need, and make it your own:

[sourcecode language=”powershell”]
## – Beginning of Script:
Function New-ZipFile{
PARAM
(
[String] $SrcFolder,
[String] $DestFolder,
[string] $DestZipName,
[String] $FileExtToZip,
[string] $ZipPurpose,
[string] $StoredInZipFolder,
[string] $DeleteFiles = $null
)
#$TodaysDate = Get-Date -uformat "%Y-%m-%d-%Hh%Mm%Ss.zip";
#$ZipFileName = $ZipPurpose + "_" +$DestZipName + "_" + $TodaysDate;
$ZipFileName = $ZipPurpose + "_" +$DestZipName + ".zip";

if (Test-Path $DestFolder){
## – Create Zip file or it won’t work:
if (Test-Path ($DestFolder+"\"+$ZipFileName)) { del ($DestFolder+"\"+$ZipFileName) }
new-item ($DestFolder+"\"+$ZipFileName) -ItemType File
}
else
{
Write-Host "Destination Folder [$DestFolder] doesn’t exist" -ForegroundColor ‘Yellow’;
Break;
};

## – Loads the Ionic.Zip assembly:
[System.Reflection.Assembly]::LoadFrom("C:\Program Files (x86)\DotNetZip\Ionic.Zip.dll") |

out-null;
$zipfile = new-object Ionic.Zip.ZipFile

## – AddSelectedFiles with source folder path:
## – ($false grab files in source folder) & ($true grab files & subfolder files)
$zipfile.AddSelectedfiles($FileExtToZip,$SrcFolder,$true) | Out-Null;
## – UseZip64WhenSaving, when needed, will create a temp file compress large number of files:
$Zipfile.UseZip64WhenSaving = ‘AsNecessary’
$zipfile.Save($DestFolder+"\"+$ZipFileName)
$zipfile.Dispose()

If ($DeleteFiles.ToUpper() -eq ‘YES’){
## – Remove all backed up files:
Write-Host "Deleting files after zip!";
get-childitem ($SrcFolder+"\"+$FileExtToZip) | remove-item
}
};

### – variables:
$DestZipName = "BackupMyTempSSIS";
$FileExtToZip = "name = *.*";
$DestFolder = "C:\MyBackupZipFolder";
$SrcFolder = "C:\TempSSIS";
$DeleteFiles = $null;
$StoredInZipFolder = "MyBackupZip\";
$ZipPurpose = "BackUp";
#or $ZipPurpose = "Save";

New-ZipFile -DeleteFiles $DeleteFiles `
-DestFolder $DestFolder -DestZipName $DestZipName `
-FileExtToZip $FileExtToZip -SrcFolder $SrcFolder `
-StoredInZipFolder $StoredInZipFolder -ZipPurpose $ZipPurpose;

## – End of Script
[/sourcecode]

This is about having flexibility over what you want to do.  This is a good example how you can use an existing API with PowerShell.  As long there’s good API documentation then the rest just follows thru.

DotNETzip_APIDoc

In the above sample script you can have is Scheduled in either Task Scheduler or in SQL Server Agent. This code becomes portable.

This script the folder for the zipped file most exist or it will display a message that the folder doesn’t exist, and has the ability to delete the files after its done. (feel free to modify)

I hope you’ll find it useful!

Maximo Trinidad (MVP – Windows PowerShell)
Mr. PowerShell

QuickBlog: PowerShell Working with Windows Azure

As I venture into the realm of learning some PowerShell Automation in Windows Azure, its interesting the things you learn by just trying things out.  On my previuos blogs I mention, in order to use PowerShell, you need to create and install the certificate in the portal.  After that, you can use following commands to connect to Azure:

1. Import-Module Azure (*Optional – Autoload module is already set to “On”)
2. Set-AzureSubscription
3. Select-AzureSubscription

*Note: The ‘Import-Module Azure’ is more of a habit to do it.  Powershell 3.0/4.0 will search and automatically load a module the first time the cmdlet is been executed.

I just realized, after the Certificates Keys are installed in Azure, then you don’t need to execute the above commands Set-AzureSubscription and Select-AzureSubscription everytime I open the PowerShell Console.  Yes! I can start typing away and work with Azure commands.

Just try it!  If you already loaded the certificate keys, then Open a PowerShell console session and type “Get-AzureVMimage” to display the list of available Azure VM images:

WindowsAzrureValidAccess

If there’s no certificates installed, the you’ll get the following message: (on another PC)

WindowsAzureInvalidAccess

So that you know, when working with Windows Azure SQL Database Server(s), you don’t need to set up a Storage (Container) Account nor a Azure Cloud Service. Definitely you will need them when working with Windows Azure VM’s.

Next, I will be blogging on “PowerShell working with Windows Azure VM’s”.

That’s it for now,

Maximo Trinidad (MVP Windows PowerShell)
AKA Mr. PowerShell

Trap missing IP Address for SQL Database Server Firewall Rule

As I work on my second blog piece for the “Getting Ready with Windows Azure SQL Database Server PowerShell and SMO Part – 2/2“, I came up with a way to trap the current IP Address with PowerShell scripting.  When using the Portal for creating your SQL Database Server, it will ask you if you want to create the Firewall rule for you.  But you may want to automate this step using PowerShell and there’s no cmdlet to identify  the “current” IP Address of your Windows Azure connection.

Here’s an example of how the Portal message when is asking for the current IP Address to be added to the Firewall rules:

WindowsAzure2SQLdb

WindowsAzureMissingIPrule

I’m going right to the point with this small blog piece.  Basically,  I’m trapping the error message from the “New-AzureSqlDatabaseServerContext” which will fail to connect to your Azure SQL Database. Then, I’m dissecting the string to get the IP Address in error.  This is my way of trapping the IP address.  I know there might be a better way but for now it works.

I’m assuming the connection to Windows Azure has already been established and you are trying to use the “New-AzureSqlDatabaseServerContext” for connecting to the database.  If you haven’t created the rule then it won’t connect.

Note: Again, stay tuned for the next “Windows Azure SQL Database Server with PowerShell and SMO” blog part 2/2.

In the “New-AzureSqlDatabaseServerContext” I’m including the following two parameters: -ErrorAction ‘SilentlyContinue’ and -ErrorVariable errConn.  The “ErrorAction” results in not displaying the message.  The “ErrorVariable” define the PowerShell variable you will be storing the error message.  Notice the “ErrorVariable” name doesn’t include a “$” but its needed to view it (ie. $errConn).

[sourcecode language=”powershell”]
## – Storing error value:
$azConn = New-AzureSqlDatabaseServerContext  `
-ServerName $azServerName -Credential $azCredential `
-ErrorAction ‘SilentlyContinue’ -ErrorVariable errConn;
[/sourcecode]

The additional script code shown next will dissect the error message string from $errConn variable. It will take the string to create an array which will help identify the element position where the IP Address is stored.  In this case I’m assuming the error message will not change so the IP Address will always be located in the same place (Right!).  So the first time this code execute, it will find the IP Address in element #18.

Note: Please run first the code to identify the element position in case the “Culture” settings might change the location of the IP Address.

[sourcecode language=”powershell”]
## – Extract information from the ErrorVariable:
$getIPforFW = ([string] $ErrConn[0]).split(" ‘");

## – Display all variable stored in the array and identify where the IP address is stored:
$global:x = 0;
$getIPforFW | Select-Object @{label=’element’;Expression={"[$($Global:x)]"; $Global:x++}}, `
@{label = ‘Array’;Expression={[string] $($_);}};

## – Run once to confirm IP value is stored in element #18:
$getIPforFW[18].Trim();
[/sourcecode]

TrappingIPfromError

The rest is easy.  After extracting the IP value then you can use the “New-AzureSqlDatabaseServerFirewallRule” to create the firewall rule to include the current IP Address.

[sourcecode language=”powershell”]
## – Get current IP and added it to the SQL Database Firewall Rule:
New-AzureSqlDatabaseServerFirewallRule `
-ServerName "YourServerName" -RuleName "YourClientIPAddressRule" `
-StartIPAddress $getIPforFW[18].Trim() -EndIPAddress $getIPforFW[18].Trim();
[/sourcecode]

CreateFilewallfromIPfound

You can refine this script code to suit your need.  Just make sure to test a few times and verify you are getting the results you need.

Here’s a few more commands you could use to work with these rules.  The “Remove-AzureSqlDatabaseServerFirewallRule” to remove any existing rule(s) and the “Get-AzureSqlDatabaseServerFirewallRule” to list them all.

[sourcecode language=”powershell”]
## – List all your SQL Database Firewall Rules:
Get-AzureSqlDatabaseServerFirewallRule -ServerName "YourServerName";

## – Removing existing SQL Database Firewall Rule:
Remove-AzureSqlDatabaseServerFirewallRule `
-ServerName "YourServerName" -RuleName "YourClientIPAddressRule"";
[/sourcecode]

So, at the end, you will have the ability to automate the process without the need of using the Portal.  Most can be done using PowerShell scripting.

Stay tuned for more Windows Azure SQL Database Server.

That’s it for now!

Maximo Trinidad
Mr. PowerShell
🙂

Getting Ready with “Windows Azure SQL Database Server” PowerShell and SMO Part – 1/2

But before we start using PowerShell with “Windows Azure SQL Database Server” there a few more steps we need to be completed after you have started your subscription:

  1. Installing the most recent Windows PowerShell Azure module
  2. Rename Subscription name (Optional)
  3. Create the Certificate Key

These three items are important before connecting Windows Azure.  Then, will be using 3 PowerShell Azure cmdlets to connect to your subscription.

WindowsAzurePortal

Installing the recent PowerShell Azure module

I recently finish updating my new Windows 8.1 (booth-VHD) and loaded all my tools. So when I started to install Windows Azure PowerShell, I was expecting it won’t work with PowerShell 4.0.  Well, Good Job Microsoft!  It did installed and I got my Windows Azure PowerShell working with PowerShell 4.0.

The latest revision, dated July 31st 2013, will let you install Windows Azure PowerShell on you Windows 8.1 preview. This is exciting Good News.  A couple of months ago I try it on my Windows 8 but the installation failed because of PowerShell 3.0.

Before you start working with your Windows Azure subscription(s) with PowerShell, you need to download the most recent “Windows Azure PowerShell – July 31, 2013 edition”.  At the same time you may want to pick the “Windows Azure SDK for .NET”.  Go to the following link: http://www.windowsazure.com/EN-US/downloads/?sdk=net

Rename Subscription name

For renaming your subscription is better to use the Portal.  It make sense to change your subscription name from “Windows Azure MSDN – Visual Studio xxxxx” to something meaningful like, for example: “MyWindowsAzureSubscription30DaysLimit“.

Note: It is not required to change the subscription name.

If you want to change the name then there’s two ways to do it. Go to the Windows Azure main page and Click on “Account”: https://www.windowsazure.com/en-us/

WindowsAzureGoAcct

Or, at the Portal you can change it by clicking on the UserID, then “View my bill”.  This  will require to login again.

WindowsAzurePortalAcct

Finally, click on the “Edit subscription details” to change the name.

WindowsAzureAccessSubst

WindowsAzureEditSubst

WindowsAzureRenameSubst

For more information on the following link:

Creating the Certificate Key

Next, to create the Certificate key or you won’t be able to use PowerShell to connect to your Windows Azure. This is mandatory as is part of your Azure credentials.  You can find documentation on this topic at following links:

Tip: You need to have installed You could use Visual Studio in order to run the “Makecert.exe” command from the Visual Studio command shell. Or, download the “Windows Software Development Kit (SDK) for Windows 8” to get the “Makecert.exe”.

After creating the certificate key use PowerShell (non-Azure) commands to check its properties.  Here’s an example script lines to look at your existing Certificate keys:

Get-ChildItem cert:\\CurrentUser\My;

Or, to display more information:

Get-ChildItem cert:\\CurrentUser\My | Format-List;

PowerShellCertKey2

Finally, we need to upload the certificate key to Windows Azure.  On the Portal, go to the “Setting” option and add the Certificate key. Follow the screenshots:

WindowsAzureAddCertKey

WindowsAzureUpCert2

Now everything is set to use PowerShell with Windows Azure. There’s no need (for now) to use the Portal web GUI.

PowerShell connecting to Windows Azure

In the following script need to include the Certificate key information as this is part of the Windows Azure credential to connect to your subscription. This is why using the previously shown “Get-ChildItem cert:\\CurrentUser\My | Format-List;” one-liner help you understand about the Certificate(s) in your system.

First, need to prepare the Certificate key use in Windows Azure:

PSCercode

Here’s the list of the 3 Azure commands to connect to your Windows Azure:

PSAzureConnect

Note: Import-Module Azure is optional if working with PowerShell 3.0 or 4.0.

After verifying connectivity to Windows Azure was successful then we can process to build VM’s, SQL Databases, and more using PowerShell.

In my next blog I will be showing how to use PowerShell Azure commands to build a Windows Azure SQL Database, and use SMO with it.

QuickBlog – PowerShell function to get system last bootup time.

Here’s a simple function that will get your system last bootup time.  Also, notice that I’m using the ‘-ErrorVariable ‘ parameter wth a given variable name ‘MyError‘ to trap any error messages during the execution of the ‘Get-WMIobject’ command.  That the same time I’m including the ‘-ErrorAction SilentlyContinue‘ so my function won’t abort while executing.

For the only argument needed in this function, I’m validating that the passing argument is not null (or empty).  Then, to build my result I’m using the scriptblocks to customized the results to be displayed on screen.

At the end, I’m collecting all thre information into the ‘$SvrRebooted‘ variable so it can be diaplayed when done.

[sourcecode language=”powershell”]
function Get-SystemLastBootUpTime{
Param(
[Parameter(Mandatory=$True, Position=0)][ValidateScript({$_ -ne $null})] [Array] $ComputerName
)
[Array] $SvrRebooted = $null;

$SvrRebooted = foreach($name in $ComputerName)
{
$x = get-wmiObject -Class Win32_OperatingSystem -Computername $name `
-ErrorAction ‘SilentlyContinue’ -ErrorVariable MyError;

if($($MyError | Select exception) -eq $Null)
{
$x | Select-Object `
@{Label = ‘ComputerName’; Expression = {$_.csname}}, `
@{Label = ‘Operating System’; Expression = {[string] (($_.Name).Split(‘|’)[0]);}}, `
@{Label = ‘MyLastBootUpTime’; Expression = {$_.ConvertToDateTime($_.LastBootUpTime)};}, `
@{Label = ‘Status’; Expression = {"Success"}};
}
else
{
$name | Select-Object `
@{Label = ‘ComputerName’; Expression = {$name}}, `
@{Label = ‘Operating System’; Expression = {$null}}, `
@{Label = ‘MyLastBootUpTime’; Expression = {$null}}, `
@{Label = ‘Status’; Expression = {‘Failed – ‘ `
+([string]([string] $MyError[0]).split("`n")).split("(E")[0];}};
};
};

$SvrRebooted;
};
[/sourcecode]

This function builds an array object.  Then you can use the ‘Format-Table‘ or the ‘Format-List‘ at your discretion. To execute the ‘Get-SystemLastBootUpTime’ function look at the following one-liners:

[sourcecode language=”powershell”]
## – Running the function:
[array] $svrList = @("Server1","Desktop2");
Get-SystemLastBootUpTime -ComputerName $svrList | Format-Table -AutoSize;
## – or
Get-SystemLastBootUpTime -ComputerName $svrList | Format-List;
[/sourcecode]

Enjoy!

Palm Beach IT User Group – “PowerShell for the Administrator – All About The Language”

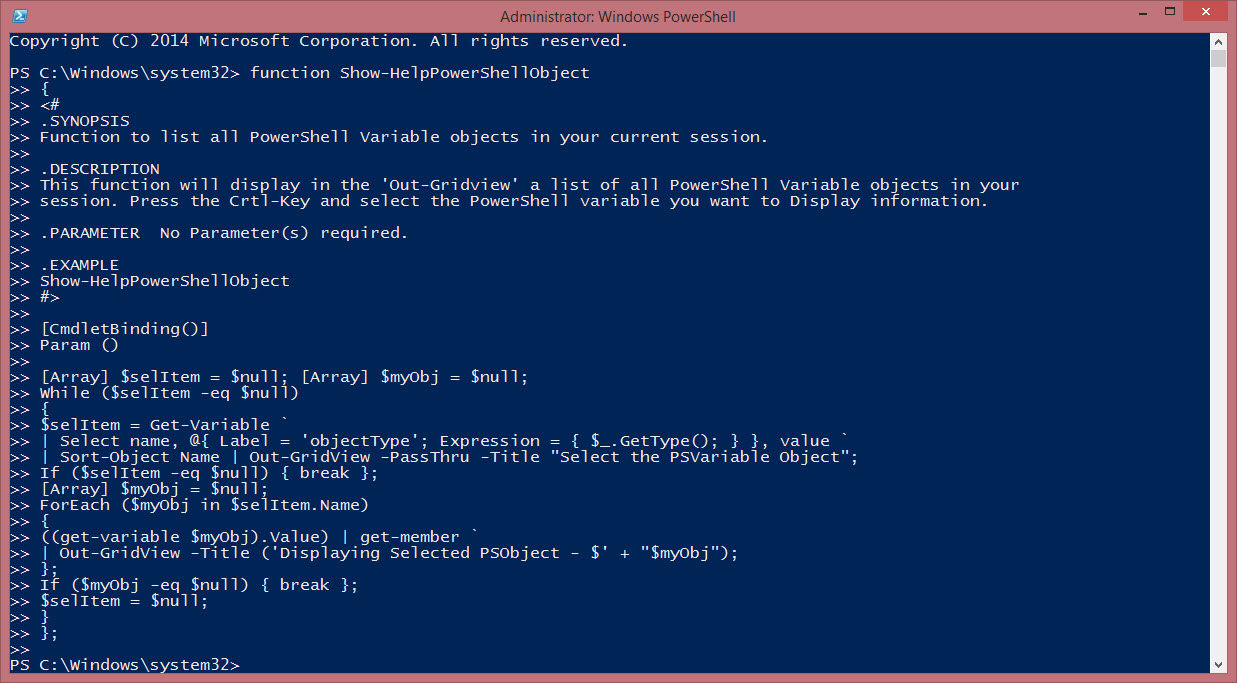
Thank once again to the Palm Beach IT User Group for having my presenting live my session “PowerShell for the Administrator – All About The Language” on May 14th evening.   http://itportalregulus.blogspot.com/

The group had the opportunity to see the evolution from a single one-liner command, to a script file, a function, and a brief taste to a module.  Also, the scripts supplied has an abundant of code snippets that can be reused.

Also, giving example of reusing and modifying a community script (Thx, Jefferey Hicks for his contributions) so you can make it your own.

Here’s some reference links: http://jdhitsolutions.com/blog/2012/02/create-html-bar-charts-from-powershell/ and http://jdhitsolutions.com/blog/2011/12/friday-fun-drive-usage-console-graph/

Special Thanks to Sapien Technology for providing some books to giveaway and to Plurasight for the free one month online subscription.

Here’s the end result.  A function that check the machine disk space, build an HTML file with a graph and send an email thru your live.com SMTP server.

[sourcecode language=”powershell”]
function Get-DiskUsageHTMLGraph{
Param(
[array] $ComputerNames,
[string] $ReportPath = "c:\Temp\HTML_DiskSpace.html",
[boolean] $ViewReport,
[boolean] $SendEmail,
[Array] $SendTo
)

## – Set variable (no function):
$htmlTitle=’Server Drive(s) Report’

## – Configuring the HTML CSS Style sheet for the HTML code: (#FFFFCC)
## – When using Here-String/Splatting you must begin in the first position.
## – The use of Tab is invalid.
$head = @"

$($htmlTitle)

"@

## – Define the HTML Fragments as an Array type, add the header and title object:
[Array] $HTMLfragments = $null; $HTMLfragments += $head;
$HTMLfragments+="</pre>
<h1>Server Disk Space</h1>
<pre>

";

## – Build WMI Disk information object and group results by ComputerNames:
$SystemNames = get-wmiobject -Class Win32_logicaldisk -computer $ComputerNames `
| Group-Object -Property SystemName;

## – This is the graph character code:
[string] $gCode = [char] 9608;

## – Loop through each computer object found and create html fragments:
ForEach ($System in $SystemNames)
{
## – Get the System name:
$HTMLfragments+="</pre>
<h2>$($System.Name)</h2>
<pre>
"

## – Create an html fragment for each system found:
$html = $System.group `
| Where-Object {$_.DriveType -notmatch ‘5|2′} | Sort-Object -Property Name `
| Select-Object `
SystemName, @{Label = "DriveID";Expression={$_.Name}}, `
VolumeName, FileSystem, DriveType, `
@{Label="DiskSizeGB";Expression={"{0:N}" -f ($_.Size/1GB) -as [float]}}, `
@{Label="FreeSpaceGB";Expression={"{0:N}" -f ($_.FreeSpace/1GB) -as [float]}}, `
@{Label="PercFree";Expression={"{0:N}" -f ($_.FreeSpace/$_.Size*100) -as [float]}}, `
@{Label="Low if(($_.FreeSpace/$_.Size*100) -le ’15’) `
{ `
"- Critical -"; `
} `
Else `
{ `
$null; `
}; `
}}, `
@{Name="";Expression={ `
$UsedPer = (($_.Size – $_.Freespace)/$_.Size)*100; `
$UsedGraph = $gCode * ($UsedPer/2); `
$FreeGraph = $gCode * ((100-$UsedPer)/2); `
"xltFont color=Redxgt{0}xlt/FontxgtxltFont Color=Greenxgt{1}xlt/fontxgt" `
-f $usedGraph,$FreeGraph; `
}} | ConvertTo-Html -Fragment;

## – Replacing replace the tag place holders: (Jefferey’s hack at work)
$html=$html -replace ‘xlt’,’
## – Add the Disk information results to the HTML fragment:
$HTMLfragments+=$html;

## – Insert a line break for each computer it find:
$HTMLfragments+="
";
}

## – Add a footer to HTML code:
$footer=("
<em>Report run {0} by {1}\{2}<em>" -f (Get-Date -displayhint date),$env:userdomain,$env:username)
$HTMLfragments+=$footer

## – Write HTML code to a file on disk:
ConvertTo-Html -head $head -body $HTMLfragments | Out-File $ReportPath;

if($ViewReport -eq $true)
{
ii $ReportPath;
}

if($SendEmail -eq $true)
{
## – Setting the information for hotmail:
$MyEmailAcct = "UserX@live.com";
$MyPassword = ConvertTo-SecureString ‘$myPassword!’ -AsPlainText -Force;
$MyCredentials = new-object -typename System.Management.Automation.PSCredential -argumentlist $MyEmailAcct,$MyPassword
[Array] $emaillist = @(‘User1@gmail.com’,’UserX@live.com’);

## – OR, send it as a body message in the email:
$GetError = $null;
Send-MailMessage `
-From ‘MySysAdmin-DoNotReply@MySysAdmin.com’ `
-To $SendTo `
-Subject "Diskspace Information for the date – $((Get-Date).ToString("MMddyyyy, HH:MM"))" `
-BodyAsHtml ([string] (ConvertTo-Html -head $head -body $HTMLfragments)) `
-SmtpServer ‘smtp.live.com’ `
-Credential $MyCredentials `
-UseSsl `
-Port 587 `
-ErrorAction SilentlyContinue `
-ErrorVariable GetError;

if($GetError -ne $null)
{
$date = (get-Date).ToString("MMddyyyy_HHMMss");
"Sender: $($getCred1.UserName) `r`n $GetError" | `
Out-File -FilePath "C:\Temp\log\emailerror_$date.txt";
};
};
};

[/sourcecode]

Sample results for email to live.com:

Sample Browser:

Here’s the zipped presentation link:

Show-PSDemo function – Simple way to demo scripts.

While working on my PowerShell demo scripts today, I decided to create a simple function to display my scripts during my presentations.  Here’s my new and simple Show-PSDemo function:

[sourcecode language=”powershell”]
#========================================================================
# Created with: SAPIEN Technologies, Inc., PowerShell Studio 2012 v3.1.15
# Created on: 1/13/2013 9:07 AM
# Created by: Maximo Trinidad
# Organization: PutItTogether
# Filename: Show-PSDemo_function.ps1
# Version: 0.1
#========================================================================

function Show-PSDemo{
Param([String] $FileLocation)

## – Verify for a valid file location:
if((Test-Path -Path $FileLocation) -ne $true)
{
Write-Host "No script files to execute!" `
-ForegroundColor ‘Yellow’;
Break;
}
else
{
[Array] $executethis = Get-Content $FileLocation;
};

## – Saved previous default Host Colors:
$defaultForegroundColor = $host.UI.RawUI.ForegroundColor;
$defaultBackgroundColor = $host.UI.RawUI.BackgroundColor;

## – Customizing Host Colors:
$host.UI.RawUI.ForegroundColor = "Cyan";
$host.UI.RawUI.BackgroundColor = "Black";
$StartDemoTime = [DateTime]::now; $i = 0;
Clear-Host;

Write-Host "Demo Start Time: $([DateTime]::now)" -ForeGroundColor ‘White’;
Write-Host "`t Running Script file: $FileLocation" -ForegroundColor ‘Yellow’;

foreach($line in $executethis)
{
$i++
## – Identify comment lines:
if($line.Startswith(‘#’)){
Write-Host -NoNewLine $("`n[$i]PS> ")
Write-Host -NoNewLine -Foreground ‘Green’ $($($line) + " ")
}
Else
{
## – add section identify oneliners with continuation tick:
[string] $Addline = $null;
if($line -match ‘`’)
{
#Write-Host " Found tick = `t`r`n $($line)" -ForegroundColor yellow;
$Addline = $line.replace(‘`’,”).tostring();
$Scriptline += $Addline;
$tickFound = $true;
$continuation = $true;

## – List oneliner with continuation tick:
Write-Host -NoNewLine $("`n[$i]PS> ");
Write-Host -NoNewLine $line;
}
else
{
## – identify the last line of a continuation oneliner:
if($tickFound -eq $true)
{
$Scriptline += $line;
$tickFound = $false;
$continuation = $false;

## – List oneliner with continuation tick:
Write-Host -NoNewLine $("`n[$i]PS> ");
Write-Host -NoNewLine $line "`r`n";
}
Else
{
## – Single onliner found:
$Scriptline = $line;
$continuation = $false;
Write-Host -NoNewLine $("`n[$i]PS> ")
Write-Host -NoNewLine $Scriptline "`r`n";
};
};
if($continuation -eq $false)
{
## – Executive:
Write-Host "`r`n`t Executing Script…`r`n" -ForegroundColor ‘Yellow’;
Invoke-Expression $(‘.{‘ +$Scriptline + ‘}| out-host’);
$Scriptline = $null;
}
## – ——————————————————————–
if($continuation -eq $false)
{
Write-Host "`r`n– Press Enter to continue –" -ForegroundColor ‘Magenta’ `
-BackgroundColor white;
Read-Host;
};
};
};

$DemoDurationTime = ([DateTime]::Now) – $StartDemoTime;
Write-Host ("`t <Demo Duration: {0} Minutes and {1} Seconds>" `
-f [int]$DemoDurationTime.TotalMinutes, [int]$DemoDurationTime.Seconds)
-ForeGroundColor ‘Yellow’ ;
Write-Host "`t Demo Completed at: $([DateTime]::now))" -ForeGroundColor ‘White’;

## – Set back to Default Color:
$host.UI.RawUI.ForegroundColor = $defaultForegroundColor;
$host.UI.RawUI.BackgroundColor = $defaultBackgroundColor;
};

## – loading:
## . .\Temp\Show-PSDemo_Function.ps1
## Show-PSdemo -FileLocation C:\temp\PowerShell_SQLdata.ps1
[/sourcecode]

It has one parameter “-FileLocation” which is you full folder and file location.  The file extension doesn’t matter as long is a text file with PowerShell code in it.

It allows to:

1. The use of Comments lines.

2. The use of the “$_” in a “Select-Object“.

3. Allows the use of the “`” tick which identify a line continuation.

4. A “Pause” is included after executing each line or block of code.

Simple to load as a function, then execute:

PS C:\> .  .\YourScriptFolder\Show-PSDemo_function.ps1

PS C:\> Show-PSDemo  -FileLocation C:\YourScriptFolder\MyDemoScript.ps1

It works in both PowerShell Console and PowerShell ISE editor.


Enjoy!!

PowerShell – Start getting your Computer Last BootUp Time

The PowerShell community has done an Excellent job in providing LOTs of sample codes. But sometime can be very intimidating for a beginner to understand. Well, PowerShell can be both simple, and complicated but not impossible to learn.

Is good to know there are other ways other to get the same or similar result. And I’m not against it because you can even integrate those solutions into PowerShell.

BUT, you need to realized this is a SKILL you need nowadays. PowerShell can’t be ignore any more. If you don’t build up this skill then you’re probably going to lose a job opportunity.

Now, here’s a series of oneliners to assist you in getting the computer BootUp time information:

[sourcecode language=”powershell”]
## – Simple way to start knowing your PSobject
$x = get-wmiObject -Class Win32_OperatingSystem -Computername "YourComputerName";

## – Discovering you PSobject content:
$x | get-member;

## – Sample getting the PSObject ‘Property’ names for computername and Lastboottime:
$x | Select csname, LastBootUpTime;

## – Need to use the "ConvertToDateTime" script method which is in your PSobject $x:
$x.ConvertToDateTime($x.LastBootUpTime);

## – Wee need to create a one-liner to display the date/time correctly
## – using scriptblock expression:
$x | Select csname, `
@{label=’MyLastBootUpTime’;Expression={$_.ConvertToDateTime($_.LastBootUpTime)};} `
| format-table -autosize;

## – Now, pay attention to the Get-member results and you’ll find the following methods:
# Reboot()
# SetDateTime()
# Shutdown()
# Win32Shutdown()
# Win32ShutdownTracker()
## – You will realized the PSObject you just created can be use to perform
## – task such as: reboot or shutdown.

## – This is an example to create an Array list of servernames:
$srvList = @("Server1","Server2","Server3");

###### BUILDING A SCRIPT with above onliners ########
## – Now we need to loop through each of the servers in the array with ‘Foreach’
## – and display the results on screen:

$srvList = @("Server1","Server2","Server3");

foreach($server in $Srvlist)
{
$x = get-wmiObject -Class Win32_OperatingSystem -Computername $server;
$x | Select csname, `
@{label=’MyLastBootUpTime’;Expression={$_.ConvertToDateTime($_.LastBootUpTime)};} `
| format-table -autosize;
};

## OR, the next sample will create a PSObject from you looping results:

$srvList = @("Server1","Server2","Server3");

[array] $myUpTimeList = foreach($server in $Srvlist)
{
$x = get-wmiObject -Class Win32_OperatingSystem -Computername $server;
$x | Select csname, `
@{label=’MyLastBootUpTime’;Expression={$_.ConvertToDateTime($_.LastBootUpTime)};};
};

$myUpTimelist | ft -auto;

## – End of scripts

[/sourcecode]

This is your starting code block. This code can be improved to suite your need by adding more PSobject properties and/or routing the results to an output file.

I hope this can give some insight on how PowerShell can help in your admin tasks.