PowerShell Core–Updated setup OpenSSH in Windows and Linux

It’s been over a year since my last post on “PowerShell Open Source – Windows PSRemoting to Linux with OpenSSH”. A lot has change, so here’s the updated version.

Linux OpenSSH installation

In Linux (Ubuntu), open a terminal (Bash) session.

Install the following *packages:

sudo apt install openssh-server
sudo apt install openssh-client

*Note: The system will let you know if they already exist.

Need to configure the OpenSSH config file:

sudo gedit /etc/ssh/sshd_config

The, add following line in the “subsystem” area:

Subsystem powershell pwsh.exe -sshs -NoLogo -NoProfile

Proceed to save the file.

Now, execute the following lines:

sudo ssh-keygen –A

Restart the ‘ssh’ service by executing the following command:

sudo service ssh restart

Windows OpenSSH installation

In *Windows Client or Server, open Services to ‘Stop‘/’Disable‘ both SSH Broker and SSH Proxy.

*Note: Latest Windows Insider Builds having the following services previously installed: SSH Broker and SSH Proxy

Open PowerShell Core Console (Run as Administrator):

[sourcecode language=”powershell”]
pwsh

[/sourcecode]

First thing, make sure Chocolatey is installed in PowerShell Core: https://chocolatey.org/install

[sourcecode language=”powershell”]
iex ((New-Object System.Net.WebClient).DownloadString(‘https://chocolatey.org/install.ps1’)

[/sourcecode]

*note: Chocolatey Install instructions will run ‘Set-ExecutionPolity Bypass’. The problem is, it won’t change it back to the previous setting.
Make sure to run “Get-ExecutionPolicy” to verify current settings.

Installing OpenSSH package from Chocolatey:

[sourcecode language=”powershell”]
choco install openssh

[/sourcecode]

Close/Reopen PowerShell Core (Run as Administrator), and execute the following command:

[sourcecode language=”powershell”]
refreshenv

[/sourcecode]

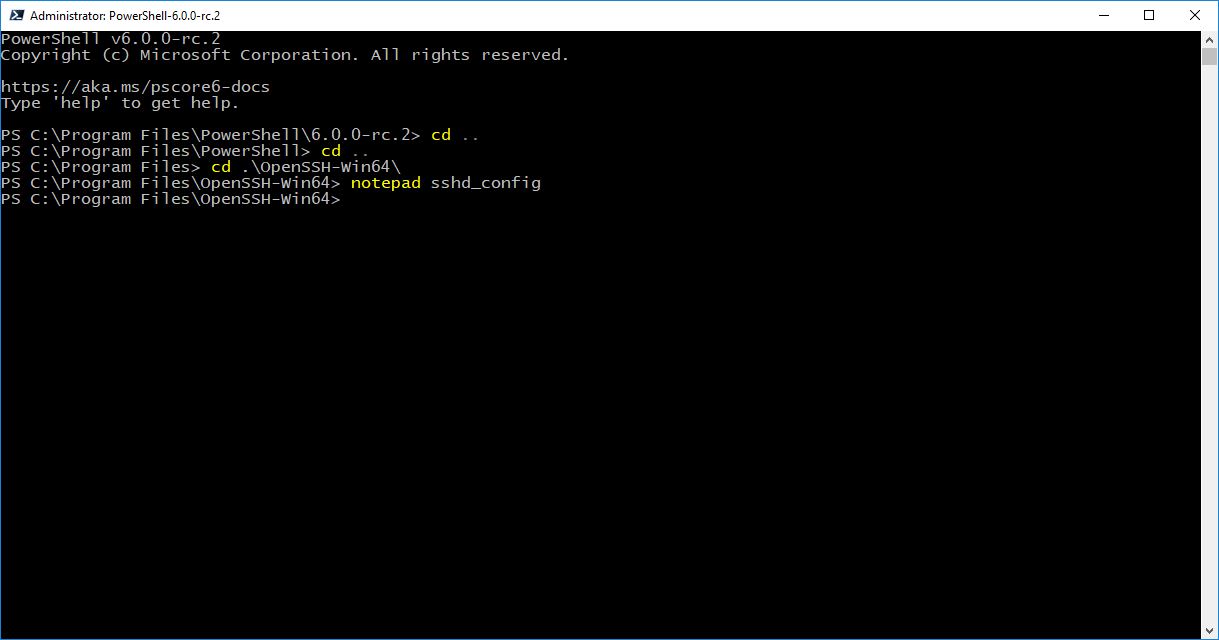
Change Directory to the OpenSSH folder:

[sourcecode language=”powershell”]
cd ‘C:\Program Files\OpenSSH-Win64\’

[/sourcecode]

Now, we need to make changes to the sshd_config file with Notepad:

[sourcecode language=”powershell”]
Notepad sshd_config

[/sourcecode]

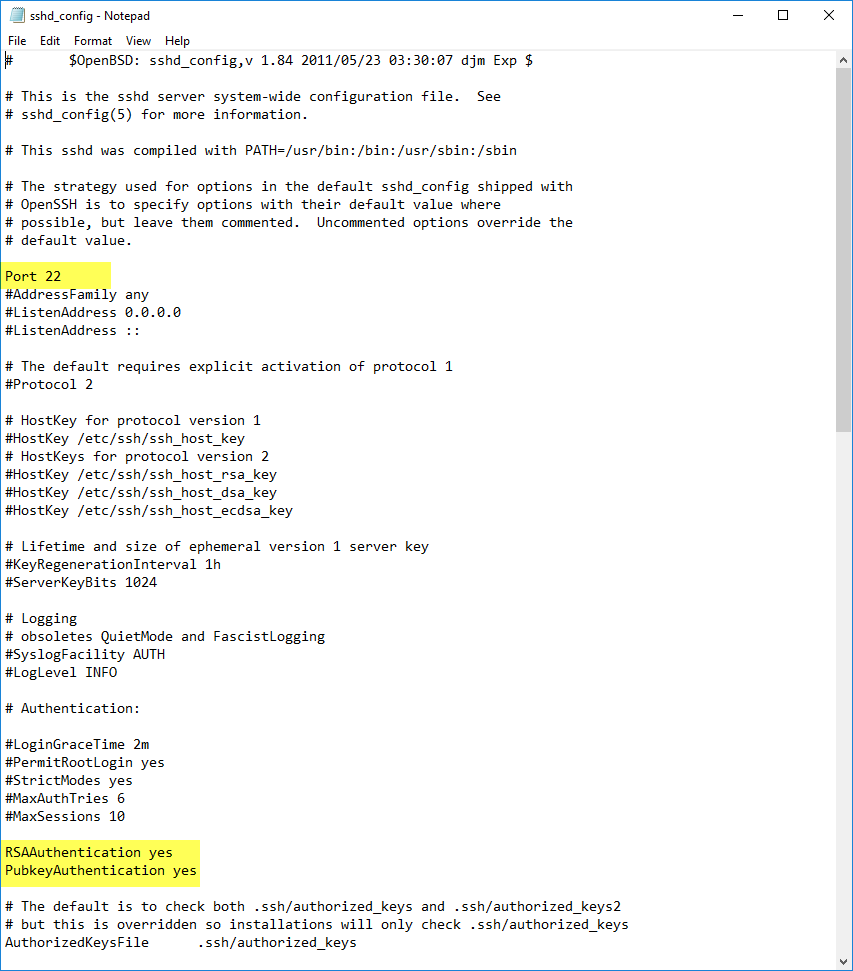
Need to enabled the following commented out lines:

[sourcecode language=”text”]
Port 22
PasswordAuthentication yes
PubkeyAuthentication yes

[/sourcecode]

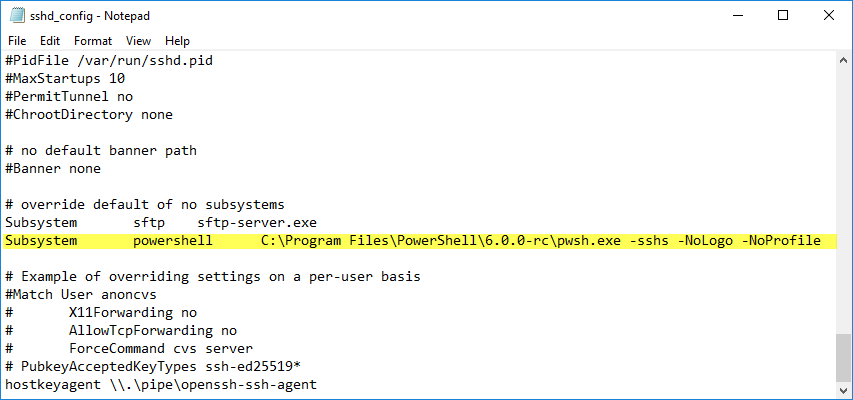
Finally, add the subsystem line to include PowerShell Core path:

[sourcecode language=”text”]
Subsystem     powershell    C:/Program Files/PowerShell/6.0.0-rc.2/pwsh.exe -sshs -NoLogo –NoProfile

[/sourcecode]

Save the file and we are ready to configure the firewall rule for port 22.

Windows Firewall Port 22 Setup

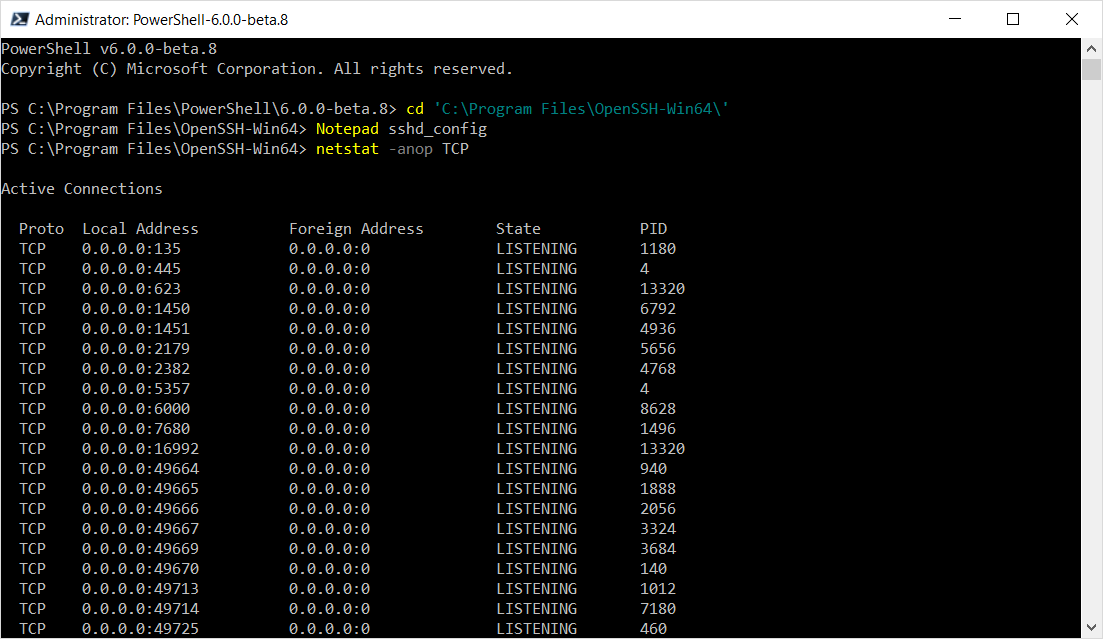
Next, confirm that there are no other TCP ports using port 22:

[sourcecode language=”powershell”]
netstat -anop TCP

[/sourcecode]

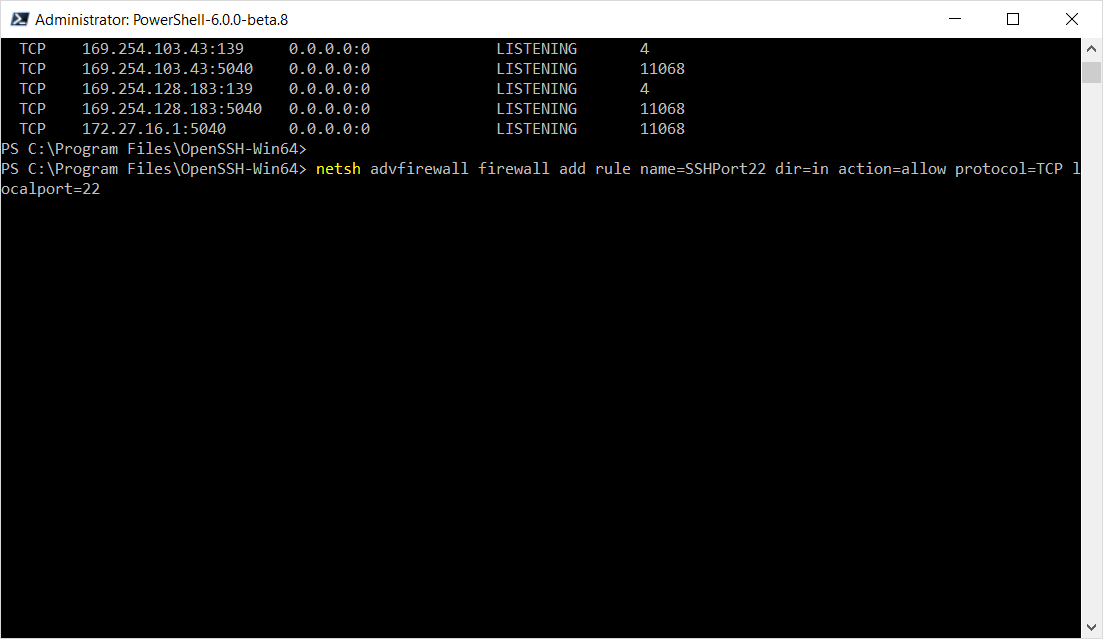
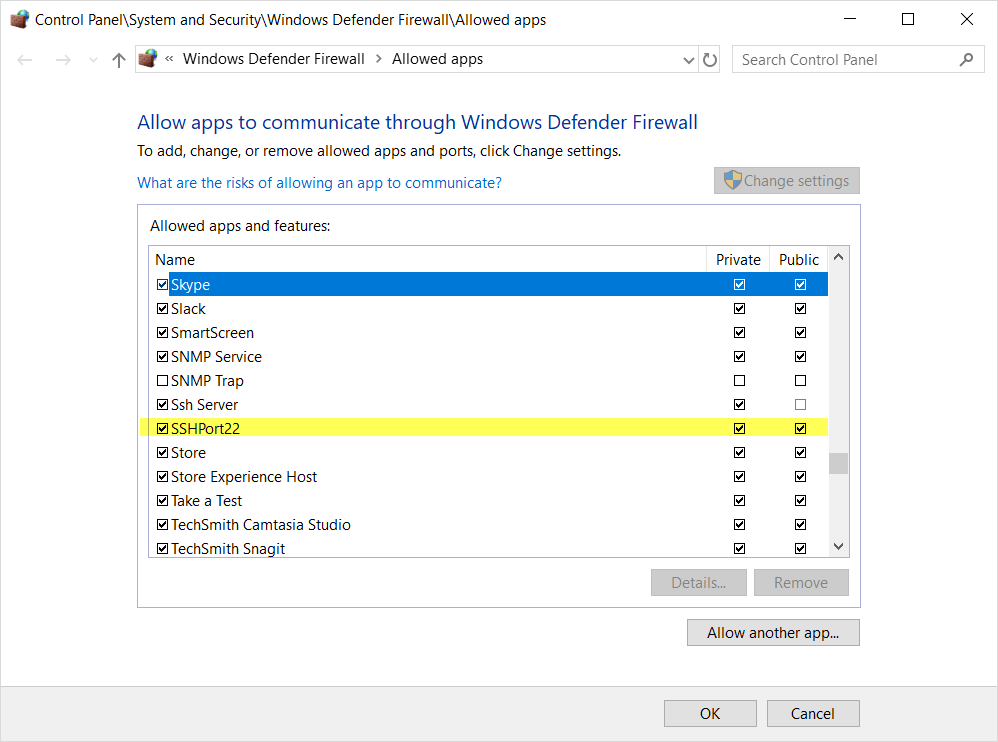
Now, add the SSH firewall rule for using port 22:

[sourcecode language=”powershell”]
netsh advfirewall firewall add rule name=SSHPort22 dir=in action=allow protocol=TCP localport=22

[/sourcecode]

Open Firewall app and verify it’s added.

Completing Windows OpenSSH Installation

The following steps are essential for the sshd service to start without any issues. Make sure to be at the OpenSSH folder:

[sourcecode language=”powershell”]
## – Generate SSH keys:
ssh-keygen -A

## – Execute both fix permissions scripts:
.\FixHostFilePermissions.ps1 -confirm:$false
.\FixUserFilePermissions.ps1

## – Install both ssh services: sshd and ssh-agent:
.\install-sshd.ps1

[/sourcecode]

Then, set both sshd and ssh-agent services set to start automatically.

[sourcecode language=”powershell”]
Set-Service sshd -StartupType Automatic
Set-Service ssh-agent -StartupType Automatic

[/sourcecode]

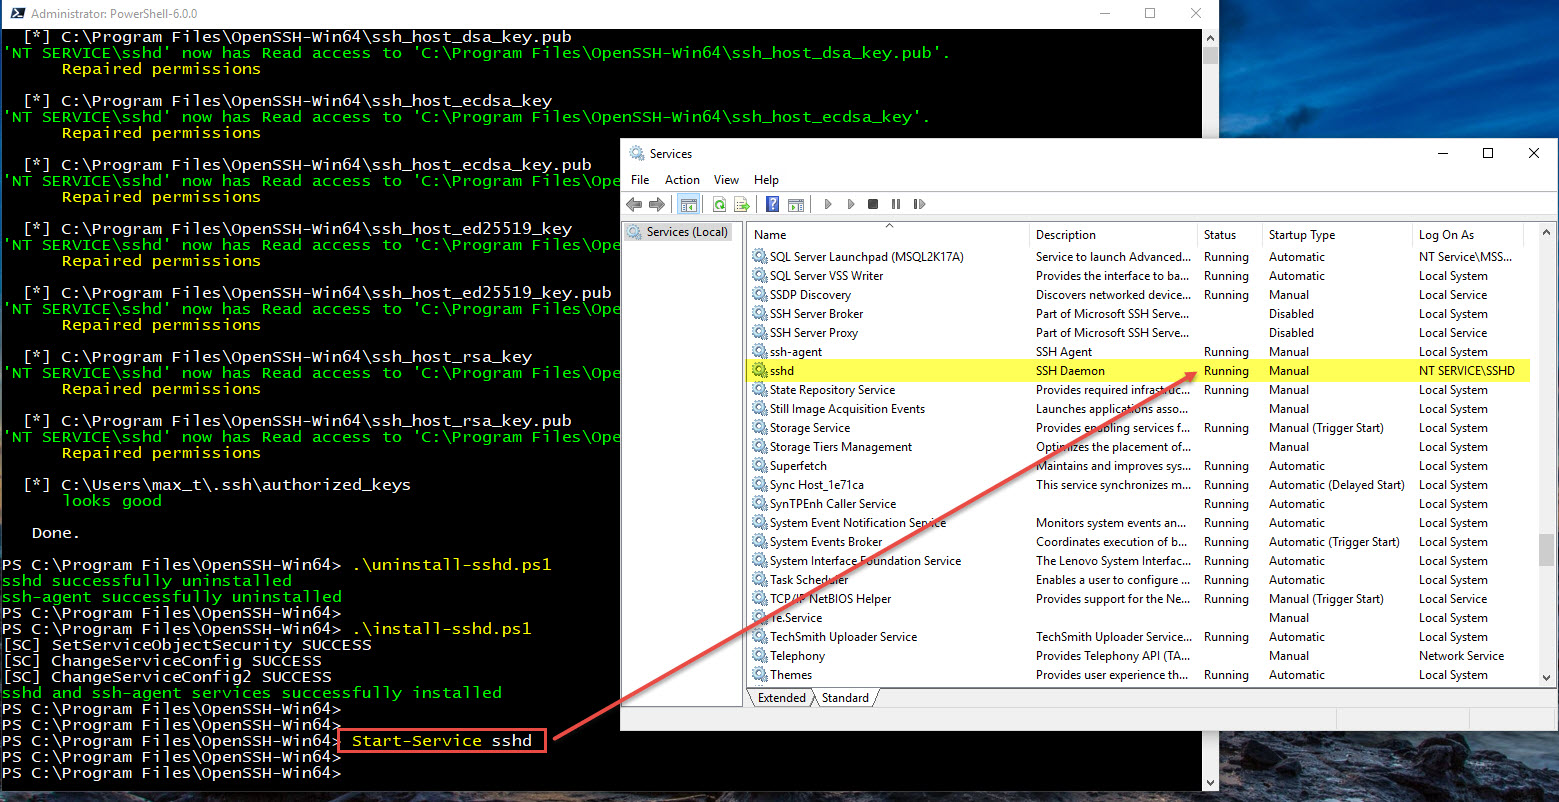
At this point, only start service sshd which will turned on the ssh-agent service.

[sourcecode language=”powershell”]
Start-Service sshd
#Start-Service ssh-agent (optional)

[/sourcecode]

Must important, open the *Services MMC console and verify that all running.

*Note: On the server will be needed to set the credential as Local System (see below).

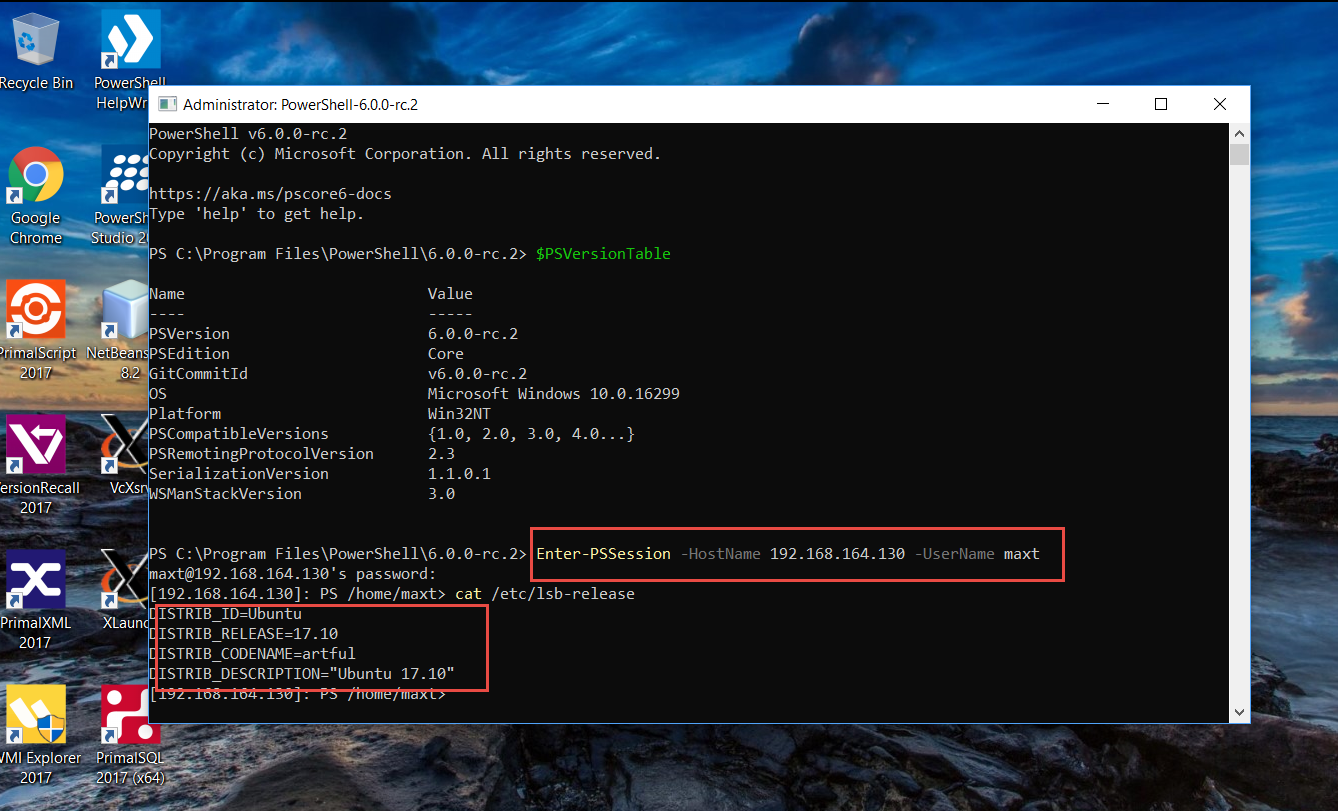
Now, proceed to test connectivity between two system using PowerShell Core.  To test connectivity could use the following command:

Enter-PSSession -hostname systemname -username UsenameHere

Additional Note:

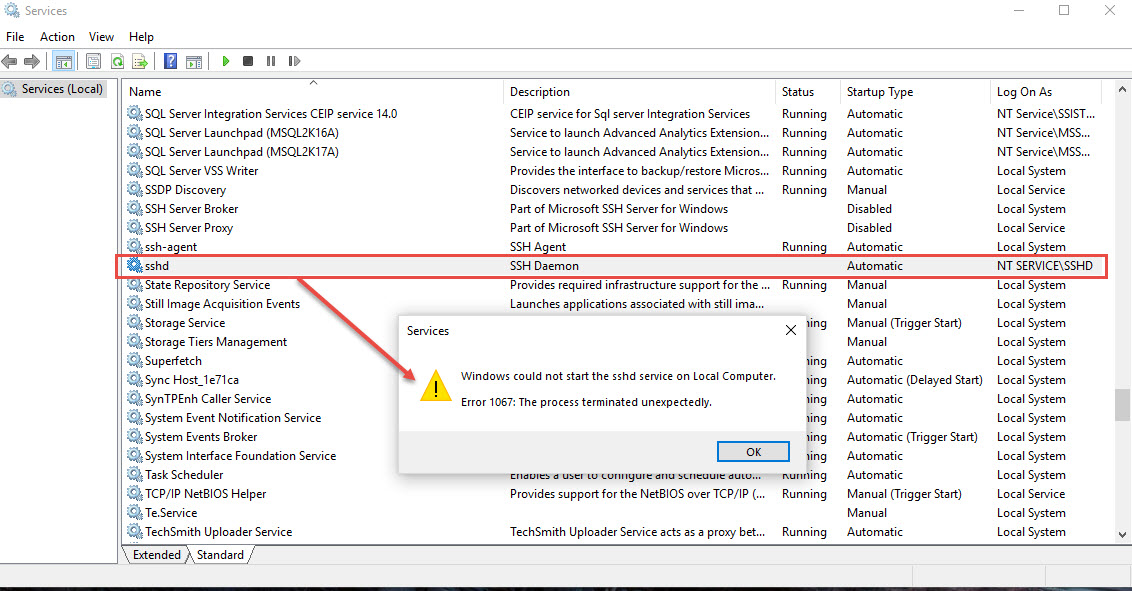
I found an issue when been a member of a domain but the Domain is Off. Trying to restart ssh service, I get the following error:

[sourcecode language=”powershell”]
PS C:\Program Files\OpenSSH-Win64> Start-Service sshd
Start-Service : Failed to start service ‘sshd (sshd)’.
At line:1 char:1
+ Start-Service sshd
+ ~~~~~~~~~~~~~~~~~~
+ CategoryInfo          : OpenError: (System.ServiceProcess.ServiceController:ServiceController) [Start-Service], ServiceCommandException
+ FullyQualifiedErrorId : StartServiceFailed,Microsoft.PowerShell.Commands.StartServiceCommand

[/sourcecode]

Or trying to manually start the “sshd” service using the Services MMC:

This error was due to missing a step in the installation:

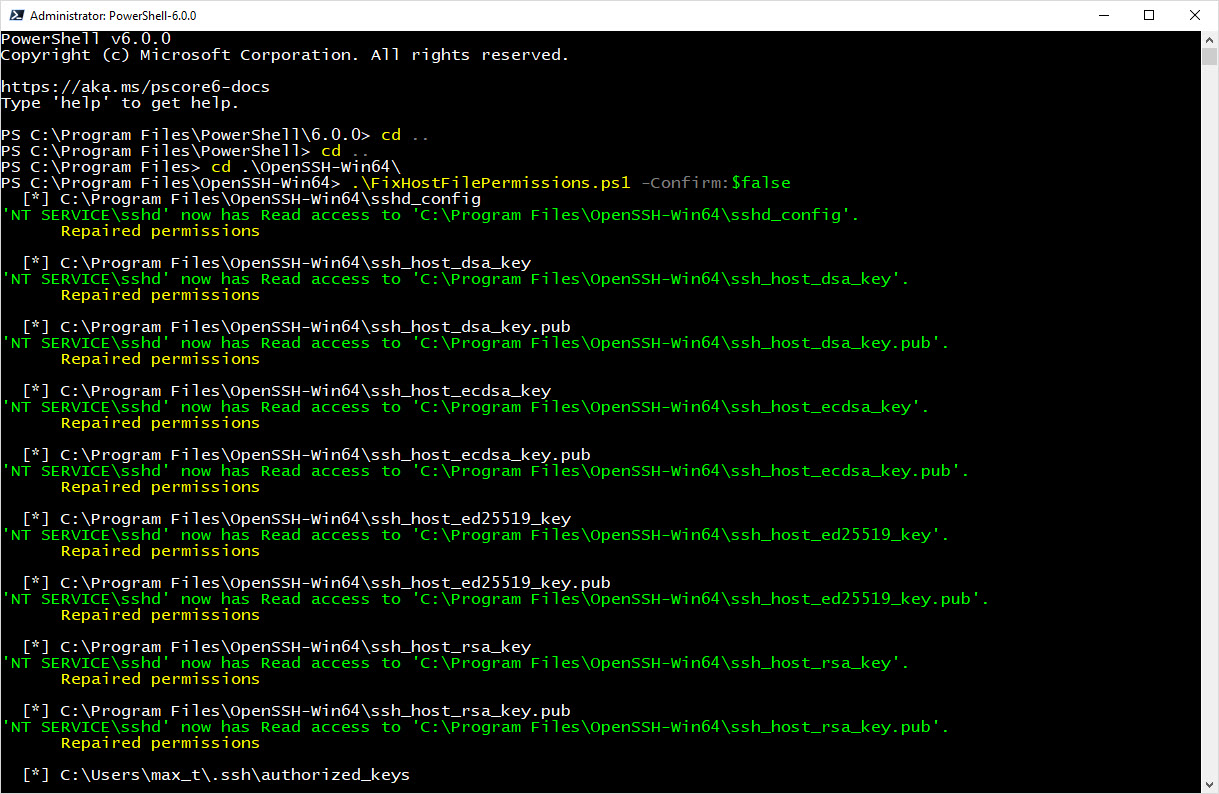
Resolution: Thanks to Github Win32-OpenSSH @bagajjal provided the following steps:

[sourcecode language=”powershell”]
## – Fixing sshd service not starting with the NET Service credentials:
.\FixHostFilePermissions.ps1 -Confirm:$false
.\uninstall-sshd.ps1
.\install-sshd.ps1
[/sourcecode]

This resolved the sshd start failure. (see below)
Awareness on Installing PowerShell Modules

As you are all aware of the upcoming PowerShell Core, and the impact it will bring in our cross-platform infrastructure. For now, both Windows Powershell and Powershell Core will co-exist side by side. Also, our Powershell skill sets will still be on a high degree of demand in the workplace. This is not going to slow down.

So, let’s create some awareness when installing Powershell modules. Now, we’ve seen a raise of *core modules which are targeted to be use with PowerShell Core for the purpose of installing them in either Windows and/or non-Windows environments. But at the same time, and I have experience, installing different versions of the same module in Windows PowerShell.

Let’s take for example AzureRM modules.

Cloud Module Balance

Let me say you will possibly experience this in the following situation:

1. If you’re install Visual Studio with the Azure SDK
2. If you’re a Developer which are trying to keep up with the latest module but forget to remove the old ones.
3. Also, installing modules from different sources.

Which sources are currently available for installing Azure modules?
(Just to name a few)

1. PowerShell Gallery
2. Azure Download
3. Azure SDK’s (VS Studio installation or standalone)

So, having multiple versions of the same modules may lead to issues such as: deprecated commands, invalid parameters/paramterset, and all leading to broken automation scripts.

It’s been suggested to use the PowerShell Gallery to get the Azure PowerShell Modules. But, always to the proper search for the latest version.

Using Powershell Gallery as the main repository for grabbing PowerShell modules, you can query for the modules before installing them:

1. Set the main repository to be “PowerShell Gallery”:

[sourcecode=”powershell”]
## – Set PowerShell Gallery Repo:
Set-PSRepository `
-Name “PSGallery” `
-InstallationPolicy Trusted;

[/sourcecode]

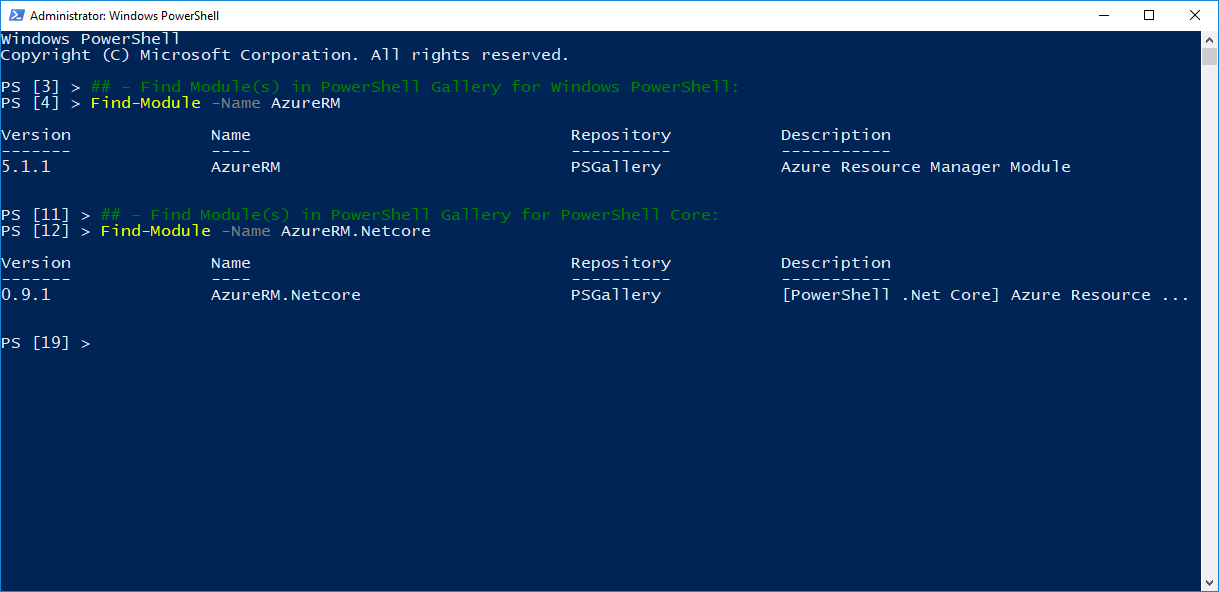
2. Find the modules you want to install: (In this case, “AzureRM”)
[sourcecode=”powershell”]
## – Find Module(s) in PowerShell Gallery for Windows PowerShell:
Find-Module -Name AzureRM

## – Find Module(s) in PowerShell Gallery for PowerShell Core:
Find-Module -Name AzureRM.Netcore

[/sourcecode]

Now, you can proceed to install the module:

1. Proceed to get the module from PowerShell *Gallery:
[sourcecode=”powershell”]
## – Get/install Module(s) from PowerShell Gallery:
Install-Module -Name AzureRM `
-Repository “PSGallery”;

[/sourcecode]

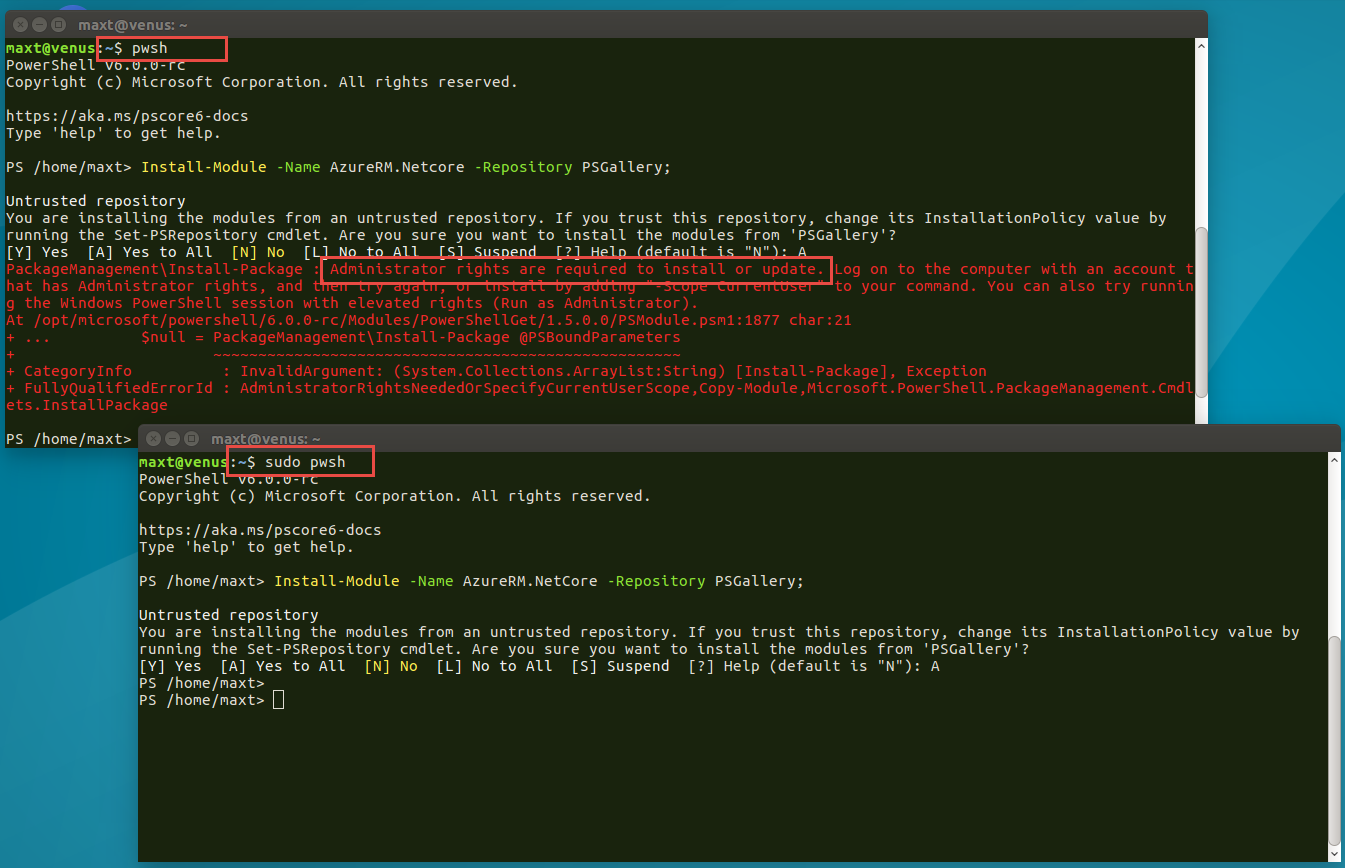
*Note: Installing AzureRM.Netcore in Linux, you need to use ‘sudo pwsh’.

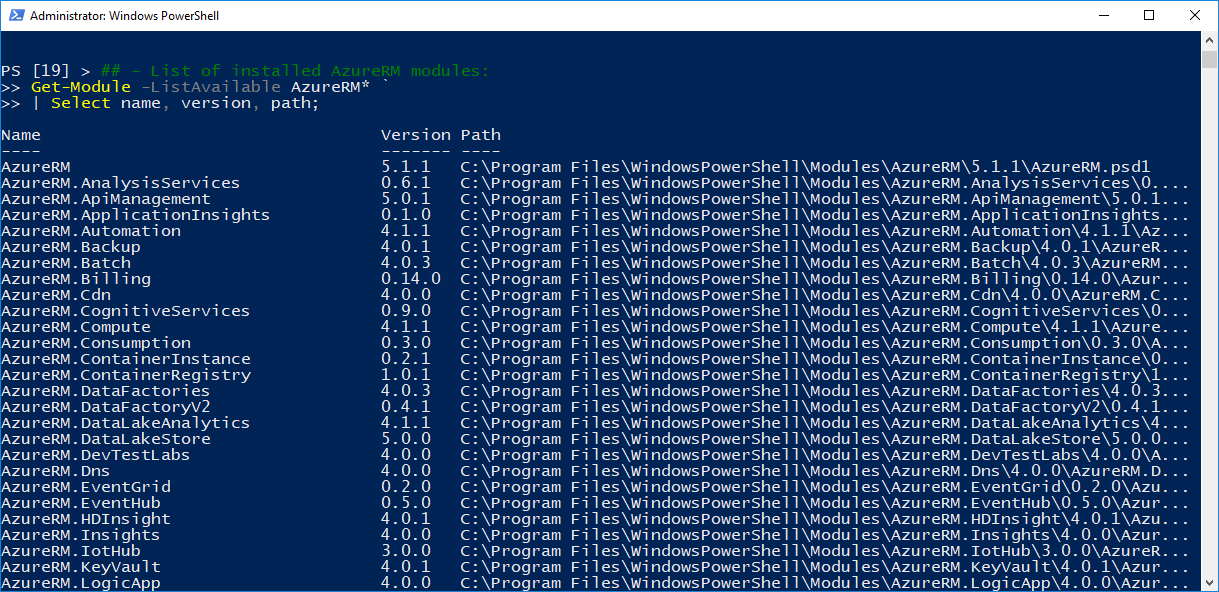
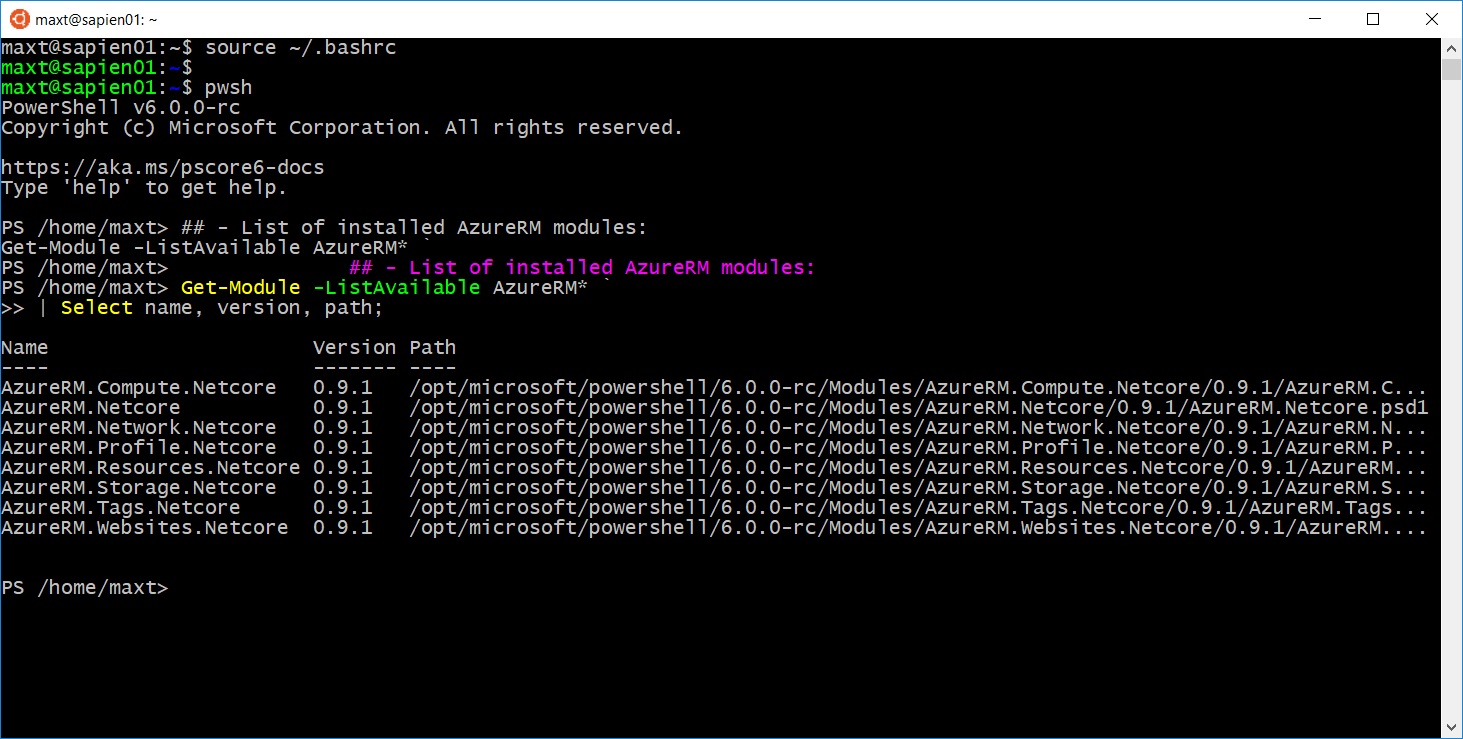
2. List the installed module(s):(Windows and Linux)
[sourcecode=”powershell”]
## – List of installed AzureRM modules:
Get-Module -ListAvailable AzureRM* `
| Select name, version, path;

[/sourcecode]

At this point, you can start building scripts.

Working with PowerShell Gallery

The following series of commands will get you started working with PowerShell Modules.

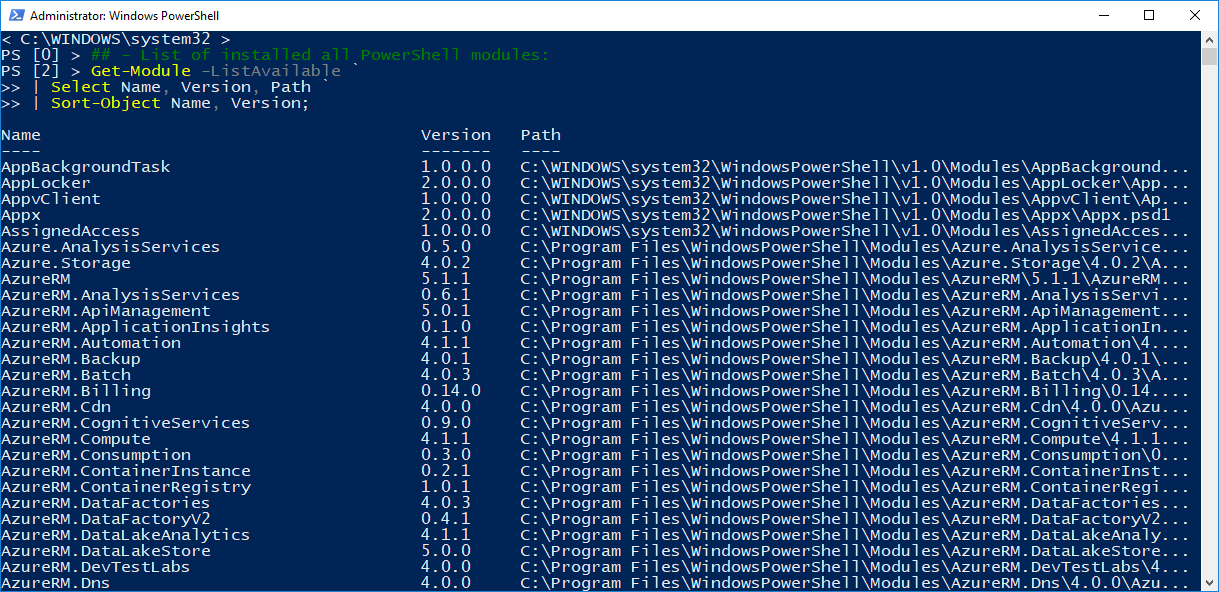
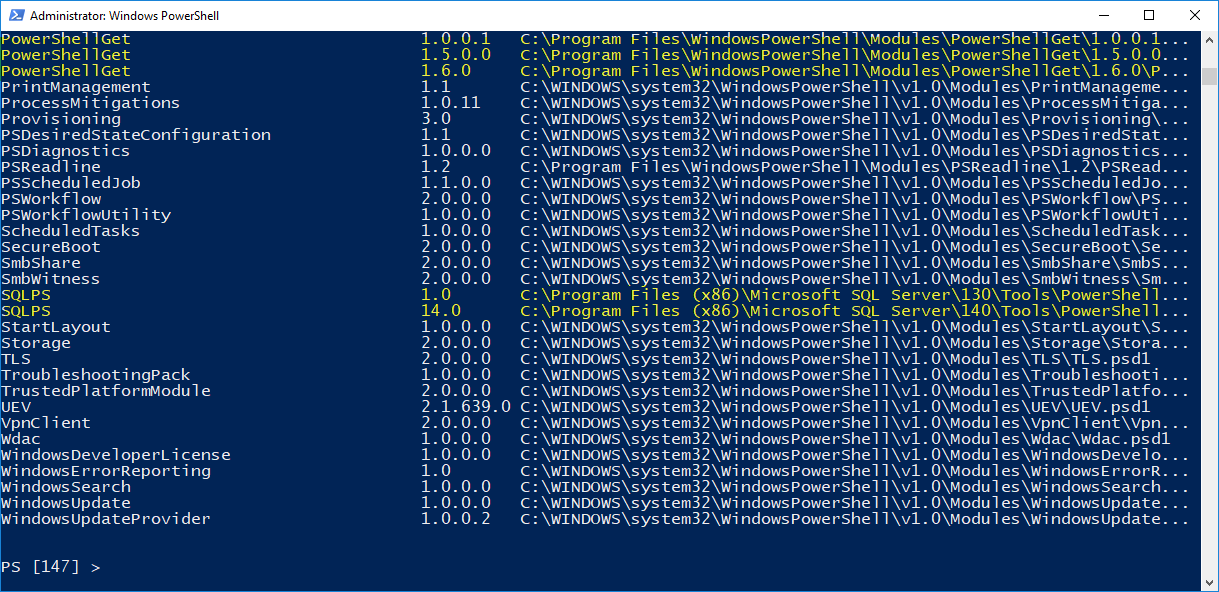
1. List all installed modules in system and can help to spot duplicates:
[sourcecode=”powershell”]
## – List of installed all PowerShell modules:
Get-Module -ListAvailable `
| Select Name, Version, Path `
| Sort-Object Name, Version;

[/sourcecode]

2. List installed modules locations in the PSModulePath variable:
[sourcecode=”powershell”]
## – List installed modules locations
$env:PSModulePath.split(‘;’);

[/sourcecode]

These two commands will give you the necessary information to identify and locate all *”installed” modules in yours system.

*Note: This will not include manually custom modules as the are not install thru PowerShell Gallery, or outside of the standard PowerShell Module folders.

Managing your Modules

In order to prevent cluttering your system with modules you may not use, then its time to do some module updates and/or cleanup.

From Github post “…Moving forward, we recommend using the PowerShell Gallery to get the Azure PowerShell modules. We are looking to push out updates to AzureRM more often since we no longer need to update every module we ship in AzureRM, which will speed up the install/update. …

Taking advantage of PowerShell Gallery commands, we can update our installed modules:

[sourcecode=”powershell”]
# Updating the modules in AzureRM
Update-Module -Name AzureRM

[/sourcecode]

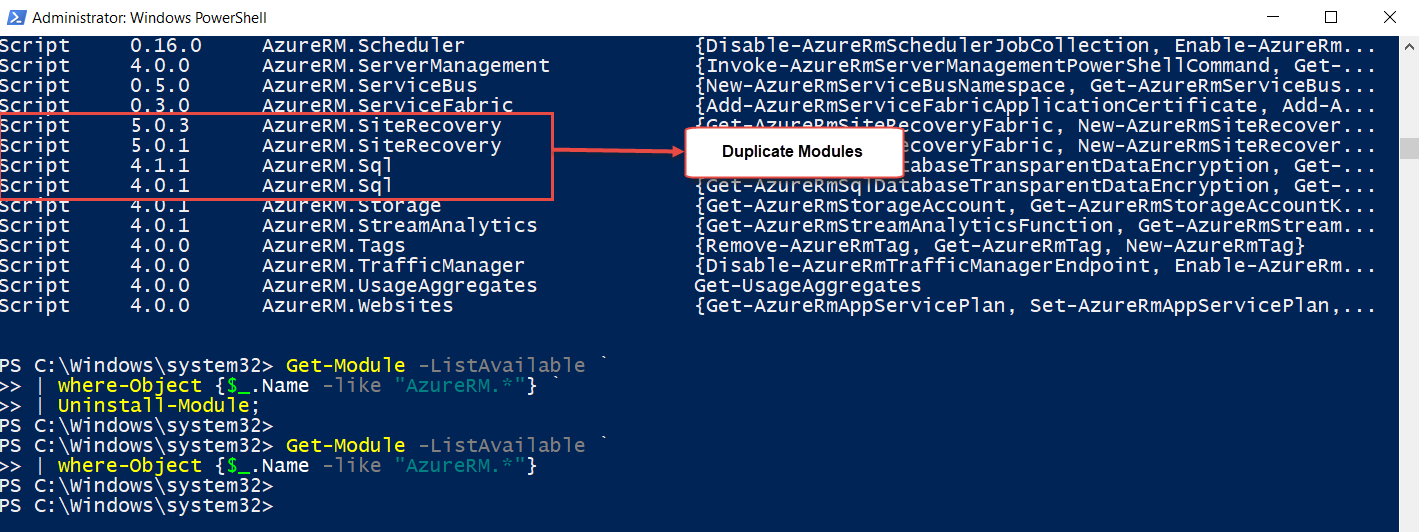
This step should prevent us installing multiple versions of the same module. (Update) – But, I discovered that this will cause a duplicate module (different versions) after the Update-Module is completed.

What about module(s) cleanup? The following one-liner can be use to cleanup/remove module(s) that install from the PowerShell Gallery. In the case of cleaning up all AzureRM modules, the following command should remove all *modules:

[sourcecode=”powershell”]
## – This will remove all AzureRM submodules “AzureRM.*:
Get-Module -ListAvailable `
| where-Object {$_.Name -like “AzureRM*”} `
| Uninstall-Module;

## – This will remove the AzureRM main module:
Get-Module -ListAvailable `
| where-Object {$_.Name -like “AzureRM”} `
| Uninstall-Module;

[/sourcecode]

*Note: This command will work as long as you have use the Install-Module to grab the modules from PowerShell Gallery. And, it will take some time to complete.

This way you can start clean and reinstall the modules!

Then, restart your PowerShell session, and use the following command to Get-Module again to list all existing modules.


Side-By-Side PowerShell Modules

As, the PowerShell Gallery has become the main repository for PowerShell Module. The Microsoft PowerShell Team has provided a special module to allow Windows Modules to work side-by-side with PowerShell Core:
https://www.powershellgallery.com/packages/windowspsmodulepath/1.0.0

Github post: “… This is currently by-design as we deliberately wanted Windows PowerShell and PSCore6 to work side-by-side with predictability. …

This will assist in identifying what else need to be done PowerShell Core. Just give it a try!

If you find issues with Windows Modules in PowerShell Core, then let the Microsoft PowerShell Team know in Github:
https://github.com/PowerShell/PowerShell

Conclusion

Managing modules when using PowerShell Gallery still is a manual process but easy to use, and even better if you build your own solution. I some instances you may decide to us the old delete or move command to get rid of unwanted modules.

Just take the necessary precautions, and remember, that you could install it back if needed.

Working with Azure Resource Manager Cross-platform with PowerShell Core

This is a brief introduction to connecting to your Azure Cloud subscription using Azure Resource Manager module (AzureRM) in both Windows PowerShell and PowerShell Core. You could install both AzureRM and AzureRM.Netcore modules in the same Windows System. Or, when using Linux, just install the AzureRM.Netcore module.

Azure Resource Manager Installation

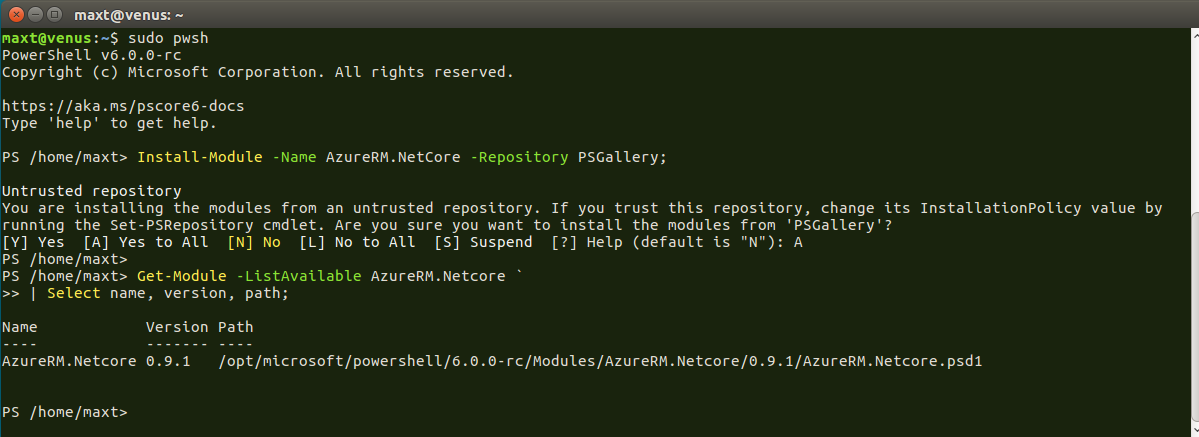
In Windows Powershell, use the following command to *install AzureRM (or Azure.Netcore) from the PowerShell Gallery:

[sourcecode language=”powershell”]
## – Install AzureRM from the PowerShell Gallery:
Install-Module -Name AzureRM -Repository PSGallery;

[/sourcecode]

*Note: Keep in mind, the console need to be open with elevated permission or it won’t install the module(s).

In Linux, use “sudo pwsh” to start PowerShell with admin pernmission.

[sourcecode language=”bash”]
$ sudo pwsh

[/sourcecode]

Then, enter the following PowerShell command to install AzureRM.Netcore module:

[sourcecode language=”powershell”]
## – Install AzureRM for PowerShell Core:
Install-Module -Name-AzureRM.Netcore -Repository PSGallery;

[/sourcecode]

To see the list of installed AzureRM in PowerShell, execute the following command:

1. AzureRM Modules. Using the following command will provide the list of modules *loaded:
[sourcecode language=”powershell”]
## – List of installed AzureRM modules:
Get-Module -ListAvailable AzureRM `
| Select name, version, path;

[/sourcecode]

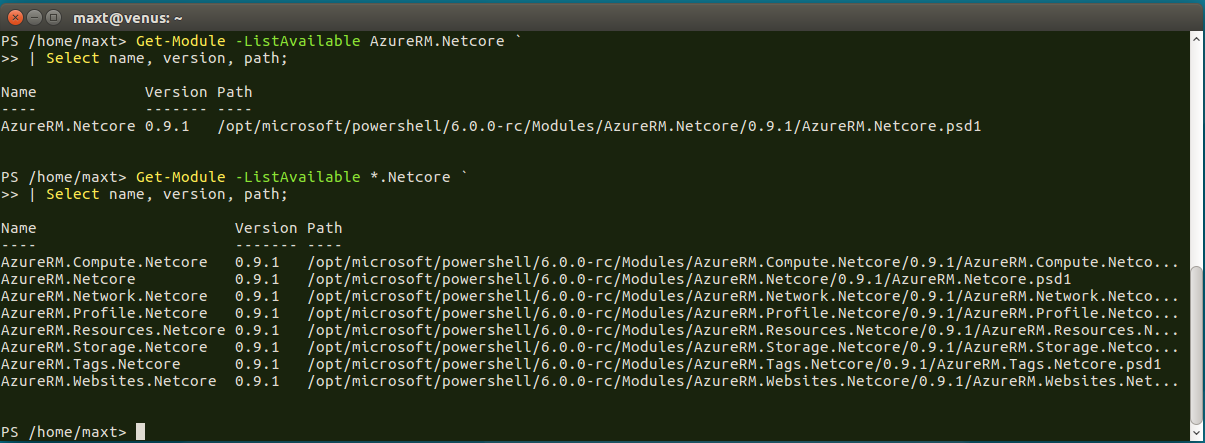
2. In Linux, AzureRM.Netcore Modules. Using the following command will provide the list of modules loaded:

[sourcecode language=”powershell”]
## – List of installed AzureRM.Netcore modules:
Get-Module -ListAvailable AzureRM.Netcore `
| Select name, version, path;

Get-Module -ListAvailable *.Netcore `
| Select name, version, path;

[/sourcecode]


*Note: If you see multiple installation of the same modules, but different versions, you’ll need to pick the right version. Or, this could lead to experiencing having issues when executing azure commands.

You’ll notice that not all Windows PowerShell AzureRM modules has been ported to PowerShell Core yet.

Connecting Linux to Azure Cloud

Here’s where fun begin! We all know in Windows Systems, for automation purpose, we need to create the a certificate key so you can connect to our Azure subscription. But in Linux, is different!

The following steps will connect a Linux System to an Azure subscription:

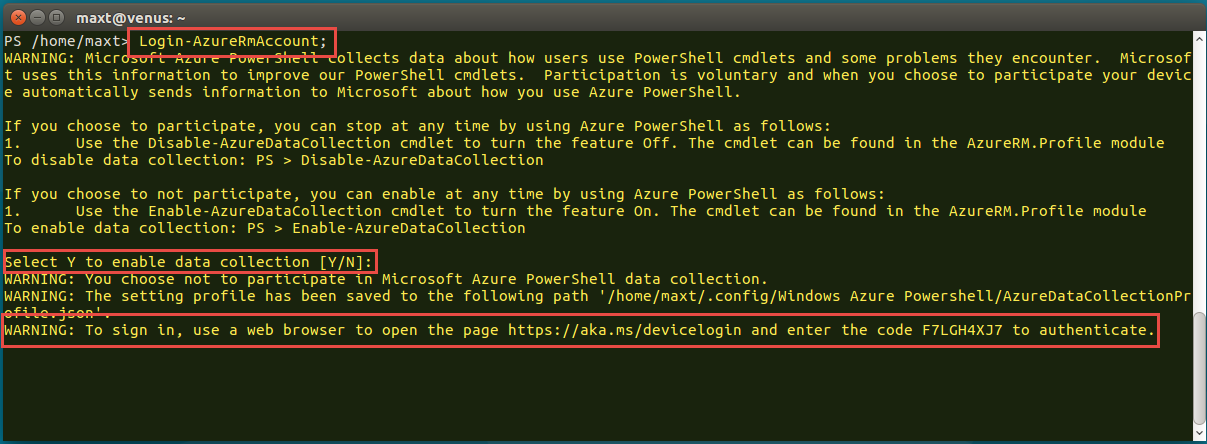
1. One time only, I use the following command to login to Azure:
[sourcecode language=”powershell”]
## – Login to Azure:
Login-AzureRmAccount;

[/sourcecode]

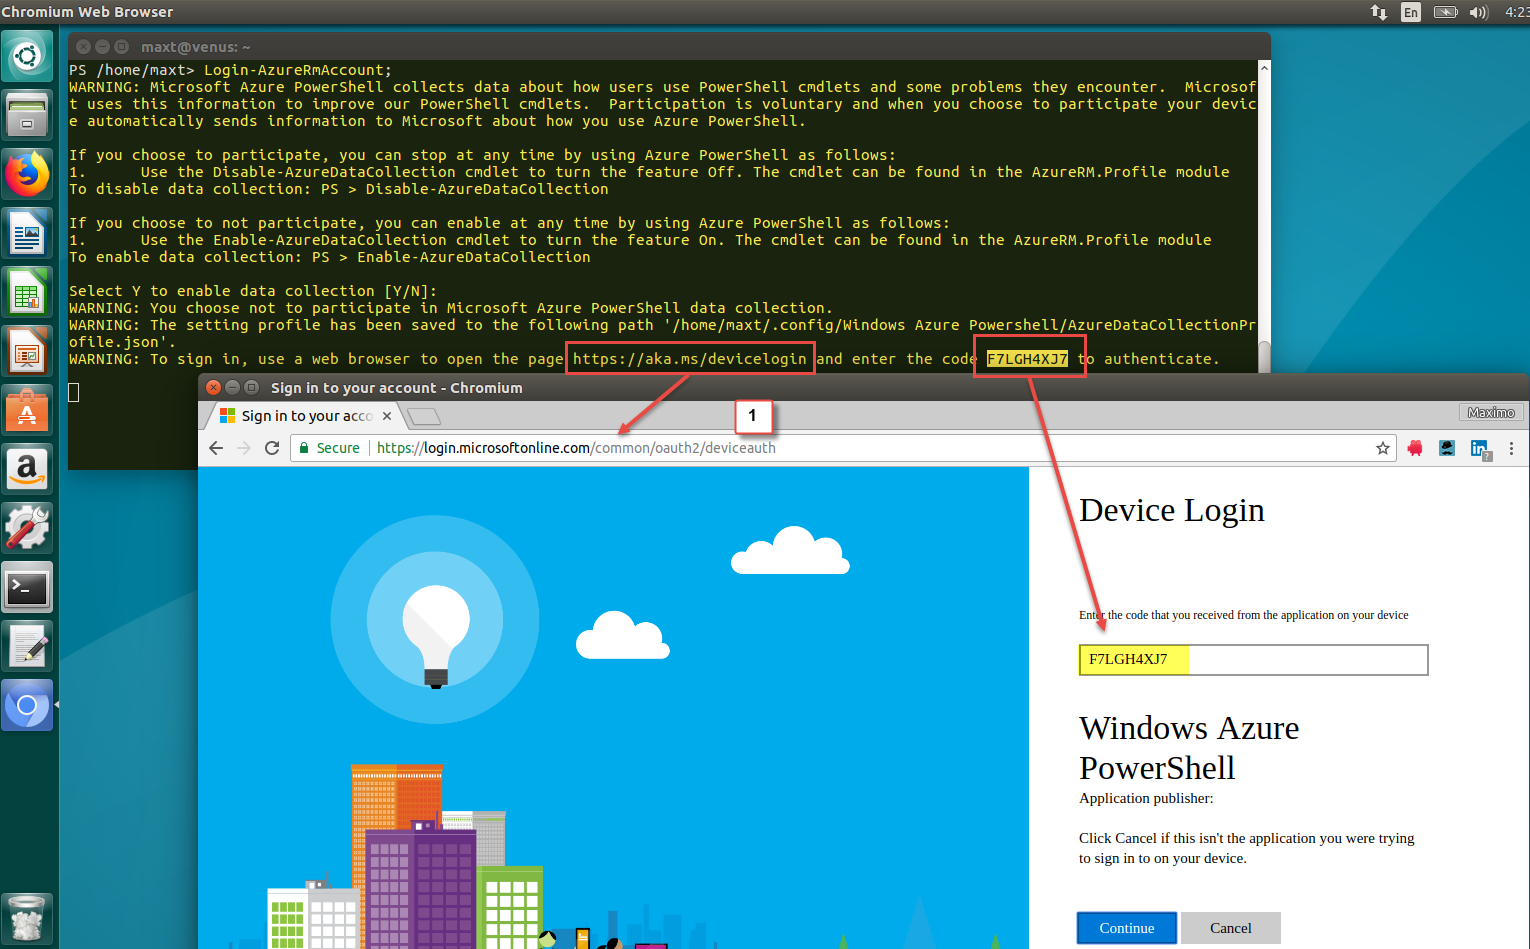
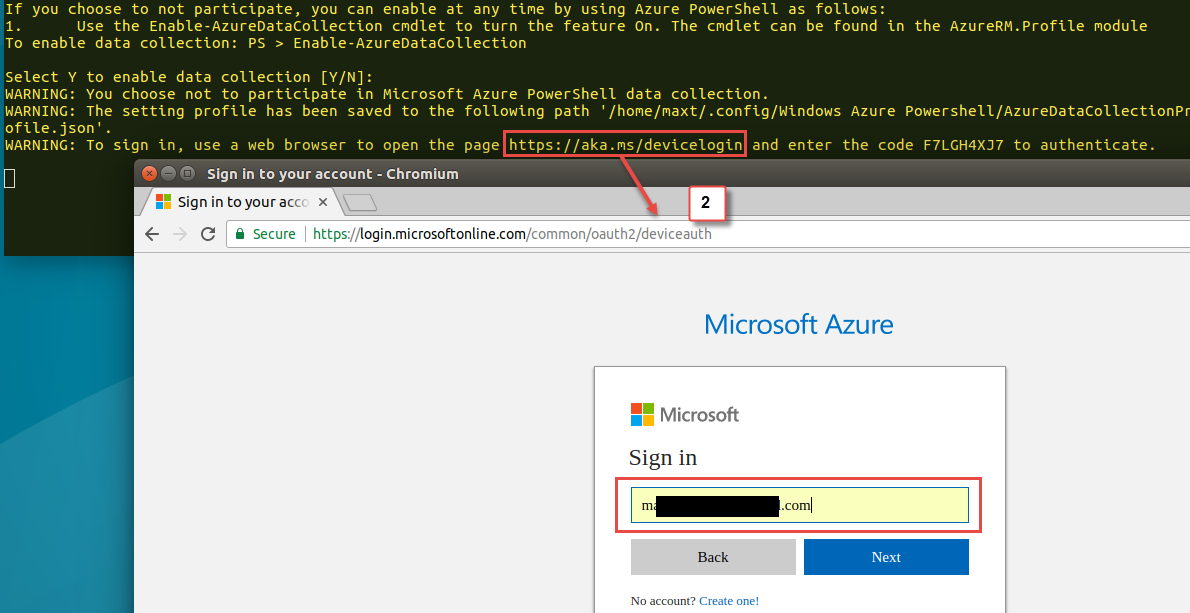
Executing this command, will have you do a few things:

1. Ask if you want to “enable data collection” (Y/N). (pick one)

2. At this point the command will pause waiting for you to open the browser.

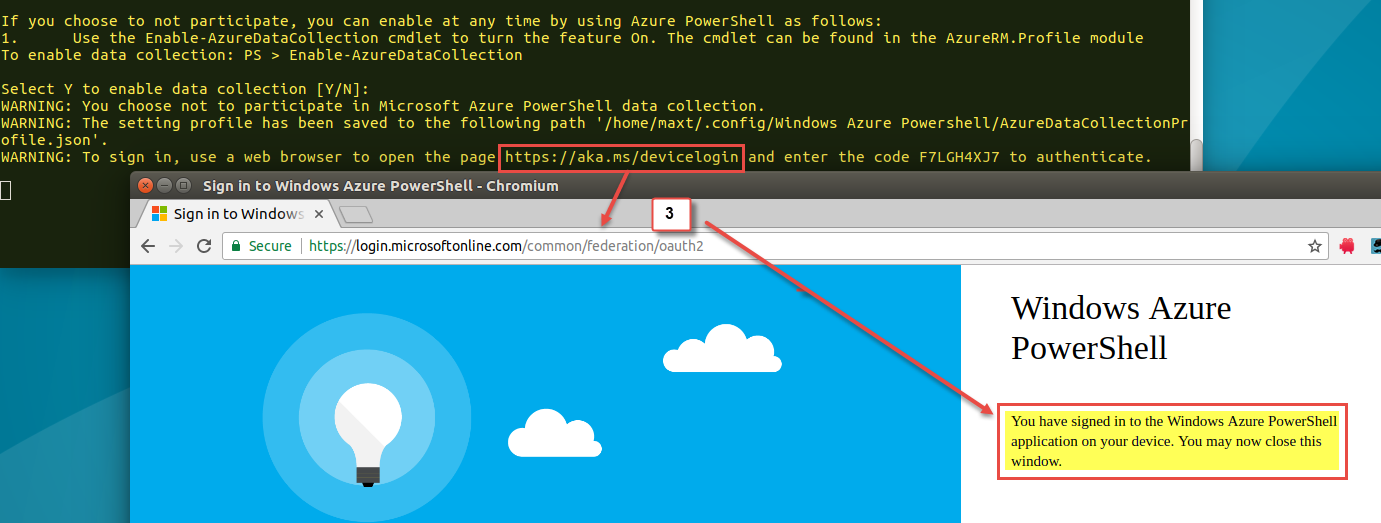
3. Open link provided (copy/paste): https://aka.ms/devicelogin

4. The proceed to enter the code:

5. Enter you Azure email account and password:

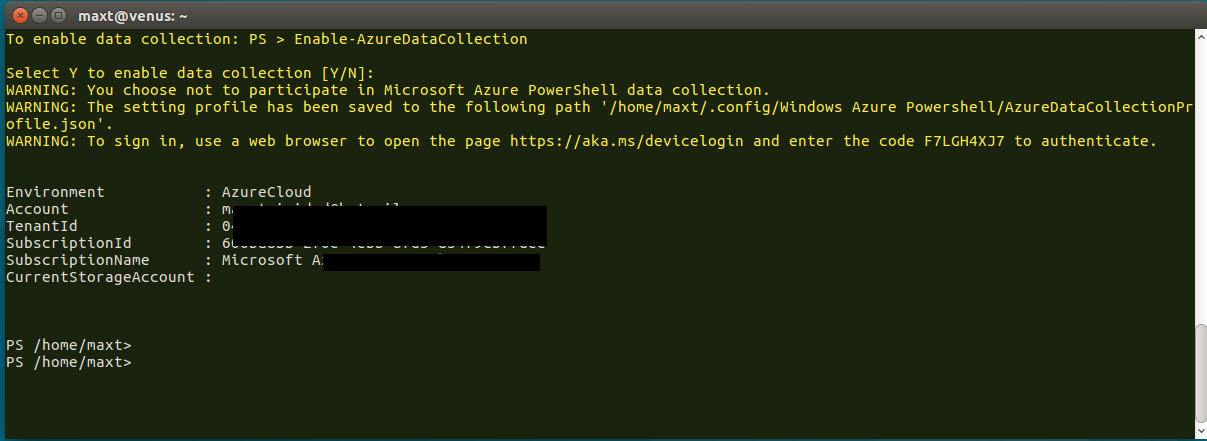
6. At the end, you will be asked to close the page and the command will end executiion connecting to Azure.

Try to execute a few AzureRM commands to make sure the connection was successful:

[sourcecode language=”powershell”]
## – Testin Azure connections:
Get-AzureRMSubscription;

Get-AzureRMVM -ResourceGroupName AZRESOURCEEAST01 -Status;

[/sourcecode]

Saving Connection Profile for Automation

After verifying connectivity to Azure, use the following command to save your Azure Subscription Profile in a *Json file. Just give it a location and save the file. This will speed up the *connection step.

[sourcecode language=”powershell”]
## – Save Azure subscription profile: (one time or as needed)
Save-AzureRmContext -Path “/home/username/AzureSubs/lx_ARMprofile.json”;

[/sourcecode]

Next time around connecting to Azure, use the Import command to connect:

[sourcecode language=”powershell”]
Import-AzureRmContext -Path “/home/username/AzureSubs/lx_ARMprofile.json”;

[/sourcecode]

These step works in both Windows PowerShell and PowerShell Core.

Word of Caution

Now, during my venture of moving from Azure Classic modules to Azure Resource Manager (AzureRM) module, I ended hitting the wall. The user experience was rough! It was all due to have duplication modules and different versions, installed in mutliples locations.

There’s a chance that you will encounter the same issues: mostly obsolete/deprecated commands and/or parameters no longer valid. Now, specially if you install Visual Studio, the Azure SDK option might be already an older version.

So, what’s the solution? Definitely, a cleanup is necessary. Then, trust the PowerShell Galery repository to get the latest versions. More in this issue in upcoming post.

For now, don’t stop learning PowerShell!