Here’s how I build my version of a standalone workgroup Windows 8 Server Virtual Machine(VM) with SQL Server 2012 (“Denal;i”) CTP3. When you create this VM, make sure to give enough memory.
How-To create a VM in Hyper-V Manager console:
I’m not going deep on this topic but the Hyper-V Manager GUI it’s easy to use. I’m assuming you already got an *.ISO image of both: Windows 8 Server Preview and SQL Server 2012 CTP3. If not you’ll have to find it at Microsoft website and/or your MSDN/Technet subscribtion.
Before Creating your new Virtual machine:
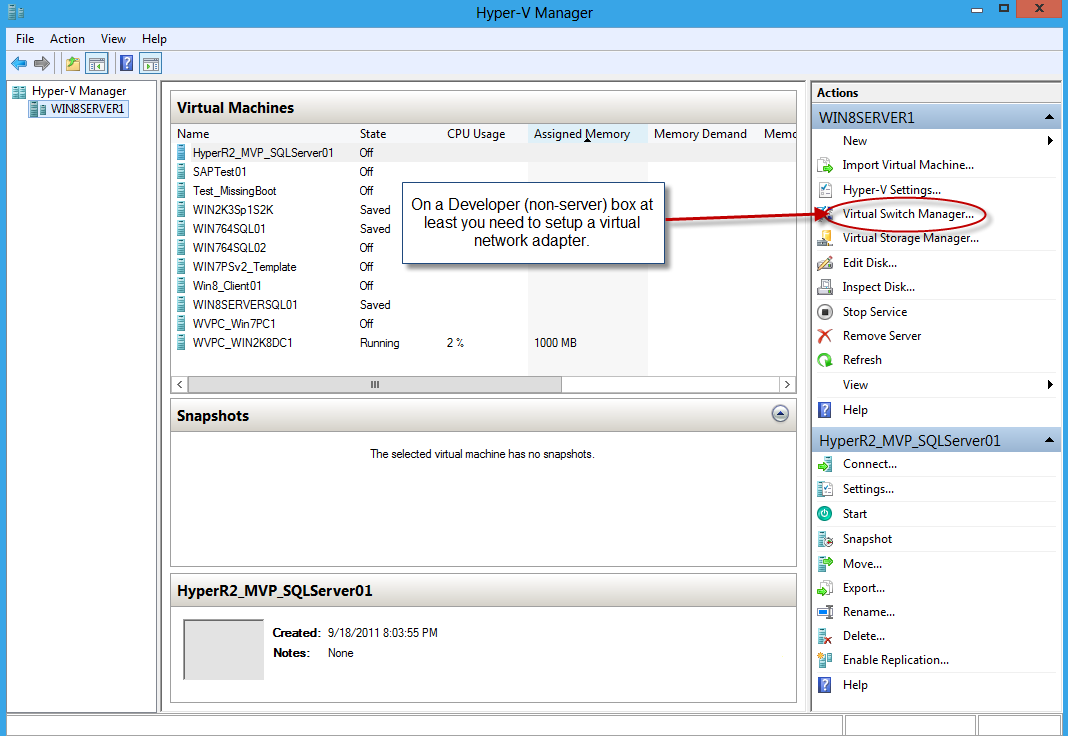
Keep in mind, you’ll need to setup you Hyper-V environment. Meaning, if you’re using a laptop and/or a desktop computer (not a server), still you need to make sure it meets the Hyper-V requirements or it won’t work.
So, at least you will need to use the “Virtual Switch Manager…” to assist you setting up your virtual network card to use by any VM you create.
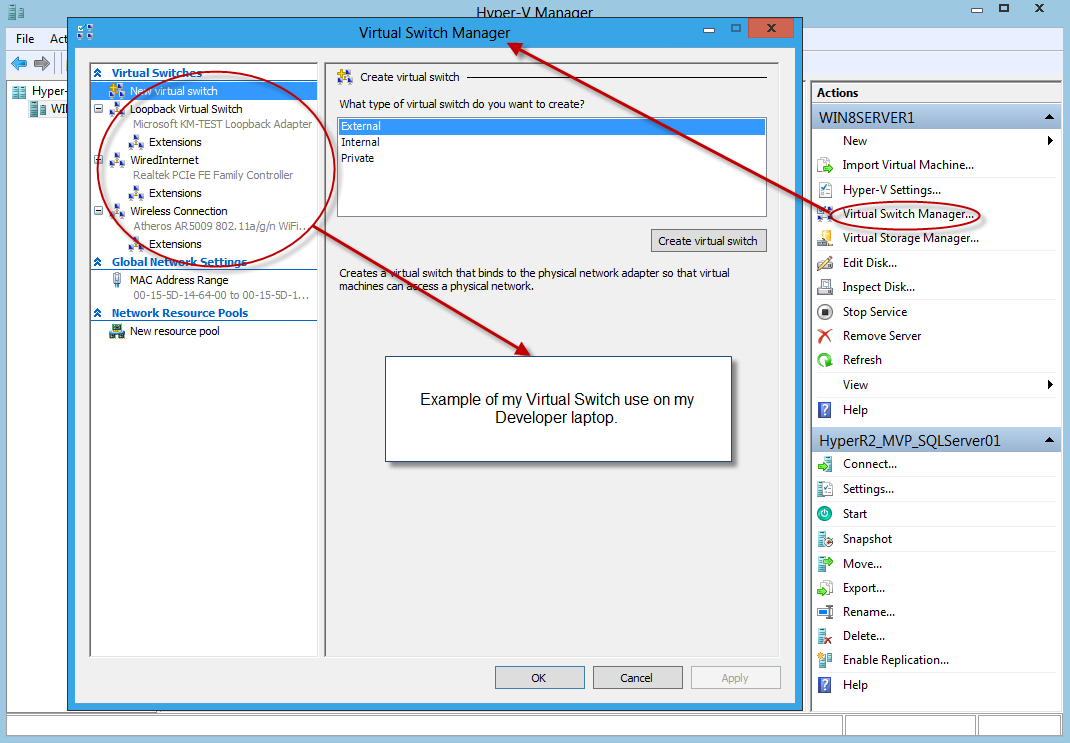
Notice, in my environment, I have created three virtual network adapters:
- Wired Internet
- Wireless Internet
- Loopback
The first two adapters serve my purpose to be able to connect to my physical machine Internet connection so I can do windows update. The loopback adapter is for my internal network connection to my virtual Domain Controller.
*Hint*: In order to allow your VMs to access your external wireless adapter, you need to enable in “Server Manager” the “Wireless LAN Service” feature before you create the virtual wireless adapter.
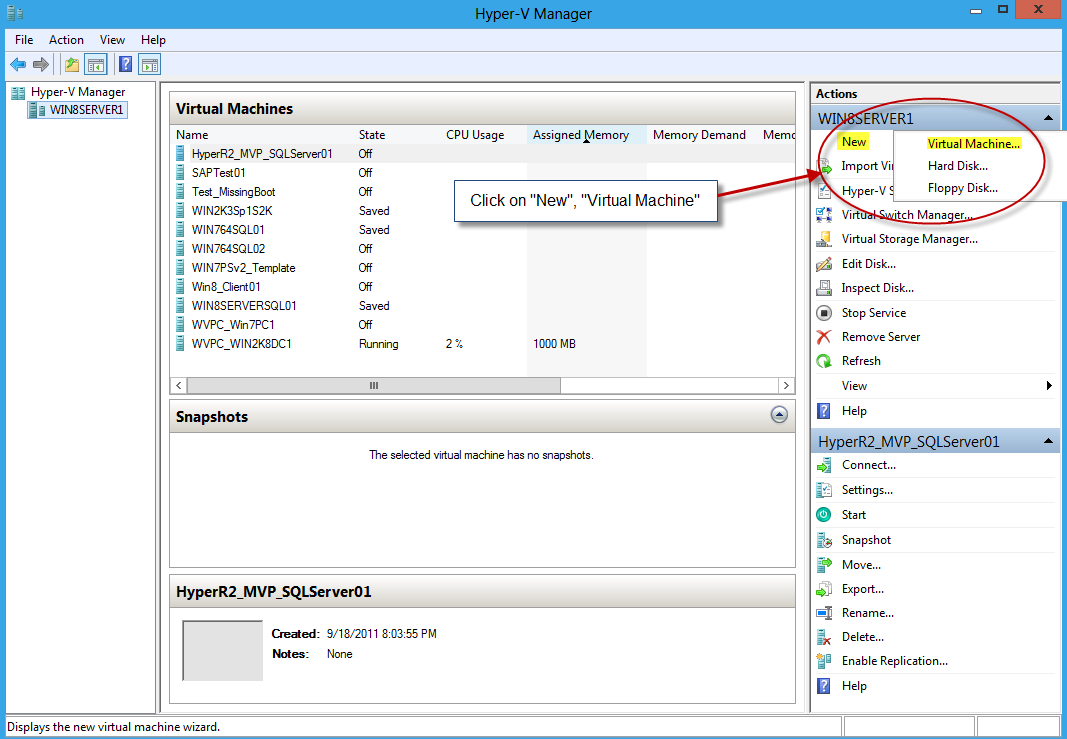
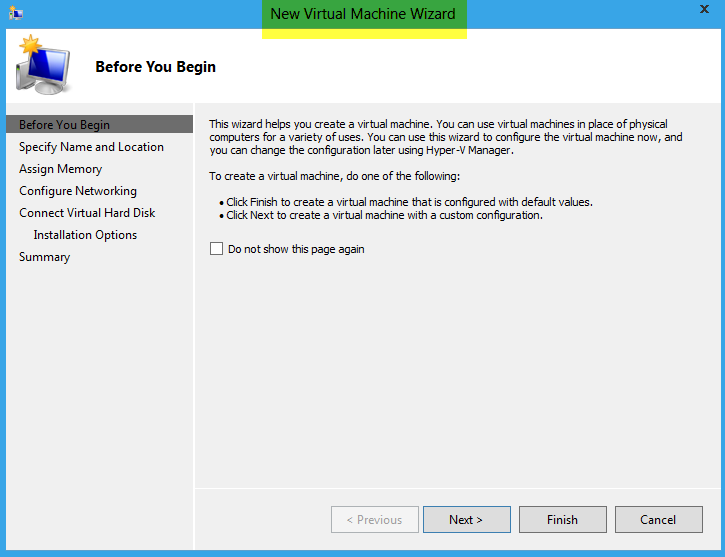
Now, you are ready to create a New Virtual machine, and just follow the wizard:
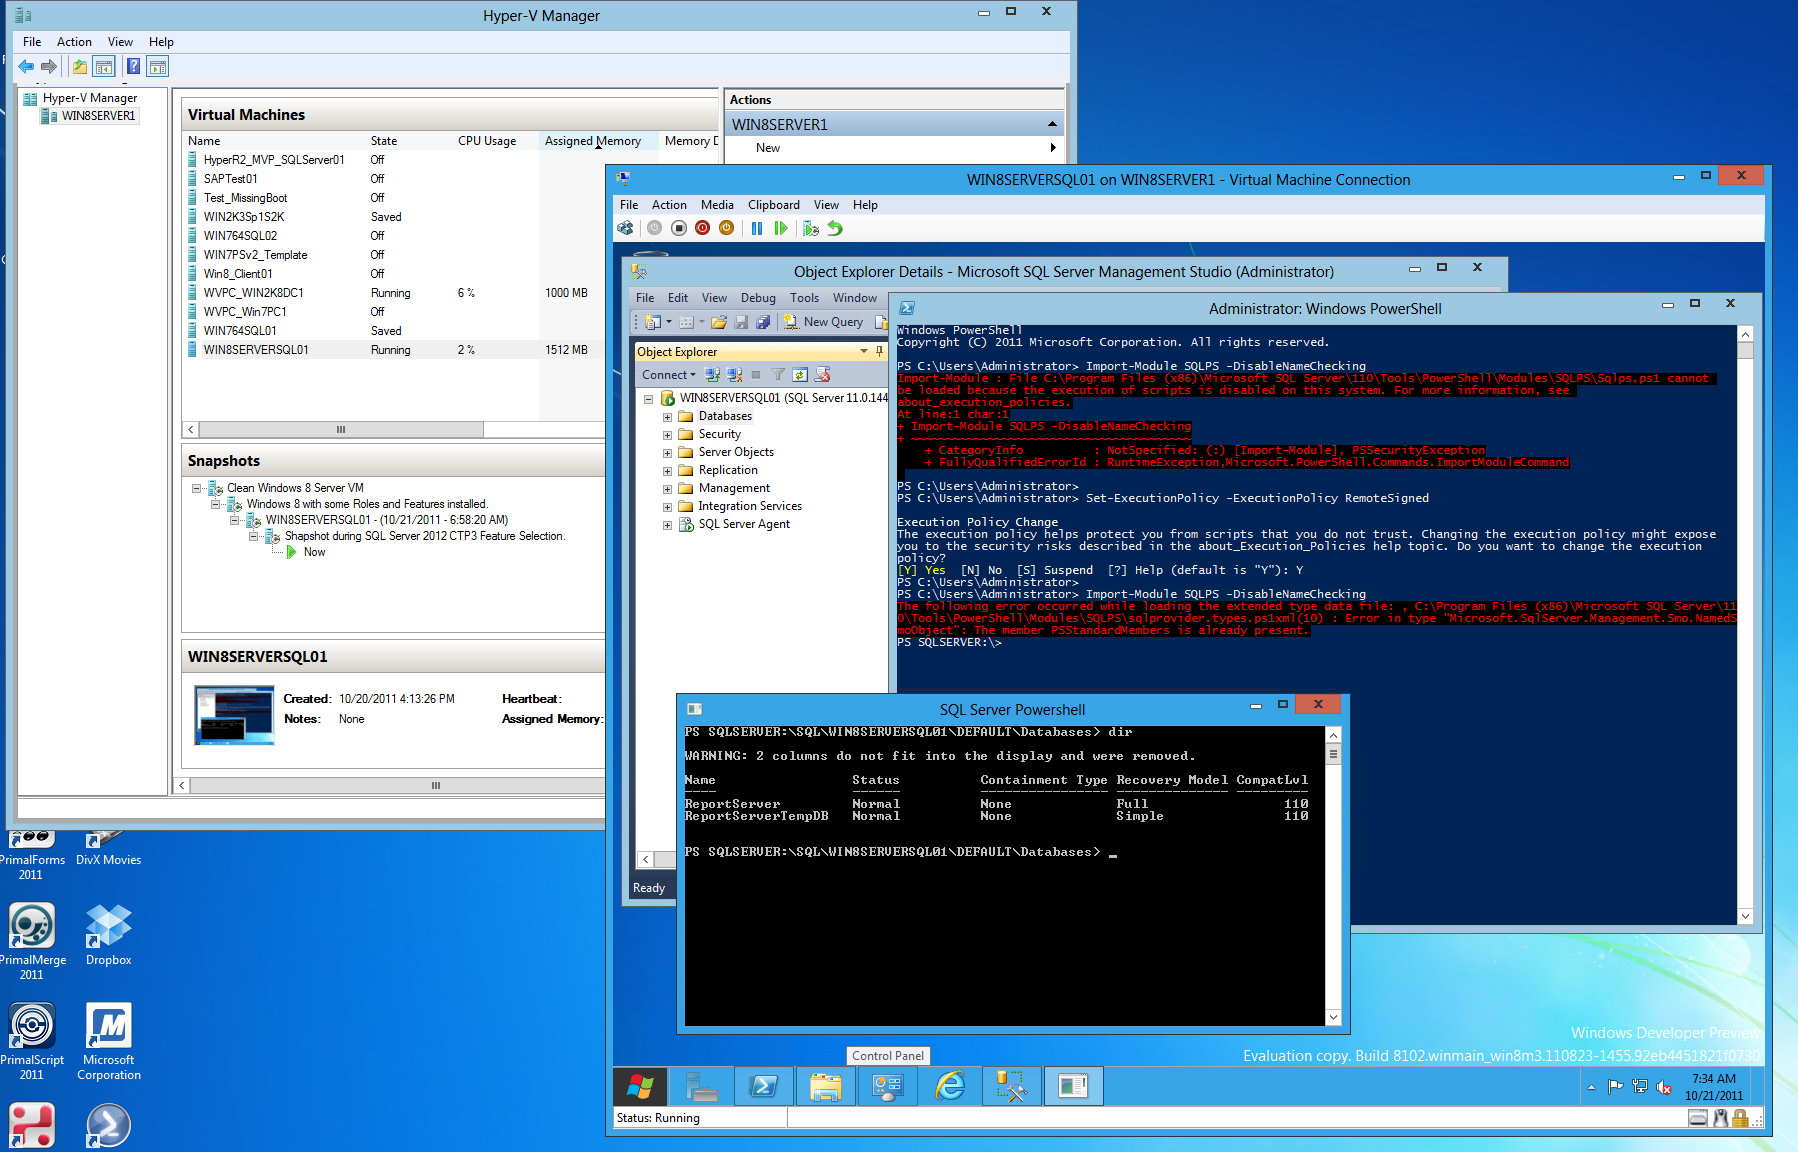
The “New Virtual Machine Wizard” will help you configured everything you need. Make sure you create this VM with enough memory. In my case I assigned 1.5GB of memory.
Opening your Virtual Machine Connection:
There’s two ways to open your VM Connection in your “Hyper-V Manager” console:
- By double-clicking at the actual virtual name.
- Or, double-click at the actual virtual machine preview pane at the bottom left side of the “Hyper-V” console.
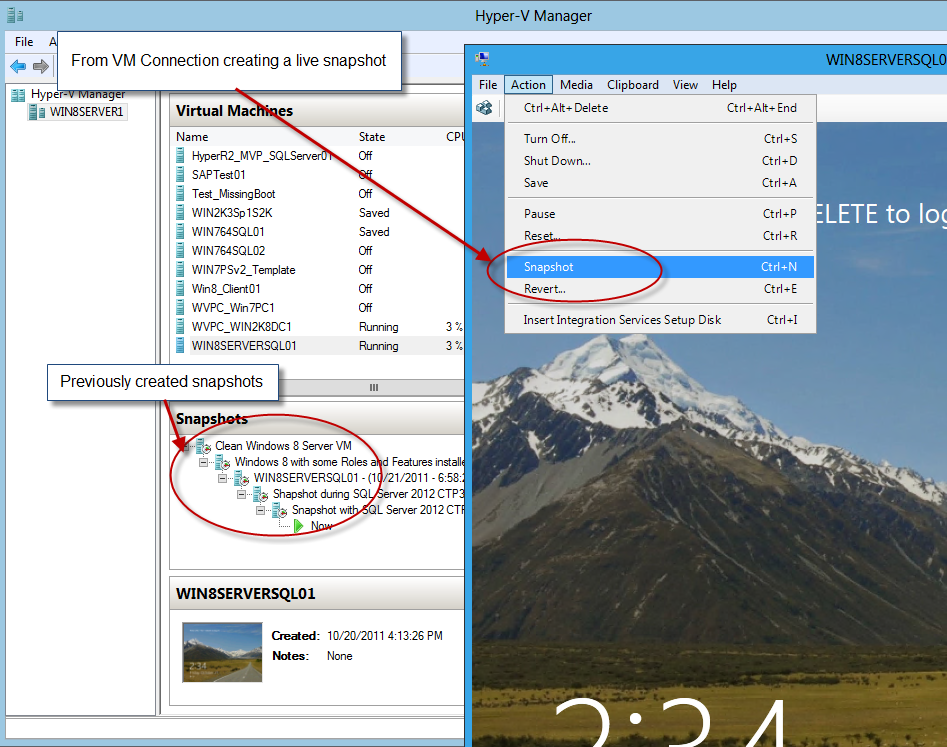
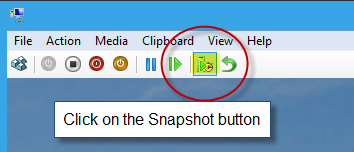
Now that your connection GUI is open, it’s a good time to start doing a VM Snapshot in case you need to go back and troubleshoot in case of problems. Here’s some pictures on How-To create a VM Snapshot:
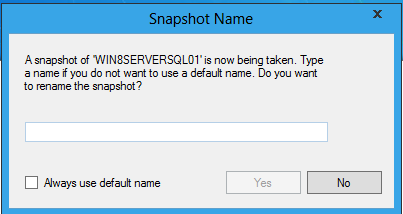
If a Snapshot box asking to add a Name to your snapshot, go ahead and do it. This box only comes when there has been changes done to your VM.
Now, Ready for SQL Installation.
Installing SQL Server 2012 (“Denali”) CTP3:
After building the virtual server, if you try to immediately install SQL Server 2012, it won’t work. And, when you try to run the setup.exe, you won’t have access to the “SQL Server Installation Center” to view the “Hardware and Software Requirements” information.
Check SQL Server Requirements:
So first, you may want to check this link to read about what’s required to install this new version of SQL Server: http://msdn.microsoft.com/en-us/library/ms143506(v=SQL.110).aspx
Need Role(s) and Feature(s):
In order to make my SQL Server installation work, I had to open Windows 8 “Server Manager” and follow the wizard to do the following steps:
- Install the Application Server Role (you can add more roles as you need during this process).
- Then, you need to add the following features: (again, you can add additional features as needed)
a. Enable the .NET Framework 3.5
b. Enable the PowerShell ISE
After doing this steps, then I was able to get the SQL Server setup to work and allow me to start my installation. Use the VM Connect GUI to allow you to attached the SQL Server *.ISO image for your VM to start the SQL Server Installation.
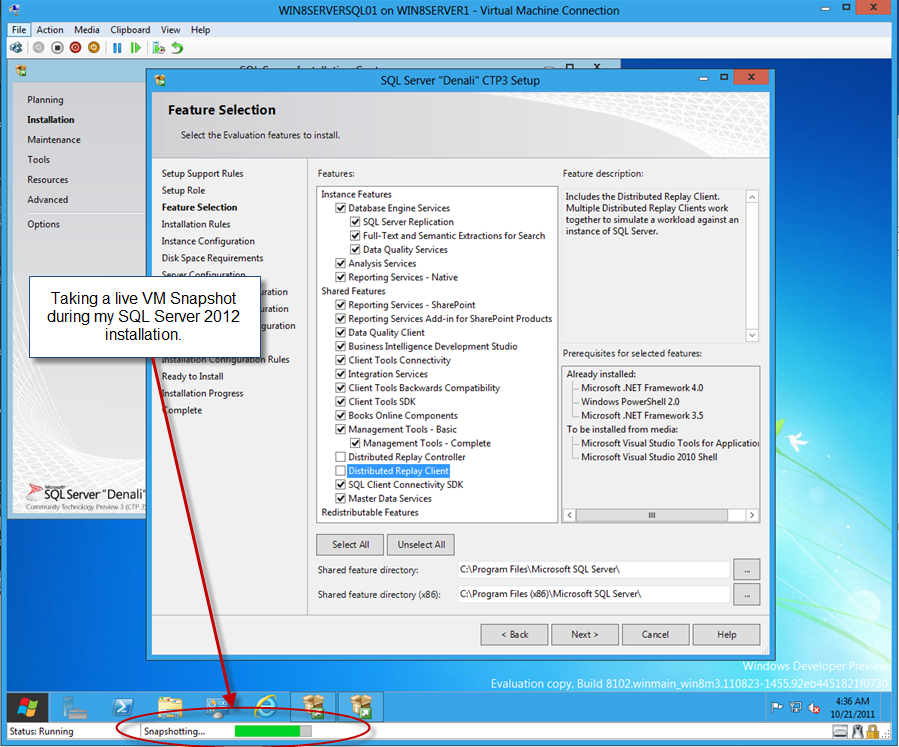
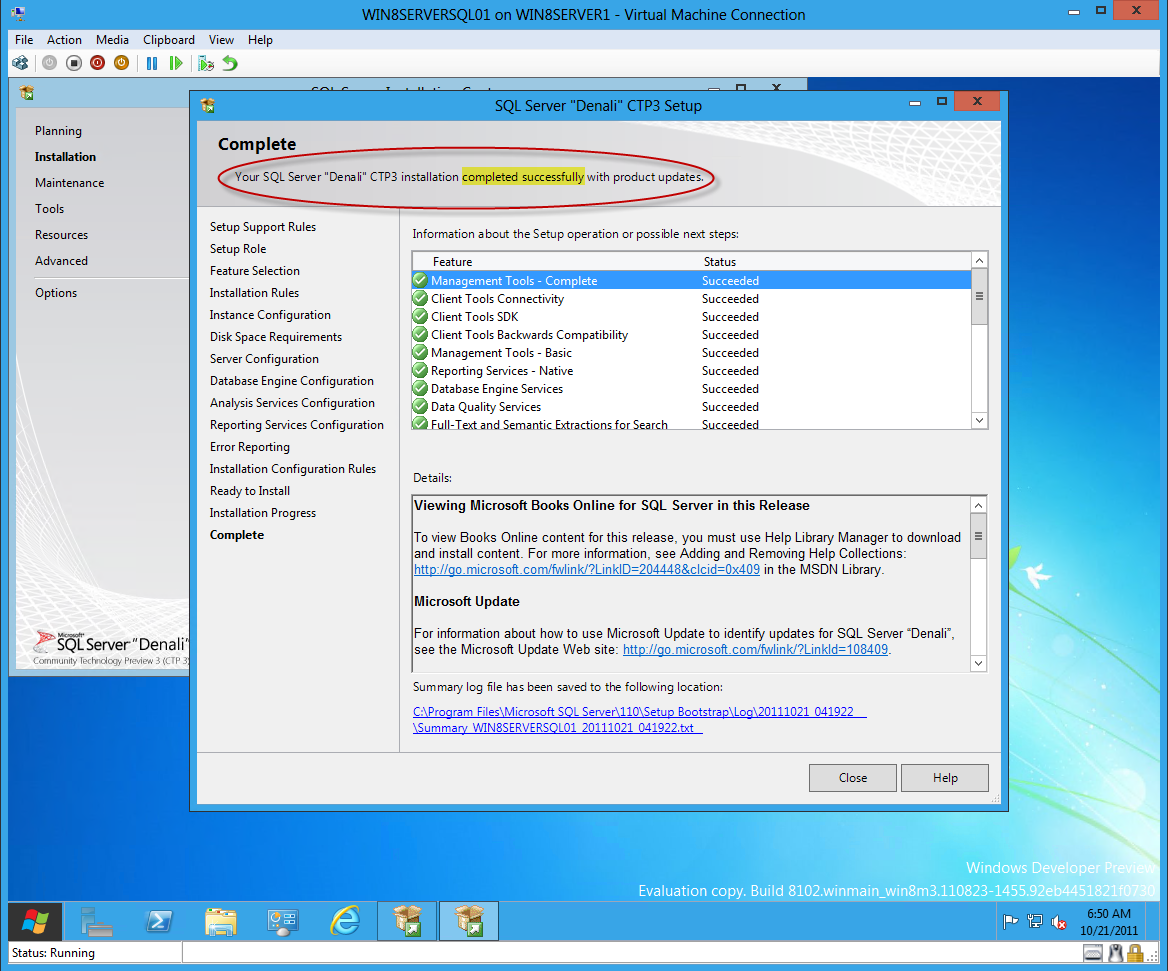
I’m not going to show all the SQL Server installation screens but here’s to show that I’m able to proceed with the installation.
On the previuos picture, notice that I selected most of the features to install except the for the two Distributed Replay services. At the same time, I took a live snapshot of my VM before the actual installation process.
Installation Completed Successfully:
Yes! I got my SQL Server 2012 installed without a glitch!
Testing SQL PowerShell:
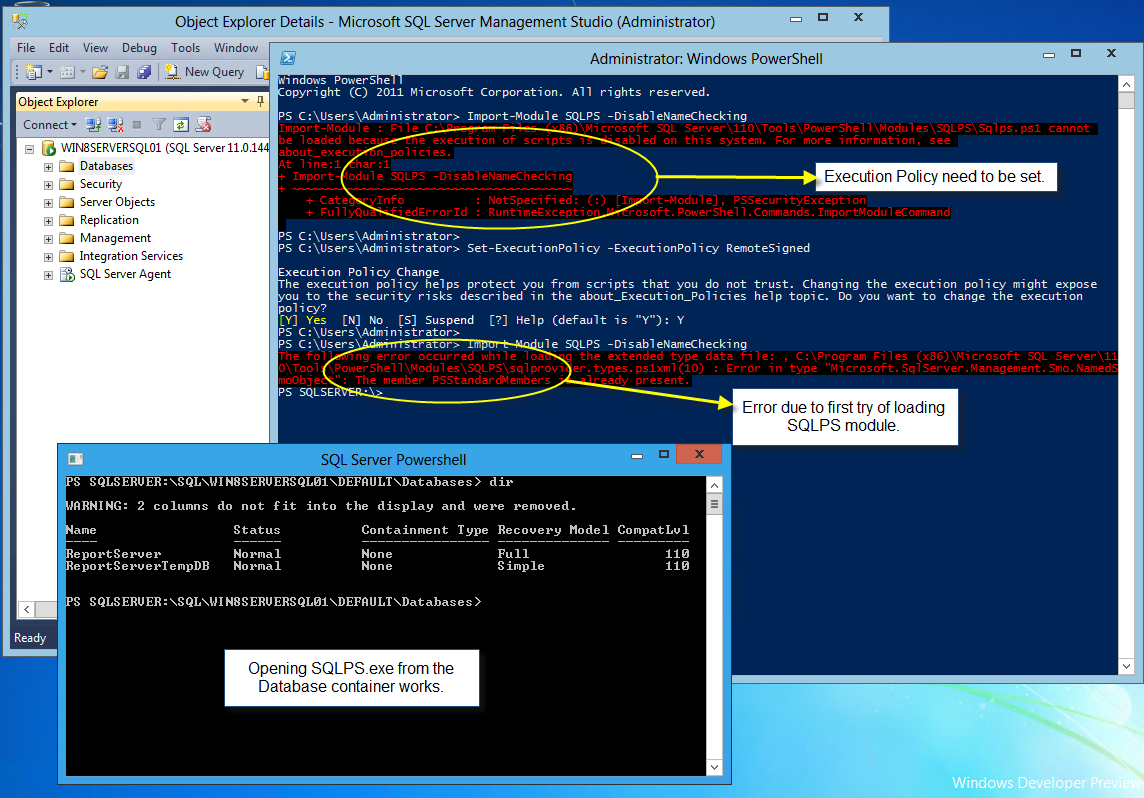
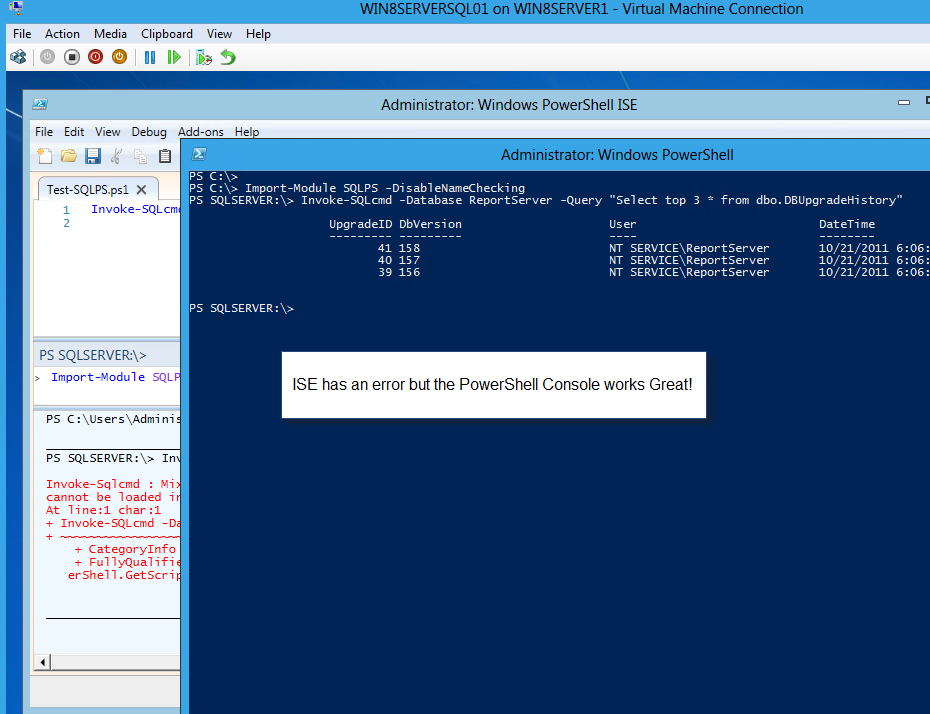
Now, I immediately testing the PowerShell SQLPS module. I was so excited that forgot to do something first. Here’s my result of my first try:
Yes! I forgot to set my “Set-ExecutionPolicy” to “RemoteSigned“, then close and reopen my Windows Console. I also I was able to SQLPS.exe from SSMS Database option just to test that there’s no errors. So, everything works at least for now.
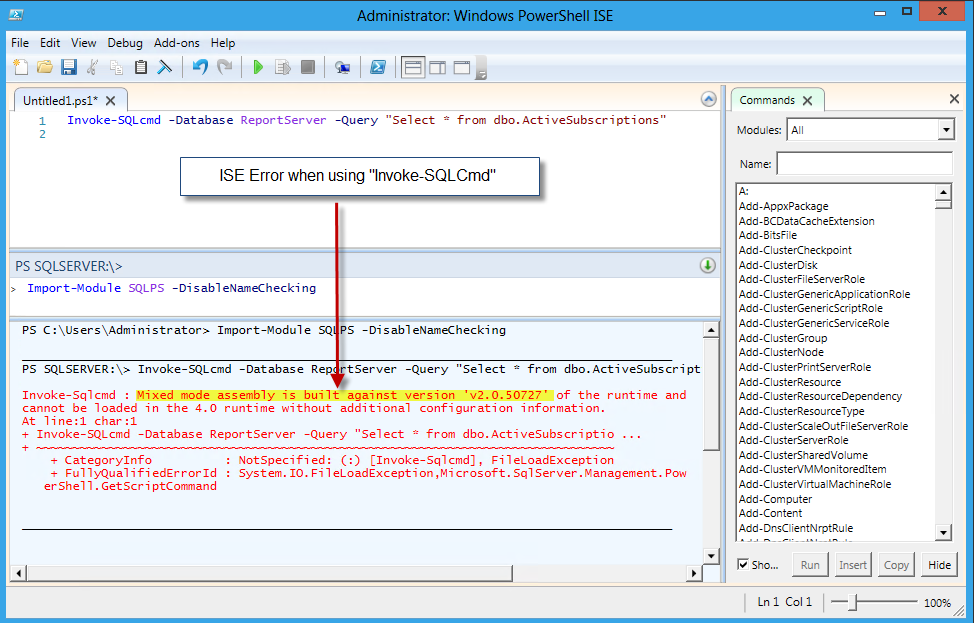
Ooops! Except for PowerShell ISE. Yes! If you try to do an “Import-Module SQLPS -DisableNameChecking” then you get an error:
Don’t Worry! PowerShell ISE is not the only editor. You can still use Notepad to create/modify your script(s). Or, just try downloading one of the free community editors from: SAPIEN, and PowerGUI just to name a few.
To test SQLPS I use the following command line:
Invoke-SQLcmd -database ReportServer -Query “Select top 3 * from dbo.DBUpgradeHistory
Final comments:
I know I may have skip some steps but the bulk on How-To create Window 8 Server VM in shown in this blog. One important thing to keep in mind, these are still Community Technologies Preview (CTP) and it will change.
So, Don’t be afraid to try it! This is why we have the ability to create Virtual Machines in our own developement machines. Again, take advantage of Hyper-V.
The opportunity we have is to learn from them, assist giving feedback, and MOST IMPORTANT, it help us to stay ahead in upcoming technologies.
Enjoy, Learn, and Collaborate!
Bonus!!… Bonus!!
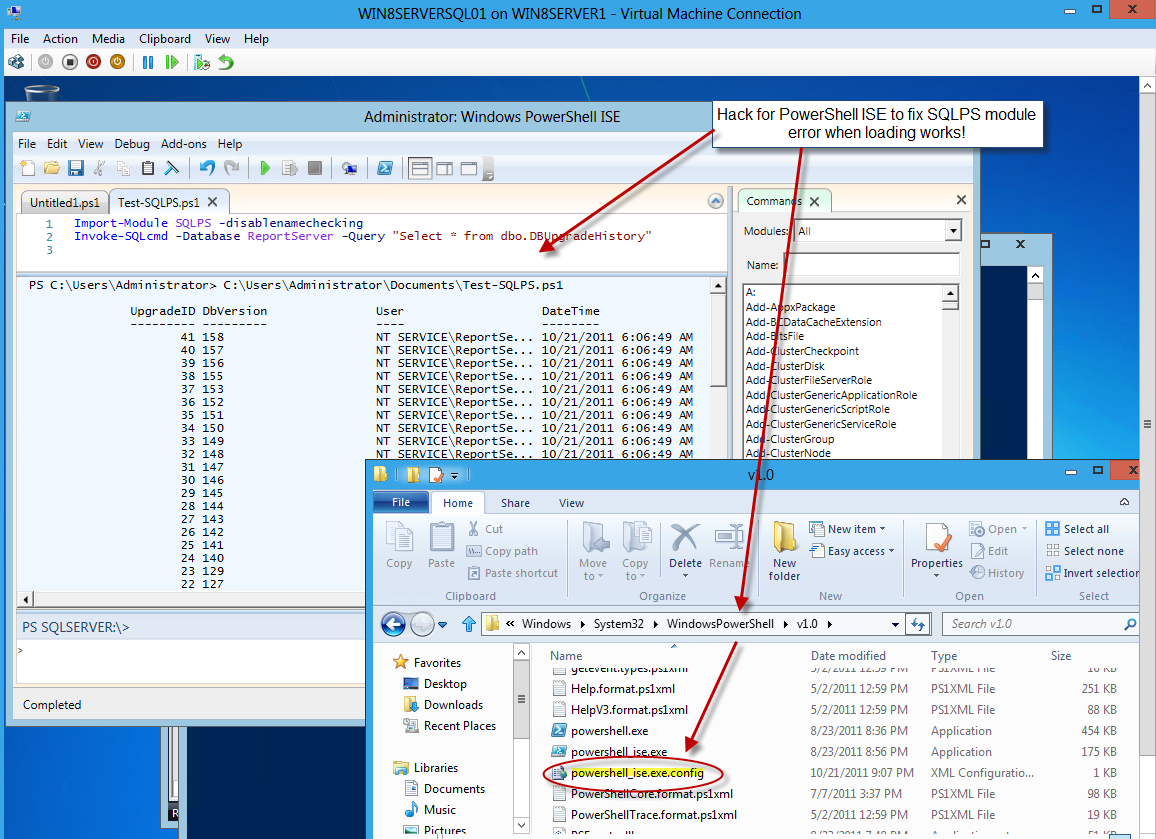
If you want a HACK to fix the PowerShell ISE that here it is: (Hack provided by one of our PowerShell MVP’s – Joel “Jaykul” Bennett
http://HuddledMasses.org
http://PowerShellGroup.org
)
- Go to you x:\Windows\System32\WindowsPowerShell folder (make sure to access this folder “As an Administrator” or it won’t work)
- Create a blank text filename: powerShell _ise.exe.config (Yes! this file extension is “.config”)
- Then, add the following XML lines, and save the file when done:
(Updated: 10/26/2011 – I missed the “runtime” section)
<configuration>
<startup useLegacyV2RuntimeActivationPolicy=”true”>
<supportedRuntime version=”v4.0″ />
</startup>
<runtime>
<loadFromRemoteSources enabled=”true”/>
</runtime>
</configuration>
Reopen PowerShell ISE and try to use the “Invoke-SQLcmd” command.
That’s it!
