Handling SQL Server Connection strings with PowerShell Secret Management

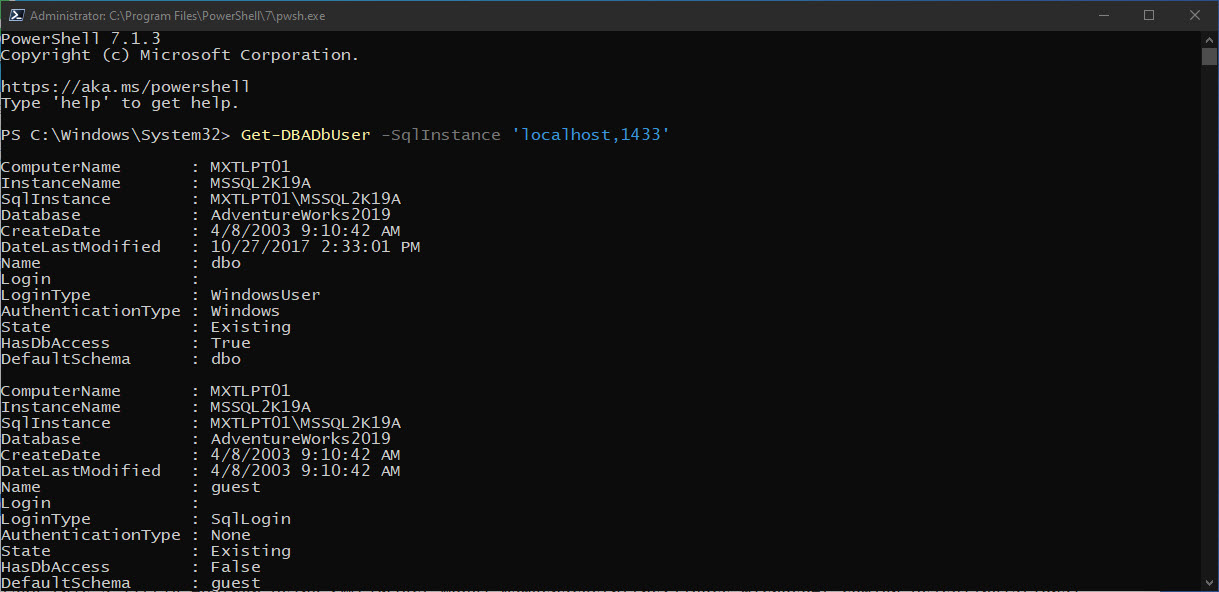
Finally, I came up with a practical example using the Powershell Secret Management module for storing SQL credentials. This is an excellent way of keeping your SQL connection strings information out of your scripting code. This way we just have it stored in our Vault.

Where do I start?

To install the Powershell Secret Management module, execute the following series of one-liners in a PowerShell prompt to install the latest version from the PowerShell Gallery:

Note: This module has finally reached GA (Generally Available) status.

## - install from the PowerShell Gallery both: SecretManagement, and SecretStore modules:
Install-Module Microsoft.PowerShell.SecretManagement, Microsoft.PowerShell.SecretStore

## - Register the vault with a given name:
Register-SecretVault -Name SecretStore -ModuleName Microsoft.PowerShell.SecretStore -DefaultVault

Now, we got the default “SecretStore” vault created. The vault password will ask once you start adding secrets.

The following cmdlets make it easy to manage your vault:

## - Module: Microsoft.PowerShell.SecretManagement
Get-Secret
Get-SecretInfo
Get-SecretVault
Register-SecretVault
Remove-Secret
Set-Secret
Test-SecretVault
Unregister-SecretVault

## - Microsoft.PowerShell.SecretStore
Get-SecretStoreConfiguration
Reset-SecretStore
Set-SecretStoreConfiguration
Set-SecretStorePassword
Unlock-SecretStore

Note: By-Design. There can only be one vault available.

Take your time to learn these commands.

Let the fun begin

Let’s cut down to the chase and see how this works. I’m going to proceed to create my secret SQL Server connection string values.

Keep in mind, secrets management supports five types of objects: byte[], String, SecureString, PSCredential, and Hashtable. By DEFAULT, the secret will be stored as a ‘SecureString‘ object.

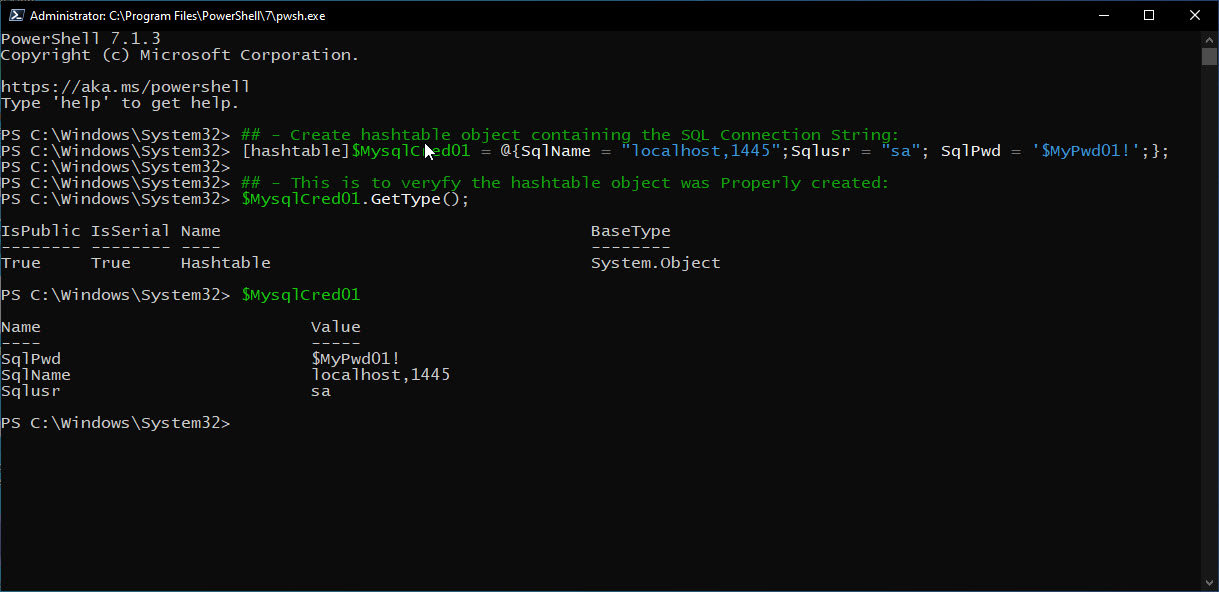
Be creative! Why not store my connection string(s) as a hash table object containing my credential information in the following way:

## - Create hashtable object containing the SQL Connection String:
[hashtable]$MysqlCred01 = @{SqlName = "localhost,1445";Sqlusr = "sa"; SqlPwd = '$MyPwd01!';};

## - This is to veryfy the hashtable object was Properly created:
$MysqlCred01.GetType();
$MysqlCred01

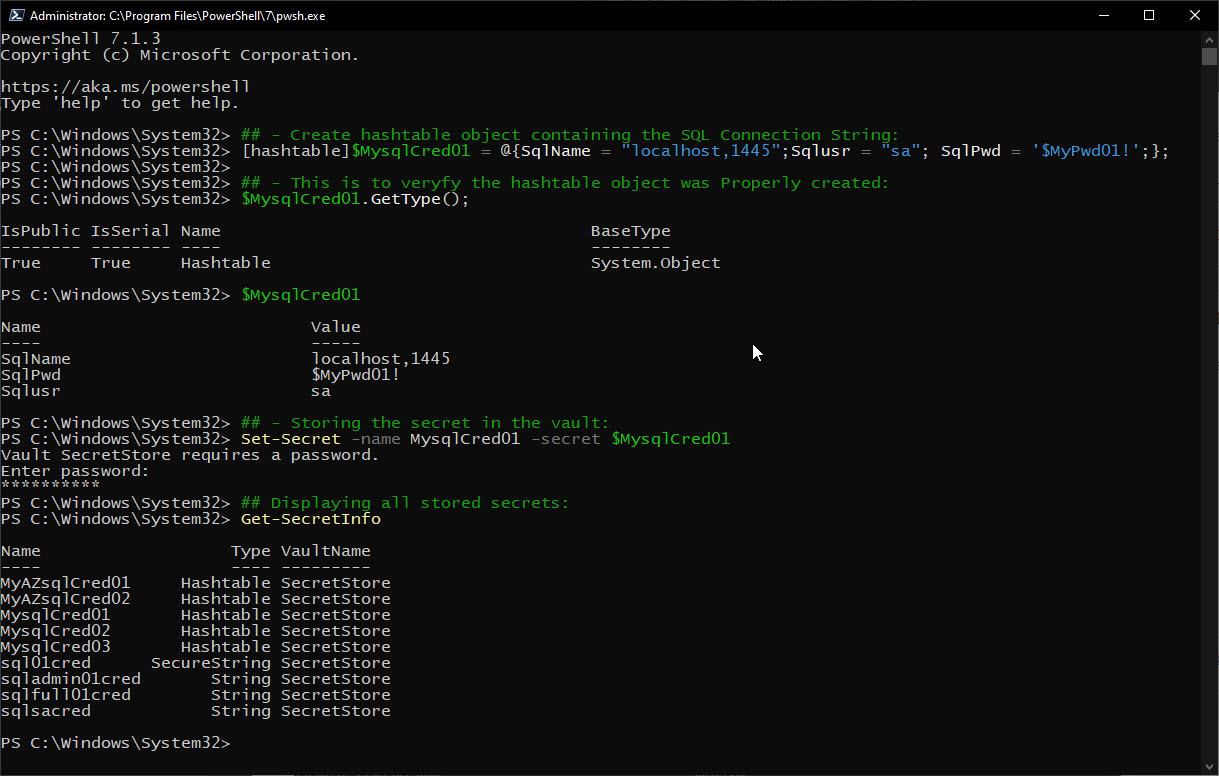
Next after creating the hashtable object, is to save it in the vault with the following command “Set-Secret“:

## - Storing the secret in the vault:
Set-Secret -name MysqlCred01 -secret $MysqlCred01

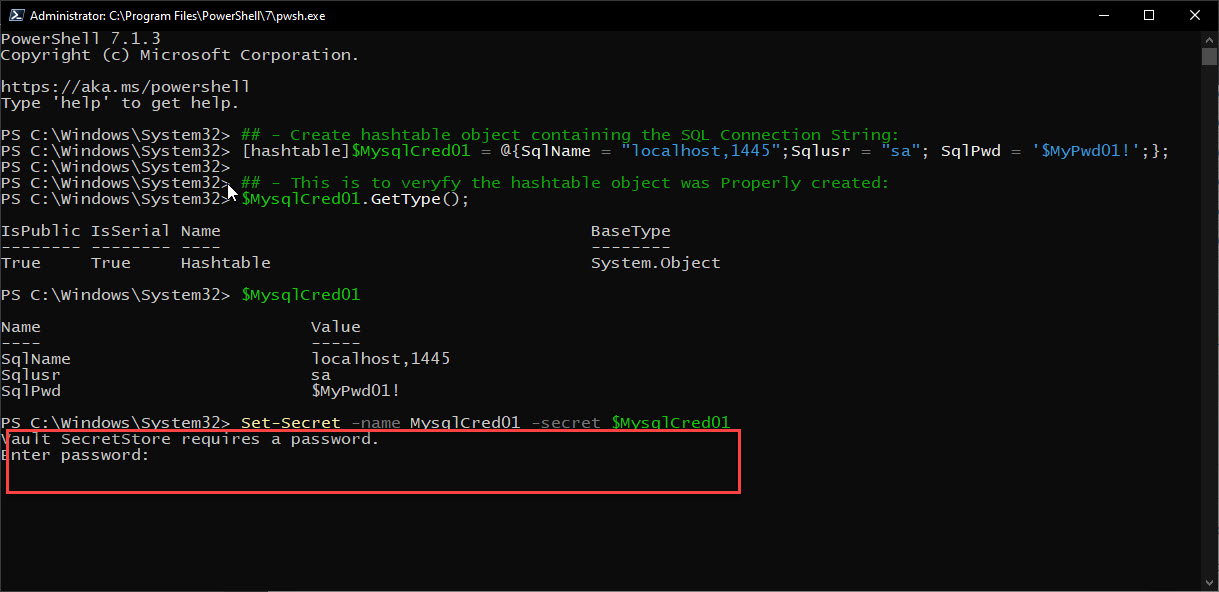
Note: the first time you store a secret value to the vault, you’ll be prompted for a password.

As you save more secrets, use the following command “Get-SecretInfo” to list what you have in the vault:

## Displaying all stored secrets:
Get-SecretInfo

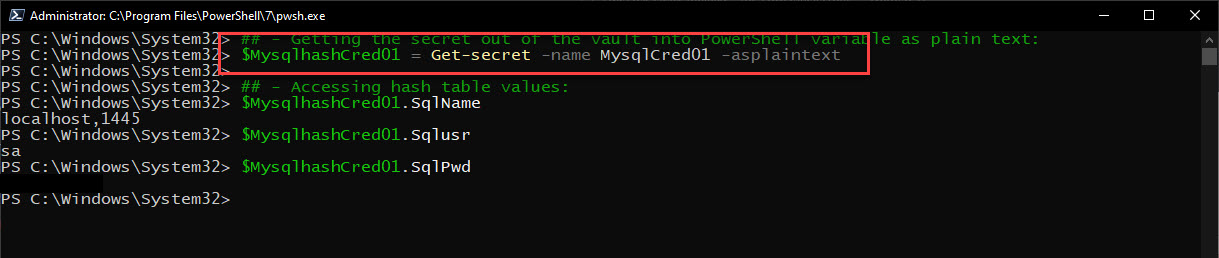
Now, to get your secret from the vault and use it in PowerShell:

## - Pulling the secret out of the vault into PowerShell variable as plain text:
$MysqlhashCred01 = Get-secret -name MysqlCred01 -asplaintext

## - Accessing hash table values:
$MysqlhashCred01.SqlName
$MysqlhashCred01.Sqlusr
$MysqlhashCred01.SqlPwd

You will notice that eventually, your access will time-out locking you out of the vault. Here’s you use the following command “Unlock-SecretStore” to temporarily unlock the vault:

## - Unlocking the vault to access your secrets providing the vault password:
Unlock-SecretStore -Password '$yourpwd!'

Now, the “Unlock-SecretStore” command is useful for script automation. when you want the script to quickly access the vault. You’ll need to do the following:

## - Unlocking the vault for automation:
Unlock-SecretStore -Password $(ConvertTo-SecureString -String '$yourpwd!' -AsPlainText);
Get-SecretInfo

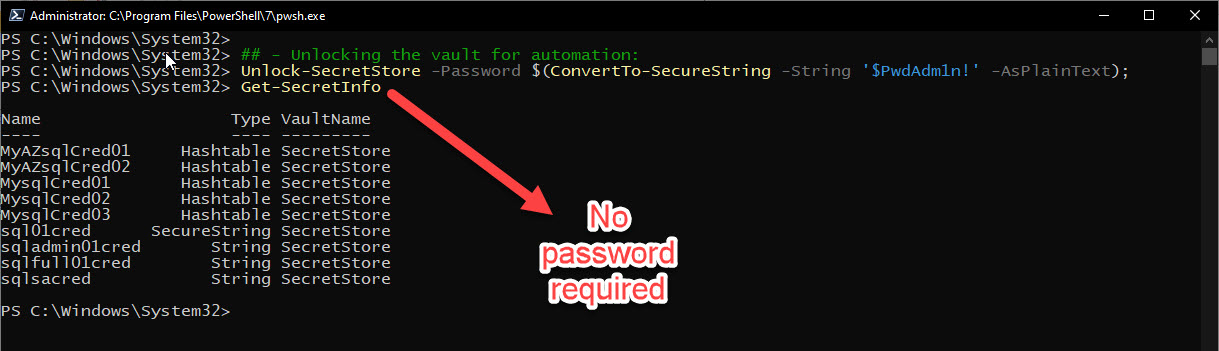
This way SecretStore vault will not prompt for a password.

Implementing Secret in a GUI Application

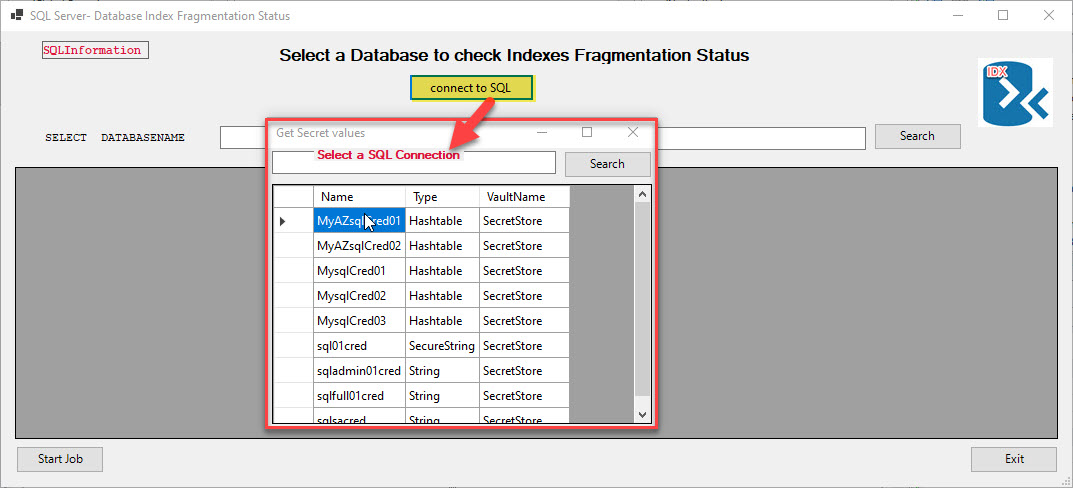
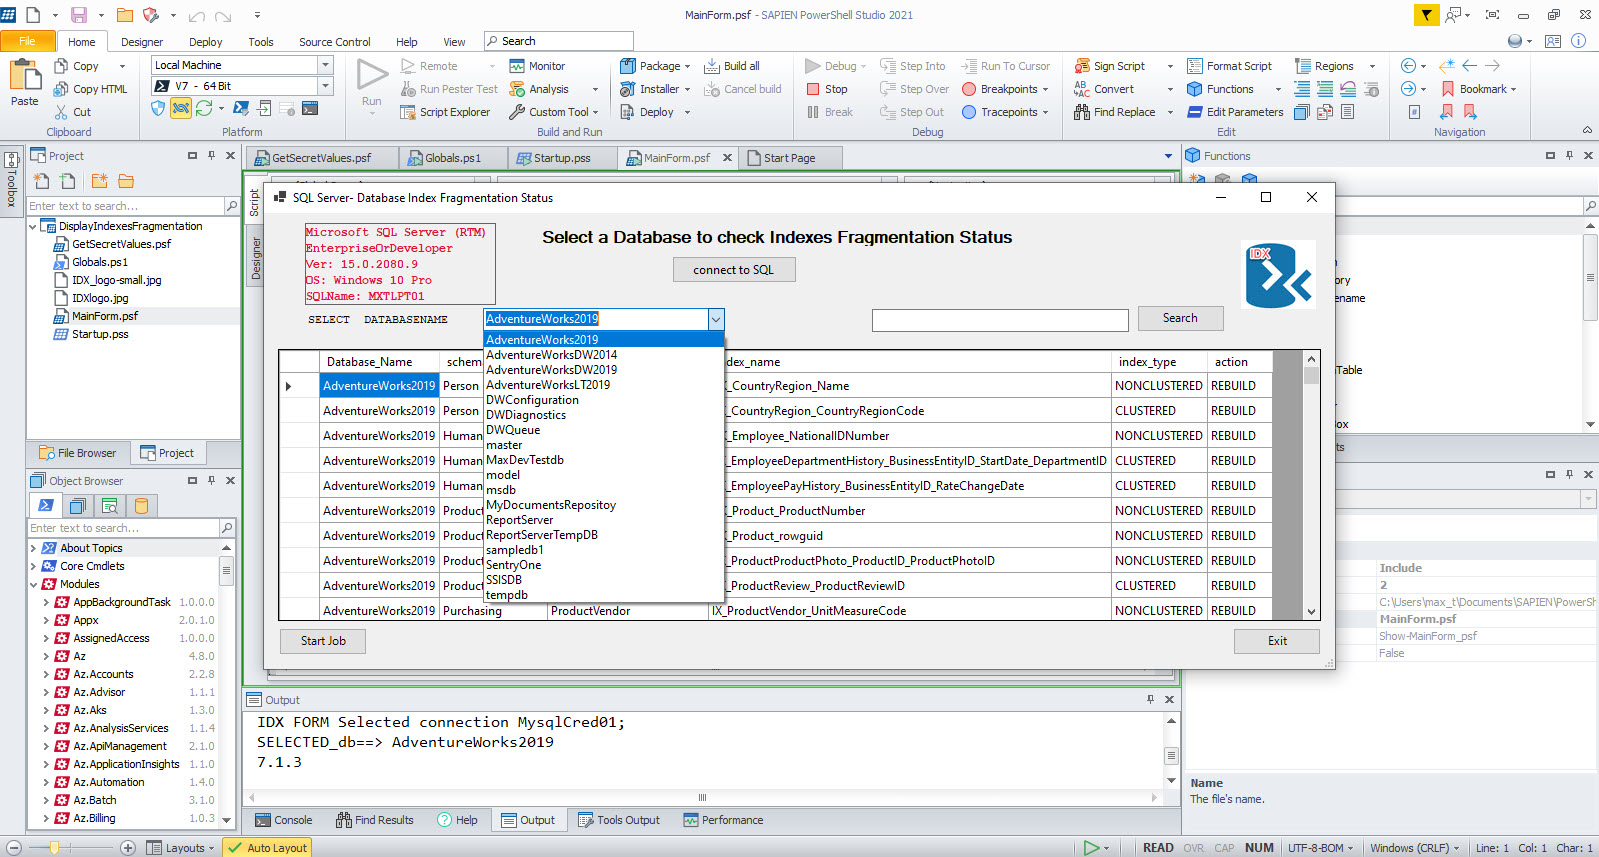
Here’s an example of implementing secret in one of my SAPIEN PowerShell Studio GUI applications that check for SQL Server Database Index Fragmentation.

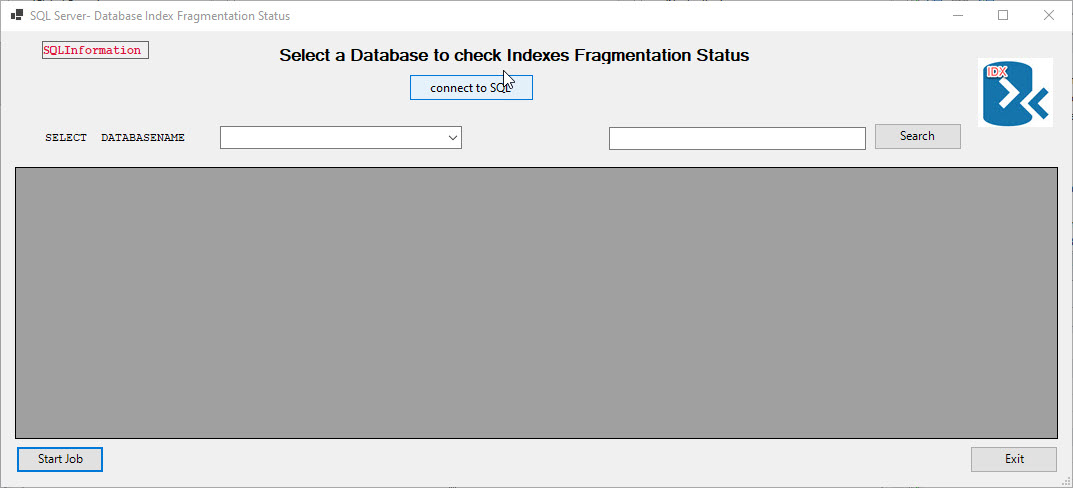
This is a multi-form Window application that where you can select a connection string stored in your SecretStore vault. then you can select the Database and click on the “Start-Job” button to list the status of Database index fragmentation. In this sample application, I can connect to both my local SQL Server and 2 of my Azure SQL Databases.

If you work with PowerShell, both SAPIEN’s Primalscript and PowerShell Studio is a good tool to have for any Administrators and DevOps. Try them out!

For more information

1. Secret Management Blog post.

2. Secret Management in Github. (Post any bugs and/or feedback here)

3. SecretStore in Github. (Post any bugs and/or feedback here)

Have a GREAT SQL PowerShell Day! This is the way!

PowerShell Working with SQL Logins Name

This blog post is following “Changing a SQL Server Login name with T-SQL“. Let’s take advantage of the .NET SMO framework assembly object model Namespaces with PowerShell to change a Windows account in a SQL Server Logins.

Remember to download the latest version of PowerShell.

There’s nothing wrong in using SSMS (SQL Server Management Studio) as our GUI application to manage our SQL Server engine. But soon, you will have the need to use PowerShell scripting for automating some daily tasks. And, Trust me! It will save you time.

Both Microsoft and the SQL Server Community provide you with some of the Awesome tools, such as the following PowerShell modules: SQLPS, SqlServer, Secretmanagement, and DBATools.

Let’s begin with creating  a list all SQL users on our SQL Server using the DBATools module  “Get-DBAuser” command:

Get-DBADBUser -SqlInstance 'localhost,1433'

As you can see, this command returns a lot of information you can export and dissect in many way.

Now, let’s take this a little further using SMO Object Model Namespaces.

Don’t be scare! in order to start using these SMO Classes. To start, all you need to have installed any of the following PowerShell Modules: SQLPS, SQLServer or DBATools, then execute the “import-Module” command:

## This will load SMO assemblies:
Import-Module SqlServer

Then all necessary SMO Assemblies are loaded and ready to be consumed during your PowerShell session. You can start building your own PowerShell one-liners or scripts/functions command to interact with the SQL Server engine.

Let’s cut to chase, and create a simple PowerShell function “Get-SqlLogins‘ to simply list all my SQL logins in my SQL Server:

## - function_Get-SqlLogins.ps1:

function Get-Sqllogins
{
param
(
[parameter(Mandatory = $true)]
[string]$sqlname,
[string]$uname,
[string]$upwd
)

## - Prepare connection to SQL Server:
$SQLSrvConn = `
new-object Microsoft.SqlServer.Management.Common.SqlConnectionInfo($sqlname, $uname, $upwd);
$SQLSrvObj = new-object Microsoft.SqlServer.Management.Smo.Server($SQLSrvConn);

## - Get SQL SERVER list of database names:
$global:itm = 0
$SQLSrvObj.logins | Select-Object @{ l = 'itm'; e = { $global:itm; ++$global:itm }; }, name, logintype;

}; 
$sqlname = 'localhost,1433';
$uname = 'sa';
$upwd = '$SqlPwd01!';

Get-Sqllogins -sqlname $sqlname -uname $uname -upwd $upwd

## - End-of-File

Note: Save this code as function_Get-Sqllogins.ps1. 

You can edit this file to run one liner at the time and explore the $SQLSrObj PowerShell object.

Use the following GET-Member(alias gm)command to explore the object content:

## - exploring .NET Objects:
$SQLSrvObj | gm | Out-GridView

This is a good way to learn about your PowerShell objects.  You’ll be surprised by the ton of information you can find for documentation.

Now, try listing all SQL logins names by typing the following:

## - shorthand  to list all values in a object proprety:
$SQLSrvObj.logins.name

So, with a few lines of code, you can quickly get results.

Now, proceeding with looking for the Windows account I want to change the name in the SQL Login.

For this, I need to add line numbers to the PSObject result. This way I can Isolate the Login ID:

$global:cnt = 0
$SQLSrvObj.logins | Select-Object @{ l = ‘cnt’; e = { $global:cnt; ++$global:cnt }; }, name, logintype

For the finale: Changing the SQL Login Name. I’m going to manually do this using SMO PowerShell One-liner:
I found that element #5 is the SQL login I need to change:

## - verify before making the changeto the SQL Login object;
$SQLSrvObj.logins[5]

So far we’ve been working with SMO .NET Objects properties. Here’s where we use SMO .NET methods which affect the object (element#5) I have manually selected using “$SQLSrvObj.logins[5]“:

Last steps for updating the SQL Login name:

Note: Keeping in mind, the actual change starts at the Windows Account level. 

1. The *.Alter() method sets the object ready to be changed:

$SQLSrvObj.logins[5].alter()

2. followup by the *.rename(**string**) method which will affect the name object.

$SQLSrvObj.logins[5].rename('MXTLPT01\Dev01')

3. And, finally we use the *.refresh() to update all logins list with the name change.

$SQLSrvObj.logins.refresh()

AS you can see,  this open to some automation opportunities that can involve Windows Domain with SQL Server Accounts administration.

Don’t forget! always test your scripts. Practice makes a good scripter, and never be afraid of trying new stuff.

SQL PowerShell! It is the way!

Getting Ready for PowerShell 7.1 (GA)

This November, PowerShell 7.1 (GA) will become available, as well as PowerShell 7.2 Preview version. And it will come with some interesting features.
If you want more information on these upcoming releases, check out the following two videos:

* Taking your automation to the next level with PowerShell 7

* PowerShell Unplugged – Challenge Edition

Both videos will give you enough information about the history and what’s coming in PowerShell 7.1.
I guarantee that you won’t be disappointed.

But wait! There’s more. Don’t forget to check out any of the existing modules found in the PowerShell Gallery, such as:

* Microsoft.PowerShell.SecretManagement and Microsoft.PowerShell.SecretStore

* Microsoft.PowerShell.GraphicalTools and Microsoft.PowerShell.ConsoleGuiTools

* Microsoft.PowerShell.UnixCompleters

Remember, PowerShell has become the cross-platform automation tool of choice for Windows, Linux, and macOS.
It’s never too late to get on the PowerShell bandwagon!

Updating ActiveDirectory module in Windows 10

Do you want to use “ActiveDirectory” module in PowerShell 7 RC.1 in Windows 10? For those who haven’t notice yet, seem like one of the recent updates to Windows 10 RTM Build 1909 will includes the latest version of this module.

“ActiveDirectory” module version 1.0.0.0 will not work in PowerShell 7 RC.1. It will give the following error during the import module process:

ActiveDirectory module imports, but the PSDrive AD: is not created.
Set-Location: Cannot find drive. A drive with the name ‘AD’ does not exist.

To correct the issue, you will need to update this module to version 1.0.1.0.

How to install the updated version?

First, make sure you have installed all of the latest Windows updates. Previous ActiveDirectory module will be on version 1.0.0.0.

To install, look in the “App or remove programs | Optional Features” then look under “Add a feature” for the “RSAT: Active Directory Domain Services and Lightweight Directory Services Tools.

It will replace the previous version with the newer one and will work with PowerShell 7 RC.1.

Remember

To use this module the system need to be a member of a domain, or you’ll get the following error message:

WARNING: Error initializing default drive: ‘Unable to find a default server with Active Directory Web Services
running.’.”

Also, it’s only available for Windows 10 RTM Build 1909, Windows 10 Insider Edition, and Windows Server 2019.

PowerShell 7 Release Candidate Is Here!!

The moment everyone has been waiting for some time is here, PowerShell Release Candidate is available for download. This a “Go Live” release officially supported in production by Microsoft.

Everyone in the Microsoft PowerShell Team, with the help of the community, has done an excellent job with the evolution of this new version of PowerShell. Read all about it on the PowerShell DevBlogs recent post “Announcing the PowerShell 7.0 Release Candidate“.

Make sure to read all previous posts as they perfectly outlined under the “Why is PowerShell 7 so awesome?” section of the release candidate post.

Also, it’s not a bad idea to download the recent .NET 3.1 SDK and check out the updated Docker Core SDK Images.

And, have you try:

1. Windows Terminal – Access all of your Windows Shells from one application.

2. Docker Tech Preview – Get the latest Docker Tech Preview for WSL 2.

3. Out-Gridview – Specially developed to work in PowerShell 7 non-Windows, as well as in Windows OS. (Module: Microsoft.PowerShell.GraphicalTools – PowerShell Gallery)

This is just a few items to keep in mind. It will help you to be a productive DevOps and System Administrator.

PowerShell – Docker Setup for Windows 10 WSL Ubuntu 18.04 with VMware Workstation

The purpose of this blog post is to show how to setup Docker Community Edition in a Windows 10 with VMware Workstation to be use in Windows Subsystem for Windows (WSL).

There are a few blog post that helped me figure out what’s needed to get this to work and I’ll be sharing these links at the end of this post.

My current environment

My current environment consist of the following components:

  • Windows 10 Build 17763
  • VMware Workstation Pro 12
  • *Oracle Virtualbox 5.2
  • WSL – Ubuntu 18.04
  • SQL Server 2017 Developer Edition
  • Windows PowerShell (v5.1.17763.316)
  • PowerShell Core GA v6.3.1 (both Windows and Linux)
  • PowerShell Core Preview v6.2.0-preview.4 (both Windows and Linux)

*Note: This is not the latest version  of Virtualbox but it’s still supported.

Remember, the purpose of this environment is to build a “developer sandbox” that can allow me to learn and work with Docker containers.

What’s needed!

Because I’m using VMware Workstation instead of Hyper-V, there are a few things need to be in place to make this work. Windows 10 need to have the following:

  • All Hyper-V services need to be disable by using “System Configuration” tool.

  •  Install VMWare Workstation Pro. (https://www.vmware.com/products/workstation-pro.html)
  •  Install Oracle Virtualbox version 5.2. (https://www.virtualbox.org/wiki/Download_Old_Builds_5_2)

  •  Install from the Microsoft Store, WSL – Ubuntu 18.04.

  • And, make sure to run “sudo apt update” and “sudo apt upgrade” because images are not updated with latest components.

Installing PowerShell Components

Next, the following Docker components packages from Chocolatey need to be install using Windows PowerShell with administrator privileges:

* Install docker

choco install -y docker

* Install docker-machine-vmwareworkstation

choco install -y docker-machine-vmwareworkstation

Getting WSL Ready for Docker

Now, open the “WSL – Ubuntu 18.04” Linux console and execute the following *commands:

sudo apt update

sudo apt upgrade

*Note: You’ll need to run these two commands manually to keep your Linux distribution up-to-date.

At this point, follow the Docker installation instructions for “Docker-CE for Ubuntu 18.04“. But, in a nutshell, here’s the shortcut:

sudo apt-get install \
apt-transport-https \
ca-certificates \
curl \
gnupg-agent \
software-properties-common

curl -fsSL https://download.docker.com/linux/ubuntu/gpg | sudo apt-key add -

sudo add-apt-repository \
"deb [arch=amd64] https://download.docker.com/linux/ubuntu \
$(lsb_release -cs) \
stable"

sudo apt-get update

sudo apt install docker-ce

sudo usermod -aG docker maxt

exit

At this point. make sure to reopen the WSL linux console.

Setup Docker-Machine in Windows

Back in Windows PowerShell, the next steps show the way to have Docker work in “WSL – Ubuntu 18.04“. Starting with Windows PowerShell console, execute the following commands:

docker-machine --native-ssh create -d vmwareworkstation default
docker-machine create docker-host

These commands should complete without any errors. At the same time, two virtual machines: “default” and “docker-host” will be created and running in *Virtualbox.

*Note: These two *NEED* to be running in order for docker to work with WSL. At the same time, both VMware Workstation and Virtualbox need to be installed or this will not work

To check that for the Docker-Machine environment(s) are working, use the following command:

docker-machine ls

Next, execute the following command to write down “docker-host” environment results to be copied into the Linux user ~/.bashrc file.

docker-machine env docker-host
PS C:\WINDOWS\system32> docker-machine.exe env default
$Env:DOCKER_TLS_VERIFY = "1"
$Env:DOCKER_HOST = "tcp://192.168.220.xxx:2376"
$Env:DOCKER_CERT_PATH = "C:\Users\max_t\.docker\machine\machines\default"
$Env:DOCKER_MACHINE_NAME = "default"
$Env:COMPOSE_CONVERT_WINDOWS_PATHS = "true"
# Run this command to configure your shell:
# & "C:\ProgramData\chocolatey\lib\docker-machine\bin\docker-machine.exe" env default | Invoke-Expression

Open a “WSL – Ubuntu 18.04 console to edit the user “~/.bashrc” file, to add the following Docker variables:

## Added manually for Docker machine docker-host:
export DOCKER_HOST=192.168.99.xxx:2376
export DOCKER_TLS_VERIFY=1
export DOCKER_CERT_PATH=/mnt/c/users/max_t/.docker/machine/machines/docker-host
export DOCKER_MACHINE_NAME=docker-host
export COMPOSE_CONVERT_WINDOWS_PATHS=true

sudo vim ~/.bashrc

Reopen the “WSL – Ubuntu 18.04 console.

Testing Docker in WSL

Now, I can test Docker in my “WSL – Ubuntu 18.04 console session. Open PowerShell Core console, and execute the following command to run the Docker Hello-World demo:

docker run Hello-World

This command download (or pull) the Docker image, then run the Hello-World container. If everything work as expected, then it will display the following text.

To check both Docker image(s) and/or container(s) in WSL , use the following commands: (Picture

# - Check for all pulled images in system:
docker images

# - Check the status of active containers:
docker ps -a

As you can see there no issues executing Docker command lines in Linux PowerShell Core.

To see the full list of docker command line help available click on the following link.

After all this is done! Docker working in my WSL environment.

Limitations

YES! There are limitations. This is a workaround on the issue of using Docker without Hyper-V. And, this will allow you to:

  • Pull images
  • Update containers
  • Save images

In my environment, I found limitations working with Docker Network using WSL which can impact Windows Docker-Machine VM “docker-host” interface. This issue can force you to rebuild both VM interfaces: “default” and “docker-host“.

Make sure to learn how to commit, save, and reload Docker images.  Don’t lose your changes!

So, if you have either VMware Workstation and/or Oracle Virtualbox, consider investing the time creating a Linux virtual machine and then install Docker CE.

Summary

We have accomplished setting up Docker containers in *Windows 10 “WSL – Ubuntu 18.04” using both Windows PowerShell and PowerShell Core in Linux. So, using Oracle Virtualbox v5.2 with VMware Workstation is a required component to make this work.

*Note: These post is meant for people to make Docker work in WSL Linux.

Also, if you’re familiar with PowerShell, Docker commands can execute without any issues. Now, I can use my favorite editor SAPIEN’s PowerShell Studio to build my automation scripts with docker commands.

What’s Next?

Try downloading other Docker images, like SQL Server 2017 and SQL Server 2019. This is the quickest way for providing a built solution using containers.

Learn about Docker Compose, and Kubernetes as these can be use in the Cloud environment as well.

Go and Explores the possibilities of provisioning solutions to your organization!

Resource links

Powerhell Core Ubuntu 18.04 – PSRemoting to an Active Directory Machine

Sometime there’s the need to do PowerShell remoting from Linux to a Windows System. In my lab environment, I was able to install, configure, and established a PowerShell Remote connection from a Linux Ubuntu 18.04 system to *Active Directory joined Windows System.

*Note: Before trying to following steps, if you’re in a corporate domain, consult with your security team. I would recommend that you try this scenario in virtual machine environment.

I’ve been struggling trying to OpenSSH in both Windows 10 (Build 1803) and Windows Server 2019 with no success connecting from Linux. So, I decided to try install Kerberos component on my Ubuntu system and it works!  And, with no need to joined my Linux system to my virtual Active Directory domain.

Install and configuring Kerberos Client

  • I need to install and configure the Kerberos Client application on my system:
$ sudo apt-get install krb5-user
  • Customizing *krb5.conf file settings for my domain:
$ sudo vim /etc/krb5.conf
  • The following are my custom settings in the krb5.conf file for “DOMAINNAME” Kerberos:
[libdefaults]
default_realm = DOMAINNAME.COM

# The following are custom settings for "DOMAINNAME" Kerberos:
dns_lookup_realm = true
dns_lookup_kdc = true
default_tgs_enctypes = arcfour-hmac-md5 des-cbc-crc des-cbc-md5
default_tkt_enctypes = arcfour-hmac-md5 des-cbc-crc des-cbc-md5
permitted_enctypes = arcfour-hmac-md5 des-cbc-crc des-cbc-md5

[realms]
TRINITY.COM = {
kdc = DOMAINMACHINENAME
admin_server = DOMAINMACHINENAME
}

[domain_realm]
.com = DOMAINNAME

*Note: Make a copy of the krb5.conf file before any changes.

One thing to point out! Both DOMAINNAME and DOMAINMACHINENAME, must be in uppercase.

Configuring ssh

Next step involves in configuring the ssh for Kerberos negotiation. This is the ssh_config file (not sshd_config).

$ sudo vim /etc/ssh/ssh_config

Make sure the following parameters are set at the end of the *ssh_config file:

SendEnv LANG LC_*
HashKnownHosts yes
GSSAPIAuthentication yes
GSSAPIDelegateCredentials no
GSSAPIKeyExchange yes

*Note: If there are missing ones, don’t touch the commented ones. Just copy/paste and set the values.

After completing the changes, I would recommend a reboot.

Testing and working Kerberos Client

Here are a few linux commands to work with Kerberos client.  If the krb5.conf setting are set correctly, then the following commands should work without any issues.

1. This command will verify user domain, asking for password.

$ kinit username@domainname

2. Shows the list of Kerberos Cached tickets and credential.

$ klist

3. To delete\clear all Kerberos Cache entries:

$ kdestroy

What about setting in Windows Systems?

I’m will cover the whole PowerShell remoting setup. But, I will highlight what’s needed to make Linux connect to a Active Directory Domain system.

  • Enable PSRemoting

In PowerShell Conscole, run the “Enable-PSRemoting -force” command line on both client and server. This command will add the firewall rule to allow PowerShell remoting to work.

  • Check WinRM Service

Check the Windows Remote Management service is running. By default, in Windows 10 client, this is set to “Manual”.
On the server, just verify that the service running.

Before, connecting Linux to a windows domain system, make sure to test PowerShell remoting between Windows machines. This will guarantee that you got everything working correctly.

Name Resolution Tip

I don’t join my Linux system to my AD domain. So, to resolve my name resolution issues, I manually update the hosts file on my systems. This will include the domain ip-address as well as all other systems

hosts file
:
xxx.xxx.xxx.xxx domainname.com
:

Testing connectivity

Ubuntu 18.04 Connecting to a domain system final test.

1. In Linux, open PowerShell:

$ pwsh

2. Prepare the domain user:

PS /home/user> kinit domainuser

3. Create a *PowerShell Remote interactive session:

PS /home/user> Enter-PSSession -ComputerName wincomputer -Authentication Negotiate -Credential user@domainname.com

*Note: This remote connection will open Windows PowerShell and not PowerShell Core.

Summary

So, in Ubuntu 18.04 installing and configuring Kerberos user client only, you can connect your Linus system to a Active Directory Domain systems. But remember, this will connect to a Windows PowerShell session only.

I’m hoping that in the near future we can have the ability to select a PowerShell versions. Wait!!  There’s a way to open a PowerShell Core session instead of Windows PowerShell!!

How To Connect to PowerShell Core

So, by default you’re going to connect to Windows PowerShell. But, if you use the following parameter ‘-ConfigurationName’ folllowed by either ‘PowerShell.6‘ or ‘PowerShell.6-Preview‘ then you’ll get PowerShell Core session.  Also, you can use an specific version ‘PowerShell.6.1.0‘.

Enter-PSSession -ComputerName venus -Authentication Negotiate -Credential max_t@trinity.com -ConfigurationName PowerShell.6

Thanks to Steve Lee (Microsoft PowerShell Team) for letting me know this is already available.

References

The following links help figured out the needed components to make my lab environment work.