PowerShell Core – Working with Persistent Disk Storage in Docker Containers

This quick blog post will hope to give you a heads up in how to work with container(s) disk data. It’s a known fact that container(s) storing data will not persist if the container is removed. Yes! If you build a container to store your data, it will be gone.

Containers are perfectly suited for testing, meant to fast deployment of a solution, and can be easily deployed to the cloud. It’s cost effective!

Very important to understand! Containers disk data only exist while the container is running. If the container is removed, that data is gone.

So, you got to find the way to properly configure your container environment to make the data persist on disk.

Persisting Data

There are *two quick way to persist data when working with container(s):

1. Create a docker volume.
2. Or, use a local machine folder area.

*Note: There are other solution to help with persisting data for containers, but this a good starting point.

I’m using the docker command line for now. Later, I will be creating some blog post about using Docker Compose and Kubernetes.

I love to use PowerShell Core with Docker command line!

Docker Create Volume

Using docker command “docker volume create <nameofvolume>” will create the volume to help persist data on your local machine.

docker volume create MyLinuxData

Use the following docker commands to check your newly created volume:

* To list all existing docker volume(s):

docker volume ls

* To check “inspect” a docker volume(s) to provide detail information:

docker volume inspect MyLinuxData

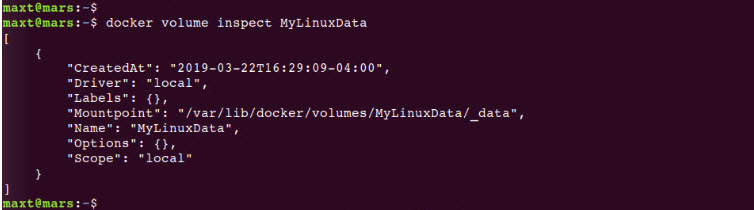
Using the “docker volume inspect <VolumeName>.” command line, it will show the volume mount location:

“Mountpoint”: “/var/lib/docker/volumes/MyLinuxData/_data”,

In this case, the mount location is on the Linux box under the Docker Volumes folder. This means all data can persist on you local machine.

Local Machine Folder

This option seems straight forward as there’s no need to create a Docker Volume. Just use the ‘-v’ switch in the Docker Run command line.

In the following command line I’m activating the Docker container with previously configured Microsoft SQL Server instance. I include the ‘-v’ switch to mount a folder on my local machine.

docker run -p 1455:1455 -v /home/maxt/TempSQLBackups:/home/TempSQLBackups --name sql2k19ctp23_v02 -d sql2k19_ctp2.3_sandbox:CTP2.3-Version02

Notice in this case, to verify that my SQL Server container has mount to my the local machine folder, I can execute the following command:

docker exec -i sql2k19ctp23_v02 ls /home/TempSQLBackups

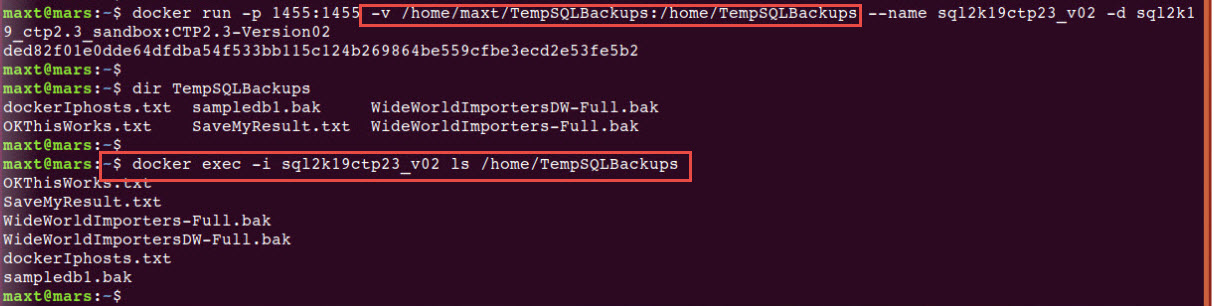
Using “docker exec -i <containerid/name> ls <containerfolderlocation” will display the results of all the files back to the screen. Now, anything you add to that local folder will be accessible to the container.

Summary

This is a good starting point when learning how to work with Docker data in containers. You’ll still go thru trails-and-errors while learning how to build container images, and make data persist for your application. But, it’s much faster and easier to rebuild images. This is one of a most to learn technology.

References

Check out the following blog post as it help me understand about “Persistent Storage”:

PowerShell Core – Updating your SQL Server Linux Docker Containers Images

In this post I’ll be covering how to install some needed components, how to commit the changes, and create a revised images for deployment.

In recent event and meetings, I’ve been talking about how to work SQL Server Linux Containers Docker images. As these images get your container up-and-running quickly they lacks some tools that may be useful to complete the SQL Server configuration.

What’s missing?

The SQL Server images contains a small footprint of Linux Ubuntu 16.04 Operating System (OS) and is meant for quick deployment. The OS side the container need to be kept updated regularly.

At the same time, when you starts exploring inside the container, there still missing components you may want to use:

  • vim – for editing text files.
  • ifconfig – to check your network interfaces.
  • ping – to check IP-Address can be reachable across the network.
  • curl – for transfering data.

So, after you pull the docker image, create the container using “docker run …“, and then get to the container Bash session by using “docker exec -it …“. Remember the bash session only get you to the “root” level as there’s no users set on these containers.

## - First time setup: (for "server:2019-CTP2.2-ubuntu" and )
docker run -e 'ACCEPT_EULA=Y' -e 'SA_PASSWORD=$SqlPwd01A' -e "MSSQL_PID=Developer" -p 1433:1433 --name sql2k19_CTP2.3 -d mcr.microsoft.com/mssql/server:2019-CTP2.3-ubuntu;

## - Display all active containers;
docker ps -a

At this point make sure the active container status should be in “Up” status. Now can proceed to update the container.

Installing Missing Components

To have access to the container we use the “docker exec …” command.  This command will allow to get access to the container “root” prompt.

## - Configuring your container:
docker exec -it sql2k19_CTP2.3 bash

The first thing I would suggest to do, execute the following to commands:

## - Updating OS:
apt update

apt upgrade

Notice if you try to execute: vim, ping, ifconfig, and curl are not installed in the container images.

Let’s proceed to install these component by executing the following command:

## - Installing additional components:
apt-get -y install \
curl \
vim \
iputils-ping \
net-tools \
powershell-preview

Also, it’s a good idea to create a Downloads folder in case to install other application(s).

## - Create Downloads folder in root:
mkdir Downloads
chmod 755 Downloads

Notice that PowerShell Core Preview was included with the other missing components.  PowerShell has become a great tool to have in a Linux environment.

PowerShell Core SQLServer Module

Although, this is optional but it doesn’t prevent you to include PowerShell Core Preview 6.2.0-RC1 with the SqlServer module which included the “Invoke-Sqlcmd” use by many administrator.  This is a great module to have in a SQL Server container image.

So, from the “root” prompt in the container open PowerShell Core Preview, then proceed to install the SqlServer module preview version 21.1.18095.

## - Open PowerShell Core:
pwsh-preview

## - Install SqlServer module preview:
Install-Module SQLServer -AllowPreRelease

This completes the essential for using PowerShell to help managing a SQL Server instance(s).

How About Anaconda?

We could install the latest version of Anaconda with Python 3.7 in our SQL Server container image.

## - Change directory to Downloads folder:
cd Downloads

## - Download Anaconda with Python 3.7:
wget https://repo.anaconda.com/archive/Anaconda3-2018.12-Linux-x86_64.sh

## - Install Anaconda with Python 3.7:
bash Anaconda3-2018.12-Linux-x86_64.sh

This will give us the ability to test Python scripts within the container.

Testing installed Components

We need to verify that all previously installed components are working. Go back to the container “root” prompt, and to execute the commands:

ifconfig
ping 127.0.0.1
vim ~/.bashrc
pwsh
sqlcmd

Now, executing “sqlcmd” command line will not work unless you add the path to the executable to the “root” ~/.bashrc file:

## - Need to include the path to SQLCMD command:
echo 'export PATH="$PATH:/opt/mssql-tools/bin"' >> ~/.bashrc

## - Refresh ~/.bashrc:
source ~/.bashrc

## - Run Sqlcmd command:
sqlcmd -L localhost -U sa -P 'sapwd'
> select @@version
> go
> exit

This is a good indication that our *SQL Server container is active. And, now we got all missing components installed.

Now, we need to make sure we don’t lose out changes.

Creating your own SQL Server Docker image

This is an important step so you won’t lose the changes already made to the container.  Below are the brief step to follow:

## - Commit the container changes: (repository name must be lowercase but Tags are OK with uppercase)
## -> docker commit "<Get-Container_ID>" "<Image-name>":"<TAG name>"

docker commit "<Get-Container_ID>" sql2k19_ctp2.3_sandbox:CTP2.3-Version01

## - List images included the committed ones:
docker images

## - Stop Image before the Save step:
docker stop sql2k19_CTP2.3
docker ps -a

## - Save docker updated image:
docker save -o ./Downloads/sql2k19ctp23_sandboxVer01.tar sql2k19_ctp2.3_sandbox

The “docker commit …” command, you’ll provide both the image-name (all lowercase) and a TAG name (uppercase allowed). You can be creative in having an naming conversion for you images repositories.

It’s very important to save images after doing the commit. I found out that having an active container would be useless without an image.  As far as I know, I haven’t found a way to rebuild an image from an existing container if the image was previously removed.

Summary

Hope this brief run down on working with SQL Server Docker container images will get you started with modifying existing images for quick deployment.

One thing to keep in mind!

  • The SQL Server Container memory need to be 4GB minimum.
  • In Windows, if your’re using non-Hyper-V virtualization tools such as Virtualbox, the virtual machine memory need to be change to 4GB.
  • Also, when you are creating images, the virtual machine disk size default is 20GB. This may need to be increase unless you keep cleaning/removing images to make room.

Just layout what you need, commit, save and deploy your docker solution in your environment.

Keep learning about this amazing technology!


PowerShell Core – How to install SQLServer Module (Preview) in WSL – Ubuntu 18.04

You all have been following Aaron Nelson blog post on Invoke-Sqlcmd availability Cross-Platform in the SqlServer module then you all are probably have proceeded to download the PowerShell SqlServer.

At the same time, on March 5th,  PowerShell Core 6.2.0-rc1 (Release Candidate) was made available for download.
Go and get it!

The thing is, in order to use the Invoke-SqlCmd cmdlet, you need to use PowerShell Preview version 6.2.0-rc1 (or greater).

Now, SqlServer Module can be easily installed in all platforms but I found out that it won’t install in Windows 10 WSL Ubuntu 18.04.

So, What the issue with Windows 10 WSL – Ubuntu 18.04?

Normally, when working with modules in PowerShell Core, I always use the following Cmdlets: Uninstall-Module to remove the module and then Install-Module with the “-AllowPrerelease” parameter. This will work flawlessly, but I found out that it won’t installed it in WSL – Ubuntu 18.04.

I don’t know why but it was installing the non-preview version SqlServer module 21.1.18080.   So, the following PowerShell Core command line will force the installation of SqlServer module version 21.1.18095-Preview.

Install-Module sqlserver -RequiredVersion 21.1.18095-preview -AllowPrerelease -Force

Now, we can start writing PowerShell Core SQL Server scripts in our Windows Subsystem for Linux – Ubuntu 18.04.