Tools to Help Document Azure Resource Groups

Sometimes is a good to go back an review any fundamental concepts. This way you can refresh and improve your skill sets. It’s true that practice makes perfect!

So, while reviewing the Microsoft Docs “Azure Architecture Fundamentals” . Here it discuss the use of Dashboards you can customized and organized your Azure resources. This course will help you setup a sandbox environment, so you can build a WordPress web application.


I went ahead to create my dashboard  documenting this exercise. Just keeping it simple!

For more information click on Azure Dashboard. You can create up to 100 ‘Private’ dashboards per user.

The next tool has recently got some attention: AzViz PowerShell module. This is module has the ability to generate a visual representation of your Azure Resources.

What was Great about this PowerShell module? For some time, I’ve created many sample demo resource assets within my subscription. This module show me the mess I have with my Azure assets in the cloud. See below image.

This is great tool for documenting your Azure Resources Group with a single one-liner help you create the the an image file of your Azure Resources Group assets.

## - AzViz example, after connecting to your Azure Subscription:
Import-Module AzViz
Export-AzViz -ResourceGroup 'your-azresourcegrp' -Theme light -OutputFormat png -Show -Direction top-to-bottom

Note: Keep in mind, you’ll need to manually rename the output.png file.

As you can see, much better picture presentation compare to the messy one.

This module will can be installed from the PowerShell Gallery, and any issues reported in Github.

As you can see, these tool not only help you to document, but also manage and organize your workloads.

Go Ahead and Try it!

Handling SQL Server Connection strings with PowerShell Secret Management

Finally, I came up with a practical example using the Powershell Secret Management module for storing SQL credentials. This is an excellent way of keeping your SQL connection strings information out of your scripting code. This way we just have it stored in our Vault.

Where do I start?

To install the Powershell Secret Management module, execute the following series of one-liners in a PowerShell prompt to install the latest version from the PowerShell Gallery:

Note: This module has finally reached GA (Generally Available) status.

## - install from the PowerShell Gallery both: SecretManagement, and SecretStore modules:
Install-Module Microsoft.PowerShell.SecretManagement, Microsoft.PowerShell.SecretStore

## - Register the vault with a given name:
Register-SecretVault -Name SecretStore -ModuleName Microsoft.PowerShell.SecretStore -DefaultVault

Now, we got the default “SecretStore” vault created. The vault password will ask once you start adding secrets.

The following cmdlets make it easy to manage your vault:

## - Module: Microsoft.PowerShell.SecretManagement
Get-Secret
Get-SecretInfo
Get-SecretVault
Register-SecretVault
Remove-Secret
Set-Secret
Test-SecretVault
Unregister-SecretVault

## - Microsoft.PowerShell.SecretStore
Get-SecretStoreConfiguration
Reset-SecretStore
Set-SecretStoreConfiguration
Set-SecretStorePassword
Unlock-SecretStore

Note: By-Design. There can only be one vault available.

Take your time to learn these commands.

Let the fun begin

Let’s cut down to the chase and see how this works. I’m going to proceed to create my secret SQL Server connection string values.

Keep in mind, secrets management supports five types of objects: byte[], String, SecureString, PSCredential, and Hashtable. By DEFAULT, the secret will be stored as a ‘SecureString‘ object.

Be creative! Why not store my connection string(s) as a hash table object containing my credential information in the following way:

## - Create hashtable object containing the SQL Connection String:
[hashtable]$MysqlCred01 = @{SqlName = "localhost,1445";Sqlusr = "sa"; SqlPwd = '$MyPwd01!';};

## - This is to veryfy the hashtable object was Properly created:
$MysqlCred01.GetType();
$MysqlCred01

Next after creating the hashtable object, is to save it in the vault with the following command “Set-Secret“:

## - Storing the secret in the vault:
Set-Secret -name MysqlCred01 -secret $MysqlCred01

Note: the first time you store a secret value to the vault, you’ll be prompted for a password.

As you save more secrets, use the following command “Get-SecretInfo” to list what you have in the vault:

## Displaying all stored secrets:
Get-SecretInfo

Now, to get your secret from the vault and use it in PowerShell:

## - Pulling the secret out of the vault into PowerShell variable as plain text:
$MysqlhashCred01 = Get-secret -name MysqlCred01 -asplaintext

## - Accessing hash table values:
$MysqlhashCred01.SqlName
$MysqlhashCred01.Sqlusr
$MysqlhashCred01.SqlPwd

You will notice that eventually, your access will time-out locking you out of the vault. Here’s you use the following command “Unlock-SecretStore” to temporarily unlock the vault:

## - Unlocking the vault to access your secrets providing the vault password:
Unlock-SecretStore -Password '$yourpwd!'

Now, the “Unlock-SecretStore” command is useful for script automation. when you want the script to quickly access the vault. You’ll need to do the following:

## - Unlocking the vault for automation:
Unlock-SecretStore -Password $(ConvertTo-SecureString -String '$yourpwd!' -AsPlainText);
Get-SecretInfo

This way SecretStore vault will not prompt for a password.

Implementing Secret in a GUI Application

Here’s an example of implementing secret in one of my SAPIEN PowerShell Studio GUI applications that check for SQL Server Database Index Fragmentation.

This is a multi-form Window application that where you can select a connection string stored in your SecretStore vault. then you can select the Database and click on the “Start-Job” button to list the status of Database index fragmentation. In this sample application, I can connect to both my local SQL Server and 2 of my Azure SQL Databases.

If you work with PowerShell, both SAPIEN’s Primalscript and PowerShell Studio is a good tool to have for any Administrators and DevOps. Try them out!

For more information

1. Secret Management Blog post.

2. Secret Management in Github. (Post any bugs and/or feedback here)

3. SecretStore in Github. (Post any bugs and/or feedback here)

Have a GREAT SQL PowerShell Day! This is the way!

PowerShell Working with SQL Logins Name

This blog post is following “Changing a SQL Server Login name with T-SQL“. Let’s take advantage of the .NET SMO framework assembly object model Namespaces with PowerShell to change a Windows account in a SQL Server Logins.

Remember to download the latest version of PowerShell.

There’s nothing wrong in using SSMS (SQL Server Management Studio) as our GUI application to manage our SQL Server engine. But soon, you will have the need to use PowerShell scripting for automating some daily tasks. And, Trust me! It will save you time.

Both Microsoft and the SQL Server Community provide you with some of the Awesome tools, such as the following PowerShell modules: SQLPS, SqlServer, Secretmanagement, and DBATools.

Let’s begin with creating  a list all SQL users on our SQL Server using the DBATools module  “Get-DBAuser” command:

Get-DBADBUser -SqlInstance 'localhost,1433'

As you can see, this command returns a lot of information you can export and dissect in many way.

Now, let’s take this a little further using SMO Object Model Namespaces.

Don’t be scare! in order to start using these SMO Classes. To start, all you need to have installed any of the following PowerShell Modules: SQLPS, SQLServer or DBATools, then execute the “import-Module” command:

## This will load SMO assemblies:
Import-Module SqlServer

Then all necessary SMO Assemblies are loaded and ready to be consumed during your PowerShell session. You can start building your own PowerShell one-liners or scripts/functions command to interact with the SQL Server engine.

Let’s cut to chase, and create a simple PowerShell function “Get-SqlLogins‘ to simply list all my SQL logins in my SQL Server:

## - function_Get-SqlLogins.ps1:

function Get-Sqllogins
{
param
(
[parameter(Mandatory = $true)]
[string]$sqlname,
[string]$uname,
[string]$upwd
)

## - Prepare connection to SQL Server:
$SQLSrvConn = `
new-object Microsoft.SqlServer.Management.Common.SqlConnectionInfo($sqlname, $uname, $upwd);
$SQLSrvObj = new-object Microsoft.SqlServer.Management.Smo.Server($SQLSrvConn);

## - Get SQL SERVER list of database names:
$global:itm = 0
$SQLSrvObj.logins | Select-Object @{ l = 'itm'; e = { $global:itm; ++$global:itm }; }, name, logintype;

}; 
$sqlname = 'localhost,1433';
$uname = 'sa';
$upwd = '$SqlPwd01!';

Get-Sqllogins -sqlname $sqlname -uname $uname -upwd $upwd

## - End-of-File

Note: Save this code as function_Get-Sqllogins.ps1. 

You can edit this file to run one liner at the time and explore the $SQLSrObj PowerShell object.

Use the following GET-Member(alias gm)command to explore the object content:

## - exploring .NET Objects:
$SQLSrvObj | gm | Out-GridView

This is a good way to learn about your PowerShell objects.  You’ll be surprised by the ton of information you can find for documentation.

Now, try listing all SQL logins names by typing the following:

## - shorthand  to list all values in a object proprety:
$SQLSrvObj.logins.name

So, with a few lines of code, you can quickly get results.

Now, proceeding with looking for the Windows account I want to change the name in the SQL Login.

For this, I need to add line numbers to the PSObject result. This way I can Isolate the Login ID:

$global:cnt = 0
$SQLSrvObj.logins | Select-Object @{ l = ‘cnt’; e = { $global:cnt; ++$global:cnt }; }, name, logintype

For the finale: Changing the SQL Login Name. I’m going to manually do this using SMO PowerShell One-liner:
I found that element #5 is the SQL login I need to change:

## - verify before making the changeto the SQL Login object;
$SQLSrvObj.logins[5]

So far we’ve been working with SMO .NET Objects properties. Here’s where we use SMO .NET methods which affect the object (element#5) I have manually selected using “$SQLSrvObj.logins[5]“:

Last steps for updating the SQL Login name:

Note: Keeping in mind, the actual change starts at the Windows Account level. 

1. The *.Alter() method sets the object ready to be changed:

$SQLSrvObj.logins[5].alter()

2. followup by the *.rename(**string**) method which will affect the name object.

$SQLSrvObj.logins[5].rename('MXTLPT01\Dev01')

3. And, finally we use the *.refresh() to update all logins list with the name change.

$SQLSrvObj.logins.refresh()

AS you can see,  this open to some automation opportunities that can involve Windows Domain with SQL Server Accounts administration.

Don’t forget! always test your scripts. Practice makes a good scripter, and never be afraid of trying new stuff.

SQL PowerShell! It is the way!

Changing a SQL Server Login name with T-SQL

It’s been some time since my last blog post! Changing a SQL Server Login name uising  T-SQL.

Everyone who has tried at first, knows that it has its caveats. I couldn’t find a straight answer to the errors I was getting. You would think changing the sql login name should be simple. But, I was using the wrong approach.

First, we are working with “WindowsUser” login type. In SQLServer, I’m trying to fix a Windows User (local account)name  from “dev01” to “devUser01” using the following T-SQL statement:

ALTER Login [MXTLPT01\Dev01] WITH NAME = [MXTLPT01\DevUser01]

but, in  doing so I got the following error message:

“Windows NT user or group ‘MXTLPT01\DevUser01’ not found. Check the name again.”

Of course, “MXTLPT01\DevUser01” Windows user account doesn’t exist on my system.

So, I created the user I try to run the T_SQL statement:

ALTER Login [MXTLPT01\Dev01] WITH NAME = [MXTLPT01\Devtest01]

Nope, it didn’t not work ending with the following message:

Msg 15098, Level 16, State 1, Line 31
The name change cannot be performed because the SID of the new name does not match the old SID of the principal.

Basically, It translate to your Windows Account SID Object in SQL Server doesn’t match the object you’re trying to change.

In other word, you need to work with the Windows User originally created in WINDOWS (Locally or Domain), has changed first before executing the T-SQL statement “Alter Login… With Name=…”will be successful:

I ran the statement after the the change took place in my Windows system;

ALTER Login [MXTLPT01\Dev01] WITH NAME = [MXTLPT01\DevUser01]

This time it works.

Wait! What about using PowerShell?

Check out the next blog post “PowerShell Working with SQL Logins Name

Happy SQLAdmin!

PSCore6 – Creating a Hybrid Cross-platform SQLServer Script

There’s some discussion around scripting on using Windows PowerShell vs PowerShell Core. So, just pick one? No.
Just think about supporting a cross-platform environment. Use both!

Following my recent post on “PSCore6 – SQLServer Module Expanding The Barrier Cross-Platform“, here’s a sample Hybrid-Script for cross-platform use.

Why not!

We all know the next generation (or evolution) of PowerShell is PowerShell Core. That’s it!
You are still using PowerShell, and Windows PowerShell is not going to be dropped nor removed any time soon.

So, why not start working towards, what I call, “Hybrid-scripting”? Powershell Core provides the necessary elements to help with cross-platform scripting.

In it’s basic code form, could look be something like this:

[sourcecode language=”powershell”]

## – Logic Structure for executing either PowerShell Version:

## – Use Set-StrictMode for debug purpose:
Set-StrictMode -Version 5.1

If ($PSversionTable.PSEdition -eq "Desktop") {
"Windows PowerShell"
}
else {
## – Use Set-StrictMode for debug purpose:
Set-StrictMode -Version 6.1

if ($PSVersionTable.PSEdition -eq "Core") {
If ($IsWindows) {
"WindowsCore"
}
If ($IsLinux) {
"LinuxCore"
}
If ($isMacOS) {
"MacOSCore"
}
}
};

[/sourcecode]

Now, let’s apply this code to a practical sample.

Sample Hybrid-Script

In the following sample script, includes Help information, begin-process-end and with try-catch code structure.
At the same time, the script will output the exception to the screen console with the failed line.

Script function name: Get-DBASQLInformation

[sourcecode language=”powershell”]
Function Get-DBASQLInformation {</pre>
<#
.SYNOPSIS
This is a cross-platform function to Get SQL Server Information.

.DESCRIPTION
This is a cross-platform function to Get SQL Server Information using SQL Authentication.

.PARAMETER UserID
Enter SQL Authentication UserID parameter.

.PARAMETER Password
Enter SQL Authentication Password parameter.

.PARAMETER SQLServerInstance
Enter SQLServerInstance name parameter.

.EXAMPLE
PS> Get-DBASQLInformation -UserID ‘sa’ -Password ‘$SqlPwd01!’ -SQLServerInstance ‘mercury,1433’

.NOTES
===========================================================================
Created with: SAPIEN Technologies, Inc., PowerShell Studio 2018 v5.5.152
Created on: 5/25/2018 8:27 AM
Created by: Maximo Trinidad
Organization: SAPIEN Technologies, Inc.
Filename: Function_Get-DBASQLInformation.ps1
===========================================================================
#>
<pre>[CmdletBinding()]
[OutputType([psobject])]
param
(
[Parameter(Mandatory = $true,
Position = 0)]
[string]
$UserID,
[Parameter(Mandatory = $true,
Position = 1)]
[string]
$Password,
[Parameter(Mandatory = $true,
Position = 2)]
[string]
$SQLServerInstance
)

BEGIN {

## – Internal function:
function GetSqlInfo {
param
(
[parameter(Mandatory = $true, Position = 0)]
[string]
$U,
[parameter(Mandatory = $true, Position = 1)]
[string]
$P,
[parameter(Mandatory = $true, Position = 2)]
[string]
$S
)
Try {
## – Prepare connection passing credentials to SQL Server:
$SQLSrvConn = New-Object Microsoft.SqlServer.Management.Common.SqlConnectionInfo($S, $U, $P);
$SQLSrvObj = new-object Microsoft.SqlServer.Management.Smo.Server($SQLSrvConn);

## – SMO Get SQL Server Info:
$SQLSrvObj.Information `
| Select-Object parent, platform, product, productlevel, `
OSVersion, Edition, version, HostPlatform, HostDistribution `
| Format-List;

}
catch {
## – Write Exception to Console:
Write-Host `
"Excepion found on line:`r`n$($error[0].InvocationInfo.line)"+ `
"`r`n$($Error[0].Exception)" `
-ForegroundColor Magenta;

}
}

};

PROCESS {

## – Cross-platform logic:
If ($PSversionTable.PSEdition -eq "Desktop") {
Write-Host "Windows PowerShell"
GetSqlInfo -U $UserID -P $Password -S $SQLServerInstance;
}
else {

if ($PSVersionTable.PSEdition -eq "Core") {
If ($IsWindows) {
Write-Host "Windows PScore";
}
If ($IsLinux) {
Write-Host "Linux PSCore";
}
If ($isMacOS) {
Write-Host "MacOS PSCore";
}
## – execute on non-Windows:
GetSqlInfo -U $UserID -P $Password -S $SQLServerInstance;
}
};

};

END {
## – EndBlock (Optional)
};
};

[/sourcecode]

The heart of the code are stored in the “Begin” section as a Internal-Function GetSQLInfo(). The internal-function will be only executed if it the criteria for each of the different platforms. The Try-Catch is just to trap the error if the SMO connection failed, or to indicate the SMO .NET wasn’t loaded.

Go ahead! Create a script file, copy/paste this code, and load this function. Give it a try cross-platforms: Windows, Linux, and MacOS.

Remember, SQLServer module is a replacement for SQLPS module. I won’t recommend having both modules installed unless you use the namespace_module/cmdlet to identify which module is going to execute the cmdlet.

So make sure to always test your scripts.

What’s Next!

This function still need to worked on, but is functional enough to test-drive and see the results. So, it be modified to support Windows Authentication. Once you start scripting and building functions, you won’t stop thinking what else can be added.

Just keep working on it and learning from the PowerShell Community.

Go Bold! Learn PowerShell Core!

PSCore6 – SQLServer Module Expanding The Barrier Cross-Platform

If you haven’t heard yet! The SQLServer Module is available for Windows, Linux, and MacOS. Yes!
And, with it,now you can even expand your scripting using .NET SQL Server Management Objects to manage your SQL Server Engine cross-platform.

How to get it!

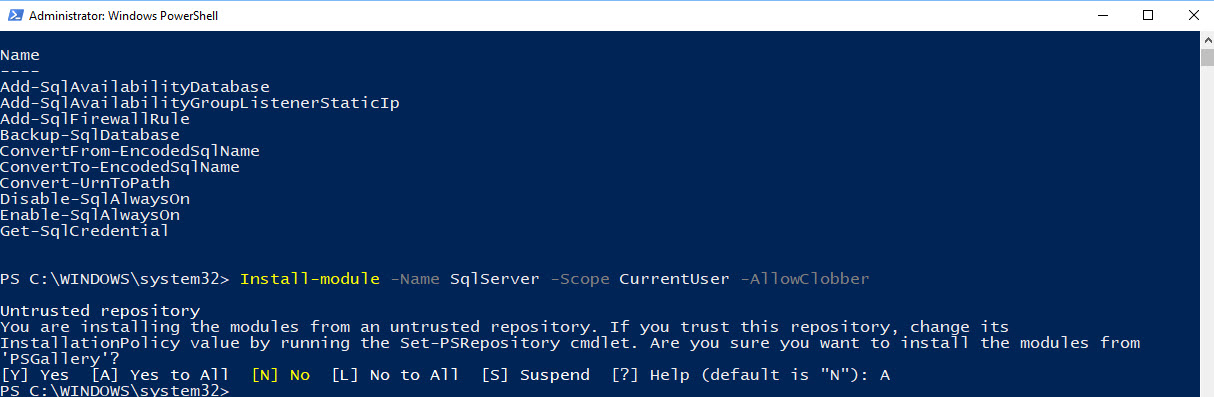
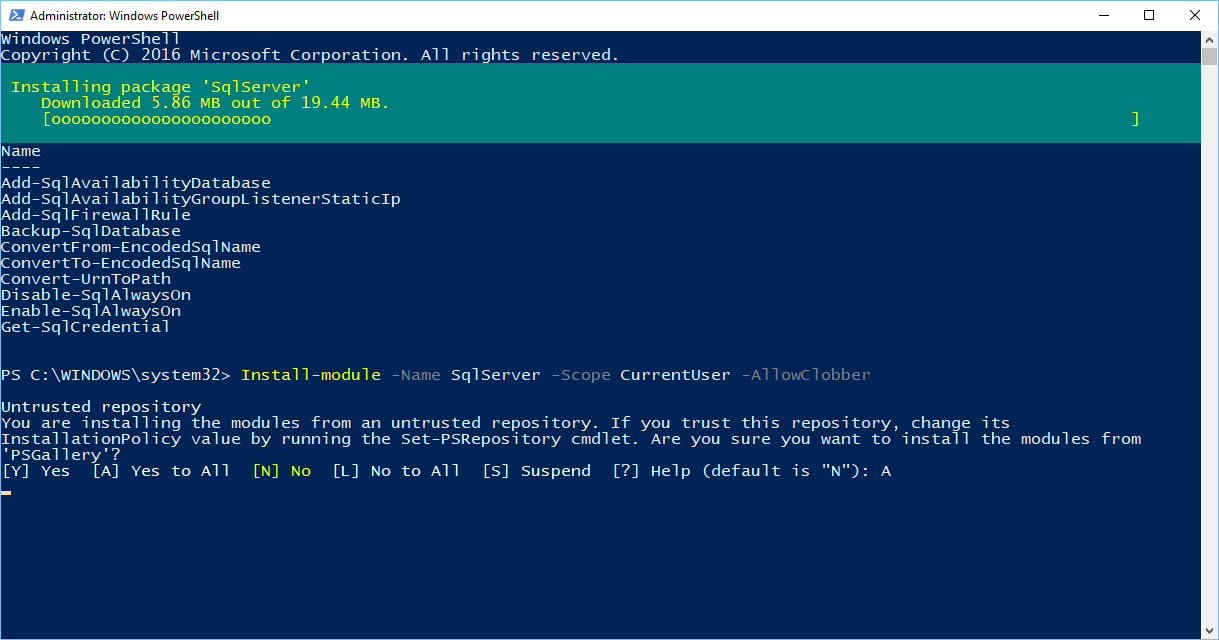
It’s available in PowerShell Galley. Just run the following command to install the module in Windows PowerShell and PowerShell Core.
Yes, you read it! Install in PowerShell Core for Windows, Linux, and MacOS.

[sourcecode language=”powershell”]

Install-Module -Name SQLServer -Force -Scope AllUsers

[/sourcecode]

What’s in it?

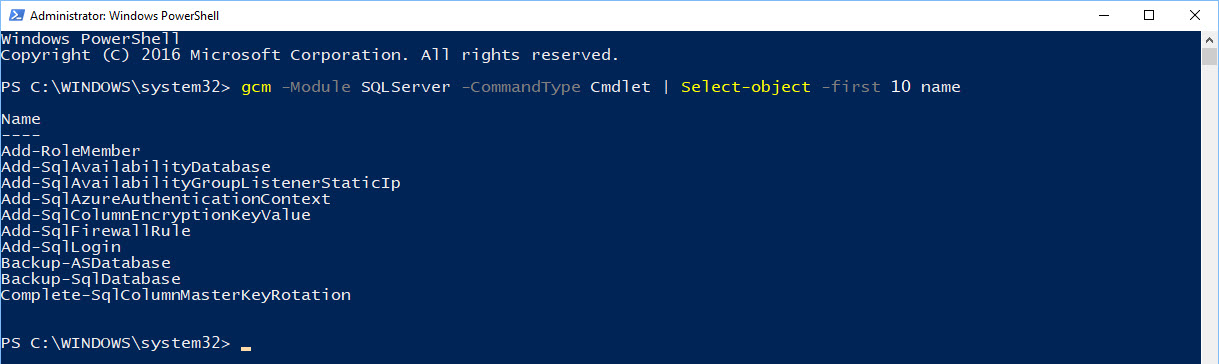
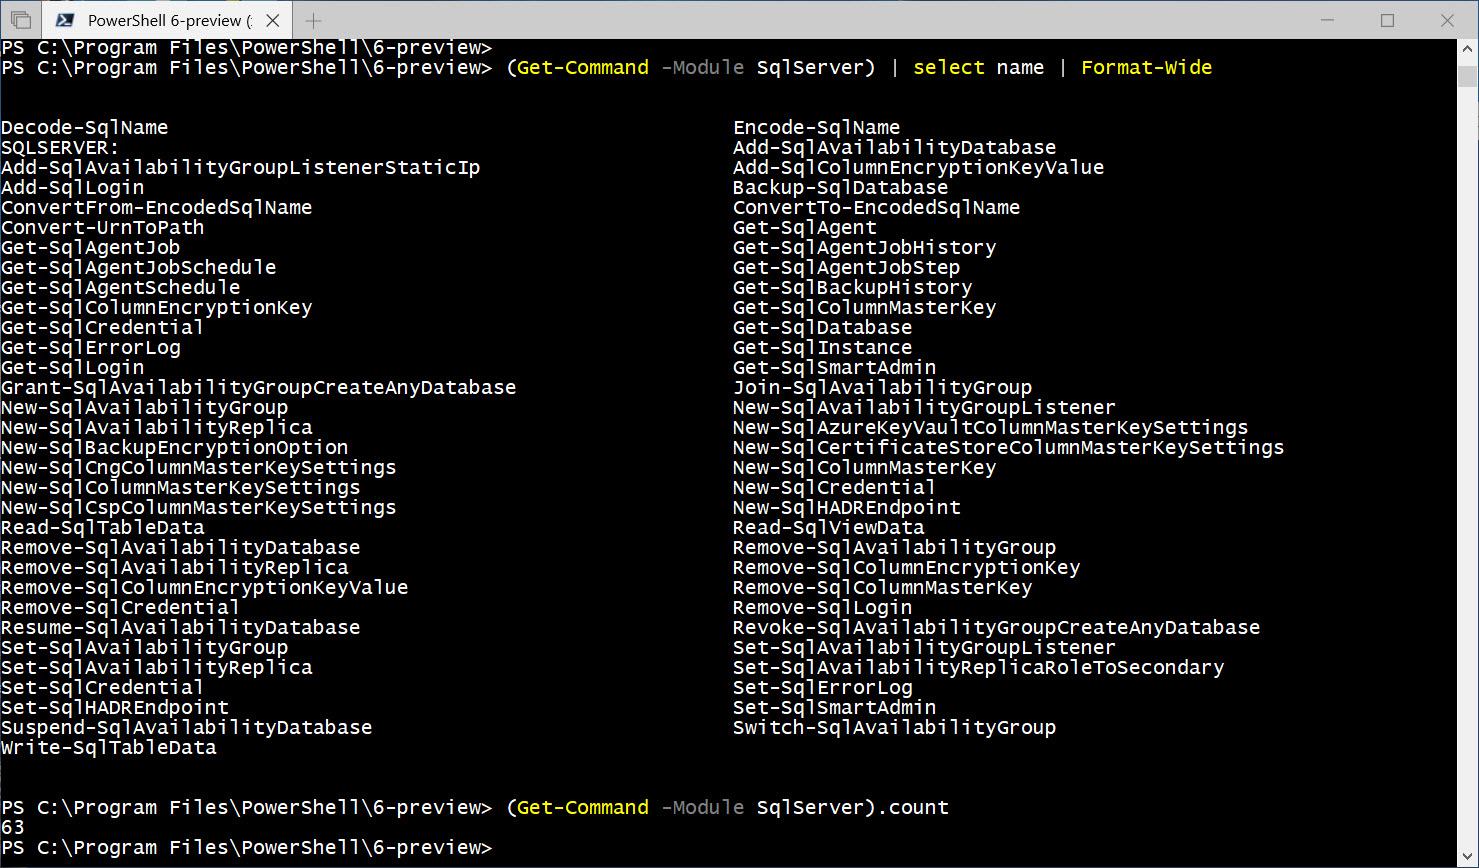
Contains all of the SQL Server Management Objects .NET assemblies that will work in both Windows and non-Windows Systems. At the same time, it contains a total of 63 commands. This will support all existing SQL Server 2017(and older) on your network. Of course, there will be some limitations because there might be some features lacking in older features. But, for most use it will work.

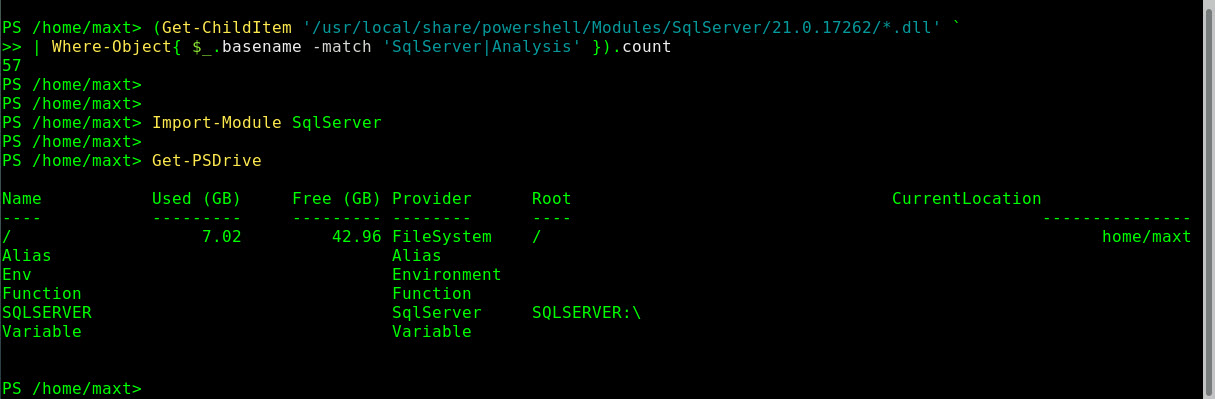
It also includes the ability to provision the SQLSERVER: drive when you import the module.

[sourcecode language=”powershell”]

Import-Module SQLServer

Get-PSDrive

[/sourcecode]

If you care for what SMO .NET Assemblies are installed, execute the following commands:

[sourcecode language=”powershell”]

## – Get the SQLServer Module path:
(Get-MOdule -ListAvailable SQLServer).path

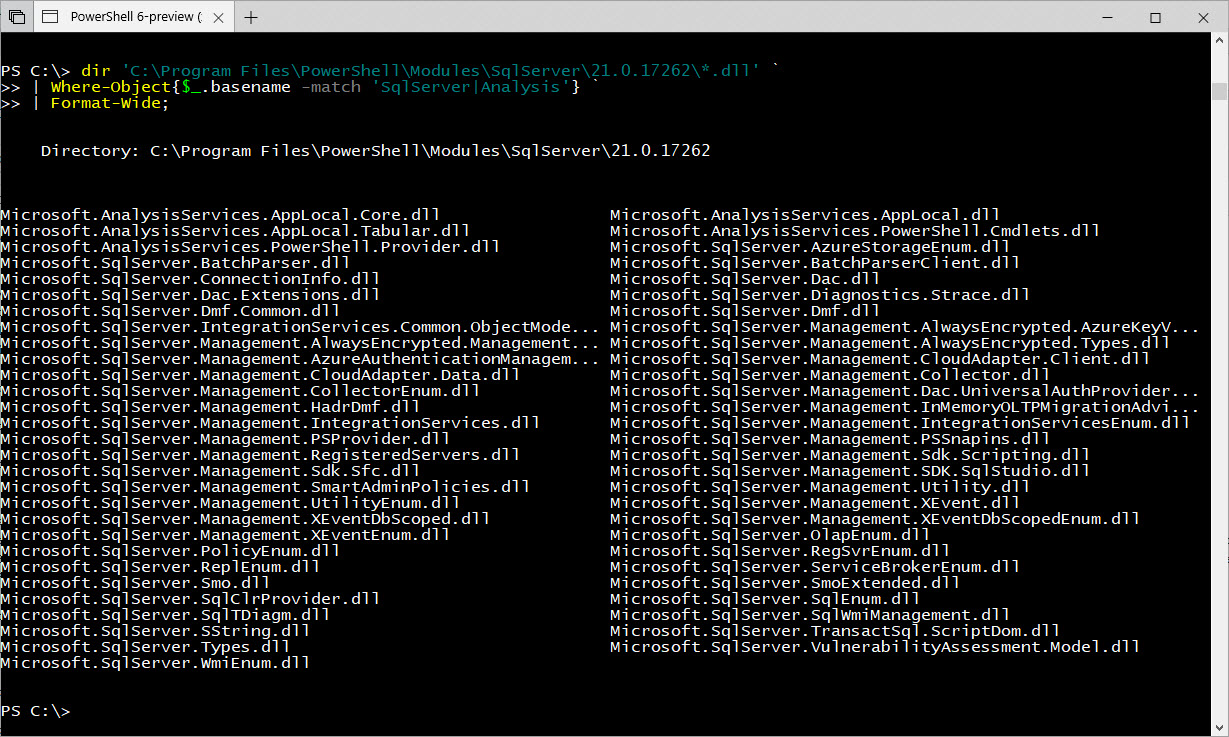
## – List of all SQLServer and Analysis Services DLL’s:
dir ‘C:\Program Files\PowerShell\Modules\SqlServer\21.0.17262\*.dll’ `
| Where-Object{$_.basename -match ‘SqlServer|Analysis’} `
| Format-Wide;

## Linux CentOS – Total of SQLServer and Analysis Services DLL’s:
(Get-ChildItem ‘/usr/local/share/powershell/Modules/SqlServer/21.0.17262/*.dll’ `
| Where-Object{ $_.basename -match ‘SqlServer|Analysis’ }).count

[/sourcecode]

Using the SQLServer: Drive

Although, I’m not a fan of using SQLServer: drive. This will allow you to navigate thru the SQL Engine like a file system from the console prompt.

In order to use the drive, it need to be recreated with the proper credentials for cross-platform use.
Below steps will create additional SQLServer: drives to another SQLServer on the *network.

[sourcecode language=”powershell”]
###==>For Windows, Linux, MacOS
Import-Module SqlServer

## – New way for Streamlining Get-Credential:
$MyUserName = ‘sa’; $MyPassword = ConvertTo-SecureString ‘$SqlPwd01!’ -asplaintext -force;
$MyCred = [System.Management.Automation.PSCredential]::new($MyUserName, $MyPassword)

## – Creating SQLSERVER: connection to Windows SQLServer:
New-PSDrive -PSProvider sqlserver -root “SQLSERVER:\SQL\sapien01,1451\default” -name MyWindowsSQL -Credential $mycred

## – List all SQLSERVER: Drives:
Get-PSDrive *SQL* | Select-Object Name, Provider, Root;

[/sourcecode]


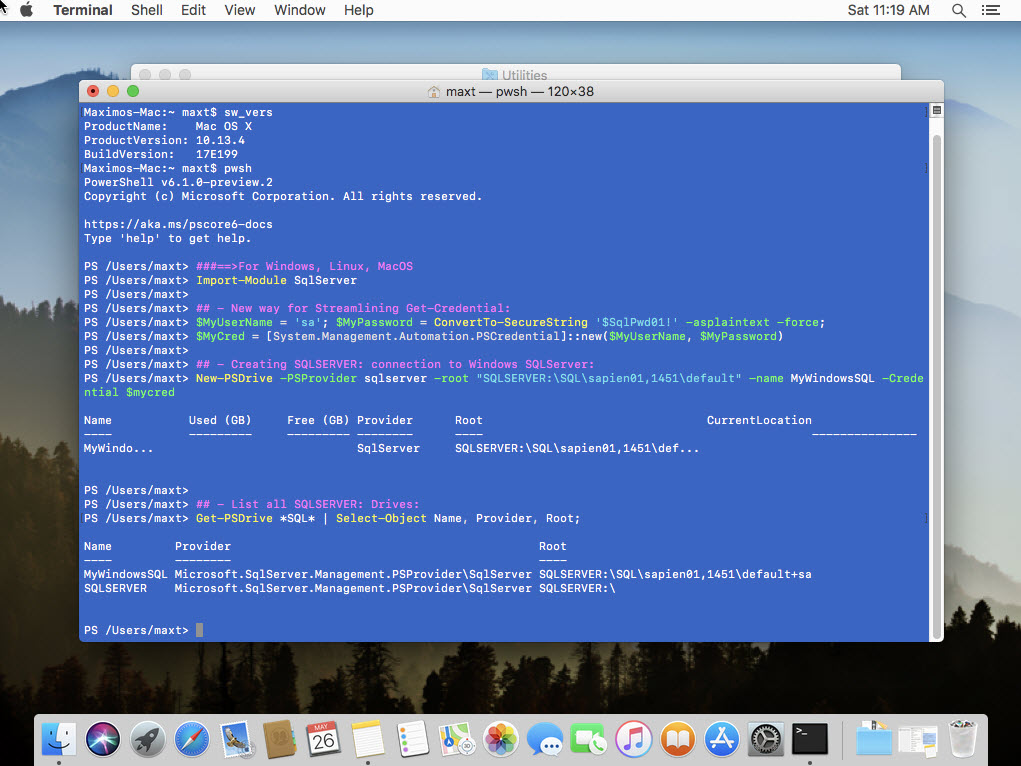
Note: In this example, I’m using SQL Authentication.

Now, I can navigate thru my SQLServer objects like a filesystem.

[sourcecode language=”powershell”]

## – Change directory to SQLSERVER: drive:
cd MyWindowsSQL:/databases/sampledb1/tables
dir

[/sourcecode]

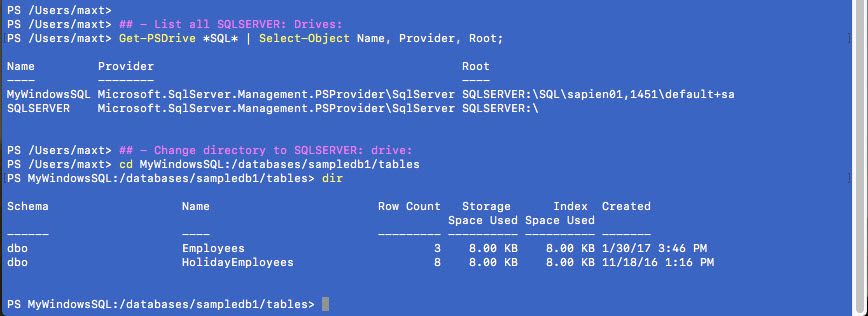
Wait! Did you notice I’ve created a SQLServer Drive in MacOS? This is Awesome!
By the way, there’s no Docker involved in here. The fun doesn’t stop here!

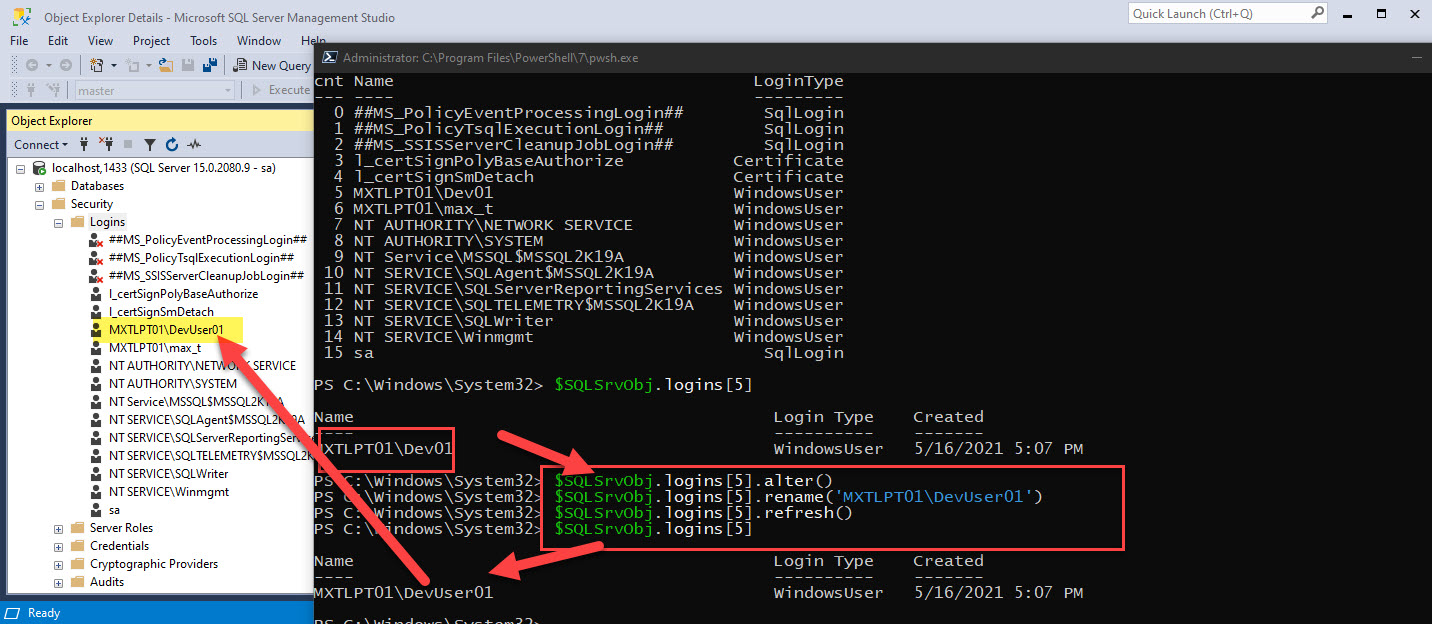
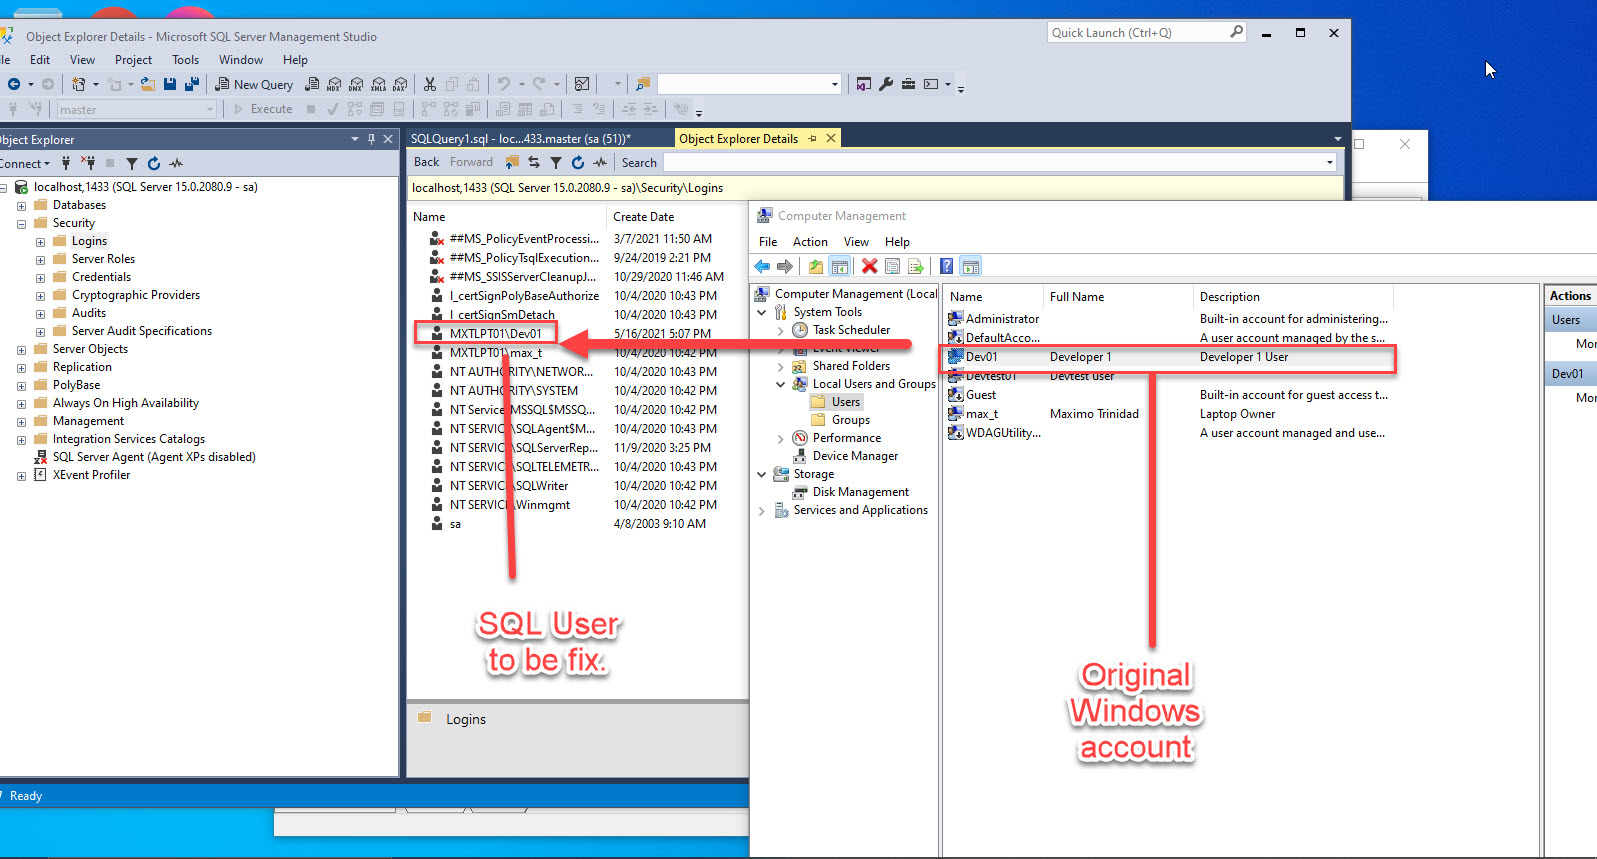
What about using SMO scripting?

If anyone have been following me recently, everytime I’ve created the SMO script, I always have to load the assemblies before I can connect to the SQLServer.

[sourcecode language=”powershell”]

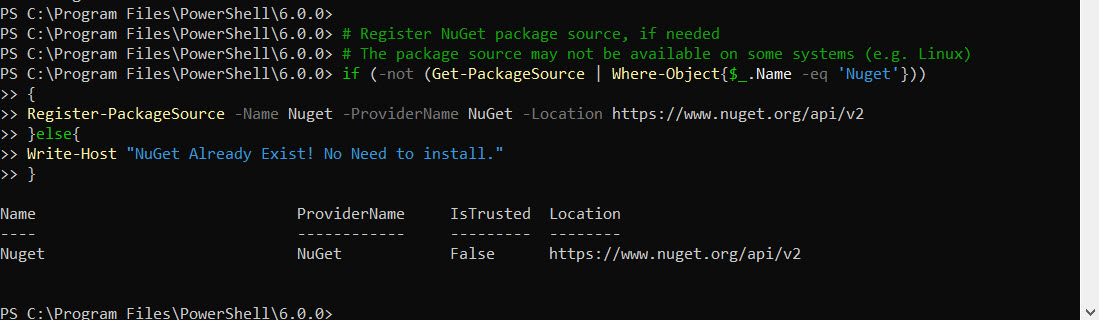
## – When using the ‘Microsoft.SqlServer.SqlManagementObjects’package installed from Nuget
## – Help find and save the location of the SMO dll’s in a PowerShell variable: ver.14.17224
$smopath = Join-Path ((Get-Package Microsoft.SqlServer.SqlManagementObjects).Source `
| Split-Path) (Join-Path lib netstandard2.0);

# Add types to load SMO Assemblies only:
Add-Type -Path (Join-Path $smopath Microsoft.SqlServer.Smo.dll);
Add-Type -Path (Join-Path $smopath Microsoft.SqlServer.ConnectionInfo.dll);

[/sourcecode]

The above code is not needed if the SQLServer module had been previously imported.
This way you will code less.

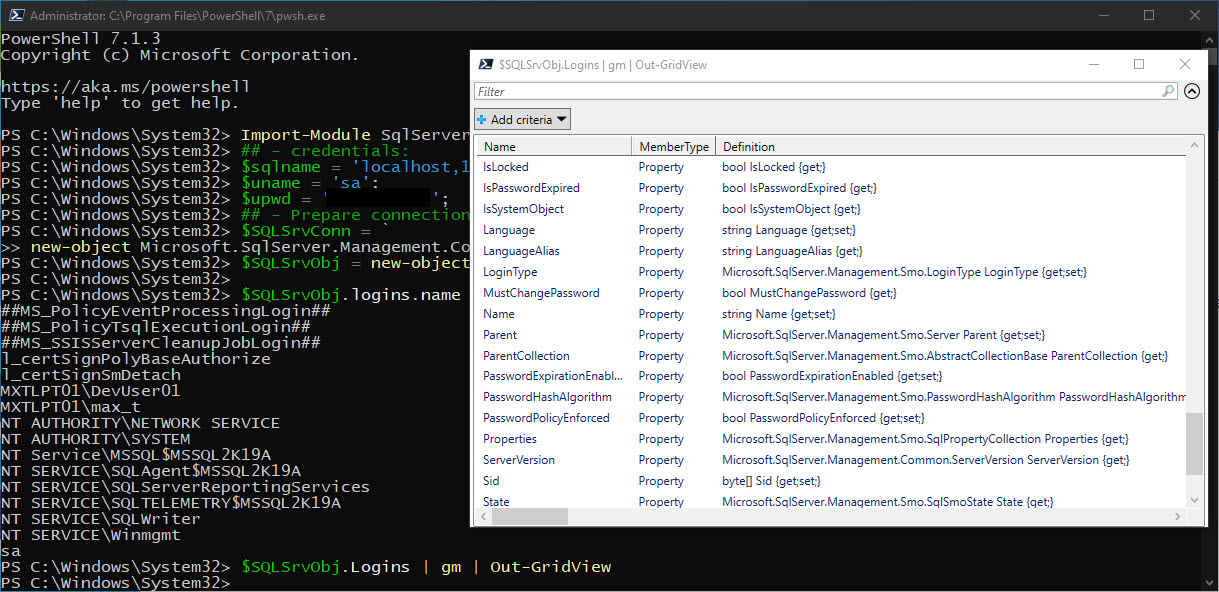
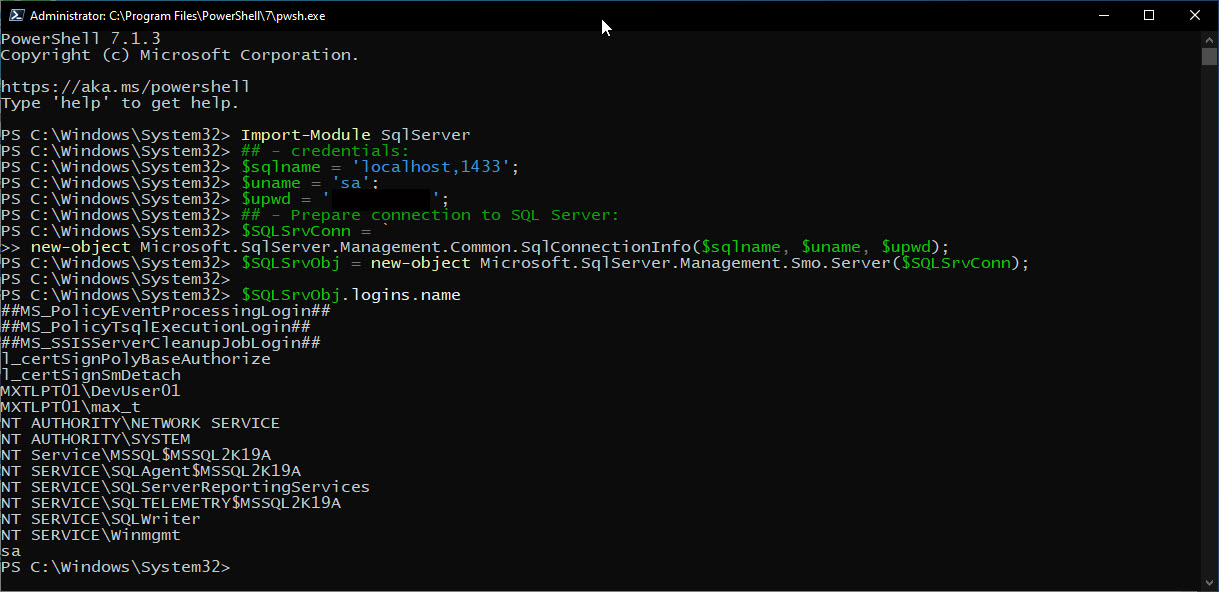
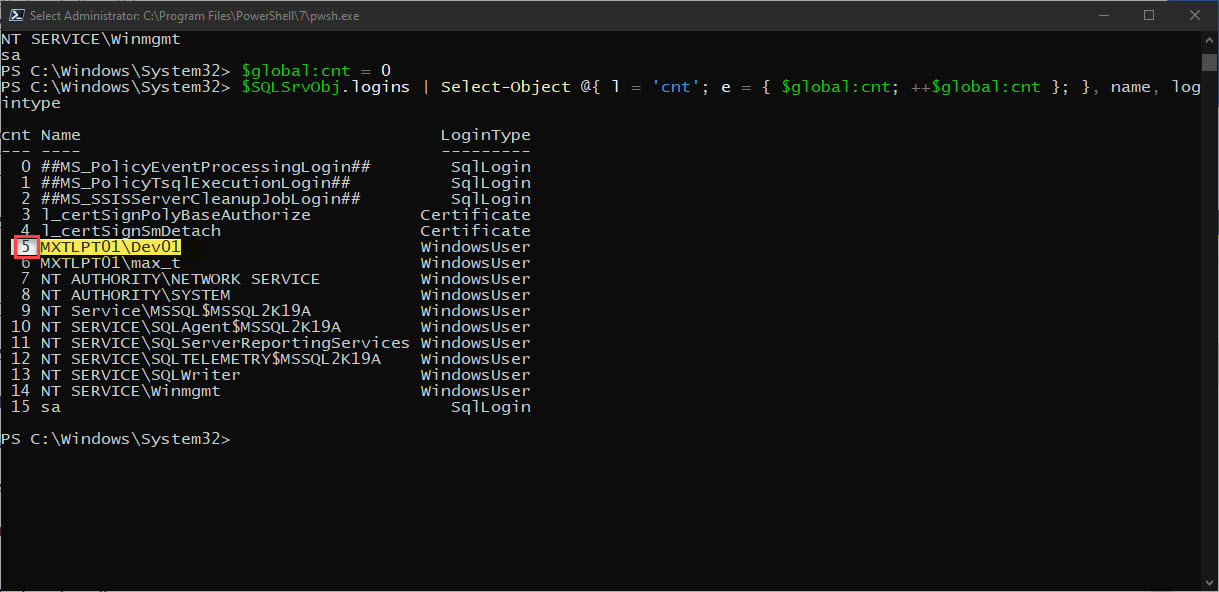
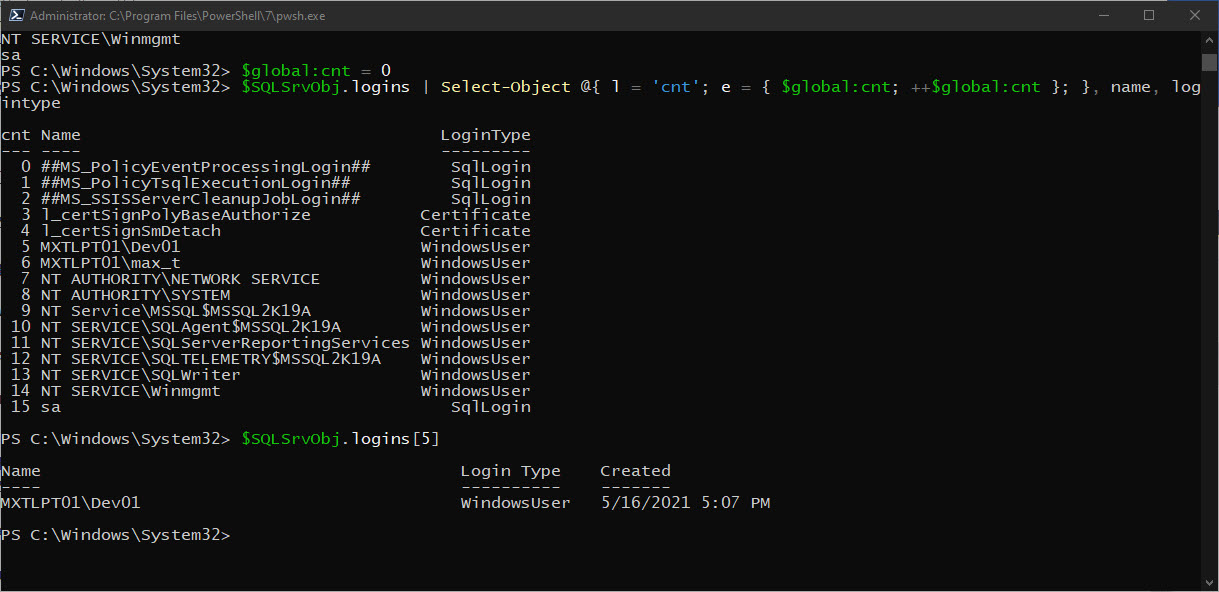
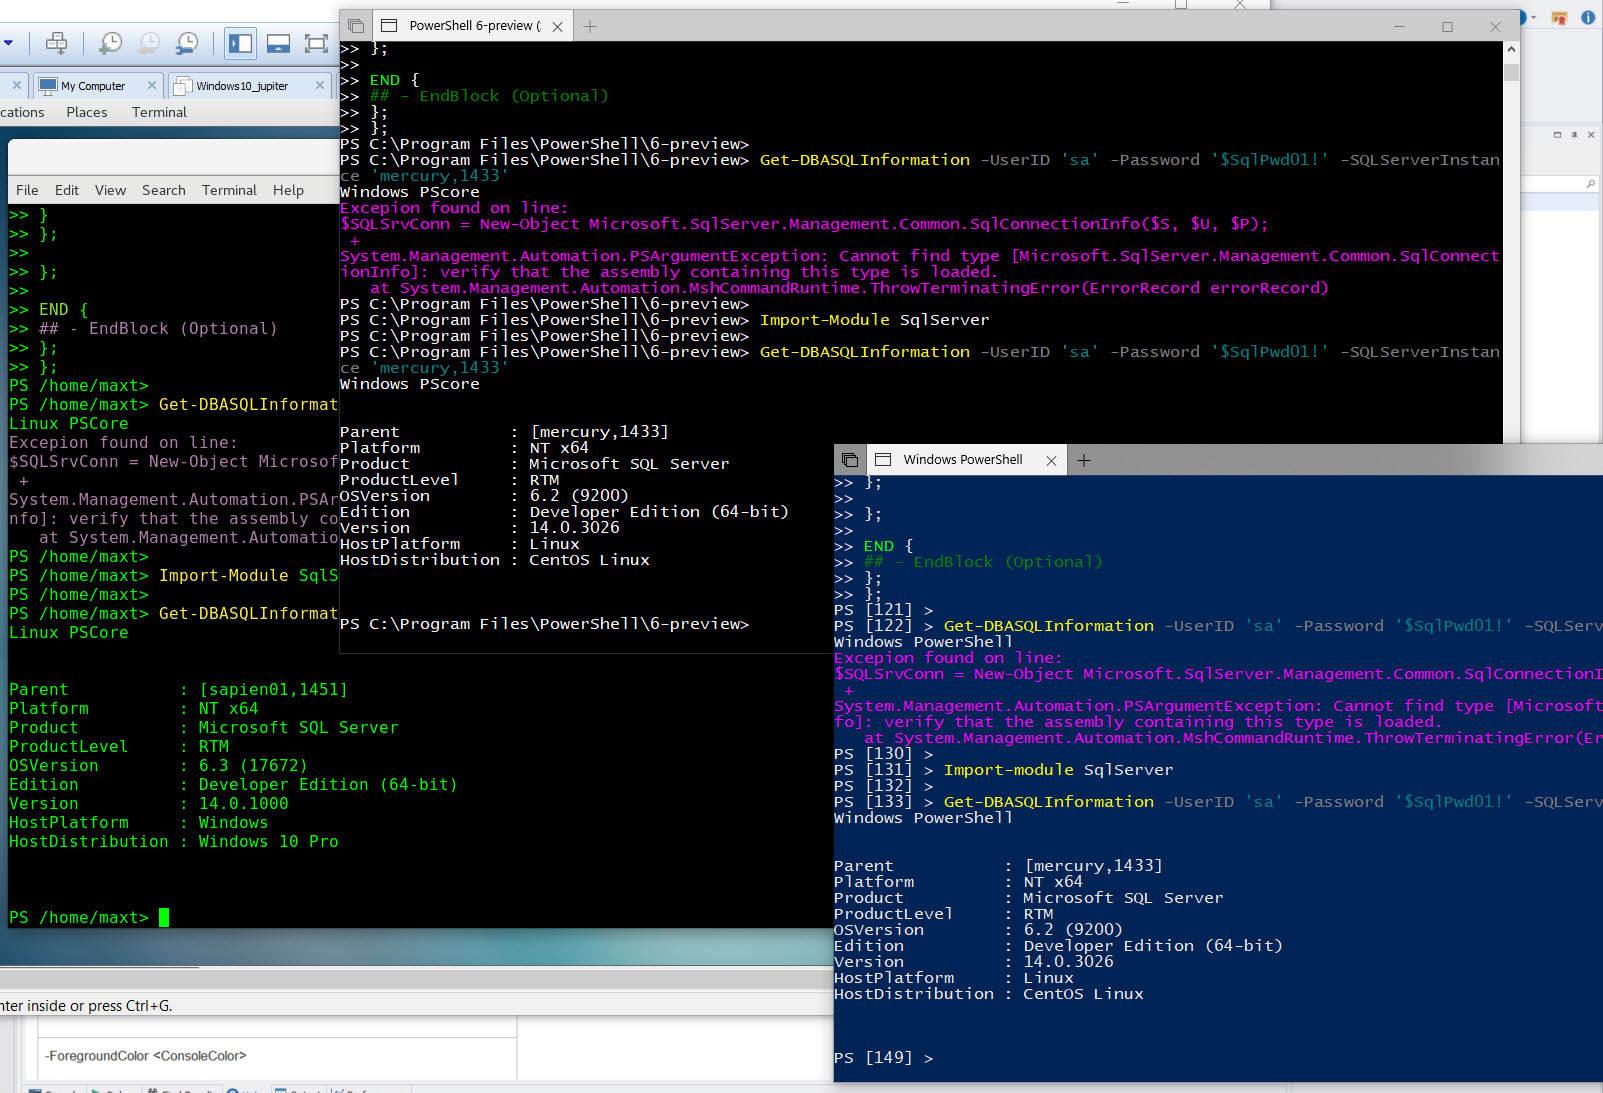
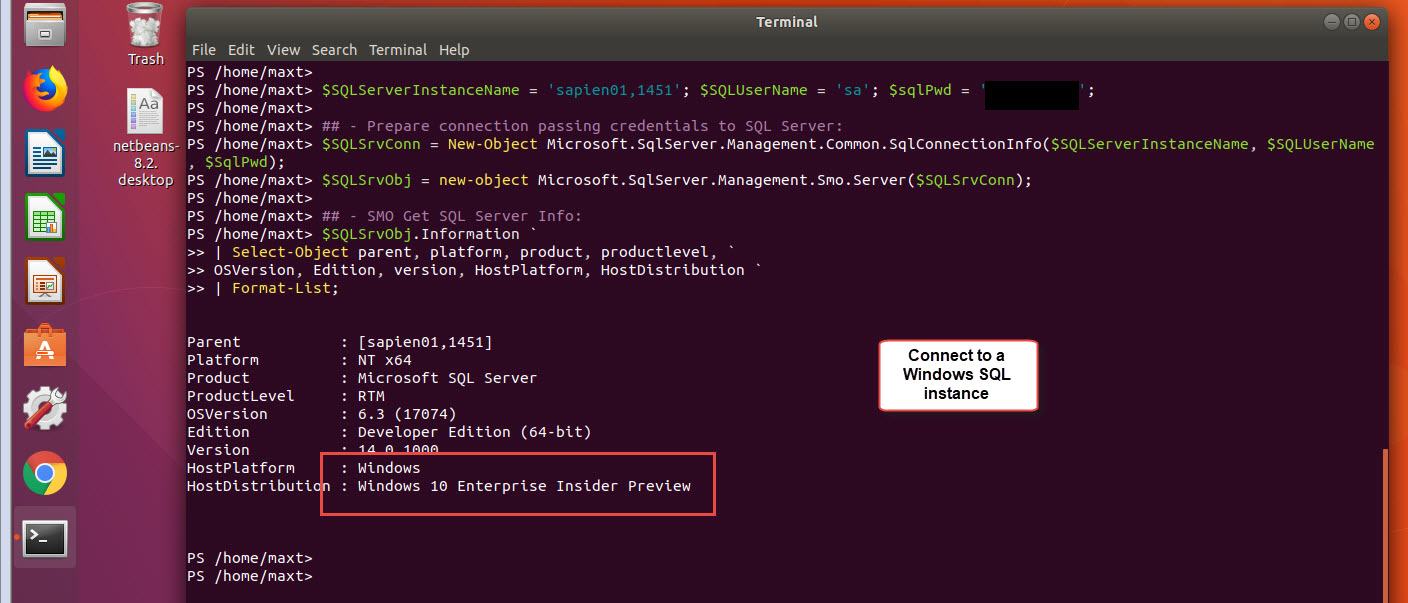
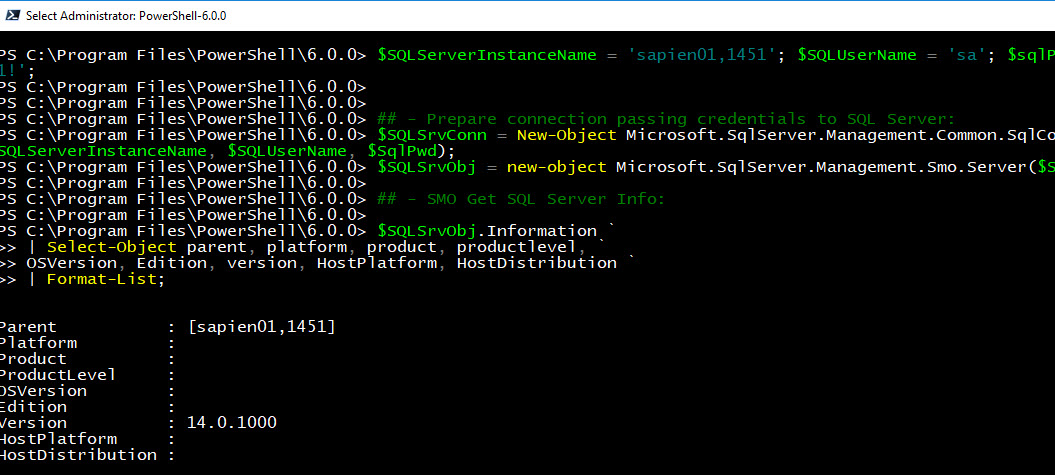
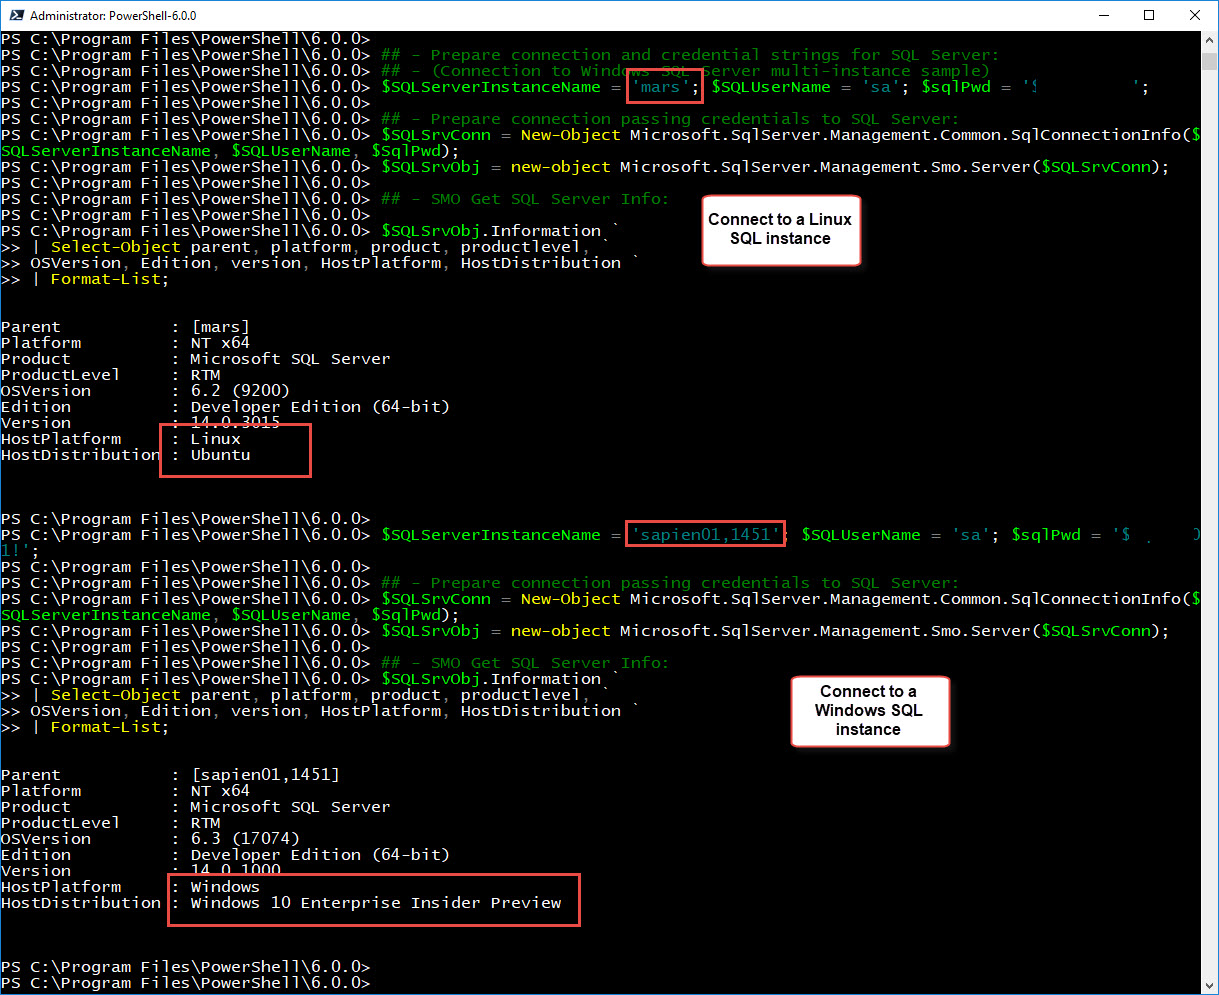
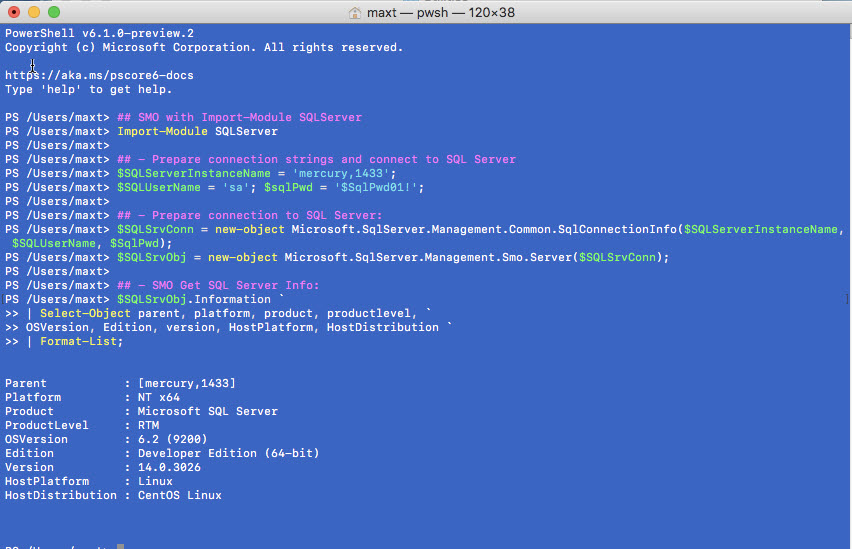
Here’s a small SMO script example for getting SQLServer information using SQL Authentication:

[sourcecode language=”powershell”]

## SMO with Import-Module SQLServer
Import-Module SQLServer

## – Prepare connection strings and connect to SQL Server
$SQLServerInstanceName = ‘mercury,1433’;
$SQLUserName = ‘sa’; $sqlPwd = ‘$SqlPwd01!’;

## – Prepare connection to SQL Server:
$SQLSrvConn = new-object Microsoft.SqlServer.Management.Common.SqlConnectionInfo($SQLServerInstanceName, $SQLUserName, $SqlPwd);
$SQLSrvObj = new-object Microsoft.SqlServer.Management.Smo.Server($SQLSrvConn);

## – SMO Get SQL Server Info:
$SQLSrvObj.Information `
| Select-Object parent, platform, product, productlevel, `
OSVersion, Edition, version, HostPlatform, HostDistribution `
| Format-List;

[/sourcecode]

As you can see, there’s no reason why not try and experiment using PowerShell Core with SQL Server.  Next blog post I’ll be creating this script code in the hybrid-script function that can be executed cross-platform. I mean, on any PowerShell version too.

What’s in the future!

Now that PowerShell SQLServer Module is available cross-platform, I will see others Community SQL modules (DBATools, DBAReports) making their way to PowerShell Core. Of course, it will take some before it becomes available!

In the meantime, you can use SMO to build your own PowerShell SQL Scripts. Why not! Go and Expand your horizon!!

Be Bold! Learn PowerShell Core!

SSMS Version 17.4 no more SQLPS Module

It was just a matter of time, as it was already mention in previous SSMS (SQL Server Management Studio) documentation that SQLPS module was going to be deprecated and replace with the new SQLServer module.

See SSMS download information at: https://docs.microsoft.com/en-us/sql/ssms/download-sql-server-management-studio-ssms

After SSMS Version 17.4 was release back in December, SQLPS module is no longer available. So, if you try to use the “Start PowerShell” from any of the database object, you’ll get the message “No SQL Server cmdlets found…” popup message.

New SQLServer PowerShell Module

But, no worries! Both the SSMS link and the popup message tell you where to get the new *SQLServer PowerShell module as is a separate installation from the PowerShell Gallery.

PowerShell Gallery SQLServer PowerShell Module, Get here: https://www.powershellgallery.com/packages/SqlServer/21.0.17199

One thing to point out, this module is only meant to be use on Windows PowerShell.

In other words, it will not work in PSCore6.

Housekeeping Needed

Now, there’s the chance previous SSMS installations have left the older SQLPS PowerShell Module in the system.

As is shown in the previous image, the variable $env:PSModulePath contains the path to the existing SQLPS module(s).

Either, remove the path manually using PowerShell, or thru the GUI System “Environment Variable“.

Or better yet, if you’re using SAPIEN Technologies, Inc. “PowerShell Studioproduct, the n use the Cache Editor feature to manage your existing PowerShell Modules. Check out the blog post and video about this feature at:
https://www.sapien.com/blog/2017/12/07/powershell-studio-feature-nugget-refreshing-local-cache-powershell-cmdlets-and-modules/

Video featuring PowerShell Studio Cache Editor

Option for PSCore

The only way to use PSCore6 to work with SQLServer cross-platform, is using the SMO (SQLServer Management Objects) for .NETCore, which is available in NuGet. For more information in how to install it, check my blog post at:
http://www.maxtblog.com/2017/11/streamlining-sql-server-management-objects-smo-in-powershell-core/

The only downside, you need to create the script from scratch. There’s plenty of documentation about SMO to overcome this hurdle. Most important, you are  sharpen your PowerShell scripting skills.

Don’t forget that before install any artifacts from PowerShell Gallery, NuGet, or Chocolatey the console shell need to be open “as an Administrator“.

Be Bold!! Learn PowerShell Core!!

PSCore6 – Nuget Microsoft.SqlServer.SqlManagementObjects latest Package (v140.17218.0) Broken

This is the SMO (SqlServer Management Objects) package use to create PSCore6 scripts to connect and manage SQL Server on Windows, Linux, and Azure.

But today, I found out the latest version “140.17218.0″ is broken. I had to rolled back to use an older version “140.17199.0” to get it to work again.

You can find the information about this package in this link:
https://www.nuget.org/packages/Microsoft.SqlServer.SqlManagementObjects

This NuGet SMO package version is built on .NETCore 2.0 for PSCore6, and will not install in Windows PowerShell.

Installing SMO Package

To *install the previous SMO package version “140.17199.0“, use the following command:

[sourcecode language=”powershell”]
Install-Package Microsoft.SqlServer.SqlManagementObjects -RequiredVersion ‘140.17199.0’

[/sourcecode]

*Note: Need to install as an Administrator.

If  the newer SMO version “140.17218.0” is installed then it will not connect. There are no errors, or failures displayed.  (See image)

This issue has been reported to NuGet SMO owners and hopefully will be resolved soon.

Testing SMO in PSCore6

Here’s the PSCore6 script for SMO testing. The script will work in both Windows and Linux.

[sourcecode language=”powershell”]
## – Help find and save the location of the SMO dll’s in a PowerShell variable:
$smopath = `
Join-Path ((Get-Package Microsoft.SqlServer.SqlManagementObjects).Source `
| Split-Path) (Join-Path lib netcoreapp2.0)

# Add types to load SMO Assemblies only:
Add-Type -Path (Join-Path $smopath Microsoft.SqlServer.Smo.dll)
Add-Type -Path (Join-Path $smopath Microsoft.SqlServer.ConnectionInfo.dll)

## – Prepare connection and credential strings for SQL Server:
## – (Connection to Windows SQL Server multi-instance sample)
$SQLServerInstanceName = ‘System01,1451’; $SQLUserName = ‘sa’; $sqlPwd = ‘$Mypwd01!’;

## – Turn ON below for Linux:
## – (Connection to Linux SQL Server multi-instance sample)
# $SQLServerInstanceName = ‘LinuxSystem02’; $SQLUserName = ‘sa’; $sqlPwd = ‘$Mypwd01!’;

## – Prepare connection passing credentials to SQL Server:
$SQLSrvConn = New-Object Microsoft.SqlServer.Management.Common.SqlConnectionInfo($SQLServerInstanceName, $SQLUserName, $SqlPwd);
$SQLSrvObj = new-object Microsoft.SqlServer.Management.Smo.Server($SQLSrvConn);

## – SMO Get SQL Server Info:
$SQLSrvObj.Information `
| Select-Object parent, platform, product, productlevel, `
OSVersion, Edition, version, HostPlatform, HostDistribution `
| Format-List;

## – End of Code

[/sourcecode]

Most Important

In order for this to work, NuGet needs to be installed first. The following *code block will help to check if it’s already installed. And, if not, then it will install NuGet in PSCore6.

[sourcecode language=”powershell”]
# Register NuGet package source, if needed
# The package source may not be available on some systems (e.g. Linux)
if (-not (Get-PackageSource | Where-Object{$_.Name -eq ‘Nuget’}))
{
Register-PackageSource -Name Nuget -ProviderName NuGet -Location https://www.nuget.org/api/v2
}else{
Write-Host "NuGet Already Exist! No Need to install."
}

[/sourcecode]

*Note: Thanks to the SMO guys for providing this code block to get me started testing.

Also, if you already installed the buggy NuGet SMO version, remember to use the following command to uninstall the package:

[sourcecode language=”powershell”]
uninstall-package Microsoft.SqlServer.SqlManagementObjects

[/sourcecode]

I’m hoping this blog post will help in any way.

Be Bold!! Learn PowerShell Core!!

PowerShell – SQL Server Management Studio v17 is Ready!

Yes! The SQL Server Management Studio  Version 17 is available for download for the purpose of managing the new SQL Server 2017, Azure SQL Databases and Azure SQL Data Warehouse. At the same time this version won’t prevent you from working with older SQL Server such as SQL Server 2000 and SQL Server 2005 but there will be some features that won’t work. Please know the limitations!

To download the new SQL Server Management Studio V17, click on the following link:
https://docs.microsoft.com/en-us/sql/ssms/download-sql-server-management-studio-ssms

Now there are a few things, you should be aware. This version depends on Visual Studio 2015 with the update KB3165756 installed. I ended up crashing SSMS when I made the mistake of uninstalling Visual Studio 2015 to make some room for the Visual Studio Preview.

Here’s the SSMS error message that will popup and made my application useless.

But, no worries! In order to correct the issue, I did the following steps:

1. Uninstall SSMS
2. Restart machine (Windows 10 Insider Build 16179)
3. In my case, I installed the Visual Studio 2015 Shell only.
4. Search and installed the Visual Studio 2015 Update – KB3165756.
5. Restart machine.
6. Just to make sure, open Visual Studio 2015 and verify the update was installed.
7. Download SQL Server Management Studio V17: https://docs.microsoft.com/en-us/sql/ssms/download-sql-server-management-studio-ssms
8. Install and restart system.
9. Open SSMS v17 and verify there are no errors.

Apparently, there are strong dependencies in SSMS with Visual Studio 2015.

Now, there are a few changes from previous SSMS Release Candidates in regards with PowerShell SQL Server commands. As the new PowerShell “SQLServer” module is no longer included with SSMS v17. But, you still get the SQLPS module.

The following PowerShell one-liners to check for the modules installed:

[sourcecode language=”powershell”]
gcm -Module SQLServer -CommandType Cmdlet | Select-object -first 10 name
gcm -Module SQLPS -CommandType Cmdlet | Select -first 10 name
[/sourcecode]

In order to installed the PowerShell “SQLServer” module, you’ll need to downloaded from “PowerShell Gallery”. Follow the instructions from the following link:
https://docs.microsoft.com/en-us/sql/ssms/download-sql-server-ps-module

One requirement for using PowerShell “SQLServer” module is to have PowerShell Version 5.0 or greater.

[sourcecode language=”powershell”]
Install-module -Name SqlServer -Scope CurrentUser -AllowClobber
[/sourcecode]

Make sure that after you complete the installation, close and open another PowerShell session.

Now, you are ready to work with both SSMS v17 and the new PowerShell “SQLServer” module.


PowerShell – SQL Server 2014 SMO TruncateData() Workaround

As I was still puzzle why the SMO *.TruncateData() was missing in SQL Server 2014, I needed to find a quick workaround to continue with my data migration.

Of course, here comes T-SQL scripting to the rescue:

[sourcecode language=”sql”]

Truncate Table databasename.schema.tablename
GO

[/sourcecode]

Basically, subtitute the SMO .TruncateData() with few lines of T-SQL statement, and have PowerShell run the code against SQL Server. The script is shown below:

[sourcecode language=”powershell”]
## —————————————– ##
## – Using SMO steps to work with tables:
$SQLServerInstanceName = ‘TSQLDSP01’; $global:SQLServerDatabasename = ‘devMaxText’;
$global:DbSchema = ‘dbo

[system.reflection.assembly]::LoadWithPartialName(“Microsoft.SQLServer.Smo”) | Out-Null;
$SQLSrvObj = new-object(‘Microsoft.SqlServer.Management.Smo.Server’) $SQLServerInstanceName;
$tables = $SQLSrvObj.Databases[$global:SQLServerDatabaseName].tables;

$global:cnt = 1;
foreach ($t in $tables.name)
{
$tsqry = @”
Truncate Table $($global:SQLServerDatabasename).$($global:DbSchema).$($t)
Go
“@;
#$SQLSrvObj.Databases[$SQLServerDatabaseName].ExecuteNonQuery($tsqry);
Write-Verbose “[$($global:cnt.ToString(“0000″))]Truncate Table dgSAP_Old.dbo.$($t) Process” -Verbose;
$global:cnt++;
};
[/sourcecode]

This *script will assist in the third-party application to load date back to the tables for our migration.

*Note: Just in case, I commented out the line having the .ExecuteNonQuery() method.