At Coders Cafe: PowerShell – Introduction to SQL Server Containers

I’ll be presenting at the South Florida .NET User Group Coders Cafe on Tuesday, August 8th, 6:30 PM. Location: Cendyn Spaces, Boca Raton.

Topic: PowerShell – Introduction to SQL Server Containers

Description: This session will be covering the basic of working with Containers and PowerShell Core. We’ll be taking the steps of creating a SQL Server 2019 container in an Ubuntu 18.04 Linux system. Then, will be using PowerShell Core to connect to the SQL Server containers to extract information.


Interested in attending this session, click here to register.

Using Linux dpkg packager to install PowerShell 7 Preview in Ubuntu 18.04

Just another way to install PowerShell Preview beside using “apt” or “snap”.  As in this sample, you don’t need to register the package repository.

Get the Preview link

First, look under the release documentation and search for the deb package. In my case I’m install the amd64 version.

Then, right-click on the “powershell-preview_7.0.0-preview.2-1.ubuntu.18.04_amd64.deb”, and select “Copy link address“.

This will copy the following link address:

https://github.com/PowerShell/PowerShell/releases/download/v7.0.0-preview.2/powershell-preview_7.0.0-preview.2-1.ubuntu.18.04_amd64.deb

Download the Preview

Now, I go back to my linux machine and open a terminal session, and I make sure to change directory to the “Downloads” folder.

cd Downloads

Then, I type the following command and the link address:

wget https://github.com/PowerShell/PowerShell/releases/download/v7.0.0-preview.2/powershell-preview_7.0.0-preview.2-1.ubuntu.18.04_amd64.deb

Installing the Preview

Now, I’m ready to install the preview using the dpkg package installer executing the following command:

sudo dpkg -i powershell-preview_7.0.0-preview.2-1.ubuntu.18.04_amd64.deb

Now, we can start working with PowerShell.

In Summary

You can pick and choose the best way to install PowerShell. So, it really takes a few lines get the PowerShell Preview installed quickly.

Reference

Keep learning more PowerShell!

PowerShell Core – Working with Persistent Disk Storage in Docker Containers

This quick blog post will hope to give you a heads up in how to work with container(s) disk data. It’s a known fact that container(s) storing data will not persist if the container is removed. Yes! If you build a container to store your data, it will be gone.

Containers are perfectly suited for testing, meant to fast deployment of a solution, and can be easily deployed to the cloud. It’s cost effective!

Very important to understand! Containers disk data only exist while the container is running. If the container is removed, that data is gone.

So, you got to find the way to properly configure your container environment to make the data persist on disk.

Persisting Data

There are *two quick way to persist data when working with container(s):

1. Create a docker volume.
2. Or, use a local machine folder area.

*Note: There are other solution to help with persisting data for containers, but this a good starting point.

I’m using the docker command line for now. Later, I will be creating some blog post about using Docker Compose and Kubernetes.

I love to use PowerShell Core with Docker command line!

Docker Create Volume

Using docker command “docker volume create <nameofvolume>” will create the volume to help persist data on your local machine.

docker volume create MyLinuxData

Use the following docker commands to check your newly created volume:

* To list all existing docker volume(s):

docker volume ls

* To check “inspect” a docker volume(s) to provide detail information:

docker volume inspect MyLinuxData

Using the “docker volume inspect <VolumeName>.” command line, it will show the volume mount location:

“Mountpoint”: “/var/lib/docker/volumes/MyLinuxData/_data”,

In this case, the mount location is on the Linux box under the Docker Volumes folder. This means all data can persist on you local machine.

Local Machine Folder

This option seems straight forward as there’s no need to create a Docker Volume. Just use the ‘-v’ switch in the Docker Run command line.

In the following command line I’m activating the Docker container with previously configured Microsoft SQL Server instance. I include the ‘-v’ switch to mount a folder on my local machine.

docker run -p 1455:1455 -v /home/maxt/TempSQLBackups:/home/TempSQLBackups --name sql2k19ctp23_v02 -d sql2k19_ctp2.3_sandbox:CTP2.3-Version02

Notice in this case, to verify that my SQL Server container has mount to my the local machine folder, I can execute the following command:

docker exec -i sql2k19ctp23_v02 ls /home/TempSQLBackups

Using “docker exec -i <containerid/name> ls <containerfolderlocation” will display the results of all the files back to the screen. Now, anything you add to that local folder will be accessible to the container.

Summary

This is a good starting point when learning how to work with Docker data in containers. You’ll still go thru trails-and-errors while learning how to build container images, and make data persist for your application. But, it’s much faster and easier to rebuild images. This is one of a most to learn technology.

References

Check out the following blog post as it help me understand about “Persistent Storage”:

PowerShell Core – How to install SQLServer Module (Preview) in WSL – Ubuntu 18.04

You all have been following Aaron Nelson blog post on Invoke-Sqlcmd availability Cross-Platform in the SqlServer module then you all are probably have proceeded to download the PowerShell SqlServer.

At the same time, on March 5th,  PowerShell Core 6.2.0-rc1 (Release Candidate) was made available for download.
Go and get it!

The thing is, in order to use the Invoke-SqlCmd cmdlet, you need to use PowerShell Preview version 6.2.0-rc1 (or greater).

Now, SqlServer Module can be easily installed in all platforms but I found out that it won’t install in Windows 10 WSL Ubuntu 18.04.

So, What the issue with Windows 10 WSL – Ubuntu 18.04?

Normally, when working with modules in PowerShell Core, I always use the following Cmdlets: Uninstall-Module to remove the module and then Install-Module with the “-AllowPrerelease” parameter. This will work flawlessly, but I found out that it won’t installed it in WSL – Ubuntu 18.04.

I don’t know why but it was installing the non-preview version SqlServer module 21.1.18080.   So, the following PowerShell Core command line will force the installation of SqlServer module version 21.1.18095-Preview.

Install-Module sqlserver -RequiredVersion 21.1.18095-preview -AllowPrerelease -Force

Now, we can start writing PowerShell Core SQL Server scripts in our Windows Subsystem for Linux – Ubuntu 18.04.

PowerShell – Docker Setup for Windows 10 WSL Ubuntu 18.04 with VMware Workstation

The purpose of this blog post is to show how to setup Docker Community Edition in a Windows 10 with VMware Workstation to be use in Windows Subsystem for Windows (WSL).

There are a few blog post that helped me figure out what’s needed to get this to work and I’ll be sharing these links at the end of this post.

My current environment

My current environment consist of the following components:

  • Windows 10 Build 17763
  • VMware Workstation Pro 12
  • *Oracle Virtualbox 5.2
  • WSL – Ubuntu 18.04
  • SQL Server 2017 Developer Edition
  • Windows PowerShell (v5.1.17763.316)
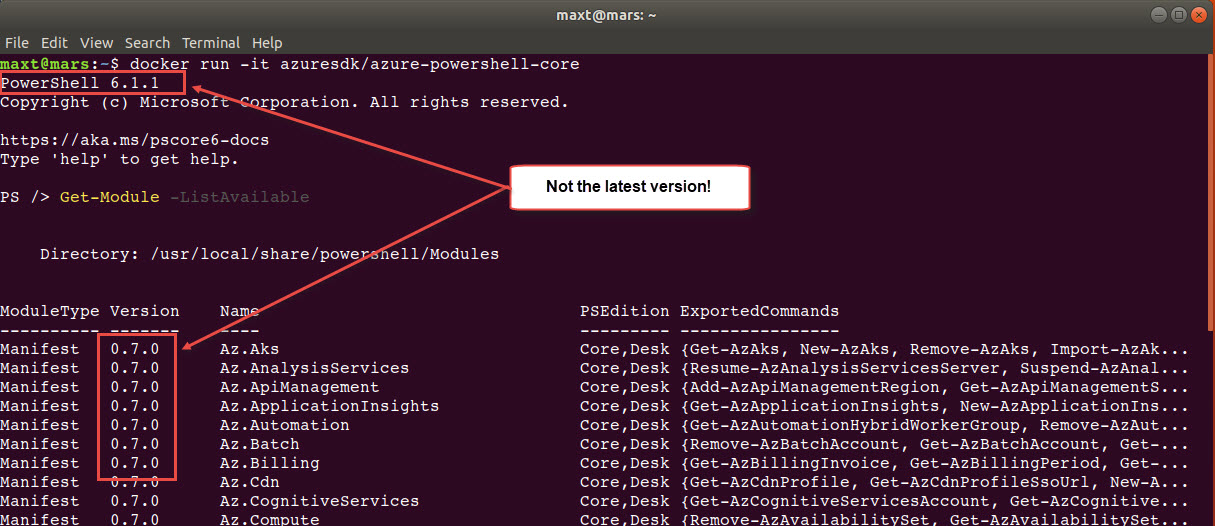
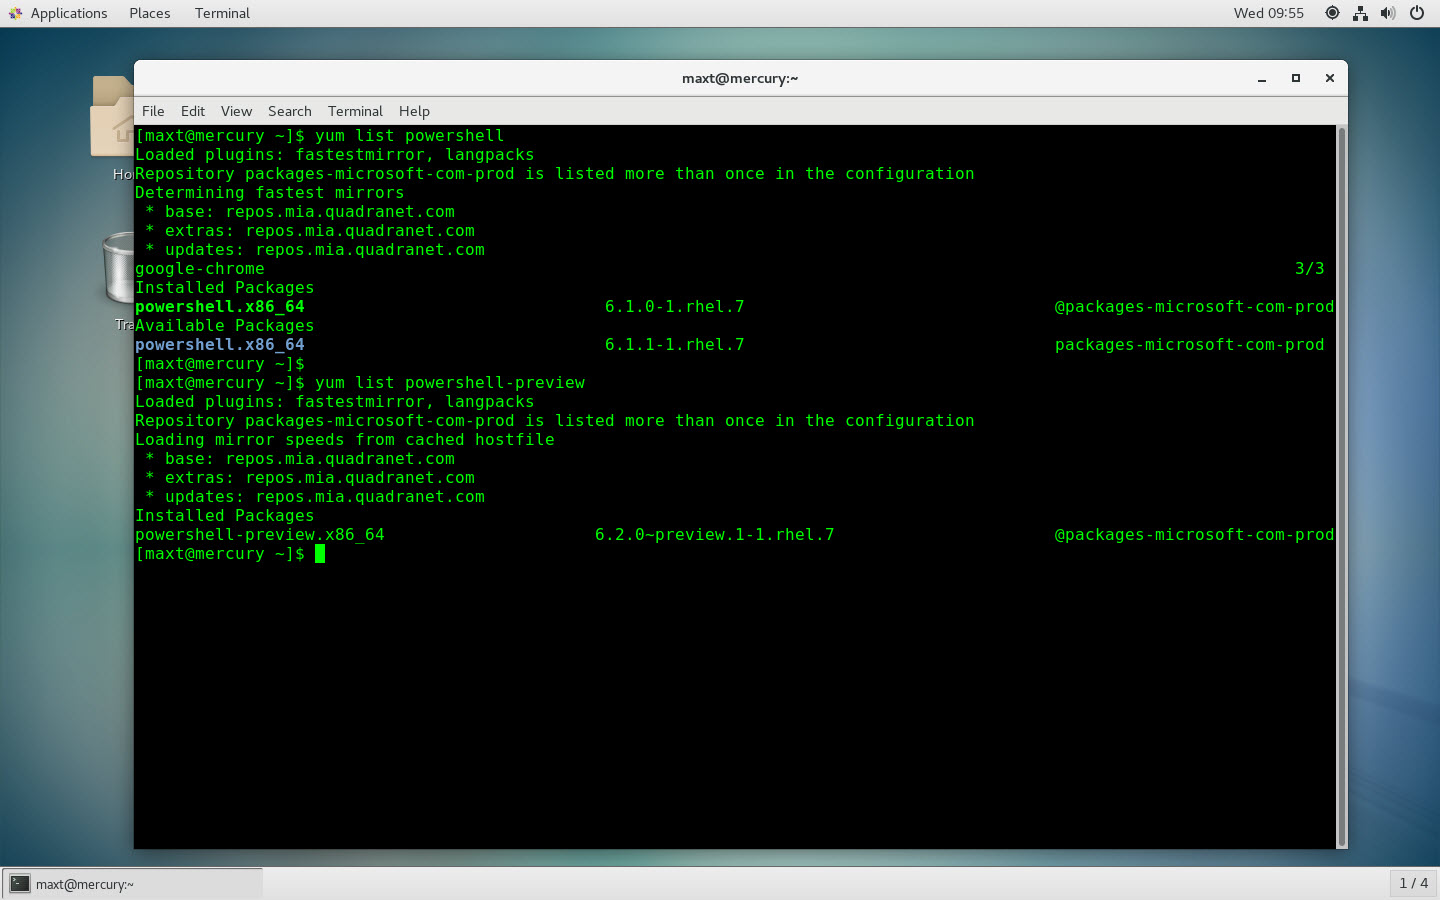
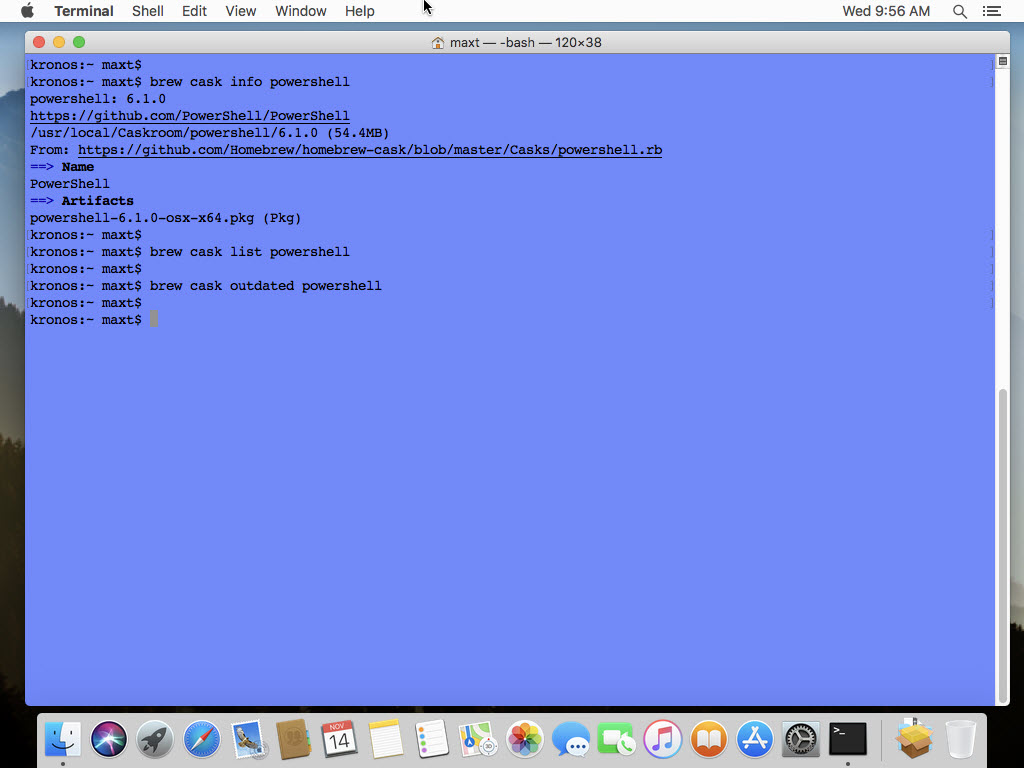
  • PowerShell Core GA v6.3.1 (both Windows and Linux)
  • PowerShell Core Preview v6.2.0-preview.4 (both Windows and Linux)

*Note: This is not the latest version  of Virtualbox but it’s still supported.

Remember, the purpose of this environment is to build a “developer sandbox” that can allow me to learn and work with Docker containers.

What’s needed!

Because I’m using VMware Workstation instead of Hyper-V, there are a few things need to be in place to make this work. Windows 10 need to have the following:

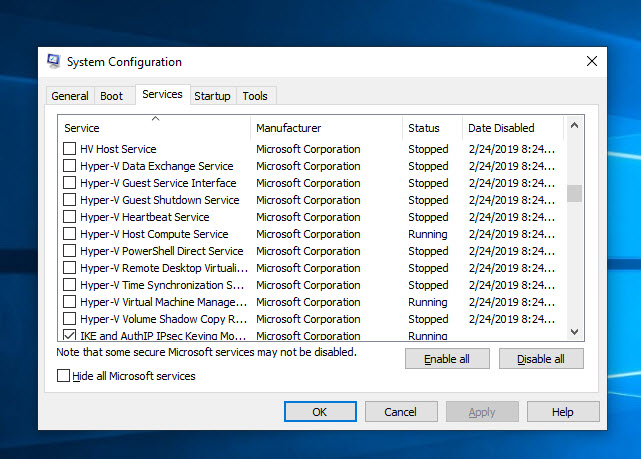
  • All Hyper-V services need to be disable by using “System Configuration” tool.

  •  Install VMWare Workstation Pro. (https://www.vmware.com/products/workstation-pro.html)
  •  Install Oracle Virtualbox version 5.2. (https://www.virtualbox.org/wiki/Download_Old_Builds_5_2)

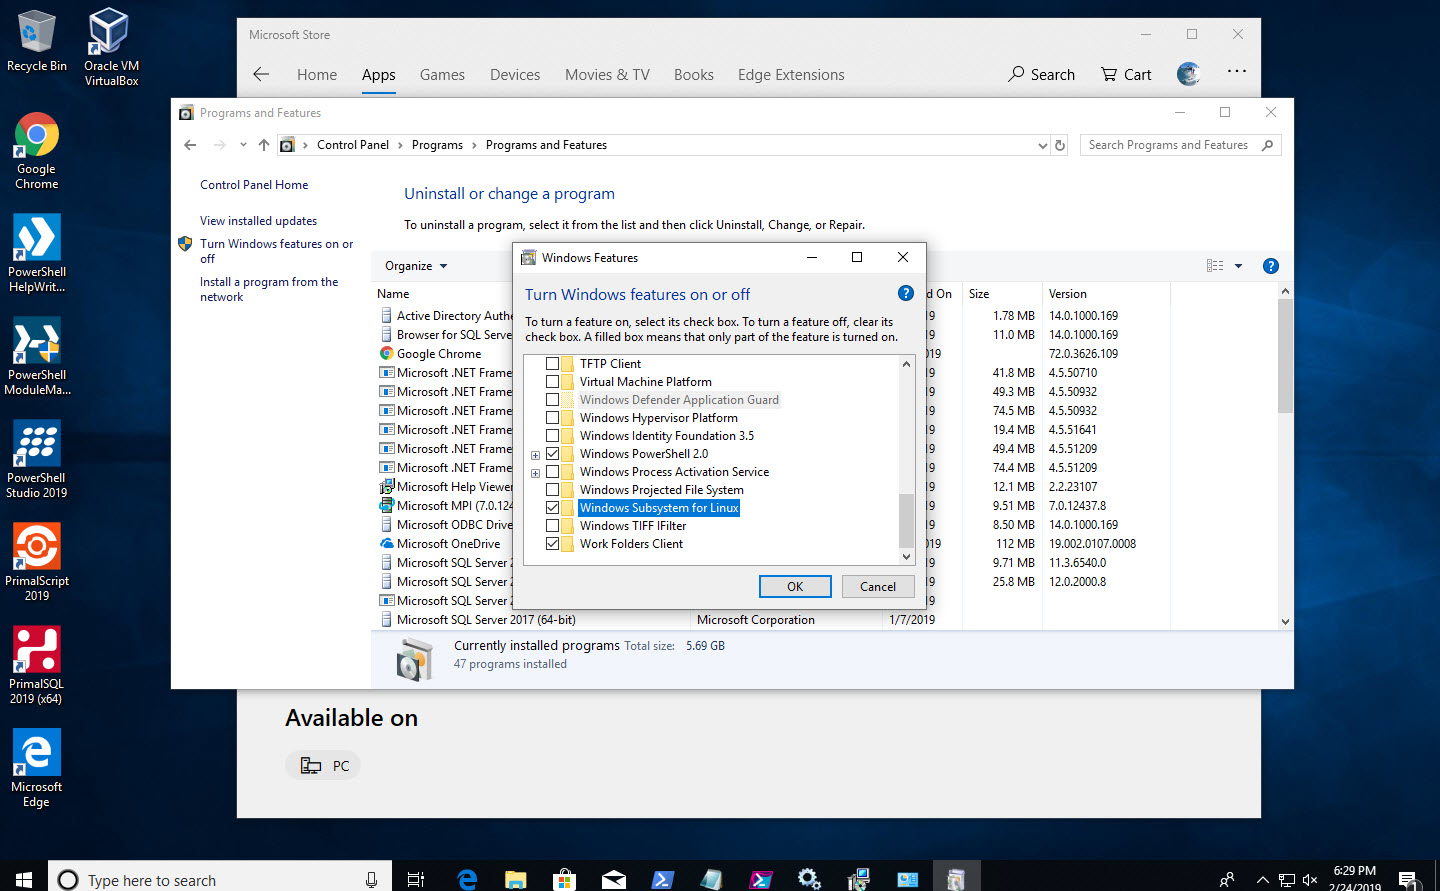
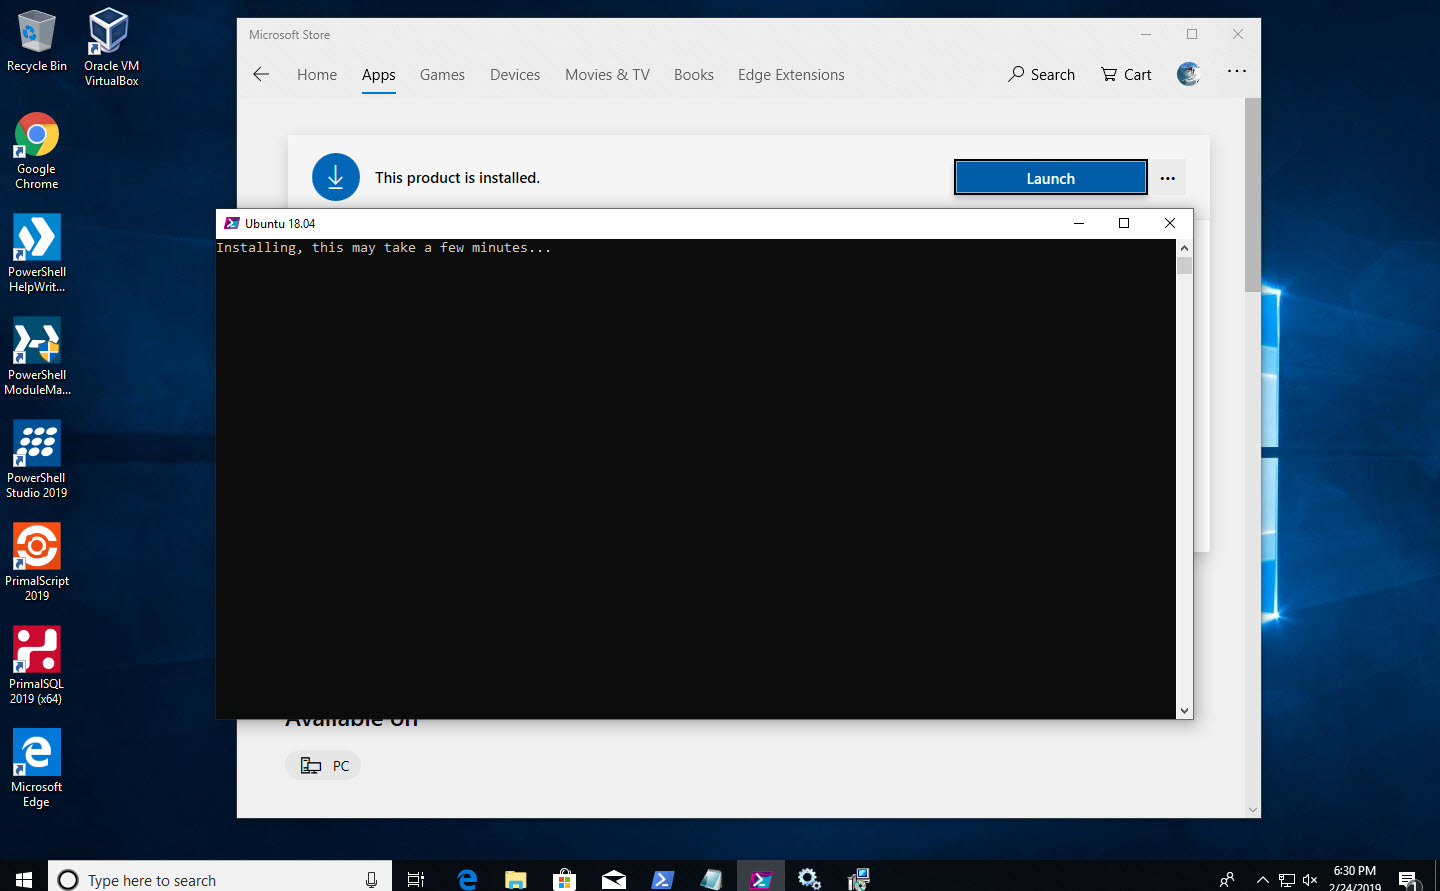
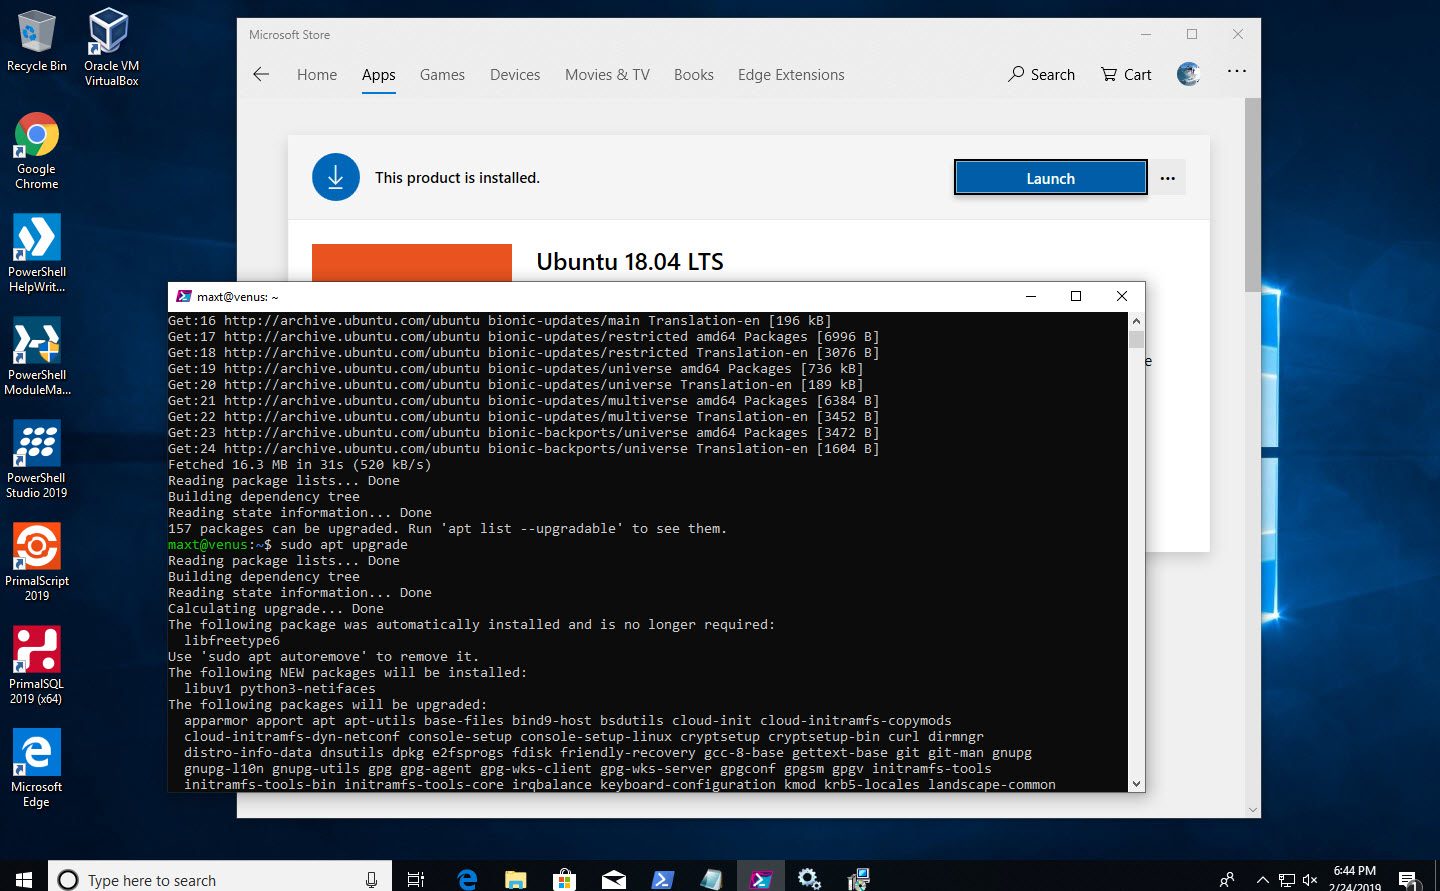
  •  Install from the Microsoft Store, WSL – Ubuntu 18.04.

  • And, make sure to run “sudo apt update” and “sudo apt upgrade” because images are not updated with latest components.

Installing PowerShell Components

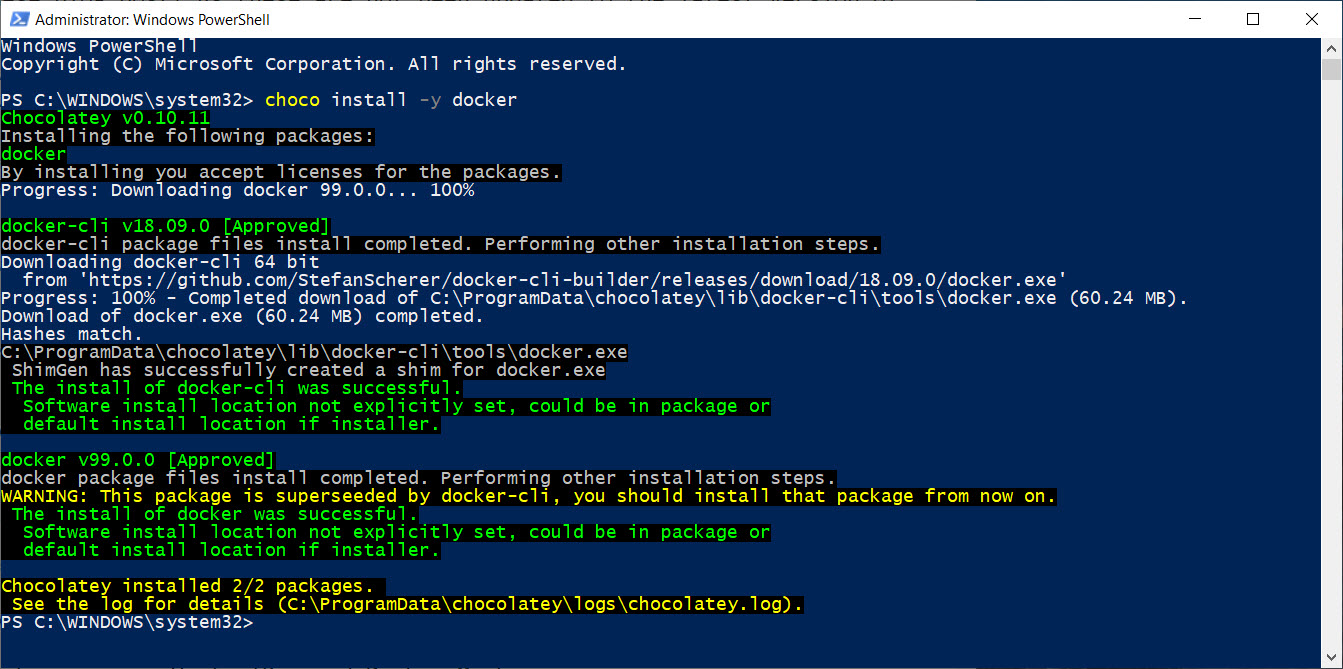
Next, the following Docker components packages from Chocolatey need to be install using Windows PowerShell with administrator privileges:

* Install docker

choco install -y docker

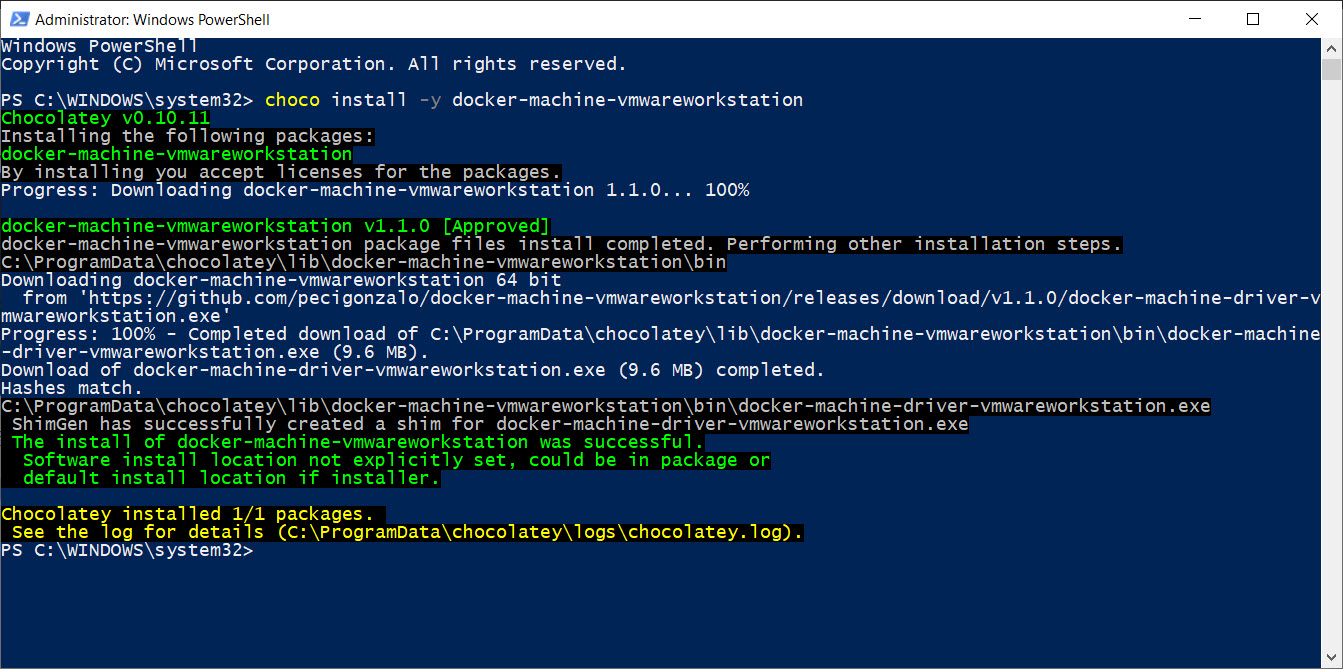
* Install docker-machine-vmwareworkstation

choco install -y docker-machine-vmwareworkstation

Getting WSL Ready for Docker

Now, open the “WSL – Ubuntu 18.04” Linux console and execute the following *commands:

sudo apt update

sudo apt upgrade

*Note: You’ll need to run these two commands manually to keep your Linux distribution up-to-date.

At this point, follow the Docker installation instructions for “Docker-CE for Ubuntu 18.04“. But, in a nutshell, here’s the shortcut:

sudo apt-get install \
apt-transport-https \
ca-certificates \
curl \
gnupg-agent \
software-properties-common

curl -fsSL https://download.docker.com/linux/ubuntu/gpg | sudo apt-key add -

sudo add-apt-repository \
"deb [arch=amd64] https://download.docker.com/linux/ubuntu \
$(lsb_release -cs) \
stable"

sudo apt-get update

sudo apt install docker-ce

sudo usermod -aG docker maxt

exit

At this point. make sure to reopen the WSL linux console.

Setup Docker-Machine in Windows

Back in Windows PowerShell, the next steps show the way to have Docker work in “WSL – Ubuntu 18.04“. Starting with Windows PowerShell console, execute the following commands:

docker-machine --native-ssh create -d vmwareworkstation default
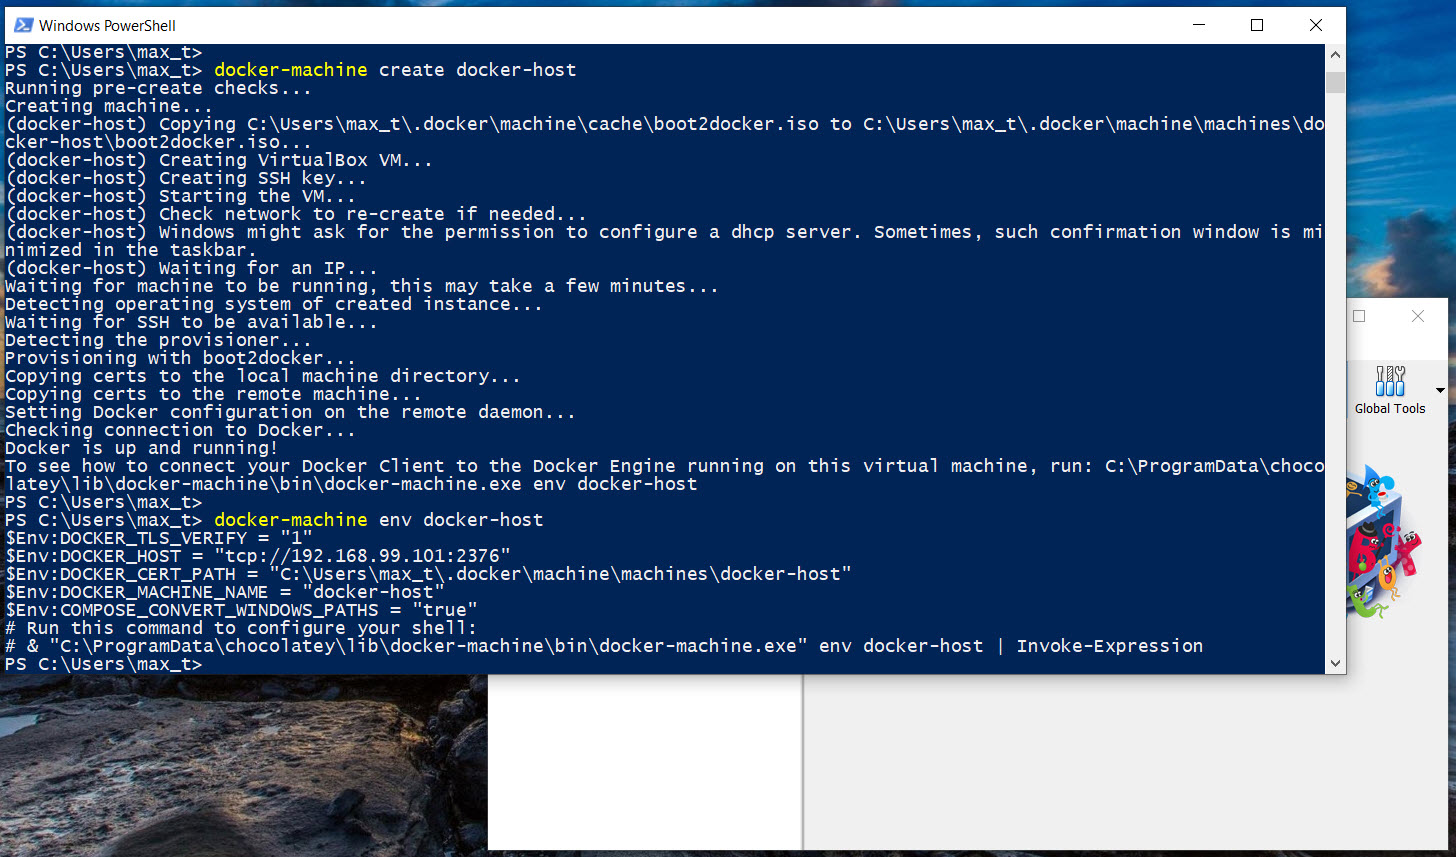
docker-machine create docker-host

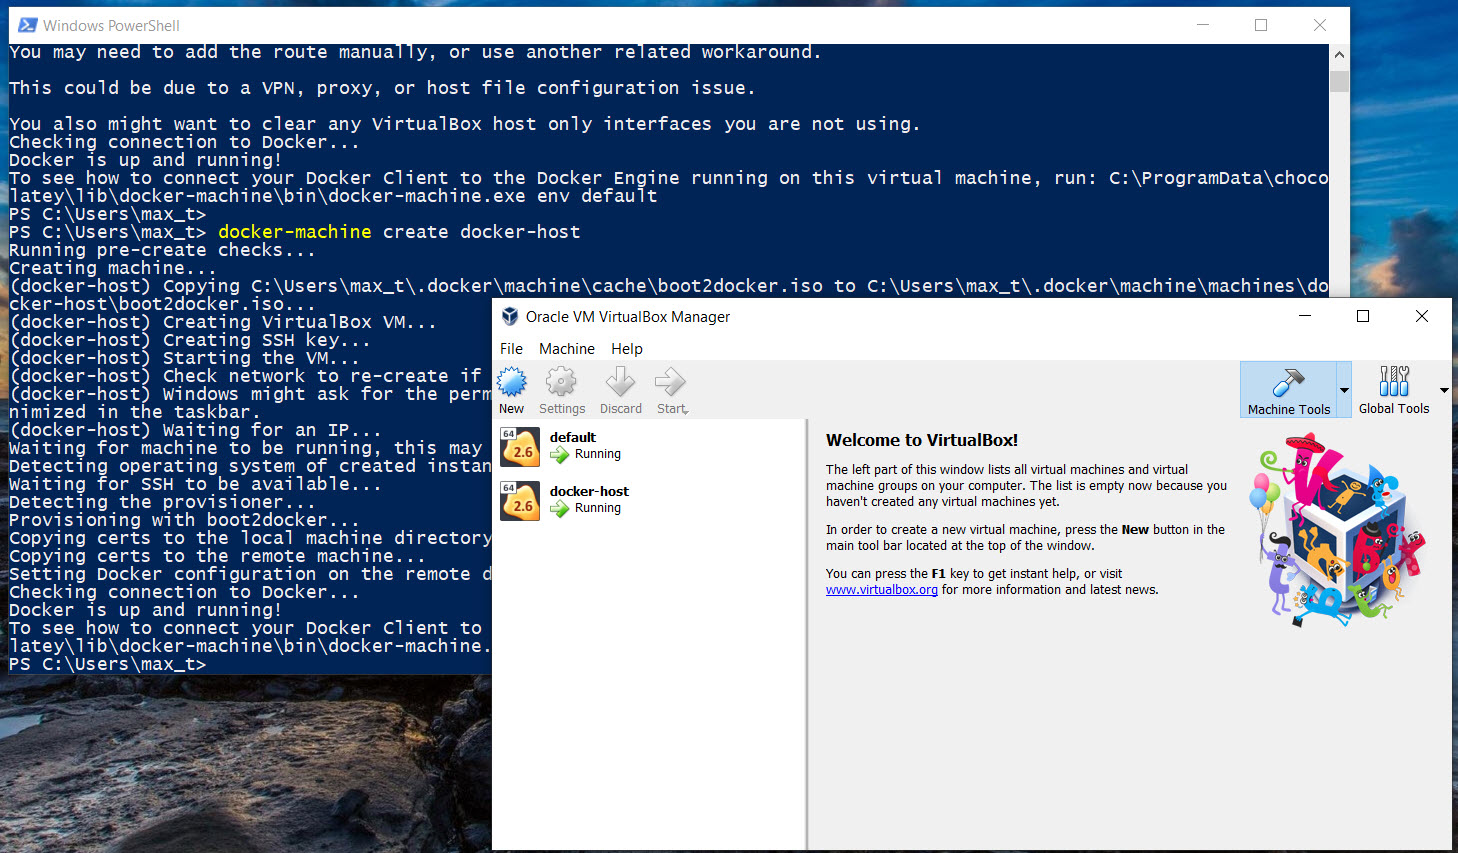
These commands should complete without any errors. At the same time, two virtual machines: “default” and “docker-host” will be created and running in *Virtualbox.

*Note: These two *NEED* to be running in order for docker to work with WSL. At the same time, both VMware Workstation and Virtualbox need to be installed or this will not work

To check that for the Docker-Machine environment(s) are working, use the following command:

docker-machine ls

Next, execute the following command to write down “docker-host” environment results to be copied into the Linux user ~/.bashrc file.

docker-machine env docker-host
PS C:\WINDOWS\system32> docker-machine.exe env default
$Env:DOCKER_TLS_VERIFY = "1"
$Env:DOCKER_HOST = "tcp://192.168.220.xxx:2376"
$Env:DOCKER_CERT_PATH = "C:\Users\max_t\.docker\machine\machines\default"
$Env:DOCKER_MACHINE_NAME = "default"
$Env:COMPOSE_CONVERT_WINDOWS_PATHS = "true"
# Run this command to configure your shell:
# & "C:\ProgramData\chocolatey\lib\docker-machine\bin\docker-machine.exe" env default | Invoke-Expression
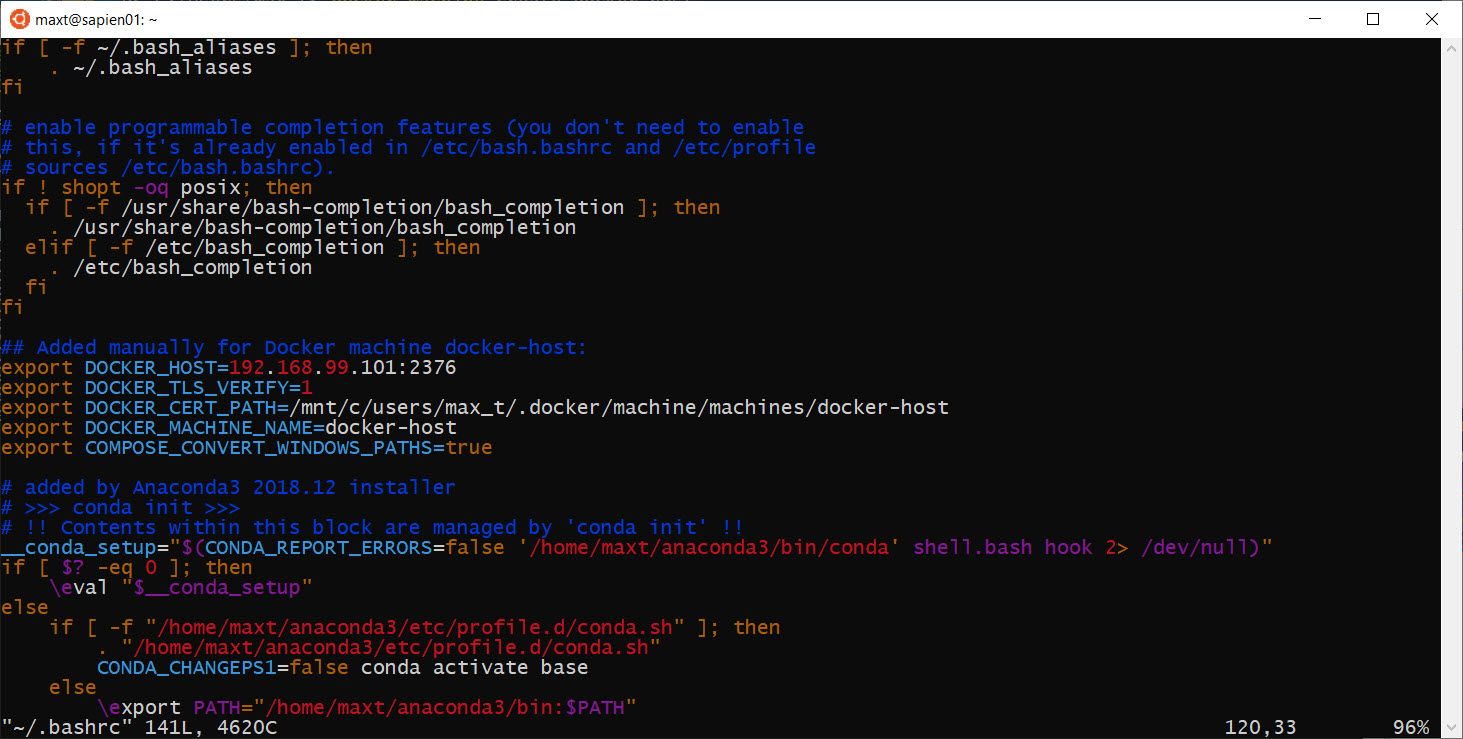
Open a “WSL – Ubuntu 18.04 console to edit the user “~/.bashrc” file, to add the following Docker variables:

## Added manually for Docker machine docker-host:
export DOCKER_HOST=192.168.99.xxx:2376
export DOCKER_TLS_VERIFY=1
export DOCKER_CERT_PATH=/mnt/c/users/max_t/.docker/machine/machines/docker-host
export DOCKER_MACHINE_NAME=docker-host
export COMPOSE_CONVERT_WINDOWS_PATHS=true

sudo vim ~/.bashrc

Reopen the “WSL – Ubuntu 18.04 console.

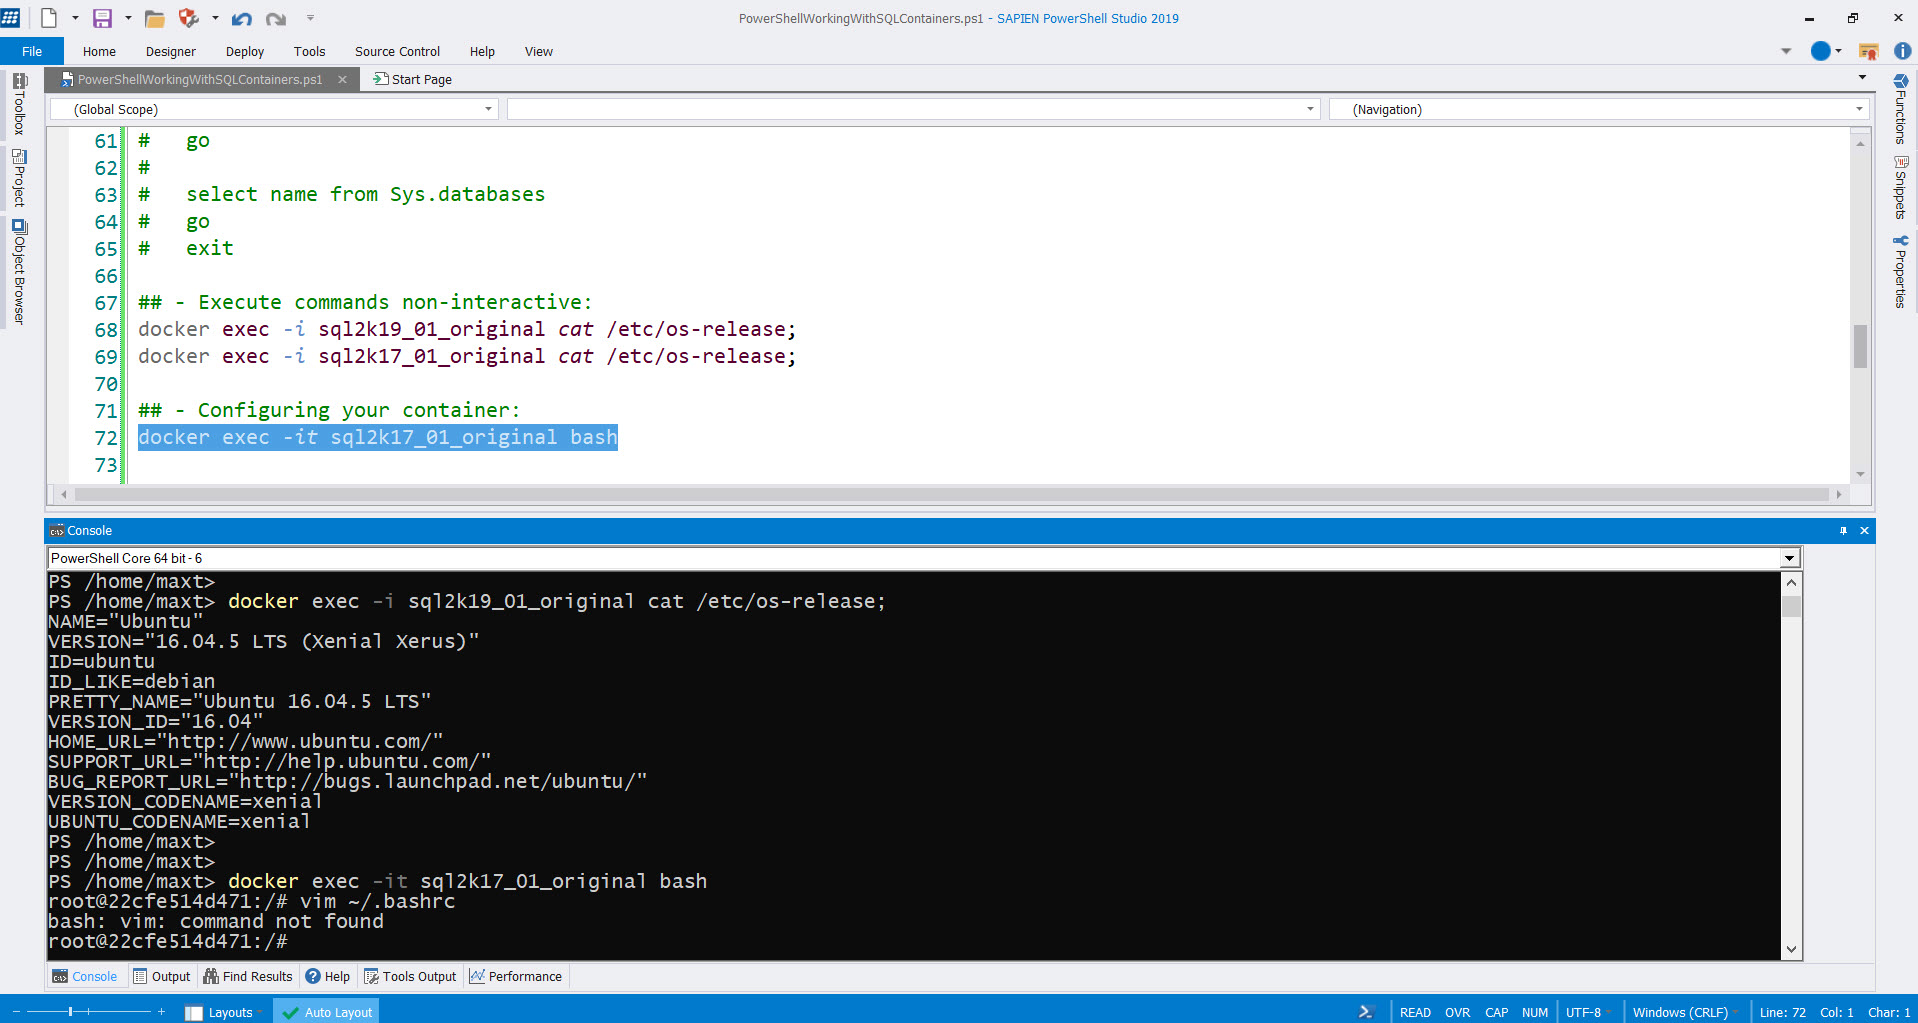
Testing Docker in WSL

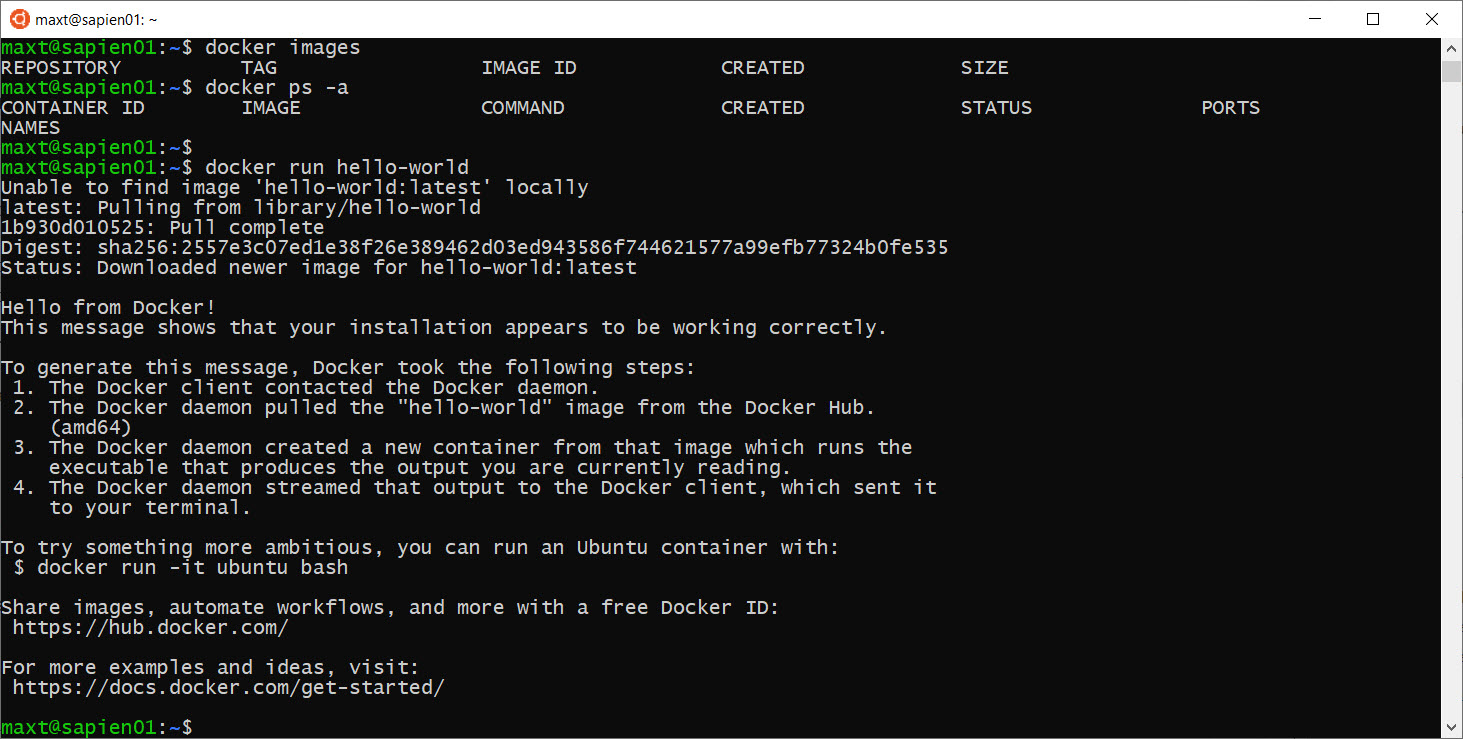
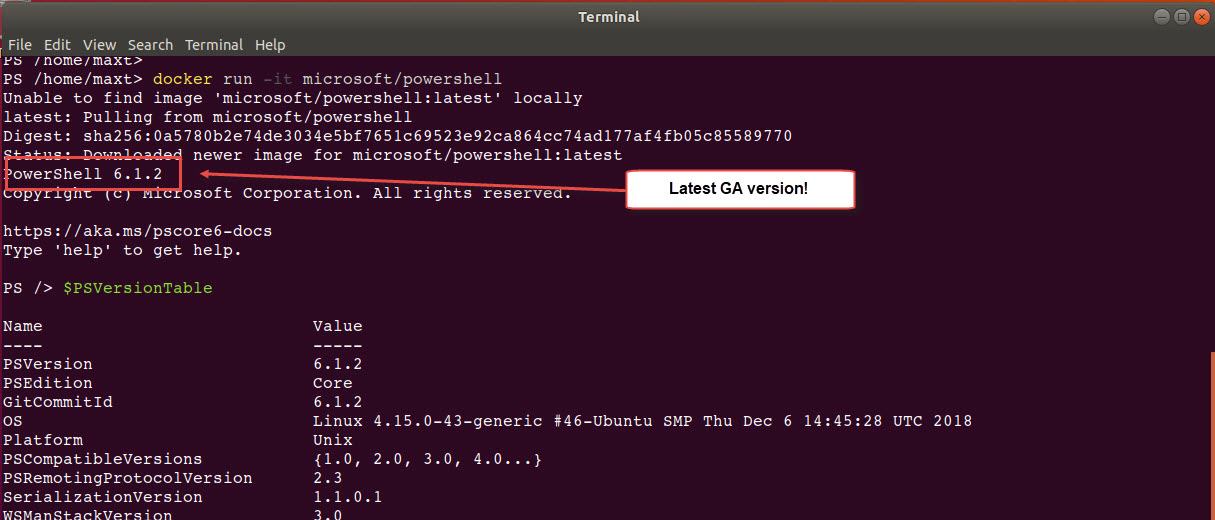
Now, I can test Docker in my “WSL – Ubuntu 18.04 console session. Open PowerShell Core console, and execute the following command to run the Docker Hello-World demo:

docker run Hello-World

This command download (or pull) the Docker image, then run the Hello-World container. If everything work as expected, then it will display the following text.

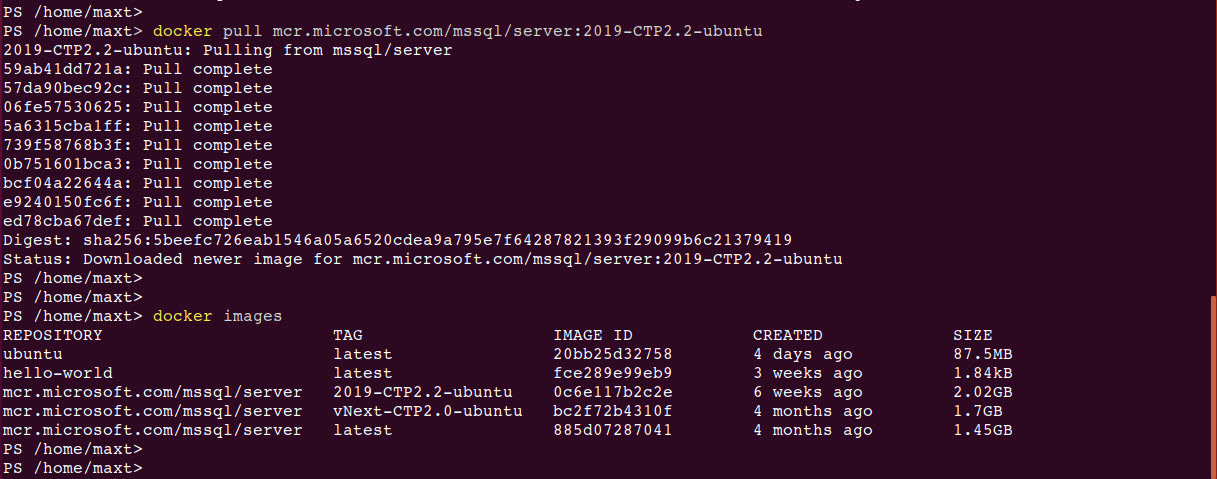
To check both Docker image(s) and/or container(s) in WSL , use the following commands: (Picture

# - Check for all pulled images in system:
docker images

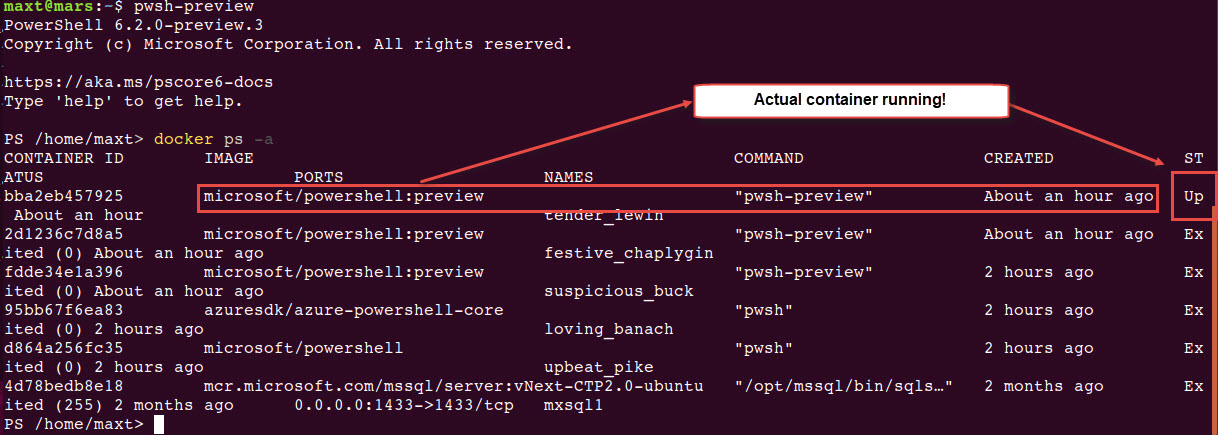
# - Check the status of active containers:
docker ps -a

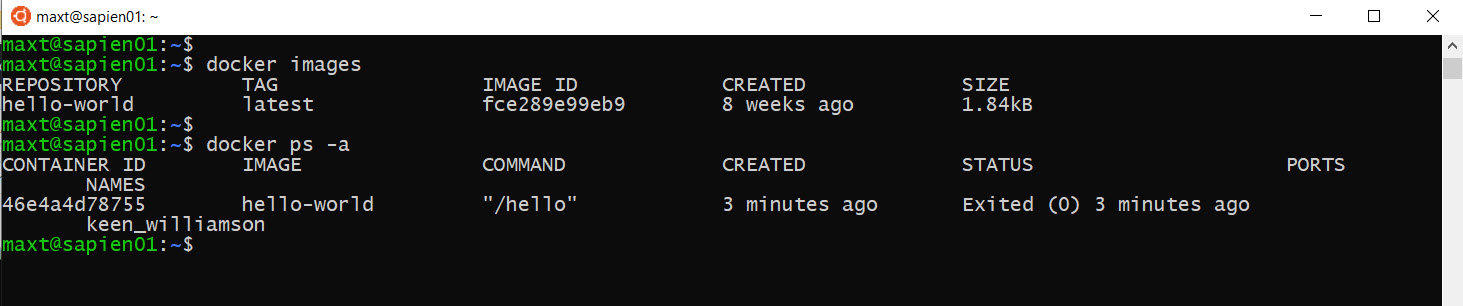
As you can see there no issues executing Docker command lines in Linux PowerShell Core.

To see the full list of docker command line help available click on the following link.

After all this is done! Docker working in my WSL environment.

Limitations

YES! There are limitations. This is a workaround on the issue of using Docker without Hyper-V. And, this will allow you to:

  • Pull images
  • Update containers
  • Save images

In my environment, I found limitations working with Docker Network using WSL which can impact Windows Docker-Machine VM “docker-host” interface. This issue can force you to rebuild both VM interfaces: “default” and “docker-host“.

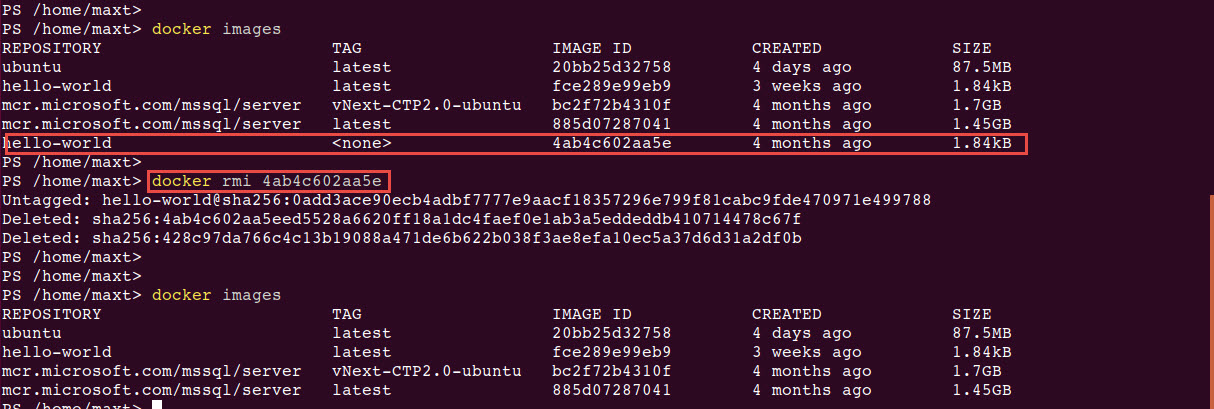
Make sure to learn how to commit, save, and reload Docker images.  Don’t lose your changes!

So, if you have either VMware Workstation and/or Oracle Virtualbox, consider investing the time creating a Linux virtual machine and then install Docker CE.

Summary

We have accomplished setting up Docker containers in *Windows 10 “WSL – Ubuntu 18.04” using both Windows PowerShell and PowerShell Core in Linux. So, using Oracle Virtualbox v5.2 with VMware Workstation is a required component to make this work.

*Note: These post is meant for people to make Docker work in WSL Linux.

Also, if you’re familiar with PowerShell, Docker commands can execute without any issues. Now, I can use my favorite editor SAPIEN’s PowerShell Studio to build my automation scripts with docker commands.

What’s Next?

Try downloading other Docker images, like SQL Server 2017 and SQL Server 2019. This is the quickest way for providing a built solution using containers.

Learn about Docker Compose, and Kubernetes as these can be use in the Cloud environment as well.

Go and Explores the possibilities of provisioning solutions to your organization!

Resource links

PowerShell Core Ubuntu 18.04 Using Docker Containers

Containers have been popular for some time now in the industry. It’s becoming as important as learning PowerShell.  Have you try it?

Installing Docker

While learning about Docker Container, I notice that is much easier to installed on a Linux system. In Windows, Hyper-V is a requirement to install Docker, and specially if you want to use the “Windows Subsystem in Linux” WSL feature, there’s more setup to complete. So, I’m not using Hyper-V, I’m using VMware Workstation.  To keeping simple, I created an Ubuntu 18.04 VM using VMWare Workstation.

You can find the Docker CE installation instructions in the following link.

If you’re using Ubuntu 18.04. make sure to install Curl, as it isn’t included in the OS.

$ sudo apt install curl

After the Docker CE installation completes, make sure to run the “hello-world” to test the container runs.

If  you have Hyper-V and you’re interested in pursuing making Docker CE works in Windows 10 WSL (Windows Subsystem for Linux), check the following link on “running-docker-on-bash-on-windows“.

Use PowerShell Core

Make sure you have the latest PowerShell Core installed. If it was previously installed, then use the “$ sudo apt upgrade” to get the latest version. Of course, this all depends on which installation method you previously chose to install PowerShell

Or, just go to the Github PowerShell page to get the latest version(s) for either GA (Generally Available) or the Preview.

Now, before starting to working with Docker as a non-root user, you will need to add the current user to the “Docker” group, by using the following command line:

$ sudo usermod -aG docker your-userid

Then, open a PowerShell Core session to start working with Docker containers.

The following docker commands are the essentials to work with containers and can be executed from within the PowerShell Core session:

1. Listing active container

PS /> docker ps -a

2. Listing images in your system

PS /> docker images

3. Get an container image

PS /> docker pull image-name (not GUID)

4. Image(s) cleanup

PS /> docker rmi image-GUID

If you want to find a particular image, then go to Docker Hub site. An account is required in order to login to the Docker Hub.  In there you’ll find certified images that can download using the “docker pull <imagename>” command line.

Docker PowerShell Containers

Interesting enough, while doing a search in Docker Hub, I found ta couple of PowerShell Core containers available that caught my attention.

1. “PowerShell” (Verified Publisher).

2. “azuresdk/azure-powershell-core”.

Also, “PowerShell-Preview” is available under the PowerShell Core container page

To try them out, just execute the following command:

1. PowerShell – Read documentation. Then execute the following command line to pull the container to your system.

PS /> docker pull mcr.microsoft.com/powershell

2. Azure-PowerShell-Core – As of now, current documentation is out-dated. (

PS /> docker pull azuresdk/azure-powershell-core

3. PowerShell-Preview

PS /> docker pull mcr.microsoft.com/powershell:preview

After completing pulling the docker images, then we are ready to check the containers by executing the following command:

1. Execute PowerShell Core GA

docker run -it microsoft/powershell

2. Execute *Azure-PowerShell

docker run -it azuresdk/azure-powershell-core

3. Execute PowerShell Core Preview (latest)

docker run -it microsoft/powershell:preview

Note: It seems the Azure-PowerShell container is not currently up-to-date for both PowerShell Core GA and the Azure modules version. Just check for upcoming updates on these repositories later.

Summary

As you can see, working with Docker containers and PowerShell makes it a convenient test environment. Either way, if you’re want to use Linux terminal session with or without PowerShell, there’s no reason why not to try it.  So, after you have created the linux VM and complete the installation of Docker CE, you’ll get it working in minutes.


Checking for PowerShell Core latest version in non-Windows Systems

I’m not sure who don’t get desperate to get the latest version of PowerShell Core when it becomes available. I do!
Sometimes I’m lucky enough to check Github PowerShell repository to find out it has been recently out.

But, this doesn’t means that is available in any of the other repositories! And, it may take a few more hours after it’s released. So, what would you do?

Repository Availability

Let’s take a look at how to check for PowerShell latest version on different non-Windows Systems.

Ubuntu:
apt-cache policy powershell #-> Or, powershell-preview

CentOS:
yum list powershell #-> Or, powershell-preview

MacOS:
## - Display installed current information.
brew cask info powershell

## - Seems when is current it will not display anything.
brew cask list powershell

## - Intended to show if app is outdated:
brew cask outdated powershell

MacOS Home Brew always takes longer for the new release to be available.

Get It Now!

So, if PowerShell Core isn’t available in the package repository, with a few steps you can download and install PowerShell. But, the first thing I do is to remove it before installing.

Ubuntu

## - When PowerShell Core isn't available in their repository: (download and execute install)
cd Downloads
wget https://github.com/PowerShell/PowerShell/releases/download/v6.1.1/powershell_6.1.1-1.ubuntu.18.04_amd64.deb
sudo dpkg -i powershell_6.1.1-1.ubuntu.18.04_amd64.deb

## - When available in Apt/Apt-Get repository:
sudo apt install -y powershell #-> Or, powershell-preview

CentOS

## - When PowerShell Core isn't available in their repository: (download and execute install)
## - Before removing PowerShell - use Invoke-WebRequest cmdlet.
pwsh
invoke-webrequest https://github.com/PowerShell/PowerShell/releases/download/v6.1.1/powershell-6.1.1-1.rhel.7.x86_64.rpm
sudo yum install powershell-6.1.0-1.rhel.7.x86_64.rpm

## - When available in Yum repository:
sudo yum install powershell #-> or, powershell-preview

MacOS

## - When PowerShell Core isn't available in their repository: (download and execute install)
## - Before removing PowerShell - use Invoke-WebRequest cmdlet.
pwsh
invoke-webrequest https://github.com/PowerShell/PowerShell/releases/download/v6.1.1/powershell-6.1.1-osx-x64.pkg
sudo installer -pkg powershell-6.1.0-osx-x64.pkg -target /

## - When available in Home Brew repository:
brew cask install powershell #-> Or, powershell-preview

Make sure, when in doubt, to check the package management documentation for any of the non-Windows Systems.

Currently Available

As of now, at the time of writing this blog post, the following PowerShell Core versions are available:

  • PowerShell Core (GA) Version 6.1.1 – Release on 11/13/2018
  • PowerShell Core Preview Version 6.2.0-preview.2 – Release on 11/15/2018 (Updated)

More Information

Don’t forget to check the installation instruction for PowerShell Core installation in Github at this link.

Go ahead and give it a try!

Custom PowerShell function to remove Azure Module

As you probably know by now, “Azure RM” modules has been renamed to “Az” Module. Microsoft want you to start using this module moving forward. Currently, this new release is on version 0.5.0, and you’ll need to remove the any previous module(s) installed. Information about Azure PowerShell can be found on the following link.

Now, there’s always been a tedious task when manually removing module dependencies, and there’s no exception with the “Az” module.  So, we can all take advantage to PowerShell and create a script to work around this limitation.

And, below is a few options.

My Custom Function

I have realized that sometimes I got duplicate modules installed with different versions installed, and this can create some confusion. My solution was to create a custom PowerShell function “Remove-AzureModule” to remove all existing Azure modules.

function Remove-AzureModule {
[CmdletBinding(SupportsShouldProcess)]
param ()

$Modules = Get-Module -ListAvailable Az* `
| Select-Object -unique Name, Version;

$cnt = 1;
ForEach ($Module in $Modules)
{
if ($PSCmdlet.ShouldProcess($Module.name, 'Uninstall'))
{
Write-Host "[$cnt] - Removing module: $($Module.Name) - Version: $($Module.Version)." -ForegroundColor Yellow;
Uninstall-Module -Name $Module.Name -AllVersions -Force;
$cnt++;
};
};
};

## - Run using the -What If parameter:
Remove-AzureModule -What If

## - Execute to remove Azure modules:
Remove-AzureModule

The purpose of this function to do a full cleanup removing all installed versions of Azure modules from PowerShell.   This function includes a the “-WhatIf” parameter that can be use to run the function without actually performing the “uninstall” process. And, I added a counter for each module when performing the “uninstall” for each of the dependency module.

Then, you can always use the following “Get-Module” command to verify that all modules has been removed.

Get-Module -Listavailable Az* | Select-Object Name, Version

Azure Docs – Uninstall modules with dependencies

Now, while writing this quick blog post, I found in the Microsoft documentation there’s a “Uninstall the Azure PowerShell Module” section. This article provide the “Uninstall-AllModules” function which is a a generic way to remove any previously installed module with dependencies.

Below, is the modified version of the Microsoft function. I added the code to allow the use of the “-What If” parameter, and to do a count of the modules been removed. I think these are a nice to have changes.

## - Uninstall-AllModules from the Microsoft Docs: https://docs.microsoft.com/en-us/powershell/azure/uninstall-azurerm-ps?view=azurermps-6.12.0#uninstall-from-powershell
## - Modified to include the "-WhatIf" parameter and a module counter.

function Uninstall-AllModules
{
[CmdletBinding(SupportsShouldProcess)]
param (
[Parameter(Mandatory = $true)]
[string]
$TargetModule,
[Parameter(Mandatory = $true)]
[string]
$Version,
[switch]
$Force
)

$AllModules = @()

'Creating list of dependencies...'
$target = Find-Module $TargetModule -RequiredVersion $version
$target.Dependencies | ForEach-Object {
$AllModules += New-Object -TypeName psobject -Property @{ name = $_.name; version = $_.minimumVersion }
}
$AllModules += New-Object -TypeName psobject -Property @{ name = $TargetModule; version = $Version }

$cnt = 1;
foreach ($module in $AllModules)
{
Write-Host ("[$cnt] - " + 'Uninstalling {0} version {1}' -f $module.name, $module.version);
$cnt++;
try
{
if ($PSCmdlet.ShouldProcess($module.name, 'Uninstall'))
{
Uninstall-Module -Name $module.name -RequiredVersion $module.version -Force:$Force -ErrorAction Stop;
};
}
catch
{
Write-Host ("`t" + $_.Exception.Message)
}
}
};

## - Example using -WhatIf parameter:
Uninstall-AllModules -TargetModule Az -Version 0.3.0 -Force -WhatIf

## - Example to remove module with dependencies:
Uninstall-AllModules -TargetModule Az -Version 0.3.0 -Force

Unfortunately, this solution will work as long as all dependencies modules has the same version.  So, a little work still need to be done!

Feel free to test the code in both Windows PowerShell and PowerShell Core.

Another way to Manage PowerShell Modules

Take a look at SAPIEN Technologies new product “Module Manager“. You’ll be surprise what you can find installed in your system. This GUI application let you manage modules installed in your system making it easy to update, disable/enable, and install/uninstall modules.

For more Module Manager Preview information check on the following SAPIEN Technologies link.

Recap

As you can see, PowerShell can provide the means to workaround issues you’ll experience in a simple way. At the same time there are both community and Microsoft documentation available that will provide assistance.

Finally, check out third-party products, like the ones from SAPIEN Technologies that are available to increase your productivity in many ways. For more information check on the following SAPIEN Technologies products link.

PowerShell Core 6.1.0 GA (Generally Available) for Anything Anywhere

Any System, Anywhere

Finally the next PowerShell Core GA (Generally Available) at: PowerShell Core 6.1.0. Thanks to the strong effort of both the Microsoft Team and the PowerShell Community has help reach this milestone achievement with the next generation of PowerShell.


Announcing PowerShell Core 6.1

Check Jeffrey Snover (Inventor of PowerShell) at MS Ignite 2018 comments about PowerShell (theCube-video)

PowerShell Core will continue to grow providing new features and performance improvements. This version is fully supported.

Anyone can join and contribute at the Microsoft PowerShell Team – Monthly PowerShell Community Call every third Thursday of the month.

To download and install PowerShell Core, go to their Github Repository.

Install Anywhere

Instructions on how to installed it are also available under Microsoft Documentation for both Windows and non-Window systems: MacOS, Ubuntu, Red Hat, CentOS, Fedora, and others Linux distributions.

For more information about installing PowerShell Core, check it out on Microsoft Doc site

For now, this next generation of PowerShell, Windows PowerShell Snap-ins are no longer supported, and the Out-Gridview cmdlet won’t work.

Reporting Issues

Any PowerShell Core feedback should be submitted to its Github repository. And, any Windows PowerShell issues need to be submitted to the UserVoice forum.

Check the Github PowerShell Core landing page, under the “Windows PowerShell vs PowerShell Core” section.

Modules Availability

Only in Windows Systems, Windows PowerShell modules are also available for PowerShell Core. This means that you can open PowerShell Core console and use the existing Microsoft Windows PowerShell modules.

Now, there’s no excuses for not to try using PowerShell Core in Windows Systems.

In the PowerShell Core console, just execute the following command line to list all modules listed in Windows:

Get-Module -ListAvailable

You’ll notice there’s a new column “PSEdition”, which identifies for which version of PowerShell the module will work:
1. Core – for PowerShell Core any system, any where.
2. Desk – for Windows PowerShell.
3. Core\Desk – for PowerShell Core and Windows.

PowerShell Modules location are listed:

1. Users Modules: C:\Users\max_t\Documents\PowerShell\Modules or C:\Users\max_t\Documents\WindowsPowerShell\Modules
2. General Modules for PowerShell Core: C:\Program Files\PowerShell\Modules or C:\program files\powershell\6\Modules
3. General use Modules for Windows PowerShell: C:\WINDOWS\system32\WindowsPowerShell\v1.0\Modules

Things are changing quickly in the PowerShell Gallery, which was recently update. Any PowerShell Module author has the responsibility to make the necessary update to their modules. Notice that some PowerShell Core modules are still labeled “Desk” when in fact should be both “Core\Desk”, like the “SQLServer” module.

Just make sure to check the module information for which version of PowerShell the module was created for.

Azure Cloud Shell GA (Generally Available)

Yes! Microsoft Cloud Shell has been updated to have PowerShell Core 6.1.0 GA, and is on Linux.


This shows the commitment of having cloud reliable solutions running anywhere on any systems.

  • User either Bash or PowerShell in Linux
  • Drag/Drop files into the Browser session
  • AzureRM Module already installed and updated to latest version
  • AzureRM Modules build on .Net Core

In summary

  • PowerShell Core is the next iteration of PowerShell built using .NET Core
  • Run self-contained, side-by-side in Windows systems with Windows PowerShell
  • Cross-platform availability for managing Anything, Anywhere.
  • Microsoft Open Source and Community-support
  • Azure Cloud support

MS Ignite 2018 – PowerShell Videos

Here’s just a couple of interesting videos from the Microsoft Ignite 2018 event in Orlando about PowerShell Core:

Go ahead and try PowerShell Core 6.1 GA! Embrace the change!

Installing MS SQL Server in Ubuntu 18.04

This has been an issue for sometime until now. I found the following link that help me install SQL Server on the latest Ubuntu 18.04:

https://askubuntu.com/questions/1032532/how-do-i-install-ms-sql-for-ubuntu-18-04-lts

But, there are few missing steps which can help ease the burden of errors. At the same time, the information is a little out-dated.

But, it works with the following adjustments.

Please Understand!!  This is NOT approved by Microsoft.  Use this method for Test Only!!

Create Your Installation

The following instructions help you download and get the dpkg package ready for you Ubuntu 18.04 SQL Server installation:

  • Create the folders to extract, and make changes to repackage the dpkg SQL Server installation:
cd ${HOME} && mkdir -p tmp/mssql/newpkg/DEBIAN/ && cd tmp/mssql
  • Download the latest version of SQL Server dpkg to the current folder location: (dpkg SQLServer date: 20-Jun-2018 18:03)
wget https://packages.microsoft.com/ubuntu/16.04/mssql-server-2017/pool/main/m/mssql-server/mssql-server_14.0.3029.16-1_amd64.deb
  • Extract the dpkg package:
dpkg-deb -x mssql-server_14.0.3029.16-1_amd64.deb newpkg/
dpkg-deb -e mssql-server_14.0.3029.16-1_amd64.deb newpkg/DEBIAN/
  • Next step will change the OpenSSL version to avoid failure during SQL Server installation:
sed -i -e 's#openssl (<= 1.1.0)#openssl (<= 1.1.0g-2ubuntu4.1)#g' newpkg/DEBIAN/control
cat newpkg/DEBIAN/control | grep openssl
  • Next step it to Repackage the SQL Server installation:
sudo dpkg-deb -b newpkg/ 18.04-mssql-server_14.0.3029.16-1_amd64.deb

At this stage you could try to install SQL Server, but it might failed.  This is needed in order to check what dependencies are missing. Then, make the necessary dependencies installation.

Additional Steps

As of today, July 5th, I went thru a series of trial-and-error to get my SQL Server running on my Ubuntu 18.04.

After executing the following command:

sudo dpkg -i 18.04-mssql-server_14.0.3029.16-1_amd64.deb

But, I got errors:

The following is the list of all my missing dependencies on Ubuntu 18.04 for the SQL Server installation:

dpkg: dependency problems prevent configuration of mssql-server:
mssql-server depends on libjemalloc1; however:
Package libjemalloc1 is not installed.
mssql-server depends on libc++1; however:
Package libc++1 is not installed.
mssql-server depends on libcurl3; however:
Package libcurl3 is not installed.
mssql-server depends on openssl (<= 1.1.0); however: Version of openssl on system is 1.1.0g-2ubuntu4.1. mssql-server depends on python (>= 2.7.0); however:
Package python is not installed.
mssql-server depends on libsss-nss-idmap0; however:
Package libsss-nss-idmap0 is not installed.
mssql-server depends on gawk; however:
Package gawk is not installed.

Now, one thing to understand, if you execute the following command:

sudo apt install -f

It will clear/remove SQL Server installation components, but it also try to install some, but not all of the dependencies.

As is shown in the image, only two of the listed dependencies were installed: “gawk“, and “libsigsegv2” (this one might be from another package not for SQLServer).

So, identifying the missing dependencies can alleviate the burden of more fail attempts to install SQLServer.

The following command will install all on the listed failed dependencies, excluding OpenSSL because another version is already installed.

## - Adding the missing dependencies:
sudo apt install python libjemalloc1 libc++1 libcurl3 libsss-nss-idmap0

After all the missing dependencies are installed than I can proceed to rerun the re-package SQL Server installation for my Ubuntu 18.04. By the way, I already took care of the OpenSSL in the “Create Your Installation” step where I change the version number.

About Python Dependency?

Yes! In Ubuntu 18.04, Python version 3.6.5 is the one installed with the OS. So, Python 2.7 is not installed.

Try running the command: python –version, then python3 –version at the Terminal Console.

In order to install SQL Server in Linux, it need Python 2.7 installed in order for the installation to work. This is why I included Python in the “sudo apt install …” command to be installed with the other missing dependencies.

Finally Ready

So, finally all the dependencies have been installed. Now, I can rerun the SQL Server installation:

sudo dpkg -i 18.04-mssql-server_14.0.3029.16-1_amd64.deb

This time the installation completes without any error.

To verify that SQL Server is running, execute to following command:

sudo service mssql-server status

Next, verify from your Windows client and open SQL Server Management Studio to verify that the Ubuntu 18.04 SQL Server is accessible.

What’s Next?

Well, if you got PowerShell Core installed, then get the SQLServer Module and start to play around working with both the available cmdlets and/or start coding SMO (SQL Server Management Object) PowerShell Core scripts.

Be creative!  Check out my previous blog post “PSCore6 – SQLServer Module Expanding The Barrier Cross-Platform” for more information.

In Summary

This is a hacking technique to be able to install SQL Server in Ubuntu 18.04.  This is not supported by Microsoft, but you will be able to make it work. Basically, is a matter of installing all the missing dependencies, and change the package required OpenSSL version number to the one installed in Ubuntu 18.04.  Then, repackaging the SQL Server installation dpkg file will allow the installation to work.

Special Thanks to the contributor in the UbuntuAsk forum, as without it I won’t have figured out, and made it work