Azure PowerShell Preview 1.0 is here

Welcome to PowerShell Azure Resource Manager (RM)!

Microsoft has introduce and made available Azure PowerShell Preview 1.0.  Please read all about it in the following Azure Blog site:

Also, feel free to search for it at usign the following link:

Some Interesting links 

Well, within the search there are more interesting blog articles to start doing some PowerShell scripting:

How to install and configure Azure PowerShell: https://azure.microsoft.com/en-us/documentation/articles/powershell-install-configure/

Using Azure PowerShell with Azure Resource Manager: https://azure.microsoft.com/en-us/documentation/articles/powershell-azure-resource-manager/

Manage Azure SQL Database with PowerShell: https://azure.microsoft.com/en-us/documentation/articles/sql-database-command-line-tools/

Integrating SQL AlwaysOn with Azure Site Recovery: https://azure.microsoft.com/en-gb/blog/integrating-sql-alwayson-with-azure-site-recovery/

Get it at PowerShell Gallery

Now, my question here is, did you found Azure PowerShell 1.0 Preview? Probably not, but in fact, it’s AzureRM 1.0.1 to be installed. Although, I did found Azure version 0.9.11 and, Yes! I did download that one just in case.

To download these new bits from the PowerShell Gallery, check out the “Get Started with the PowerShell Gallery” link: http://www.powershellgallery.com/pages/GettingStarted

AzureRM_01_10-16-2015

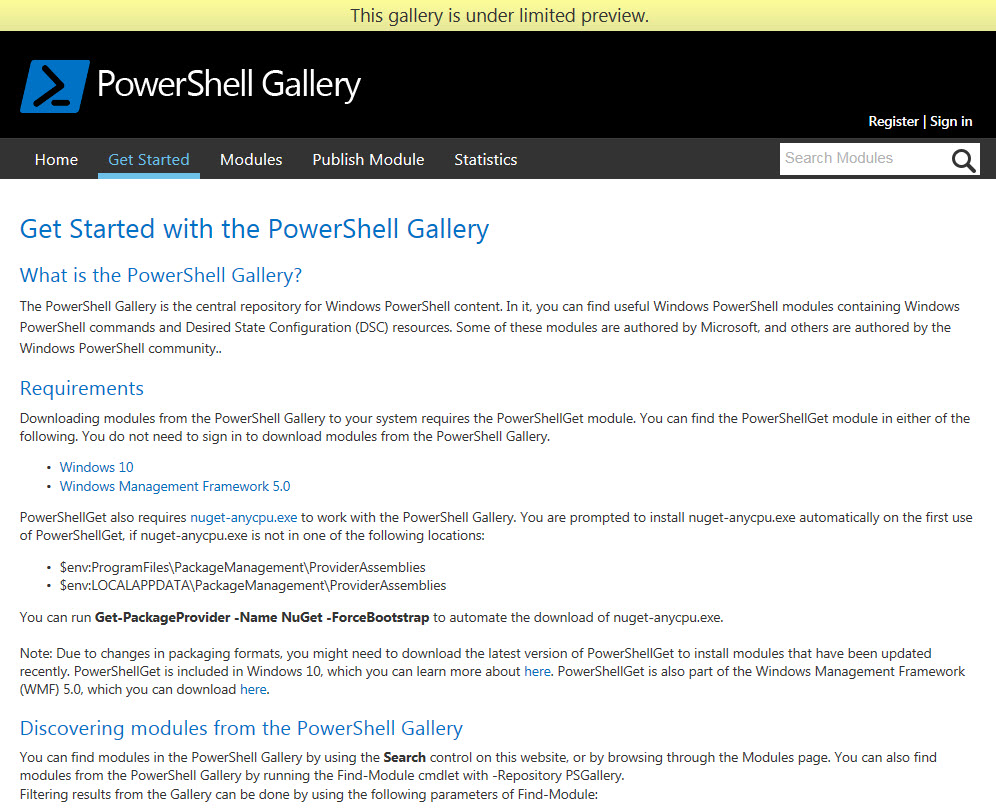
Search for both “Azure” and AzureRM”.

AzureRM_02_10-16-2015

AzureRM_03_10-16-2015

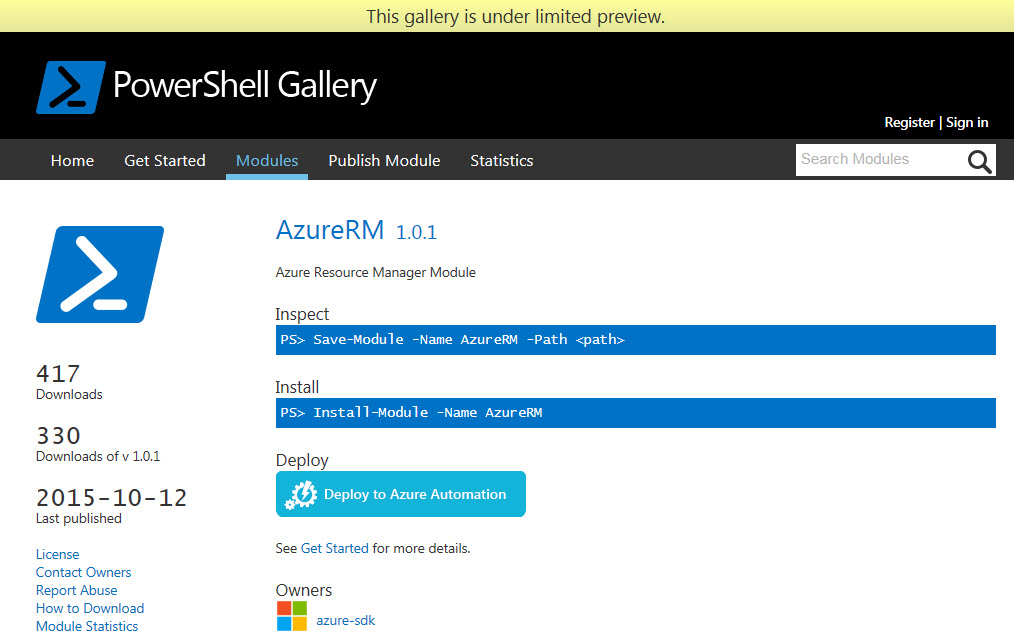
During my quest to download Azure PowerShell 1.0, I realized that its AzureRM the one I need to download using: “Install-Module AzureRM” followed by “Install-AzureRM -force“.

AzureRM_04_10-16-2015

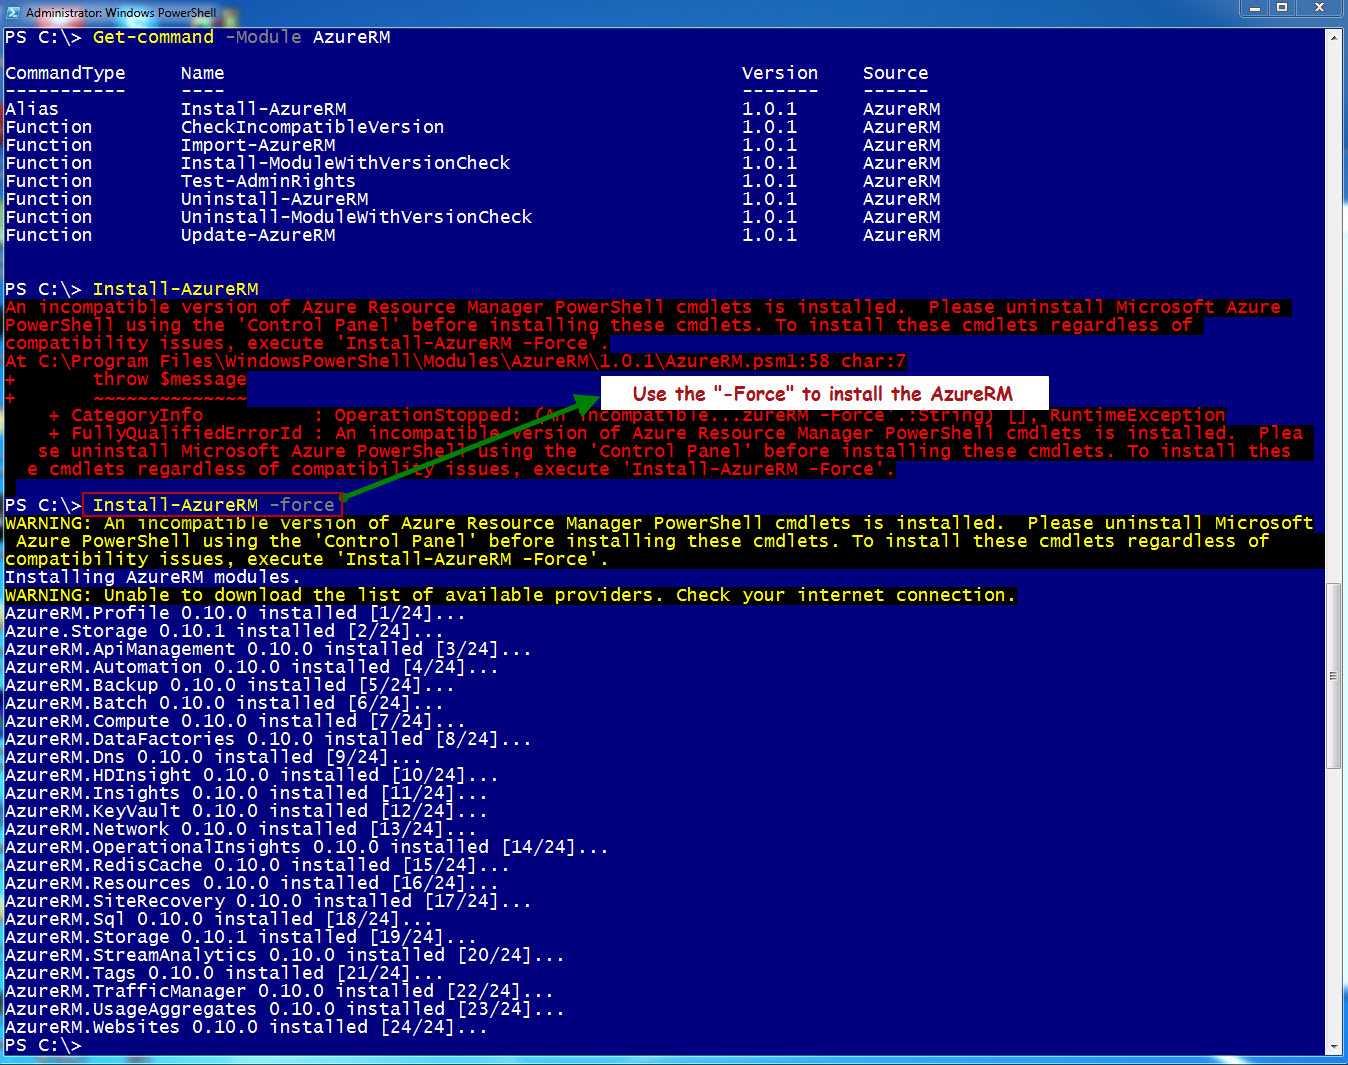
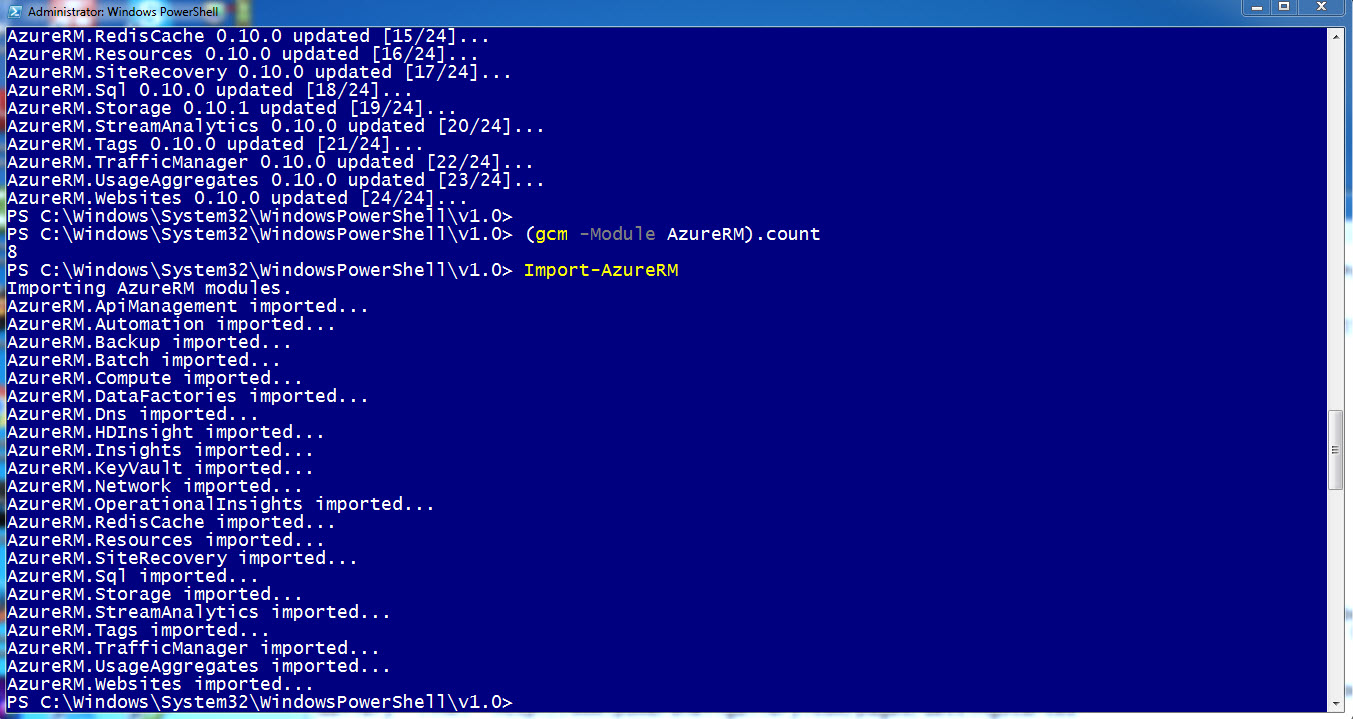
To start using the AzureRM Cmdlets, just run the “Import-AzureRM” command.

AzureRM_07_10-16-2015

Now, we are ready to play with Azure Resource Manager and Azure SQL databases.   There’s a total of 653 *AzureRM* cmdlets.

AzureRM_08_10-16-2015

AzureRM_09_10-16-2015

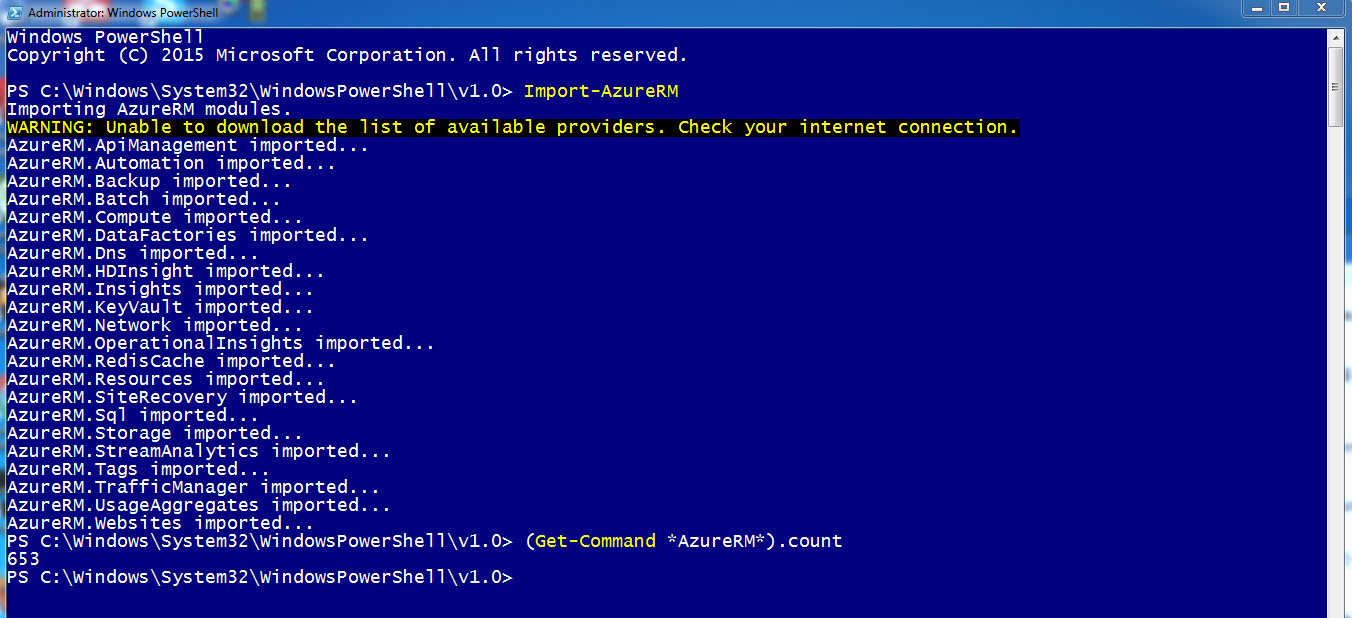
Run the following command to list all *AzureRM* commands:

Import-AzureRM; Get-Command *AzureRM*;


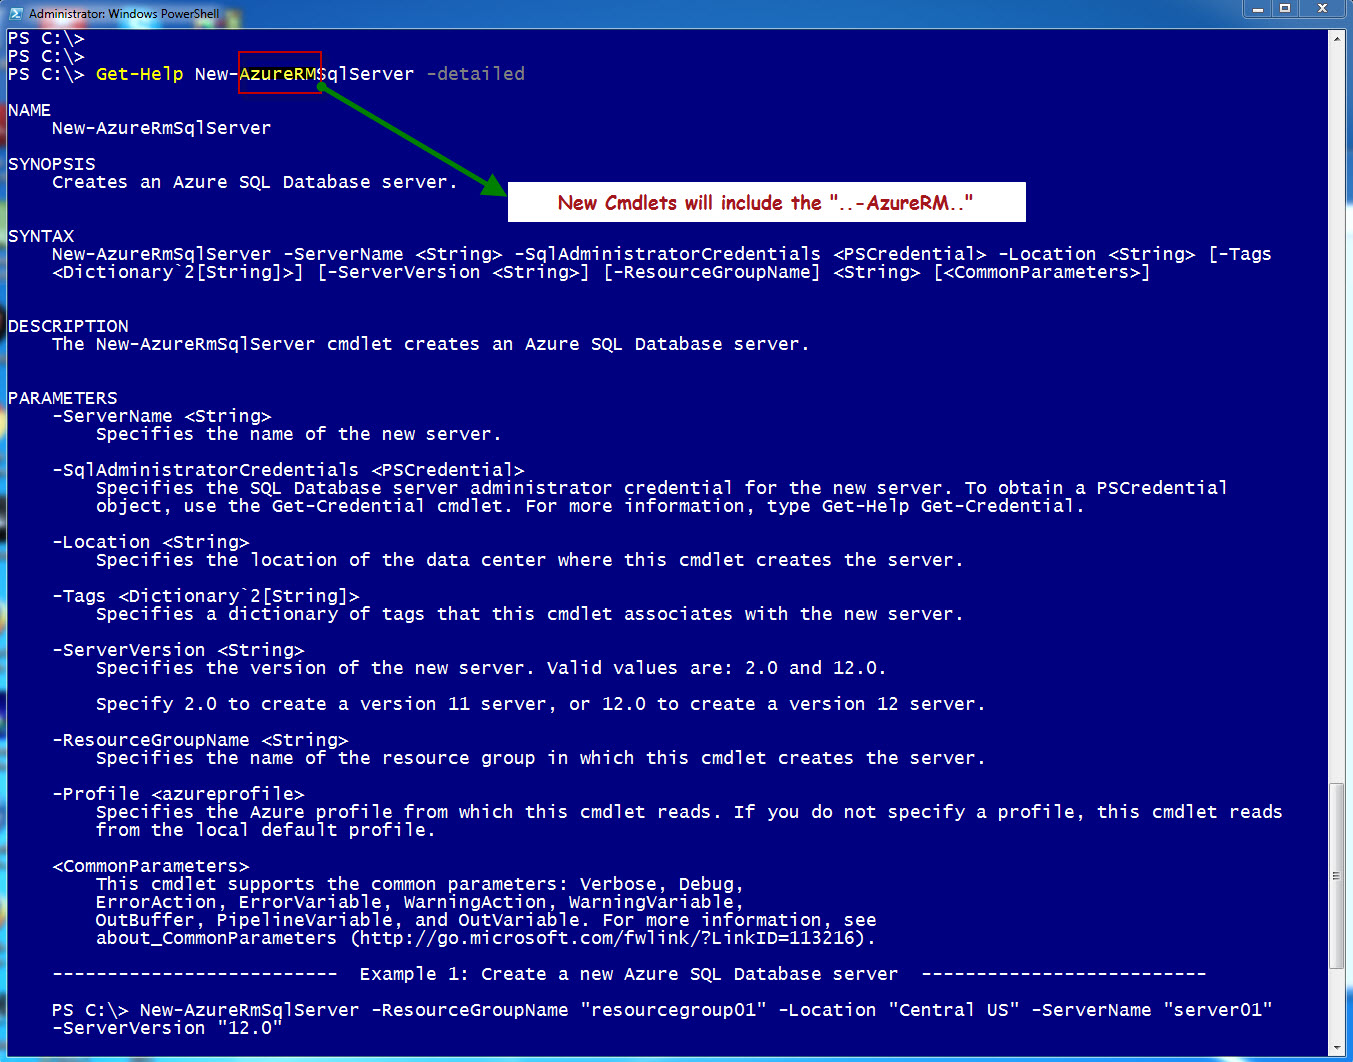
In my next blog article I’ll be converting my classic Azure SQL script to use the Azure RM new paradigm.


FLPSUG Last meeting May 15th on “PowerShell Azure SQL Database”

FLPSUG Lync meeting Thursday May 15 2014 – Session: “PowerShell Working w/Microsoft Azure SQL Database” Speaker Maximo Trinidad (MVP) and Co-hosting Adnan Cartwright (MVP).

In this presentation I will be covering how to subscribe to Azure, setup PowerShell to connect to your subscription, use scripting to create a SQL Database Server and then use SMO with PowerShell push data to your SQL Azure tables. All this using PowerShell scripting plus showing some editor, scripting techniques, and tips to avoid issues when working and setting Azure with PowerShell. (live demo with Windows Azure). Thanks to Adnan for assisting me in this meeting.

Here’s the Powerpoint presentation, demo scripts, and link to the recorded video. The video is the full and unedited meeting: https://onedrive.live.com/redir?resid=7FD7082276C66197!31206&authkey=!AIbxWUhyiUth7Dg&ithint=file%2c.zip

Video link: http://youtu.be/9-fMxXY7DcQ

Co-host Adnan Cartwright link: http://www.fisg.us/


Quick Rundown – Microsoft Azure SQL Database Server and PowerShell

Azure SQL Database 
1. Web and Business editions are no longer available. Now there’s Basic, Standard, and Enterprise editions. (New)
2. There is a limit of 6 SQL Database Servers and up to 150 databases per subscription.
3. Create database from 1 GB up to 500GB of storage.
4. Database Throughput Unit(DTU) Service performance levels available: (New)

  • DTU Service Level:
    1  – Basic
    5 – S1
    25 – S2
    100 – P1
    200 – P2
    800 – P3

AzureSQLdb_DTU

For more information about Azure SQL Database Throughout Units Service, check out Scott Kline and Tobias Ternstrom on this link: http://channel9.msdn.com/Series/Windows-Azure-Storage-SQL-Database-Tutorials/Scott-Klein-Video-02

Quick tips when testing Azure SQL Database Server:
1. There’s no need to specify a storageaccount.
2. Start with “Basic” or “Standard” Service level.
3. Start with  1GB in size for testing.
4. Current Azure Portal version will create random database server names.

Observations on the “Preview” Azure Portal on Azure SQL Datbases:
1. It show the ability to group databases.
2. You can provide a SQL Database Server name (not random).

Upcoming Azure Portal (Preview)

Assign a Group and Name your Database Server

Windows Management Framework 5.0 May 2014

On PowerShell  v5.0 Preview just released on May 14th.  This version has no problem with the Azure PowerShell cmdlets installation.

Blog: http://blogs.msdn.com/b/powershell/archive/2014/05/14/windows-management-framework-5-0-preview-may-2014-is-now-available.aspx

Download at: http://www.microsoft.com/en-us/download/details.aspx?id=42936

Azure PowerShell cmdlets updated

Azure PowerShell cmdlet was updated to version 0.8.2 on 05/12/2014 with 390 commands.AzurePosh_082_05152014


QuickBlog: PowerShell Working with Windows Azure

As I venture into the realm of learning some PowerShell Automation in Windows Azure, its interesting the things you learn by just trying things out.  On my previuos blogs I mention, in order to use PowerShell, you need to create and install the certificate in the portal.  After that, you can use following commands to connect to Azure:

1. Import-Module Azure (*Optional – Autoload module is already set to “On”)
2. Set-AzureSubscription
3. Select-AzureSubscription

*Note: The ‘Import-Module Azure’ is more of a habit to do it.  Powershell 3.0/4.0 will search and automatically load a module the first time the cmdlet is been executed.

I just realized, after the Certificates Keys are installed in Azure, then you don’t need to execute the above commands Set-AzureSubscription and Select-AzureSubscription everytime I open the PowerShell Console.  Yes! I can start typing away and work with Azure commands.

Just try it!  If you already loaded the certificate keys, then Open a PowerShell console session and type “Get-AzureVMimage” to display the list of available Azure VM images:

WindowsAzrureValidAccess

If there’s no certificates installed, the you’ll get the following message: (on another PC)

WindowsAzureInvalidAccess

So that you know, when working with Windows Azure SQL Database Server(s), you don’t need to set up a Storage (Container) Account nor a Azure Cloud Service. Definitely you will need them when working with Windows Azure VM’s.

Next, I will be blogging on “PowerShell working with Windows Azure VM’s”.

That’s it for now,

Maximo Trinidad (MVP Windows PowerShell)
AKA Mr. PowerShell

Trap missing IP Address for SQL Database Server Firewall Rule

As I work on my second blog piece for the “Getting Ready with Windows Azure SQL Database Server PowerShell and SMO Part – 2/2“, I came up with a way to trap the current IP Address with PowerShell scripting.  When using the Portal for creating your SQL Database Server, it will ask you if you want to create the Firewall rule for you.  But you may want to automate this step using PowerShell and there’s no cmdlet to identify  the “current” IP Address of your Windows Azure connection.

Here’s an example of how the Portal message when is asking for the current IP Address to be added to the Firewall rules:

WindowsAzure2SQLdb

WindowsAzureMissingIPrule

I’m going right to the point with this small blog piece.  Basically,  I’m trapping the error message from the “New-AzureSqlDatabaseServerContext” which will fail to connect to your Azure SQL Database. Then, I’m dissecting the string to get the IP Address in error.  This is my way of trapping the IP address.  I know there might be a better way but for now it works.

I’m assuming the connection to Windows Azure has already been established and you are trying to use the “New-AzureSqlDatabaseServerContext” for connecting to the database.  If you haven’t created the rule then it won’t connect.

Note: Again, stay tuned for the next “Windows Azure SQL Database Server with PowerShell and SMO” blog part 2/2.

In the “New-AzureSqlDatabaseServerContext” I’m including the following two parameters: -ErrorAction ‘SilentlyContinue’ and -ErrorVariable errConn.  The “ErrorAction” results in not displaying the message.  The “ErrorVariable” define the PowerShell variable you will be storing the error message.  Notice the “ErrorVariable” name doesn’t include a “$” but its needed to view it (ie. $errConn).

[sourcecode language=”powershell”]
## – Storing error value:
$azConn = New-AzureSqlDatabaseServerContext  `
-ServerName $azServerName -Credential $azCredential `
-ErrorAction ‘SilentlyContinue’ -ErrorVariable errConn;
[/sourcecode]

The additional script code shown next will dissect the error message string from $errConn variable. It will take the string to create an array which will help identify the element position where the IP Address is stored.  In this case I’m assuming the error message will not change so the IP Address will always be located in the same place (Right!).  So the first time this code execute, it will find the IP Address in element #18.

Note: Please run first the code to identify the element position in case the “Culture” settings might change the location of the IP Address.

[sourcecode language=”powershell”]
## – Extract information from the ErrorVariable:
$getIPforFW = ([string] $ErrConn[0]).split(" ‘");

## – Display all variable stored in the array and identify where the IP address is stored:
$global:x = 0;
$getIPforFW | Select-Object @{label=’element’;Expression={"[$($Global:x)]"; $Global:x++}}, `
@{label = ‘Array’;Expression={[string] $($_);}};

## – Run once to confirm IP value is stored in element #18:
$getIPforFW[18].Trim();
[/sourcecode]

TrappingIPfromError

The rest is easy.  After extracting the IP value then you can use the “New-AzureSqlDatabaseServerFirewallRule” to create the firewall rule to include the current IP Address.

[sourcecode language=”powershell”]
## – Get current IP and added it to the SQL Database Firewall Rule:
New-AzureSqlDatabaseServerFirewallRule `
-ServerName "YourServerName" -RuleName "YourClientIPAddressRule" `
-StartIPAddress $getIPforFW[18].Trim() -EndIPAddress $getIPforFW[18].Trim();
[/sourcecode]

CreateFilewallfromIPfound

You can refine this script code to suit your need.  Just make sure to test a few times and verify you are getting the results you need.

Here’s a few more commands you could use to work with these rules.  The “Remove-AzureSqlDatabaseServerFirewallRule” to remove any existing rule(s) and the “Get-AzureSqlDatabaseServerFirewallRule” to list them all.

[sourcecode language=”powershell”]
## – List all your SQL Database Firewall Rules:
Get-AzureSqlDatabaseServerFirewallRule -ServerName "YourServerName";

## – Removing existing SQL Database Firewall Rule:
Remove-AzureSqlDatabaseServerFirewallRule `
-ServerName "YourServerName" -RuleName "YourClientIPAddressRule"";
[/sourcecode]

So, at the end, you will have the ability to automate the process without the need of using the Portal.  Most can be done using PowerShell scripting.

Stay tuned for more Windows Azure SQL Database Server.

That’s it for now!

Maximo Trinidad
Mr. PowerShell
🙂

Getting Ready with “Windows Azure SQL Database Server” PowerShell and SMO Part – 1/2

But before we start using PowerShell with “Windows Azure SQL Database Server” there a few more steps we need to be completed after you have started your subscription:

  1. Installing the most recent Windows PowerShell Azure module
  2. Rename Subscription name (Optional)
  3. Create the Certificate Key

These three items are important before connecting Windows Azure.  Then, will be using 3 PowerShell Azure cmdlets to connect to your subscription.

WindowsAzurePortal

Installing the recent PowerShell Azure module

I recently finish updating my new Windows 8.1 (booth-VHD) and loaded all my tools. So when I started to install Windows Azure PowerShell, I was expecting it won’t work with PowerShell 4.0.  Well, Good Job Microsoft!  It did installed and I got my Windows Azure PowerShell working with PowerShell 4.0.

The latest revision, dated July 31st 2013, will let you install Windows Azure PowerShell on you Windows 8.1 preview. This is exciting Good News.  A couple of months ago I try it on my Windows 8 but the installation failed because of PowerShell 3.0.

Before you start working with your Windows Azure subscription(s) with PowerShell, you need to download the most recent “Windows Azure PowerShell – July 31, 2013 edition”.  At the same time you may want to pick the “Windows Azure SDK for .NET”.  Go to the following link: http://www.windowsazure.com/EN-US/downloads/?sdk=net

Rename Subscription name

For renaming your subscription is better to use the Portal.  It make sense to change your subscription name from “Windows Azure MSDN – Visual Studio xxxxx” to something meaningful like, for example: “MyWindowsAzureSubscription30DaysLimit“.

Note: It is not required to change the subscription name.

If you want to change the name then there’s two ways to do it. Go to the Windows Azure main page and Click on “Account”: https://www.windowsazure.com/en-us/

WindowsAzureGoAcct

Or, at the Portal you can change it by clicking on the UserID, then “View my bill”.  This  will require to login again.

WindowsAzurePortalAcct

Finally, click on the “Edit subscription details” to change the name.

WindowsAzureAccessSubst

WindowsAzureEditSubst

WindowsAzureRenameSubst

For more information on the following link:

Creating the Certificate Key

Next, to create the Certificate key or you won’t be able to use PowerShell to connect to your Windows Azure. This is mandatory as is part of your Azure credentials.  You can find documentation on this topic at following links:

Tip: You need to have installed You could use Visual Studio in order to run the “Makecert.exe” command from the Visual Studio command shell. Or, download the “Windows Software Development Kit (SDK) for Windows 8” to get the “Makecert.exe”.

After creating the certificate key use PowerShell (non-Azure) commands to check its properties.  Here’s an example script lines to look at your existing Certificate keys:

Get-ChildItem cert:\\CurrentUser\My;

Or, to display more information:

Get-ChildItem cert:\\CurrentUser\My | Format-List;

PowerShellCertKey2

Finally, we need to upload the certificate key to Windows Azure.  On the Portal, go to the “Setting” option and add the Certificate key. Follow the screenshots:

WindowsAzureAddCertKey

WindowsAzureUpCert2

Now everything is set to use PowerShell with Windows Azure. There’s no need (for now) to use the Portal web GUI.

PowerShell connecting to Windows Azure

In the following script need to include the Certificate key information as this is part of the Windows Azure credential to connect to your subscription. This is why using the previously shown “Get-ChildItem cert:\\CurrentUser\My | Format-List;” one-liner help you understand about the Certificate(s) in your system.

First, need to prepare the Certificate key use in Windows Azure:

PSCercode

Here’s the list of the 3 Azure commands to connect to your Windows Azure:

PSAzureConnect

Note: Import-Module Azure is optional if working with PowerShell 3.0 or 4.0.

After verifying connectivity to Windows Azure was successful then we can process to build VM’s, SQL Databases, and more using PowerShell.

In my next blog I will be showing how to use PowerShell Azure commands to build a Windows Azure SQL Database, and use SMO with it.

South Florida IT Camp Saturday 2011 on July 23rd

We are pleased to announce the first South Florida IT Camp on Saturday, July 23rd 2011 from 8:00 am to 5:00 pm at Nova Southeastern in Fort Lauderdale.

Parking and admittance to this event is free.  Lunch will provided. Please Register now. Let your friends and colleagues know about this event.

Join system administrators IT professionals and database professionals in addition to managers at all levels in Florida that work with Microsoft technologies for a “IT Camp Saturday”. IT Camps are a free, one day learning event for anyone seeking professional development. This event serves IT professionals and students with a focus on IT Pro related technologies. IT Camps offer a conference style learning environment free of charge to attendees and is open to presenters of
all backgrounds and expertise.

Have questions? Comment or Contact Us.

Call for Speakers is Open

The call for speakers is open until 6/11. Topics can be anything applicable to System admins, and/or IT Pros including SharePoint, System Center, SQL Server, PowerShell, Active Directory, or Windows 2008 R2 and Windows 7.

To submit your session, please Click Here, or if you have questions? Comment or contact us.

SQL Azure available PowerShell Cmdlets…

Here’s some links you check on available cmdlets for SQL Azure:

Windows Azure Service Management CmdLets: http://code.msdn.microsoft.com/azurecmdlets

Exercise 2: Using PowerShell to Manage Windows Azure Applications: http://msdn.microsoft.com/en-us/wazplatformtrainingcourse_deployingapplicationsinwindowsazurevs2010_topic3.aspx

This something to keep in mind.  Azure is here to stay!