Updating your .NET Tools components

Have you installed any of the .NET Tools? Such as “.NET Interactive” and “PowerShell Global“, then you’ll need to remember, to update these tools manually.

These tools give you the ability to use create Jupyter Notebook using Python Kernel but also with C#, F#, and PowerShell 7 kernels.

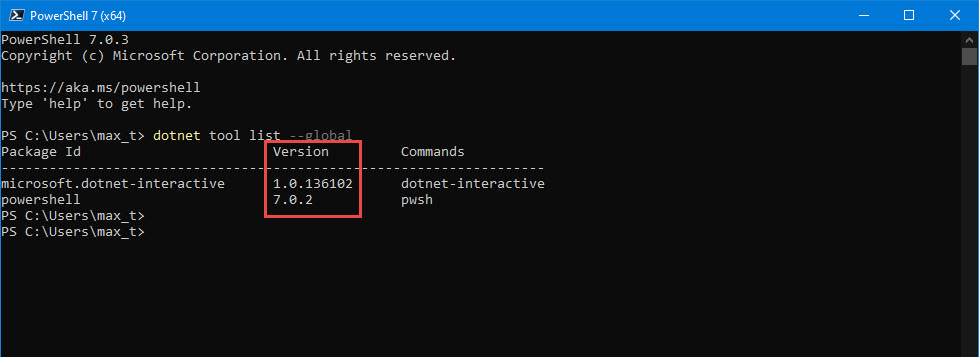
Check Current Version

First, need to list which .NET Tools are currently installed by using the following command:

dotnet tool list --global

In this sample, I opened a PowerShell 7 console and executed the command.

Manual Update

To update the tools, use the “dotnet tool …” command as follows:

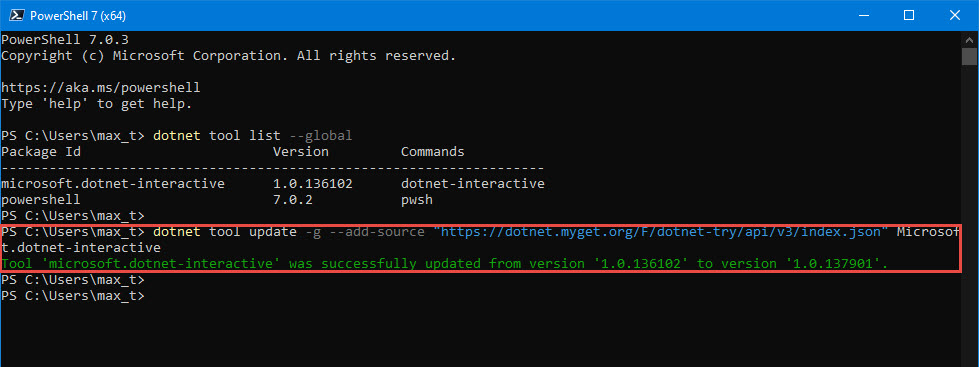
1. To update the “Microsoft .NET Interactive” tool to the latest version:

dotnet tool update -g --add-source "https://dotnet.myget.org/F/dotnet-try/api/v3/index.json" Microsoft.dotnet-interactive

Completion message: (As of 07/30/2020, 16:20 PM)

Tool ‘microsoft.dotnet-interactive’ was successfully updated from version ‘1.0.136102’ to version ‘1.0.137901’.

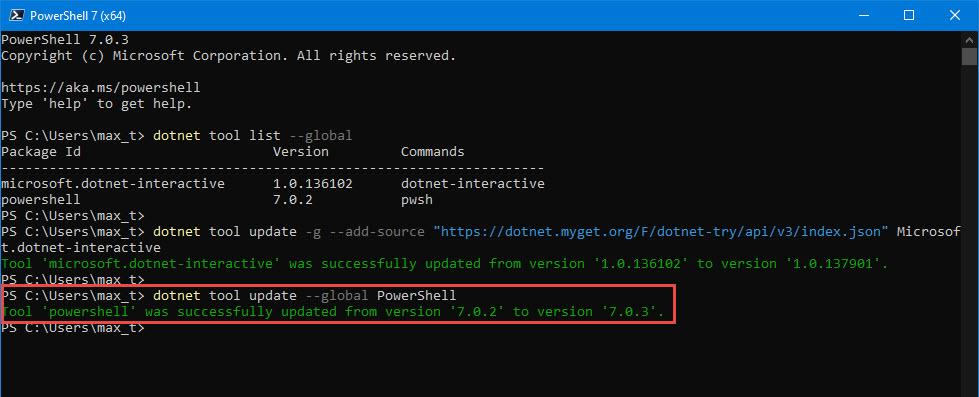
2. To update PowerShell Global tool to the latest version:

dotnet tool update --global PowerShell

Completion message: (As of 07/30/2020, 16:20 PM)
Tool ‘powershell’ was successfully updated from version ‘7.0.2’ to version ‘7.0.3’.

*Note: If you have installed Anaconda, a manual update will be needed.

Keep in mind, these tools are not managed by Windows Update. So, you need to periodically run the update yourself.

This also applies to WSL 2 (Windows Subsystem for Linux).

More Information

Streamlining SQL Server Management Objects (SMO) In PowerShell 7 (Revised)

It’s been over two years since I touch this topic, so here’s an updated post about using SQL Server Management Object (SMO) on the latest PowerShell Version 7.

Here’s 411 on what’s out there!

For the most part, nowadays you can use SMO to  connect:

1. Windows to Linux.
2. Linux to Windows.
3. Windows to Linux Containers.
4. Linux to Linux Containers.
5. Windows to Windows Containers.
6. WSL to Linux Containers or Windows.

And, of course, will include cloud technologies.

Now, we have to extend our skills thanks to Docker Container.

*Note: Any connection issues connecting from Linux to Windows, can be solved by creating the inbound rule for Linux in Windows Firewall.

Ways to use SMO

There are two ways you could use SMO in PowerShell 7 (cross-platform):

1. Installing the SMO NuGet packages, two packages are requiered:
a. Microsoft.SqlServer.SqlManagementObjects Version 150.18208.0 (as of 03/23/2020)
b. Microsoft.Data.SqlClient Version 1.1.1 (recommended)

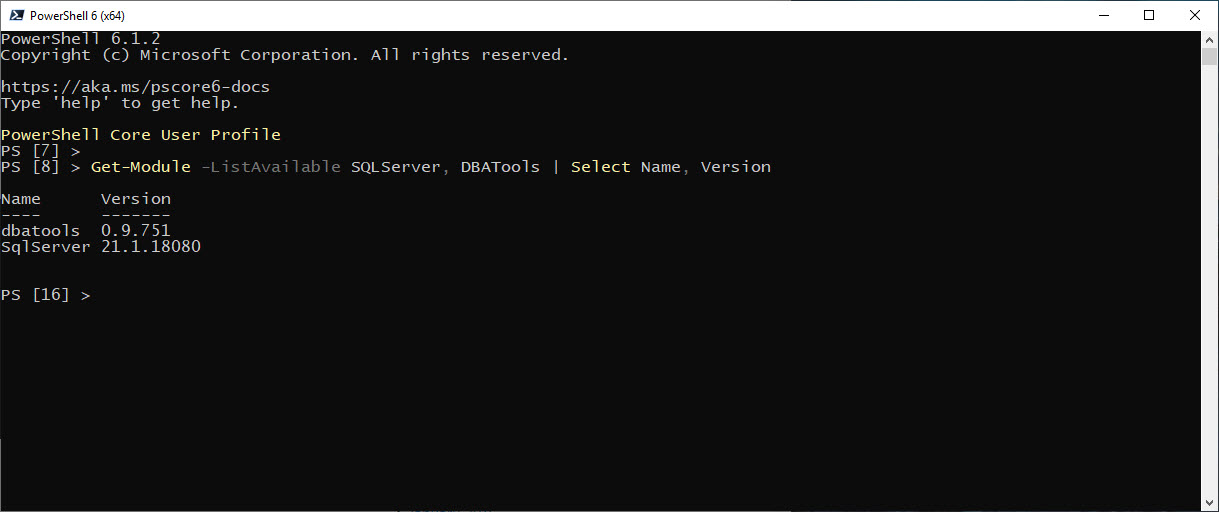
2. Installing the PowerShell Module: SqlServer Version 21.1.18221 (as of 03/23/2020)

Keep in mind, once the packages and/or modules are installed, you need to update them manually.

Working with SMO NuGet Packages

To install the Microsoft.SqlServer.SqlManagementObjects package. You first need to verify that Nuget Package Management is registered in PowerShell 7. Execute the following code will do the task of registration:

function Verify-NugetRegistered
{
[CmdletBinding()]
Param ()
# Microsoft provided code: Test Auto sAVCE
# Register NuGet package source, if needed
# The package source may not be available on some systems (e.g. Linux/Windows)
if (-not (Get-PackageSource | Where-Object{ $_.Name -eq 'Nuget' }))
{
Register-PackageSource -Name Nuget -ProviderName NuGet -Location https://www.nuget.org/api/v2
}
else
{
Write-Host "NuGet Already Exist! No Need to install." -ForegroundColor Yellow;
};
}; Verify-NugetRegistered;

Now, here’s the tricky part. There’s a known issue when executing the Install-Package cmdlet which will fail to install the package.

The workaround is to download the Nuget.exe CLI and place the executable in the following folder: “C:\Program Files\PackageManagement\NuGet\Packages.”
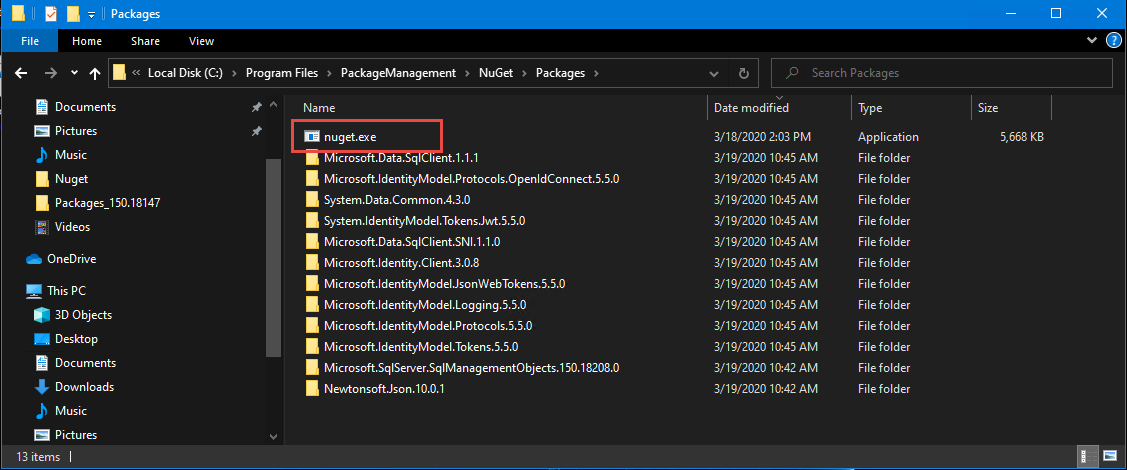
This is the PowerShell default path for storing Packages, and it may not exist in the beginning. So you may need to manually create the folders.

To install the SMO packages needed, execute the following command in PowerShell 7 prompt as an Admin:

cd 'C:\Program Files\PackageManagement\NuGet\Packages\'
./nuget install Microsoft.SqlServer.SqlManagementObjects -version 150.18208.0
Pause
./nuget install Microsoft.Data.SqlClient -version 1.1.1
Pause

Notice, I included the versions of the packages as of 3/23/2020. These SMO packages will support SQL Server 2019 or older, but keeping in mind the older the SQL Server version the latest features will not apply.

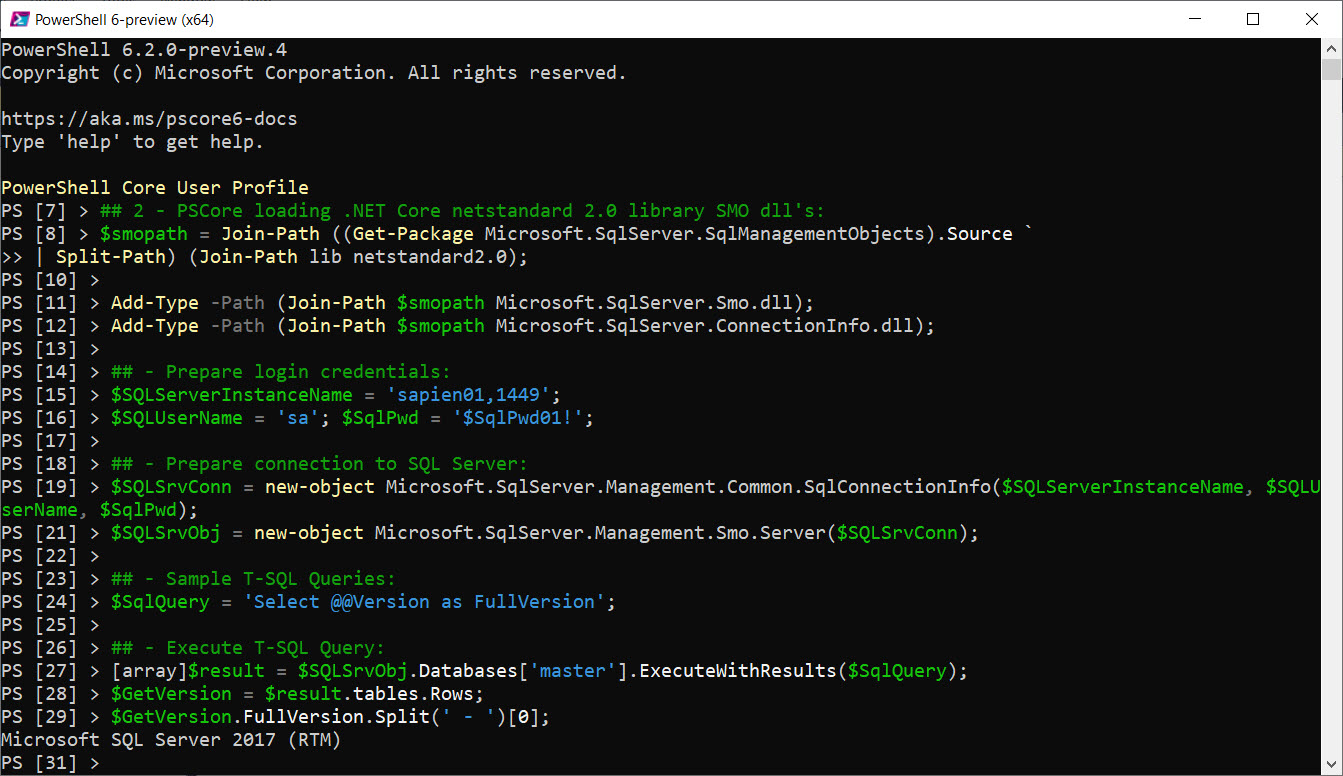
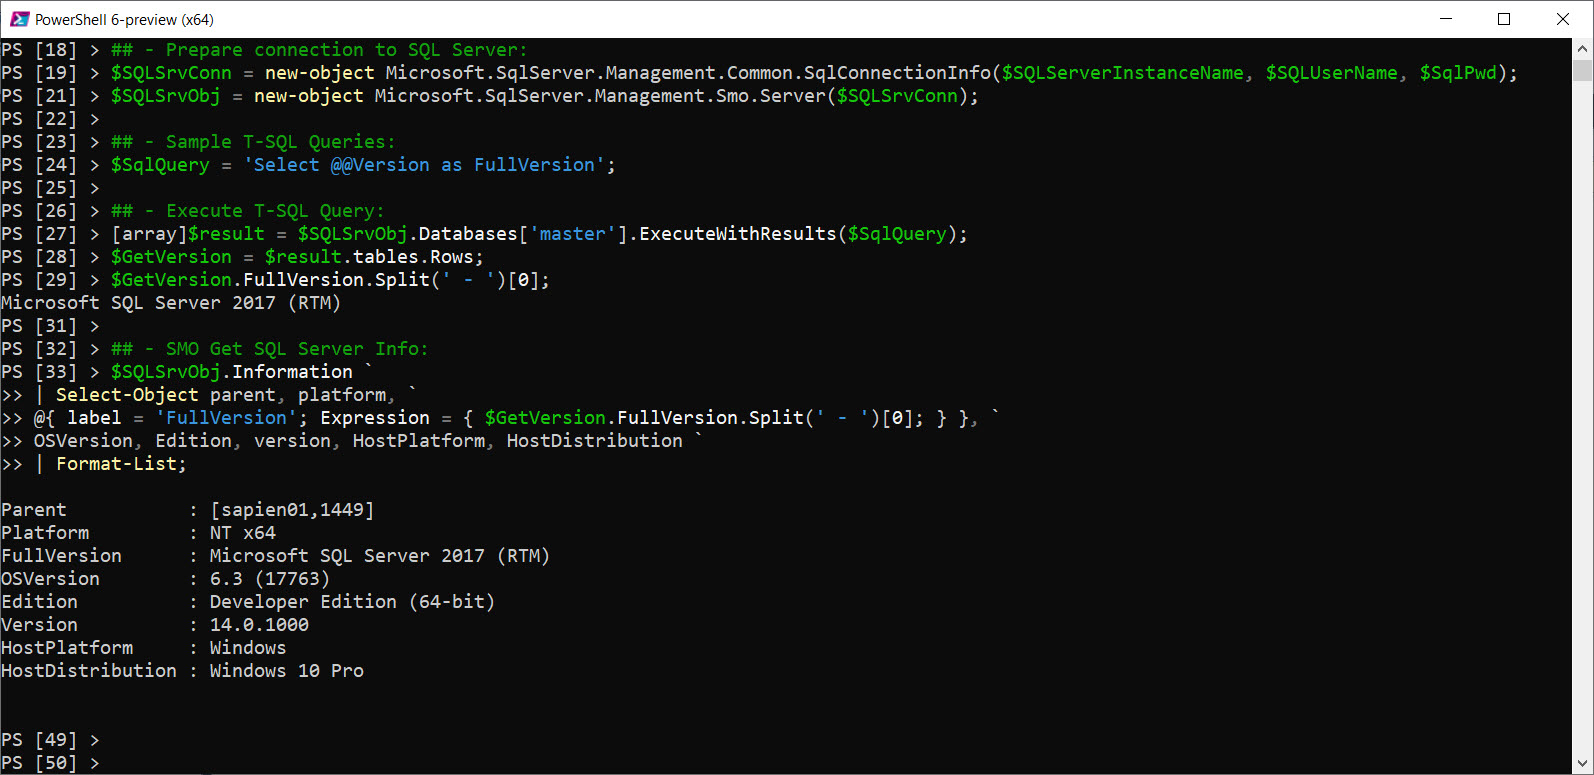
Also, these packages doesn’t contain any PowerShell cmdlets, they are meant for developing solution from scratch. For example, below I’m creating an SMO script to connect to a SQL Server providing my SQL authentication, query to get the SQL Server engine version, and manipulate the results from the script.

## - PowerShell 7 loading .NET Core netstandard 2.0 library SMO dll's:
$smopath = Join-Path ((Get-Package Microsoft.SqlServer.SqlManagementObjects).Source `
| Split-Path) (Join-Path lib netstandard2.0);

Add-Type -Path (Join-Path $smopath Microsoft.SqlServer.Smo.dll);
Add-Type -Path (Join-Path $smopath Microsoft.SqlServer.ConnectionInfo.dll);
Add-Type -Path (Join-Path $smopath Microsoft.SqlServer.SmoExtended.dll);
Add-Type -Path (Join-Path $smopath Microsoft.SqlServer.Management.Sdk.Sfc.dll);

## - Prepare login credentials:
$SQLServerInstanceName = 'sapien01,1449';
$SQLUserName = 'sa'; $SqlPwd = '$SqlPwd01!';

## - Prepare connection to SQL Server:
$SQLSrvConn = `
new-object Microsoft.SqlServer.Management.Common.SqlConnectionInfo($SQLServerInstanceName, $SQLUserName, $SqlPwd);
$SQLSrvObj = new-object Microsoft.SqlServer.Management.Smo.Server($SQLSrvConn);

## - Sample T-SQL Queries:
$SqlQuery = 'Select @@Version as FullVersion';

## - Execute T-SQL Query:
[array]$result = $SQLSrvObj.Databases['master'].ExecuteWithResults($SqlQuery);
$GetVersion = $result.tables.Rows;
$GetVersion.FullVersion.Split(' - ')[0];

## - SMO Get SQL Server Info:
$SQLSrvObj.Information `
| Select-Object parent, platform, `
@{ label = 'FullVersion'; Expression = { $GetVersion.FullVersion.Split(' - ')[0]; } }, `
OSVersion, Edition, version, HostPlatform, HostDistribution `
| Format-List;
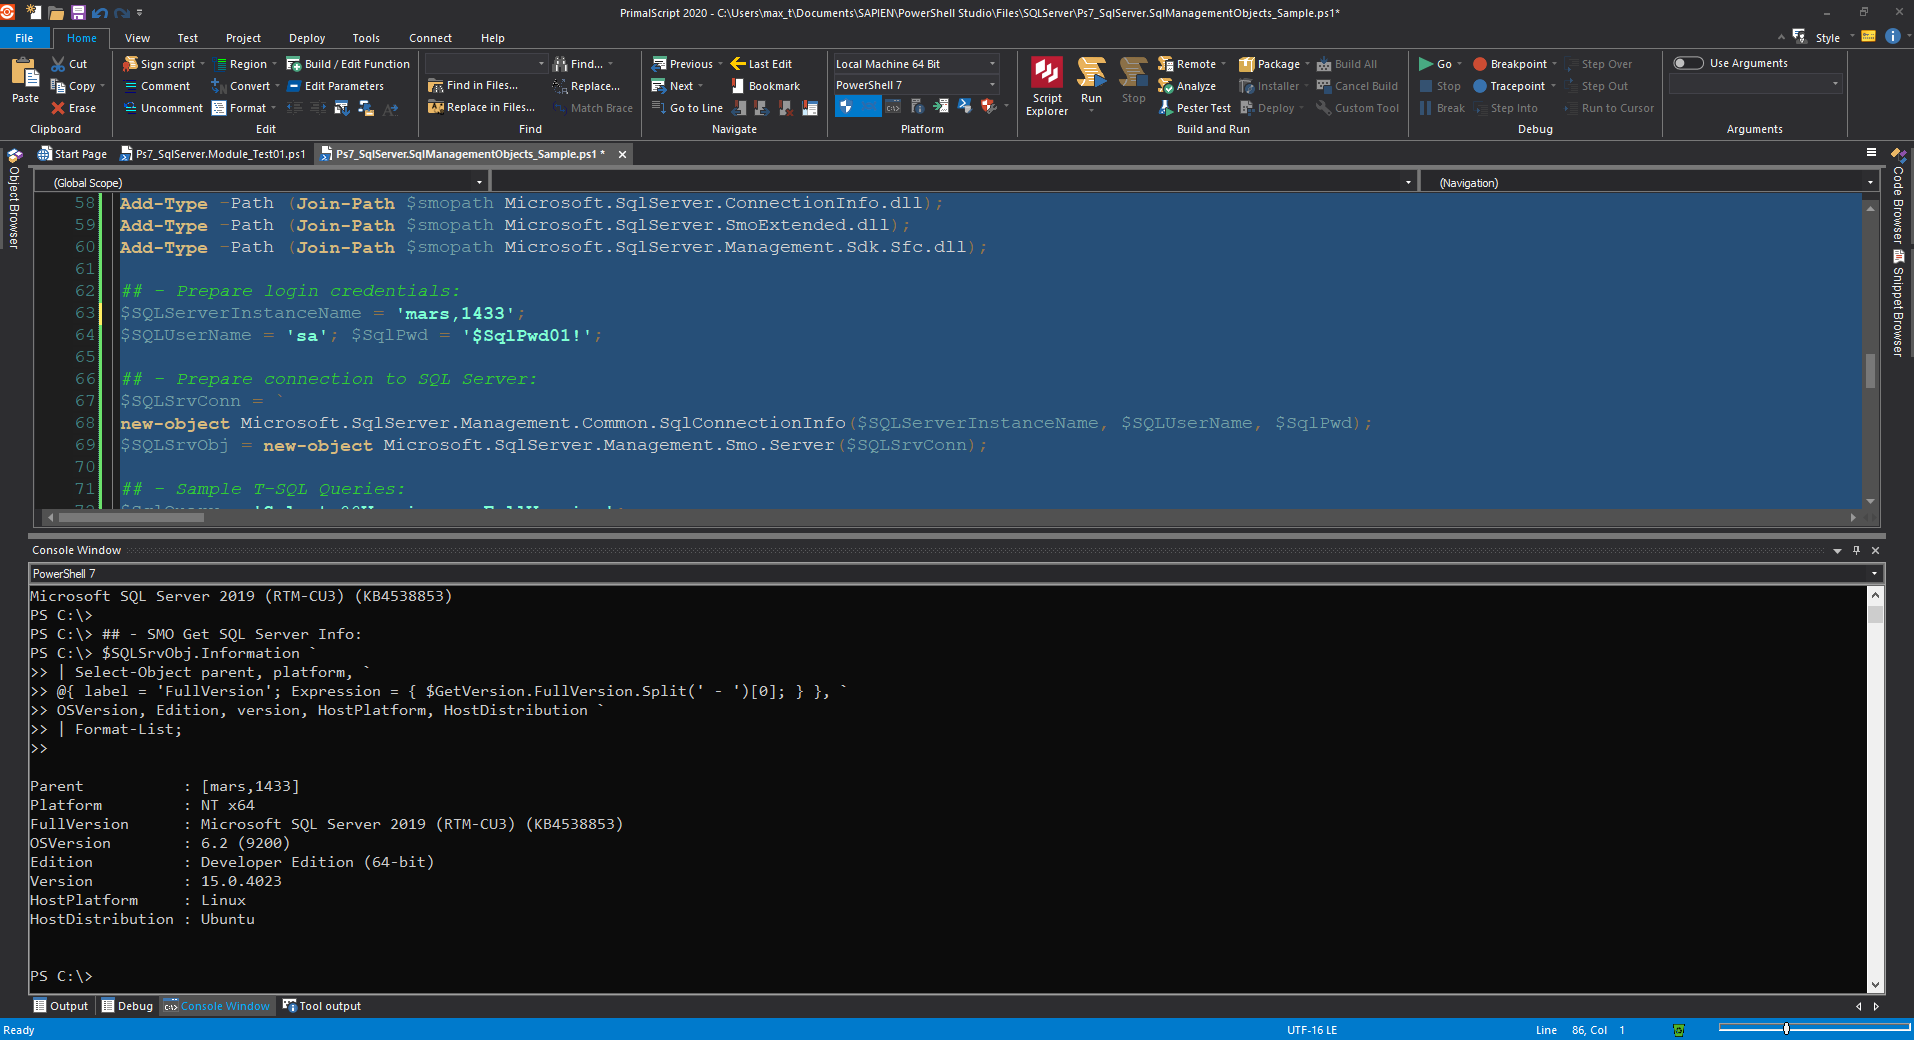
The best thing! This Package is supported cross-platform so you can execute the script on any OS.

The beauty of coding with SMO is that everything is documented. Just check the Microsoft Documentation “SQL Server Management Objects (SMO) Programming Guide“.

Working with SqlServer Module

Now, using the SQL Server Module in PowerShell 7 is makes it a bit simple to install. And, it’s supported cross-platform.

Just execute the following command as an Admin:

Install-Module -Name SqlServer -AllowClobber

The latest version contains a total of 66 commands you can use to manage your SQL Server engine.
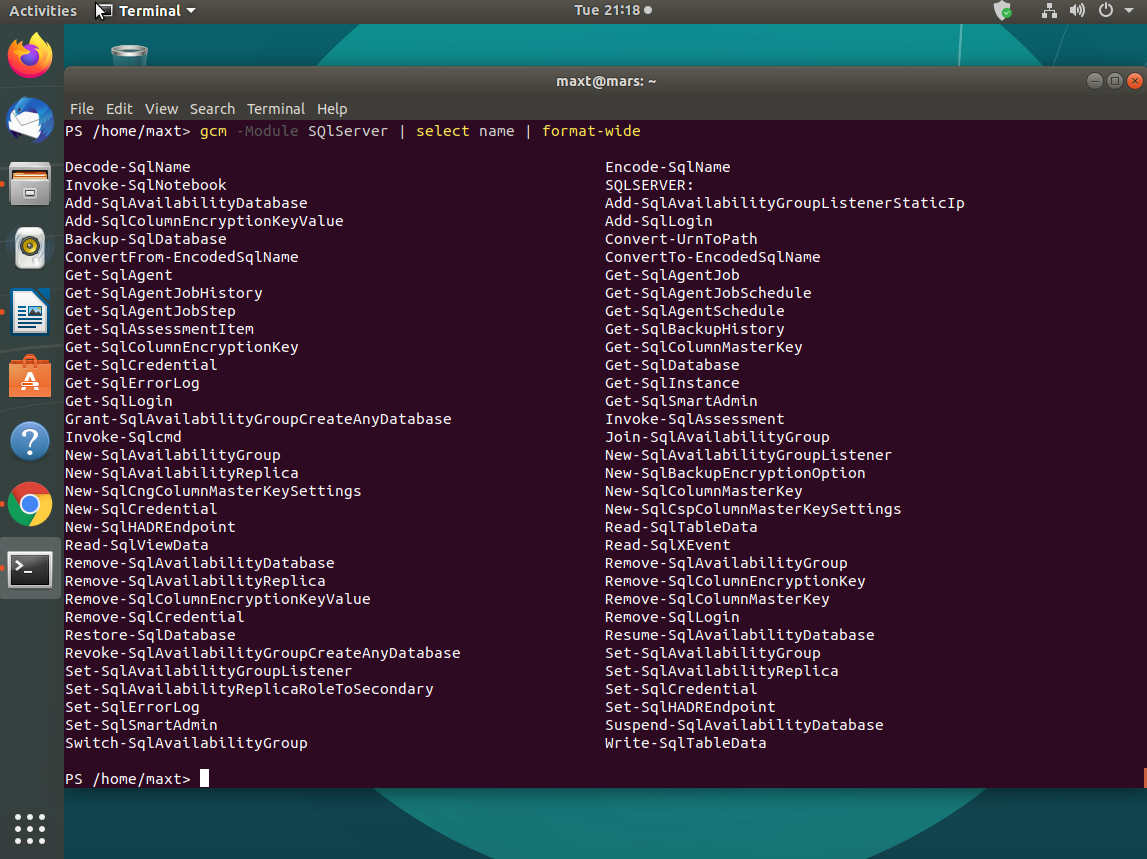
Now, besides having all of these commands available, in the future, you may have the need to create custom functions.

Here’s the variation of the previous SMO script sample:

## - Import the SqlServer module which it loads all needed SMO assemblies:
Import-Module SqlServer

## - Prepare login credentials:
$SQLServerInstanceName = 'sapien01,1449';
$SQLUserName = 'sa'; $SqlPwd = '$SqlPwd01!';

## - Prepare connection to SQL Server:
$SQLSrvConn = `
new-object Microsoft.SqlServer.Management.Common.SqlConnectionInfo($SQLServerInstanceName, $SQLUserName, $SqlPwd);
$SQLSrvObj = new-object Microsoft.SqlServer.Management.Smo.Server($SQLSrvConn);

## - Sample T-SQL Queries:
$SqlQuery = 'Select @@Version as FullVersion';

## - Execute T-SQL Query:
[array]$result = $SQLSrvObj.Databases['master'].ExecuteWithResults($SqlQuery);
$GetVersion = $result.tables.Rows;
$GetVersion.FullVersion.Split(' - ')[0];

## - SMO Get SQL Server Info:
$SQLSrvObj.Information `
| Select-Object parent, platform, `
@{ label = 'FullVersion'; Expression = { $GetVersion.FullVersion.Split(' - ')[0]; } }, `
OSVersion, Edition, version, HostPlatform, HostDistribution `
| Format-List;
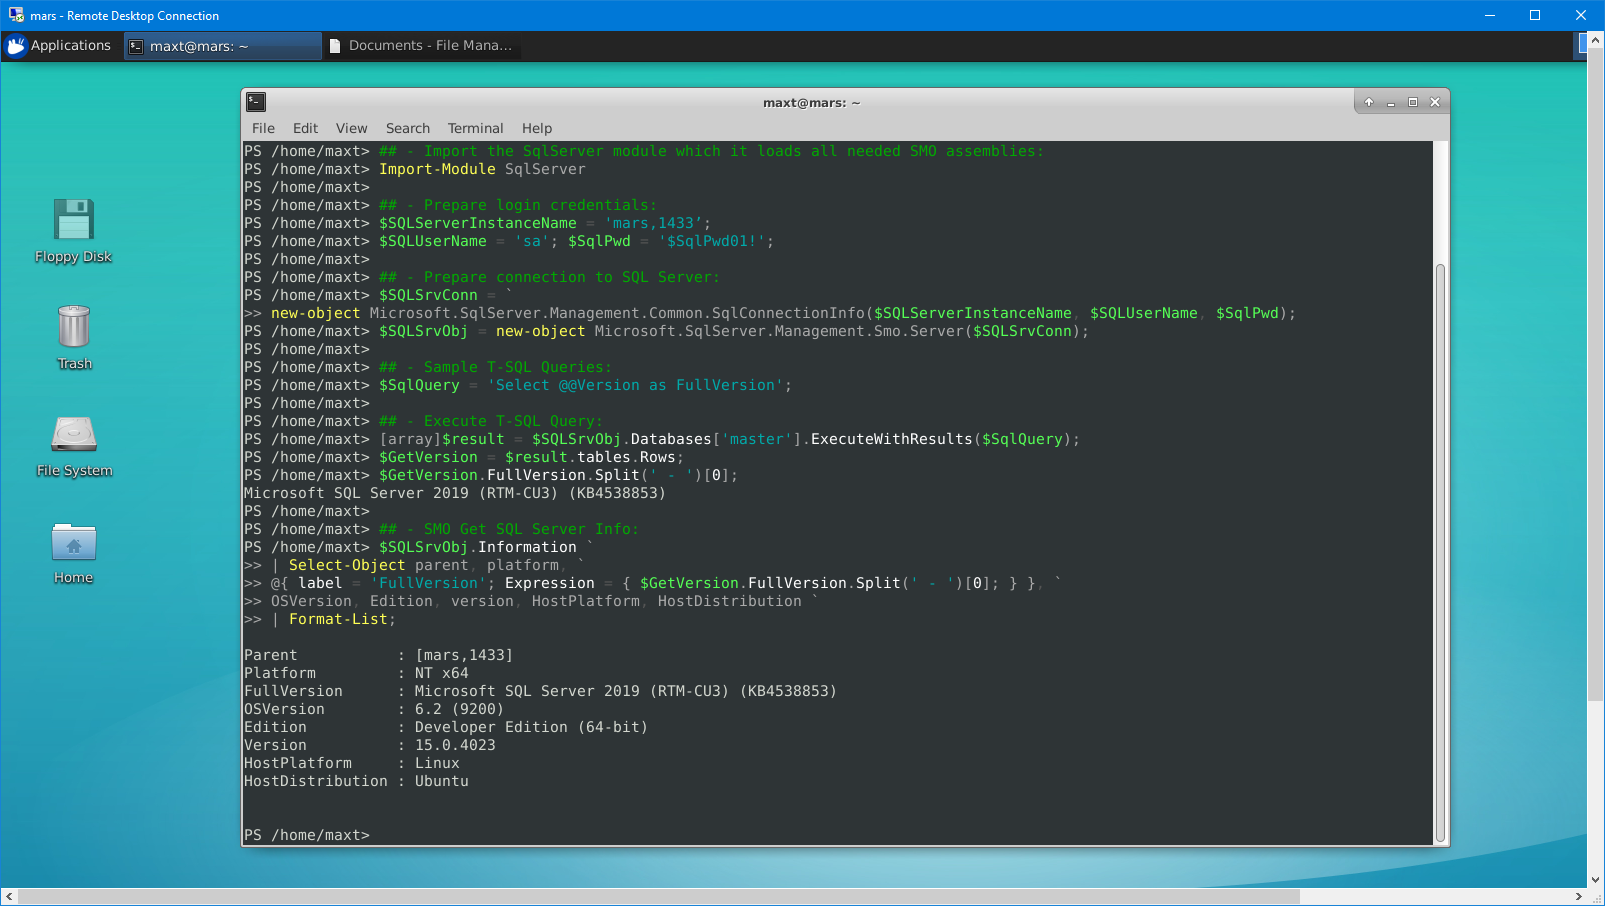
The differences is quite simple. All SMO assemblies are previously loaded when you import the SqlServer module. So, you don’t have to worry about including the assemblies in the code. Make sure to check all of the commands available that can help you manage the SQL Server.

Additional Tools Available

Now, don’t forget to check other SQL Server community tools that are available, such as:
1. DBATools – SQL SMO PowerShell.
2. MSSql-Scripter – Python-based tool.
3. Mssql-cli – Python-based tool.

And, don’t forget to check out .NET Interactive which brings Jupyter Notebook with PowerShell kernel.

If you want to try .NET Notebook, I suggest to first install Anaconda (Python 3.7) which makes it simple to use in Windows.
If you want to experiment with .NET Notebook without installing anything in your system, then try MyBinder. This is a web-based .NET Notebook that’s run from a container.
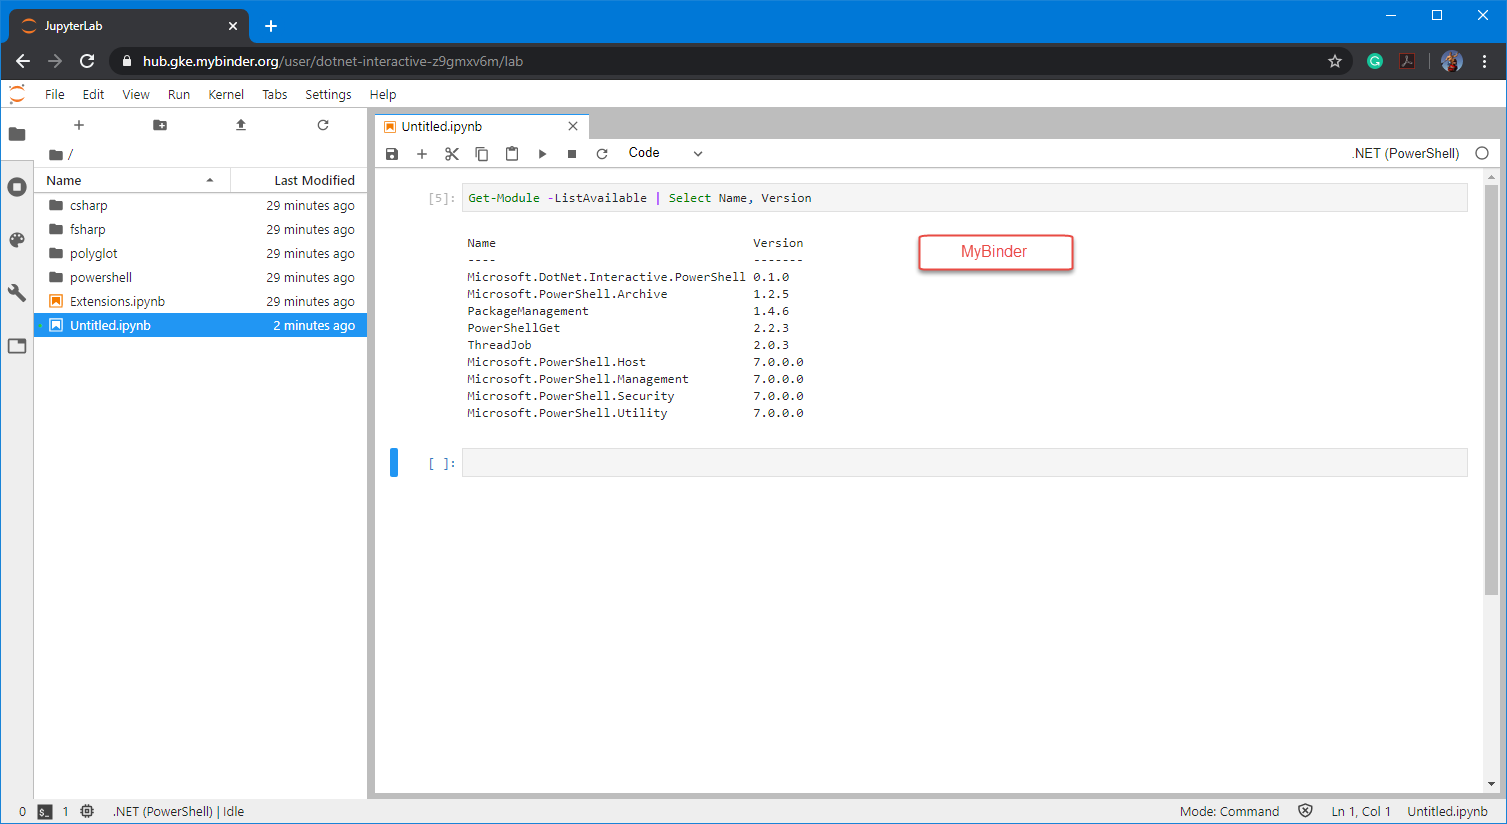
Unfortunately, in this scenario, only the PowerShell 7 core modules are available. But at least you will be able to learn the essentials of .NET Notebook.

Go ahead and start using this Amazing technology!
Getting ready for PowerShell .NET Notebook

The latest release of .NET Interactive Preview 2 (February 6), which includes .NET Notebook for PowerShell. Remember, this is a .NET Core component that is available cross-platform.

This is great! You can start using notebook file and share it across many systems, both Windows and Linux Operating Systems.

Check out Microsoft blog post on “Public Preview of PowerShell Support in Jupyter Notebooks.”

Before you continue, I suggest to get Anaconda 2019.10 (v4.8.1) installed in your system.

Installing .NET Interactive in Ubuntu

In Windows, just takes a few steps to set it up. For Linux, it takes a few extra steps but still is quick enough to get you started.

For Windows, follow the instructions found at the .NET Interactive page in Github.

For Linux, for Ubuntu 18.04, follow the blog post “Ubuntu 18.04 Package Manager – Install .NET Core“.

Basically, in either operating systems, you install:

  • Install the .NET Core SDK
  • Install the ASP.NET Core runtime
  • Install the .NET Core runtime

After these components are installed, proceed to install .NET Interactive Tools, which will include PowerShell support in Jupyter Notebook.

1. Install the .NET Interactive Global tools with this simple command:

$ dotnet tool install --global Microsoft.dotnet-interactive

2. Then install .NET Interactive “Jupyter” component with the following command:

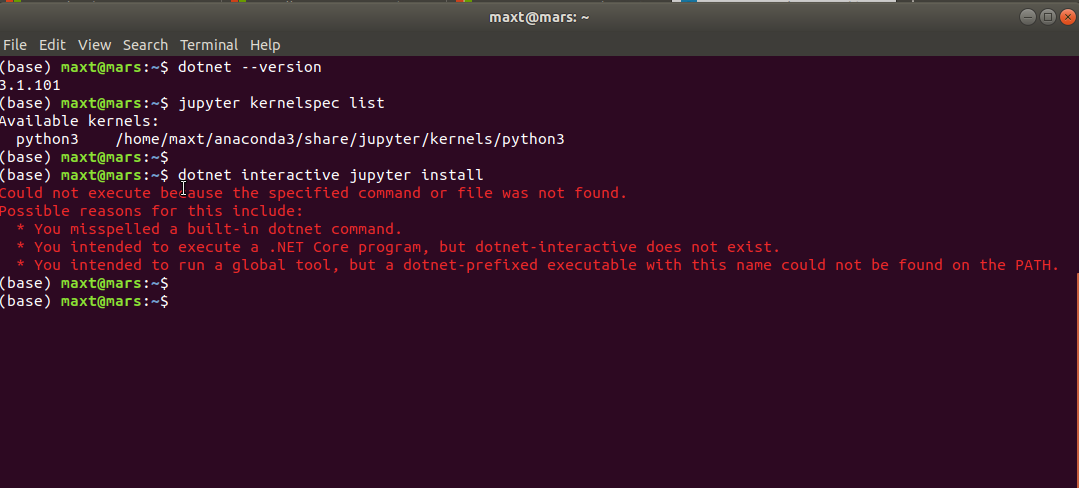
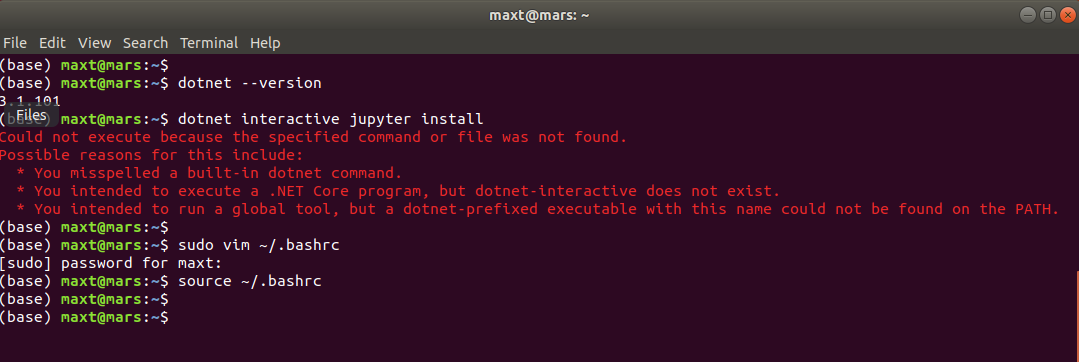
$ dotnet interactive jupyter install

At this point, in Ubuntu, you will encounter the following known error: (see image)

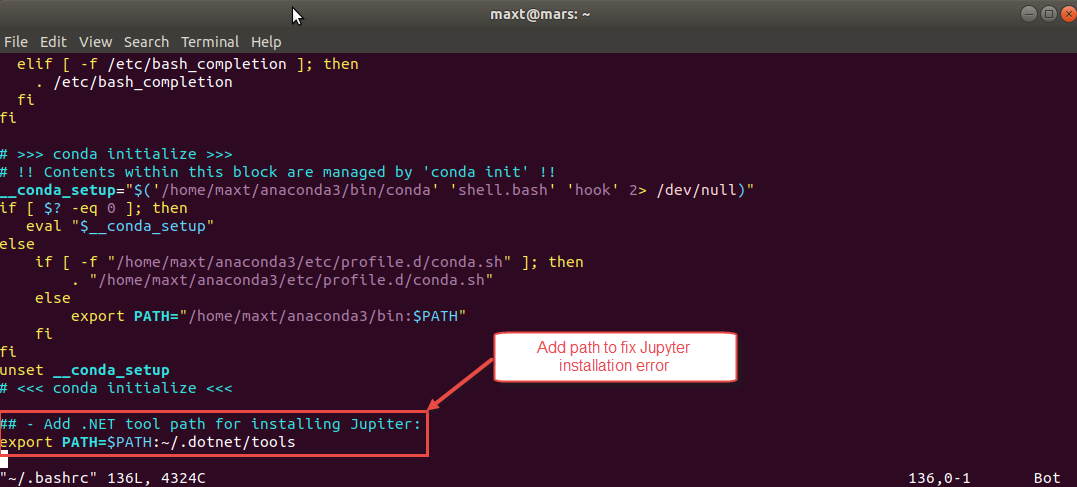
To resolve the issue, use the text editor to open the ~/.bashrc file to add the path to .NET Tools folder:

$ sudo vim ~/.bashrc
## - Add path to .NET Tools:
export PATH=$PATH:~/.dotnet/tools
:wq
$ source ~/.bashrc

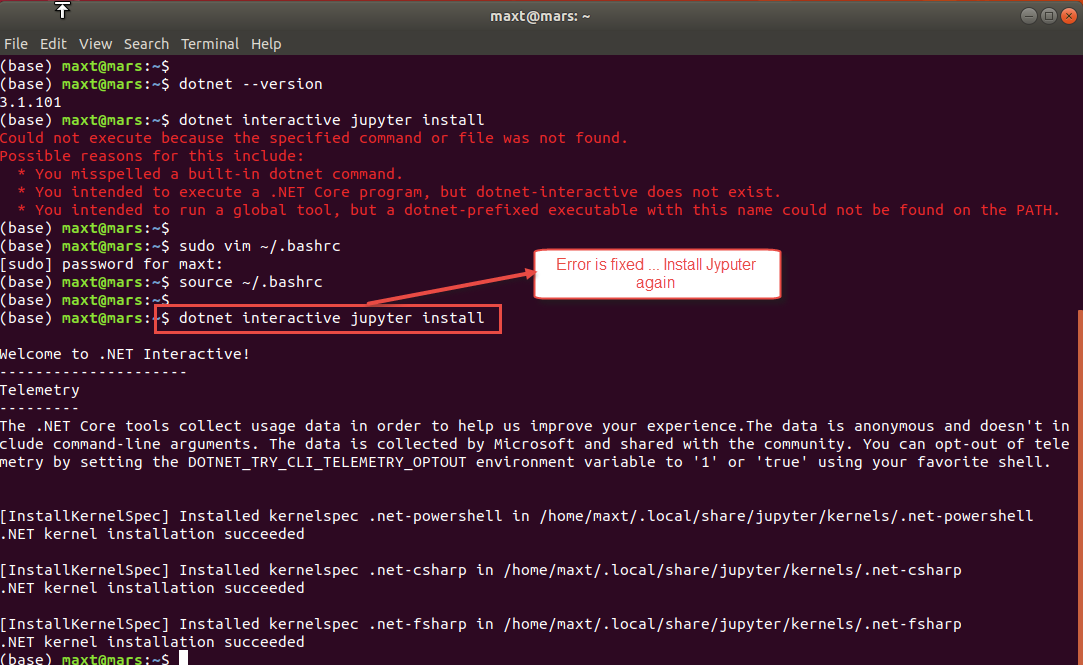
Now, we rerun the command, and this time it will complete without any errors:

$ dotnet interactive jupyter install

To verify that all Jupyter kernel was installed, execute the following command:

$ jupyter kernelspec list

Now, you’re ready to work with PowerShell Jupyter Notebook.

Starting Jupyter Notebook

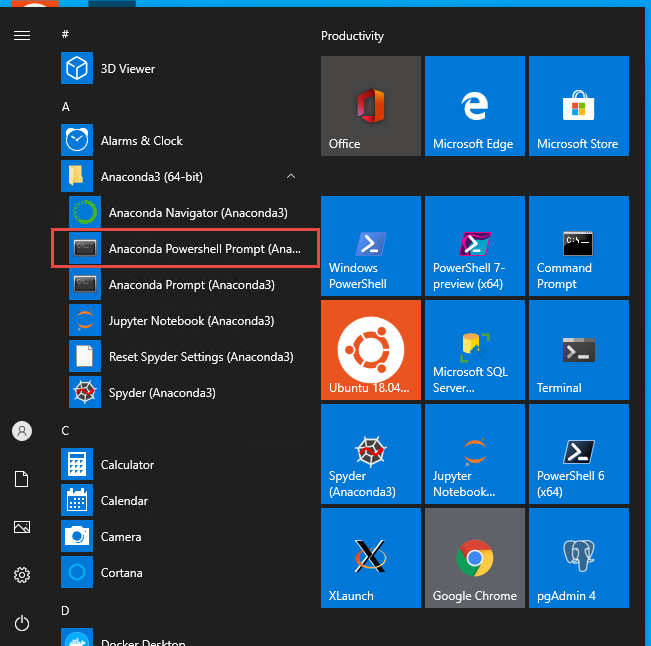
In Windows, you use any console application to start a Jupyter Notebook session using: DOS, Windows PowerShell, and even PowerShell 7 Preview. Have you to use the Anaconda menu shortcut has provided for running the Windows PowerShell prompt?

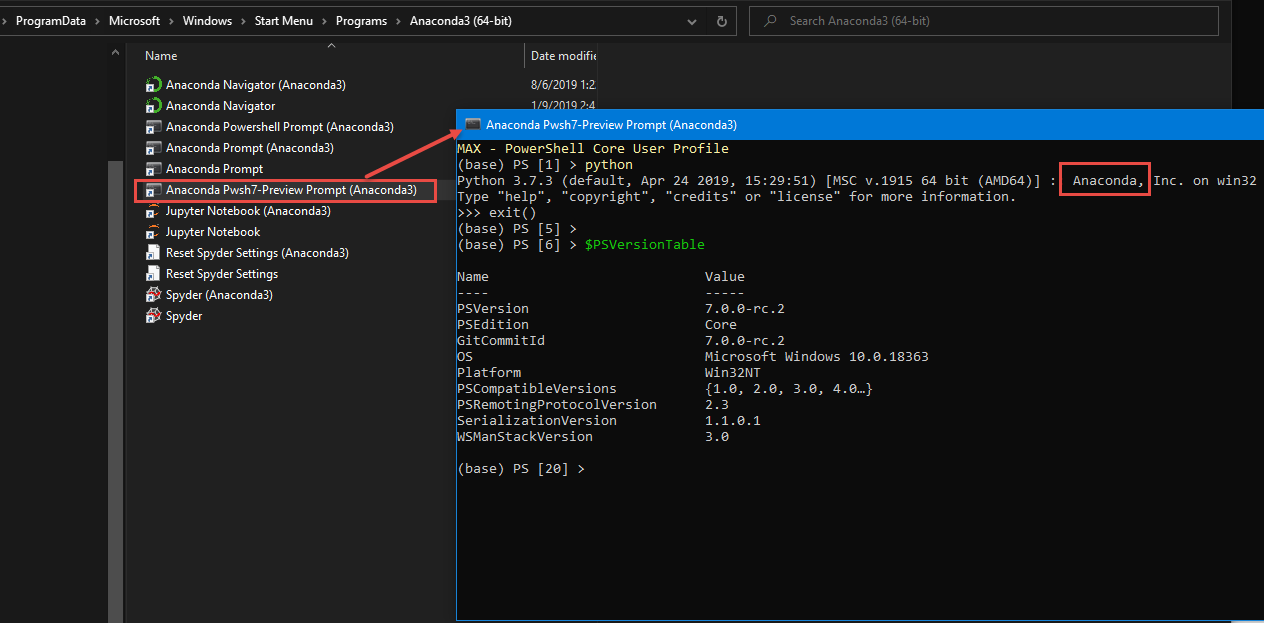
Better yet, check my instructions on how to create the “Anaconda Pwsh7 Preview Prompt” shortcut in my previous blog post “ANACONDA AND POWERSHELL WORKING TOGETHER!“.()

Back in Linux, open a bash terminal session.

Now, to start a .NET Interactive Jupyter Notebook session, at the console prompt type the following command:

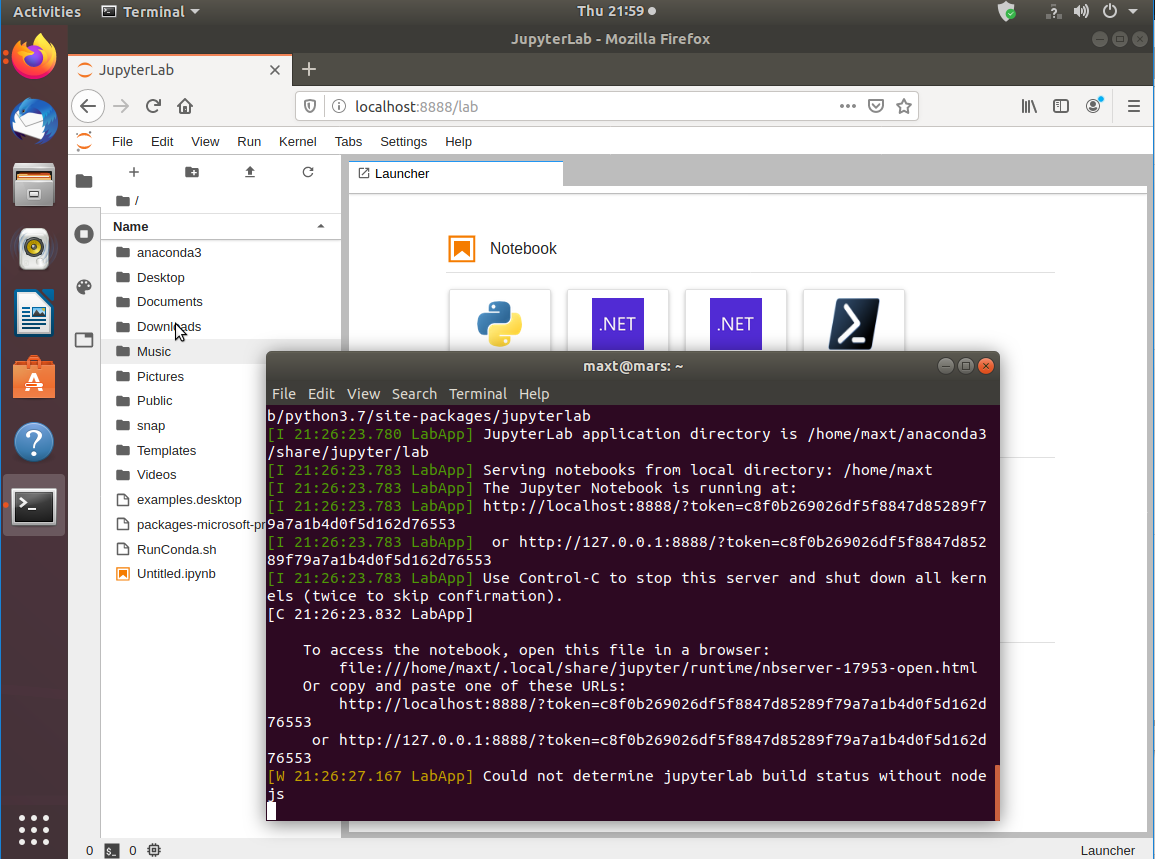
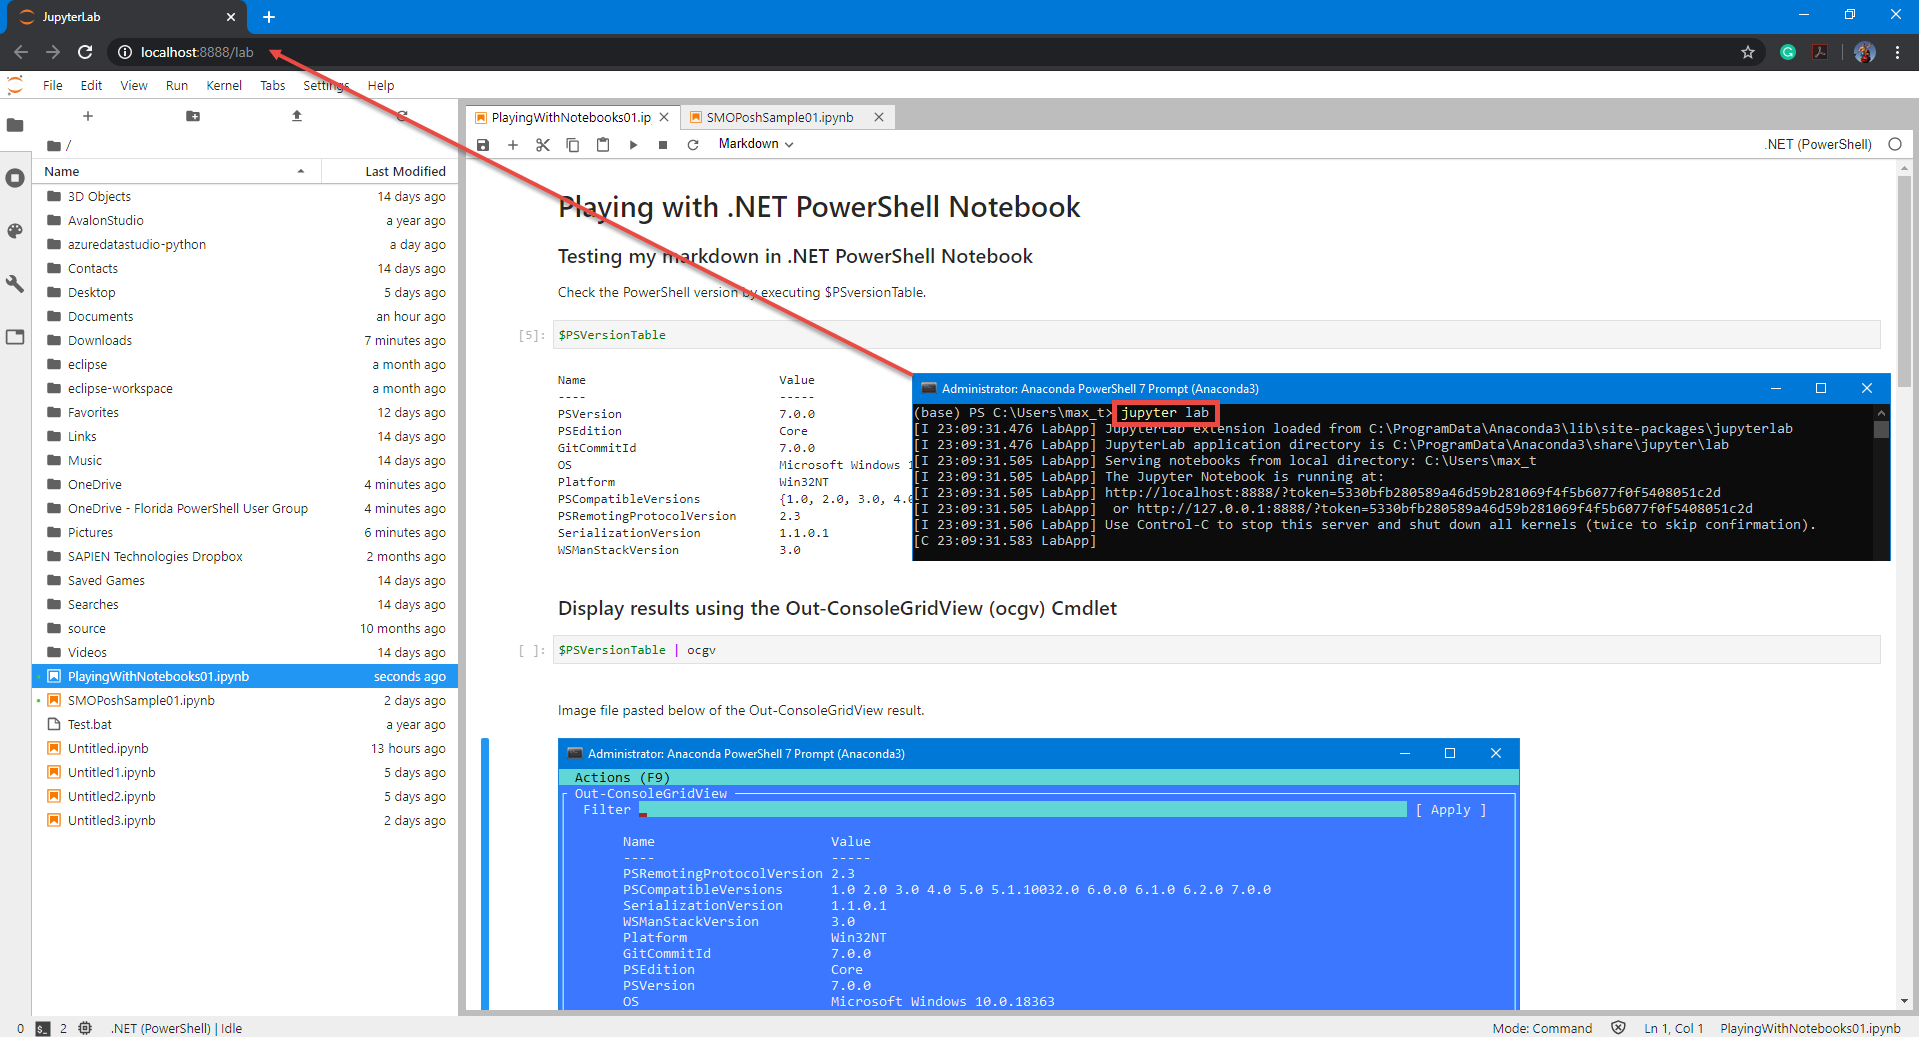
jupyter lab

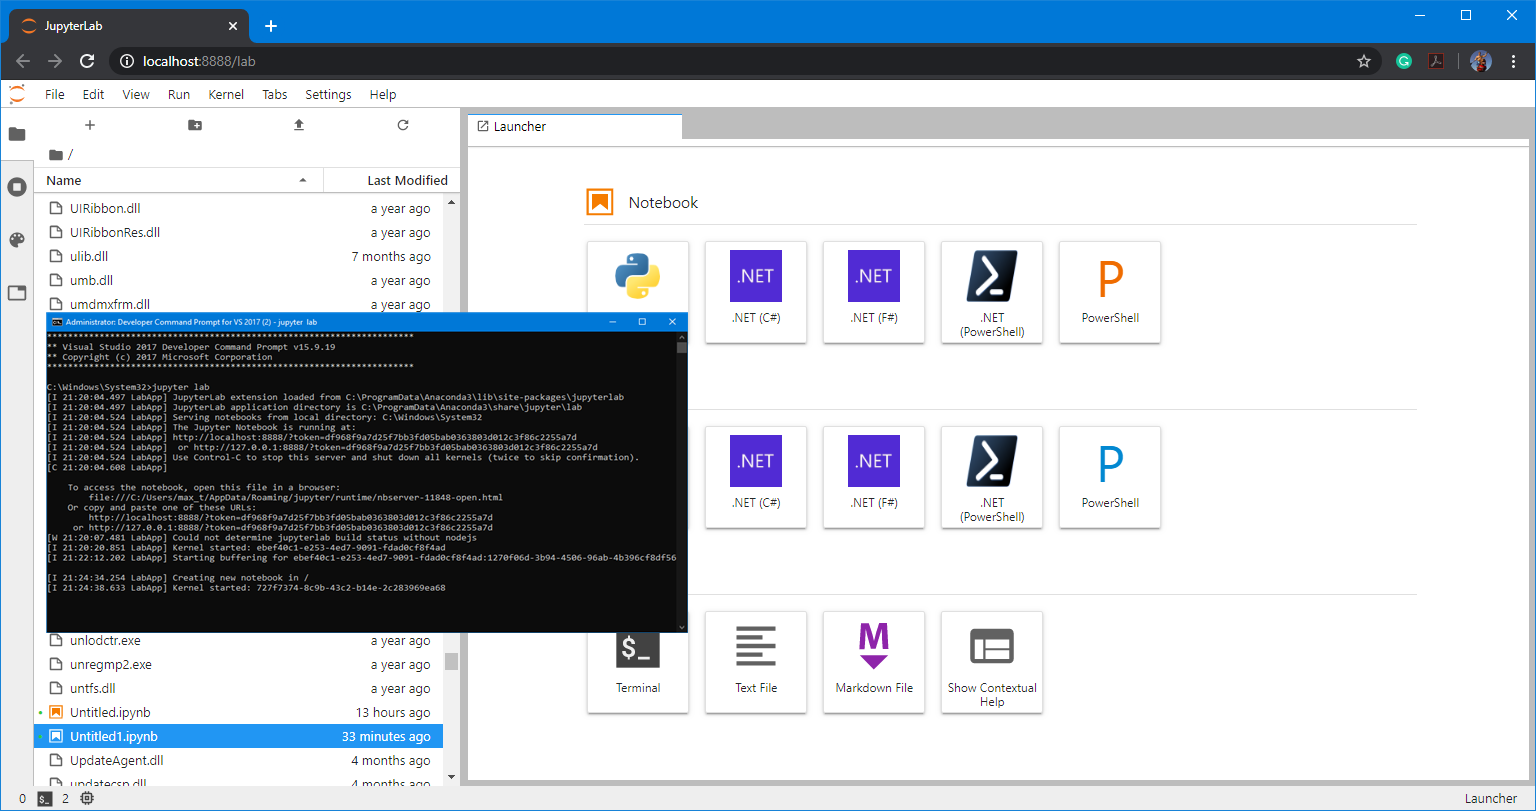
At this point, the Jupyter Notebook will open on your default browser (Windows or Linux).

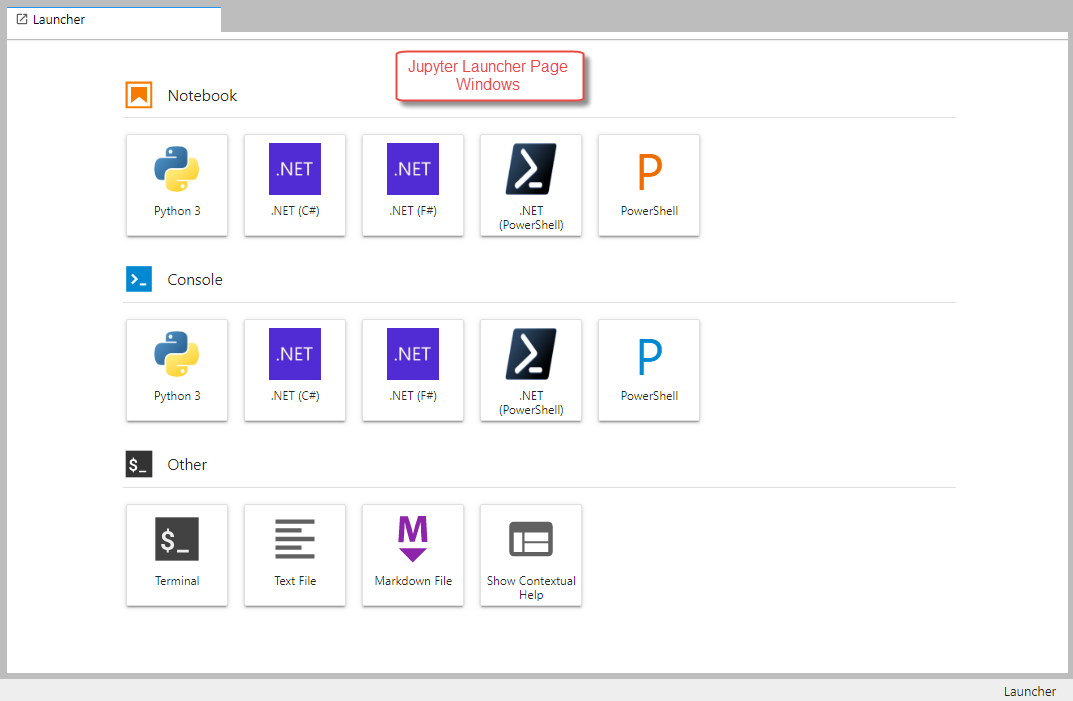
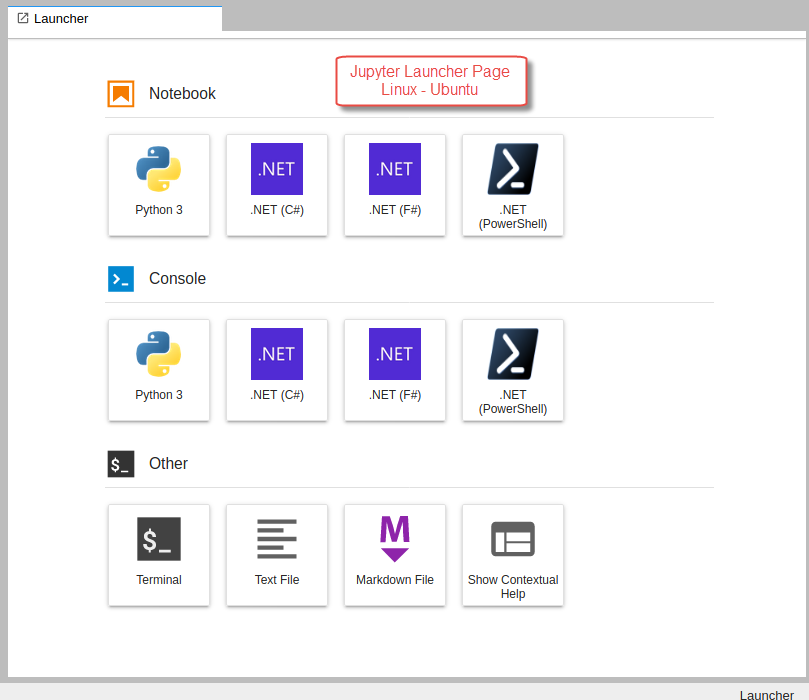
The launcher will show all available components for creating notebook files.

Just pick the notebook kernel you wish to start working… let say “.NET PowerShell.”

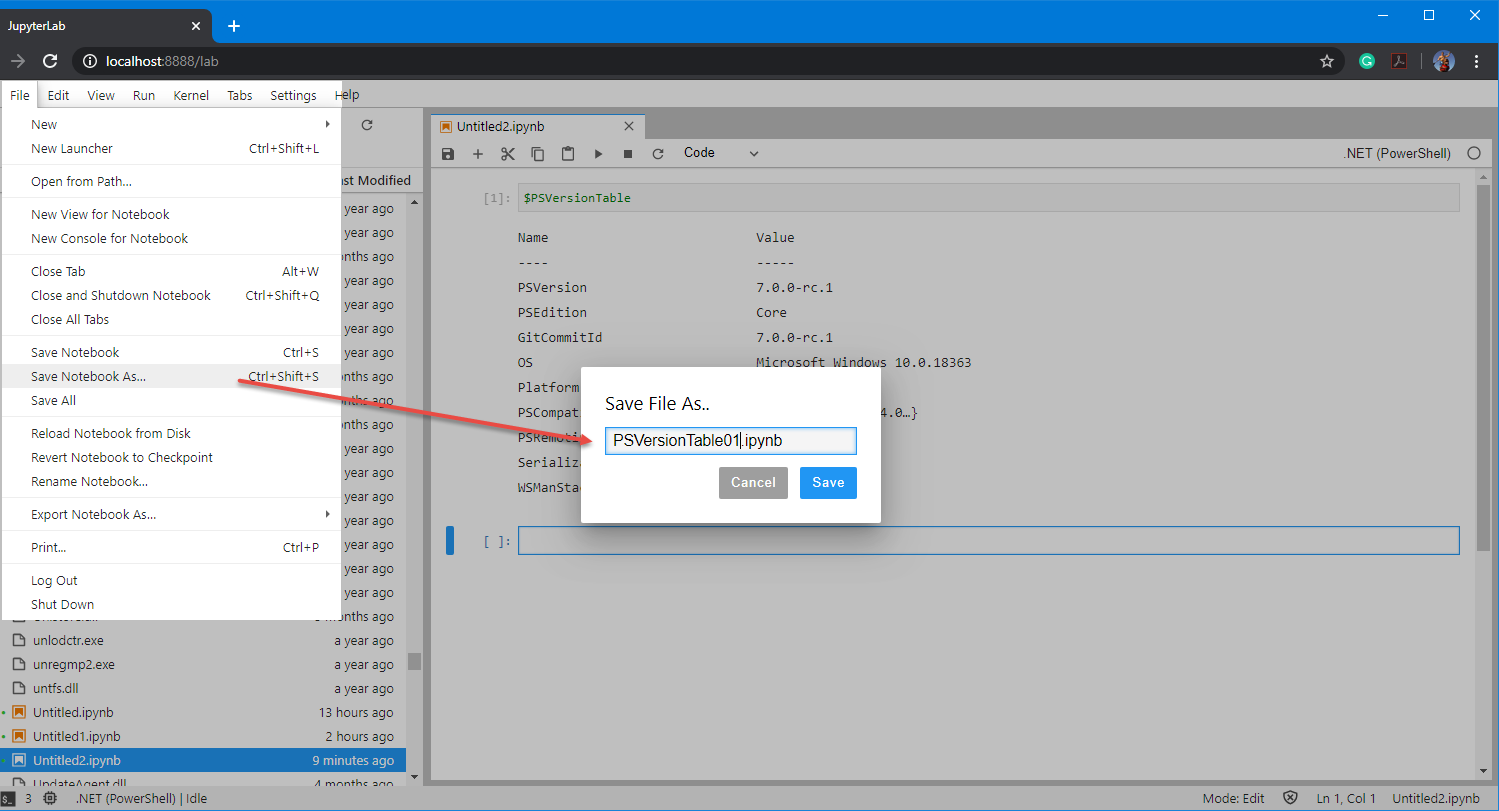
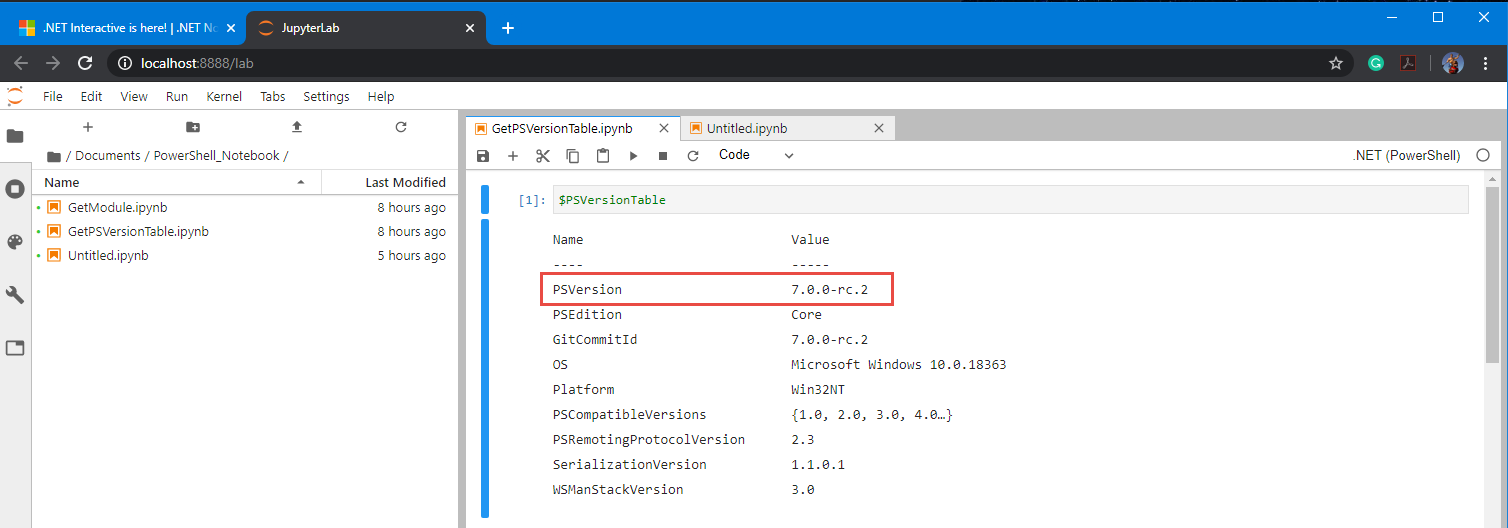
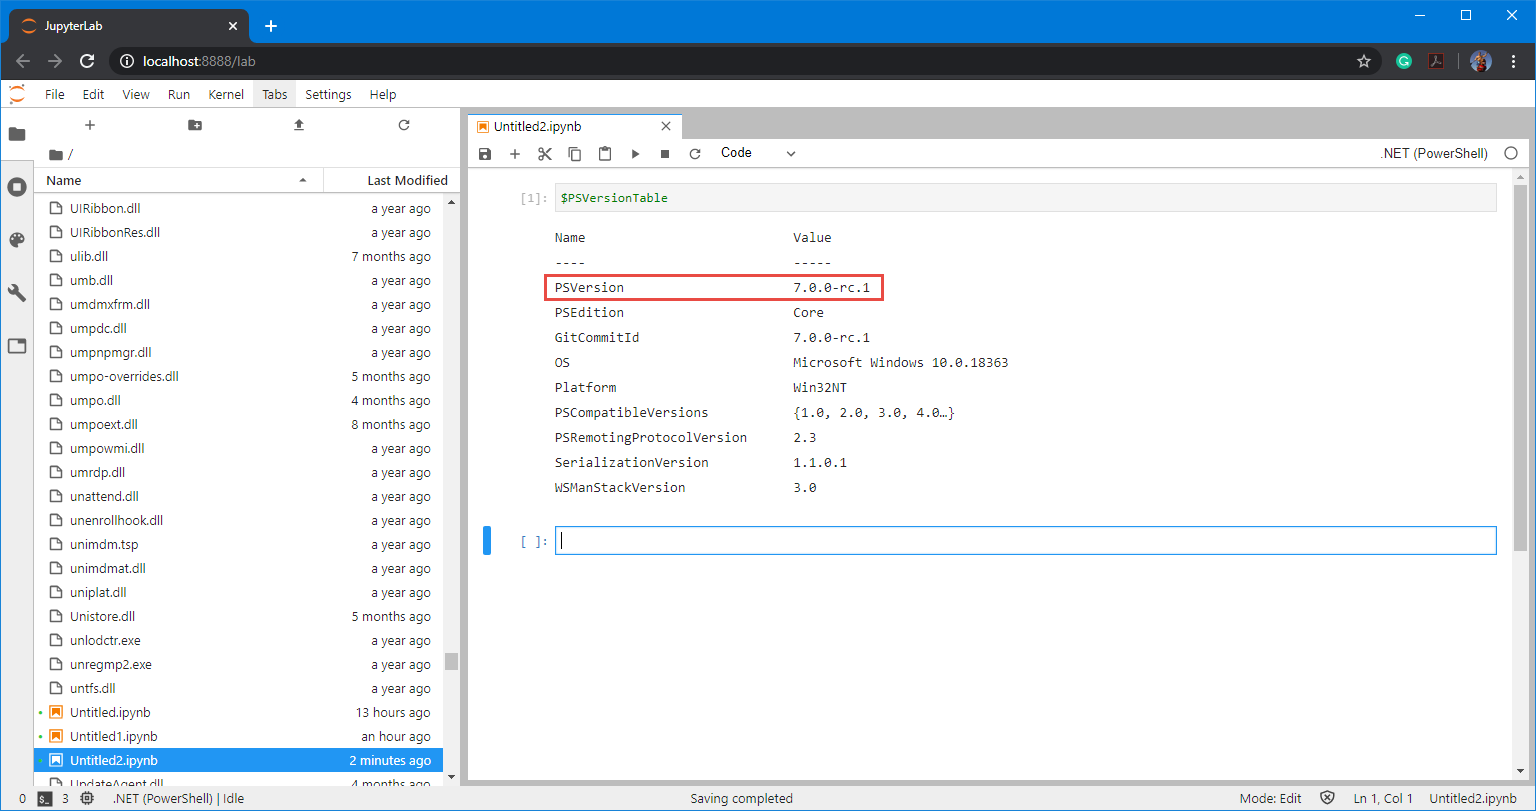
Notice that I running the $PSVersionTable in the Notebook that the .NET PowerShell kernel is one release behind the latest update.

Now that I test that my .NET Notebook works, I can save my results for later use.

Please, if you encounter any issues with .NET Interactive/.NET Notebook, post them in their Github repo.

Wait! How can I get PowerShell 7 Preview RC 2 updated in .NET Interactive?

I did post the issue about why I was getting PowerShell 7 Preview RC 1 instead of RC2 and got the answer.

It looks like the initial build of .NET Interactive installation will install version ‘1.0.110801‘, which includes PowerShell 7 Preview RC1.

To get the latest build available with PowerShell 7 Preview RC 2, you need to run the update command:

## - To update tool - use PowerShell 7 Preview RC2
dotnet tool update -g --add-source "https://dotnet.myget.org/F/dotnet-try/api/v3/index.json" Microsoft.dotnet-interactive

Run the “jupyter lab” command again and run again the saved *.ipynb.

And that’s it!  As you can see, this command can get your .NET Interactive installation refreshed with the latest build.

Some exciting features are coming down the pipeline. Stay tuned for more!

Anaconda and PowerShell working together!

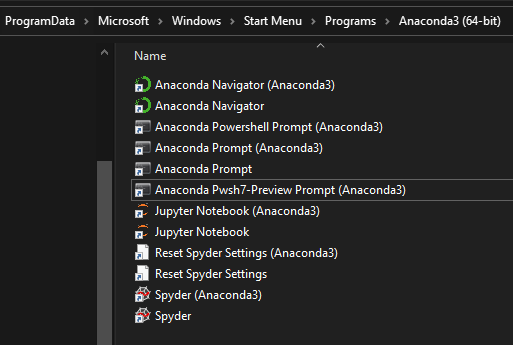
Yes! To my surprise, when I completed installing the latest update of Anaconda (Anaconda3 2019.10 (64bit) v4.8.1), I realized they have included the following menu item: “Anaconda PowerShell Prompt (Anaconda3)“. Apparently, this menu item has been added for some time.

So, we can take advantage of this shortcut, especially when we can use this console prompt for working with “PowerShell Notebook.” Please, check out Rob Sewell blog post on the recent update .NET Notebook Preview 2 post about “New .NET Notebooks are here – PowerShell 7 notebooks are here.“.

But, Wait! Let’s take this a little further and get you ready to do some fun.

What’s the main advantage?

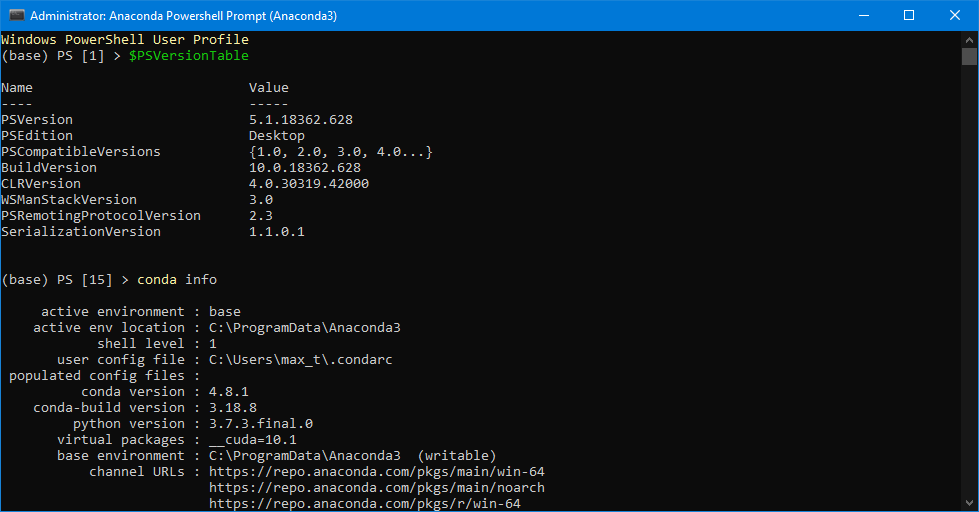
The “Anaconda PowerShell Prompt” shortcut is already set to activate Anaconda to be used with Windows PowerShell. There’s no need to do a manual activation by opening a DOS command shell and executing:

c:\> conda activate

Trying to use Python without activating Anaconda, it will give you a message.

The activation will allow you to use Python within Windows PowerShell. Or, just use the shortcut “Anaconda PowerShell Prompt.”

As you probably will notice, this menu item only open Windows PowerShell. So, what about PowerShell Core?

This is probably because of PowerShell Core has multiple versions: PowerShell 6.2.4 (GA) and PowerShell 7 Preview (RC2), both supported by Microsoft.

Would you like to create the Anaconda Pwsh7 Prompt shortcut?

Yes! We can create our own PowerShell Core shortcut. And, here’s how to create the shortcut for Anaconda PowerShell 7 Preview.

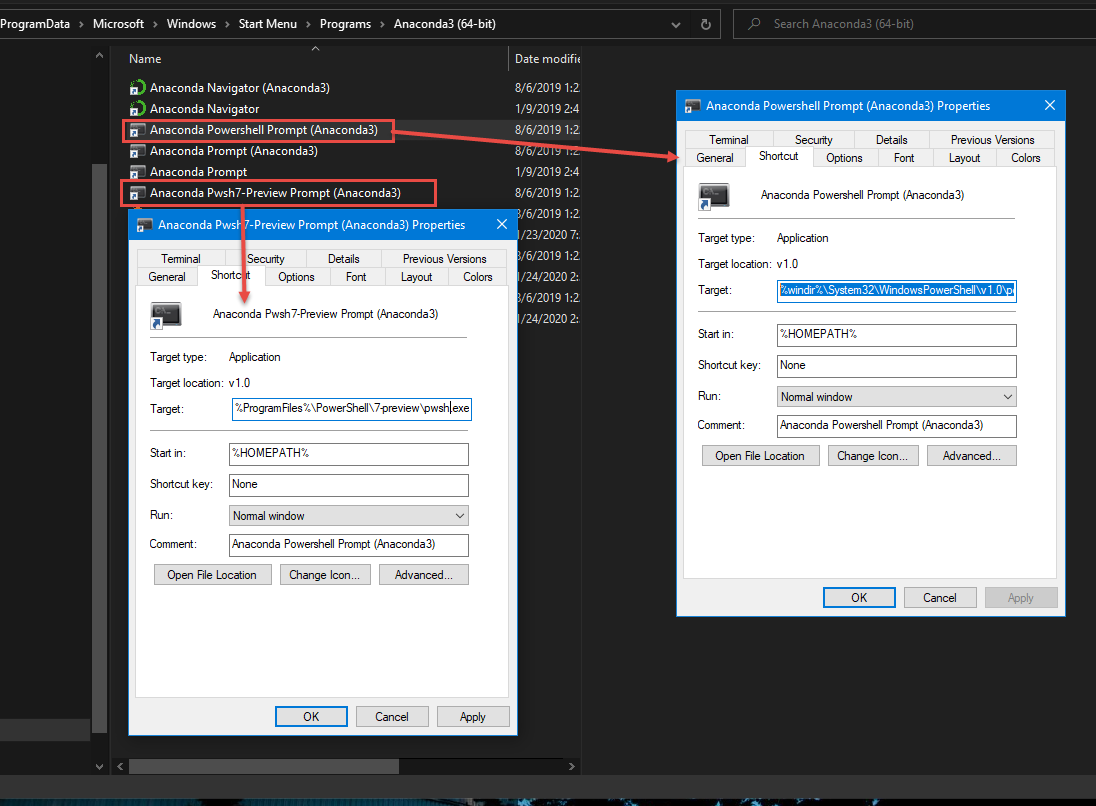
First, I will make another copy of the original shortcut and label it “Anaconda Pwsh7-Preview Prompt (Anaconda3)“.

Here’s the original path use the Windows PowerShell shortcut:

%windir%\System32\WindowsPowerShell\v1.0\powershell.exe -ExecutionPolicy ByPass -NoExit -Command "& 'C:\ProgramData\Anaconda3\shell\condabin\conda-hook.ps1' ; conda activate 'C:\ProgramData\Anaconda3' "

And, here’s my shortcut modification to use PowerShell 7 Preview:

%ProgramFiles%\PowerShell\7-preview\pwsh.exe -ExecutionPolicy ByPass -NoExit -Command "& 'C:\ProgramData\Anaconda3\shell\condabin\conda-hook.ps1' ; conda activate 'C:\ProgramData\Anaconda3' "

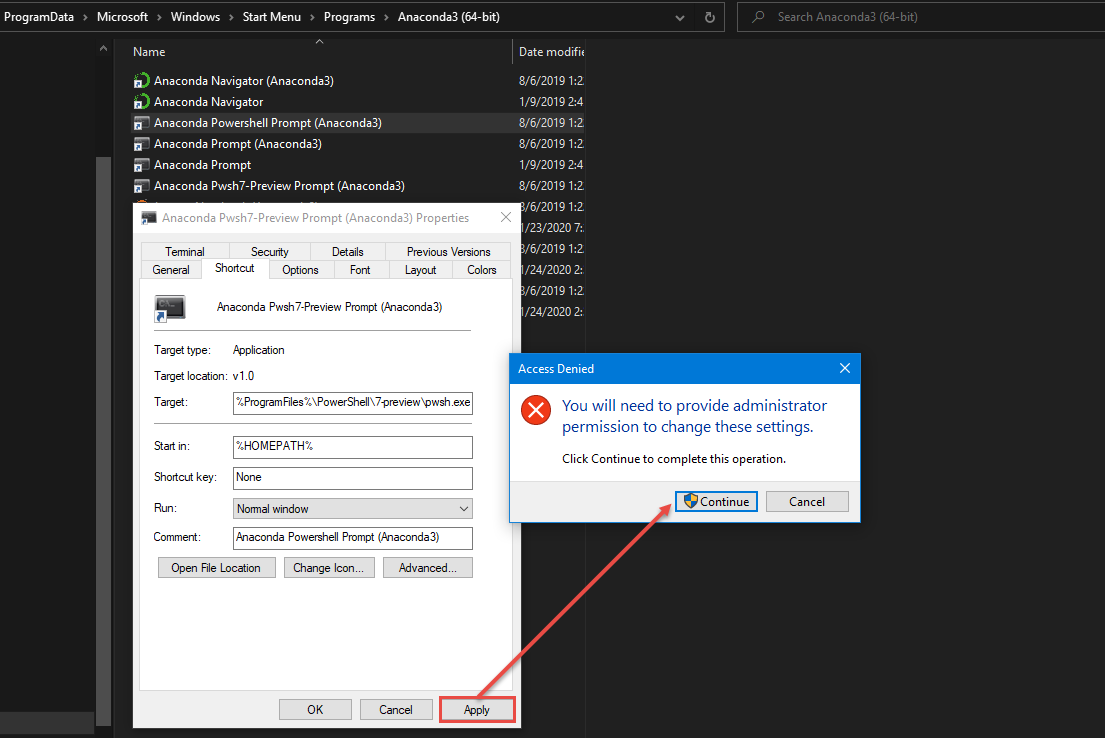
Keep in mind, you will need administrator privileges to create this shortcut in the ProgramData Anaconda menu.

After making all the necessary changes to the new shortcut, we got both Window PowerShell and PowerShell 7 Preview working with Anaconda.

Now go ahead and expand your scripting knowledge!

PowerShell Core – Updating your SQL Server Linux Docker Containers Images

In this post I’ll be covering how to install some needed components, how to commit the changes, and create a revised images for deployment.

In recent event and meetings, I’ve been talking about how to work SQL Server Linux Containers Docker images. As these images get your container up-and-running quickly they lacks some tools that may be useful to complete the SQL Server configuration.

What’s missing?

The SQL Server images contains a small footprint of Linux Ubuntu 16.04 Operating System (OS) and is meant for quick deployment. The OS side the container need to be kept updated regularly.

At the same time, when you starts exploring inside the container, there still missing components you may want to use:

  • vim – for editing text files.
  • ifconfig – to check your network interfaces.
  • ping – to check IP-Address can be reachable across the network.
  • curl – for transfering data.

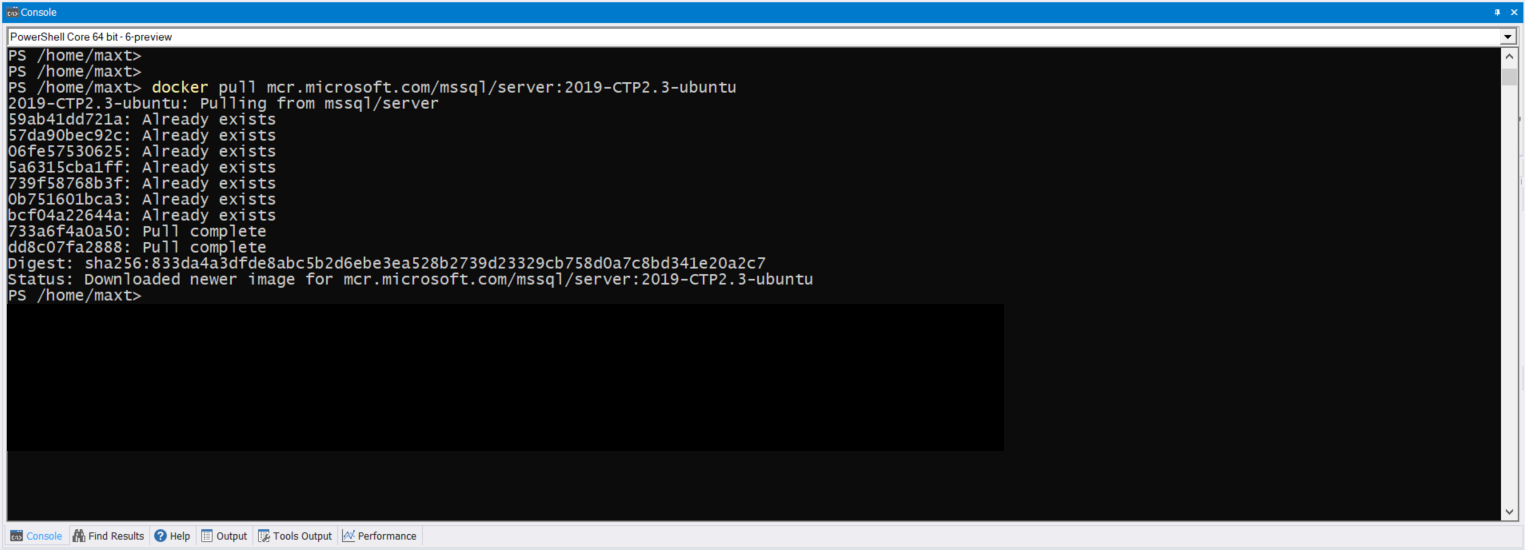
So, after you pull the docker image, create the container using “docker run …“, and then get to the container Bash session by using “docker exec -it …“. Remember the bash session only get you to the “root” level as there’s no users set on these containers.

## - First time setup: (for "server:2019-CTP2.2-ubuntu" and )
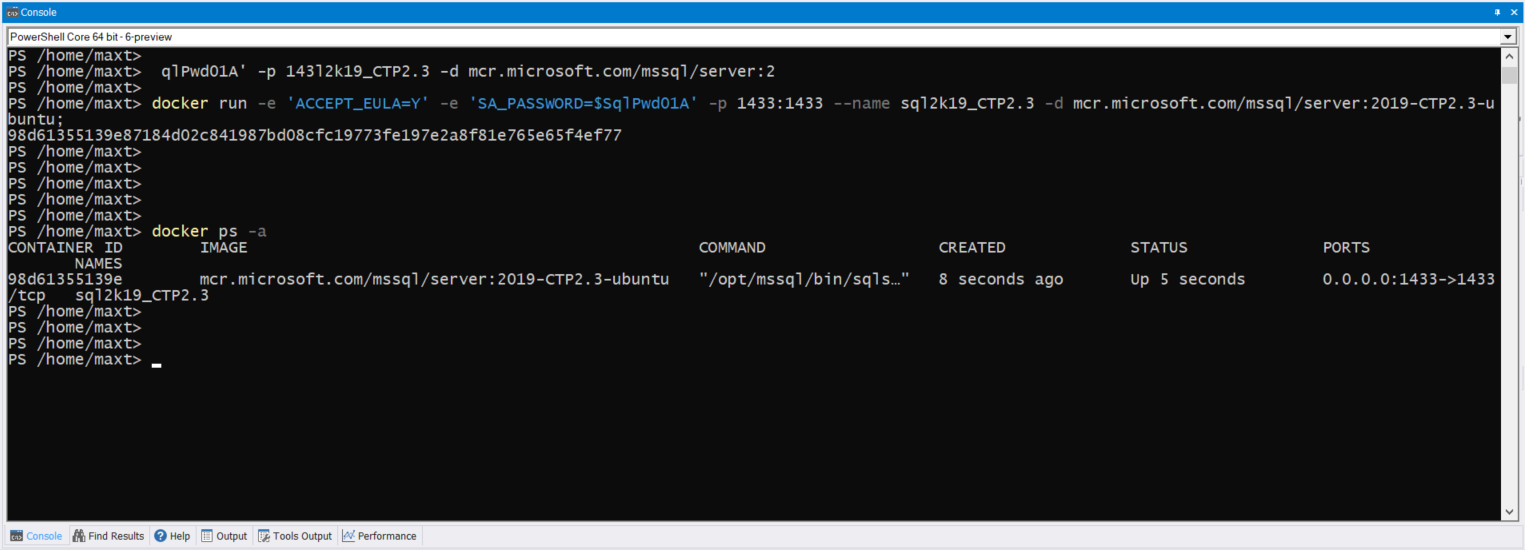
docker run -e 'ACCEPT_EULA=Y' -e 'SA_PASSWORD=$SqlPwd01A' -e "MSSQL_PID=Developer" -p 1433:1433 --name sql2k19_CTP2.3 -d mcr.microsoft.com/mssql/server:2019-CTP2.3-ubuntu;

## - Display all active containers;
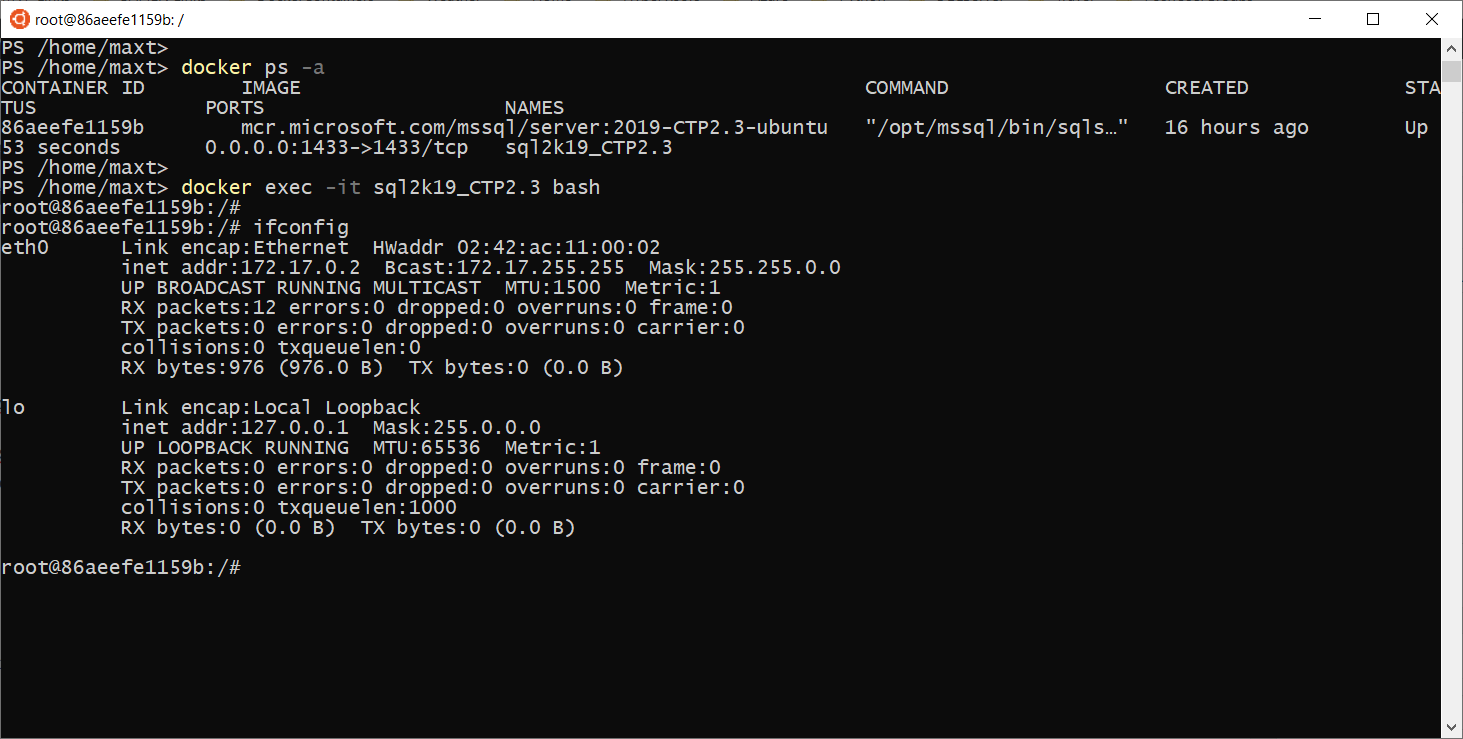
docker ps -a

At this point make sure the active container status should be in “Up” status. Now can proceed to update the container.

Installing Missing Components

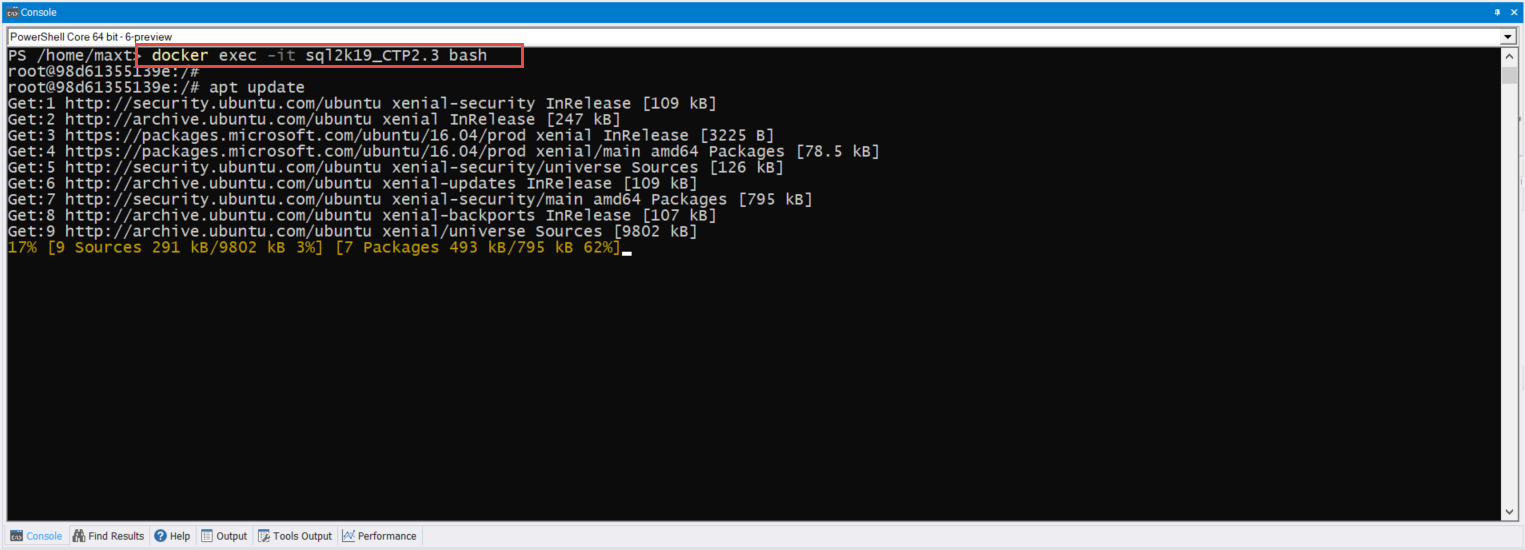
To have access to the container we use the “docker exec …” command.  This command will allow to get access to the container “root” prompt.

## - Configuring your container:
docker exec -it sql2k19_CTP2.3 bash

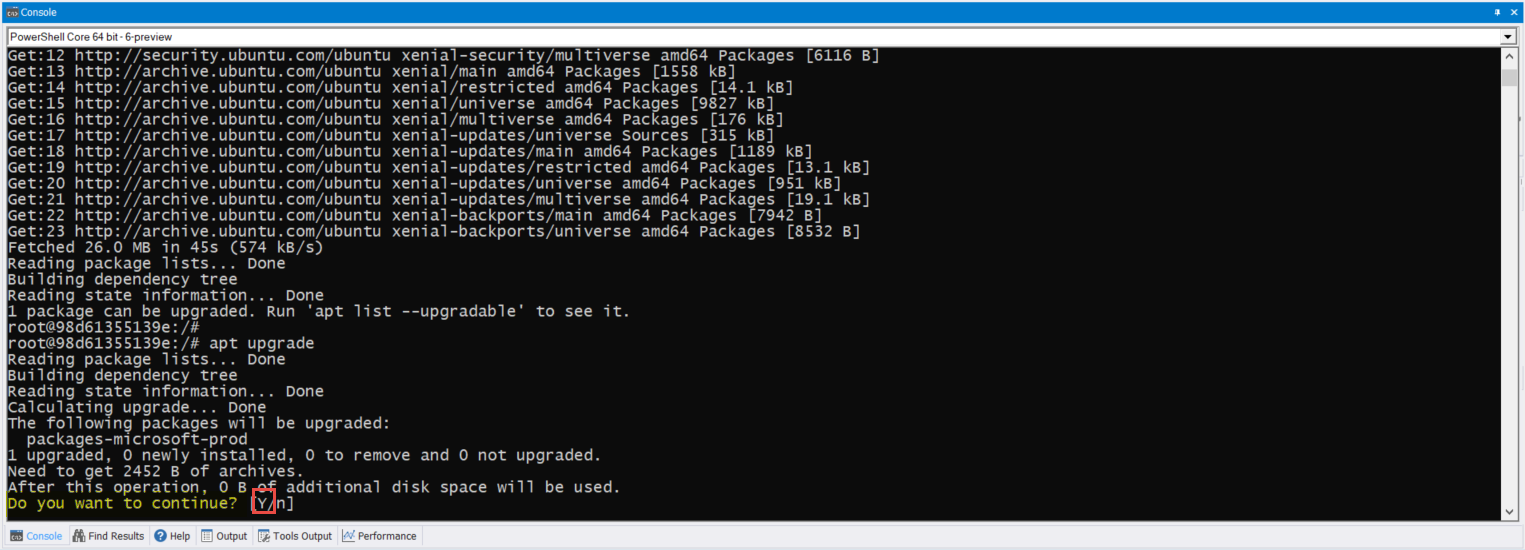
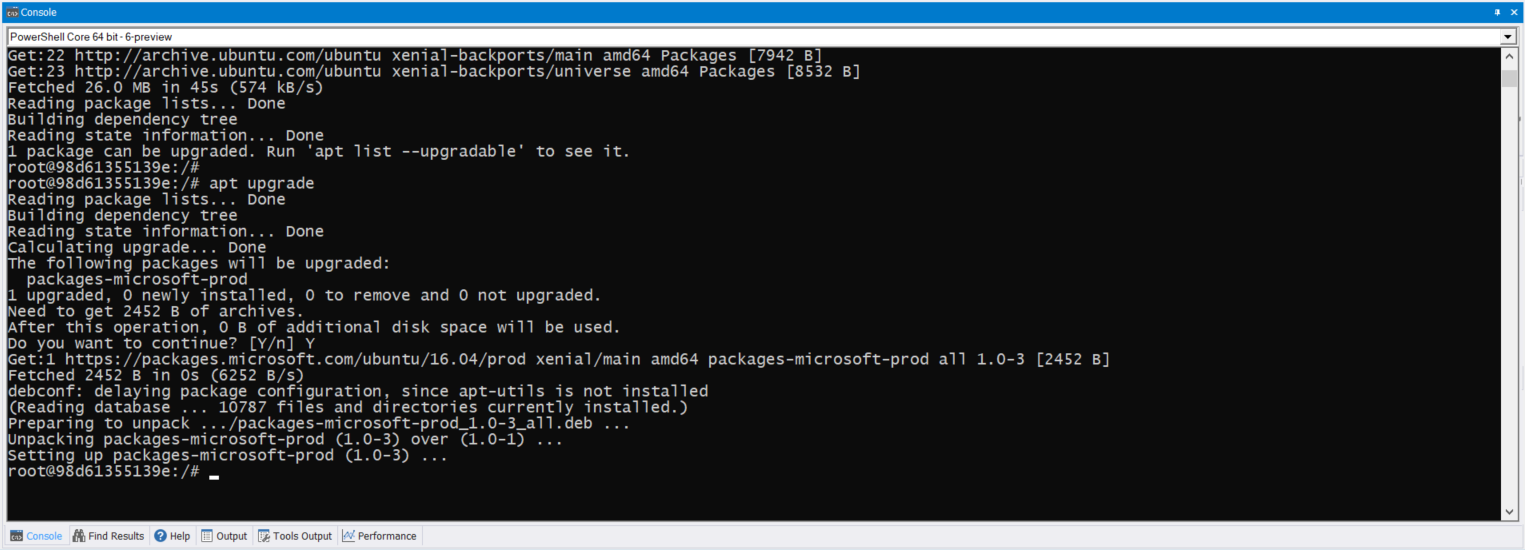
The first thing I would suggest to do, execute the following to commands:

## - Updating OS:
apt update

apt upgrade

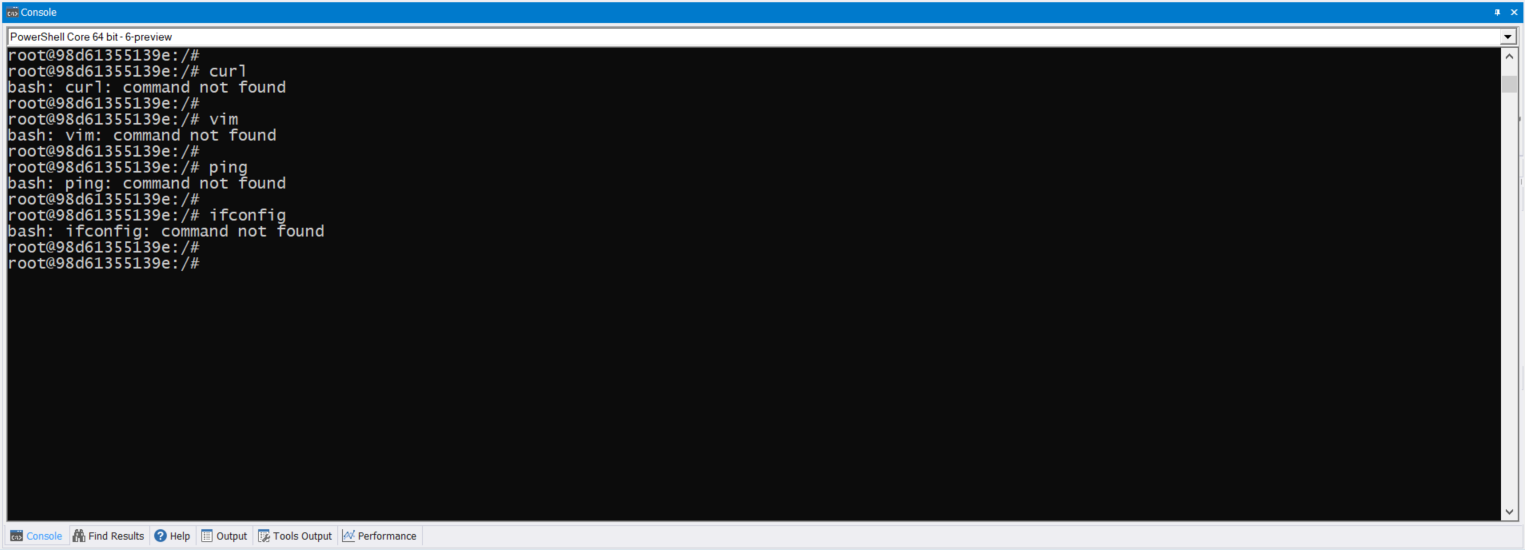
Notice if you try to execute: vim, ping, ifconfig, and curl are not installed in the container images.

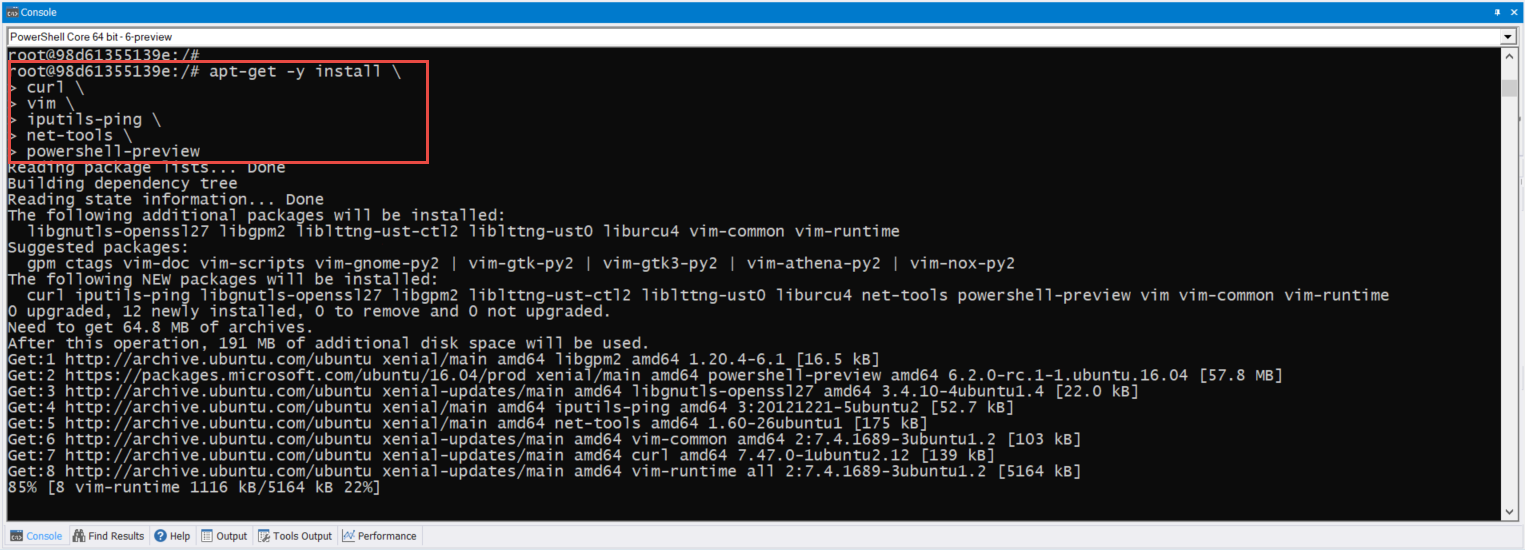
Let’s proceed to install these component by executing the following command:

## - Installing additional components:
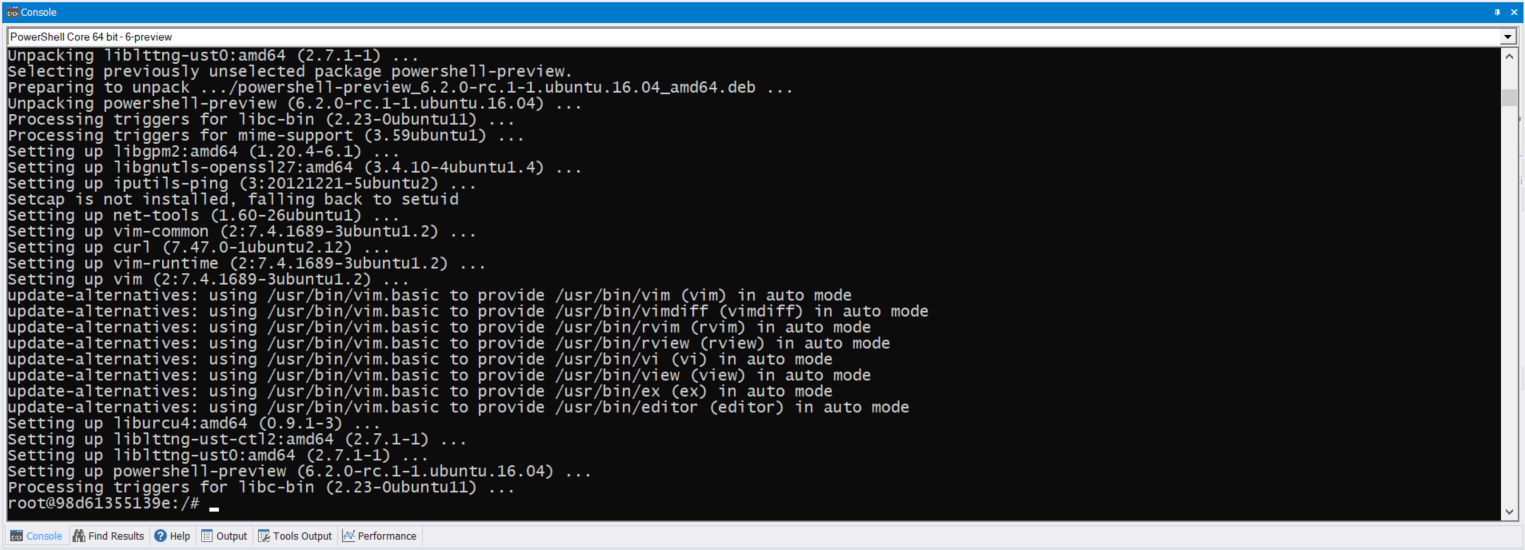
apt-get -y install \
curl \
vim \
iputils-ping \
net-tools \
powershell-preview

Also, it’s a good idea to create a Downloads folder in case to install other application(s).

## - Create Downloads folder in root:
mkdir Downloads
chmod 755 Downloads

Notice that PowerShell Core Preview was included with the other missing components.  PowerShell has become a great tool to have in a Linux environment.

PowerShell Core SQLServer Module

Although, this is optional but it doesn’t prevent you to include PowerShell Core Preview 6.2.0-RC1 with the SqlServer module which included the “Invoke-Sqlcmd” use by many administrator.  This is a great module to have in a SQL Server container image.

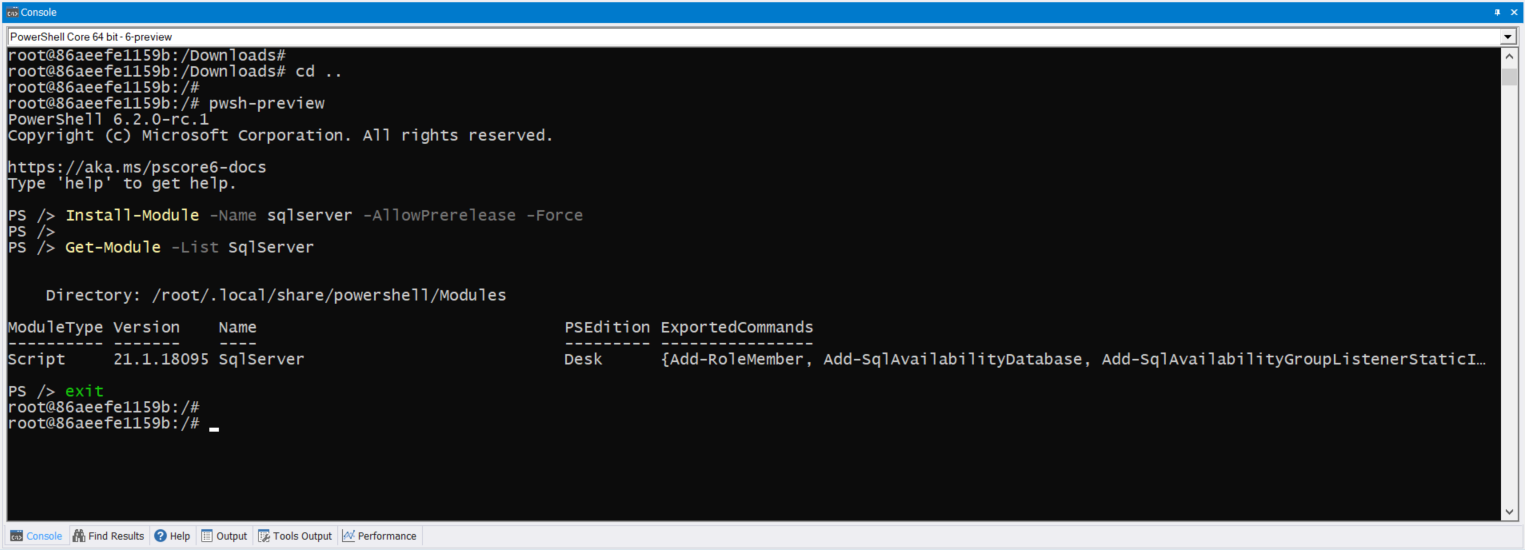
So, from the “root” prompt in the container open PowerShell Core Preview, then proceed to install the SqlServer module preview version 21.1.18095.

## - Open PowerShell Core:
pwsh-preview

## - Install SqlServer module preview:
Install-Module SQLServer -AllowPreRelease

This completes the essential for using PowerShell to help managing a SQL Server instance(s).

How About Anaconda?

We could install the latest version of Anaconda with Python 3.7 in our SQL Server container image.

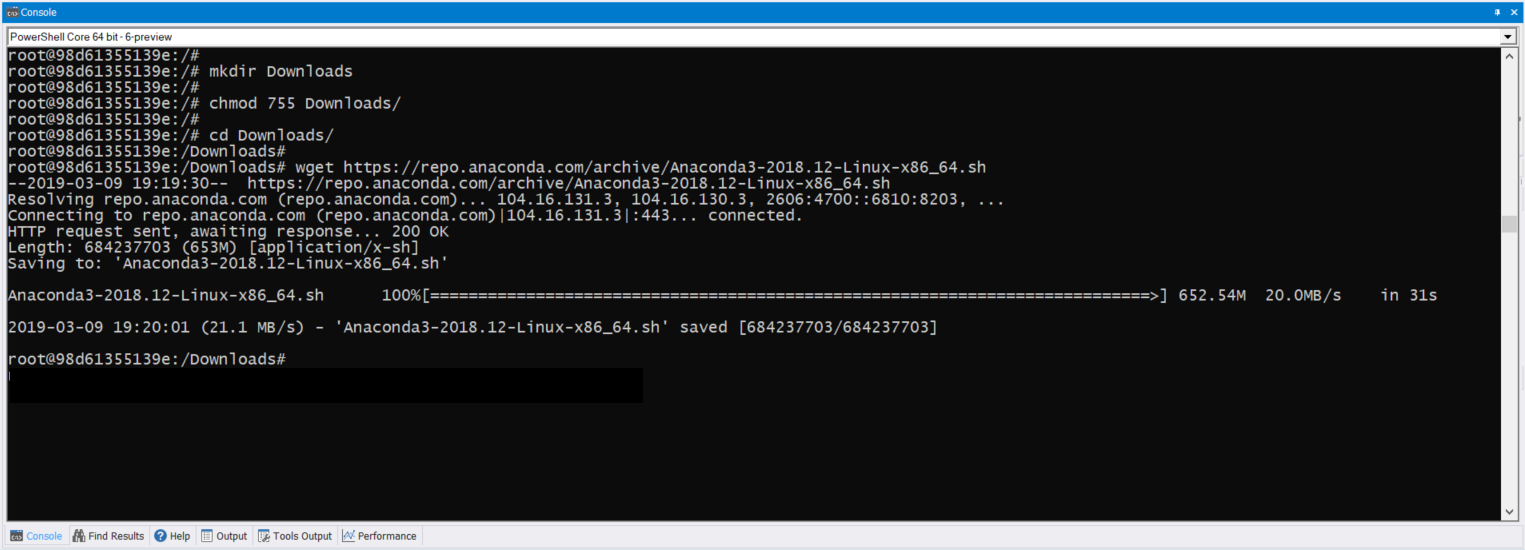
## - Change directory to Downloads folder:
cd Downloads

## - Download Anaconda with Python 3.7:
wget https://repo.anaconda.com/archive/Anaconda3-2018.12-Linux-x86_64.sh

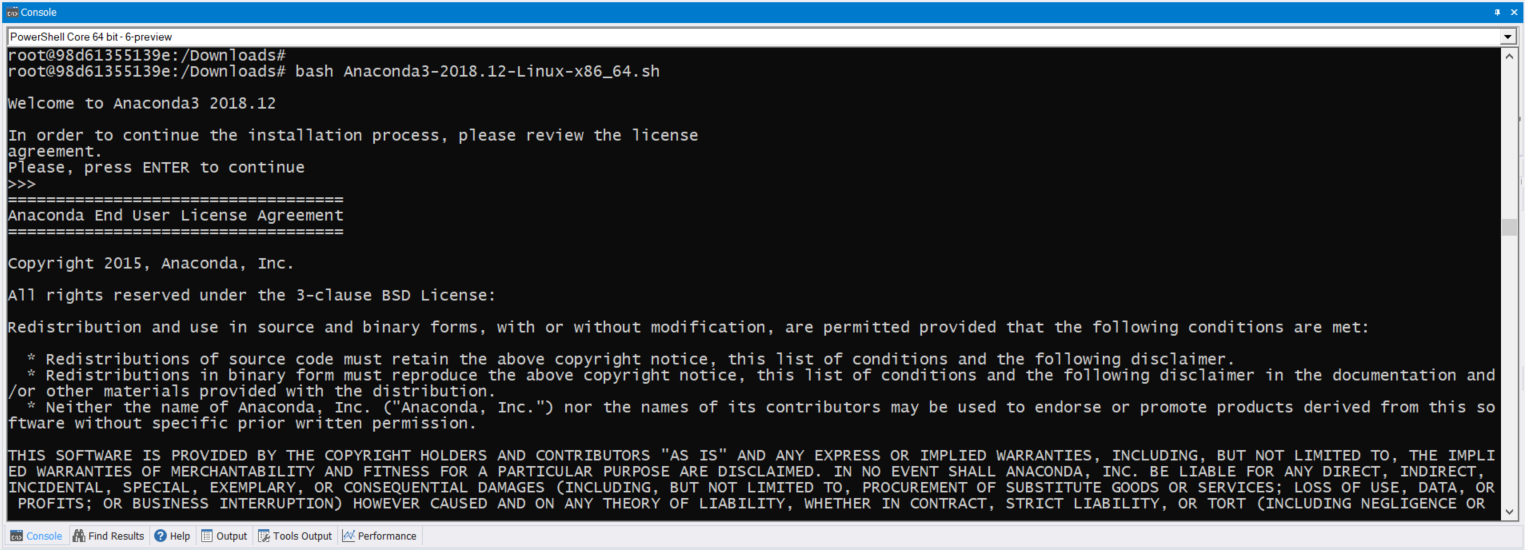
## - Install Anaconda with Python 3.7:
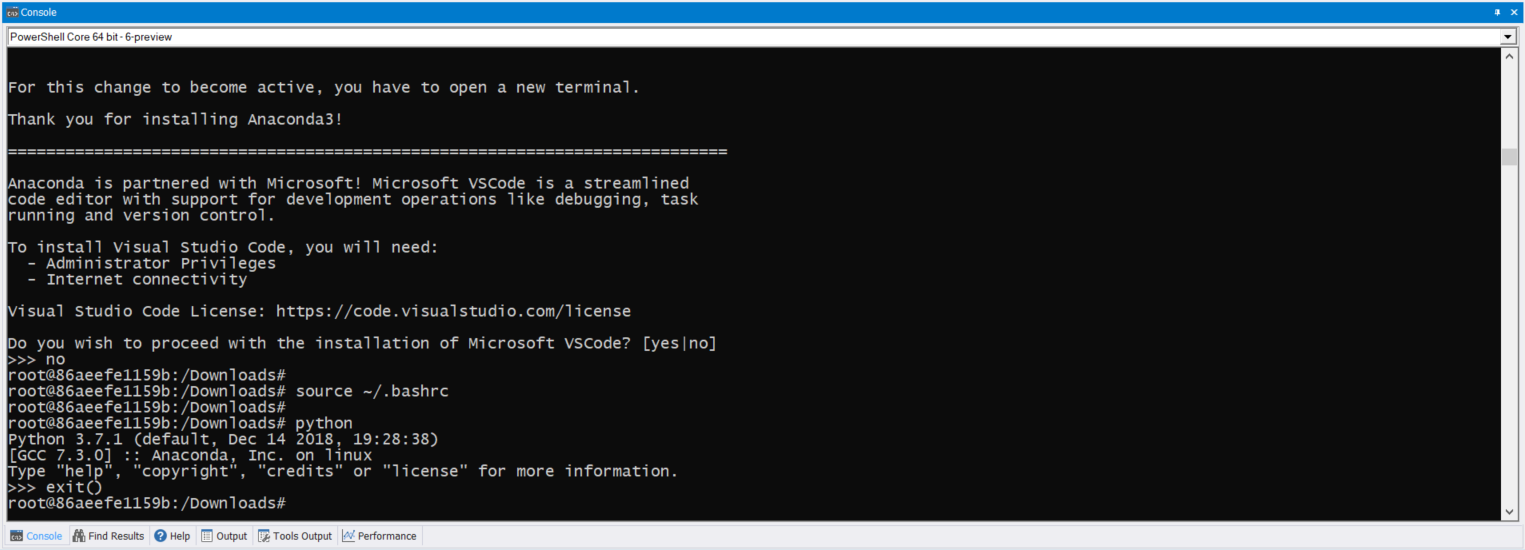
bash Anaconda3-2018.12-Linux-x86_64.sh

This will give us the ability to test Python scripts within the container.

Testing installed Components

We need to verify that all previously installed components are working. Go back to the container “root” prompt, and to execute the commands:

ifconfig
ping 127.0.0.1
vim ~/.bashrc
pwsh
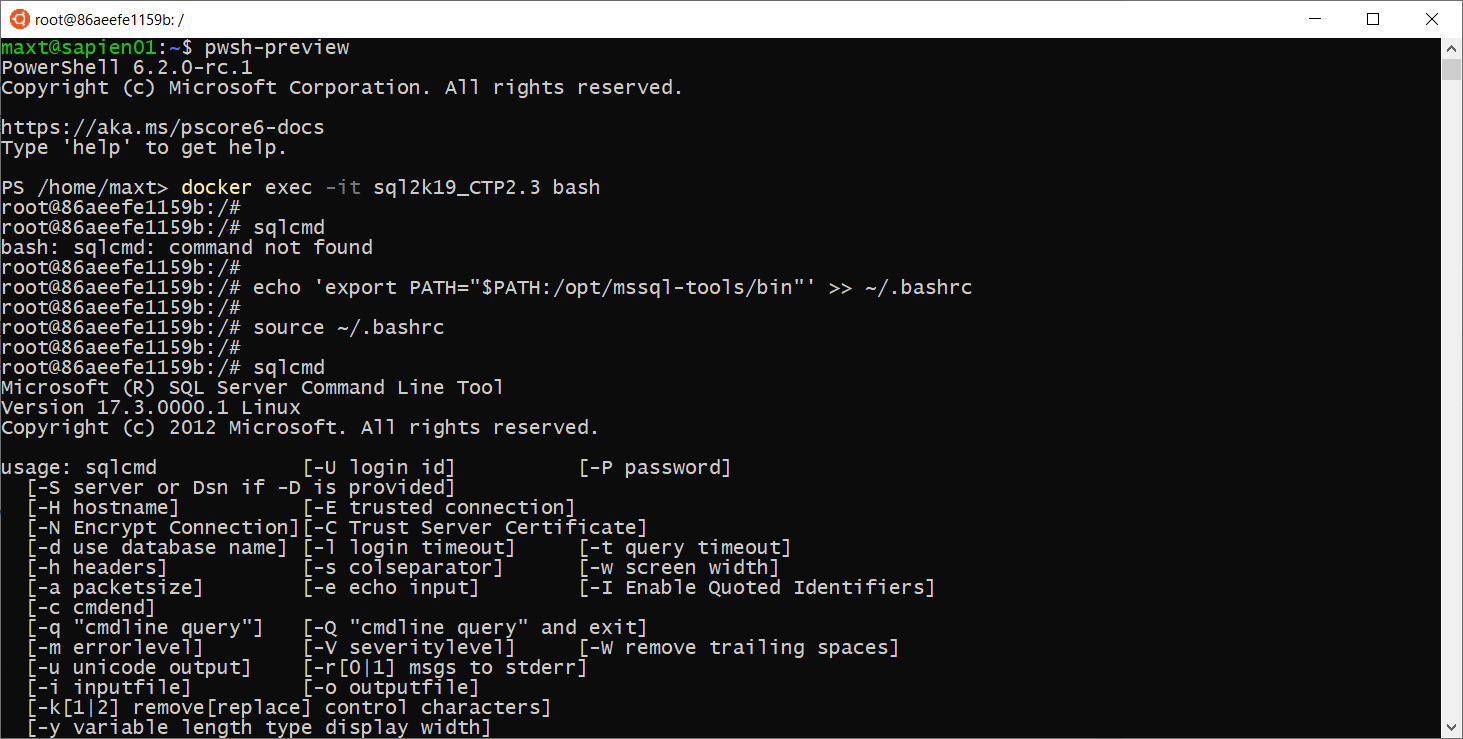
sqlcmd

Now, executing “sqlcmd” command line will not work unless you add the path to the executable to the “root” ~/.bashrc file:

## - Need to include the path to SQLCMD command:
echo 'export PATH="$PATH:/opt/mssql-tools/bin"' >> ~/.bashrc

## - Refresh ~/.bashrc:
source ~/.bashrc

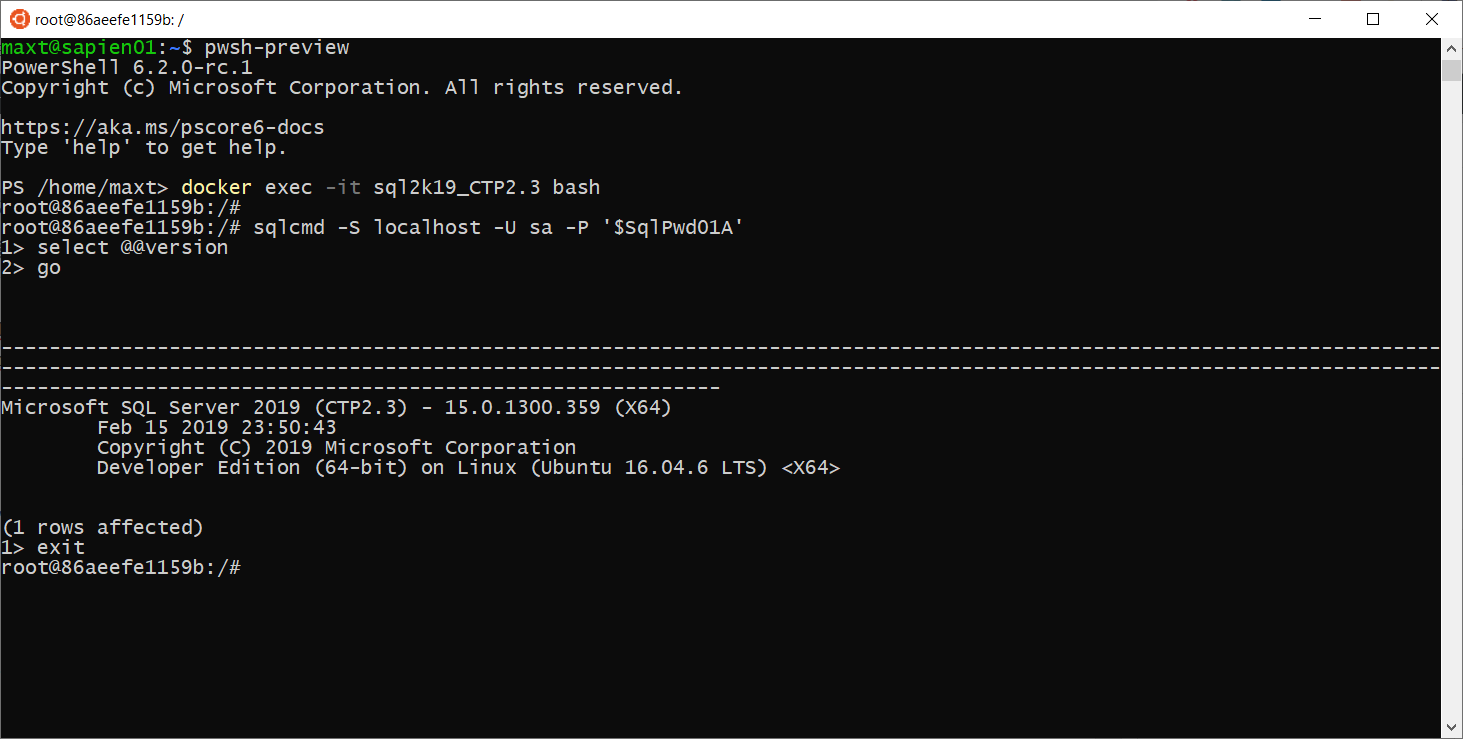
## - Run Sqlcmd command:
sqlcmd -L localhost -U sa -P 'sapwd'
> select @@version
> go
> exit

This is a good indication that our *SQL Server container is active. And, now we got all missing components installed.

Now, we need to make sure we don’t lose out changes.

Creating your own SQL Server Docker image

This is an important step so you won’t lose the changes already made to the container.  Below are the brief step to follow:

## - Commit the container changes: (repository name must be lowercase but Tags are OK with uppercase)
## -> docker commit "<Get-Container_ID>" "<Image-name>":"<TAG name>"

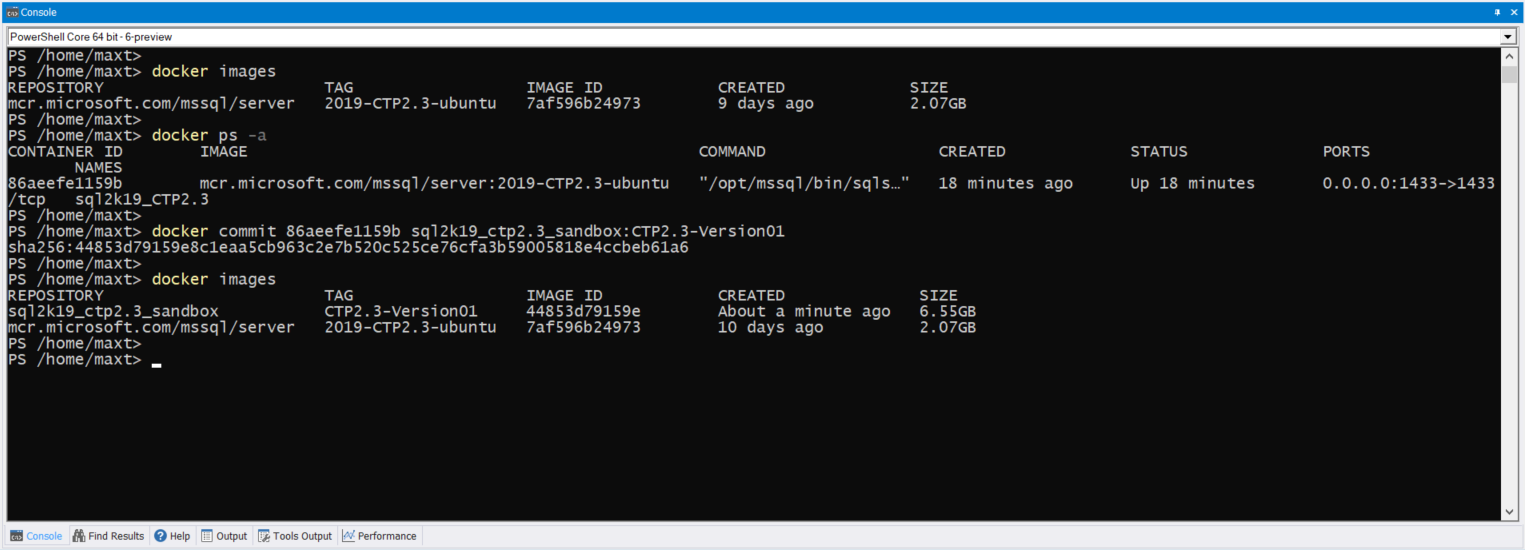
docker commit "<Get-Container_ID>" sql2k19_ctp2.3_sandbox:CTP2.3-Version01

## - List images included the committed ones:
docker images

## - Stop Image before the Save step:
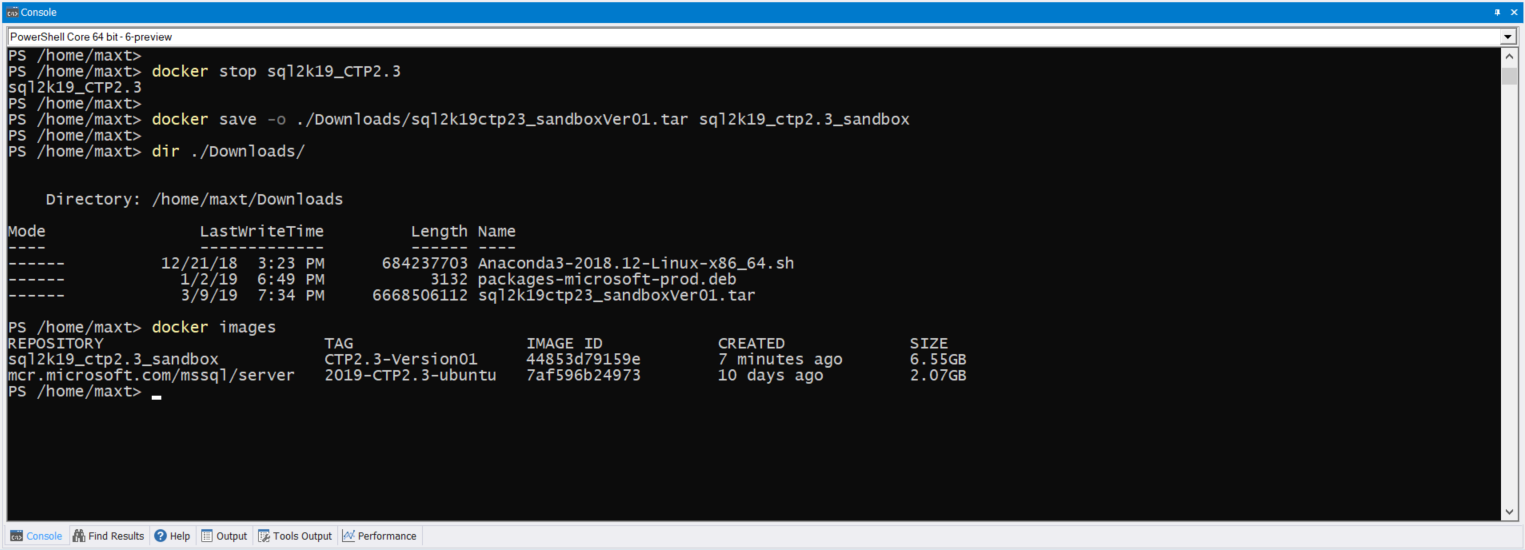
docker stop sql2k19_CTP2.3
docker ps -a

## - Save docker updated image:
docker save -o ./Downloads/sql2k19ctp23_sandboxVer01.tar sql2k19_ctp2.3_sandbox

The “docker commit …” command, you’ll provide both the image-name (all lowercase) and a TAG name (uppercase allowed). You can be creative in having an naming conversion for you images repositories.

It’s very important to save images after doing the commit. I found out that having an active container would be useless without an image.  As far as I know, I haven’t found a way to rebuild an image from an existing container if the image was previously removed.

Summary

Hope this brief run down on working with SQL Server Docker container images will get you started with modifying existing images for quick deployment.

One thing to keep in mind!

  • The SQL Server Container memory need to be 4GB minimum.
  • In Windows, if your’re using non-Hyper-V virtualization tools such as Virtualbox, the virtual machine memory need to be change to 4GB.
  • Also, when you are creating images, the virtual machine disk size default is 20GB. This may need to be increase unless you keep cleaning/removing images to make room.

Just layout what you need, commit, save and deploy your docker solution in your environment.

Keep learning about this amazing technology!
 

Getting the latest Tools for PowerShell SQL Server Automation

You all know how important is to have the tool that can make our life easy do our system administration, and become a hero in our organization. Here’s a startup helper guide to get you going with some PowerShell and SQL Server tools.

What is available for automation!
For script automation we could install either or both version of PowerShell Core: (As of February 19th, 2019)

Here are some important PowerShell Modules to use for SQL Server management scripting:

  • *SQLServer – This module currently can be use on SQL Server 2017 and greater.
  • *DBATools – This a community supported module that will work with SQL Server 2000 and greater.
  • DBAReports – Supports for Windows SQL Server.
  • DBCheck – Support for Windows SQL Server.

*Note: This module is coming popular in cross-platform systems (non-Windows)

All of the above module can be downloaded from the PowerShell Gallery from the PowerShell console using the Install-Module cmdlet.

Install-Module -Name SQLServer -Force -AllowClobber;

Now, when working with older versions of SQL Server (2008->2017), you will find the SQLPS module is loaded during the SQL Server installation.

Just remember, since SQL Server 2017, Microsoft has change the PowerShell SQLPS module to SQLServer module downloadable from the PowerShell Gallery. This module is not available in PowerShell Gallery, only available during the SQL Server installation.

When PowerShell SQL Server Module can’t provide a script?

It won’t hurt to install the SQL Server Management Objects (SMO) library in case you want to be creative and start building your own SQL PowerShell scripts. This library is already available cross-platform, meaning that it will work in Windows, Linux and MacOS environments.

In this case, you can install the SQL Server SMO library “Microsoft.SqlServer.SqlManagementObjects” from the PowerShell Console using the Install-Package cmdlet.

Install-Package -Name Microsoft.SqlServer.SqlManagementObjects -AllowPrereleaseVersions;

Wait! There is more

As you already know, to manage SQL Server in Windows environment, we use the SQL Server Management Studio. But, this
application won’t work cross-platform.

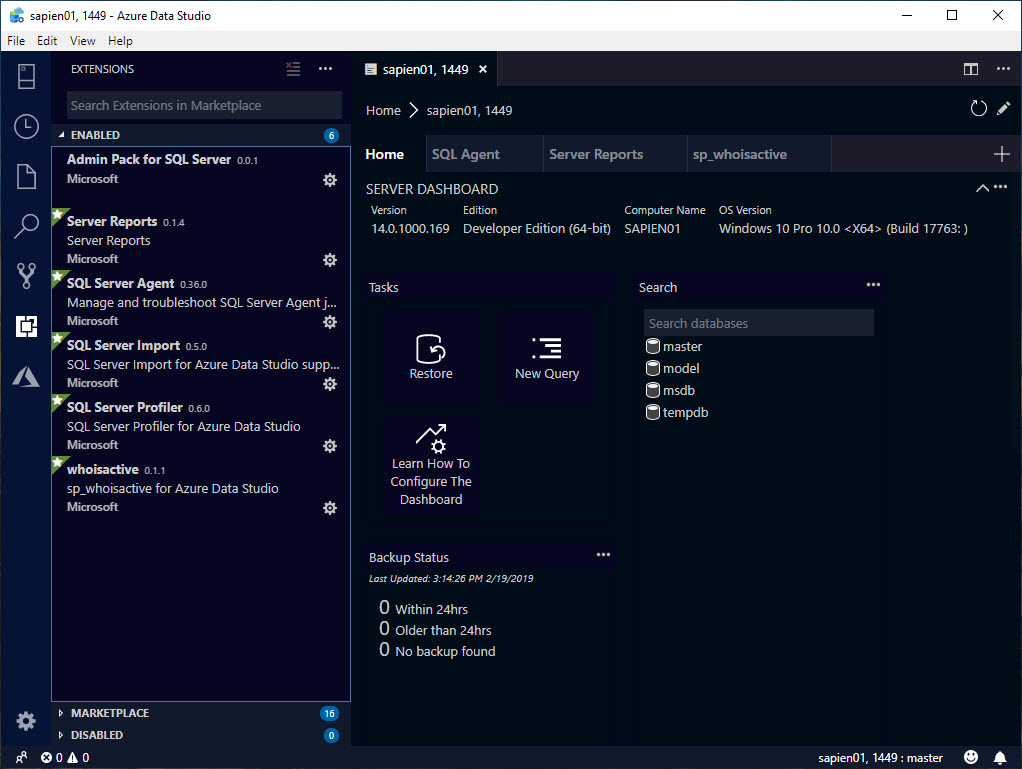
So, the cross-platform option available is Azure Data Studio (February edition):

Don’t forget to include for following extensions:

What about Python?

By now you should already know that Python has been around for many year as cross-platform interpreted object-oriented high-level language. And, its popularity keeps increasing.

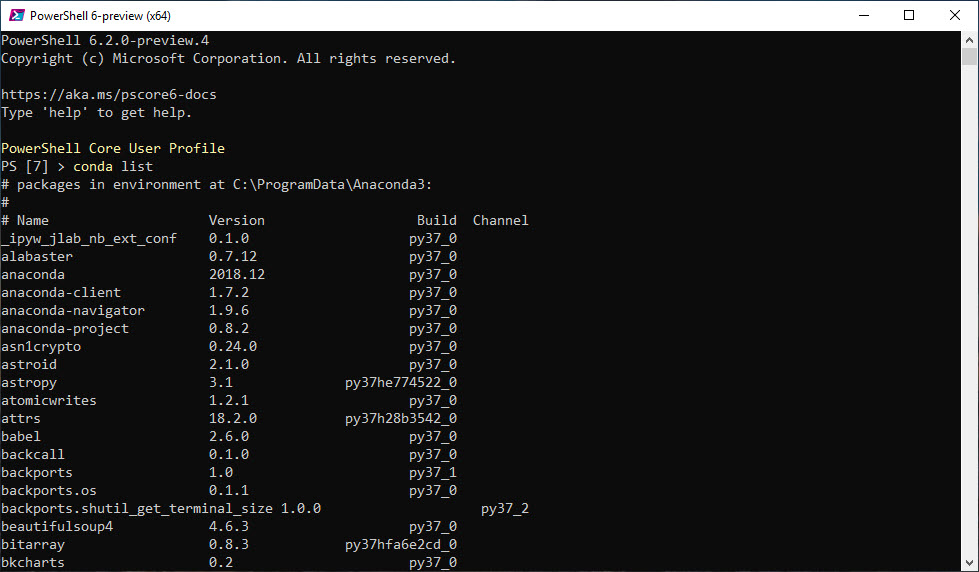
I would recommend to take a look at the Anaconda Distribution, and specifically the one with the latest version of Python (v3.7).

Download Anaconda for data science platform:

This installation will include *All* Python packages available to build an application.

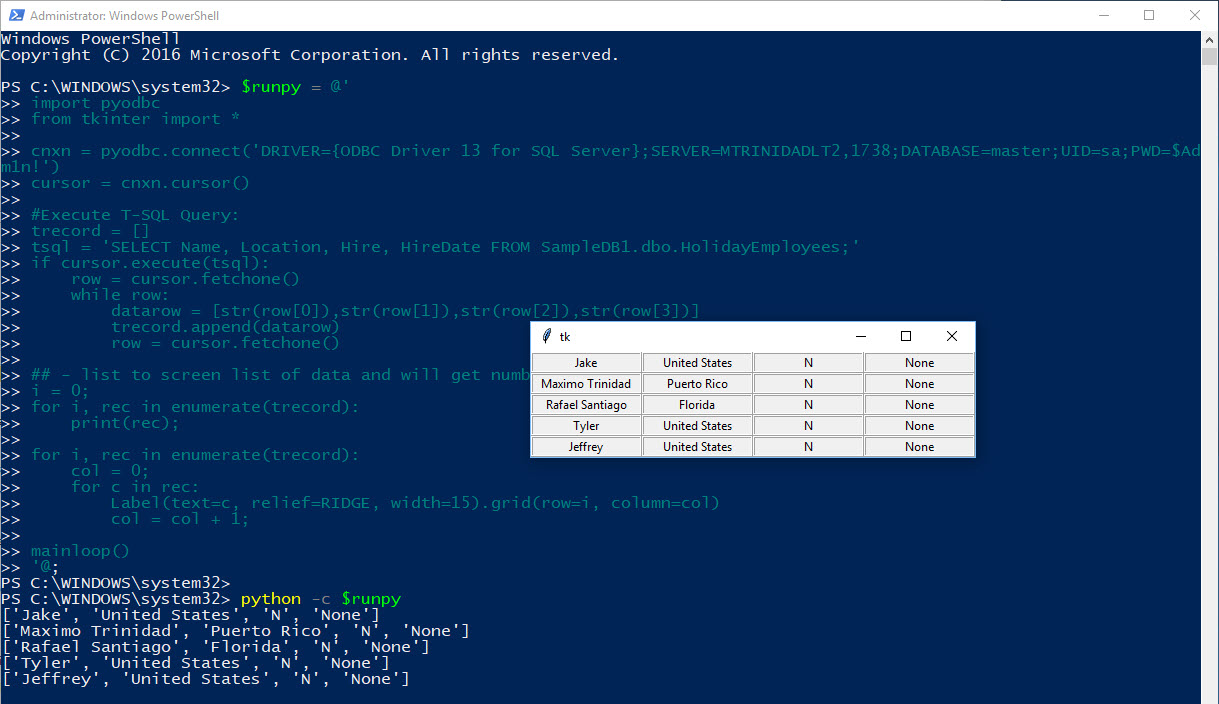
And, Python can interact with PowerShell too!

Ah finally Containers!

Yes! Containers has become popular and can’t be ignored. It can be use in both Windows, Linux and any cloud environments. Go ahead to learn how to work and manage Docker containers.

Docker site to Download the Docker CE.

Don’t forget to check Docker Hub to find the latest Docker Container images available for download. And, you will need to create an account before downloading images.  The image below shows how-to search for the SQL Server image.

In Summary

As technology will keep improving, make sure stay up-to-date. This give us the opportunity to improve our job position and be of value for the organization that hire us.

Don’t forget to look for the nearest technology event in your areas, as this is the opportunity to learn for free and gain invaluable knowledge.

Listing SQL Server 2017 Installed Anaconda Packages Using PowerShell

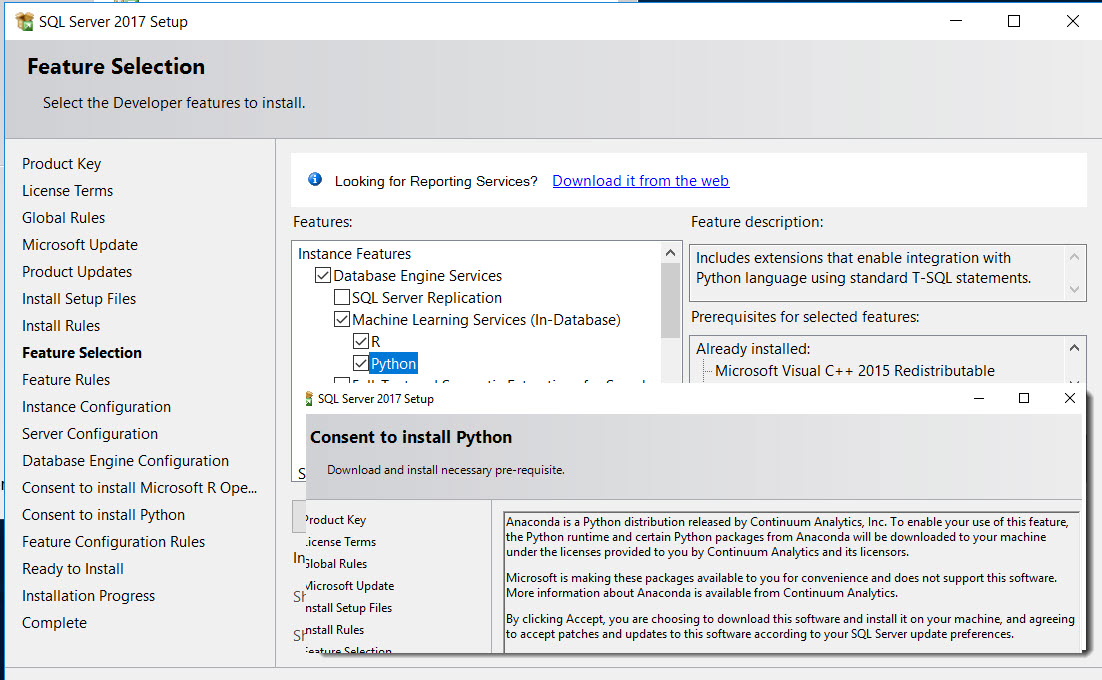
SQL Server 2017 comes with the option to include Python (Anaconda) during SQL Server installation. It will install Anaconda with a small set of python packages for the purpose of creating Data Science solution that sre executed within T-SQL statement(s). Unfortunately, there’s no documentation of what Anaconda packages are installed with SQL Server.

Much Easier with Full Installation

Doing the full Anaconda installation, gives the necessary commands to query what has been installed in your system. This makes it much easier to list all existing installed packages.

In the full installation of Anaconda, done separate from SQL Server, you can use the following command to list all packages installed:

[sourcecode language=”powershell”]
conda info
[/sourcecode]

But, with SQL Server 2017 is a different story.

Where’s my SQL Server Anaconda packages?

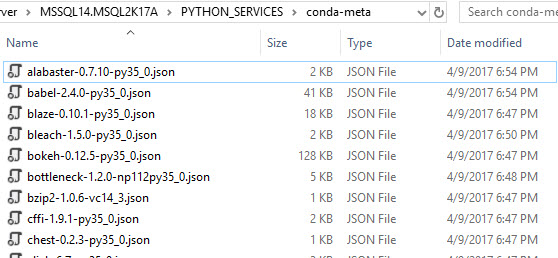
These packages are found in the default installation location: “C:\Program Files\Microsoft SQL Server\”YourSQLServerInstanceName”\PYTHON_SERVICES\conda-meta

All packages are of file type *json. Each Anaconda package will named with: the package name, package version, and python version number. But, this makes it hard to view using “File Explorer“.

So, solution to list the SQL Server Anaconda packages in a proper format will be needed.

PowerShell To The Rescue

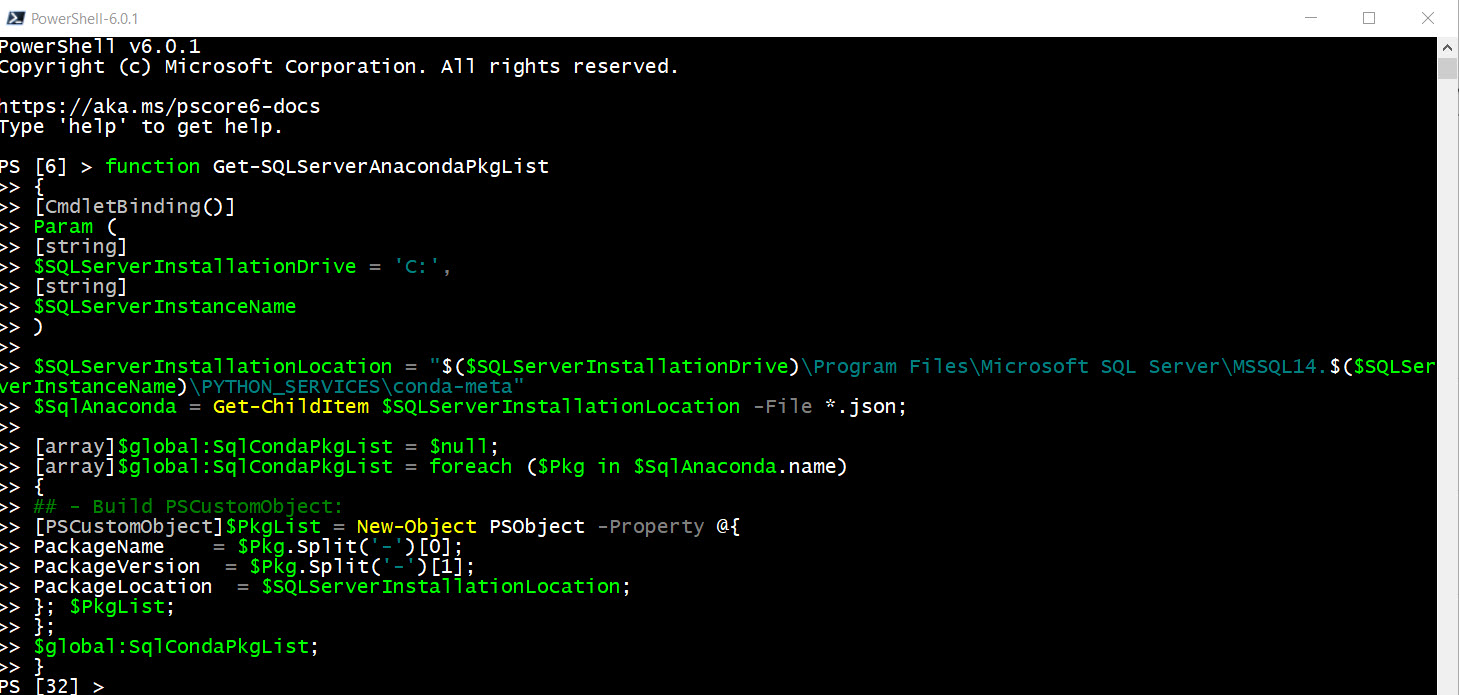
So, here’s a PowerShell function that will list all installed Anaconda packages in SQL Server 2017. This will required to enter some parameters, such as: SQL Server Installation Location, and SQL Server Instance name.

[sourcecode language=”powershell”]
function Get-SQLServerAnacondaPkgList
{
[CmdletBinding()]
Param (
[string]
$SQLServerInstallationDrive = ‘C:’,
[string]
$SQLServerInstanceName
)

$SQLServerInstallationLocation = "$($SQLServerInstallationDrive)\Program Files\Microsoft SQL Server\MSSQL14.$($SQLServerInstanceName)\PYTHON_SERVICES\conda-meta"
$SqlAnaconda = Get-ChildItem $SQLServerInstallationLocation -File *.json;

[array]$global:SqlCondaPkgList = $null;
[array]$global:SqlCondaPkgList = foreach ($Pkg in $SqlAnaconda.name)
{
## – Build PSCustomObject:
[PSCustomObject]$PkgList = New-Object PSObject -Property @{
PackageName = $Pkg.Split(‘-‘)[0];
PackageVersion = $Pkg.Split(‘-‘)[1];
PackageLocation = $SQLServerInstallationLocation;
}; $PkgList;
};
$global:SqlCondaPkgList;
}

## To execute function:
$SQLServerInstallationDrive = ‘C:’
$SQLServerInstanceName = "MSQL2K17A"

Get-SQLServerAnacondaPkgList -SQLServerInstallationDrive $SQLServerInstallationDrive `
-SQLServerInstancename $SQLServerInstanceName;

## – Or, after executing the function, go back to use
## – the existing global variable:
$global:SqlCondaPkgList | Select-Object PackageName, PackageVersion

[/sourcecode]

Bottom line

Executing Anaconda within T-SQL seems only available on Windows version. But, you can still create the Python code and do some testing on Linux.

The total number of packages provided with Microsoft SQL Server 2017 is about 146. Now, in the full version of Anaconda, there is a total of about 217 python packages.

Full listing of all Anaconda Packages installed for SQL Server 2017 (See below):

[sourcecode language=”text”]
PackageName PackageVersion
———– ————–
alabaster 0.7.10
babel 2.4.0
blaze 0.10.1
bleach 1.5.0
bokeh 0.12.5
bottleneck 1.2.0
bzip2 1.0.6
cffi 1.9.1
chest 0.2.3
click 6.7
cloudpickle 0.2.2
colorama 0.3.7
conda 4.3.22
conda env
configobj 5.0.6
console_shortcut 0.1.1
cryptography 1.7.1
curl 7.52.1
cycler 0.10.0
cython 0.25.2
cytoolz 0.8.2
dask 0.14.1
datashape 0.5.4
decorator 4.0.11
dill 0.2.5
docutils 0.13.1
entrypoints 0.2.2
et_xmlfile 1.0.1
flask 0.12.1
flask cors
freetype 2.5.5
h5py 2.7.0
hdf5 1.8.15.1
heapdict 1.0.0
html5lib 0.999
icu 57.1
idna 2.2
imagesize 0.7.1
ipykernel 4.6.0
ipython_genutils 0.2.0
ipython 5.3.0
ipywidgets 6.0.0
itsdangerous 0.24
jdcal 1.3
jinja2 2.9.6
jpeg 9b
jsonschema 2.5.1
jupyter_client 5.0.1
jupyter_console 5.1.0
jupyter_core 4.3.0
jupyter_kernel_gateway 2.0.0
jupyter 1.0.0
libpng 1.6.27
libtiff 4.0.6
llvmlite 0.16.0
locket 0.2.0
lxml 3.7.3
markupsafe 0.23
matplotlib 2.0.0
menuinst 1.4.2
mistune 0.7.4
mkl 2017.0.1
mkl service
mpmath 0.19
multipledispatch 0.4.9
nbconvert 5.1.1
nbformat 4.3.0
networkx 1.11
nltk 3.2.2
notebook 5.0.0
numba 0.31.0
numexpr 2.6.2
numpy 1.12.1
numpydoc 0.6.0
odo 0.5.0
olefile 0.44
openpyxl 2.4.1
openssl 1.0.2k
pandas 0.19.2
pandas datareader
pandasql 0.7.3
pandocfilters 1.4.1
partd 0.3.7
path.py 10.1
pathlib2 2.2.1
patsy 0.4.1
pickleshare 0.7.4
pillow 4.1.0
pip 9.0.1
prompt_toolkit 1.0.14
psutil 5.2.1
py 1.4.33
pyasn1 0.2.3
pycosat 0.6.1
pycparser 2.17
pycrypto 2.6.1
pycurl 7.43.0
pygments 2.2.0
pyodbc 4.0.16
pyopenssl 16.2.0
pyparsing 2.1.4
pyqt 5.6.0
pytables 3.2.2
pytest 3.0.7
python 3.5.2
python dateutil
pytz 2017.2
pywavelets 0.5.2
pywin32 220
pyyaml 3.12
pyzmq 16.0.2
qt 5.6.2
qtconsole 4.3.0
requests 2.13.0
requests file
ruamel_yaml 0.11.14
scikit image
scikit learn
scipy 0.19.0
seaborn 0.7.1
setuptools 27.2.0
simplegeneric 0.8.1
sip 4.18
six 1.10.0
snowballstemmer 1.2.1
sphinx 1.5.4
sqlalchemy 1.1.9
sqlparse 0.1.19
statsmodels 0.8.0
sympy 1.0
testpath 0.3
tk 8.5.18
toolz 0.8.2
tornado 4.4.2
traitlets 4.3.2
unicodecsv 0.14.1
vs2015_runtime 14.0.25123
wcwidth 0.1.7
werkzeug 0.12.1
wheel 0.29.0
widgetsnbextension 2.0.0
win_unicode_console 0.5
xlrd 1.0.0
xlsxwriter 0.9.6
xlwt 1.2.0
zlib 1.2.8
[/sourcecode]

So, there’s plenty of room to learn with Python Data Science and SQL Server 2017.

Be Bold! Learn PowerShell Core!