PowerShell Get-AzureRMNetworkInterface Customize View

This is an example that can be use in both Windows PowerShell and PowerShell Core to customize the result information from the “Get-AzureRmNetworkInterface” cmdlet. Showing the importance of using the Script-block Expression in the Select-Object statement when querying PowerShell .Net Object.

Executing Get-AzureRmNetworkInterface

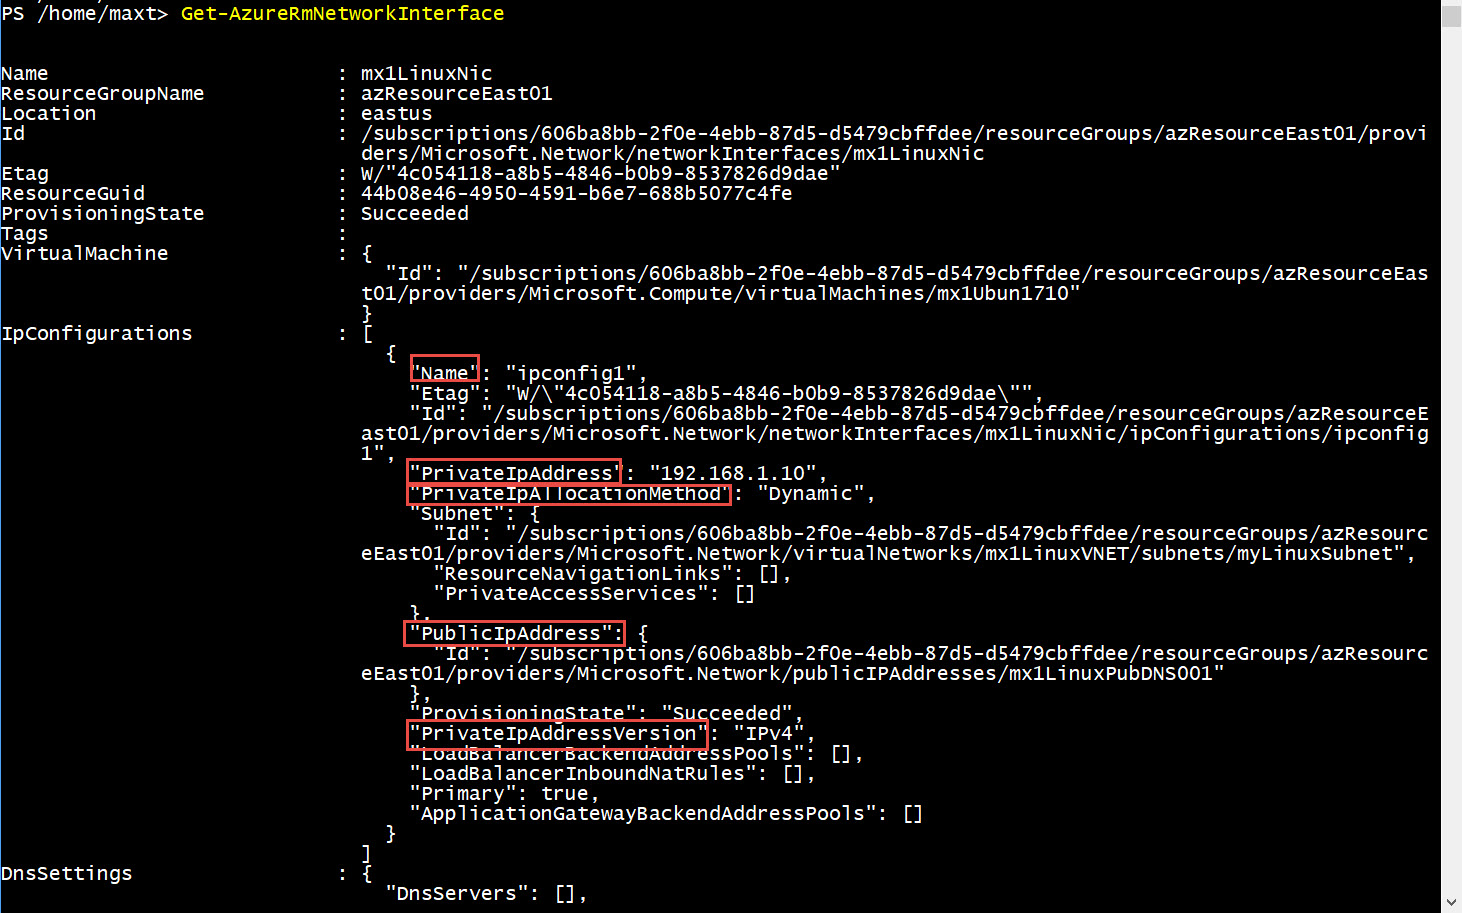
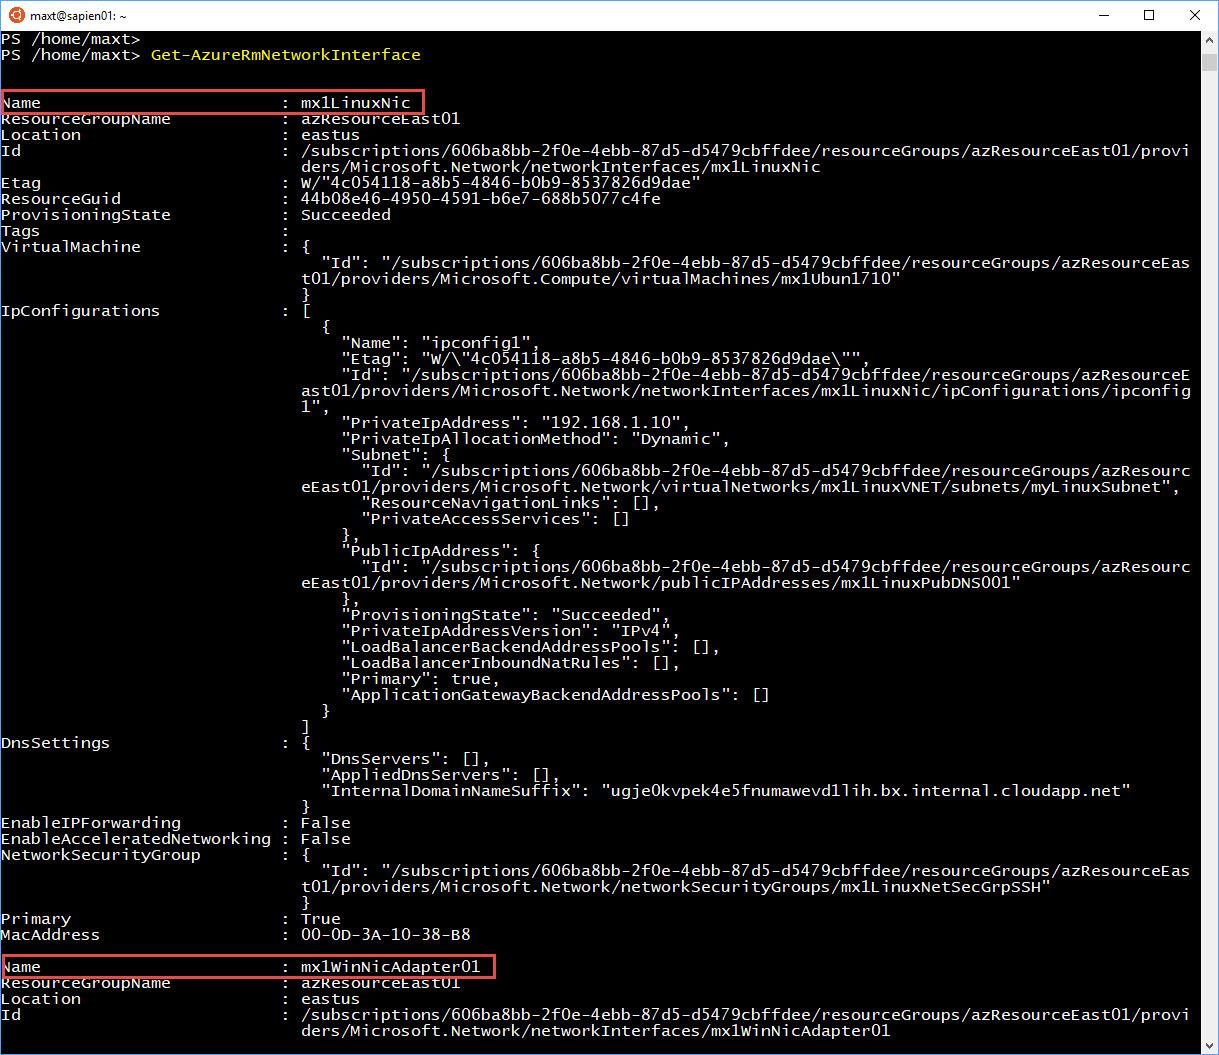
After successfully signing on the Azure from, in this case my Windows 10 Ubuntu PowerShell Core prompt, executing the “Get-AzureRmNetworkInterface” command will return lots of information:

[sourcecode language=”powershell”]
Get-AzureRmNetworkInterface

[/sourcecode]

Now, to document this information in a proper format, a custom script need to be created.

Thought Process

First identifying which properties are going to be displayed. Let’s pick the following:
1. AdapterName
2. Virtual Machine name
3. Private IPAdress
4. Private IP Allocation Method
5. MAC Address

Now, looking at the previous results of the command, lets look at the ‘VirtualMachine‘ property:

[sourcecode language=”powershell”]
(Get-AzureRmNetworkInterface).VirtualMachine.Id

[/sourcecode]

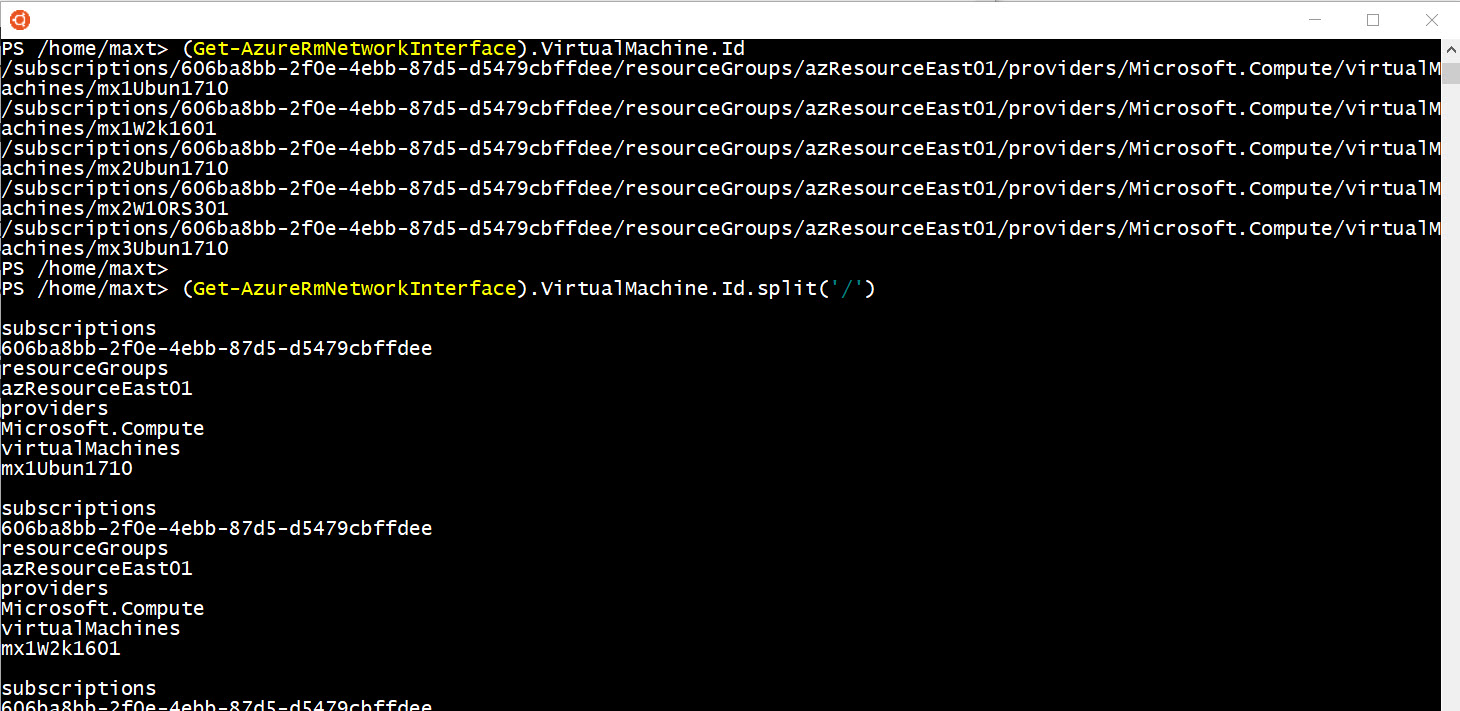
This will display all Virtual Machine network interface in your subscription. But, I’m just interested in getting the Virtual Machine name.

Notice the common separator is the forward-slash ‘/’. We can use the .NET split() method to extract the *Virtual Machine name value.

[sourcecode language=”powershell”]
(Get-AzureRmNetworkInterface).VirtualMachine.Id.split(‘/’)

[/sourcecode]

*Note: Notice the use of single-quote forward-slash

This way we can list all the separate values belonging to the “*.Id” property.
So, in order to access the Virtual Machine name, we count the listed values from 0 thru 7. We found the name is on #6, then use the number to extract the value.

[sourcecode language=”powershell”]
(Get-AzureRmNetworkInterface).VirtualMachine.Id.split(‘/’)[7]

[/sourcecode]

How About The Ip Configutation section?

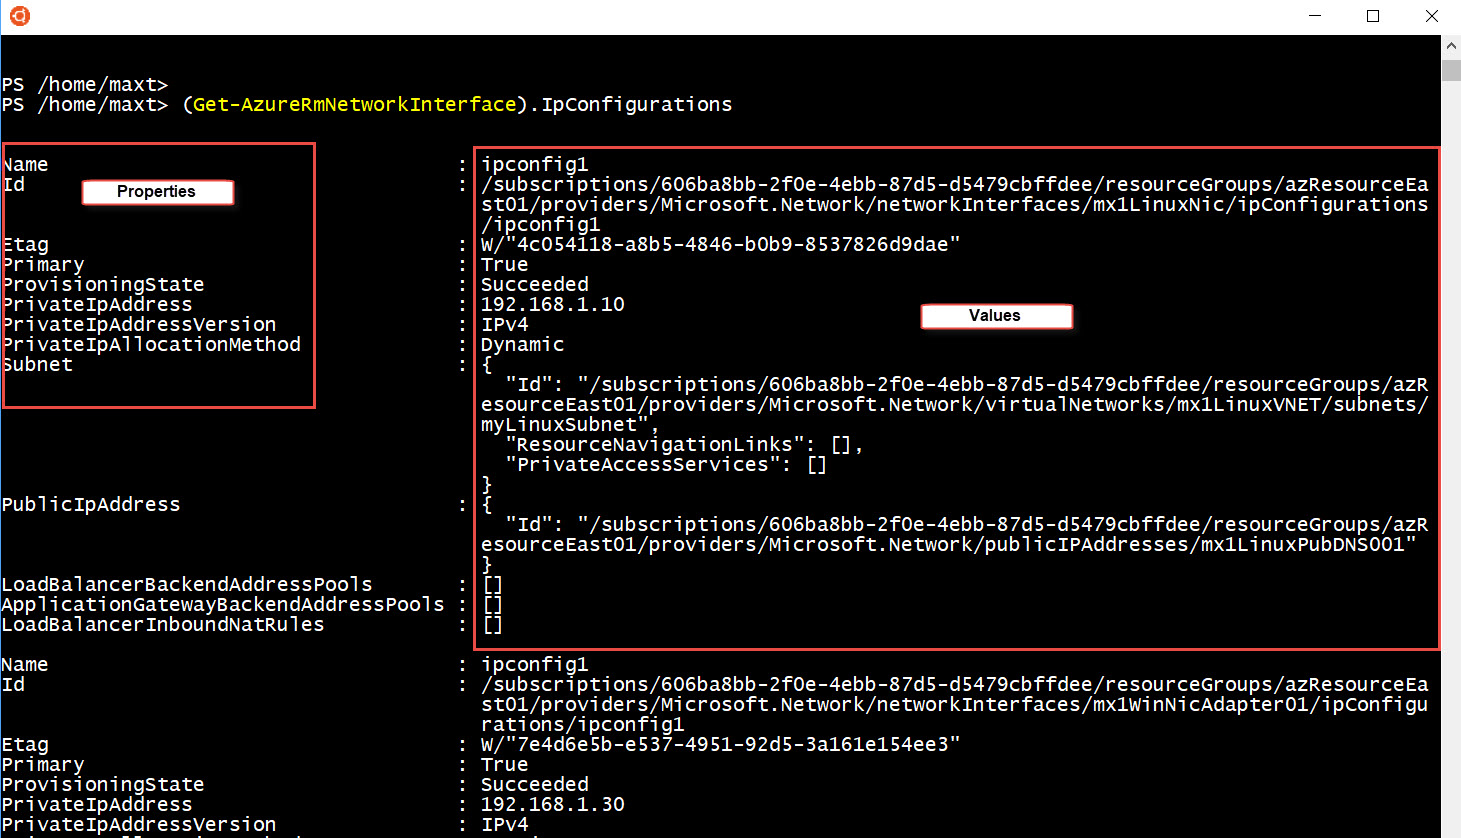
in the case of extracting information from the “IpConfiguration” property, we can execute the following line to list all available properties and its values:

[sourcecode language=”powershell”]
(Get-AzureRmNetworkInterface).IpConfigurations

[/sourcecode]

This makes it much easier to extract information by just pick and chose properties.

Custom script code

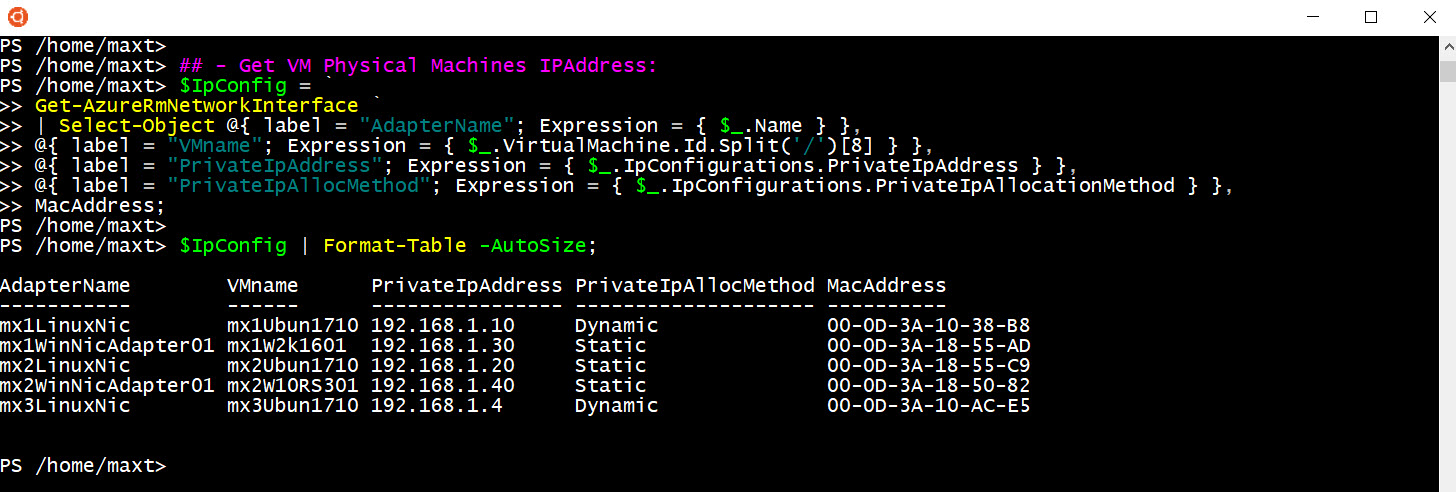
Now that we know how to extract value, the block of code would look like:

[sourcecode language=”powershell”]
## – Get VM Physical Machines IPAddress:
$IpConfig = `
Get-AzureRmNetworkInterface `
| Select-Object @{ label = "AdapterName"; Expression = { $_.Name } },
@{ label = "VMname"; Expression = { $_.VirtualMachine.Id.Split(‘/’)[8] } },
@{ label = "PrivateIpAddress"; Expression = { $_.IpConfigurations.PrivateIpAddress } },
@{ label = "PrivateIpAllocMethod"; Expression = { $_.IpConfigurations.PrivateIpAllocationMethod } },
MacAddress;

$IpConfig | Format-Table -AutoSize;

[/sourcecode]

In the above sample code, the results are saved into a PowerShell variable for better output formatting.

Conclusion

Although I’m only showing extracting information from the Get-AzureRMNetworkInterface command, this can apply to any PowerShell cmdlet that provide such complex properties values. This can apply to both Windows PowerShell and PowerShell Core.

Be Bold!! Learn PowerShell Core!!

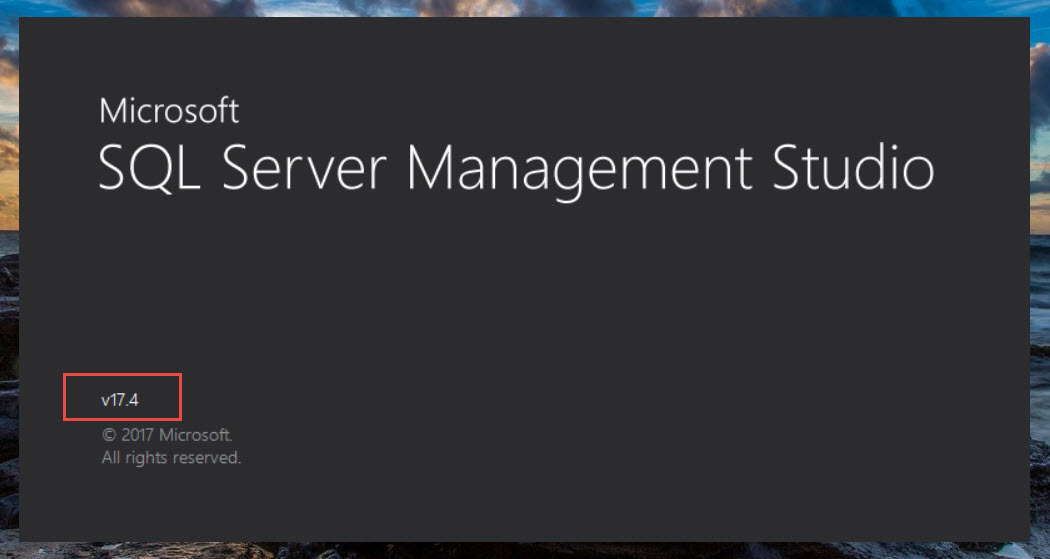
SSMS Version 17.4 no more SQLPS Module

It was just a matter of time, as it was already mention in previous SSMS (SQL Server Management Studio) documentation that SQLPS module was going to be deprecated and replace with the new SQLServer module.

See SSMS download information at: https://docs.microsoft.com/en-us/sql/ssms/download-sql-server-management-studio-ssms

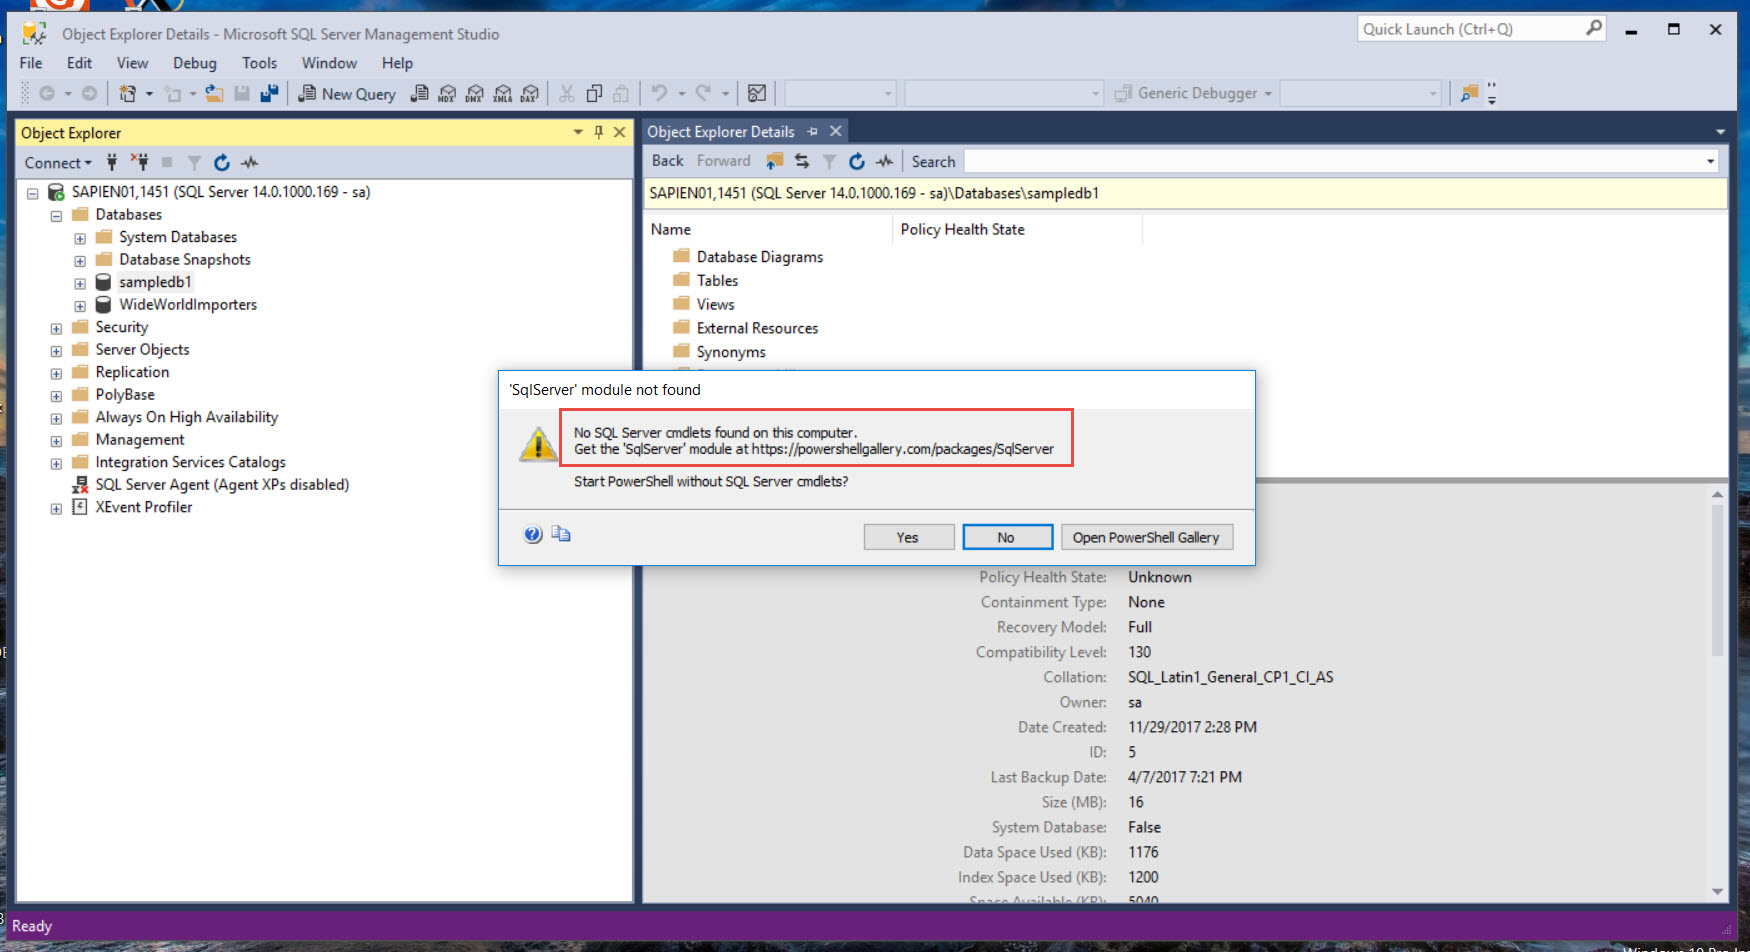
After SSMS Version 17.4 was release back in December, SQLPS module is no longer available. So, if you try to use the “Start PowerShell” from any of the database object, you’ll get the message “No SQL Server cmdlets found…” popup message.

New SQLServer PowerShell Module

But, no worries! Both the SSMS link and the popup message tell you where to get the new *SQLServer PowerShell module as is a separate installation from the PowerShell Gallery.

PowerShell Gallery SQLServer PowerShell Module, Get here: https://www.powershellgallery.com/packages/SqlServer/21.0.17199

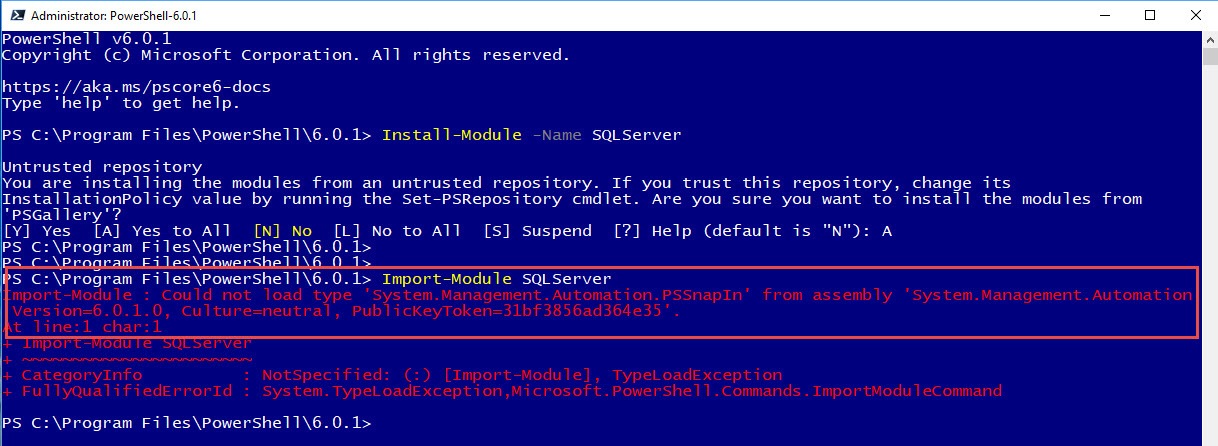
One thing to point out, this module is only meant to be use on Windows PowerShell.

In other words, it will not work in PSCore6.

Housekeeping Needed

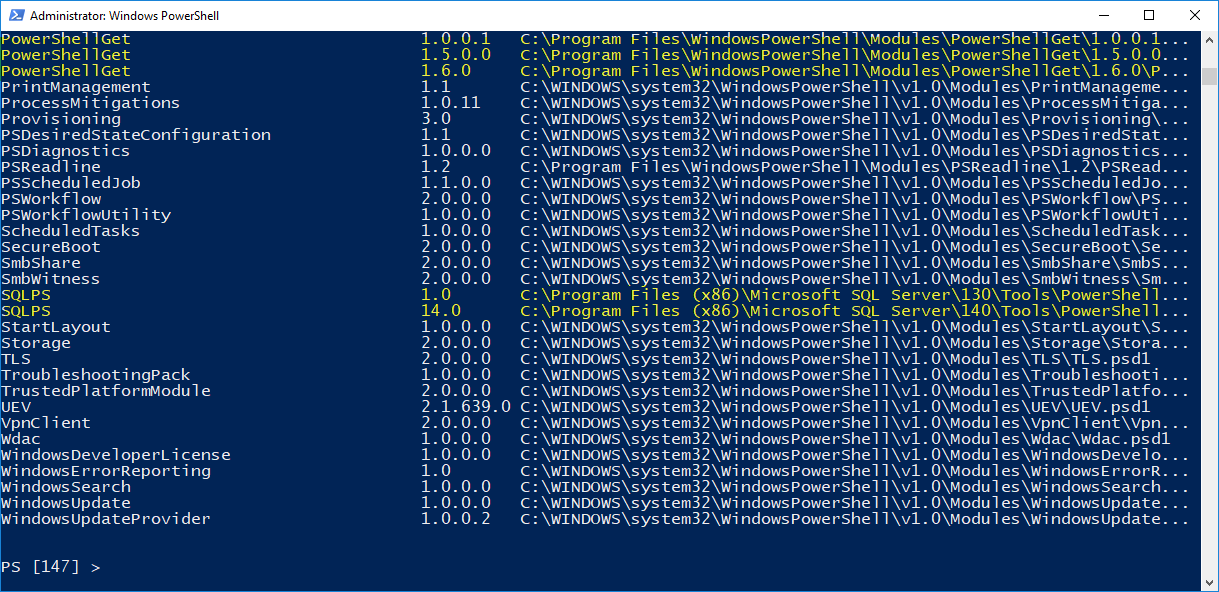
Now, there’s the chance previous SSMS installations have left the older SQLPS PowerShell Module in the system.

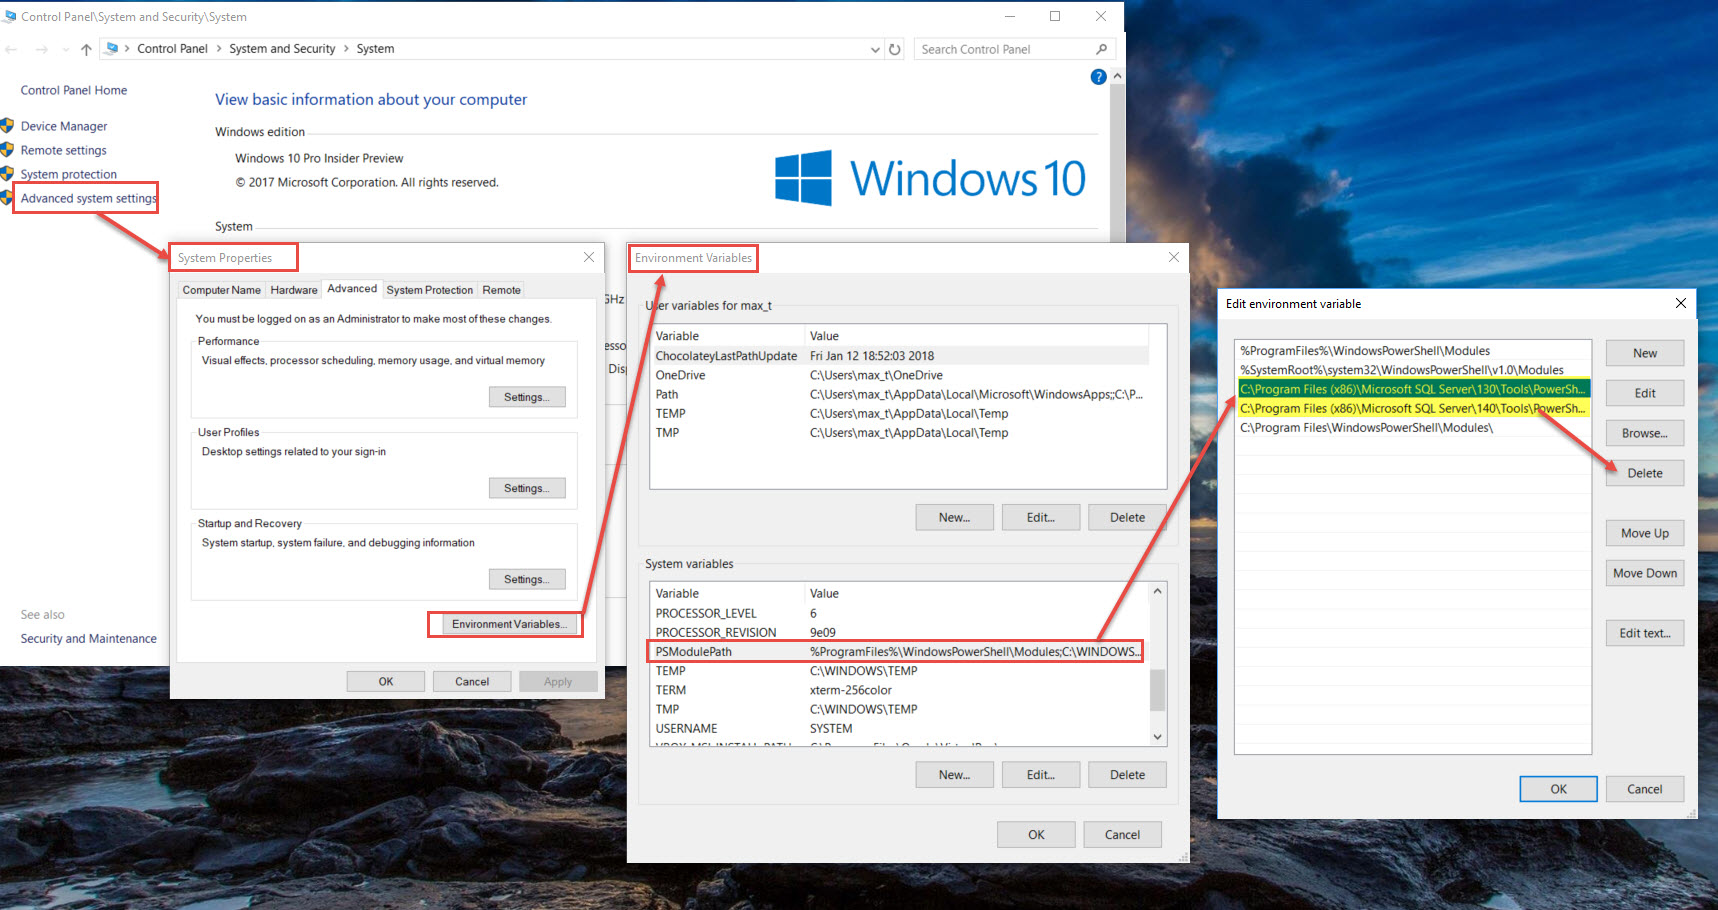
As is shown in the previous image, the variable $env:PSModulePath contains the path to the existing SQLPS module(s).

Either, remove the path manually using PowerShell, or thru the GUI System “Environment Variable“.

Or better yet, if you’re using SAPIEN Technologies, Inc. “PowerShell Studioproduct, the n use the Cache Editor feature to manage your existing PowerShell Modules. Check out the blog post and video about this feature at:
https://www.sapien.com/blog/2017/12/07/powershell-studio-feature-nugget-refreshing-local-cache-powershell-cmdlets-and-modules/

Video featuring PowerShell Studio Cache Editor

Option for PSCore

The only way to use PSCore6 to work with SQLServer cross-platform, is using the SMO (SQLServer Management Objects) for .NETCore, which is available in NuGet. For more information in how to install it, check my blog post at:
http://www.maxtblog.com/2017/11/streamlining-sql-server-management-objects-smo-in-powershell-core/

The only downside, you need to create the script from scratch. There’s plenty of documentation about SMO to overcome this hurdle. Most important, you are  sharpen your PowerShell scripting skills.

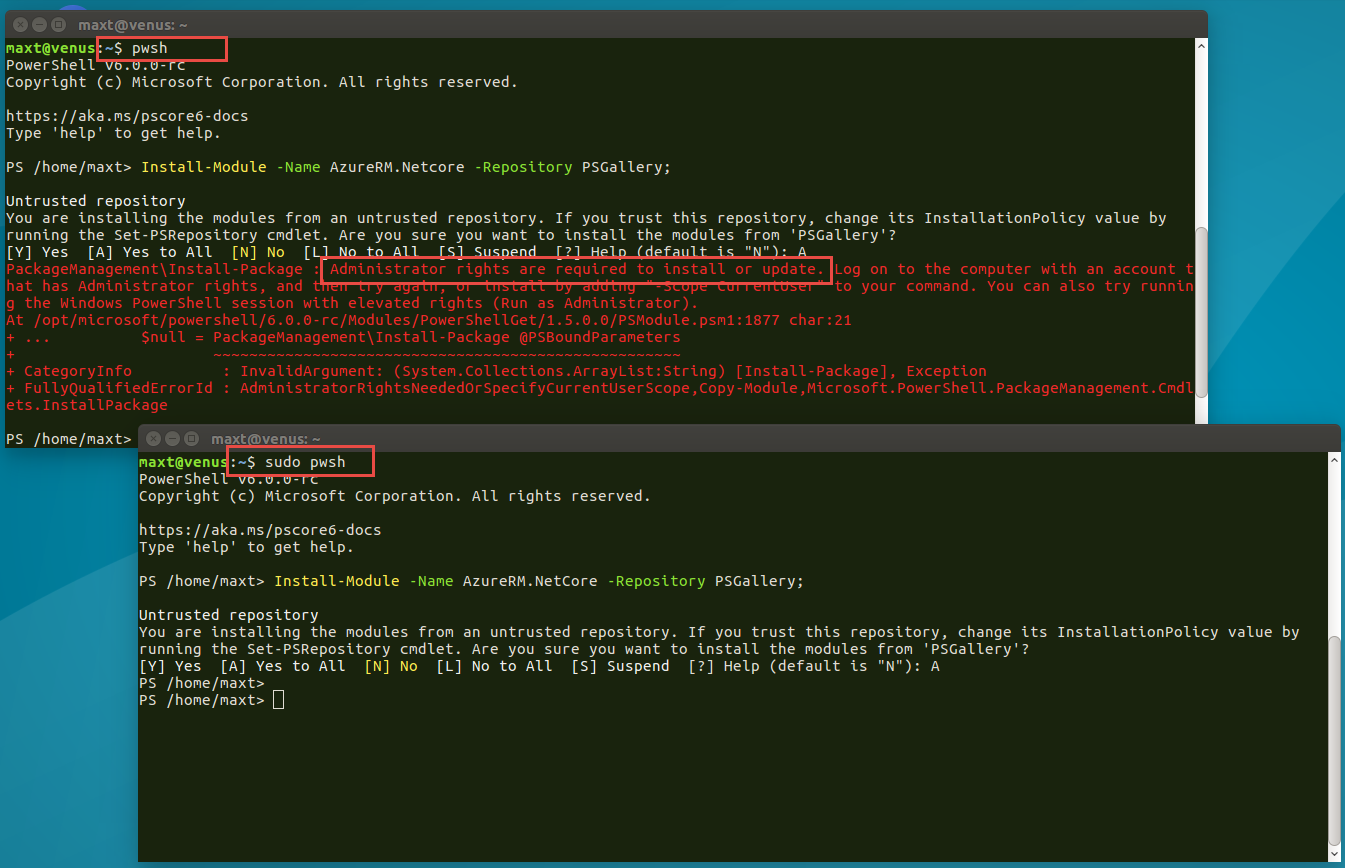
Don’t forget that before install any artifacts from PowerShell Gallery, NuGet, or Chocolatey the console shell need to be open “as an Administrator“.

Be Bold!! Learn PowerShell Core!!

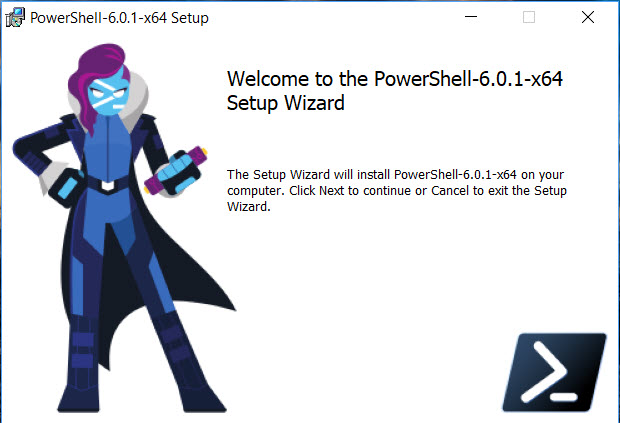
PSCore6 – Version 6.0.1 is out of the oven!

Yes! Go and get while it still hot.  The Microsoft PowerShell Team is making it happen and they are not stopping.

Need to know more about the PSCore Roadmap, the check this link: https://blogs.msdn.microsoft.com/powershell/2018/01/24/powershell-core-6-1-roadmap/

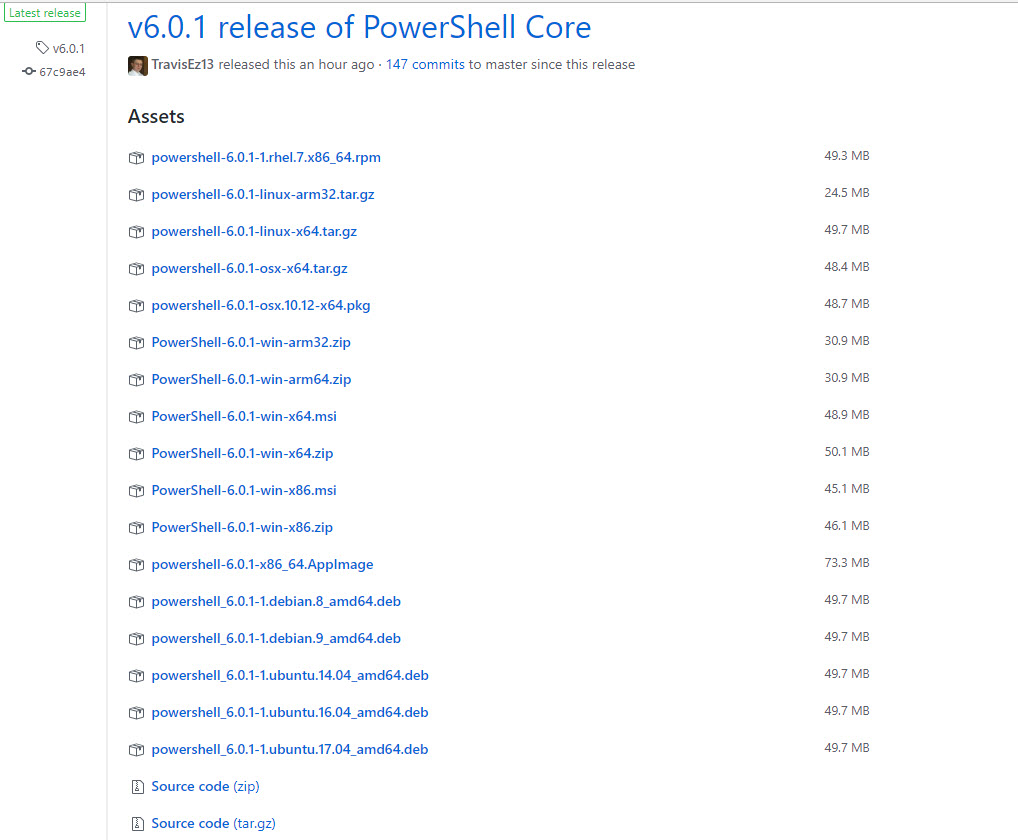
Keep mind, that it always take few hour for some of the links to be update.  So, the quick way to download the latest version is to go directly to the “Release“page: https://github.com/PowerShell/PowerShell/releases

Then, select the OS version for PSCore.

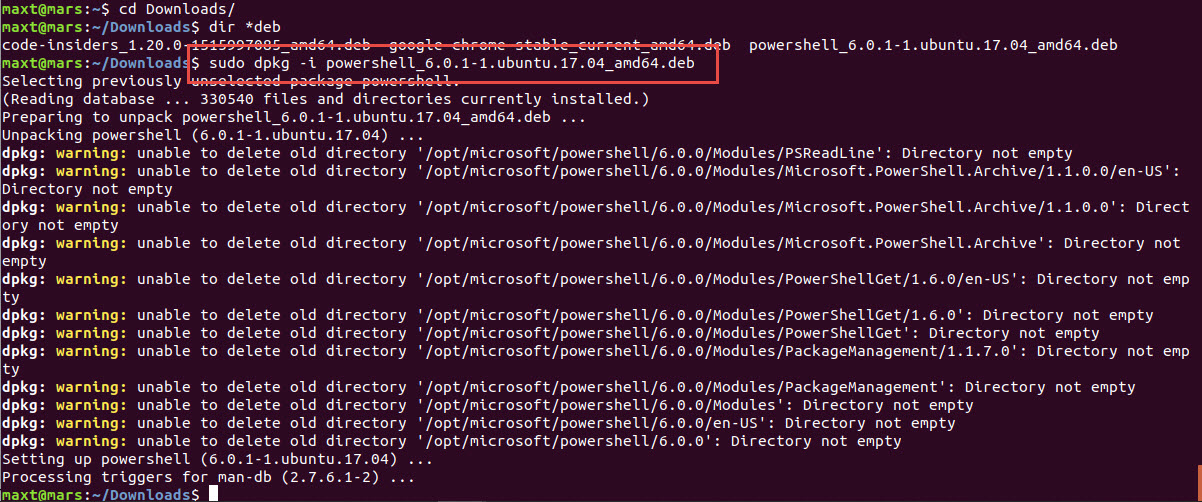
While we await for Ubuntu (or other) Repositories gets the latest update, you can use the debian installation format after downloading the file :

sudo dpkg -i *.deb 

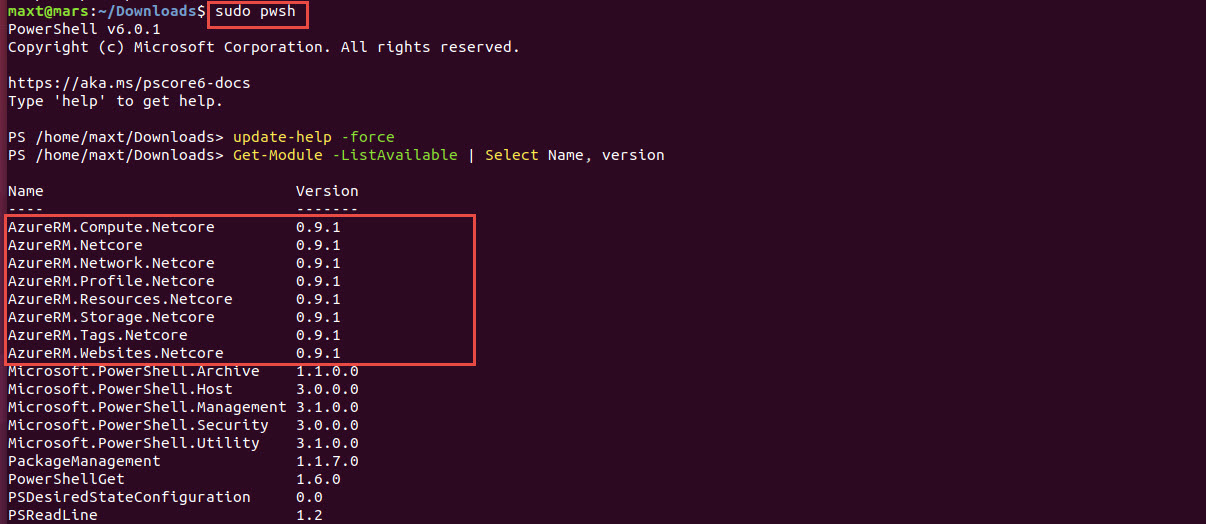
Don’t forget to always update the help documentation using “Update-Help -force” with Administrator privileges.

Also, notice that previously installed PowerShellGalley Modules remains installed.

Be Bold!! Learn PowerShell Core!!


PSCore6 – Nuget Microsoft.SqlServer.SqlManagementObjects latest Package (v140.17218.0) Broken

This is the SMO (SqlServer Management Objects) package use to create PSCore6 scripts to connect and manage SQL Server on Windows, Linux, and Azure.

But today, I found out the latest version “140.17218.0″ is broken. I had to rolled back to use an older version “140.17199.0” to get it to work again.

You can find the information about this package in this link:
https://www.nuget.org/packages/Microsoft.SqlServer.SqlManagementObjects

This NuGet SMO package version is built on .NETCore 2.0 for PSCore6, and will not install in Windows PowerShell.

Installing SMO Package

To *install the previous SMO package version “140.17199.0“, use the following command:

[sourcecode language=”powershell”]
Install-Package Microsoft.SqlServer.SqlManagementObjects -RequiredVersion ‘140.17199.0’

[/sourcecode]

*Note: Need to install as an Administrator.

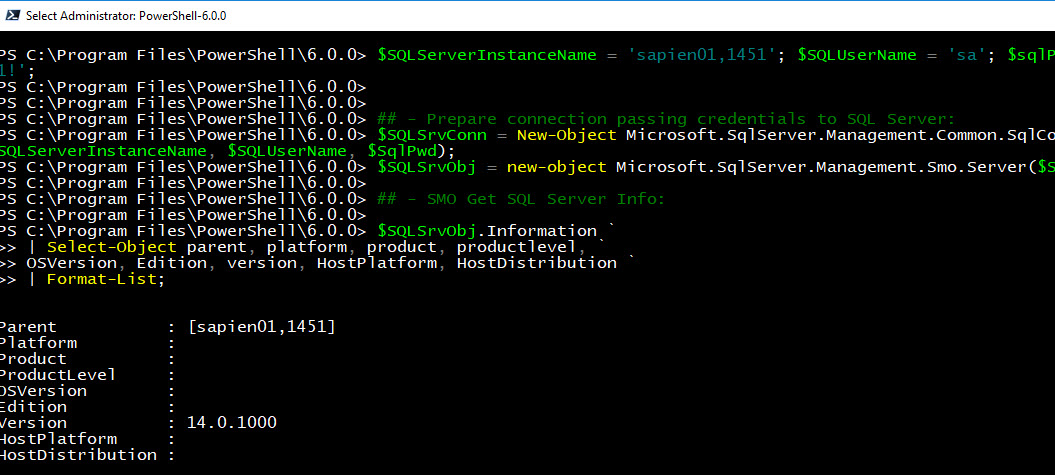
If  the newer SMO version “140.17218.0” is installed then it will not connect. There are no errors, or failures displayed.  (See image)

This issue has been reported to NuGet SMO owners and hopefully will be resolved soon.

Testing SMO in PSCore6

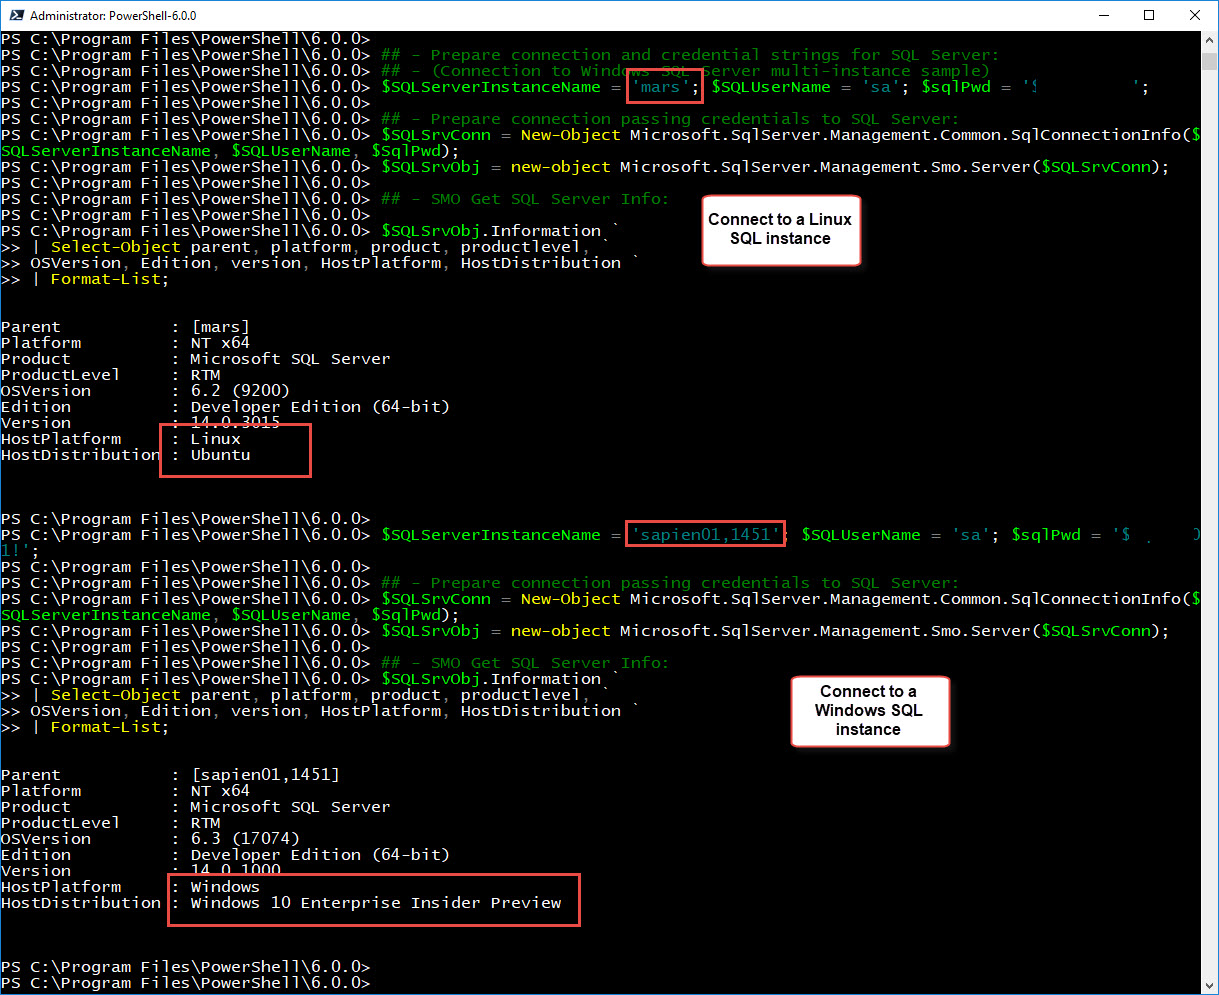
Here’s the PSCore6 script for SMO testing. The script will work in both Windows and Linux.

[sourcecode language=”powershell”]
## – Help find and save the location of the SMO dll’s in a PowerShell variable:
$smopath = `
Join-Path ((Get-Package Microsoft.SqlServer.SqlManagementObjects).Source `
| Split-Path) (Join-Path lib netcoreapp2.0)

# Add types to load SMO Assemblies only:
Add-Type -Path (Join-Path $smopath Microsoft.SqlServer.Smo.dll)
Add-Type -Path (Join-Path $smopath Microsoft.SqlServer.ConnectionInfo.dll)

## – Prepare connection and credential strings for SQL Server:
## – (Connection to Windows SQL Server multi-instance sample)
$SQLServerInstanceName = ‘System01,1451’; $SQLUserName = ‘sa’; $sqlPwd = ‘$Mypwd01!’;

## – Turn ON below for Linux:
## – (Connection to Linux SQL Server multi-instance sample)
# $SQLServerInstanceName = ‘LinuxSystem02’; $SQLUserName = ‘sa’; $sqlPwd = ‘$Mypwd01!’;

## – Prepare connection passing credentials to SQL Server:
$SQLSrvConn = New-Object Microsoft.SqlServer.Management.Common.SqlConnectionInfo($SQLServerInstanceName, $SQLUserName, $SqlPwd);
$SQLSrvObj = new-object Microsoft.SqlServer.Management.Smo.Server($SQLSrvConn);

## – SMO Get SQL Server Info:
$SQLSrvObj.Information `
| Select-Object parent, platform, product, productlevel, `
OSVersion, Edition, version, HostPlatform, HostDistribution `
| Format-List;

## – End of Code

[/sourcecode]

Most Important

In order for this to work, NuGet needs to be installed first. The following *code block will help to check if it’s already installed. And, if not, then it will install NuGet in PSCore6.

[sourcecode language=”powershell”]
# Register NuGet package source, if needed
# The package source may not be available on some systems (e.g. Linux)
if (-not (Get-PackageSource | Where-Object{$_.Name -eq ‘Nuget’}))
{
Register-PackageSource -Name Nuget -ProviderName NuGet -Location https://www.nuget.org/api/v2
}else{
Write-Host "NuGet Already Exist! No Need to install."
}

[/sourcecode]

*Note: Thanks to the SMO guys for providing this code block to get me started testing.

Also, if you already installed the buggy NuGet SMO version, remember to use the following command to uninstall the package:

[sourcecode language=”powershell”]
uninstall-package Microsoft.SqlServer.SqlManagementObjects

[/sourcecode]

I’m hoping this blog post will help in any way.

Be Bold!! Learn PowerShell Core!!

PowerShell Core–Updated setup OpenSSH in Windows and Linux

It’s been over a year since my last post on “PowerShell Open Source – Windows PSRemoting to Linux with OpenSSH”. A lot has change, so here’s the updated version.

Linux OpenSSH installation

In Linux (Ubuntu), open a terminal (Bash) session.

Install the following *packages:

sudo apt install openssh-server
sudo apt install openssh-client

*Note: The system will let you know if they already exist.

Need to configure the OpenSSH config file:

sudo gedit /etc/ssh/sshd_config

The, add following line in the “subsystem” area:

Subsystem powershell pwsh.exe -sshs -NoLogo -NoProfile

Proceed to save the file.

Now, execute the following lines:

sudo ssh-keygen –A

Restart the ‘ssh’ service by executing the following command:

sudo service ssh restart

Windows OpenSSH installation

In *Windows Client or Server, open Services to ‘Stop‘/’Disable‘ both SSH Broker and SSH Proxy.

*Note: Latest Windows Insider Builds having the following services previously installed: SSH Broker and SSH Proxy

Open PowerShell Core Console (Run as Administrator):

[sourcecode language=”powershell”]
pwsh

[/sourcecode]

First thing, make sure Chocolatey is installed in PowerShell Core: https://chocolatey.org/install

[sourcecode language=”powershell”]
iex ((New-Object System.Net.WebClient).DownloadString(‘https://chocolatey.org/install.ps1’)

[/sourcecode]

*note: Chocolatey Install instructions will run ‘Set-ExecutionPolity Bypass’. The problem is, it won’t change it back to the previous setting.
Make sure to run “Get-ExecutionPolicy” to verify current settings.

Installing OpenSSH package from Chocolatey:

[sourcecode language=”powershell”]
choco install openssh

[/sourcecode]

Close/Reopen PowerShell Core (Run as Administrator), and execute the following command:

[sourcecode language=”powershell”]
refreshenv

[/sourcecode]

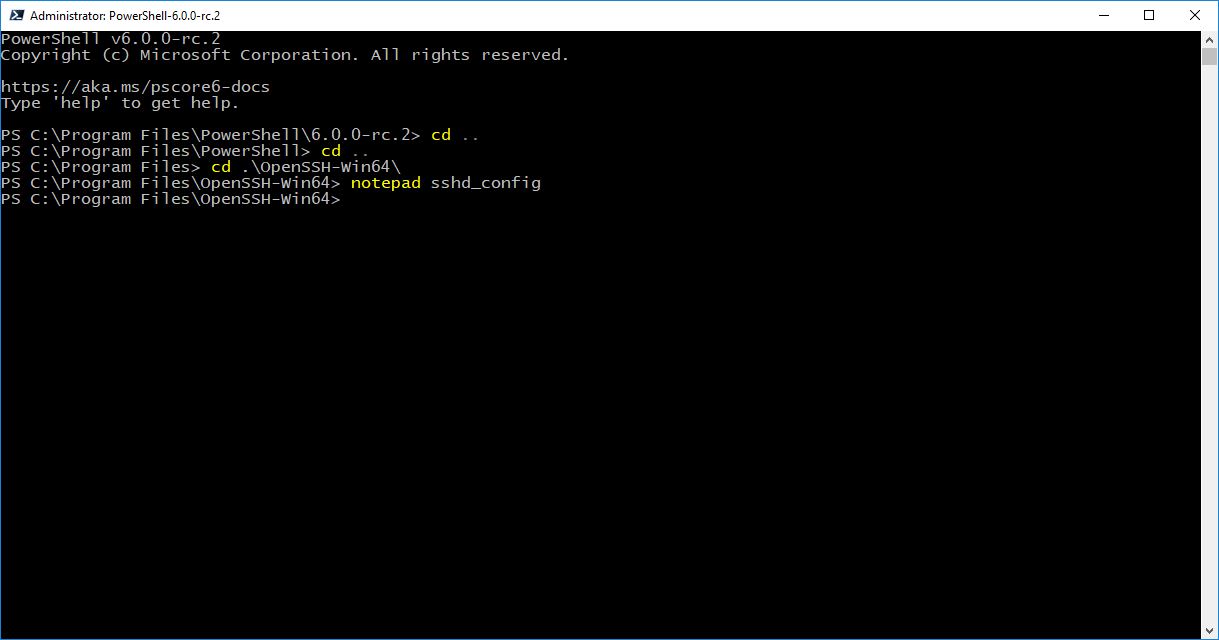
Change Directory to the OpenSSH folder:

[sourcecode language=”powershell”]
cd ‘C:\Program Files\OpenSSH-Win64\’

[/sourcecode]

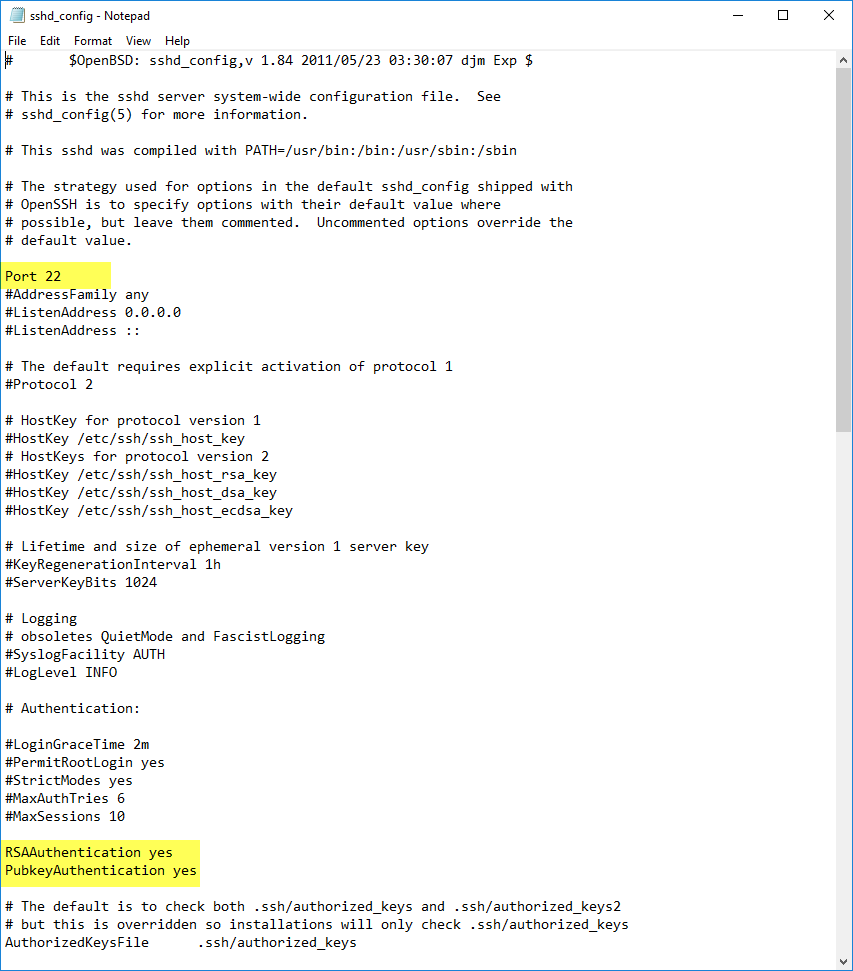
Now, we need to make changes to the sshd_config file with Notepad:

[sourcecode language=”powershell”]
Notepad sshd_config

[/sourcecode]

Need to enabled the following commented out lines:

[sourcecode language=”text”]
Port 22
PasswordAuthentication yes
PubkeyAuthentication yes

[/sourcecode]

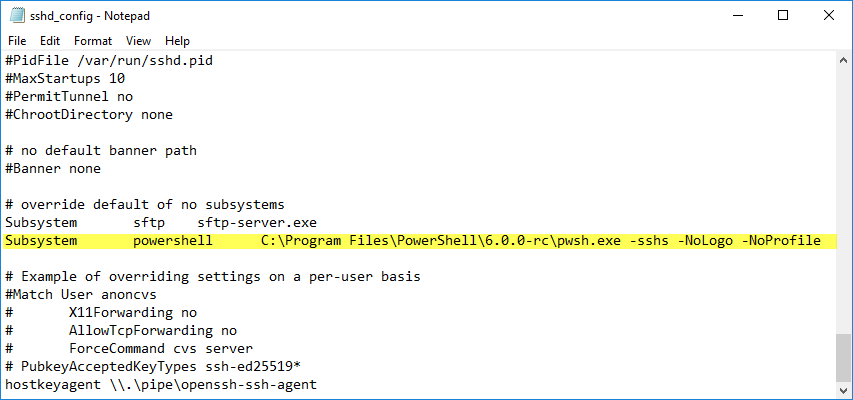
Finally, add the subsystem line to include PowerShell Core path:

[sourcecode language=”text”]
Subsystem     powershell    C:/Program Files/PowerShell/6.0.0-rc.2/pwsh.exe -sshs -NoLogo –NoProfile

[/sourcecode]

Save the file and we are ready to configure the firewall rule for port 22.

Windows Firewall Port 22 Setup

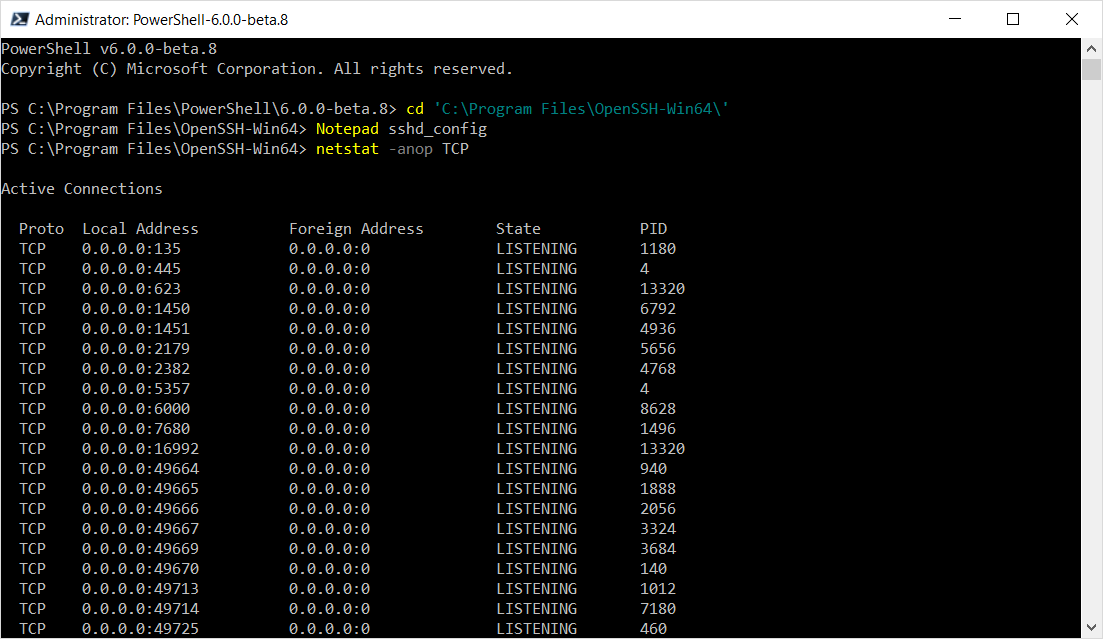
Next, confirm that there are no other TCP ports using port 22:

[sourcecode language=”powershell”]
netstat -anop TCP

[/sourcecode]

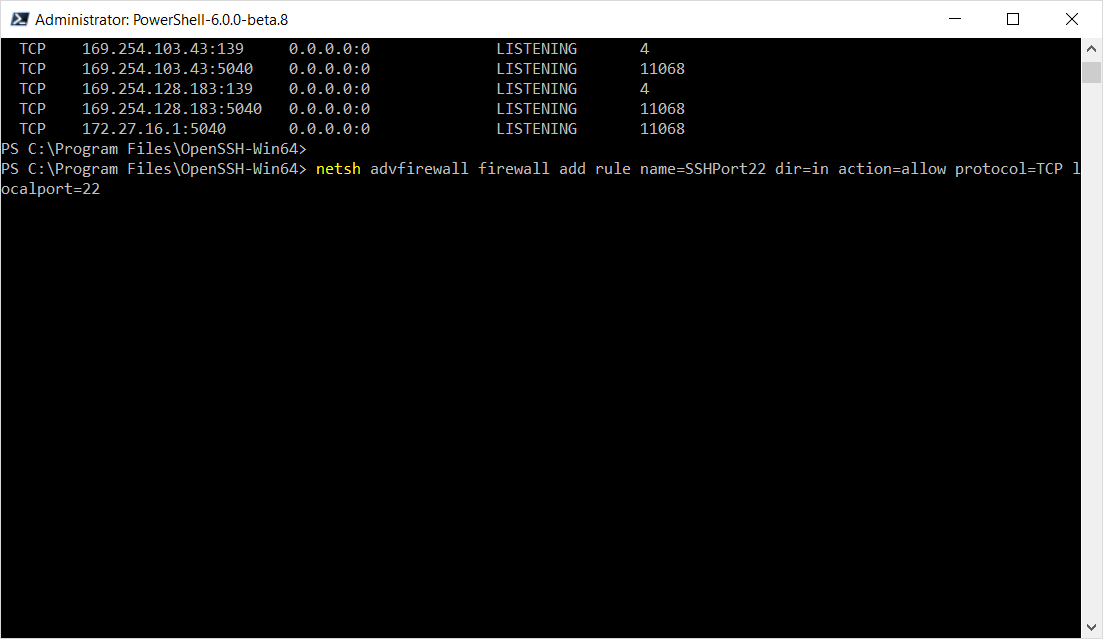
Now, add the SSH firewall rule for using port 22:

[sourcecode language=”powershell”]
netsh advfirewall firewall add rule name=SSHPort22 dir=in action=allow protocol=TCP localport=22

[/sourcecode]

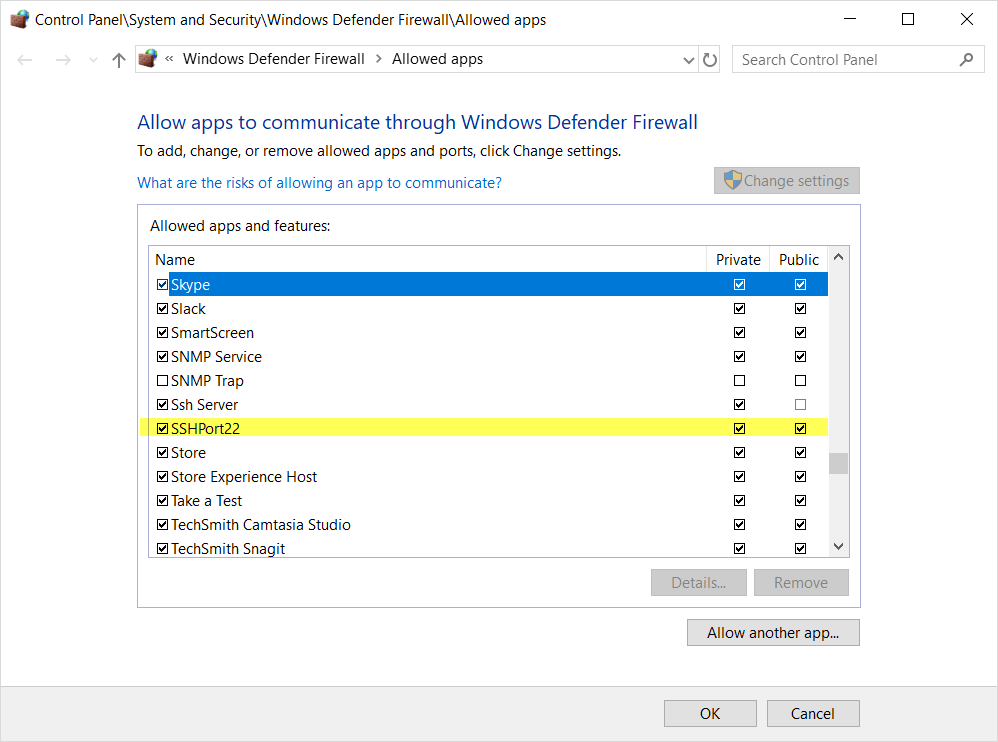
Open Firewall app and verify it’s added.

Completing Windows OpenSSH Installation

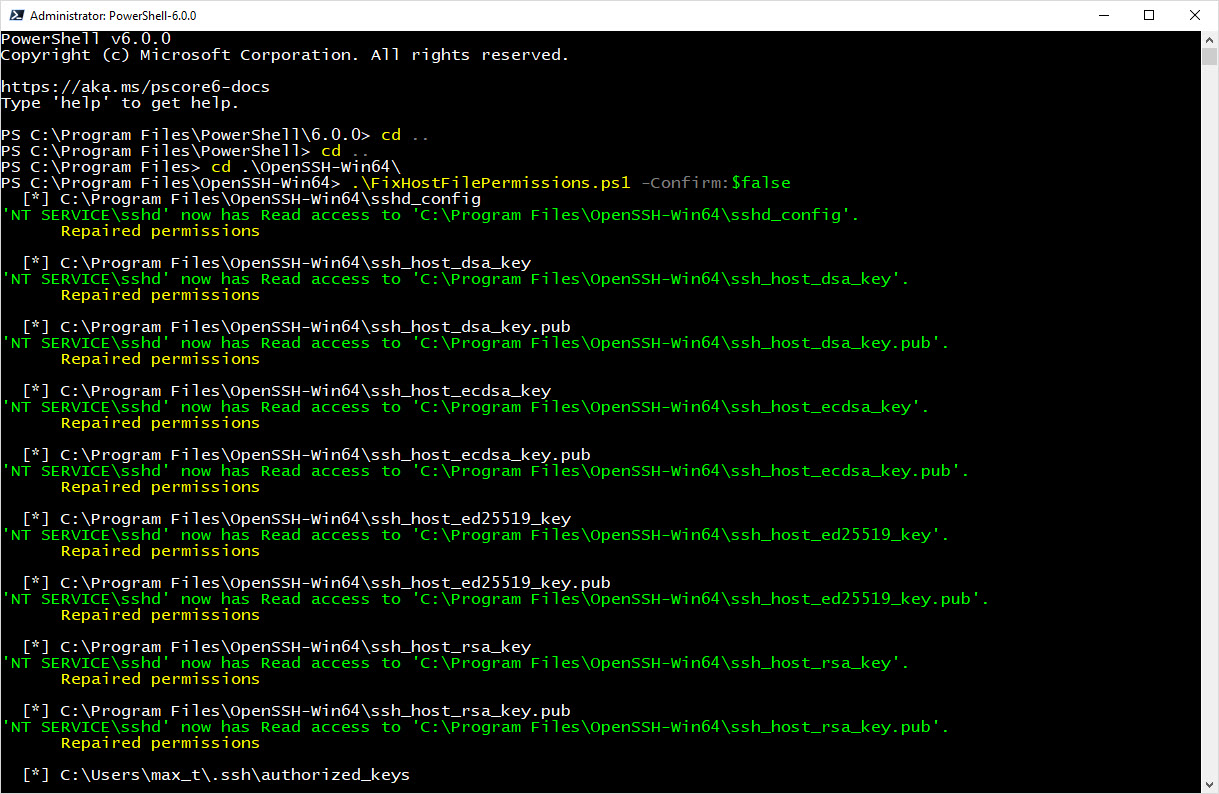
The following steps are essential for the sshd service to start without any issues. Make sure to be at the OpenSSH folder:

[sourcecode language=”powershell”]
## – Generate SSH keys:
ssh-keygen -A

## – Execute both fix permissions scripts:
.\FixHostFilePermissions.ps1 -confirm:$false
.\FixUserFilePermissions.ps1

## – Install both ssh services: sshd and ssh-agent:
.\install-sshd.ps1

[/sourcecode]

Then, set both sshd and ssh-agent services set to start automatically.

[sourcecode language=”powershell”]
Set-Service sshd -StartupType Automatic
Set-Service ssh-agent -StartupType Automatic

[/sourcecode]

At this point, only start service sshd which will turned on the ssh-agent service.

[sourcecode language=”powershell”]
Start-Service sshd
#Start-Service ssh-agent (optional)

[/sourcecode]

Must important, open the *Services MMC console and verify that all running.

*Note: On the server will be needed to set the credential as Local System (see below).

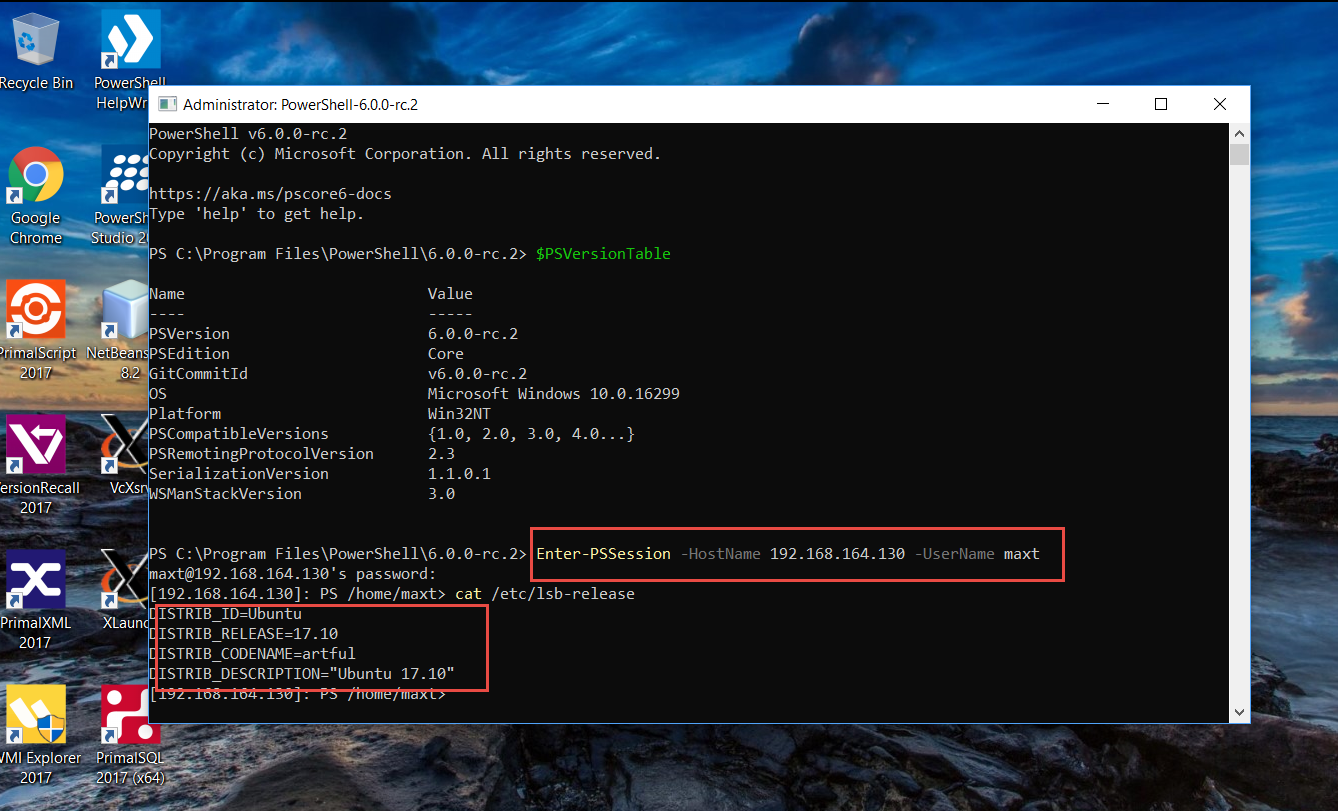
Now, proceed to test connectivity between two system using PowerShell Core.  To test connectivity could use the following command:

Enter-PSSession -hostname systemname -username UsenameHere

Additional Note:

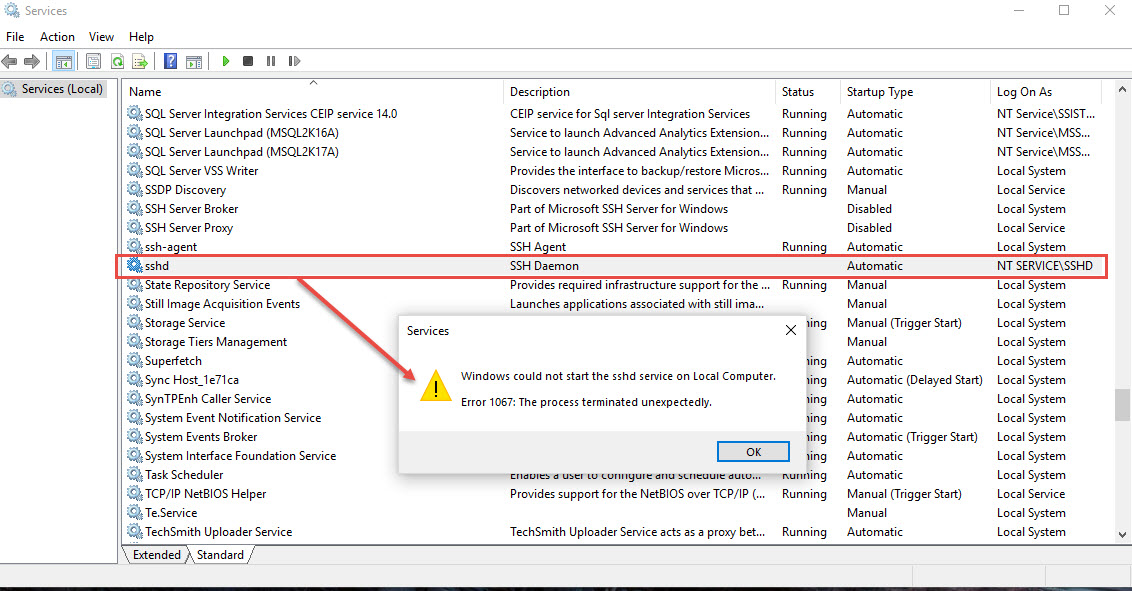
I found an issue when been a member of a domain but the Domain is Off. Trying to restart ssh service, I get the following error:

[sourcecode language=”powershell”]
PS C:\Program Files\OpenSSH-Win64> Start-Service sshd
Start-Service : Failed to start service ‘sshd (sshd)’.
At line:1 char:1
+ Start-Service sshd
+ ~~~~~~~~~~~~~~~~~~
+ CategoryInfo          : OpenError: (System.ServiceProcess.ServiceController:ServiceController) [Start-Service], ServiceCommandException
+ FullyQualifiedErrorId : StartServiceFailed,Microsoft.PowerShell.Commands.StartServiceCommand

[/sourcecode]

Or trying to manually start the “sshd” service using the Services MMC:

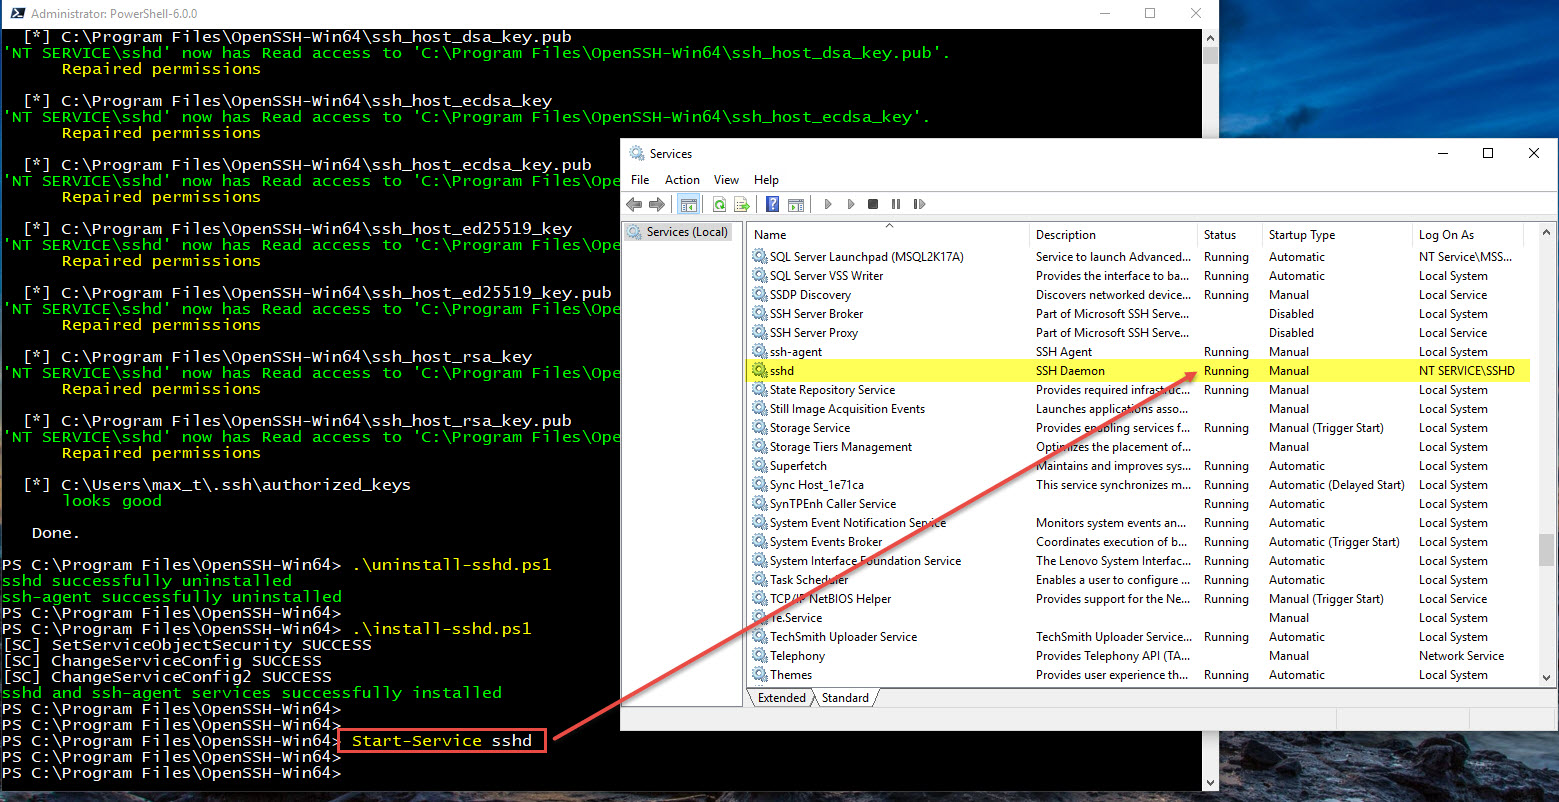
This error was due to missing a step in the installation:

Resolution: Thanks to Github Win32-OpenSSH @bagajjal provided the following steps:

[sourcecode language=”powershell”]
## – Fixing sshd service not starting with the NET Service credentials:
.\FixHostFilePermissions.ps1 -Confirm:$false
.\uninstall-sshd.ps1
.\install-sshd.ps1
[/sourcecode]

This resolved the sshd start failure. (see below)

Awareness on Installing PowerShell Modules

As you are all aware of the upcoming PowerShell Core, and the impact it will bring in our cross-platform infrastructure. For now, both Windows Powershell and Powershell Core will co-exist side by side. Also, our Powershell skill sets will still be on a high degree of demand in the workplace. This is not going to slow down.

So, let’s create some awareness when installing Powershell modules. Now, we’ve seen a raise of *core modules which are targeted to be use with PowerShell Core for the purpose of installing them in either Windows and/or non-Windows environments. But at the same time, and I have experience, installing different versions of the same module in Windows PowerShell.

Let’s take for example AzureRM modules.

Cloud Module Balance

Let me say you will possibly experience this in the following situation:

1. If you’re install Visual Studio with the Azure SDK
2. If you’re a Developer which are trying to keep up with the latest module but forget to remove the old ones.
3. Also, installing modules from different sources.

Which sources are currently available for installing Azure modules?
(Just to name a few)

1. PowerShell Gallery
2. Azure Download
3. Azure SDK’s (VS Studio installation or standalone)

So, having multiple versions of the same modules may lead to issues such as: deprecated commands, invalid parameters/paramterset, and all leading to broken automation scripts.

It’s been suggested to use the PowerShell Gallery to get the Azure PowerShell Modules. But, always to the proper search for the latest version.

Using Powershell Gallery as the main repository for grabbing PowerShell modules, you can query for the modules before installing them:

1. Set the main repository to be “PowerShell Gallery”:

[sourcecode=”powershell”]
## – Set PowerShell Gallery Repo:
Set-PSRepository `
-Name “PSGallery” `
-InstallationPolicy Trusted;

[/sourcecode]

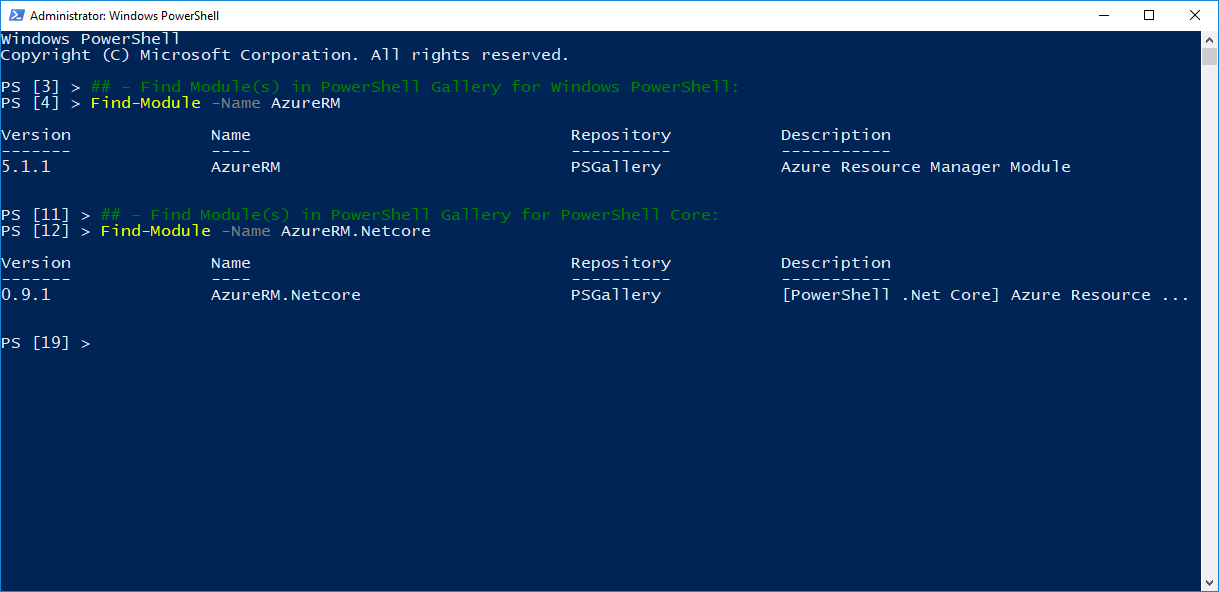
2. Find the modules you want to install: (In this case, “AzureRM”)
[sourcecode=”powershell”]
## – Find Module(s) in PowerShell Gallery for Windows PowerShell:
Find-Module -Name AzureRM

## – Find Module(s) in PowerShell Gallery for PowerShell Core:
Find-Module -Name AzureRM.Netcore

[/sourcecode]

Now, you can proceed to install the module:

1. Proceed to get the module from PowerShell *Gallery:
[sourcecode=”powershell”]
## – Get/install Module(s) from PowerShell Gallery:
Install-Module -Name AzureRM `
-Repository “PSGallery”;

[/sourcecode]

*Note: Installing AzureRM.Netcore in Linux, you need to use ‘sudo pwsh’.

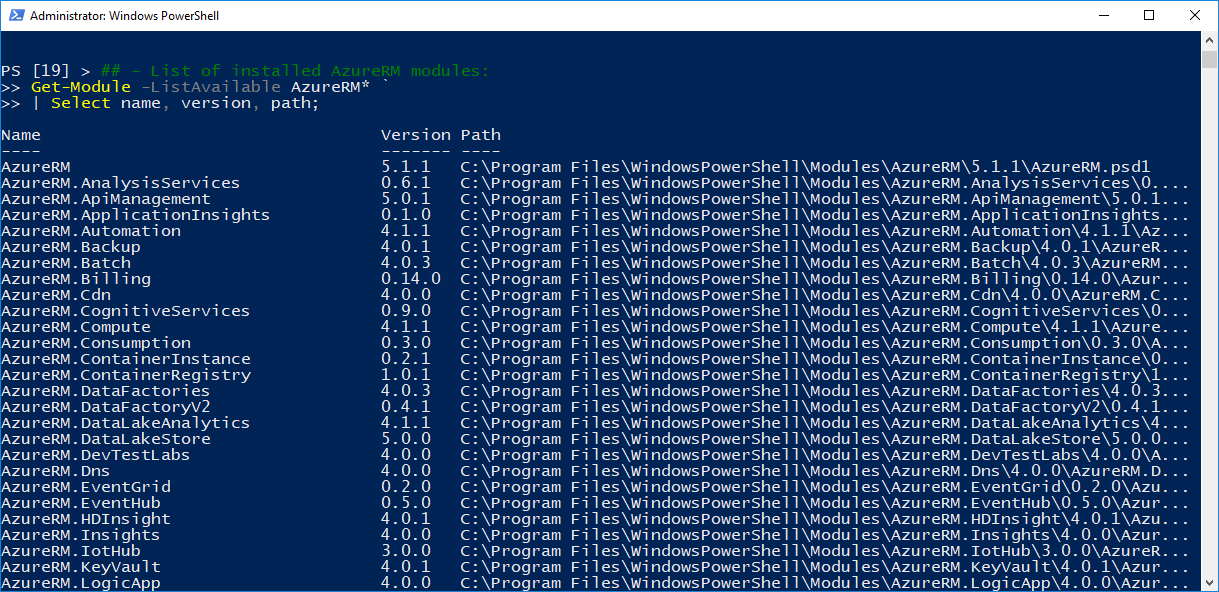
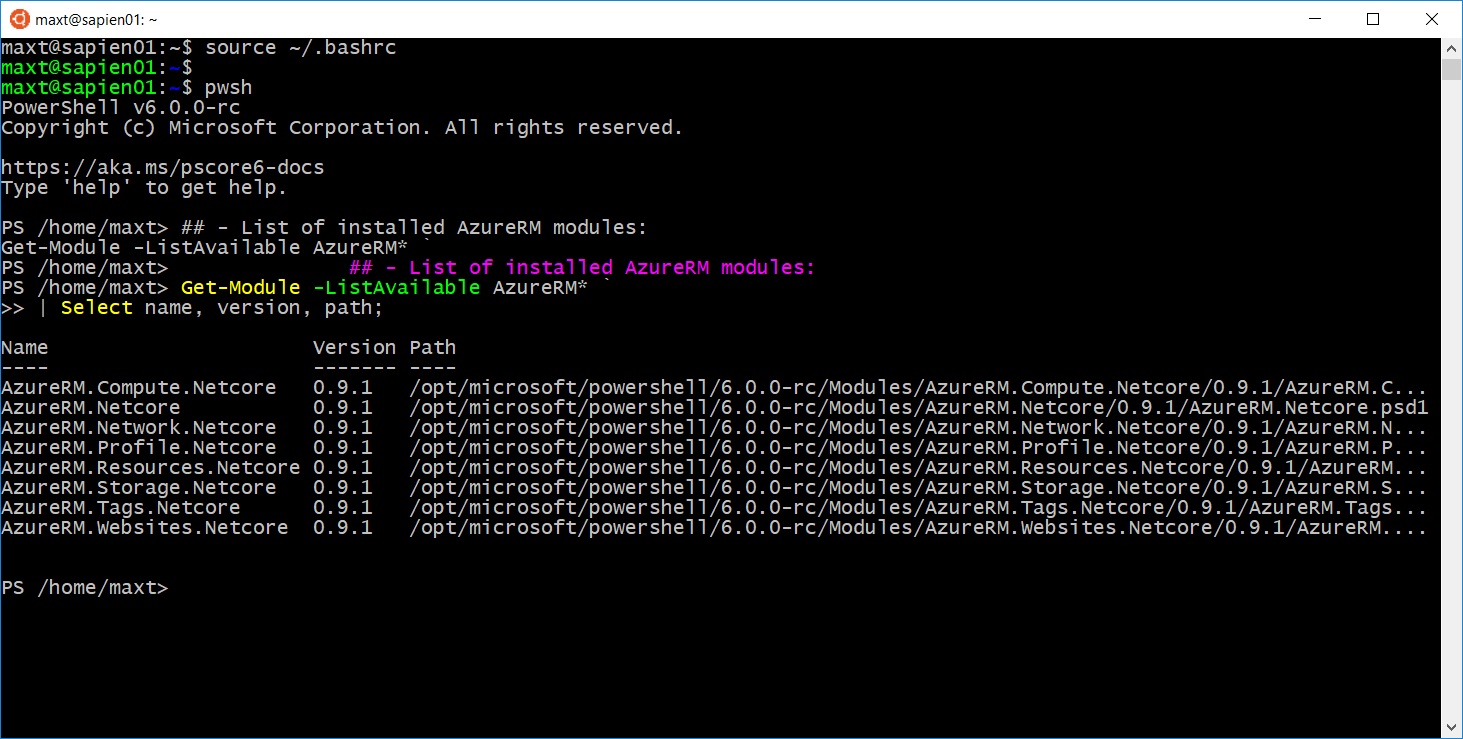
2. List the installed module(s):(Windows and Linux)
[sourcecode=”powershell”]
## – List of installed AzureRM modules:
Get-Module -ListAvailable AzureRM* `
| Select name, version, path;

[/sourcecode]

At this point, you can start building scripts.

Working with PowerShell Gallery

The following series of commands will get you started working with PowerShell Modules.

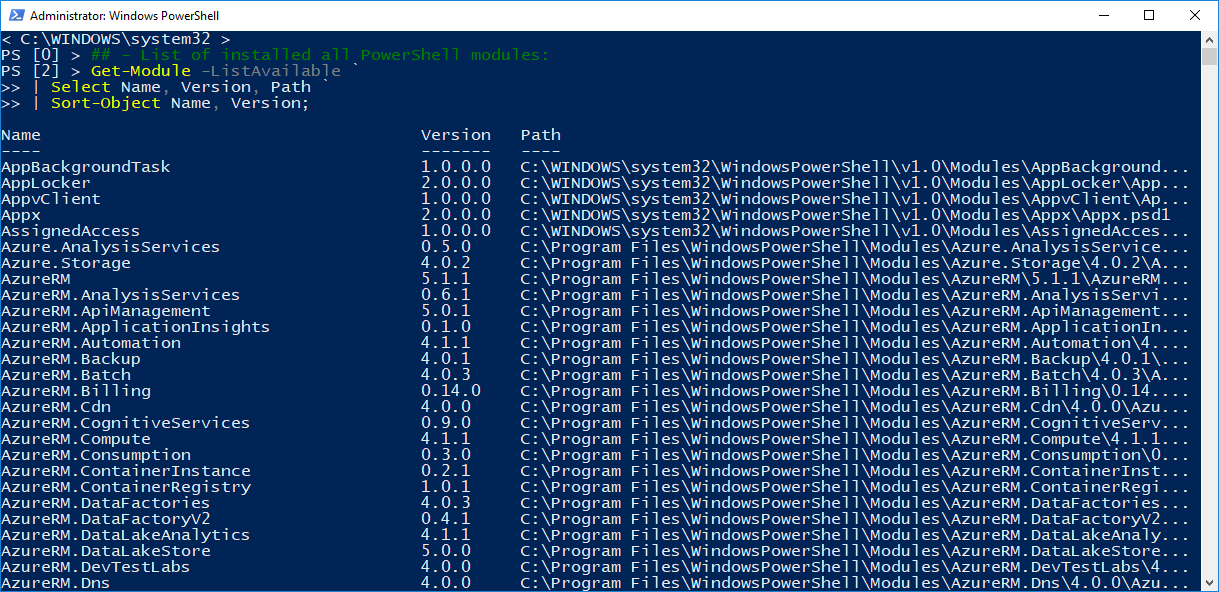
1. List all installed modules in system and can help to spot duplicates:
[sourcecode=”powershell”]
## – List of installed all PowerShell modules:
Get-Module -ListAvailable `
| Select Name, Version, Path `
| Sort-Object Name, Version;

[/sourcecode]

2. List installed modules locations in the PSModulePath variable:
[sourcecode=”powershell”]
## – List installed modules locations
$env:PSModulePath.split(‘;’);

[/sourcecode]

These two commands will give you the necessary information to identify and locate all *”installed” modules in yours system.

*Note: This will not include manually custom modules as the are not install thru PowerShell Gallery, or outside of the standard PowerShell Module folders.

Managing your Modules

In order to prevent cluttering your system with modules you may not use, then its time to do some module updates and/or cleanup.

From Github post “…Moving forward, we recommend using the PowerShell Gallery to get the Azure PowerShell modules. We are looking to push out updates to AzureRM more often since we no longer need to update every module we ship in AzureRM, which will speed up the install/update. …

Taking advantage of PowerShell Gallery commands, we can update our installed modules:

[sourcecode=”powershell”]
# Updating the modules in AzureRM
Update-Module -Name AzureRM

[/sourcecode]

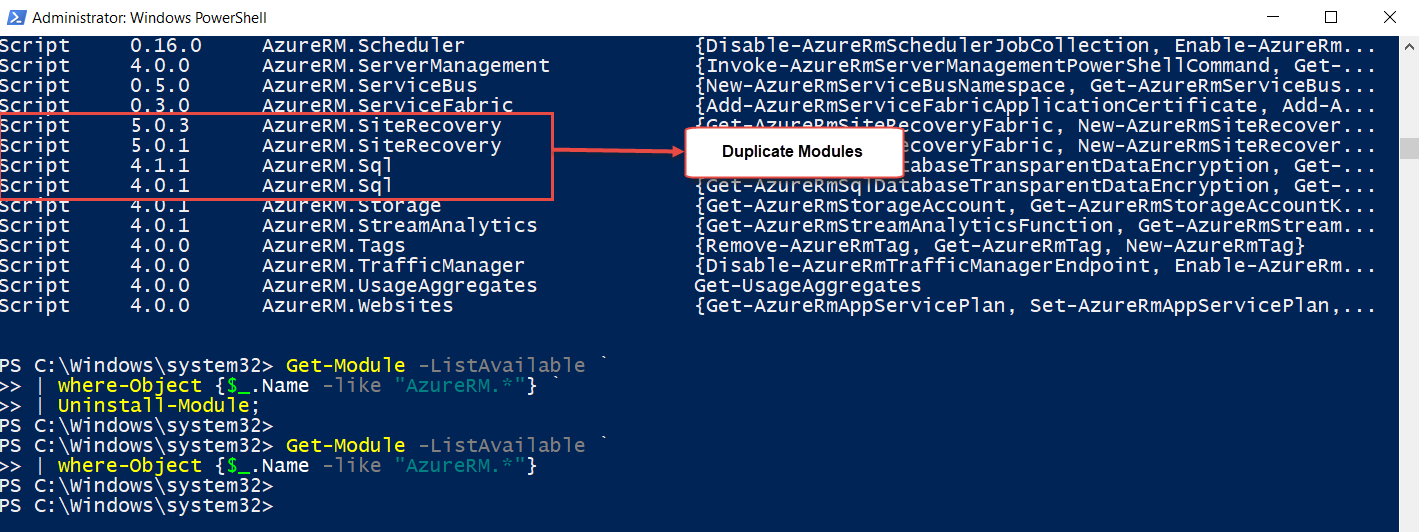
This step should prevent us installing multiple versions of the same module. (Update) – But, I discovered that this will cause a duplicate module (different versions) after the Update-Module is completed.

What about module(s) cleanup? The following one-liner can be use to cleanup/remove module(s) that install from the PowerShell Gallery. In the case of cleaning up all AzureRM modules, the following command should remove all *modules:

[sourcecode=”powershell”]
## – This will remove all AzureRM submodules “AzureRM.*:
Get-Module -ListAvailable `
| where-Object {$_.Name -like “AzureRM*”} `
| Uninstall-Module;

## – This will remove the AzureRM main module:
Get-Module -ListAvailable `
| where-Object {$_.Name -like “AzureRM”} `
| Uninstall-Module;

[/sourcecode]

*Note: This command will work as long as you have use the Install-Module to grab the modules from PowerShell Gallery. And, it will take some time to complete.

This way you can start clean and reinstall the modules!

Then, restart your PowerShell session, and use the following command to Get-Module again to list all existing modules.


Side-By-Side PowerShell Modules

As, the PowerShell Gallery has become the main repository for PowerShell Module. The Microsoft PowerShell Team has provided a special module to allow Windows Modules to work side-by-side with PowerShell Core:
https://www.powershellgallery.com/packages/windowspsmodulepath/1.0.0

Github post: “… This is currently by-design as we deliberately wanted Windows PowerShell and PSCore6 to work side-by-side with predictability. …

This will assist in identifying what else need to be done PowerShell Core. Just give it a try!

If you find issues with Windows Modules in PowerShell Core, then let the Microsoft PowerShell Team know in Github:
https://github.com/PowerShell/PowerShell

Conclusion

Managing modules when using PowerShell Gallery still is a manual process but easy to use, and even better if you build your own solution. I some instances you may decide to us the old delete or move command to get rid of unwanted modules.

Just take the necessary precautions, and remember, that you could install it back if needed.

FLPSUG – Next Online meeting July 26th 2017

I’m working on getting a meeting with Keiser University to allow me to host my Florida PowerShell User Group Monthly meetings at their Port St. Lucie Campus location.  But, in the meantime, I setup July’s Online meeting for Wednesday 26th at 6:30pm (EST).

This month topic:

Working with SQL Server for Linux Cross-Platform

You’re welcome to explore the latest build of SQL Server for Linux, including everything you need to install and connect to SQL Server. He will also look into the tools that are available to use from Linux and / or Windows. Maximo will provide samples on querying for database information using Python/Java and PowerShell between two environments. This will be a demo intensive session you will not want to miss!

To register, click on the following Eventbrite link: https://www.eventbrite.com/e/florida-powershell-user-group-monthly-meeting-july-2017-tickets-36113308879?ref=estw

I hope you can joined me in this exciting session!

South Florida SQLSaturday – Working with SQL Server in Linux session

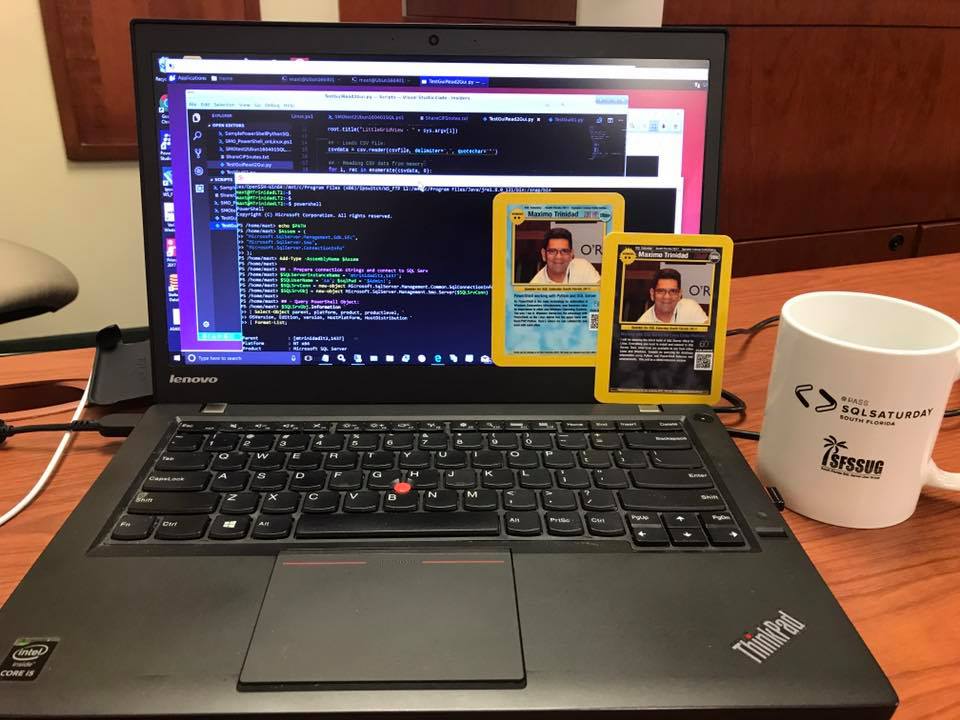
First! Thanks to the organizers, and specially the attendees as they waited patiently to the attend my last session of the day “Working with SQL Server for Linux Cross-Platform”. It proves to be good. Love their interaction and the will to embrace technology.

As, I almost didn’t make it to the event, due to car problem, I one my coworker gave me ride to the event at Nova Southeastern University. I missed giving the early session “SQL Server working with PowerShell and Python” so I ended up merging both sessions into one.

For my surprise, the last session went better than I expected. I ran everything from Azure Cloud which work like a charm, and the attendee were awesome.

Both presentation and all demo scripts were uploaded to the SQLSaturday #627 event site. I hope you all take advantage of the resource link I provided.

In the demo it’s interesting we covered the following on PowerShell Core, Python 3.6 (Anaconda), and SQL Server 2017 (Linux):

* In Window 10, using SSMS v17.1 connecting to SQL Server 2017 in Linux
* In Linux, connect to a Windows Shared folders
* In Windows, using SSMS to restore a Windows Database into Linux SQL Server.
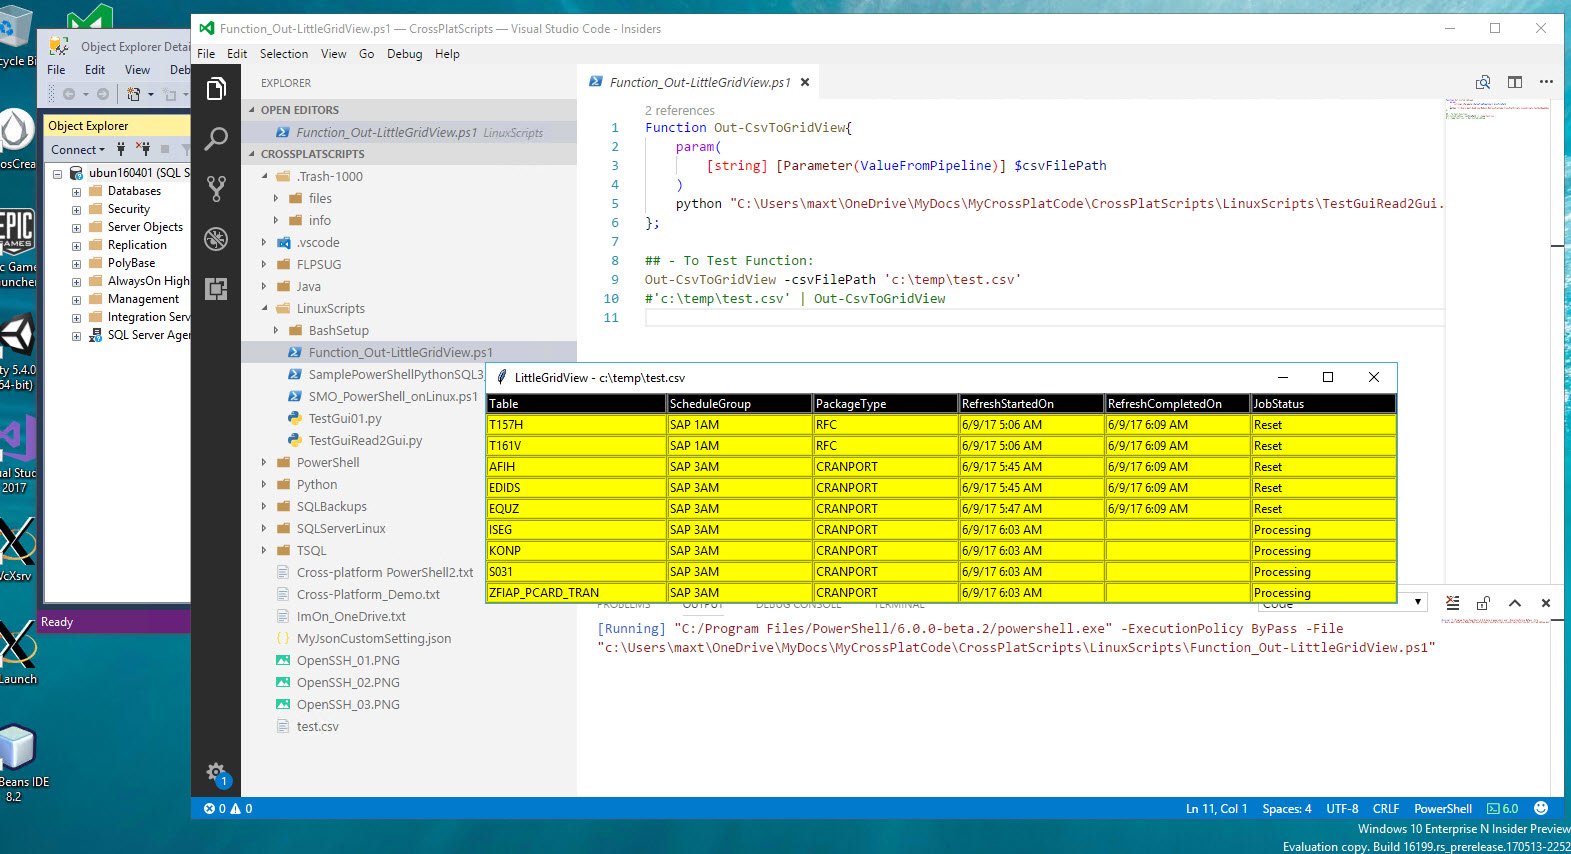
* Sample script using Python tk (Gui) w/pyodbc (SQL connector), and PowerShell displaying PowerShell object in a Gridview.
* Using SMO in Linux with PowerShell.

And, we did covered a lot in a short time.

By the way, I will be giving the same session at IDERA’s Geek Synch webinar, on July 12th, at 11:00am CT/12:00pm ET:

Geek Sync – I Working with SQL Server for Linux Cross-Platform
https://register.gotowebinar.com/register/9138484624537412611

Once again Thanks to everyone!

I’ll see you all in Orlando SQLSaturday #678 on October 7th!

Using Linux SQL Server SMO in PowerShell Core

Yes! It’s possible. Here’s the information in how to set it up and start doing some PowerShell scripting. But, first understand that everything posted here is still a Work-In-Progress. And, the good news, it’s all Open Source.
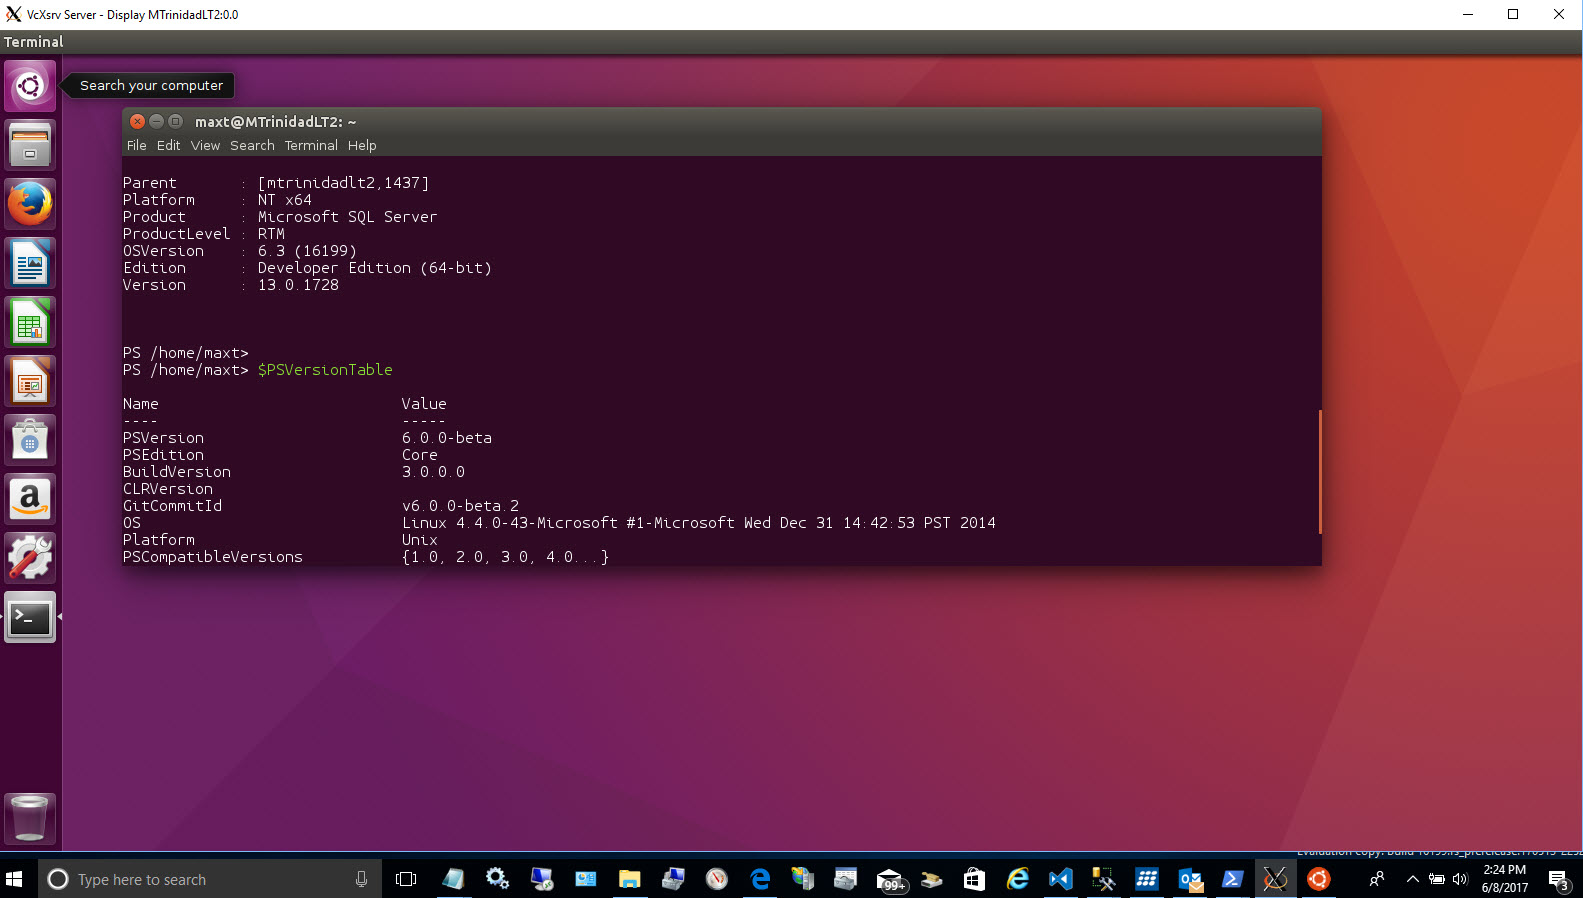
I hope you find the following information essential as there’s no really any instruction in how to install these components. So, let’s get started!

Where To Get It!

The Microsoft SQL Tools Service is a set of API that provided SQL Server Data Management capabilities on all system cross-platforms. It provide a small set for SMO dll’s enough to get started.

You can download the file from following Github link: https://github.com/Microsoft/sqltoolsservice 

Here’s the list of available SMO DLL’s currently include in the “SqlToolsService – ServiceLayer” file:

[sourcecode language=”text”]
Microsoft.SqlServer.ConnectionInfo.dll
Microsoft.SqlServer.Management.Dmf.dll
Microsoft.SqlServer.Management.Sdk.Sfc.dll
Microsoft.SqlServer.Management.SmoMetadataProvider.dll
Microsoft.SqlServer.Management.SqlScriptPublishModel.dll
Microsoft.SqlServer.Smo.dll
Microsoft.SqlServer.SmoExtended.dll
Microsoft.SqlServer.SqlEnum.dll
Microsoft.SqlServer.SqlParser.dll
[/sourcecode]

Keep in mind, this list will continue to grow and we hopefully expect more SMO DLL’s added.

Installation pre-requisites

In my case, I got various systems setup: Windows and Ubuntu 16.04. So, I make sure I download correct *zip or *tar.gz file

As, pre-requisite, you will needed to have already installed *”.NET Core 2.0 Preview 1” for the SQL Service Tools to work and remember this need to be installed in all systems.

Just in case, here’s the link to download “.NET Core 2.0 Preview 1“: https://www.microsoft.com/net/core/preview#windowscmd
https://www.microsoft.com/net/core/preview#linuxubuntu

Now, because we are working with PowerShell Core, don’t forget to install the latest build found at:
https://github.com/PowerShell/PowerShell/releases

Windows Installation

You need to get the file from the latest release. At the time I writing this blog, it’s Pre-release “v1.0.0-alpha.34 – .Net Core 2.0 build“.

To make *”Sql Tools Services” to work in PowerShell Core, I had to extract all content in the file into the “C:\Program Files\PowerShell\6.0.0-Beta.x” folder. Remember, this will replace any existing DLL’s on that folder.

*Caution: This steps should be done on a test machine as there’s always a possibility that it could PowerShell Core DLL’s.

Don’t forget that all these components are still in development but this should stopped us from trying and even contributing.

The file you’ll need to download for Windows is: microsoft.sqltools.servicelayer-win-x64-netcoreapp2.0.zip

Please, for now ignore the *microsoft.sqltools.credentials*.  If you install the Credentials DLL’s in the PowerShell Beta folder, PowerShell will not work.

Linux Installation

Now, for Linux is a different story as there’s no need to add the DLL’s in the PowerShell Core folder. You need to get the file from the latest release. At the time I writing this blog, it’s Pre-release “v1.0.0-alpha.34 – .Net Core 2.0 build“.

I would recommend doing the following steps in the Bash Console:

1. At your /home/user-name location, create the sqltoolsservice folder:

[sourcecode language=”bash”]
maxt@MyUbuntu01:~$ mkdir sqltoolsservice
[/sourcecode]

2. Change directory and Download the file for Ubuntu:

[sourcecode language=”bash”]
maxt@MyUbuntu01:~$ cd sqltoolsservice/
maxt@MyUbuntu01:~/sqltoolsservice$ wget https://github.com/Microsoft/sqltoolsservice/releases/download/v1.0.0-alpha.34/microsoft.sqltools.credentials-ubuntu16-x64-netcoreapp2.0.tar.gz
[/sourcecode]

3. Continue extract the *tar.gz into the folder:

[sourcecode language=”bash”]
maxt@MyUbuntu01:~$ tar -xzvf microsoft.sqltools.credentials-ubuntu16-x64-netcoreapp2.0.tar.gz
[/sourcecode]

That’s it for Linux. Now, you are ready to work with SMO and PowerShell.

Testing SMO in PowerShell Core

This is changing my way I script SMO in PowerShell. As my normal way I’ve been scripting SMO in PowerShell doesn’t work in PowerShell Core. Basically, a few more lines need to be added and now I will use the Add-Type to get the SMO assemblies loaded.

Loading SMO Assemblies

The first step is to load the SMO assemblies needed to start working with SQL Server. So, the following line is finally depricated and won’t work:

[sourcecode language=”powershell”]
[system.reflection.assembly]::LoadWithPartialName(“Microsoft.SQLServer.Smo”)
[/sourcecode]
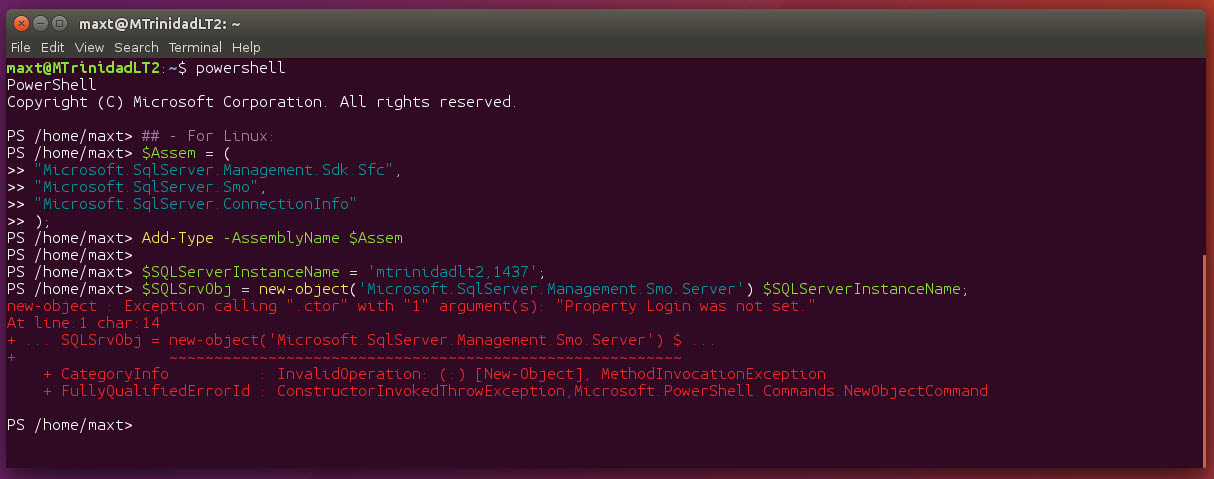
The old method I’ve been using for a long time will failed because is expecting the “Property Login …” to be set.

The updated way, has been replaced by the Add-Type with the following essential three assemblies:

[sourcecode language=”powershell”]
## – Loadind SQL Server SMO assemblied needed:
$Assem = (
“Microsoft.SqlServer.Management.Sdk.Sfc”,
“Microsoft.SqlServer.Smo”,
“Microsoft.SqlServer.ConnectionInfo”
); Add-Type -AssemblyName $Assem;
[/sourcecode]

The above assemblies are required in order to work since SQL Server SMO 2012 and greater. You can have limited use when connecting to SQL Servers version 2005, and possibly 2000.

Prepare connection parameters for Windows Systems

In Windows systems, we use ‘Integrated Authentication‘. But, here’s where things change a bit since SQL Server 2012 SMO. You will need to prepare the connection parameters, and set the *.UseIntegratedSecurity property to ‘true‘ (the default is ‘false‘). At the same time, you’ll need to set the password to ‘null’ in order to connect successfull.

[sourcecode language=”powershell”]
## – Prepare connection strings and connect to a Windows SQL Server:
$SQLServerInstanceName = ‘sqlsvrinst01,1439’;
$SQLUserName = ‘winUsername’;
$SQLSrvConn = new-object Microsoft.SqlServer.Management.Common.SqlConnectionInfo($SQLServerInstanceName, $SQLUserName, $null);
$SQLSrvConn.UseIntegratedSecurity = $true;
$SQLSrvObj = new-object Microsoft.SqlServer.Management.Smo.Server($SQLSrvConn)
[/sourcecode]

Now, you can query the PowerShell Object $SQLSrvObj.

[sourcecode language=”powershell”]
## – Query PowerShell Object:
$SQLSrvObj.Information `
| Select-Object parent, platform, product, productlevel, `
OSVersion, Edition, version, HostPlatform, HostDistribution `
| Format-List;
[/sourcecode]
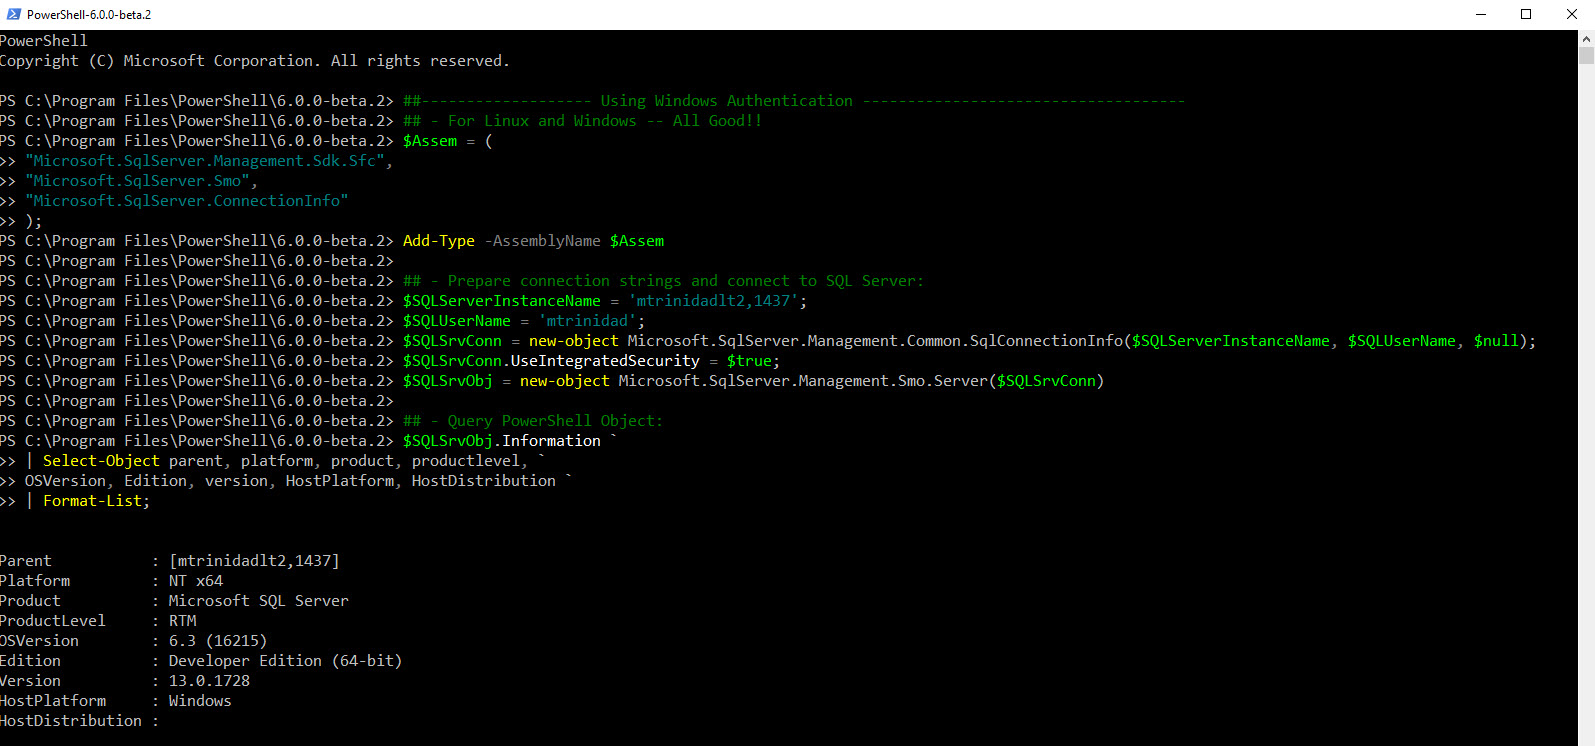
Prepare connection parameters for Linux Systems

For Linux systems, we use ‘SQL Authentication’. Here we add the SQL User password, then passing the value to the SqlConnectionInfo class.  And, the *.UseIntegratedSecurity property by the default is ‘false‘.

[sourcecode language=”powershell”]
## – Prepare connection strings and connect to a Linux SQL Server:
$SQLServerInstanceName = ‘sqlsvrinst01,1439’;
$SQLUserName = ‘sqluser01’; $sqlPwd = ‘$usrpwd01!’;
$SQLSrvConn = new-object Microsoft.SqlServer.Management.Common.SqlConnectionInfo($SQLServerInstanceName, $SQLUserName, $SqlPwd)
$SQLSrvObj = new-object Microsoft.SqlServer.Management.Smo.Server($SQLSrvConn)
[/sourcecode]

Again, you can proceed to query the PowerShell Object $SQLSrvObj.

[sourcecode language=”powershell”]
## – Query PowerShell Object:
$SQLSrvObj.Information `
| Select-Object parent, platform, product, productlevel, `
OSVersion, Edition, version, HostPlatform, HostDistribution `
| Format-List;
[/sourcecode]
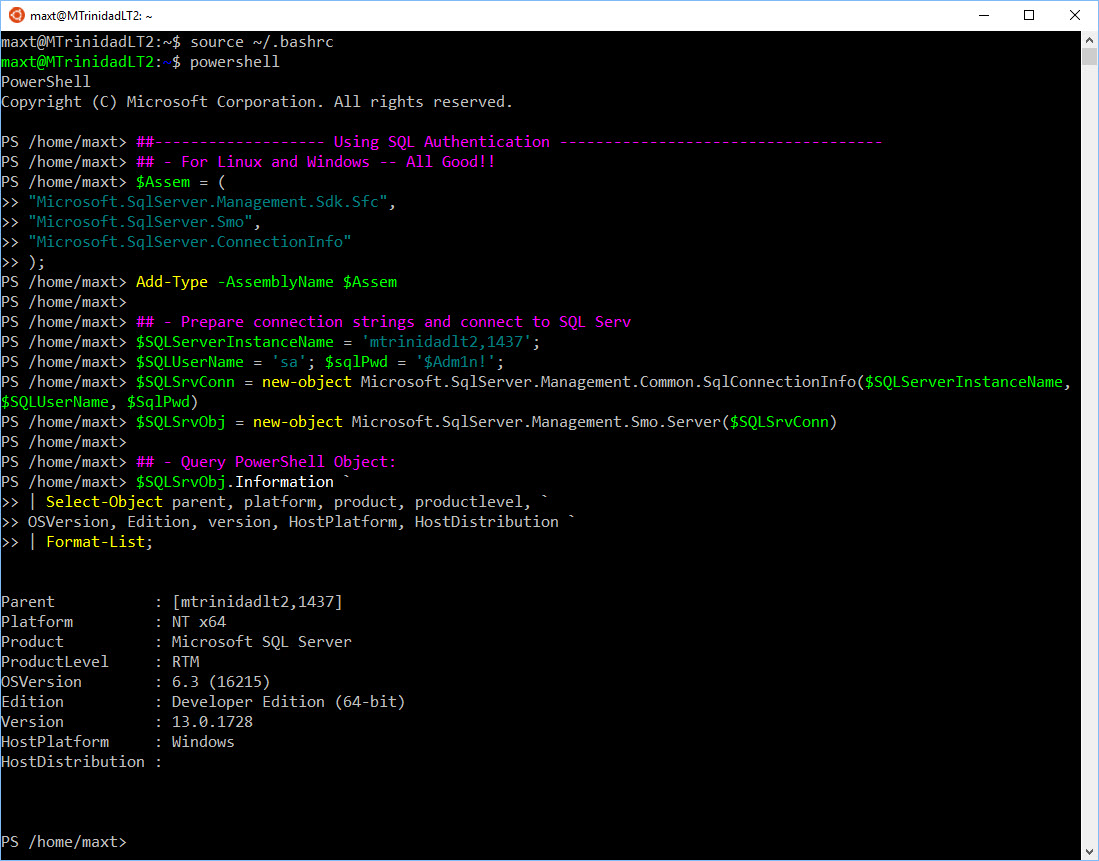
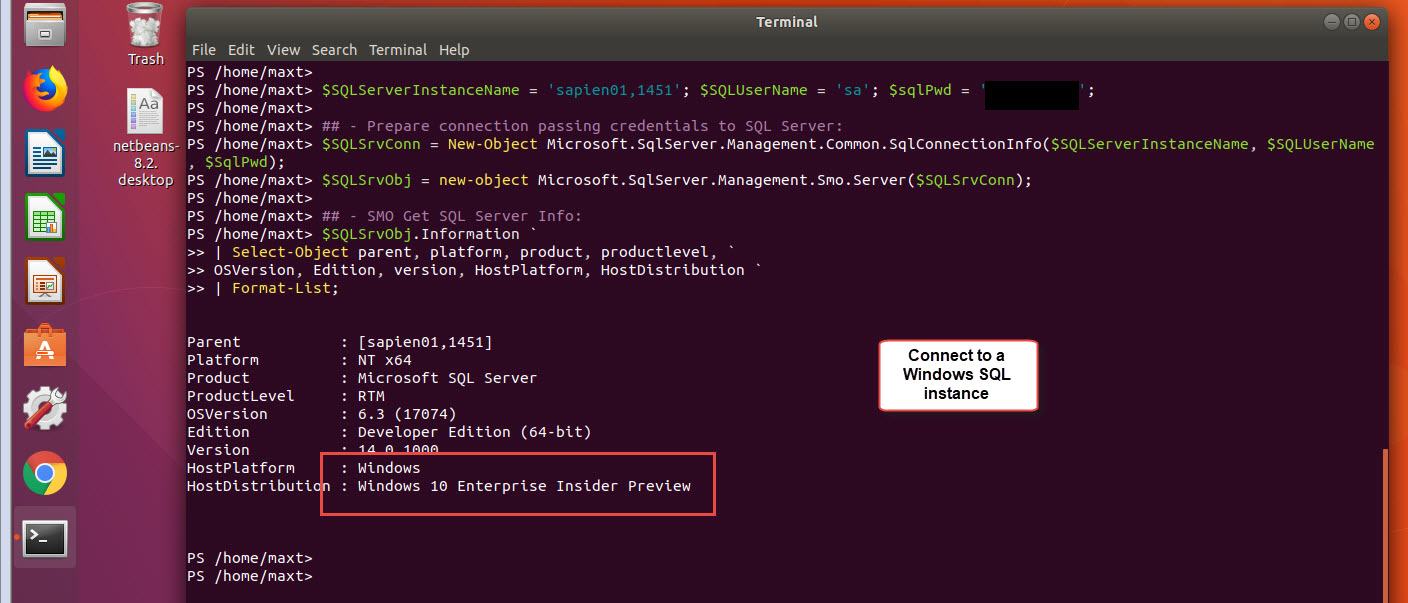
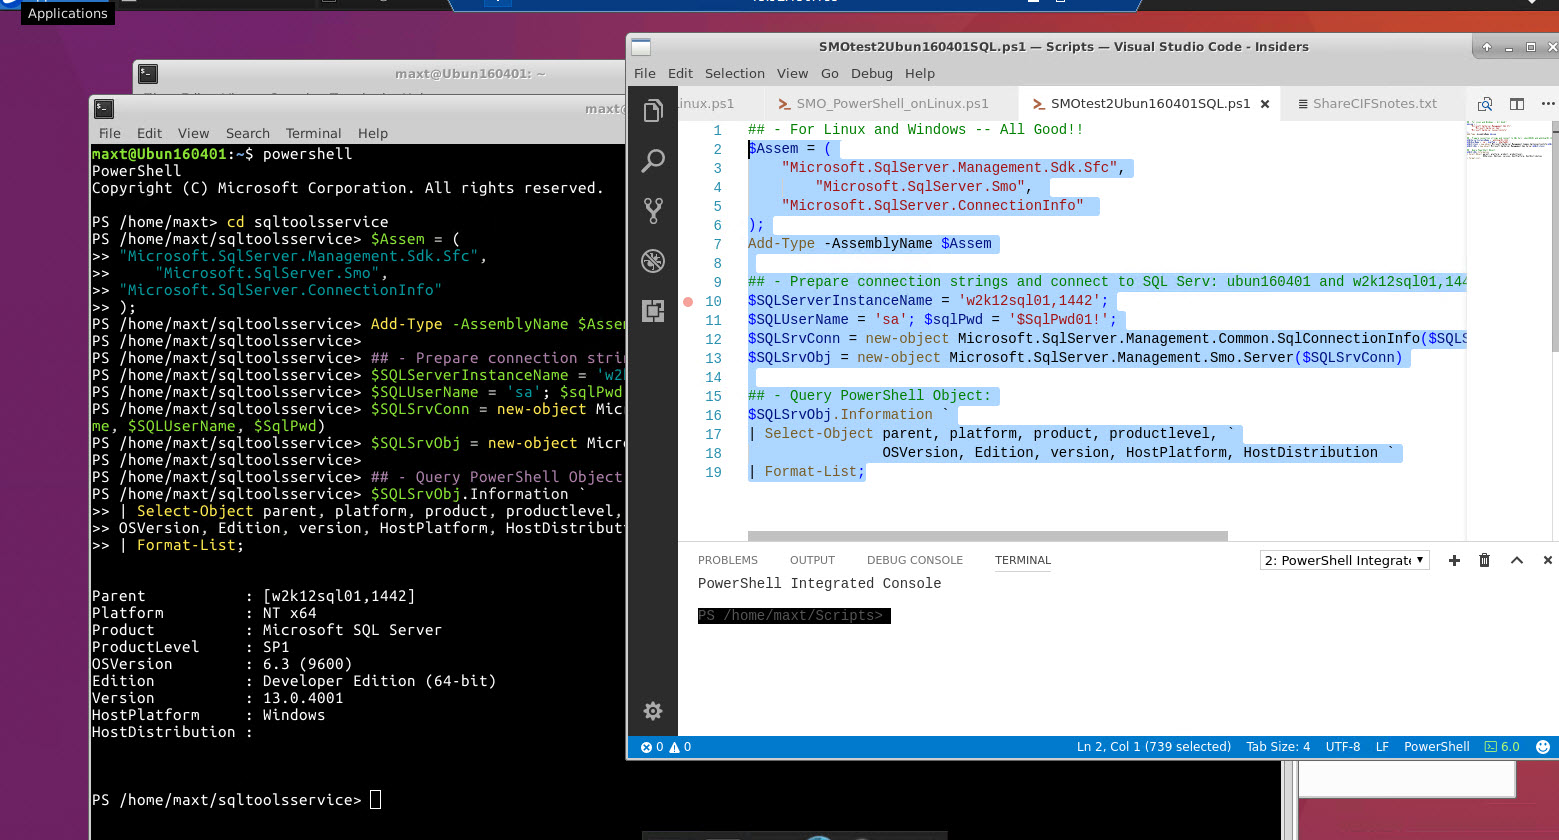
Please notice in the above image, the Windows 10 Insider Build 16215 Bash Console is running PowerShell Core. This list insider release made it possible for PowerShell Core to be functional again.

Conclusion

As we can see, this opens new opportunities to build cross-platform PowerShell scripts solutions working with SQL Servers in Linux, Windows, and others.

This is very exciting to start experiencing first hand these upcoming changes. I can’t deny that’s it’s challenging but you can’t turn down an opportunity to gain more skills.

Please, take advantage and subscribe to Microsoft Azure. Build, test, and start deploying solutions. Don’t be afraid to be creative. We all learn thru trial and errors!

This is a good time to keep up with what’s going on with technology.

Additional References:

Microsoft Azure: https://azure.microsoft.com/en-us/
Github: https://github.com/
Ubuntu: https://www.ubuntu.com/
Microsoft Windows Bash Shell: https://msdn.microsoft.com/en-us/commandline/wsl/about
Microsoft Academy: https://mva.microsoft.com/
Microsoft Channel 9: https://channel9.msdn.com/
Microsoft MVP Blog: https://blogs.msdn.microsoft.com/mvpawardprogram/
Microsoft SQL Server Docs: https://docs.microsoft.com/en-us/sql/sql-server/sql-server-technical-documentation
Microsoft PowerShell Blog: https://blogs.msdn.microsoft.com/powershell/

Azure PowerShell Preview 1.0 is here

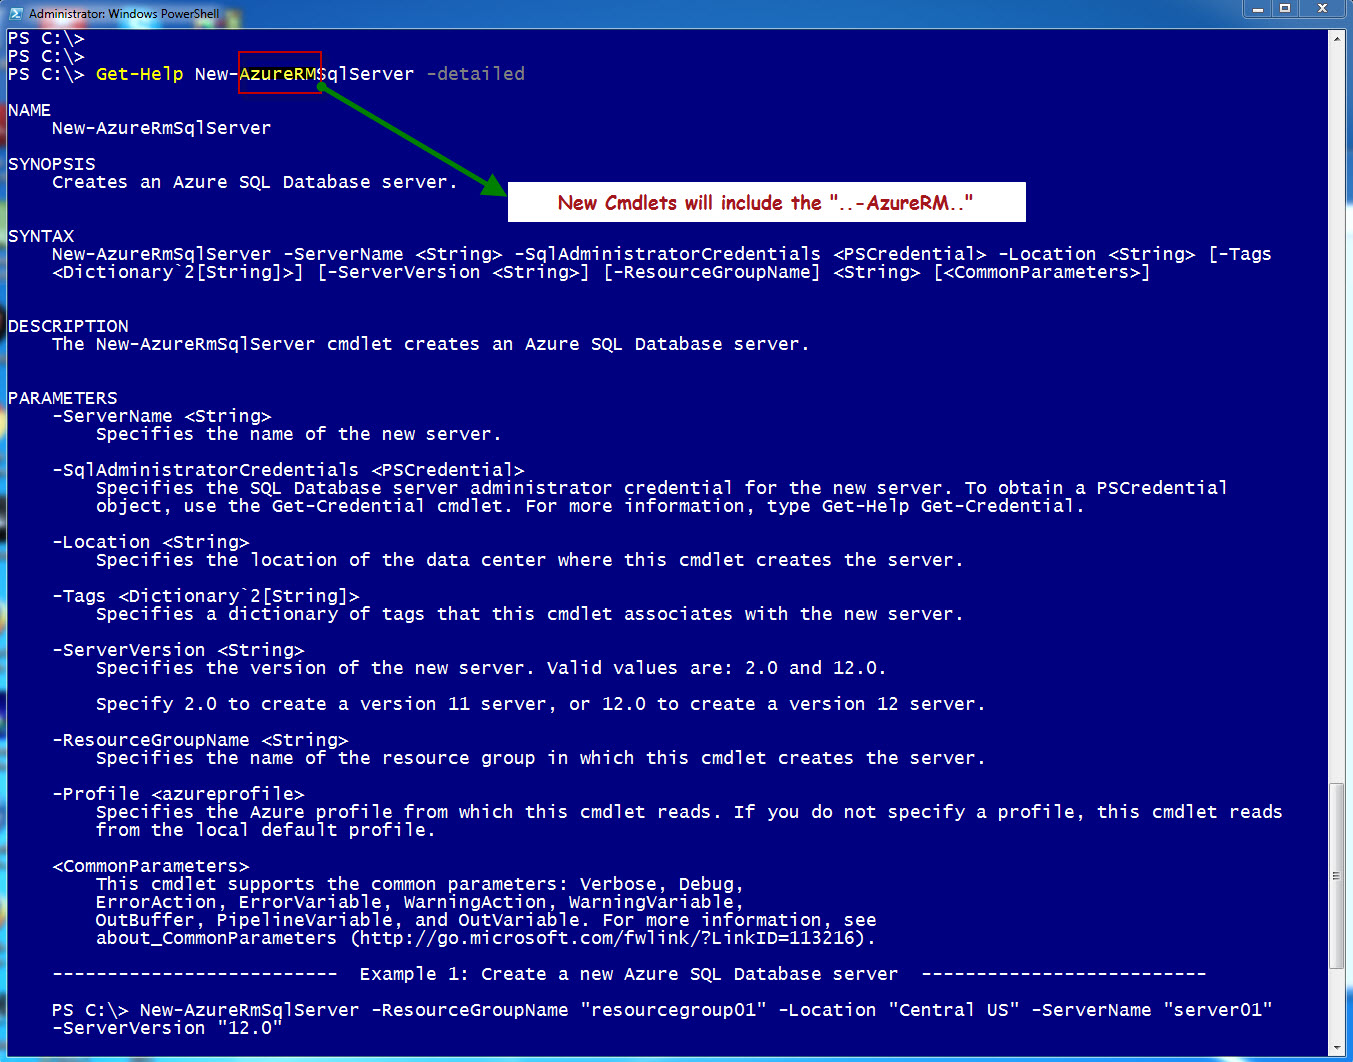
Welcome to PowerShell Azure Resource Manager (RM)!

Microsoft has introduce and made available Azure PowerShell Preview 1.0.  Please read all about it in the following Azure Blog site:

Also, feel free to search for it at usign the following link:

Some Interesting links 

Well, within the search there are more interesting blog articles to start doing some PowerShell scripting:

How to install and configure Azure PowerShell: https://azure.microsoft.com/en-us/documentation/articles/powershell-install-configure/
Using Azure PowerShell with Azure Resource Manager: https://azure.microsoft.com/en-us/documentation/articles/powershell-azure-resource-manager/

Manage Azure SQL Database with PowerShell: https://azure.microsoft.com/en-us/documentation/articles/sql-database-command-line-tools/

Integrating SQL AlwaysOn with Azure Site Recovery: https://azure.microsoft.com/en-gb/blog/integrating-sql-alwayson-with-azure-site-recovery/

Get it at PowerShell Gallery

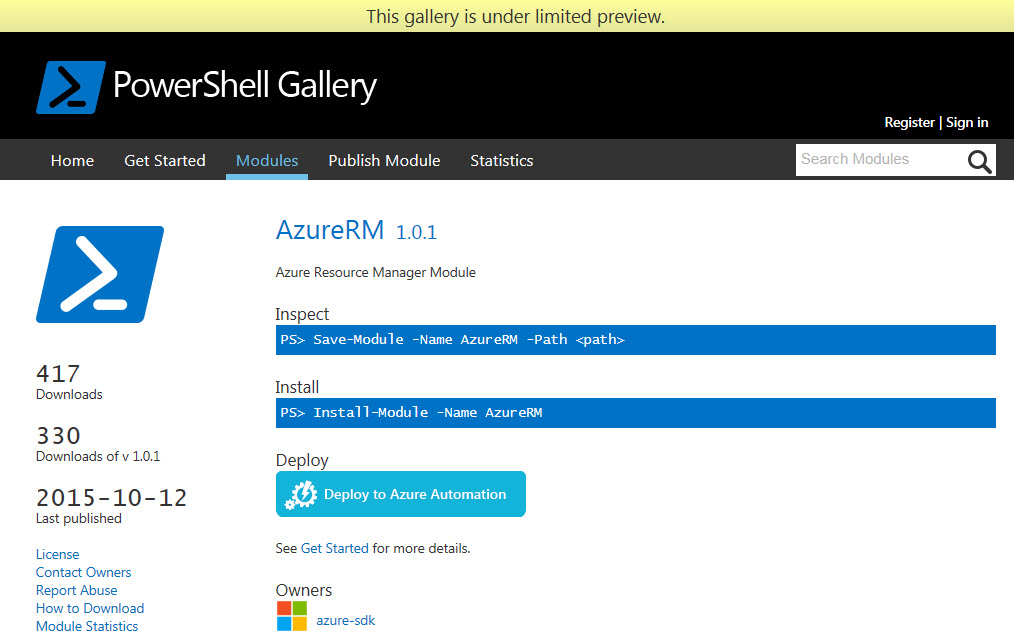
Now, my question here is, did you found Azure PowerShell 1.0 Preview? Probably not, but in fact, it’s AzureRM 1.0.1 to be installed. Although, I did found Azure version 0.9.11 and, Yes! I did download that one just in case.

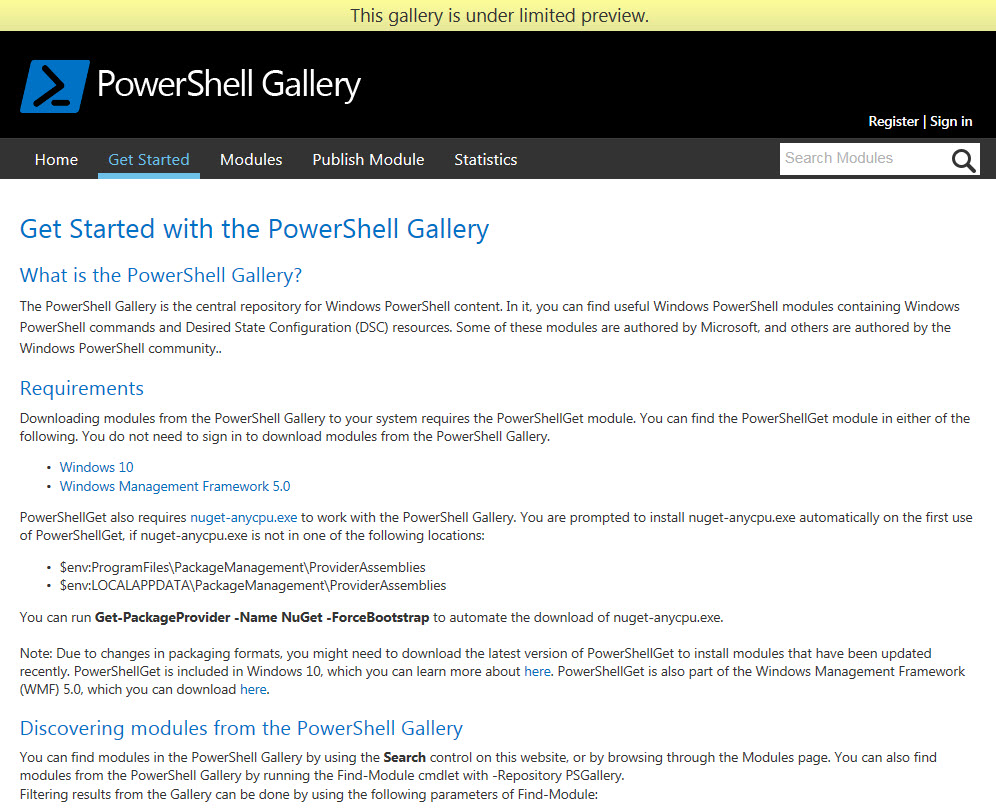
To download these new bits from the PowerShell Gallery, check out the “Get Started with the PowerShell Gallery” link: http://www.powershellgallery.com/pages/GettingStarted

AzureRM_01_10-16-2015

Search for both “Azure” and AzureRM”.

AzureRM_02_10-16-2015

AzureRM_03_10-16-2015

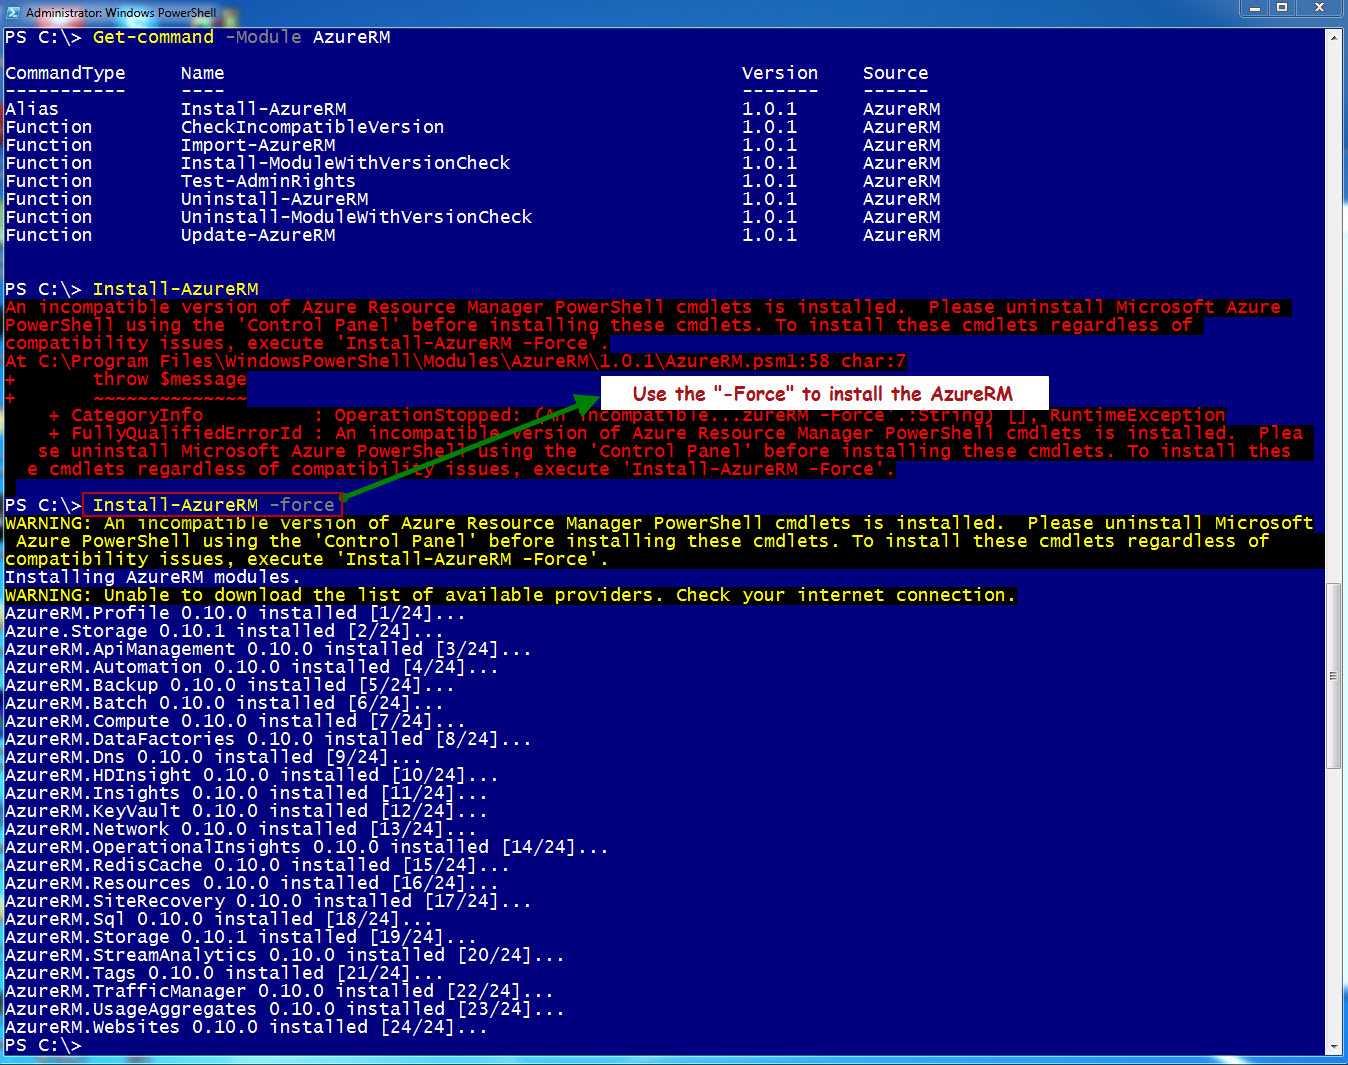
During my quest to download Azure PowerShell 1.0, I realized that its AzureRM the one I need to download using: “Install-Module AzureRM” followed by “Install-AzureRM -force“.

AzureRM_04_10-16-2015

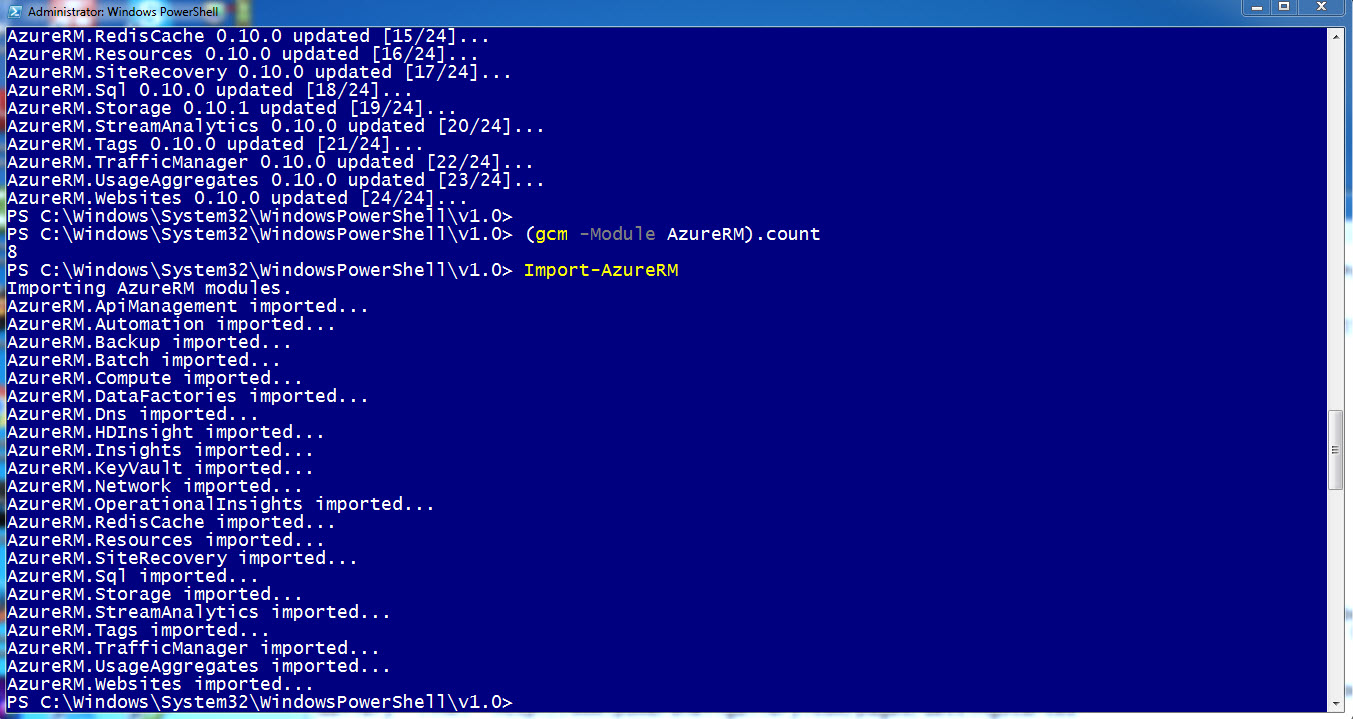
To start using the AzureRM Cmdlets, just run the “Import-AzureRM” command.

AzureRM_07_10-16-2015

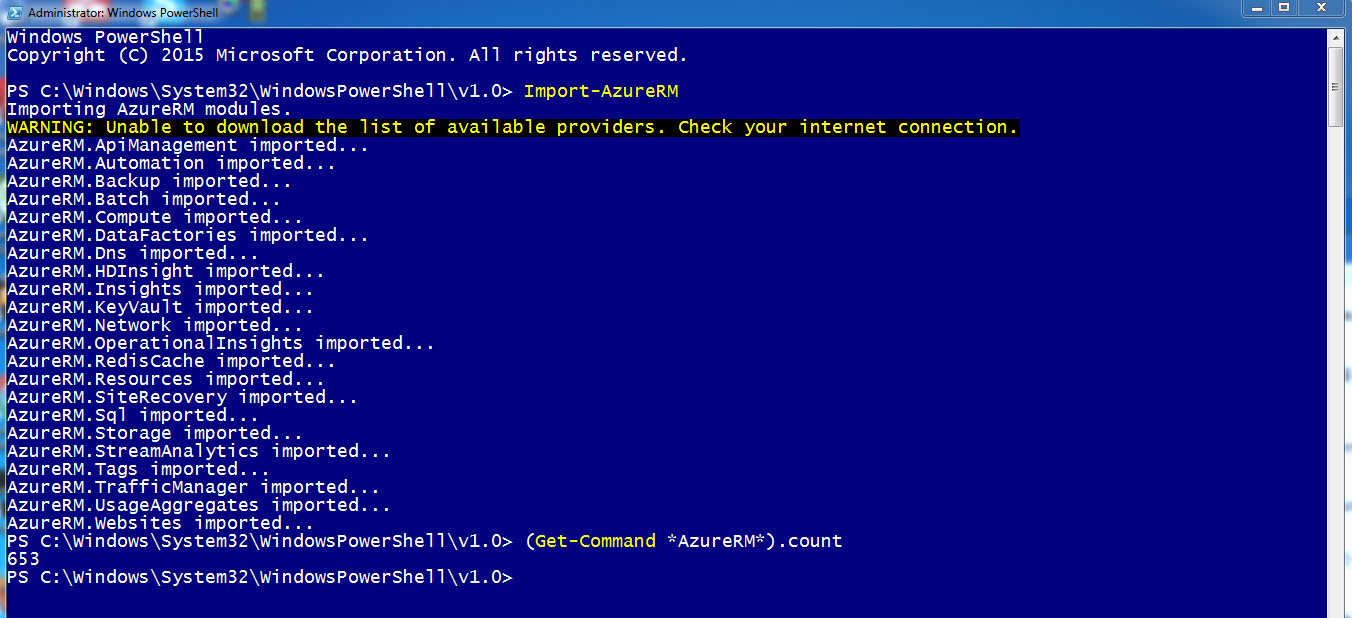
Now, we are ready to play with Azure Resource Manager and Azure SQL databases.   There’s a total of 653 *AzureRM* cmdlets.

AzureRM_08_10-16-2015

AzureRM_09_10-16-2015

Run the following command to list all *AzureRM* commands:

Import-AzureRM; Get-Command *AzureRM*;


In my next blog article I’ll be converting my classic Azure SQL script to use the Azure RM new paradigm.