PowerShell and T-SQL converting XML UTC DateTime value to DateTime string

Following my previous blog (“PowerShell – SQL Server SMO has XML and XSD Schema method“) I continue to use SMO to generate my XML files, I encountered that my SQL datetime field is converted to a UTC DateTime string. This gave me some work to get it back to a DateTime type. I had the requirement to provide my source file in XML format.

I realized using SMO WriteXml() method will write the DateTime type to a UTC DateTime string format in the XML file resulting in something like this:

[sourcecode language=”text”]
:
<OrderDate>2001-07-01T00:00:00-04:00</OrderDate>
:
[/sourcecode]

Unfortunate, trying to pass this value to a SQL DateTime field is tricky. I look around the internet and there’s plenty of examples of UTC but not in this format “2001-07-01T00:00:00-04:00″.   So, I ended up using PowerShell to ease off the pain.

Here’s an example of how PowerShell can easly convert UTC DateTime string to a regular System.DateTime type:

[sourcecode language=”powershell”]
$utc = "2001-07-01T00:00:00-04:00";
[datetime] $converte_DateTime = $utc;

## – Resulting in:
#-> Sunday, July 1, 2001 12:00:00 AM

[/sourcecode]

That was easy. Right! But the issue is when we want to pass this value into a SQL DateTime type. Then, here’s a possible solution now that I got PowerShell to convert my UTC string to string DateTime output.

Using the string generated from PowerShell, as a proof-of-concept, I can test this value in the following T-SQL script:

[sourcecode language=”sql”]
–now using t-SQL to convert a UTC string to a standard datetime type value:
Declare @stringFromPowerShellDateTime nvarchar(50)
Declare @fixDate nvarchar(50)
Declare @cleanup int
Declare @dtDateTime DateTime

Set @stringFromPowerShellDateTime = ‘Sunday, July 1, 2001 12:00:00 AM’
Set @cleanup = (charindex(‘,’, @stringFromPowerShellDateTime, 1))
Set @fixDate = (Substring(@stringFromPowerShellDateTime, (@cleanup+1), len(@stringFromPowerShellDateTime)))
Set @dtDateTime = (Convert(DateTime, @fixDate, 101))

Select @dtDateTime

— – Resulting in:
– -> 2001-07-01 00:00:00.000

[/sourcecode]

The end result of this SQL script is to be able to create my SQL DateTime type from the PowerShell converted UTC-to-DateTime-String.

Now I need go back to my first XML file, and update my DateTime elements values with the converted UTC to string format. Here’s where I go back PowerShell to fix my XML file:

[sourcecode language=”powershell”]
## – the following routine will correct UTC datetime as string:
[xml] $xmlfile = Get-Content ‘C:\PowerShellScripts\ADWtblOrders1.xml’;
foreach($xItem in ($xmlFile.newdataset.table))
{
[string] $dt = ([DateTime] $xItem.OrderDate).ToString();
$xItem.OrderDate = $dt;
};
$xmlfile.save(‘C:\PowerShellScripts\ADWtblOrders1_New.xml’);

[/sourcecode]

The results after convert the DateTime to the new XML DateTime values fix will look like this:

[sourcecode language=”text”]
:
<OrderDate>7/1/2001 12:00:00 AM</OrderDate>
:
[/sourcecode]

Now, this DateTime values can be consume in SQL Server without any issues. Notice that I’m using the “xml” Accelerator which has a *.Save() method so you can save your changes to file .

I think you got the pieces necessary to use PowerShell, XML, SMO, and T-SQL.

Don’t be afraid!
PowerShell – SQL Server SMO has XML and XSD Schema method.

As I continue to work with Microsoft BizTalk Server it still amazed me when I can find something useful.  As I was building a BizTalk solution that involves getting data from our SQL Server table, I found an SMO method that allow me to create both the XML and the XML Schema (XSD) so I can use them in my BizTalk solution.

Here’s the quick route using PowerShell and SQL Server SMO (SQL Server Management Objects) to create your XML Schema from a SQL table.  Keep in mind, in order to use SQL Server SMO you must have SQL Server 2005 or greater.

1. Here’s a simple T-SQL script to query a table:

[sourcecode language=”powershell”]
## – Prepare you SQL Script in ‘PowerShell’ Here-String:
## (for more Info on ‘Here-String’use the command: get-help about_Quoting_Rules
$Sqlqry1 = @’
Use Northwind
SELECT TOP 3 [OrderID]
,[CustomerID]
,[EmployeeID]
,[OrderDate]
,[RequiredDate]
,[ShippedDate]
,[ShipVia]
,[Freight]
,[ShipName]
,[ShipAddress]
,[ShipCity]
,[ShipRegion]
,[ShipPostalCode]
,[ShipCountry]
FROM [Northwind].[dbo].[Orders]
‘@;

[/sourcecode]

2. Then, the next three SMO lines we get the information and store it in our variable.  Make sure to define the variable as an array so you can get the right format:

[sourcecode language=”powershell”]
## – Load the SQL Server SMO Assembly:
[System.Reflection.Assembly]::loadwithPartialName(‘Microsoft.SQLServer.SMO’)

## – Connect to your SQL Server Instance and execute your SQL Query:
$MySQL = New-Object(‘Microsoft.SqlServer.Management.SMO.Server’) ‘BIZTALK2K10DEV’;
$tbldata = $MySQL.Databases[‘Northwind’].ExecuteWithResults($Sqlqry1);

[/sourcecode]

3. The following line just check the first 10 records in your PowerShell object:

[sourcecode language=”powershell”]
## – Display the first 10 lines of your data:
($tbldata.Tables) | Select -First 10 $_ | Format-Table -AutoSize;

[/sourcecode]

4. Finally, we can use the “.WriteXML()” and “.WriteXmlSchema()” methods to create our XML and XSD files:

[sourcecode language=”powershell”]
## – Create you XML file with your data:
($tbldata).WriteXml(‘C:\PowerShellScripts\tblServiceFacts.xml’);

## – To create the XML Schema (.xsd file) use the following method:
($tbldata).WriteXmlSchema(‘C:\PowerShellScripts\tblServiceFacts.xsd’);

[/sourcecode]

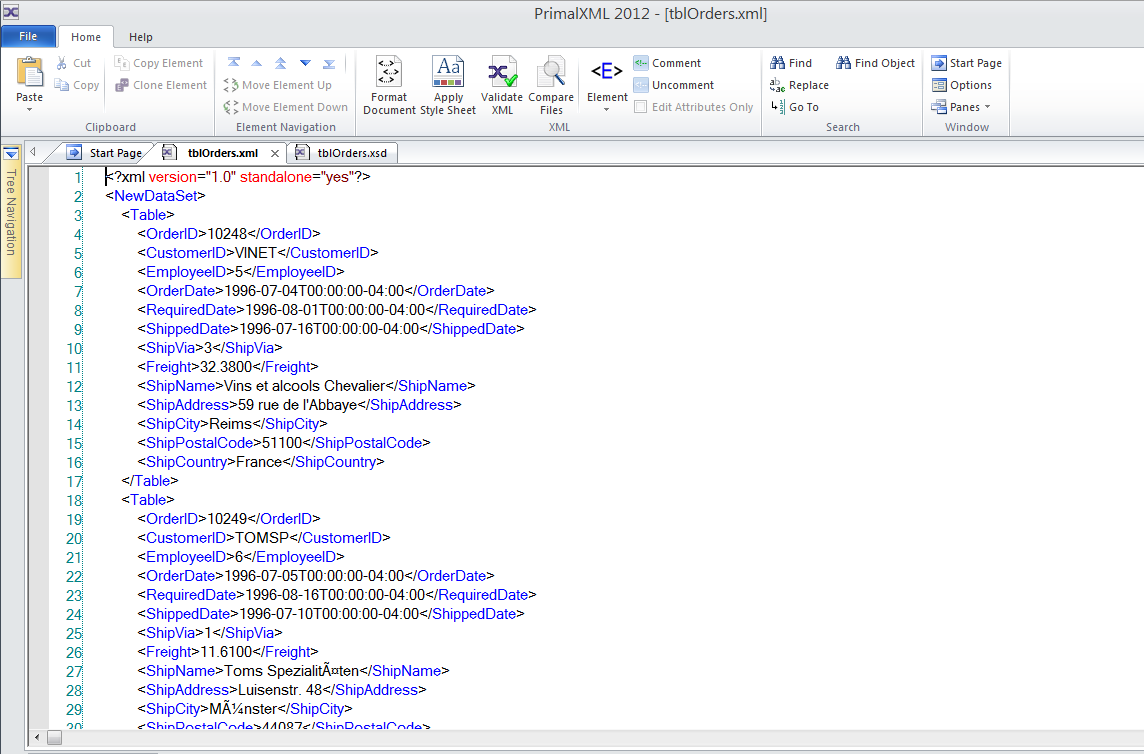
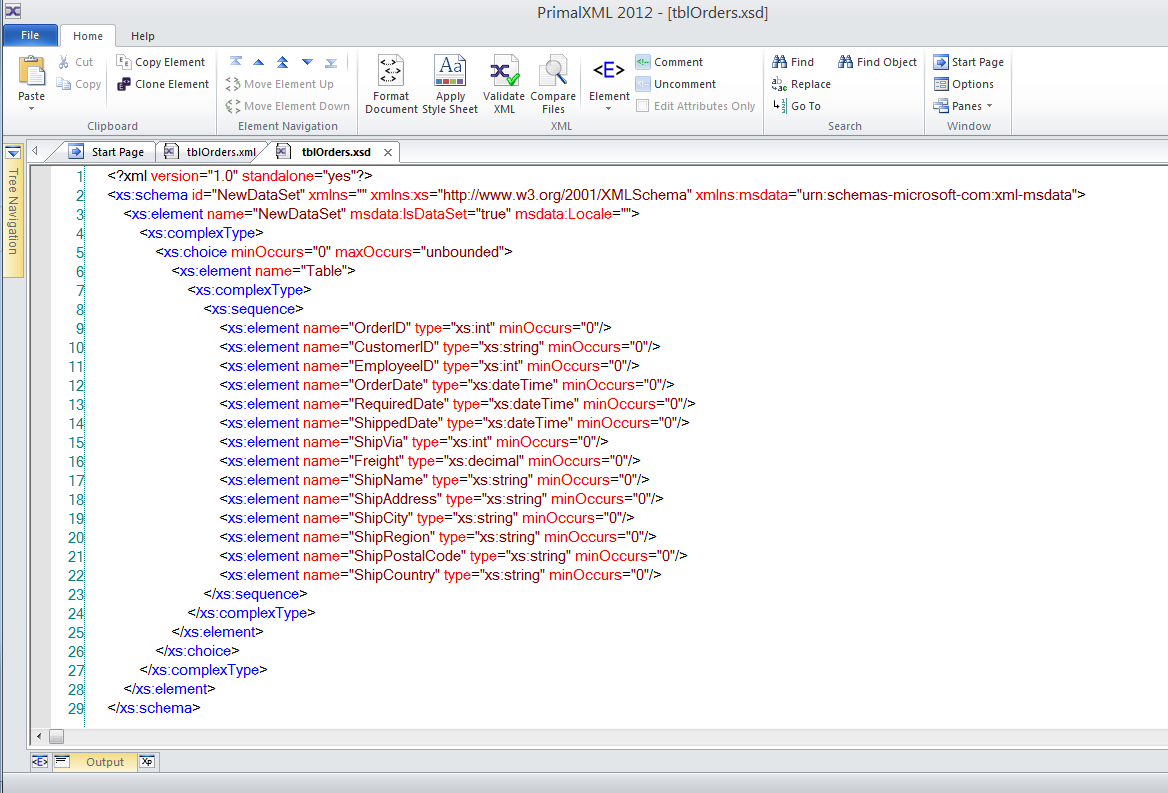
Sapien XML Editor - looking at teh XSD file created with SMO
Sapien XML Editor - looking at the XML file generated with SMO

We are ready to incorporate the XSD file in your BizTalk solution(s).

There’s a few things to keep in mind. The above version will work with SQL Server 2008 but will behave different with SQL Server 2005 and PowerShell V2.0 it might giving you an “overload” error.

So, if you encounter the following error, then here’s a possible how-to fix it: (it work for me but further testing in other environment gave me a different results.  It’s all just about testing and understanding your tools.

[sourcecode language=”powershell”]
## – Create you XML file with your data:
$tbldata.WriteXml([string] ‘C:\PowerShellScripts\tblOrders.xml’);

## – To create the XML Schema (.xsd file) use the following method:
$tbldata.WriteXmlSchema([string] ‘C:\PowerShellScripts\tblOrders.xsd’);

[/sourcecode]

Don’t forget to test your code to make sure you’re getting what you want.   The main code will work in both PowerShell v2.0/v3.0, and SQL Server 2008 (or greater).

Awesome Technology!   I will come back to this issue later and provide the PowerShell V2 solution.

PowerShell – Quick sample of getting a BizTalk Performance Counter information

As you all probably know, you can use the “Reliability and Performance Monitor” in older servers, or the “Performance Monitor” in newer ones.  This mean going thru the GUI to start setting up you user-defined custom counters.

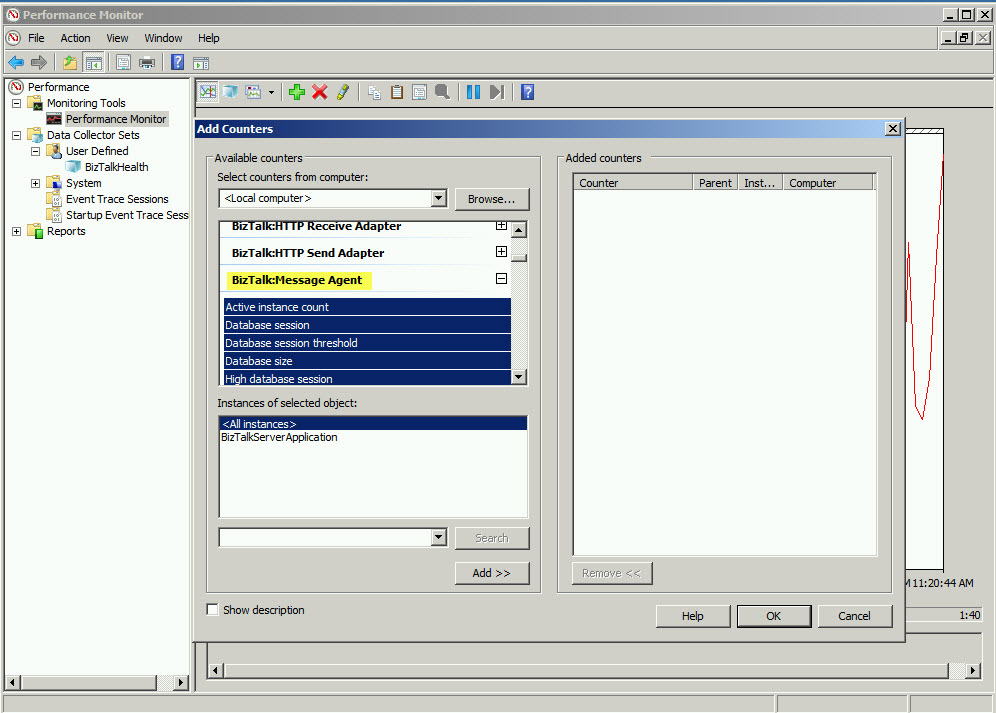
Well, for a pointer, the GUI can help in fine-tuning what you want to accomplished in your script.  Here’s a quick example of getting a  “BizTalk:Message Agent” Performance counter to get the “Total messages published” for a giving application.  But before you start going crazy with BizTalk, make sure the application(s) are “Started“.

Note: To get Microsoft BizTalk Server Performance Counter information, here’s some links:

I have ran the following script code against all version of PowerShell V1->V3:

1. First you need to load the Assembly responsible of giving you the Performance Counter class:

 [System.Reflection.Assembly]::LoadWithPartialName(“System.Diagnostics”)

2. Then, we can create the PowerShell variable that will hold our results:

$bpc = new-object system.diagnostics.PerformanceCounter(“BizTalk:Message Agent“, “Total messages published“, “YourHostInstanceName”, “BTSserver”);

3. To display the information just type: $bpc.

Sample output:

PS D:\> $pbc

CategoryName     : BizTalk:Message Agent
CounterHelp      : The total number of messages published by the service class
CounterName      : Total messages published
CounterType      : NumberOfItems32
InstanceLifetime : Global
InstanceName     : BizTalkServerApplication
ReadOnly         : True
MachineName      : XXXXXXX
RawValue         : 71191
Site             :
Container        :

And, that’s it.

You’re looking for the “RawValue“.  To keep updating the result I notice you can call the variable again without running the two previous script lines.  Eventually, you can enhanced this sample to go thru each of BizTalk Server, each BizTalk host instances, and pull the information.

That’s Awesome!

I’m using BizTalk Performance Counter as an example but you can probably figures out how to use the other counters, and the rest I leave the rest to your imagination.

PowerShell – Adding a Sequence column to your result

I just the little things that can help while collecting information using PowerShell.  This is one thing that can be reuse in so many ways and is just a matter of using one simple concept.

Let say you want to collect a list of files and at the same time you want to create a sequence# column to be included with this list and at the same time you know the total number listed.

Here’s my way I’m doing it:

1.  First, we are going to create a PowerShell “Global” variable:

$Global:sequence = 1;

2.  Then, we add the command (or could be another PowerShell variable holding the results).  In this example I’m using “dir” to get the list of all “name” and include a sequence column using custom Expression scriptblock:

$Global:sequence = 1; dir | Select @{label = “Seq”; Expression = {$Global:sequence; $Global:Sequence++;}}, Name | Format-Table -Autosize;

Now the trick is simple.  You define a global variable which will retain the incremental value produce inside the scriptblock in the “.. Expresion = {..}”.

Basically, just reuse the scriptblock “@{Label = “seq”; Expression = {$Global:Sequence; $Global:Sequence++;}}” in your PowerShell “Select” command.

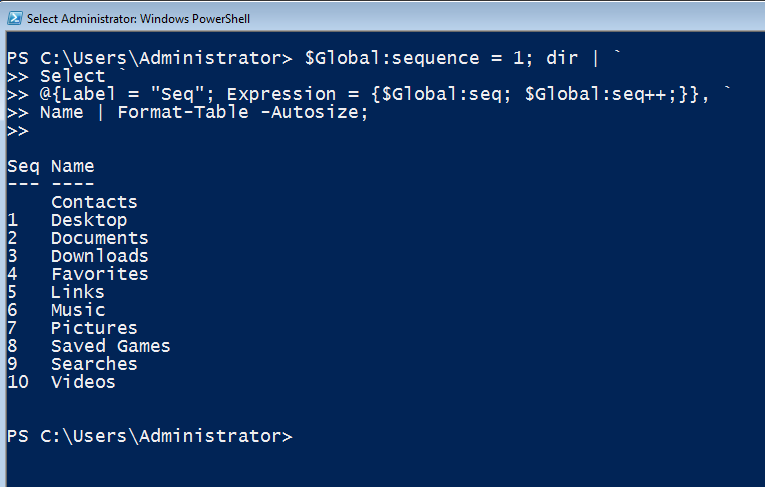
Here’s a similar result:

Full code:

$Global:sequence = 1; dir | `
 Select `
 @{Label = “Seq”; Expression = {$Global:seq; $Global:seq++;}}, `
 Name | Format-Table -Autosize;

Using PowerShell $Error variable

The $Error variable hold a collection of information, and that’s why using $Error[0] can get to your error message objects.  Also the $Error[0] variable will hold the last error message encountered until the PowerShell session ends.

Sample Console session:
Windows PowerShell
Copyright (C) 2009 Microsoft Corporation. All rights reserved.

PS C:\Users\maxt> $error 
PS C:\Users\maxt>
PS C:\Users\maxt> Ip[config
Ip[config : The term ‘Ip[config’ is not recognized as the name of a cmdlet, function, script file, or operable program.
Check the spelling of the name, or if a path was included, verify that the path is correct and try again.
At line:1 char:10
+ Ip[config <<<<
    + CategoryInfo          : ObjectNotFound: (Ip[config:String) [], CommandNotFoundException
    + FullyQualifiedErrorId : CommandNotFoundException

PS C:\Users\maxt>
PS C:\Users\maxt> $error[0]
Ip[config : The term ‘Ip[config’ is not recognized as the name of a cmdlet, function, script file, or operable program.
Check the spelling of the name, or if a path was included, verify that the path is correct and try again.

At line:1 char:10
+ Ip[config <<<<
    + CategoryInfo          : ObjectNotFound: (Ip[config:String) [], CommandNotFoundException
    + FullyQualifiedErrorId : CommandNotFoundException

PS C:\Users\maxt>
PS C:\Users\maxt> $Error[0].InvocationInfo.line
Ip[config
PS C:\Users\maxt> 

Starting a new PowerShell session the $Error will be empty.  Type a bad command “Ip[onfig” and the $Error variable will get populated.  Then we use the $Error[0] to display and access the rest of the information it holds.

Don’t forget to use the Get-Member to expose your PS variable objects.

PS C:\Users\maxt> $Error | Get-Member

   TypeName: System.Management.Automation.ErrorRecord

Name                  MemberType     Definition
—-                  ———-     ———-
Equals                Method         bool Equals(System.Object obj)
GetHashCode           Method         int GetHashCode()
GetObjectData         Method         System.Void GetObjectData(System.Runtime.Serialization.Serializatio
GetType               Method         type GetType()
ToString              Method         string ToString()
CategoryInfo          Property       System.Management.Automation.ErrorCategoryInfo CategoryInfo {get;}
ErrorDetails          Property       System.Management.Automation.ErrorDetails ErrorDetails {get;set;}
Exception             Property       System.Exception Exception {get;}
FullyQualifiedErrorId Property       System.String FullyQualifiedErrorId {get;}
InvocationInfo        Property       System.Management.Automation.InvocationInfo InvocationInfo {get;}
PipelineIterationInfo Property       System.Collections.ObjectModel.ReadOnlyCollection`1[[System.Int32,
TargetObject          Property       System.Object TargetObject {get;}
PSMessageDetails      ScriptProperty System.Object PSMessageDetails {get=& { Set-StrictMode -Version 1;

PS C:\Users\maxt> $Error.InvocationInfo
PS C:\Users\maxt> $Error[0].InvocationInfo

MyCommand        :
BoundParameters  : {}
UnboundArguments : {}
ScriptLineNumber : 1
OffsetInLine     : 9
HistoryId        : -1
ScriptName       :
Line             : ip[onfig
PositionMessage  :
                   At line:1 char:9
                   + ip[onfig <<<<
InvocationName   : ip[onfig
PipelineLength   : 0
PipelinePosition : 0
ExpectingInput   : False
CommandOrigin    : Internal

Finally, we can get deeper in the $Error[0] object to extract the line that failed during execution.  If you need to display the failed command line you can use the following line:

$Error[0].InvocationInfo.line

PS C:\Users\maxt> $Error[0].InvocationInfo.line
ip[onfig
PS C:\Users\maxt>

It’s all about understanding your .NET objects.  Hope this help!
🙂

Installing SQL Server 2012 on Server Core 2012

The Truth, it wasn’t easy.  I look around some blogs but they always failed to mention what was done prior to the actual installation of SQL Server on a Server Core machine.  But, installing SQL Server on a Server Core 2012 makes it better if you have installed the Minimal-Server interface.  Yes! The new Server Core gives you the flexibility to partially add and remove the GUI shell.

Here’s what I did to get my SQL Server on a Server Core 2012 installed in a Virtual Machine.   Remember, when using Hyper-V, you can use the shapshot feature to create a point of recovery state in case you need to go back and start over.

Setting up Server Core 2012 with Minimal-Server Interface

First, I need to make sure Server Core has all the components in place.  In my test building a virtual machine I found that I needed to have:

1. Connection to the internet or some features will fail to install.

2. I need to assign a static IP Address (so I can join my domain).

3. Add an admin user account to the local administrator group (Workgroup or Domain admin user account).

4. Configure Remote Management.

5. Configure Remote Desktop.

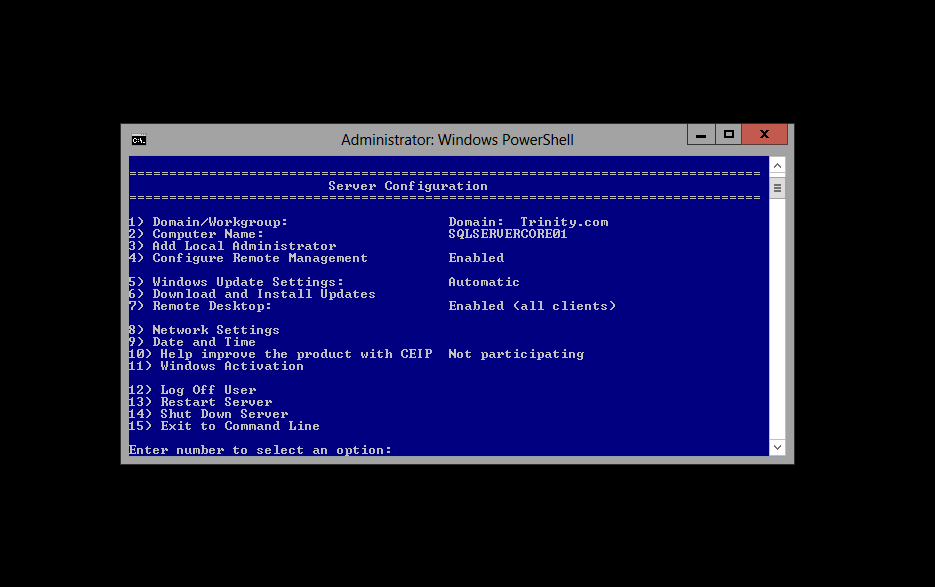
To get this done I use the vbscript application “SConfig” tool to assist configuring my Server Core.  It’s a great tool, and it can be executed from PowerShell prompt too.

Configuring Server Core 2012 with VBScript "SConfig" Tool

Now, keep in mind you need to meet some requirements before installing SQL Server.  Most important is installing .NET Framework 3.5.  But, if you successfully install the following Windows Features to enable the Minimal-Server interface on Server Core 2012 then you should be fine for setting up SQL Server.  Again, connection to the internet is mandatory (at least in my scenario).

Here’s the features required to *install and enabled the Minimal-Server interface:

Install-WindowsFeature -Name UpdateServices

Install-WindowsFeature -Name Net-Framework-Core

Install-WindowsFeature -Name Server-Gui-Mgmt-Infra -restart

*Note: Notice these are PowerShell commands.

Yes! You can use PowerShell.  Just type *PowerShell as soon as the command prompt shows up and you can continue building the you Server Core.  A restart of the server will be needed.

Tip: To start PowerShell in Server Core 2012 DOS command prompt, type “PowerShell” and press Enter .  Then, to get back to DOS command prompt, type the “Exit” and press Enter.

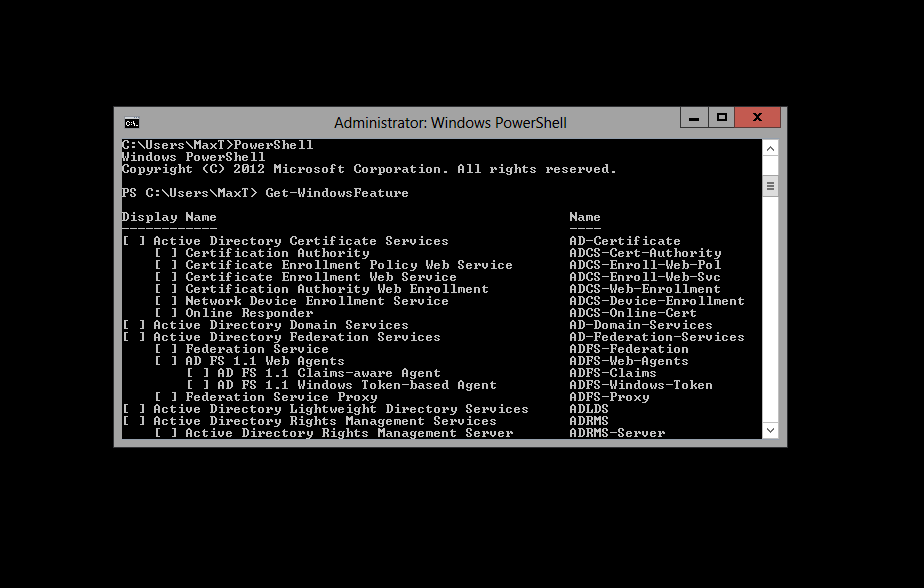
To get a list of all installed features, use the following PowerShell command:

Get-WindowsFeature

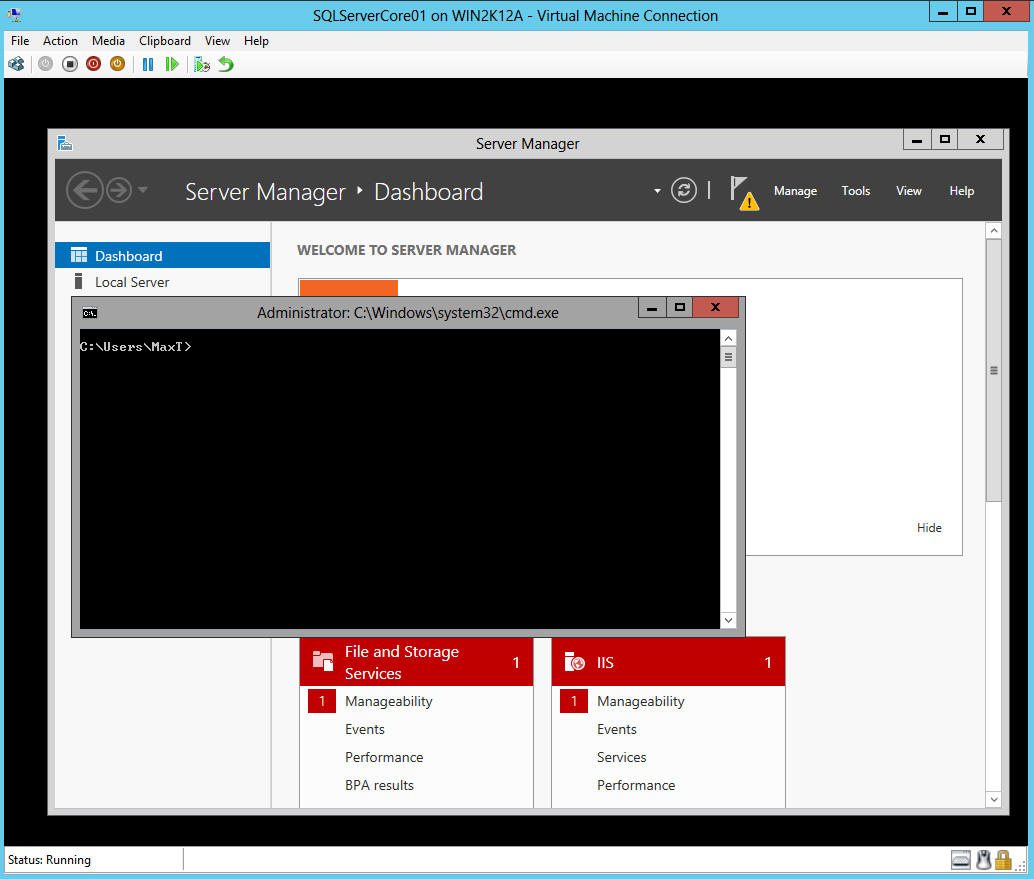
Use the above command verify the .NET Framework 3.5 features has been enabled.  Of course, after rebooting the server you will notice the Server Manager GUI will be displayed along with the command prompt.  This is a good indication .NET Framework is in place.

After rebooting, you will get the Minimal-Server Interface.

Server Core 2012 with Minimal-Server interface

Installing SQL Server 2012 on Server Core 2012

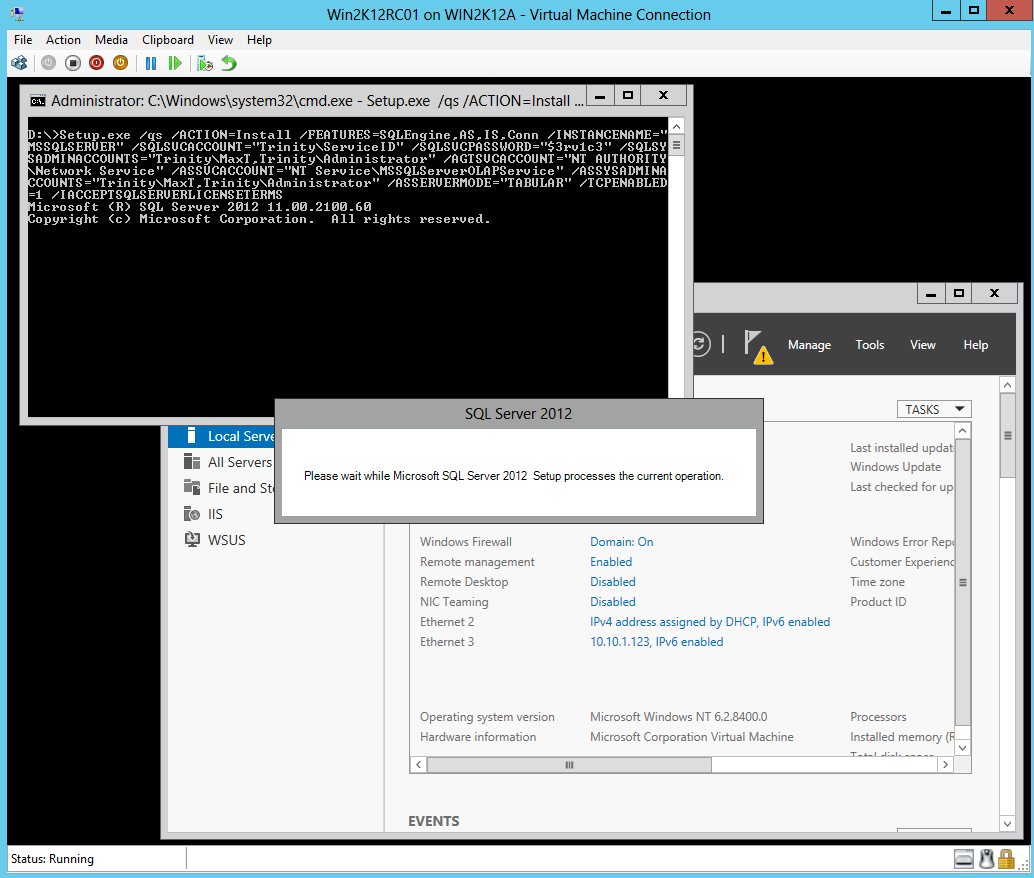
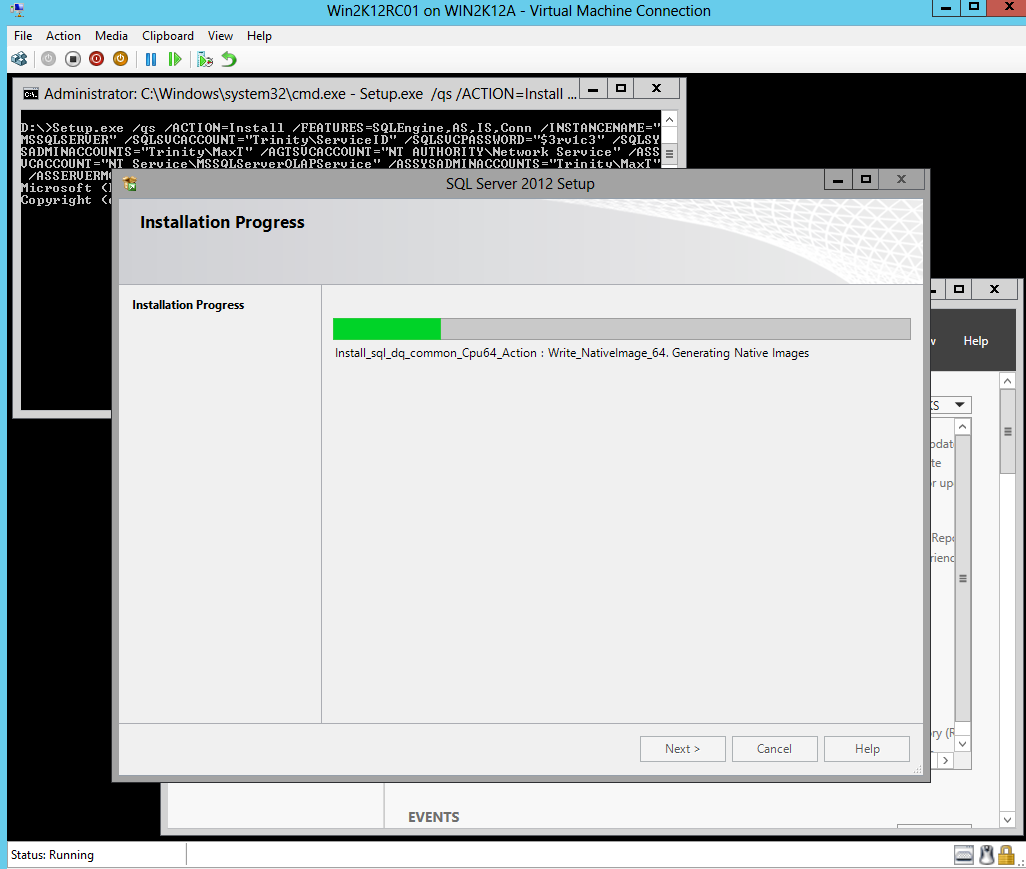
Now, I’m are ready to install SQL Server 2012.  I have attached the SQL Server 2012 ISO image to my virtual machine.  Here’s the *Setup command to install: SQLEngine, AS, IS, and Conn.  For more information: http://msdn.microsoft.com/en-us/library/hh231669.aspx

Setup.exe /qs /ACTION=Install /FEATURES=SQLEngine,AS,IS,Conn /INSTANCENAME=”MSSQLSERVER” /SQLSVCACCOUNT=”DomainName” \AccountName” /SQLSVCPASSWORD=”*******”  /SQLSYSADMINACCOUNTS=”DomainName\AccountName” /AGTSVCACCOUNT=”NT AUTHORITY \Network Service” /ASSVCACCOUNT=”NT Service\MSSQLServerOLAPService” /ASSYSADMINACCOUNTS=””DomainName\AccountName” /ASSERVERMODE=”TABULAR” /TCPENABLED=1 /IACCEPTSQLSERVERLICENSETERMS

*Note: The above command is a *one-liner.

A Word of Caution. I’ve experience that sometimes the setup will finished with no indication that everything completed successfully.  To find later that the SQLEngine wasn’t installed

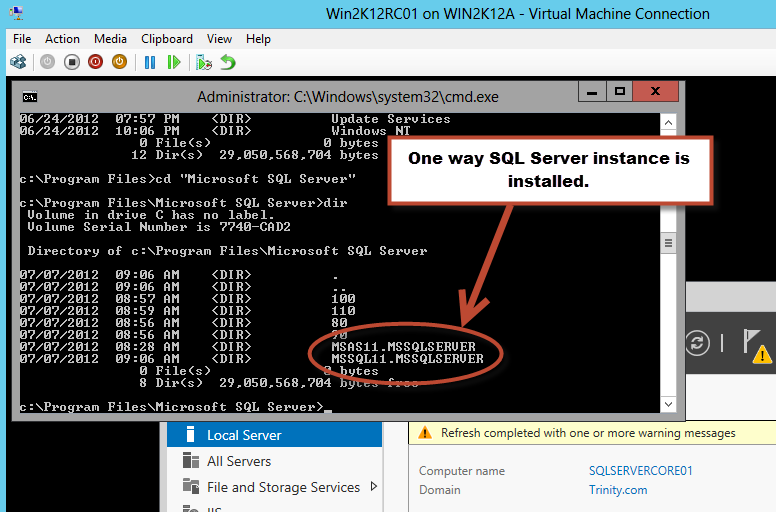
I had to verify the SQL Server instance was installed by looking at the Microsoft SQL Server folder under “C:\Program Files\Microsoft SQL Server” and use the PowerShell command “Get-Service” to see all services were active.

Another way to make sure SQL Server was installed on Server Core

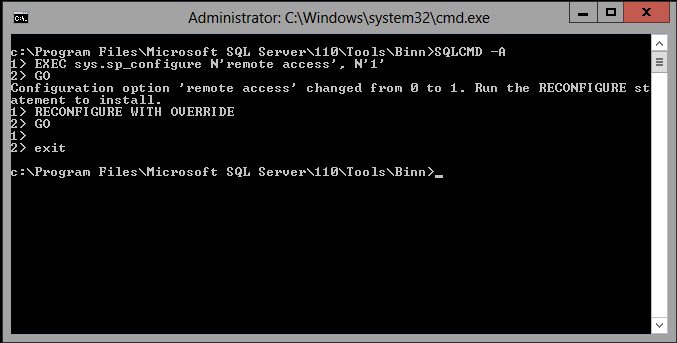
Now, I need to configure the SQL Remote Access to option “1” using the “SQLCMD -A” command from the “C:\Program Files\Microsoft SQL Server\110\tools\binn” folder with the following T-SQL lines:

EXEC sys.sp_configure N’remote access’, N’1′

GO

RECONFIGURE WITH OVERRIDE

GO

Exit

Using SQLCMD -A command

Test SQL Server connection remotely

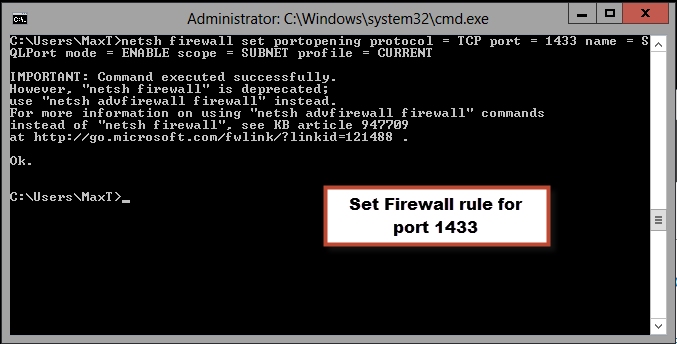
Now, before trying to connect from another machine, I need to configure the Windows *Firewall rule to allow access to my SQL Server by executing the following line in the DOS command prompt:

netsh firewall set portopening protocol = TCP port = 1433 name = SQLPort mode = ENABLE scope = SUBNET profile = CURRENT

Setting Firewall SQL Server rule

*Note: This command will  execute but read the warning message

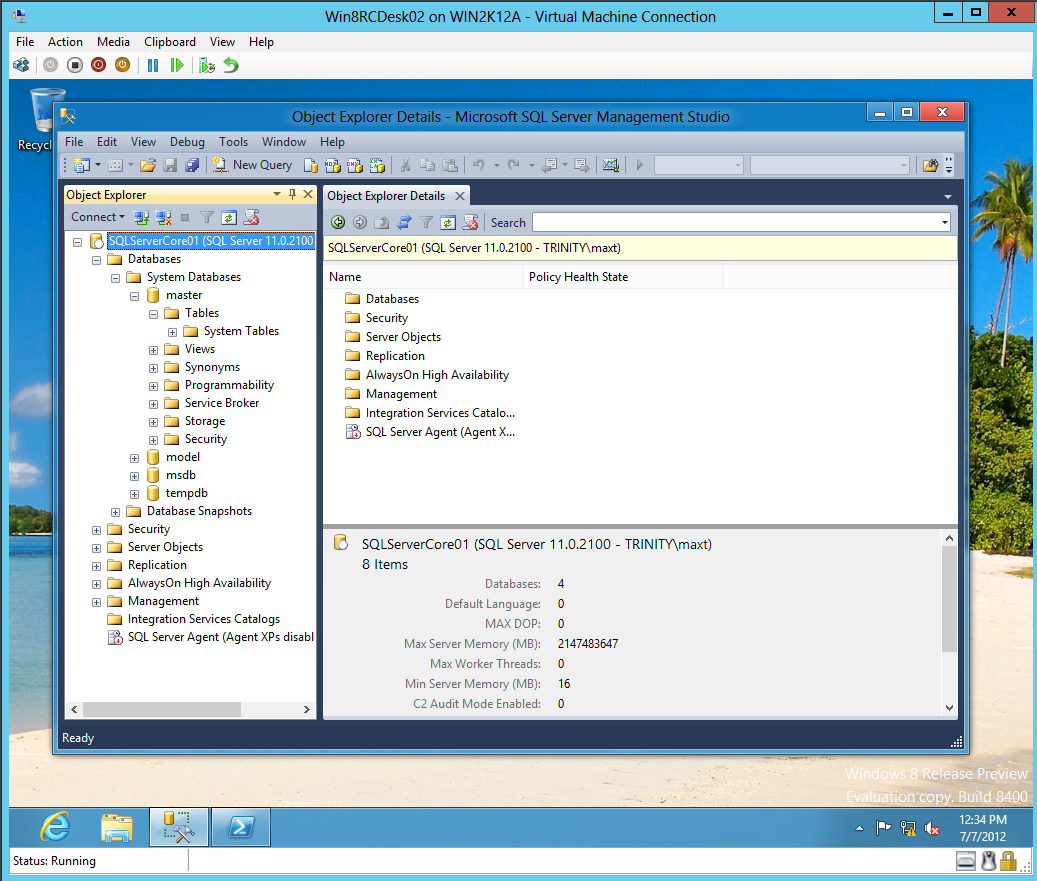
The moment of Truth!  Testing that I can connect to SQL Server on Server Core 2012 from a Windows 8 Desktop using SSMS.

Windows 8 client Virtual Machine connecting to SQL on Server Core 2012

Conclusion

In this blog I have accomplished the following in a virtual machine:

1. Build a Server Core 2012 with Minimal-Shell interface.

2. Use the VBScript “SConfig” to help configuring my server.

3. Install SQL Server 2012: Engine, Analysis Services, and Integration Services.

4. Verify remote connectivity using SSMS from a desktop machine.

I’m just having fun with technology!

Windows PowerShell v3.0 (RTM) Resource Links- Start Now!

As the RTM release of PowerShell will becomes available soon, here’s some resource information links you may want to take into consideration.

Download the Windows Management Framework 3.0 RTM: http://www.microsoft.com/en-us/download/details.aspx?id=34595

Windows PowerShell 3.0 and Server Manager Quick Reference Guides: http://www.microsoft.com/en-us/download/details.aspx?id=30002

Management and Tools for Windows Server 2012: http://technet.microsoft.com/en-us/library/hh801900

New V3 Language Features: http://blogs.msdn.com/b/powershell/archive/2012/06/14/new-v3-language-features.aspx

Intellisense in Windows PowerShell ISE 3.0: http://blogs.msdn.com/b/powershell/archive/2012/06/13/intellisense-in-windows-powershell-ise-3-0.aspx

Basic installation guide for Windows PowerShell Web Access: http://blogs.msdn.com/b/powershell/archive/2012/06/27/windows-powershell-web-access-basic-installation-guide.aspx

High Level Architecture of Windows PowerShell Workflow (Part 1): http://blogs.msdn.com/b/powershell/archive/2012/06/15/high-level-architecture-of-windows-powershell-workflow-part-1.aspx

High Level Architecture of Windows PowerShell Workflow (Part 2): http://blogs.msdn.com/b/powershell/archive/2012/06/19/high-level-architecture-of-windows-powershell-workflow-part-2.aspx

Managing Storage with Windows PowerShell on Windows Server 2012: http://blogs.msdn.com/b/san/archive/2012/07/03/managing-storage-with-windows-powershell-on-windows-server-2012.aspx

Getting Started with Windows Azure PowerShell: http://msdn.microsoft.com/en-us/library/windowsazure/jj156055.aspx

And, most important of all, check the TechEd North America 2012PowerShell” videos: http://channel9.msdn.com/Events/TechEd/NorthAmerica/2012?sort=sequential&direction=desc&term=PowerShell

This should get you started.  So, what’s preventing you to learn PowerShell?  Start now.

Telnet Automation with PowerShell made simple…

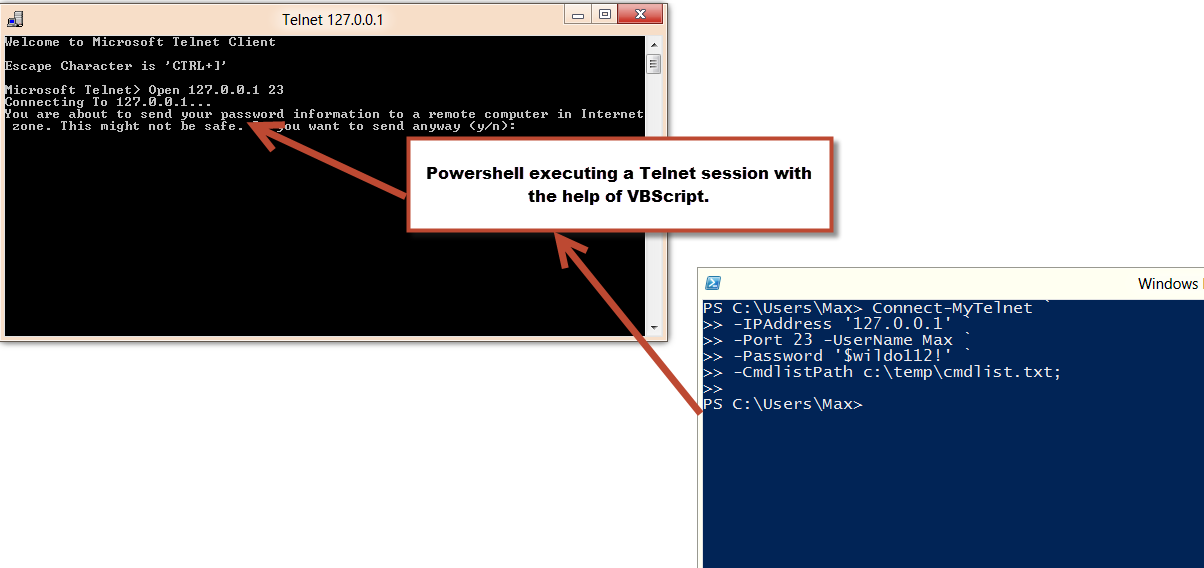
Whaoo! After hours searching the internet for some code that could simply help me automate my Telnet sessions, and not finding a simple solution was frustrating. I had to give up and admit that this one goes to VBScript. YES! I said this one goes to VBScript. But, WAIT A SECOND! PowerShell can provide some leverage when you combine these two scritping technologies. Again, it’s all about integrating technologies to help you be productive and efficient at work.

Let’s cut to the chase and here’s the low down. Many you have been wondering How Can I Automate my Telnet session? Well, VBScript have provided some means to do this for some time. Now, I can use PowerShell to make it more pretty.

Here’s the sample VBScript code use to send commands to a Telnet session: (keep in mind, I’m connecting to Microsoft Telnet in this scenario)

[sourcecode language=”vbscript”]
set oShell = CreateObject("WScript.Shell")
oShell.run("Telnet")
WScript.Sleep 1000
oShell.SendKeys("Open 127.0.0.1 23")
WScript.Sleep 1000
oShell.SendKeys("{Enter}")
WScript.Sleep 1000
oShell.SendKeys("n")
WScript.Sleep 1000
oShell.SendKeys("{Enter}")
WScript.Sleep 1000
oShell.SendKeys"MyName"
WScript.Sleep 1000
oShell.SendKeys("{Enter}")
WScript.Sleep 1000
oShell.SendKeys("MyPassword")
WScript.Sleep 1000
oShell.SendKeys("{Enter}")
WScript.Sleep 1000
oShell.SendKeys("MyCommand")
WScript.Sleep 1000
oShell.SendKeys("{Enter}")
WScript.Sleep 1000
[/sourcecode]

This is, in it basic form,  and with no complexity. Now, using PowerShell we can make it a little more functional by automating the process. I decided to add a text file containing a list of Telnet commands I want to automatically execute during my session. Then, I created a PowerShell function that will build and then execute my auto-generated VBScript.

My command list text file “cmdlist.txt” contains 2 commands for testing purpose and it’s stored in my C:\Temp folder:
Help
Exit

Now, Here’s my “Connect-MyTelnet” function (in its basic form) prototype which put everything together:

[sourcecode language=”powershell”]
function Connect-MyTelnet{
Param(
[string] $IPAddress,
[string] $Port,
[string] $UserName,
[string] $Password,
[string] $cmdlistPath
)
## – Setting default values:
if($port -eq $null){ $Port = "23"; };
if($cmdlistPath -eq $null) { $CmdlistPath = ‘c:\temp\cmdlist.txt’; };

## create vbscript file: MyTelnetSession.vbs
## – For Microsoft Telnet:
$MyVBScript = @"
set oShell = CreateObject("WScript.Shell")`r`n
oShell.run("Telnet")`r`n
WScript.Sleep 1000`r`n
oShell.SendKeys("Open $IPAddress $Port")`r`n
WScript.Sleep 1000`r`n
oShell.SendKeys("{Enter}")`r`n
WScript.Sleep 1000`r`n
oShell.SendKeys("n")`r`n
WScript.Sleep 1000`r`n
oShell.SendKeys("{Enter}")`r`n
WScript.Sleep 1000`r`n
oShell.SendKeys("$UserName")`r`n
WScript.Sleep 1000`r`n
oShell.SendKeys("{Enter}")`r`n
WScript.Sleep 1000`r`n
oShell.SendKeys("$Password")`r`n
WScript.Sleep 1000`r`n
oShell.SendKeys("{Enter}")`r`n
WScript.Sleep 1000`r`n
"@;

## – Get file with telnet commands:
[array] $Cmdlist = Get-Content $cmdlistPath;

## loop through and build each telnet command line:
foreach($cmd in $cmdlist)
{
## – Build VBscript lines:
$MyVBScript += ‘oShell.SendKeys("’+$cmd+’")’+"`r`n";
$MyVBScript += "WScript.Sleep 1000`r`n";
$MyVBScript += ‘oShell.SendKeys("{Enter}")’+"`r`n";
$MyVBScript += ‘WScript.Sleep 1000’+"`r`n";
}

## – Close Telnet Session:
$MyVBScript += ‘oShell.SendKeys(" QUIT")’+"`r`n";
$MyVBScript += "WScript.Sleep 1000`r`n";
$MyVBScript += ‘oShell.SendKeys("{Enter}")’+"`r`n";
$MyVBScript += ‘WScript.Sleep 1000’+"`r`n";

## – Save and execute generated VBscript:
$MYVBScript | Out-File -FilePath c:\temp\MyTelnet.vbs -Encoding ASCII;
& c:\temp\MyTelnet.vbs
}; Set-Alias ct Connect-MyTelnet;

[/sourcecode]

Save the above code as a “Connect-MyTelnet.ps1”, then to load in PowerShell use the “. ./Connect-MyTelnet.ps1″ from the folder you saved the file. Finally, to execute run the following one-liner:

[sourcecode language=”powershell”]
Connect-MyTelnet `
-IPAddress ‘127.0.0.1’ `
-Port 23 -UserName Max `
-Password ‘$mypasword1!’ `
-CmdlistPath c:\temp\cmdlist.txt;

[/sourcecode]

This will create/execute the vbscript that will open a Microsoft Telnet session and submit a series of Telnet commands. Now you got something to work and play.

Bonus!!

If you want to use “PuttyTel.exe” just substitute the PowerShell VBscript code to the following:

[sourcecode language=”powershell”]
## – For PuttyTel:
$MyVBScript = @"
set oShell = CreateObject("WScript.Shell")`r`n
oShell.run("c:\temp\PuttyTel")`r`n
WScript.Sleep 1000`r`n
oShell.SendKeys("$IPAddress")`r`n
WScript.Sleep 1000`r`n
oShell.SendKeys("{Enter}")`r`n
WScript.Sleep 1000`r`n
oShell.SendKeys("$UserName")`r`n
WScript.Sleep 1000`r`n
oShell.SendKeys("{Enter}")`r`n
WScript.Sleep 1000`r`n
oShell.SendKeys("$Password")`r`n
WScript.Sleep 1000`r`n
oShell.SendKeys("{Enter}")`r`n
WScript.Sleep 1000`r`n
"@;

[/sourcecode]

PowerShell V3.0 Object difference vs V2.0…?

I was unconsciously doing something while coding in PowerShell V3.0 Beta, and it caught me off guard.  As I’m getting more comfortable working with PowerShell Objects, I didn’t realized there is an enhancement in place.  There’s a quick way to access with your objects values. I’m trying to scripting for PowerShell V2.0 but I started see errors, then I realize I was accessing my items differently in PowerShell V3.0.

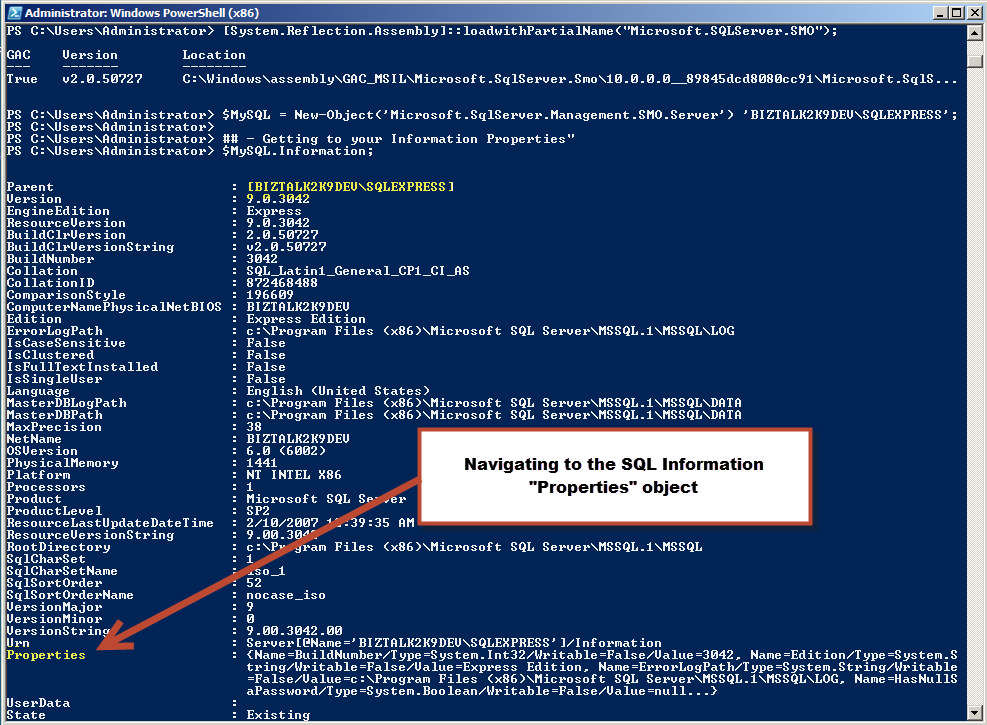
Let me show some PowerShell V3.0 code that access a SQL Server SMO collection of type “Microsoft.SqlServer.Management.Smo.Information”.  I want to access the values of the property “Properties” in the SQL Server Information SMO Object.

*hint*: Remember to use the command “Get-Member” to expose the content (method & properties) in your PowerShell variable.

[sourcecode language=”powershell”]

## – Load Assembly and create your SQL object:
[System.Reflection.Assembly]::loadwithPartialName("Microsoft.SQLServer.SMO");
$MySQL = New-Object(‘Microsoft.SqlServer.Management.SMO.Server’);

## – Getting to your Information Properties"
$MySQL.Information;
$MySQL.Information.Properties;

[/sourcecode]

The last two lines will give you some results back. Now, try the next line:

[sourcecode language=”powershell”]

## – Only valid in PowerShell V3.0:
$MySQL.Information.Properties.name;

[/sourcecode]

This line will display all values in the property “Name”, and that’s great.

Go to another machine with PowerShell V2.0, and execute the lines:

[sourcecode language=”powershell”]

## – Load Assembly and create your SQL object:
[System.Reflection.Assembly]::loadwithPartialName("Microsoft.SQLServer.SMO");
$MySQL = New-Object(‘Microsoft.SqlServer.Management.SMO.Server’);

## – Only valid in PowerShell V3.0:
$MySQL.Information.Properties.name;

[/sourcecode]

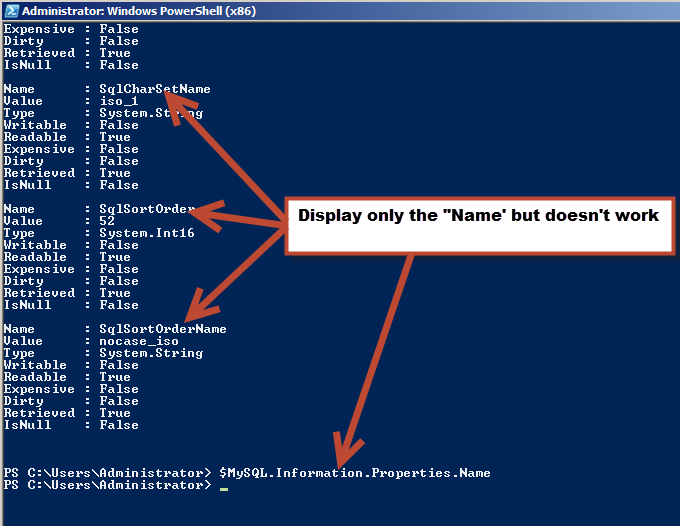
Notice you will not get any results back.

Now, change the line below and the execute:

[sourcecode language=”powershell”]

## – Valid in both PowerShell V3.0 and V2.0:
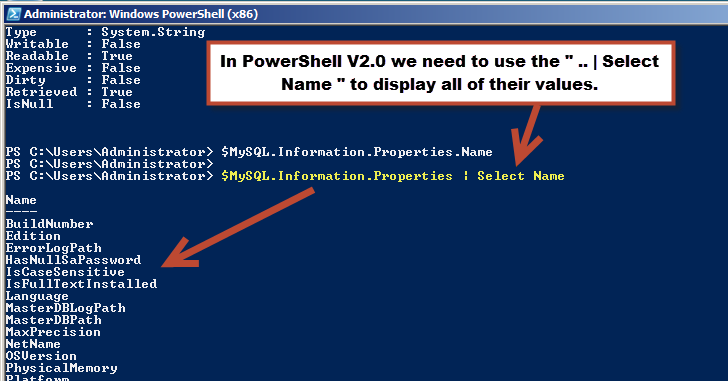
$MySQL.Information.Properties | Select name;

[/sourcecode]

And, it will display all values from this property.

As you notice, using PowerShell V3.0 can list items from the collection without forcing you to pipe “|” the value to another command (“.. | Select Name ..“). Just be careful and make sure the code stay compatible with PowerShell V2.0.

I like this enhancement!

PragmaticWorks Webinar: Basic Intro to PowerShell for the DBA – agenda

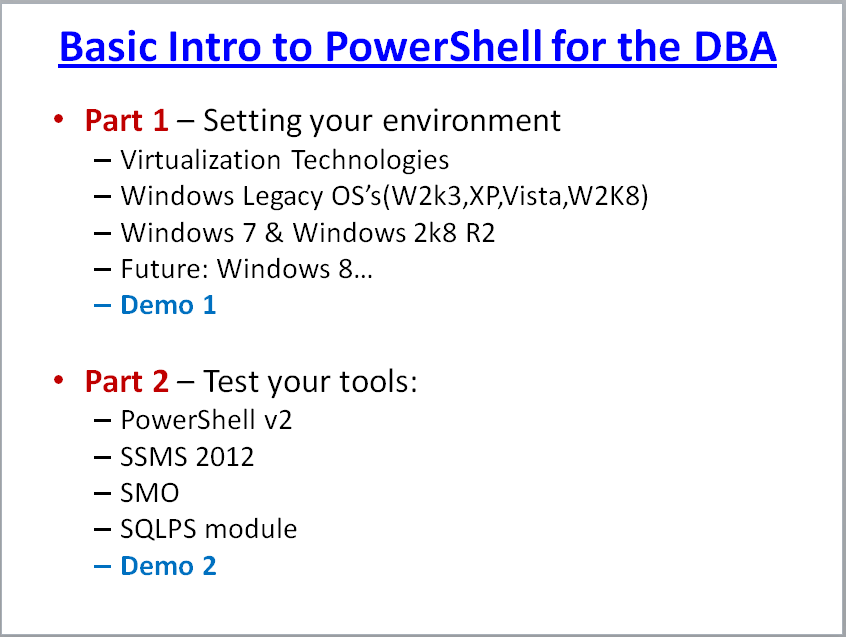
Yes! Today, Tuesday April 17th at 11:00am EST on PragmaticWorks Webinar, I will be speaking doing a session on “Basic Intro to PowerShell for the DBA“. This is an introduction to what you need in order to start using PowerShell in your SQL Server environment.

Here’s the agenda for this session:

Hopefully, this material will help you get you started to learn PowerShell all your automation needs.
And, YES!! Here’s some few scripts to get you started: