VS Code running PowerShell – Code Runner Extensions 2/3

As, I recently went back to try using VS Code in Linux, I’m going to show the second way to execute PowerShell:
1. VS Code – PowerShell Extension and Debug feature.
2. VS Code – Code Runner Extensions for PowerShell.
3. VS Code – Terminal session.
powershell_linux

VS Code – Code Runner Extensions

We need to proceed to install the “Code Runner” Extension. Take a look at this extension information which can be use with many other script languages.
vscodeps2_01_2016-09-22
In Linux, to execute PowerShell using “Code Runner“Extension:
1. open the script.
2. Right-click anywhere in the script area.
3. Then, select “Run Code” to execute.
vscodeps2_03_2016-09-22
That’s it!  All script results will be display in the “Output” pane below the code.
vscodeps2_04_2016-09-22
Now, in Windows OS, Windows PowerShell is the default executable path to run the script. If you want to change from Windows PowerShell to use the PowerShell Open Source then you need the change the executable path line in “Code Runner” settings.
Here’s a sample view of “Code Runner” modified code in the user “settings.json” file:
 vscodeps2_02_2016-09-22
This change in ‘ “powershell”: …” line will point the PowerShell Open Source:
vscodeps2_05_2016-09-22
Notice, by using the two forward slashes ” // …“, I commented out,the original line that will execute Windows PowerShell.
Next blog post, I’m going to cover the third way to execute PowerShell – “VS Code – Terminal Session“.

SQL Server 2014 missing SMO .TruncateData() method

Hum! I just found out that in SQL Server 2014 (SP2 installed), while migrating from SQL Server 2005, one of my PowerShell script (I’ve been using for a long time) that uses SMO to truncate tables. But, when running it against a SQL Server 2014 database, I’m getting an error:

“..this property is not available on SQL Server 2014.”

For mi surprise, I ran the same PowerShell script against SQL Server 2016 and it works fine.

Here’s a sample function that does a Truncate to all my tables in a database:

[sourcecode language=”powershell”]
function Clear-DatabaseTable
{
[CmdletBinding()]
param (
[string]$SQLServerInstanceName,
[string]$SQLServerDatabasename
)

[system.reflection.assembly]::LoadWithPartialName(“Microsoft.SQLServer.Smo”) | Out-Null;
$SQLSrvObj = new-object(‘Microsoft.SqlServer.Management.Smo.Server’) $SQLServerInstanceName;
$tables = $SQLSrvObj.Databases[$SQLServerDatabaseName].tables;

## Database tables rowcounts before truncate:
$tables | Select @{ Label = “TruncatedTable”; Expression = { $_.Schema + “.” + $_.Name }; }, `
@{ Label = “PrevRowCount”; Expression = { $_.rowcount }; } | FT -auto

$ReadThis = `
“**********************************************************************`r`n ” `
+ “Do you really want to Truncate all tables in $SourcedbName ? Y/N `r`n” `
+ “**********************************************************************`r`n “;
$Cont = Read-Host $ReadThis;
[console]::ResetColor();

if ($Cont.ToUpper() -eq ‘Y’)
{
foreach ($t in $tables)
{
Write-Verbose “Truncating Table $($t)” -Verbose;
$t.TruncateData();
};
};
};

[/sourcecode]

Load this function into you session and then run the following command:

[sourcecode language=”powershell”]
Clear-DatabaseTable -SQLServerInstanceName ‘MTRINIDADLT2\MSSQL2K16A’ `
-SQLServerDatabasename ‘devMaxTest’;

[/sourcecode]

The results against SQL Server 2016 were successful:

sqltruncatedata_01_2016-09-21_9-21-18

But, when running against SQL Server 2014, I get the error:

sqltruncatedata_02_2016-09-21_9-21-18

I logged this issue under SQL Server UserVoice: https://manage.uservoice.com/forums/108777-database-manager-for-sql-azure-feature-suggestions/suggestions/16286755-sql-server-2014-is-missing-smo-truncatedata-met

Please Vote on it!

VS Code running PowerShell – Debug 1/3

I recently went back to try using VS Code. Now that I’m fully invested with PowerShell Open Source in Ubuntu Linux 16.04.1 Desktop.  During trails and errors I found at least three ways to execute PowerShell:

1. VS Code – PowerShell Extension and Debug feature.
2. VS Code – Code Runner Extensions for PowerShell.
3. VS Code – Terminal session.

VS Code Extensions

First, we need to add a couple of extensions:
1. PowerShell
2. Code Runner

In below image, we are installing Python Extensions.  In Linux, having Python installed will be of great benefit.

powershellandpythonextensions

These are a most-to-have extensions to work with PowerShell. We are going to use the Debug feature.

Using VS Code Debug

First, we are going to use VS Code debug option to run PowerShell Out-Of-The-Box. This way we can be use debug to execute and step thru the PowerShell script code.

Open the folder were the scripts are going to be stored. The first time using the Debug it will ask to create the “launch.json” which is needed in order to execute and debug the script.  Accept the default values as you can change them later if needed.

launchjson

By the default, in Windows OS, it will execute Windows PowerShell ver 5.x.  In Linux, it will run the PowerShell Open Source. Keep in mind, I’m on a Linux system.

Next, is to create a new “settings.json” file, go to VS Code menu click on “File | Preferences | User Settings“.  In order to execute PowerShell Open Source, which is in a different folder, we need to create a “settings.json” file with the following code:

settingsjson_01

So, you’ll ended up with two *.json files in your script folder.  Then, you can customized these file to work with your script code when it gets debug.

setlaunchjson_04

Bonus Note: On a Windows System, if you want to customize VS Code to use PowerShell v6.0.0-alpha.x, just add the following line in the “settings.json” file:

changepowershelexepath

Next blog post, I’m going to cover “VS Code – Code Runner extension

PowerShell for every system is becoming a reality!

Powershell_2016-08-18_11-29-36

Yes! Now, PowerShell will be available CrossPlatform to help any system automation need. As a Linux newbie, I’m excited about this announcement.

https://msdn.microsoft.com/en-us/powershell/mt173057.aspx

So, if you have Linux Systems such as Ubuntu, CentOS, and, even for Mac OS X 10.11.

Check the link: https://github.com/PowerShell/PowerShell

Just go and get it. But, keep in mind, this is a work in progress.

This is PowerShell Core only, Alpha Version 6.0.0.9 and there’s a lot of work to do. Bugs and feedback are been submitted as the community are contributing for it success.

This version is also available for Windows 10 / Server 2016 and Windows 8.1 / Server 2012 R2. You can have it side-by-side with the current version of PowerShell.

WinPoshAlpha_2016-08-18_10-22-33

Linux Installation Steps

Just follow the instruction provided in the GitHub PowerShell page, look for your Linux version, and follow the link provided for downloading installation package: https://github.com/PowerShell/PowerShell/blob/master/docs/installation/linux.md#ubuntu-1604

In my case, I took the setup for Ubuntu 16.04:

1. Open a Terminal session.

2. run the following three commands:
$ sudo apt-get install libunwind8 libicu55
$ cd Downloads
$ sudo dpkg -i powershell_6.0.0-alpha.9-1ubuntu1.16.04.1_amd64.deb

The first lines installs two dependencies needed before installing the package.  Then, changing the folder to “Downloads”.

For those new to Linux, keep in mind, all command line sample is case-sensitive or it will not run.

Run PowerShell

After the installation is completed then you are ready to run PowerShell from any of the Linux Terminal applications.

  1. Open the “Terminal” application
  2. Then, type “powershell” (all in lowercase).

PoshLinux

And, you try to run some cmdlet straight from Linux. But, are still some limitations, and there are some parameter that won’t work.  Remember! This is an Alpha version.
PoshLinuxGetHelpErr_07
You can’t build a remote PSSession (yet) and any use of the parameter “-computername ” will be limited to Linux systems.
GetprocessLinuxErr_01

So, a word of caution! if you try to use a cmdlet from Windows to access a Linux system, your Windows PowerShell session will crash.

GetprocessLinuxErr_02
All these issues will be handle soon.

Linux – Creating an Alias to call ‘powershell’

The following Linux commands will help to create the alias to call ‘powershell’. This way so you don’t type the whole name.  The alias will be ‘Ps’ because there already is an existing one call ‘ps’.

Below are all the steps needed to create the alias:
1. Create a linux commands file by opening the gedit app.
$ sudo gedit Posh.sh
Add line -> powershell

2. After saving the file go and add permission.
$ sudo chdmod 755 Posh.sh

3. Need to make it Alias permanent and available when opening the Terminal app.
$ sudo gedit /etc/bash.bashrc
Add line -> alias Ps=/home/maxt/Posh.sh

4. This reset bash.
$ bash

5. Testing the new alias
$ Ps

Now, you just type ‘Ps’ (case-sensitive) to open PowerShell in Linux. This way you’ll have the flexibility of using PowerShell when needed.

Linux PowerShell Editor – VS Code

In Linux, open Visual Studio Code:
VSCODE2016-08-18_11-10-03

From with in VS Code, you can open the “Terminal” session by using the hotkey combination “ctrl” +”\” +” ` “.  So, at the $ prompt you can either type ‘powershell‘ or our new alias ‘Ps‘.

You can make your VS Code Terminal session or load PowerShell automatically by doing the following steps: Click “File -> Preferences -> User Settings”.
Then, on the opened Settings.json file and change to the following lines:

** for Linux **
LinuxVSCode_2016-08-18_11-22-10

** for Windows **
WinVSCode_2016-08-18_11-22-10

Remember to safe the file and you are set to work with PowerShell to build scripts.
This is an Awesome Time to learn PowerShell!


Important PowerShell Links To Remember

Powershell_2016-07-28_12-37-40

Just a reminder!  Here are some PowerShell resource link to save.

Microsoft just recently announce the PowerShell “Windows Management Framework 5.1 Preview“. Check the PowerShell Team Blog:

Announcing Windows Management Framework (WMF) 5.1 Preview

In addition, if you encounter any PowerShell bugs and want to provide any suggestions, below is the link you can use:

*note: Keep in mind. WMF 5.1 Preview is not supported in production environments.

More resource links:

Windows PowerShell Home Page
https://msdn.microsoft.com/powershell

Windows Management Framework 5.1 Preview
https://www.microsoft.com/en-us/download/details.aspx?id=53347

Don’t forget to check WMF 5.1 Release Notes
https://msdn.microsoft.com/en-us/powershell/wmf/5.1/release-notes

SAPIEN Technologies ‘PowerShell Studio 2016’ – The premier editor and tool-making environment for Windows PowerShell
https://www.sapien.com/software/powershell_studio

And forgot!!  For everyone who love to work with PowerShell and SQL Server:

Go and keep learning about PowerShell!!

Microsoft SSMS July 2016 Hotfix is Available now

Go and get it.  Of course, No SQLServer PowerShell update on this hotfix. But you’ll need this update.

MSSMS_02_2016-07-15_14-32-33

Read more on this link for more information: https://msdn.microsoft.com/en-us/library/mt238290.aspx

If you are still interested of see what’s new in this July Edition of SSMS, check the following Microsoft Blog site:
https://blogs.technet.microsoft.com/dataplatforminsider/2016/06/30/sql-powershell-july-2016-update/

MSSMS_01_2016-07-15_14-32-33


Create PowerShell Top-Down ETL Process III

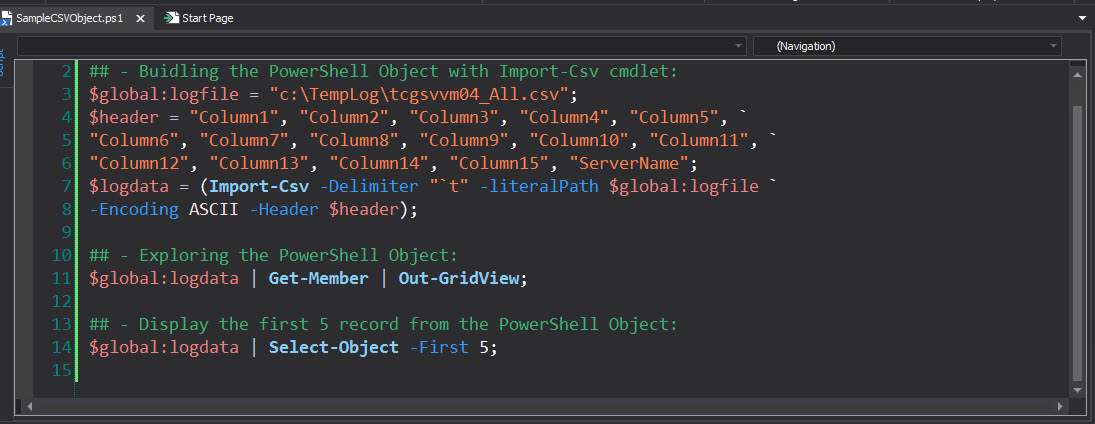
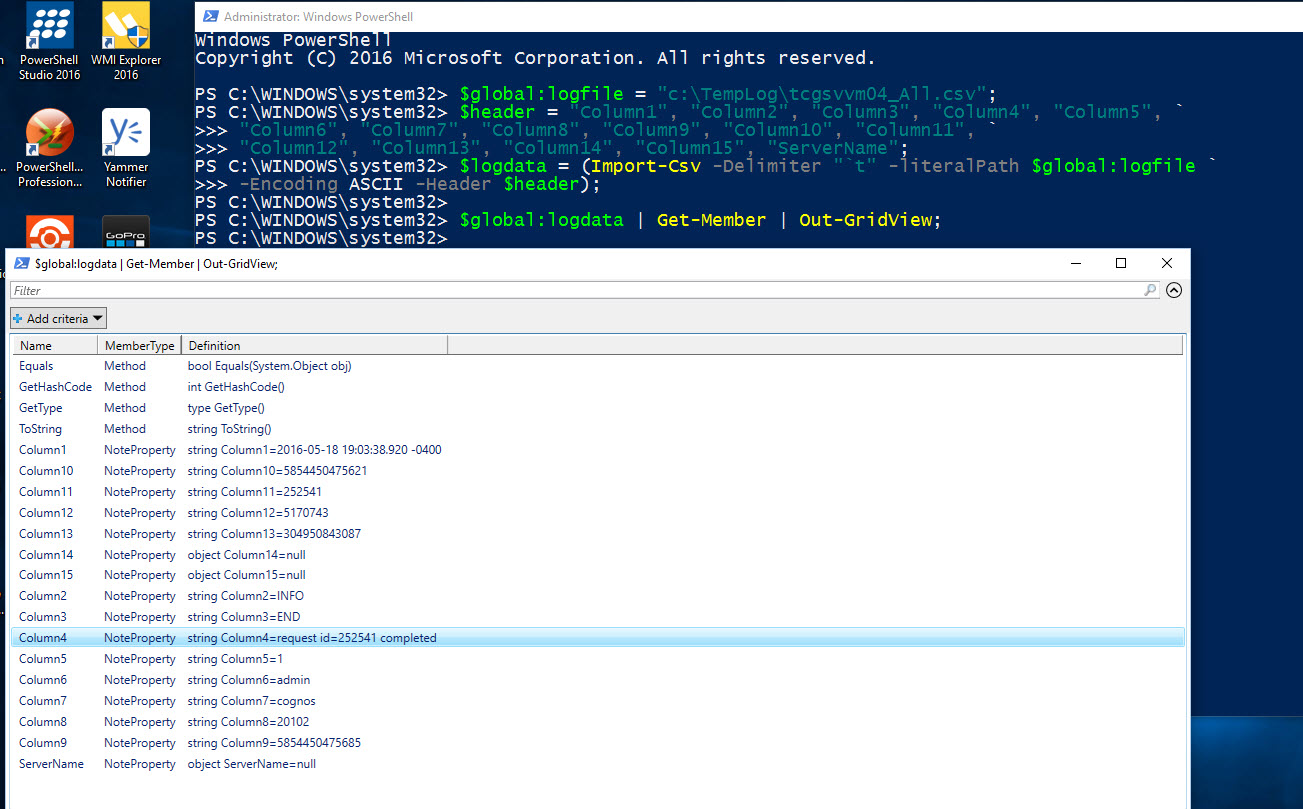
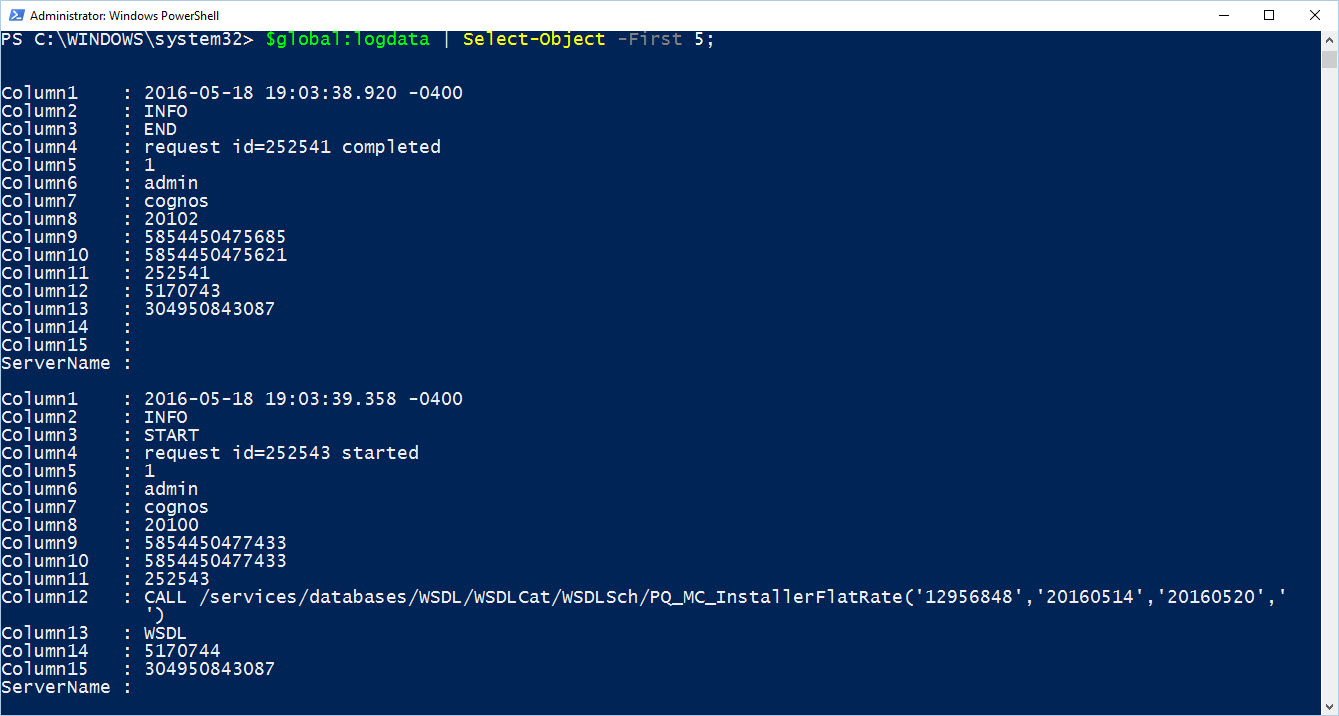
On previous blog we have collect some data and built our .NET PowerShell object which is going to be loaded into our SQL Server.

In this final section we are completing the process of loading the data into SQL Server. We need to make sure we got our Database and table previously created and ready to receive our data.

For this process we’ll need to create 3 functions:
1. ConnectTo-SQLServer
2. Load-LogRecord
3. Process-PSObjectToSQL

Of course we could do everything in one long script file.  But, by breaking out into it will make it much easier to handle and maintain.

In order to connect to SQL Server, we’ll be using straight SMO classes to load the data. Also, we’ll  integrate some basic error catching using “try-catch” code block structure.

I’m keeping the functions in a basic level hardcoding some the PSObject variables instead of using parameter names. Keep in mind, the use of parameter name(s) in a function brings a lot flexibility and function reusability.

Function – ConnectTo-SQLServer

Using SMO with a few lines of code we connect to a SQL Server engine. Here’s the basic script code to will allow us to initiate a connection to SQL Server:

[sourcecode language=”powershell”]
function ConnectTo-SQLServer
{
 [CmdletBinding()]
 param ()
 ## – Select SQLServer:
 $global:SQLServerInstanceName = "MTRINIDADLT2";
 $global:SQLServerDatabaseName = "LogEntries";
 $global:logServerName = "tcgsvvm04";

 ## – Loading SMO .NET Assembly: (Required)
 [system.reflection.assembly]::LoadWithPartialName("Microsoft.SQLServer.Smo") | Out-Null;

 ## – Connecting to SQL Server (Windows Authentication) and building you table object:
 $global:SQLSvrObj = new-object(‘Microsoft.SqlServer.Management.Smo.Server’) $SQLServerInstanceName;
 $global:SQLSvrObj.ConnectionContext.StatementTimeout = 0;
};
[/sourcecode]

You will notice the use the of “$global:variablename” with some of the variable objects created. This way we won’t loose the value stored in my PSObject(s) like “$global:SQLSvrObj” and have it available to other PowerShell function(s).

Function – Load-logRecord

This function show a Kind-Of template for using T-SQL insert statement to an existing table and at the same time subtitute the PSObject variable(s) constructing full qualify database table name. We construct the T-SQL Insert string and then to execute the query using SMO database *method “.ExecuteNonQuery($global:insertqry)”.

[sourcecode language=”powershell”]
function Load-logRecord
{
CmdletBinding()]
Param ()
$global:insertQry = @"
INSERT INTO [$($global:SQLServerDatabaseName)].[dbo].[$($global:logServerName)_Log]
([Column1]
, [Column2]
, [Column3]
, [Column4]
, [Column5]
, [Column6]
, [Column7]
, [Column8]
, [Column9]
, [Column10]
, [Column11]
, [Column12]
, [Column13]
, [Column14]
, [Column15]
, [ServerName])
VALUES
( ‘$($global:l.Column1)’
, ‘$($global:l.Column2)’
, ‘$($global:l.Column3)’
, ‘$($global:l.Column4)’
, ‘$($global:l.Column5)’
, ‘$($global:l.Column6)’
, ‘$($global:l.Column7)’
, ‘$($global:l.Column8)’
, ‘$($global:l.Column9)’
, ‘$($global:l.Column10)’
, ‘$($global:l.Column11)’
, ‘$($global:l.Column12)’
, ‘$($global:l.Column13)’
, ‘$($global:l.Column14)’
, ‘$($global:l.Column15)’
, ‘$($global:LogServerName)’)
GO
"@;
 $global:SQLSvrObj.Databases["Master"].ExecuteNonQuery($global:insertQry);
};
[/sourcecode]

*Note: Keep in mind, by saving the PSObject variable with a $global: scope, you will access to its value after the function has been executed or the value will be dispose (null).

Function – Process-PSObjectToSQL

This is the heart of loading the data.  Here we use both previous functions: 1. ConnectTo-SQLServer and
2. Load-LogRecord.

This a simple code block using the ForEach() block to read thru the PSObject variable to load the data into SQL Server.  All accomplished with a few code block.

Now, here’s where we’ll include our error catching code block in case we encounter any data load issue during this process.

[sourcecode language=”powershell”]
function Process-PSObjectToSQL
{
 [CmdletBinding()]
 param (
  [array]$SQLDataObj
 )
 ## Start process
 Try
 {
  ConnectTo-SQLServer;
  $global:cnt = 0
  Write-Verbose "Start loading Data to SQL Server" -Verbose;
  foreach ($global:l in $SQLDataObj)
  {
   Load-logRecord;
   $global:cnt++;
  }
 }
 catch
 {
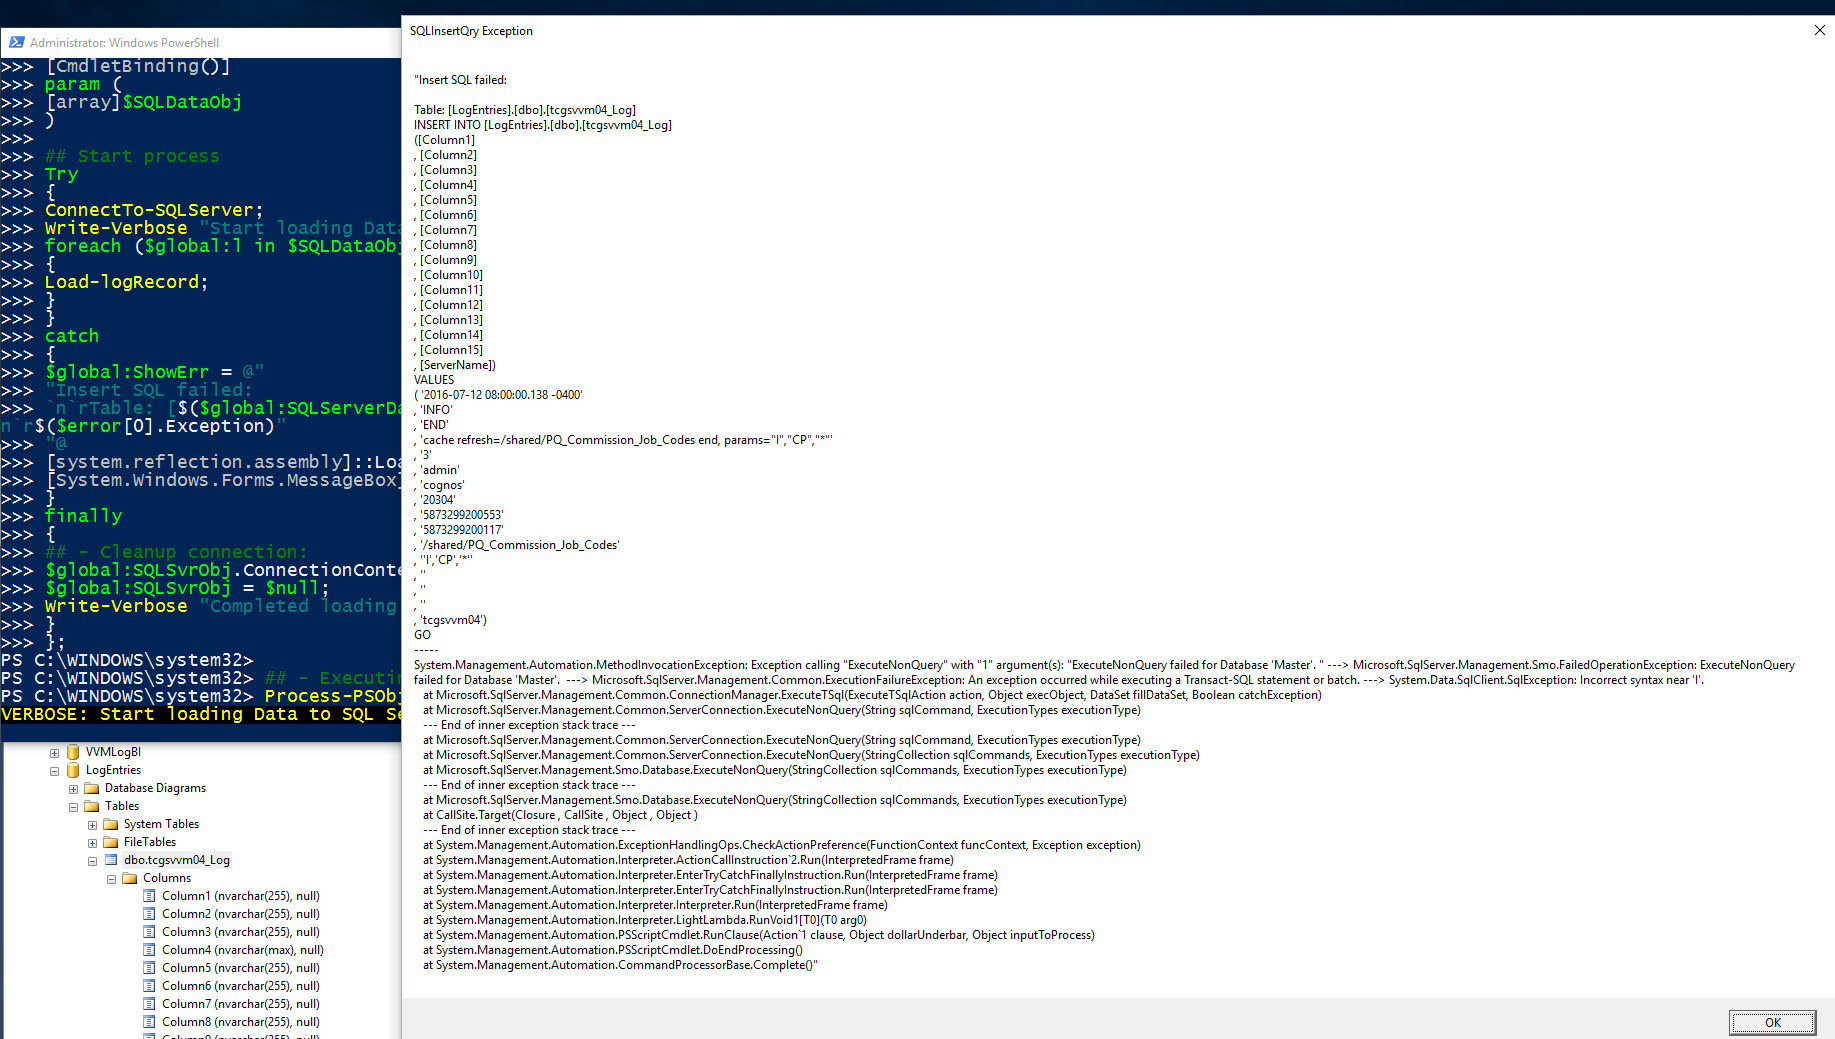
  $global:ShowErr = @"
Insert SQL failed:  Record #[ $($global:cnt) ]`n`r—–
Table: [$($global:SQLServerDatabaseName)].[dbo].[$($global:logServerName)_Log]`n`r—–
$($global:insertQry)`n`r—–`n`r$($error[0].Exception)
"@
  [system.reflection.assembly]::LoadWithPartialName("System.Windows.Forms") | Out-Null;
  [System.Windows.Forms.MessageBox]::Show("$global:ShowErr", "SQLInsertQry Exception") | Out-Null;
 
  $errfound = $true
 }
 finally
 {
  ## – Cleanup connection:
  $global:SQLSvrObj.ConnectionContext.Disconnect();
  $global:SQLSvrObj = $null;
  if ($errfound -eq $true)
  {
   Write-Verbose "Failure loading Data to SQL Server!" -Verbose;
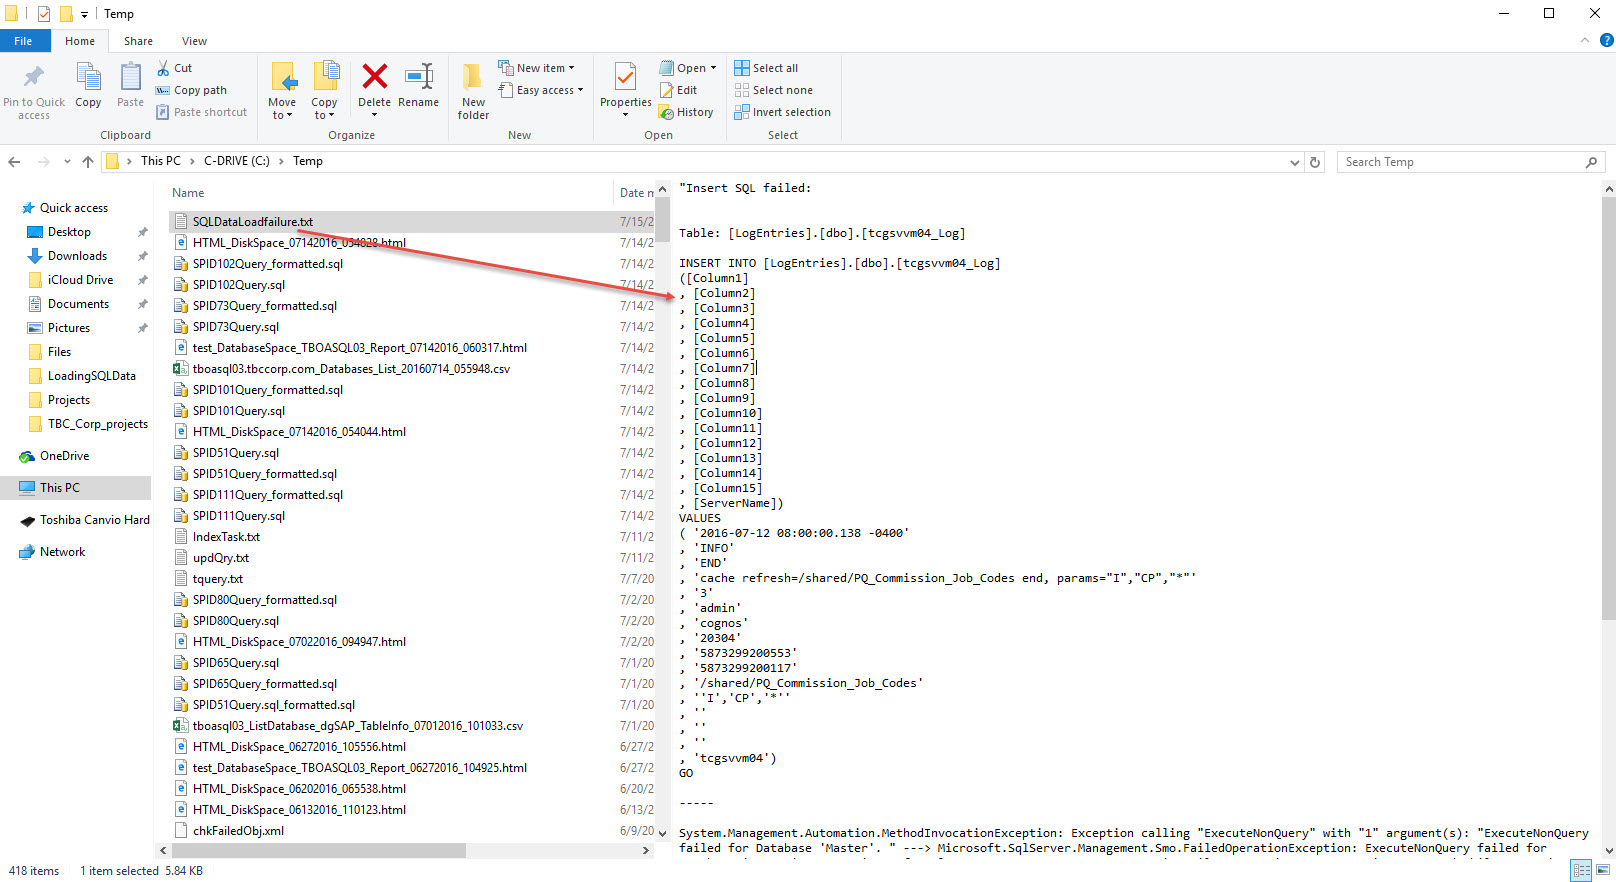
   $global:ShowErr | Out-File -FilePath c:\Temp\SQLDataLoadfailure.txt;
   Invoke-Item c:\Temp\SQLDataLoadfailure.txt;
  }else{
   Write-Verbose "Completed loading Data to SQL Server" -Verbose;
  }
 }
};
[/sourcecode]

This function has a ParameterName $SQLDataObj.  This will take the previously created $SQLData PSObject to be loaded to SQL Server.

In Error catching code block, the try{..} contains all the logic code to process the data. Then, the catch{..} has a custom string with enough information to trouble the issue the process may have encountered, such as: Fully qualified Database name, Insert Query T-SQL script, and the actual Exception error message.

At the end of the process, error or not, the finally{..} block will always execute the code. In this case, to disconnect and cleanup the connection to SQL Server.

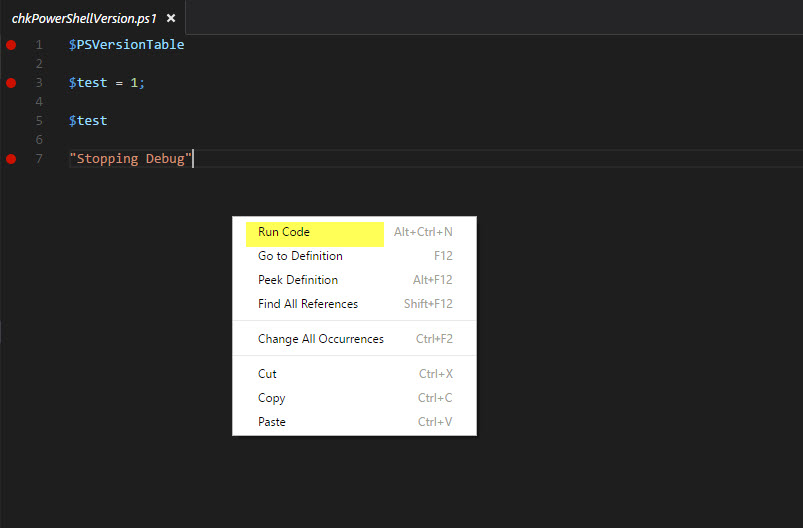
Executing the process

After all the previous functions has been loaded, just type the following one-liner:

Process-PSObjectToSQL -SQLDataObj $SQLData;

This sample script code can serve as a startup Template to load data into SQL Server.

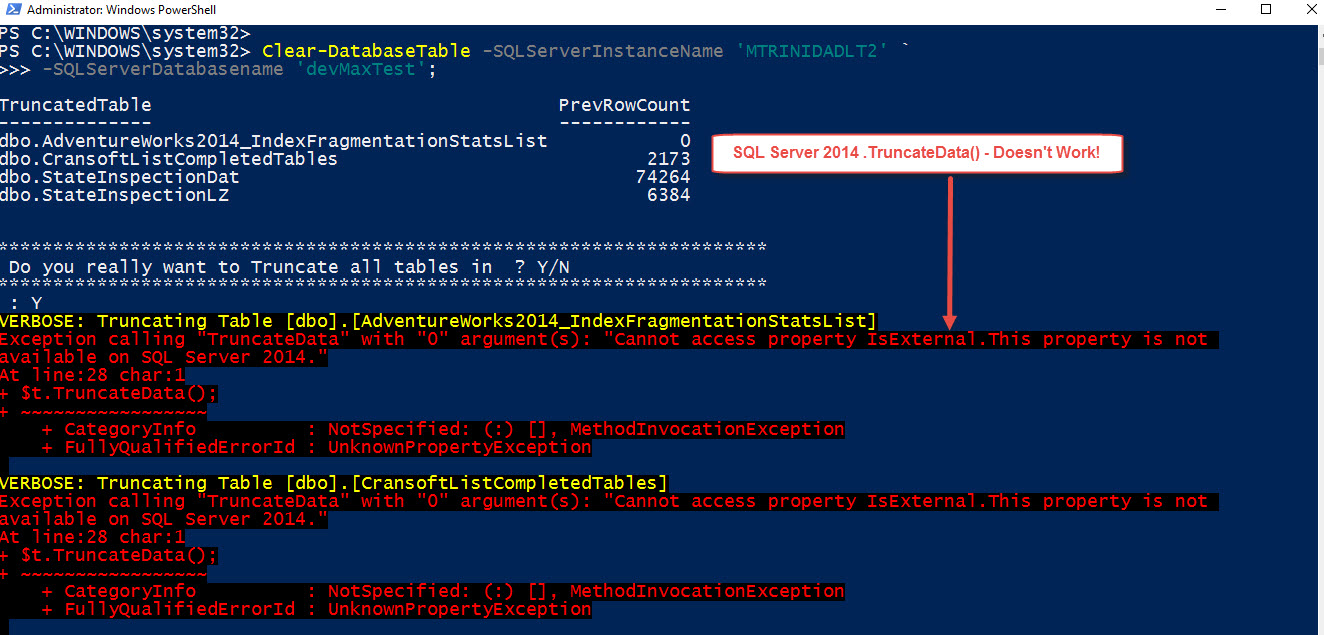
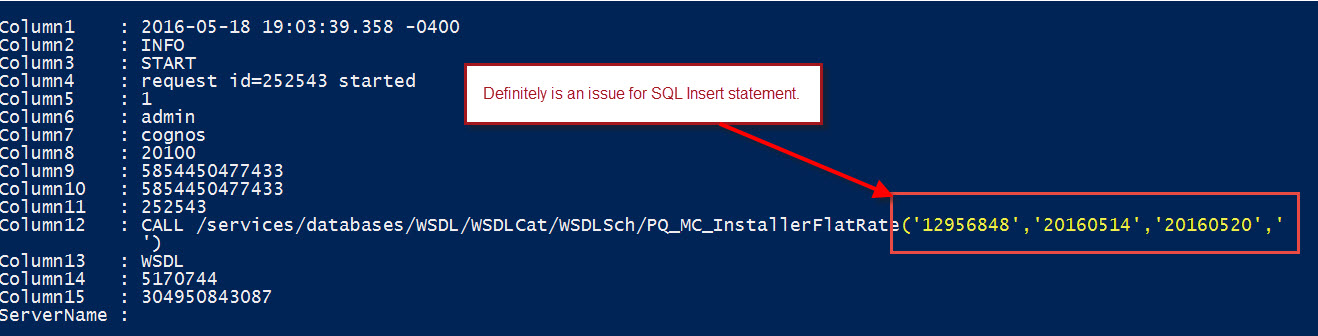
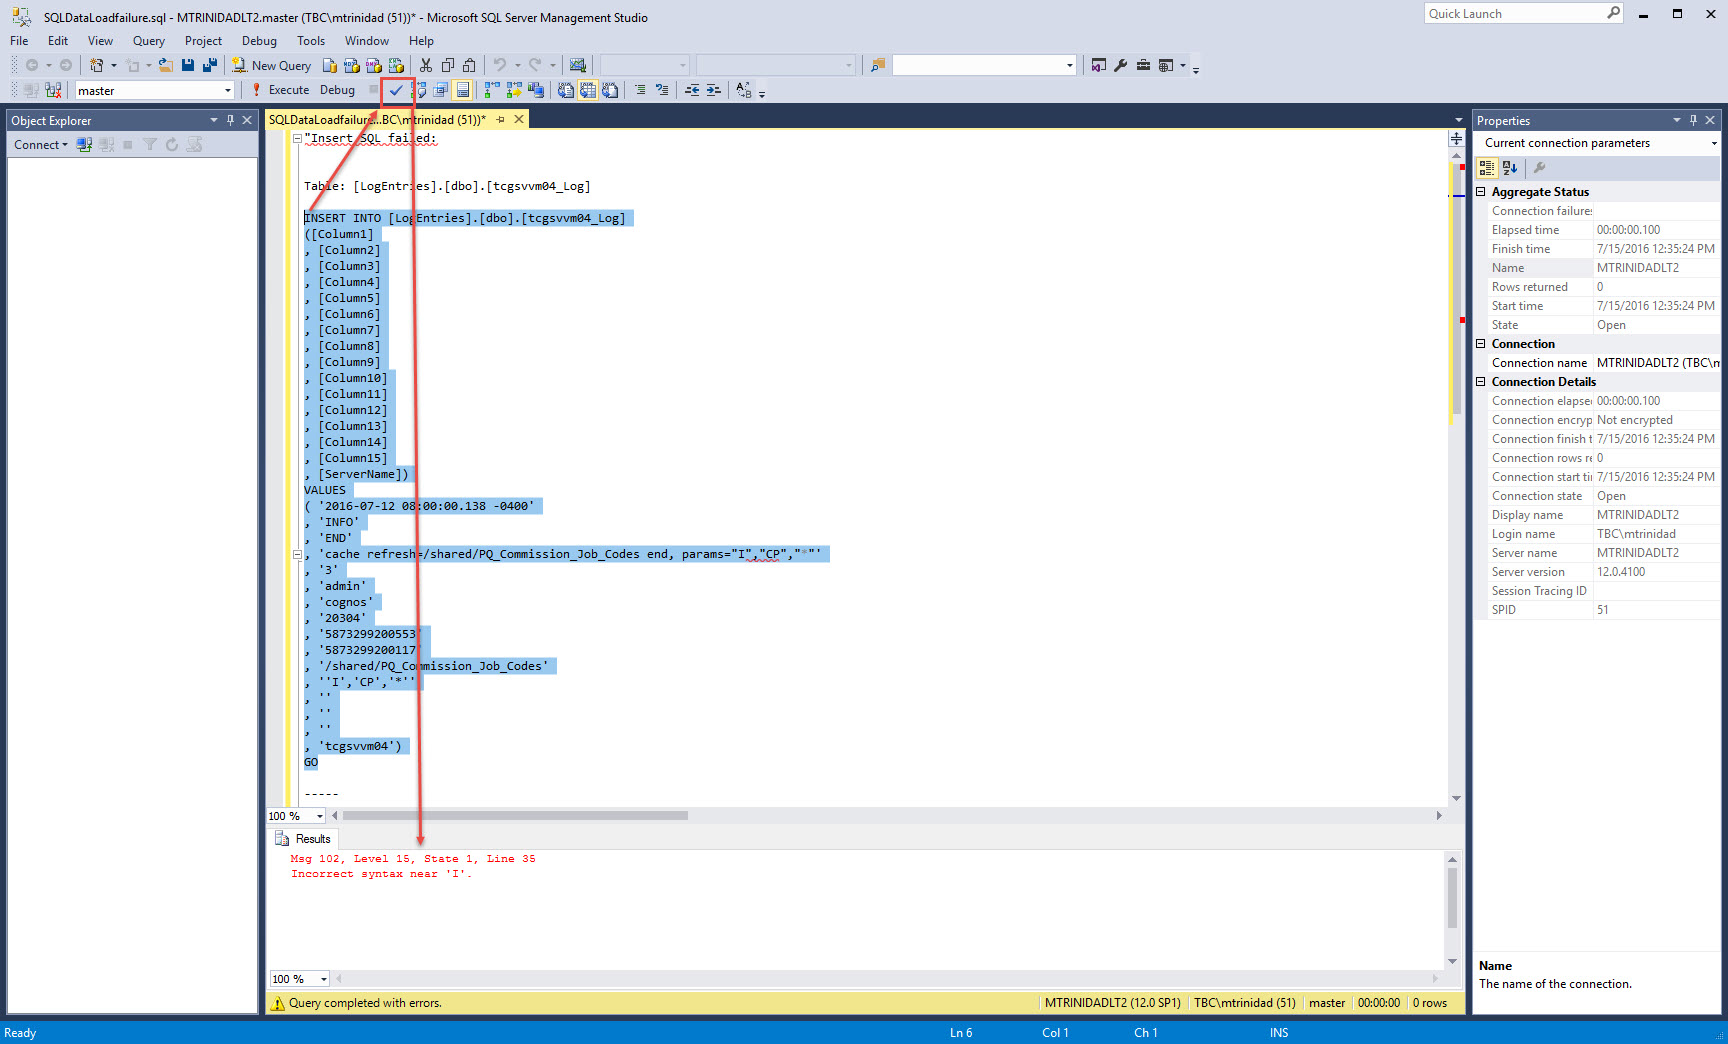
This sample SQL data load will fail. Here’s when the Try/Catch/Finally will work for you in trapping what went wrong. Adding the necessary code to provide that additional information to troubleshoot and fix the problem.

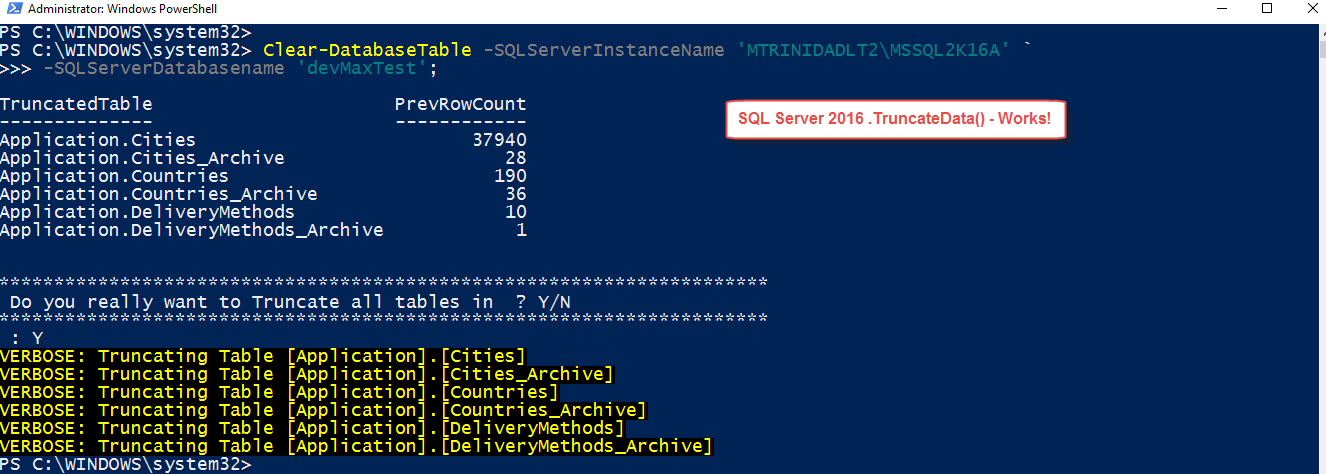
Be Creative!  Check out the results.

  1. Data exception when inserting a record which was a transformation error in one of the fields.SampleSQLDataLoad_01
  2. Results generated from the data exception can be use to find what went wrong with this T-SQL insert script. SampleSQLDataLoad_02
  3. Error exception code could generate an output file. SampleSQLDataLoad_03
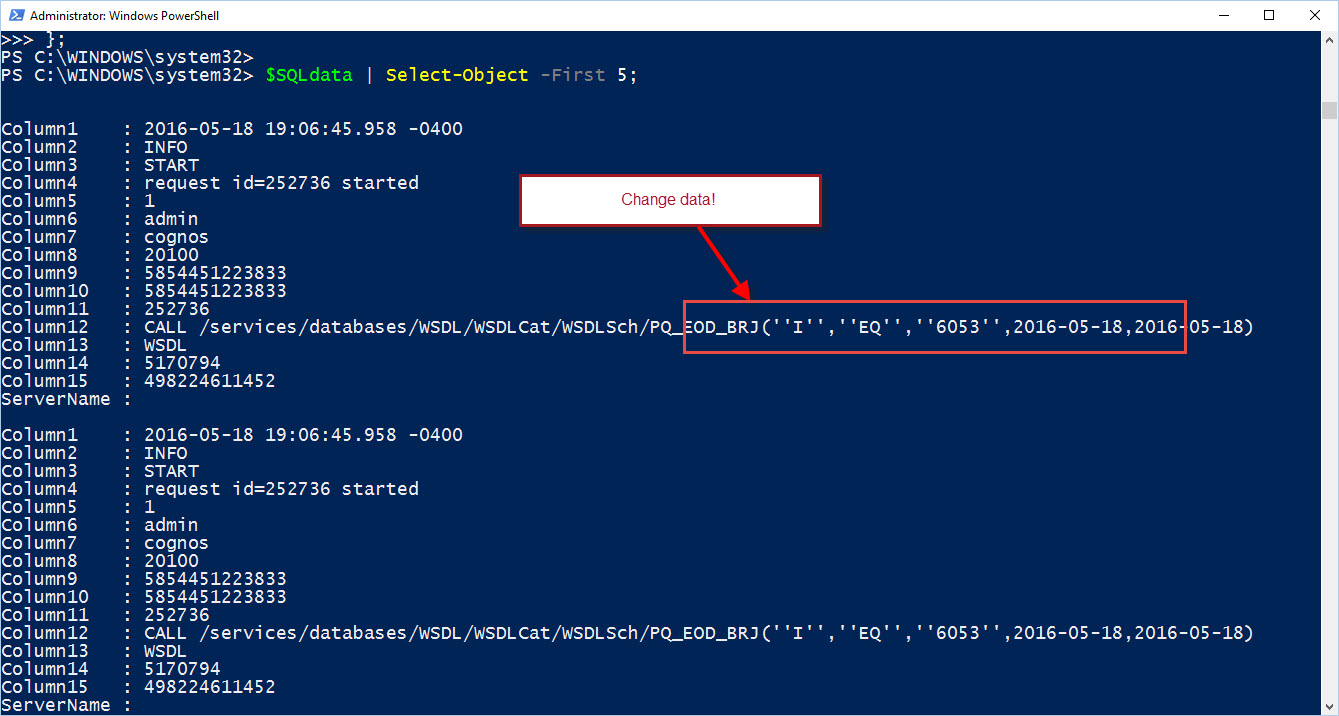
  4. Then, after fixing the issue, the data was completely loaded to SQL Server. SampleSQLDataLoad_04

Happy PowerShell!

Microsoft SQL PowerShell Continnium

Yes! By now you all heard the news. SQL Server 2016 July update will include 25 new cmdlets for SQL PowerShell under the new module named SQLServer.
Now, you need to know that this only with the installation of the “Microsoft Sql Server Management Studio” (MSSMS) available as an option on the SQL Server 2016 installation disk. Its a separate download.
SQLPosh_00_2016-07-04_17-50-29
This link will take you to the following web page: https://msdn.microsoft.com/library/mt238290.aspx
SQLPosh_06_2016-07-04_17-50-29
Interesting to know that the SQLPS module hasn’t been renamed (just changed), as its still loaded on the “C:\Program Files (x86)\Microsoft SQL Server\130\Tools\PowerShell\Modules\SQLPS” folder.
SQLPosh_01_2016-07-04_17-50-29
But, don’t worry about having SQLPS conflicts with the SqlServer cmdlets. Aparently, SqlServer module will be loaded and somehow the SQLPS is disabled. You’ll find the SQLServer module at “C:\Program Files\WindowsPowerShell\Modules\SqlServer” folder.
SQLPosh_07_2016-07-04_17-50-29
SQLPosh_02_2016-07-04_17-50-29
Now, during my SQLServer 2016 new instance installation (No MSSMS) on a new image, I notice that SQLPS module get installed. So make sure to test SQL PowerShell if you are not going to install MSSMS.
You can verify all the modules you have installed on your machine by typing this simple oneliner:
get-module -ListAvailable | Select name,path | sort name
or
get-module -ListAvailable | Select name,path | sort name
See sample results from my machine:
SQLPosh_03_2016-07-04_17-50-29
Also, you notice that I got various copy of SQL PowerShell modules including the new one.  Its obvious that I got 3 version of SQL Server installed.  But, in order to use only the newer module, I got to make sure my PSModule path have the proper folder location names loaded.
To check the values of your PSModulePath type: $env:PSModulePath
SQLPosh_04_2016-07-04_17-50-29
Now, if you ever have the need to do some editing to any of these Path values, then you need to open the “Environment Variables” under your “This PC” system properties using File Explorer.  (See image below)
SQLPosh_05_2016-07-04_17-50-29
I can do the Happy Dance now!!  The SQL Server Team has done a GREAT JOB!!!

List of SQLServer module cmdlets (*NEW) – SQLServer MSSMS July Update

Add-SqlAvailabilityDatabase
Add-SqlAvailabilityGroupListenerStaticIp
*Add-SqlAzureAuthenticationContext
*Add-SqlColumnEncryptionKeyValue
Add-SqlFirewallRule
Backup-SqlDatabase
*Complete-SqlColumnMasterKeyRotation
ConvertFrom-EncodedSqlName
ConvertTo-EncodedSqlName
Convert-UrnToPath
Decode-SqlName
Disable-SqlAlwaysOn
Enable-SqlAlwaysOn
Encode-SqlName
*Get-SqlAgent
*Get-SqlAgentJob
*Get-SqlAgentJobHistory
*Get-SqlAgentJobSchedule
*Get-SqlAgentJobStep
*Get-SqlAgentSchedule
*Get-SqlColumnEncryptionKey
*Get-SqlColumnMasterKey
Get-SqlCredential
Get-SqlDatabase
*Get-SqlErrorLog
Get-SqlInstance
Get-SqlSmartAdmin
Invoke-PolicyEvaluation
Invoke-Sqlcmd
*Invoke-SqlColumnMasterKeyRotation
Join-SqlAvailabilityGroup
New-SqlAvailabilityGroup
New-SqlAvailabilityGroupListener
New-SqlAvailabilityReplica
*New-SqlAzureKeyVaultColumnMasterKeySettings
New-SqlBackupEncryptionOption
*New-SqlCertificateStoreColumnMasterKeySettings
*New-SqlCngColumnMasterKeySettings
*New-SqlColumnEncryptionKey
*New-SqlColumnEncryptionKeyEncryptedValue
*New-SqlColumnEncryptionSettings
*New-SqlColumnMasterKey
New-SqlCredential
*New-SqlCspColumnMasterKeySettings
New-SqlHADREndpoint
Remove-SqlAvailabilityDatabase
Remove-SqlAvailabilityGroup
Remove-SqlAvailabilityReplica
*Remove-SqlColumnEncryptionKey
*Remove-SqlColumnEncryptionKeyValue
*Remove-SqlColumnMasterKey
Remove-SqlCredential
Remove-SqlFirewallRule
Restore-SqlDatabase
Resume-SqlAvailabilityDatabase
Save-SqlMigrationReport
Set-SqlAuthenticationMode
Set-SqlAvailabilityGroup
Set-SqlAvailabilityGroupListener
Set-SqlAvailabilityReplica
*Set-SqlColumnEncryption
Set-SqlCredential
*Set-SqlErrorLog
Set-SqlHADREndpoint
Set-SqlNetworkConfiguration
Set-SqlSmartAdmin
SQLSERVER:
Start-SqlInstance
Stop-SqlInstance
Suspend-SqlAvailabilityDatabase
Switch-SqlAvailabilityGroup
Test-SqlAvailabilityGroup
Test-SqlAvailabilityReplica
Test-SqlDatabaseReplicaState
Test-SqlSmartAdmin

Additional Information:

1. PowerShell Team Blog on feedback and/or bugs using UserVoice: https://blogs.msdn.microsoft.com/powershell/2016/05/09/understanding-the-powershell-uservoice/
2. To log any feedback and/or bugs using UserVoice under Windows: https://windowsserver.uservoice.com/forums/301869-powershell/

Florida PowerShell Upcoming activities for May and June 2016

It’s a busy and a good time to learn some PowerShell.

1. Where: Florida PowerShell User Group Monthly meeting, Date: Thursday, May 26th at 6:30pm. Online
Topic: The Essential PowerShell on Error Trapping.
Description:
Do you to learn how to trap and document error while running PowerShell scripts? This session will cover the use and how to trap errors in your PowerShell script. We’ll be creating simple script providing some scenarios in trapping errors. At the same time, we are going to end up creating an error report.

Register at Eventbrite: https://www.eventbrite.com/e/florida-powershell-user-group-monthly-meeting-may-2016-tickets-25454080841

2. Where: Idera Geek Synch, Date: Wednesday, June 1st at 12:00pm – 01:00pm, Online
Topic: The Essential PowerShell Tools for the DBA Administrator.
Description: I will covers the some of my favorite PowerShell tools I uses on a regular basis. In this session I will be showing some available tools the DBA can use along with PowerShell. I’ll be integrating Visual Studio with PowerShell and at the same time using IDERA’s PowerShellPlus editor. At the end, we’ll build an SSIS package solution to execute our PowerShell script. It will be pack with interesting thing to do as well as help you accomplish your automation tasks.

Register at: https://www.idera.com/events/geeksync

3. Where: IT Pro Camp Jacksonville. Date: Saturday, June 11th All Day Event. (In Person)
Topic: The Essentials of Tackling PowerShell Basic Functions
Description:  I will demonstrate creating a PowerShell function from a one-liner and/or an existing script file in its basic form. This is an example of the script evolution which you’ll experience while building you PowerShell skills.

Register at: http://itprocamp.com/

4. Where: SQLSaturday South Florida. Date: Saturday, June 18th, All Day Event. (In Person)
Topic: SSIS – Integrating PowerShell in a ScriptTask component
Description: This session will demostrate how you can reuse a PowerShell script in SSIS “Script Task” component as part on a ETL flow.  I’ll be showing some basic .NET Script code in both C# and VB.  I’ll be adding some useful tips when re-using existing Powershell code. Integrating different .NET technologies in a SSIS package: C#, VB.NET, XML, and PowerShell.

Register at: http://www.sqlsaturday.com/524/EventHome.aspx

Come and say Hi!

Create PowerShell Top-Down ETL Process – II

Series 2 – Building your data object

In the first part of the series we mapped to a server folder, and merge all needed log text files into a CSV type.  Now, we need to analize the data we have collected so we can determine the correct course of action.  This way we can work in creating our script solution to load this information in a SQL Server table.

Before analyzing our data we are going to create our data by creating a PowerShell object using the “Import-Csv” cmdlet. Keep in mind, if your CSV file is on a network drive then you’ll need to point to the folder.  For most cases you’ll start creating CSV file on your local drive.

Creating your CSV data object is easy. Follow the sample:

[sourcecode language=”powershell”]
$logdata = `
(Import-Csv -Delimiter "`t" -literalPath $logfile -Encoding ASCII -Header $header) `
| Where-object{ $_.Column1 -gt "$($sqlresult.Tables.LastWriteTime)" };
[/sourcecode]

The above sample gives you a look on what’s possible to do with such a command line in the script.  Basically, at the same time while  importing the data from a CSV file, I’m also querying it to look at a particular column containing a date field.  The other global variable  comes a result set from another query done against a SQL table.  The end result is to only create the $logdata with the dates we want to load into a SQL table.

PowerShell Object Column headers

If you notice, in the above cmdlet the where-clause I’m selecting to use the Column1 property instead of a reasonable label. In my scenario the data in the CSV file contain variable columns fopr its different data types such as: Info, Error, and System. So, it was easy to identify the total number of columns to be 15 columns.

Now, using the cmdlet “Import-Csv” using the parameter “-Header”, you can define a list columns when you build the $Logdata object. We create the $header variable with the column-names separated by comma.

[sourcecode language=”powershell”]
$header= "Column1", "Column2", "Column3", …"Column15";
[/sourcecode]

Then, we can incorporate this $header variable in the *”Import-Csv” cmdlet in the following way:
*Note: Keep in mind, you must define the delimiter use in the CSV file.

[sourcecode language=”powershell”]
$logdata = (Import-Csv -Delimiter "`t" -literalPath $logfile -Encoding ASCII -Header $header)
[/sourcecode]

Next step after building the $logdata object is do the analysis on what you’re going to import into your SQL Server table. To start exploring any PowerShell object use the Get-Member cmdlet in combination with the Out-Gridview cmdlet. This combination will be use all the time while you develop and test you scripts.

[sourcecode language=”powershell”]
$logdata | Get-Member | Out-Gridview;
[/sourcecode]

SampleBuildData01

SampleBuildData01a

Displaying the $logdata object but only the first five data object:

[sourcecode language=”powershell”]
$logdata |  | Select-Object -First 5;
[/sourcecode]

SampleBuildData03
Analyzing the data

This is the part where you’re going to spend some time.  In figuring out what possible issues you’ll find to import this data into your SQL table.  Things like having both a single and double quotes will break your SQL Insert statements. So, look carefully and take the right action to transform this piece of the data.

SampleBuildData04

The following sample code snippet have help in converting to a proper format before using the SQL Insert statement.

[sourcecode language=”powershell”]
## – Step to change data that has Single or Double quotes:
$SQLdata = $null;
$SQLdata = foreach ($l in $global:logdata)
{
 ## – Sample snippet for replacing Single or Double-quotes before SQL Inserts:
 if ($l.Column12 -ne ‘Admin’)
 {
  $l.Column4 = $l.Column4.replace("”", "””").replace("’ ", ‘" ‘).Replace(" ‘", ‘ "’).Replace("’", ‘"’);
  if (($l.Column3 -eq ‘START’) -or ($l.Column3 -eq ‘END’))
  {
   if ($l.Column12 -ne $null)
   {
    $l.Column12 = $l.Column12.replace("’", "”");
   }
   else
   {
    if (($l.Column12 -ne $null) -or ($l.Column12 -ne ‘Admin’))
    {
     if ($l.Column3 -eq ‘FAILED’ )
     {
      $l.Column12 = $l.Column12.replace("’ ", ‘" ‘).Replace(" ‘", ‘ "’);
     }
     else
     {
      $l.Column12 = $l.Column12.replace("”", "””");
     }
    };
   };
  };
  ## – To output with reformated data:
  $l;
 }
};
[/sourcecode]

Here’s the changed data object information in Column12 only if Column3 has a “Failed” value. I will cover more in the next blog I’ll where I show how to construct the SQL Insert statement.

SampleBuildData05

What’s Next?

Next blog I’ll be covering importing the $logdata to a SQL Server table reaching its final destination.