Using PowerShell Studio 2015 snippet sample

In my previous blog I show how to integrate a custom function called “RefreshDataGrid1” which is used to populate the DataGrid.  Now, SAPIEN PowerShell Studio does provide a Snippet code called “ConvertTo-DataTable” will convert your PSObject to a Data Table type which can be load into the DataGrid component. Thanks to June Blender (SAPIEN Technology Evangelist) for showing me the ” ConvertTo-DataTable” function.

Snippet_00_5-1-2015

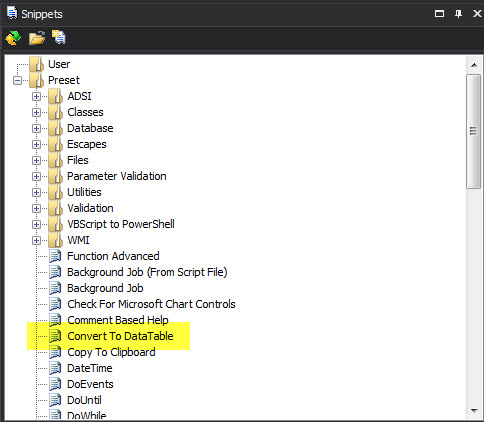
This function can be found in the Snippet panel just below the WMI folder.

Snippet_01_5-1-2015

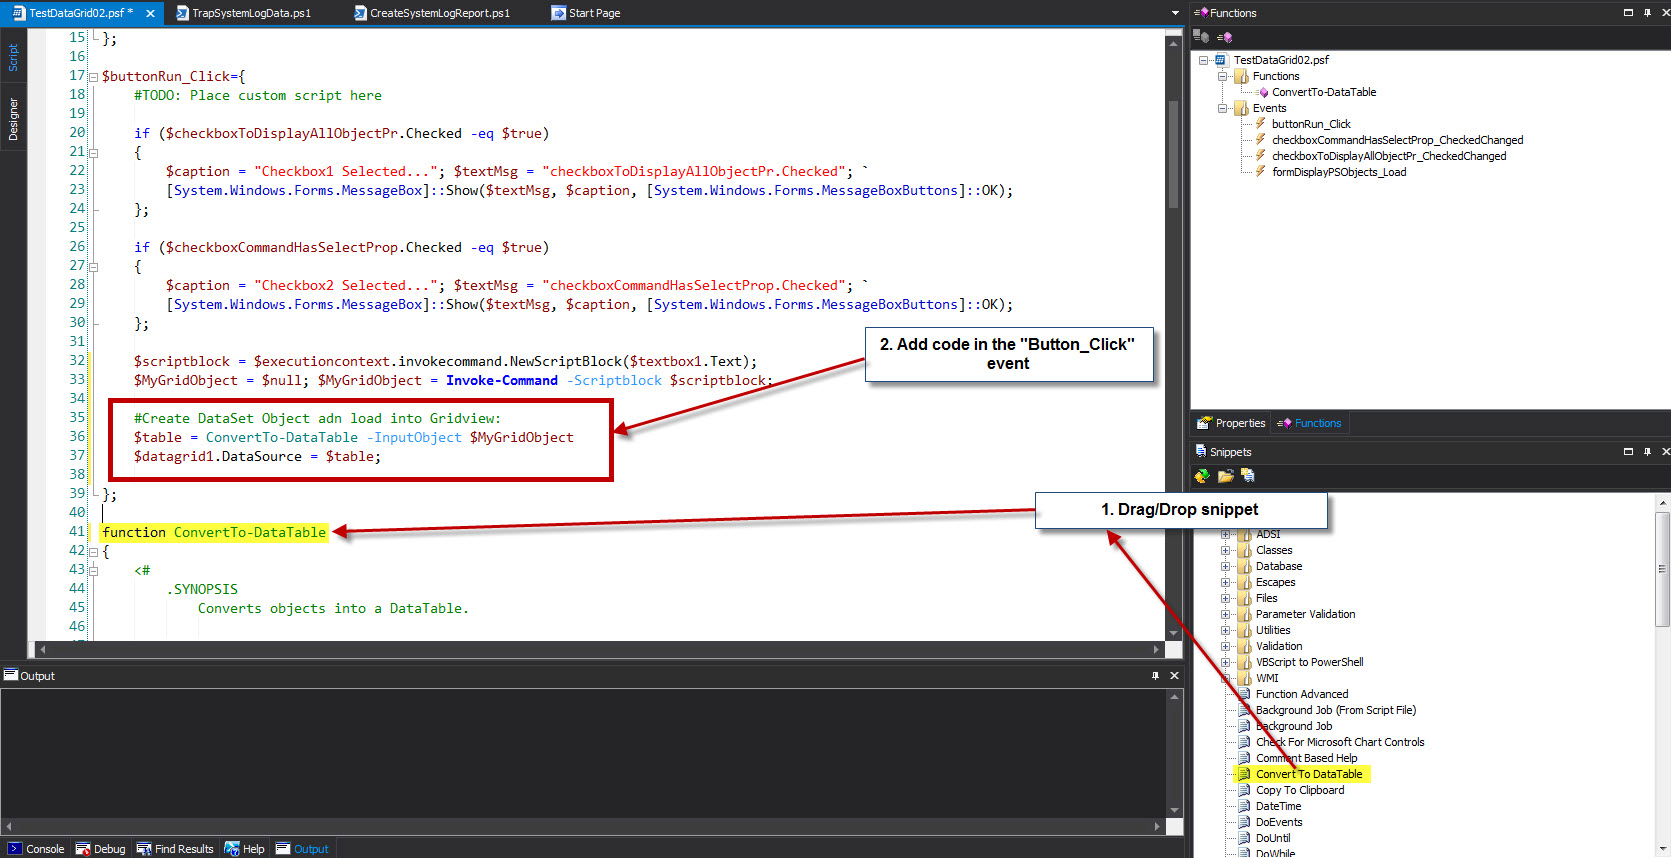
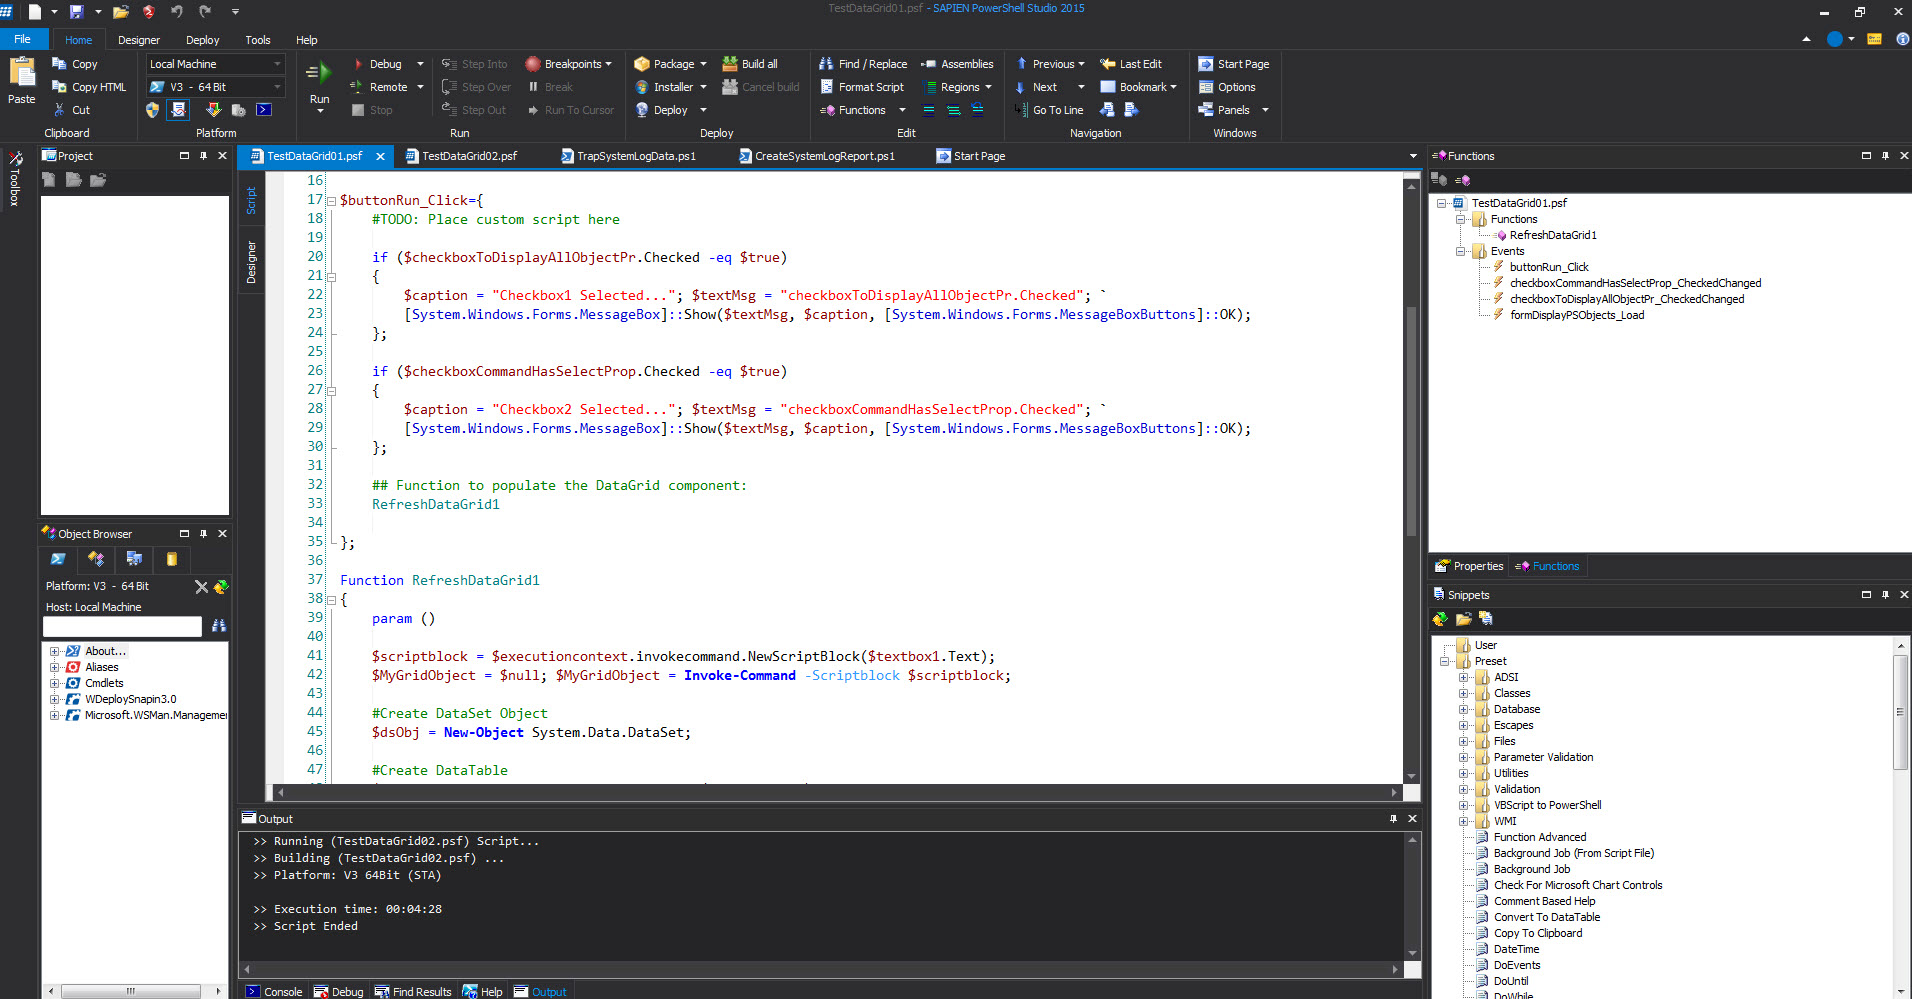
So, changes can be made to the existing TestDataGrid01 solution: 1. Removing the “RefreshDataGrid1” function code and from Button_Click event. 2. From the “Snippet” panel, Drag/Drop the “ConvertTo DataTable” code into the Script pane. 3. finally add the code to use the function in the “Button_Click” event.

Snippet_02_5-1-2015

So, adding the following two line of code will get the data populated into the DataGrid component:

[sourcecode language=”powershell”]
$table = ConvertTo-DataTable -InputObject $MyGridObject
$datagrid1.DataSource = $table;

[/sourcecode]

The use of Snippet code can help cut down your PowerShell Coding time.

Snippet_03_5-1-2015

Snippet_04_5-1-2015

Please, take the time to learn and understand this tool.  It’s full of interesting features.  Don’t forget to check SAPIEN Blog site at: http://www.sapien.com/blog/

WMF Version 5.0 PowerShell Preview for Windows 7 SP1

Yes!  Windows Management Framework Version 5.0 PowerShell Preview is also available for Windows 7 SP1 machines.  HURRAY!!

POSH5tWin7_01_4-29-2015

Go ahead and check the “Windows PowerShell Blog” article about it: http://blogs.msdn.com/b/powershell/archive/2015/04/29/windows-management-framework-5-0-preview-april-2015-is-now-available.aspx

Take it for a test-drive and I guarantee you won’t look back.  Here’s the Microsoft Download page: http://www.microsoft.com/en-us/download/details.aspx?id=46889

POSH5tWin7_00_4-29-2015

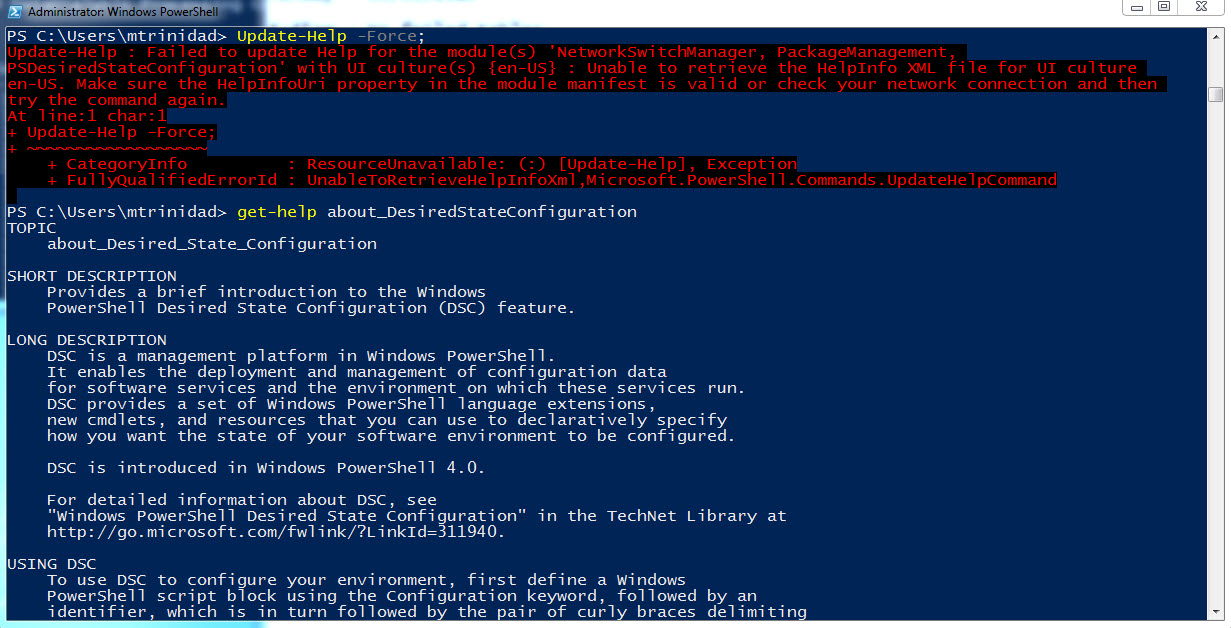
Make sure to execute both of the following commands:

Set-ExecutionPolicy -ExecutionPolicy RemoteSigned;
Update-Help

By the way, this still is a Preview version.  So, expect some errors to show up.   Don’t be discourage by it!

POSH5tWin7_02_4-29-2015


Playing with PowerShell Studio 2015 Windows Form 2/2

PSStudio2_01_4-21-2015

Adding the code

Now that we have the framework of the Windows Form built with added component, we can proceed to add the PowerShell code to make it work.

First, keep in mind, to add the code in any of the component you added to the form by just double-clicking on the component. This will take you to the editor “Script” pane and the cursor will be at the event generated code.

When you first create a blank Windows form, it will automatically generate the $formxxxxx_Load={..} event code. Here’s where you add any additional code before the windows form load at runtime. So, the following added code will set some “CheckBox” components properties to either “$true” or “$false”.

DataGrid2_01_04-28-2015

DataGrid2_02_04-28-2015

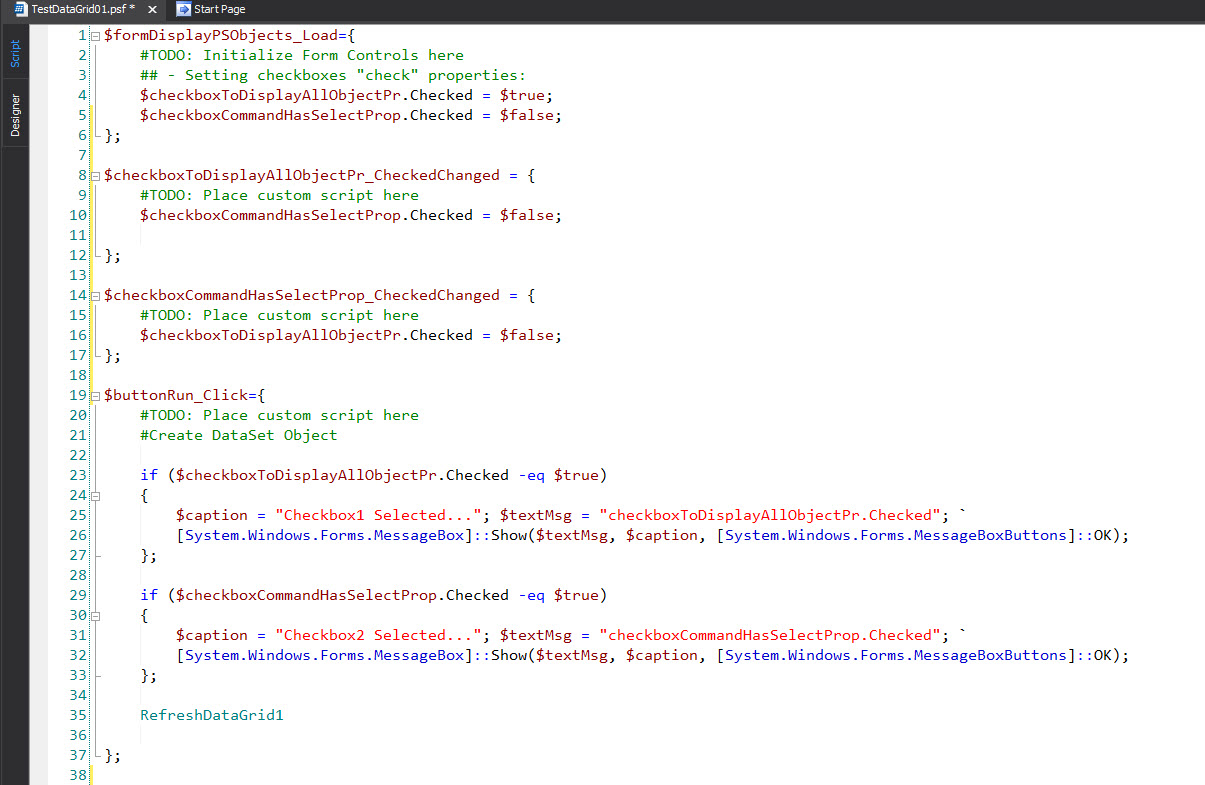
Here’s the code added to all out Windows Form components:

[sourcecode language=”powershell”]
$formDisplayPSObjects_Load={
#TODO: Initialize Form Controls here
## – Setting checkboxes “check” properties:
$checkboxToDisplayAllObjectPr.Checked = $true;
$checkboxCommandHasSelectProp.Checked = $false;
};

$checkboxToDisplayAllObjectPr_CheckedChanged = {
#TODO: Place custom script here
$checkboxCommandHasSelectProp.Checked = $false;

};

$checkboxCommandHasSelectProp_CheckedChanged = {
#TODO: Place custom script here
$checkboxToDisplayAllObjectPr.Checked = $false;
};

$buttonRun_Click={
#TODO: Place custom script here
#Create DataSet Object

if ($checkboxToDisplayAllObjectPr.Checked -eq $true)
{
$caption = “Checkbox1 Selected…”; $textMsg = “checkboxToDisplayAllObjectPr.Checked”; `
[System.Windows.Forms.MessageBox]::Show($textMsg, $caption, [System.Windows.Forms.MessageBoxButtons]::OK);
};

if ($checkboxCommandHasSelectProp.Checked -eq $true)
{
$caption = “Checkbox2 Selected…”; $textMsg = “checkboxCommandHasSelectProp.Checked”; `
[System.Windows.Forms.MessageBox]::Show($textMsg, $caption, [System.Windows.Forms.MessageBoxButtons]::OK);
};

## Function to populate the DataGrid component:
RefreshDataGrid1

};
[/sourcecode]
DataGrid2_03_04-28-2015

As you can see, just adding a few line of PowerShell code will bring your windows form to life. Please notice that in this application, both CheckBox component doesn’t really do anything except to display a Popup message.

Adding the DataGrid function

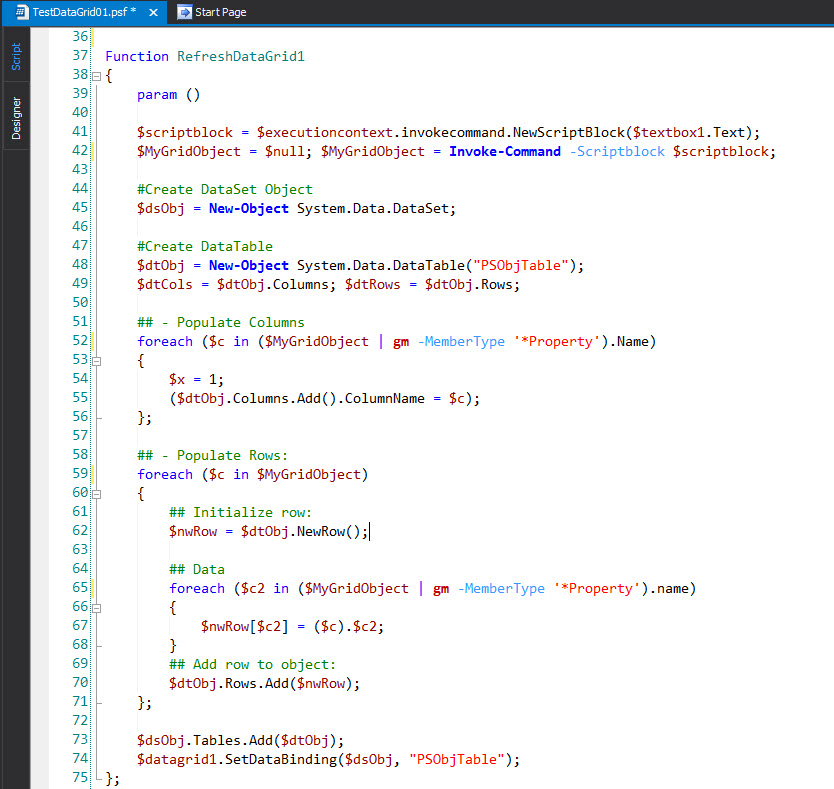
The following function (“RefreshDataGrid1”) is the heart of the form which will display the data into the DataGrid. In order to build our data we need to type then execute a one-line PowerShell command in our form textbox. This is where we use the “$executioncontext.invokecommand.NewScriptBlock($textbox1.Text)” which will convert the text into a PowerShell ScriptBlock object for processing in the “Invoke-Command”.

DataGrid2_04_04-28-2015

After we got the object create, the function will proceed to:
1. Create the DataSet object and the table placeholder for columns and rows of DataGrid.
2. Then, populate columns names and data rows.
3. Finally, it binds the DataSet table into the DataGrod component.

[sourcecode language=”powershell”]
Function RefreshDataGrid1
{
param ()

$scriptblock = $executioncontext.invokecommand.NewScriptBlock($textbox1.Text);
$MyGridObject = $null; $MyGridObject = Invoke-Command -Scriptblock $scriptblock;

#Create DataSet Object
$dsObj = New-Object System.Data.DataSet;

#Create DataTable
$dtObj = New-Object System.Data.DataTable(“PSObjTable”);
$dtCols = $dtObj.Columns; $dtRows = $dtObj.Rows;

## – Populate Columns
foreach ($c in ($MyGridObject | gm -MemberType ‘*Property’).Name)
{
$x = 1;
($dtObj.Columns.Add().ColumnName = $c);
};

## – Populate Rows:
foreach ($c in $MyGridObject)
{
## Initialize row:
$nwRow = $dtObj.NewRow();

## Data
foreach ($c2 in ($MyGridObject | gm -MemberType ‘*Property’).name)
{
$nwRow[$c2] = ($c).$c2;
}
## Add row to object:
$dtObj.Rows.Add($nwRow);
};

$dsObj.Tables.Add($dtObj);
$datagrid1.SetDataBinding($dsObj, “PSObjTable”);
};

[/sourcecode]
DataGrid2_05_04-28-2015

Testing the Windows Form

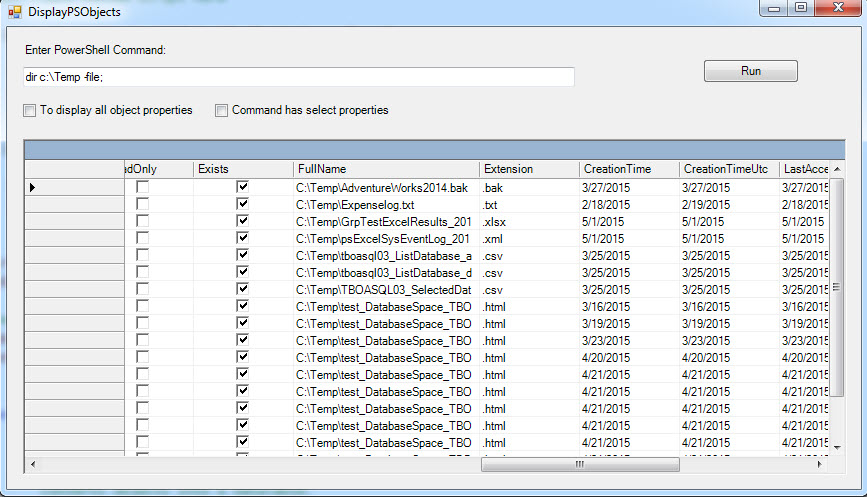
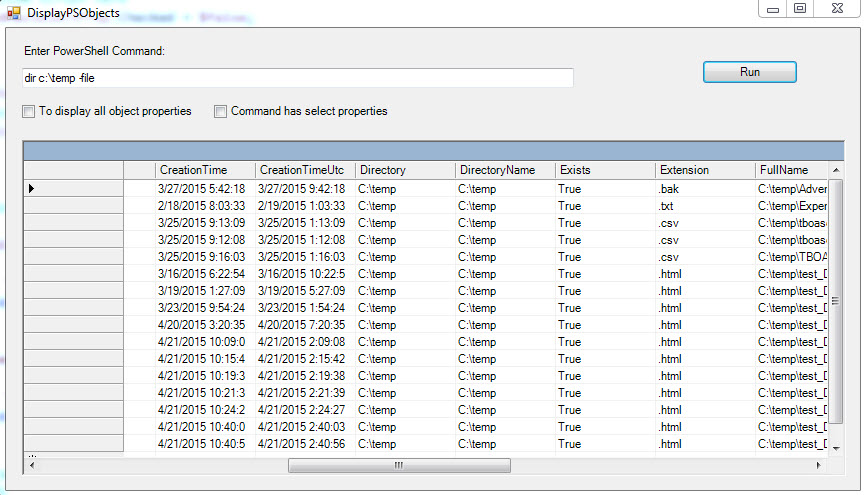
Following the instruction from the previous blog, run the form and type the following one-liner:

[sourcecode language=”powershell”]
dir c:\temp -file
[/sourcecode]

Then, click on the “Run” button to execute the command and view the result in the Datagrid view.
DataGrid2_06_04-28-2015

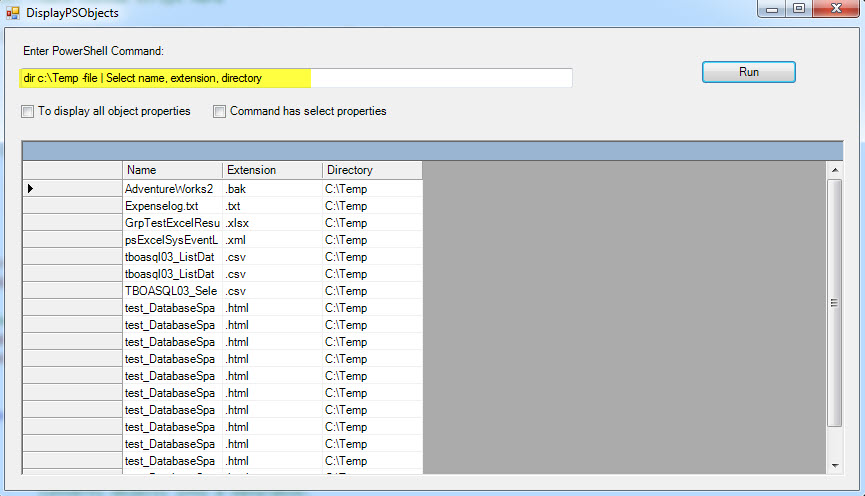
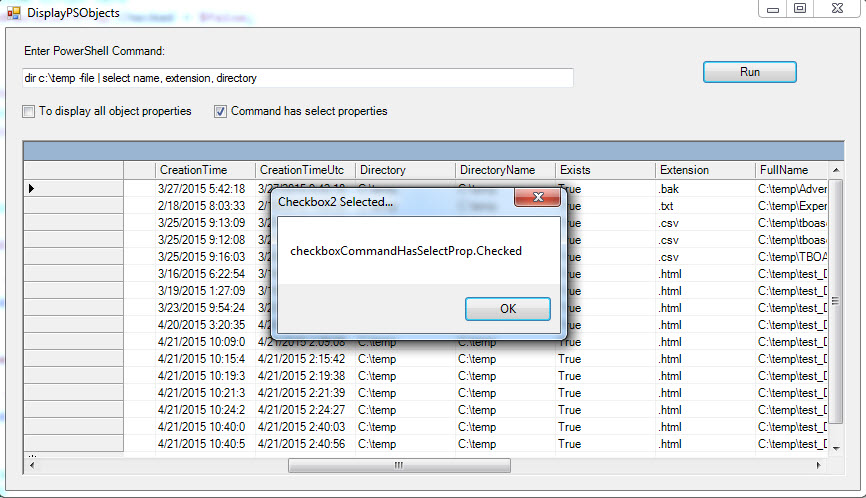
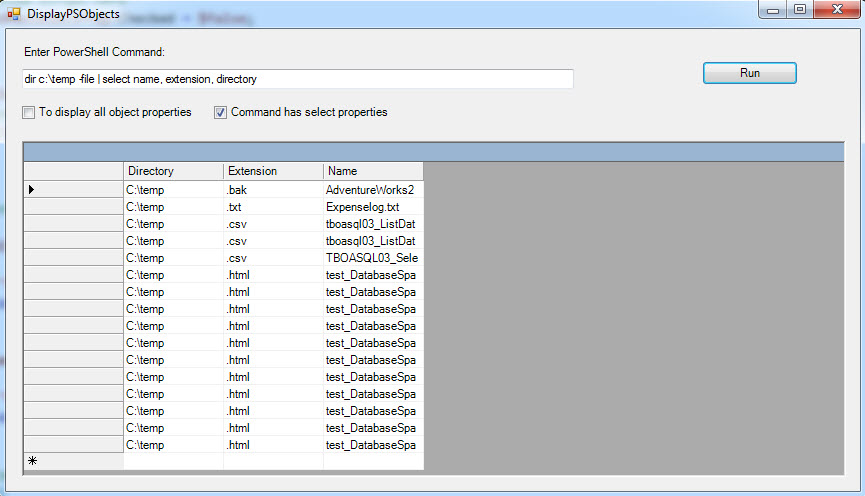
Now, type another one-liner, select one either of the CheckBox, and click on the “Run” button:

[sourcecode language=”powershell”]
dir c:\temp -file | Select name, extension, directory
[/sourcecode]
DataGrid2_07a_04-28-2015

As you can see, the checkbox will display the message and the datagrid will refresh its data.
DataGrid2_07b_04-28-2015

Additional tip

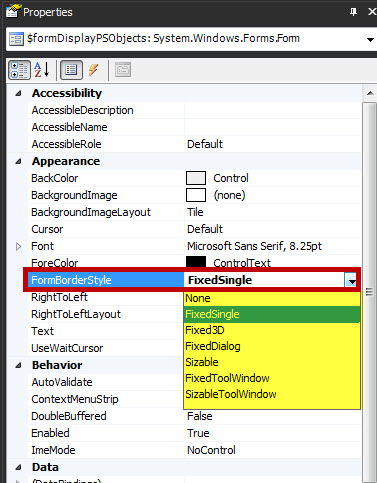
If you want to lock the Windows Form so it won’t resize, use the “FormBorderStyle” property. This form has the “FormBorderStyle” property set to “FixedSingle”.
DataGrid2_08_04-28-2015

After the Windows form is fully tested and working, you can proceed to either keep executing it from PowerShell Studio or go ahead to build the executable file.

Keep in mind, This sample is not perfect but shows some essentials in building the Windows forms using PowerShell Studio 2015.  This tool is a GREAT tool that has a lot to offer.

If you want more information about Window Component properties, search the MSDN library online. Also, don’t forget to check SAPIEN’s Blog at:  http://www.sapien.com/blog/
 

Playing with PowerShell Studio 2015 Windows Form 1/2

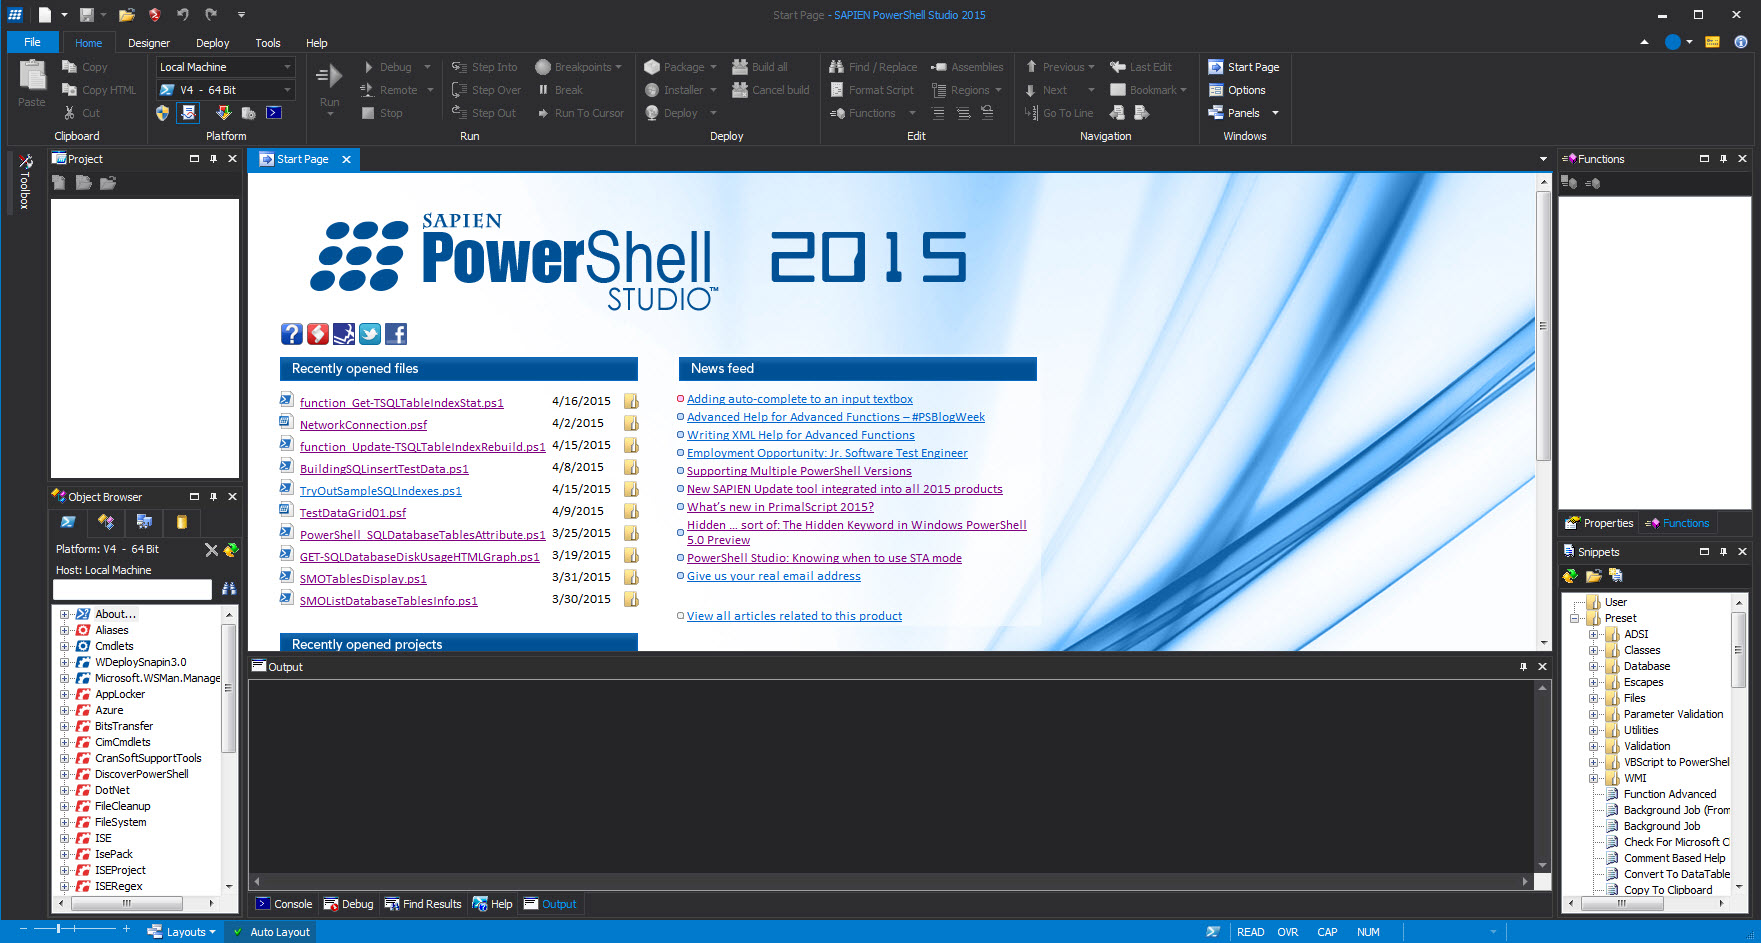
Yes! SAPIEN TechnologiesPowerShell Studio 2015” product allow you to create Windows form and at the same time you can compile it creating an executable application.  So, just for playing around I’m going to create a Windows application that will allow me to execute a PowerShell command and display all of its properties values in a datagrid form.

PSStudio_00_4-7-2015

Creating a PowerShell Studio Windows form

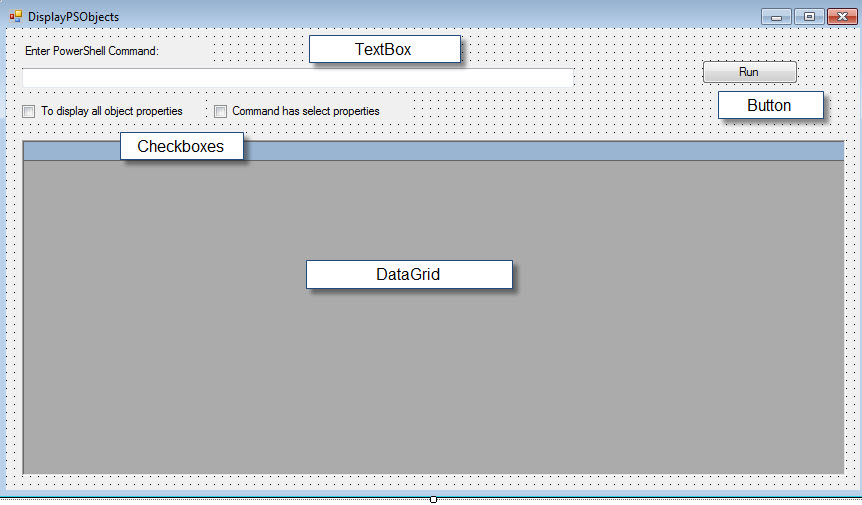
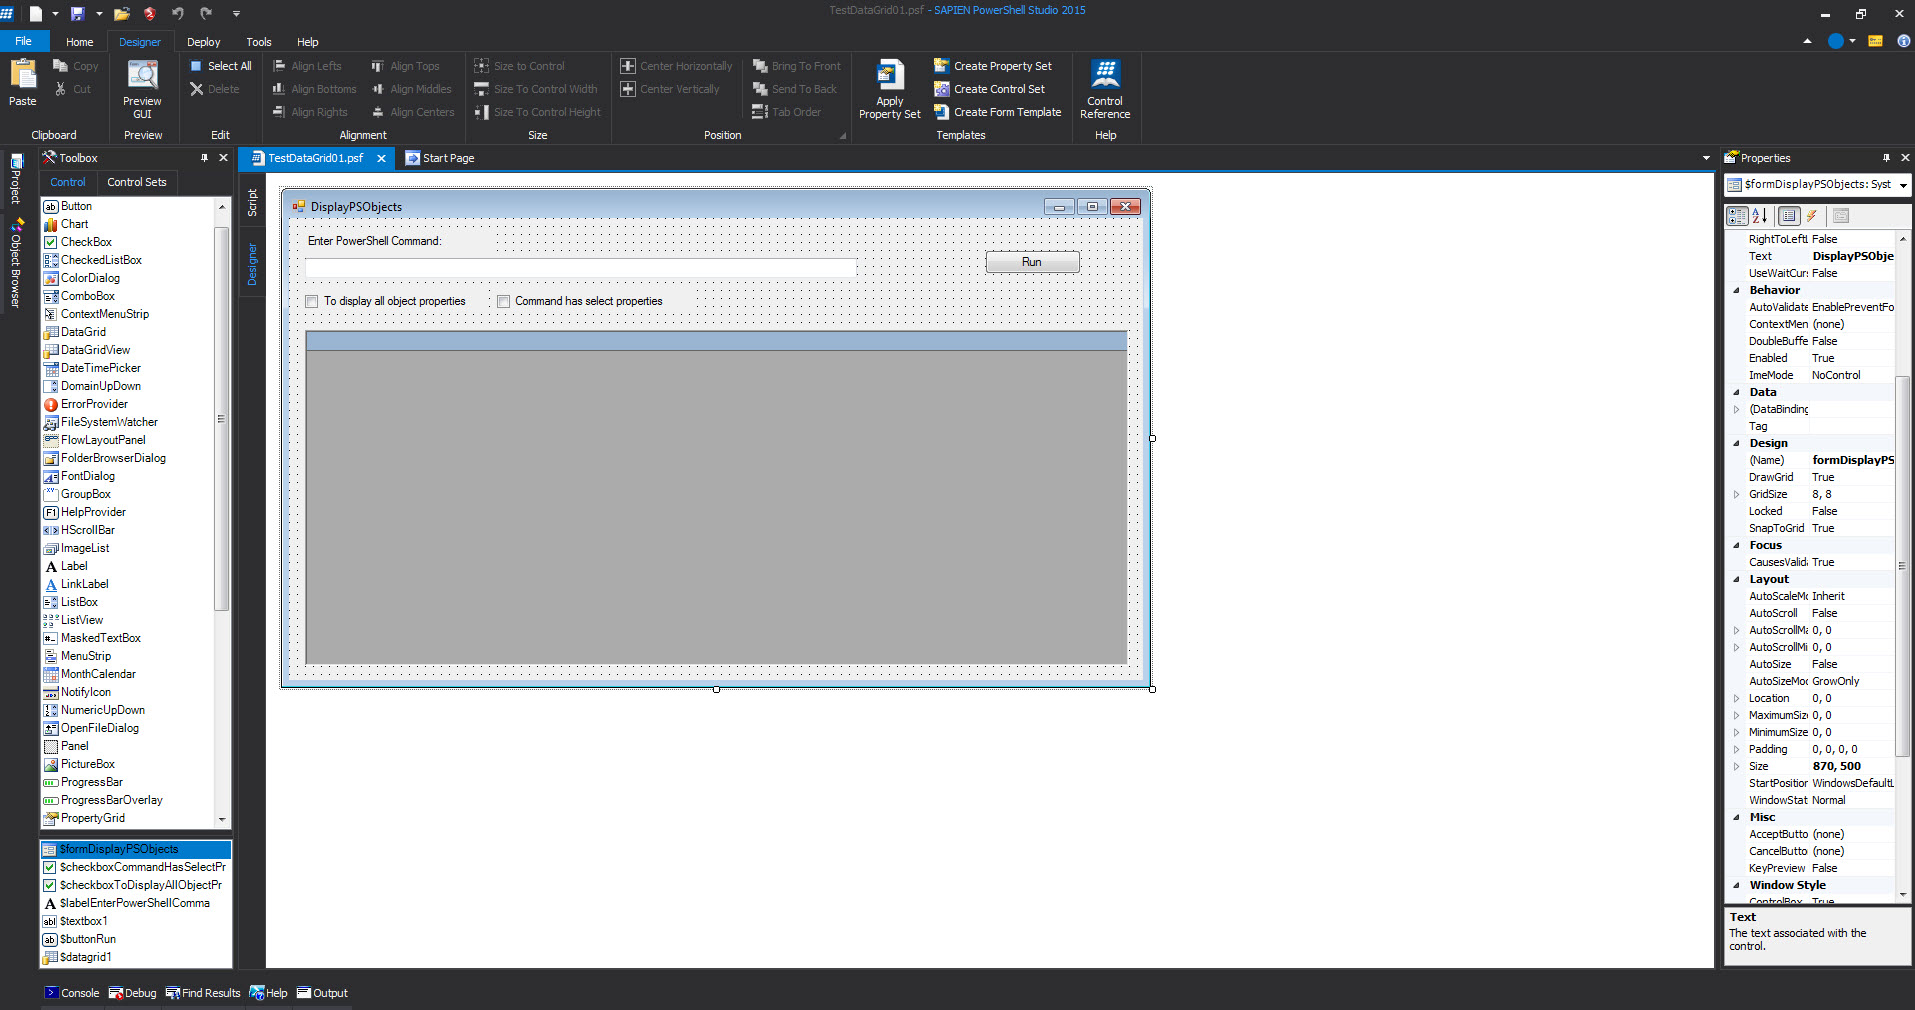
This application will have the following Windows components:

1. A textbox to type the PowerShell command.
2. Two checkboxes to allow display all or selected properties.
3. A datagrid to display the results.
4. And the button to execute the PowerShell command typed in the textbox.

DataGrid_01_4-8-2015

Also, I created a PowerShell function use to build the data to be sent to the datagrid component.

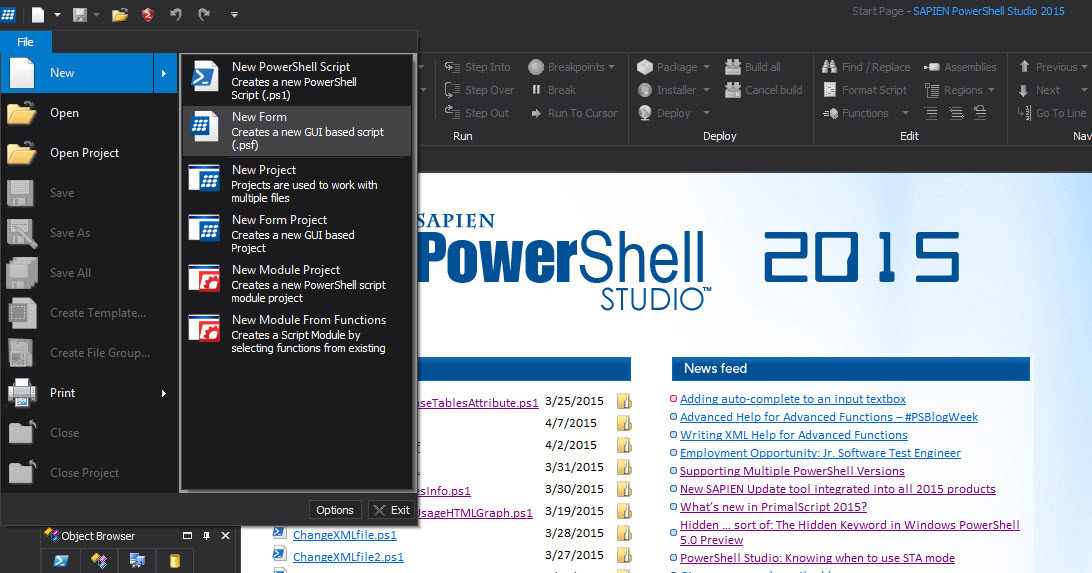
To create a new Windows form click on the “File” menu and select “New” then from the dropdown list pick “New Form“. This option will create a “*.psf” file.  I’ve named it “TestDataGrid1.psf“.

PSStudio_01_4-7-2015

PSStudio_02_4-7-2015

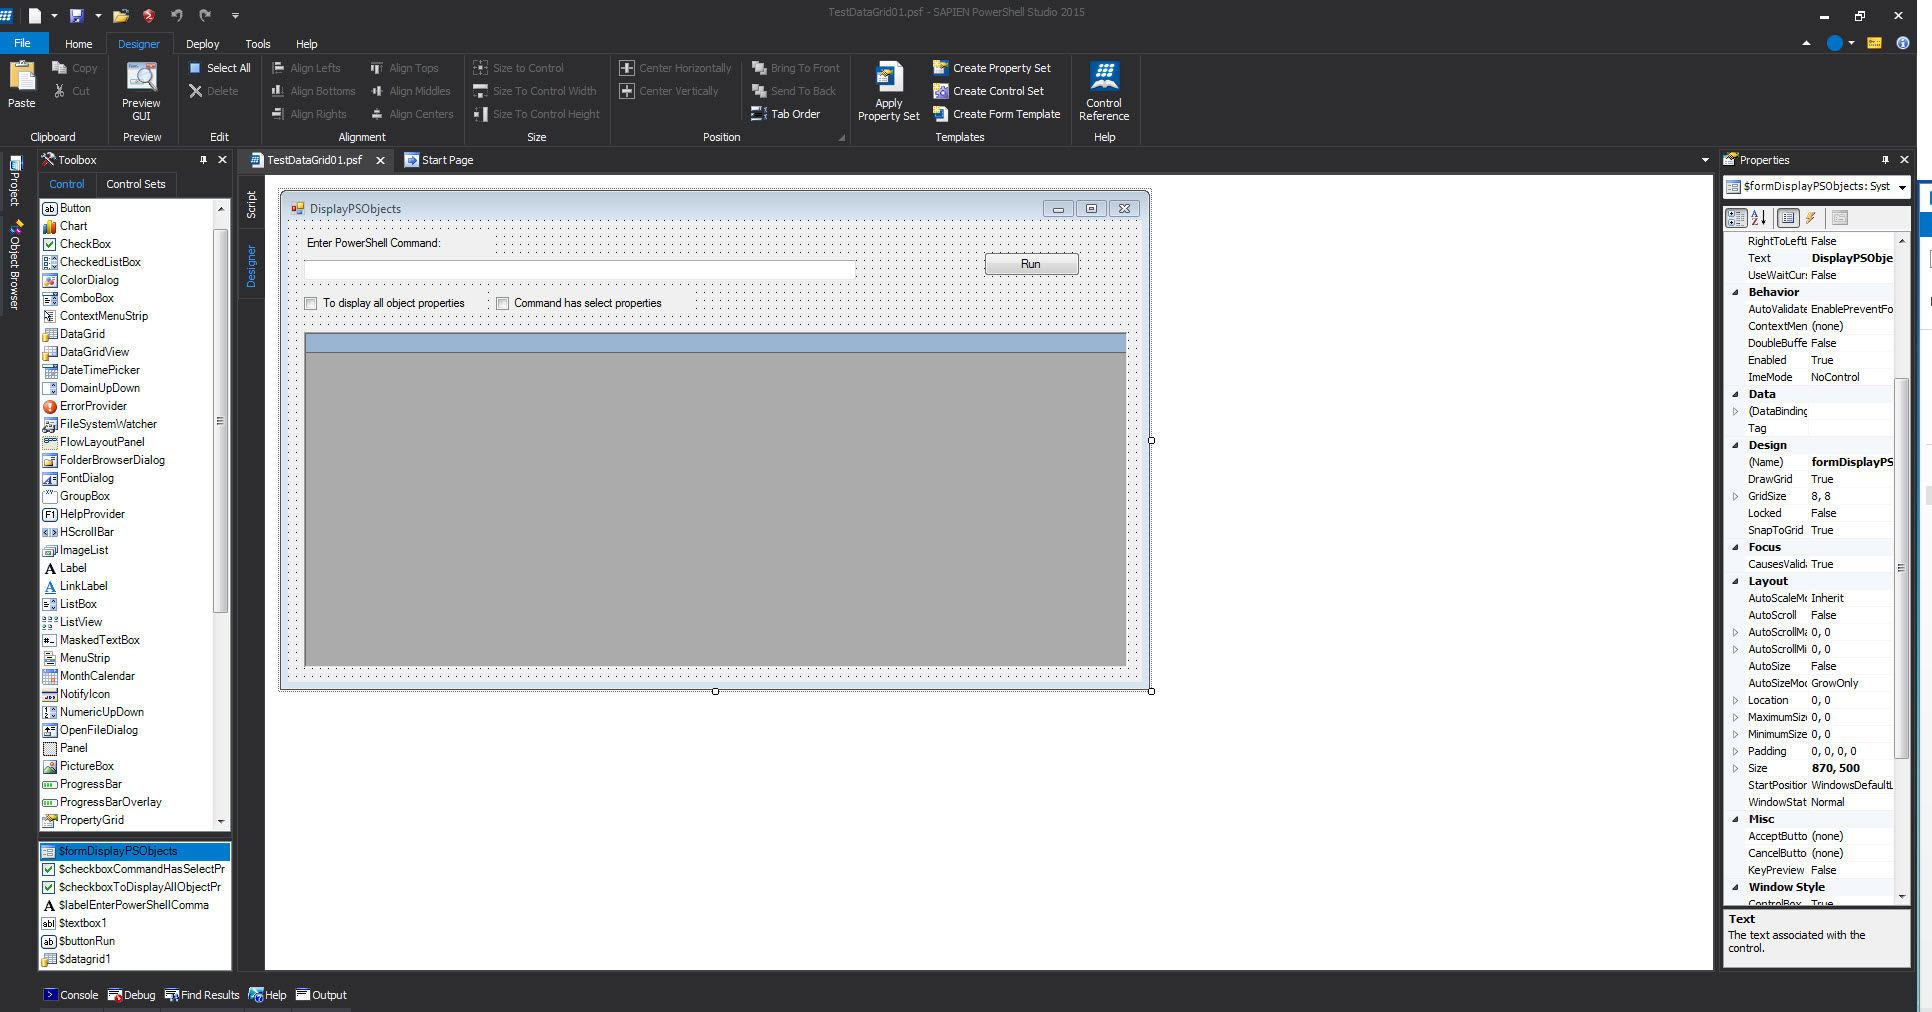
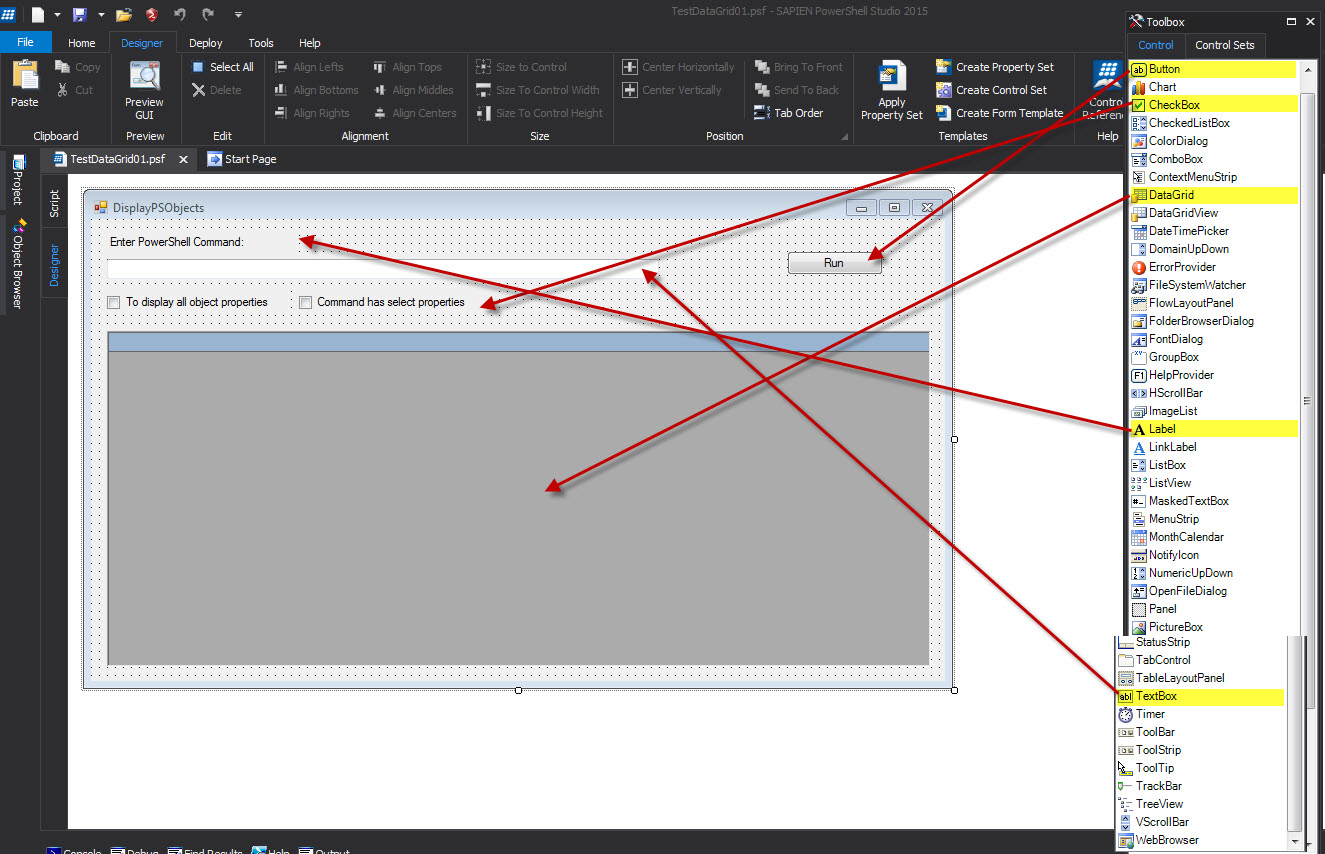
One important thing to keep in mind, when working building a Windows-based solution, this editor is Visual Studio-like. So, if you have work with any version of Visual Studio then your learning curved is minimal.  Just drag-and-drop the object into the form then later add the script code afterward.

This Windows form will contain the following controls:
1. TextBox
2. Label
3. Checkbox
4. Button
5. DataGrid

DataGrid_02_4-8-2015

As you add object components to the form their properties can change too. Mainly, look into changing the “Text” property of some of the objects, such as: Form, Label, and the Button.

DataGrid_03_4-9-2015

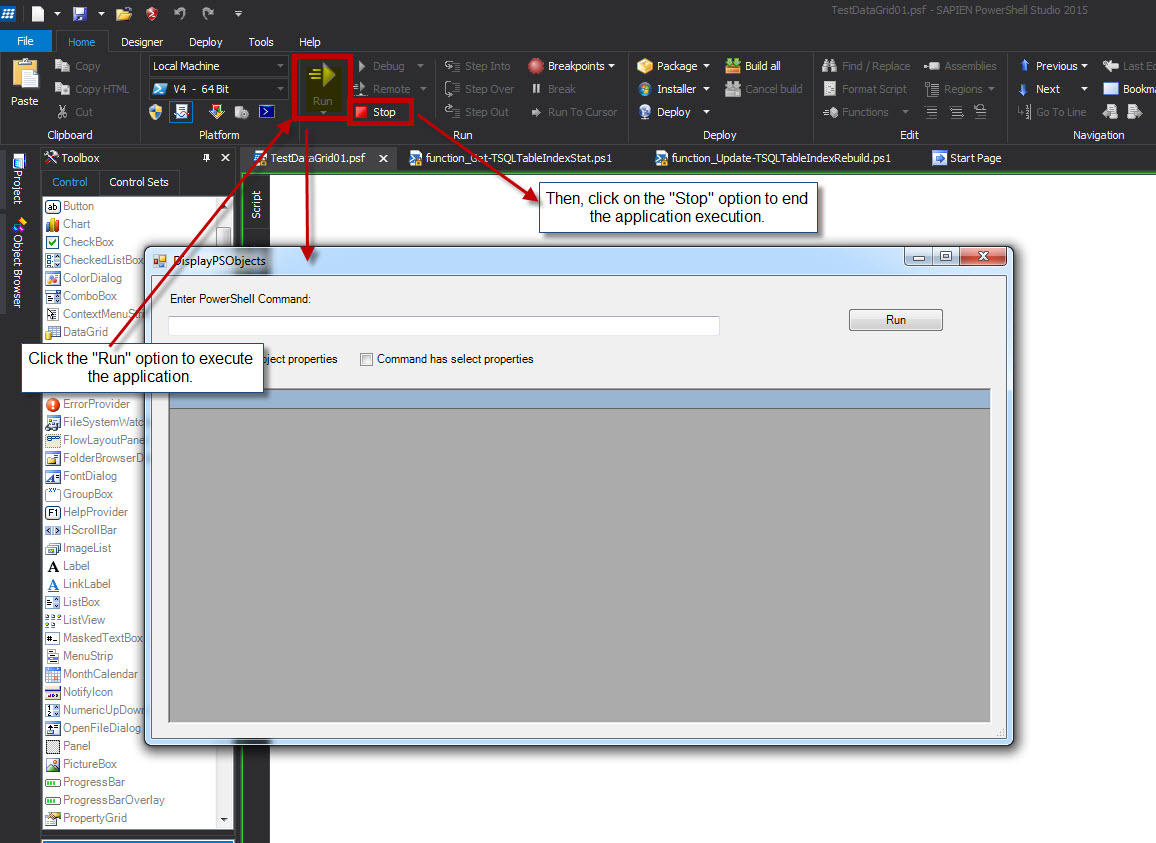
At this point there’s no code added to this Windows application but, from the “Home” menu, you can click on the “Run” option to see it running.  And, ‘No!’, you can’t execute the application outside of this editor.  Unless, you create an executable program out of this solution which you can do with this editor.

DataGrid_04_4-10-2015

Next upcoming blog will be adding the PowerShell code and some functions to our solution.


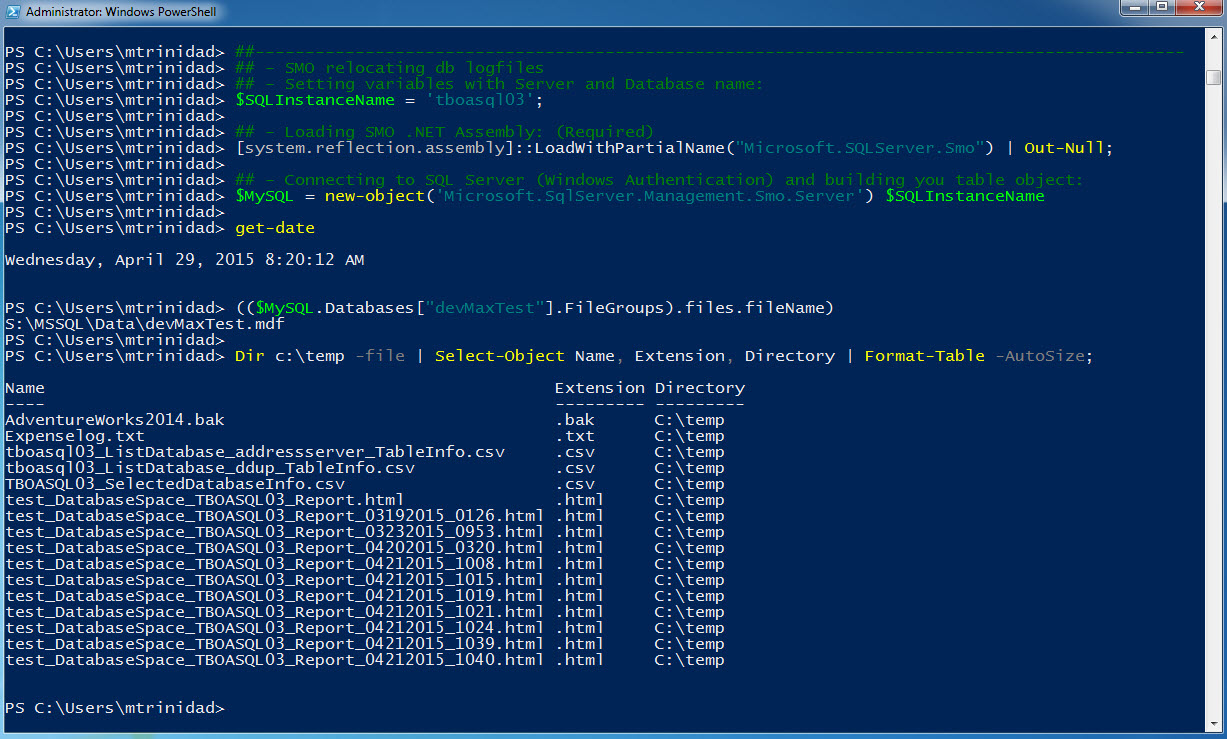
PowerShell SQL Server SMO Simplicity Series – 1

This series is a learn by sample blog which I’m hoping any DBA and/or SQL Developer will take advantage to re-use these code snippets.  Due to the lack of SQL Server cmdlets, I prefer to use SMO which gives me flexibility to build my own PowerShell commands to automate most of my routine tasks.

1 – Connecting to your SQL Server engine

This take at least three lines of code: (excluding the comment lines)

[sourcecode language=”powershell”]
## – Setting variables with Server and Database name:
$SQLInstanceName = ‘YourSQLServerInstancename’;

## – Loading SMO .NET Assembly: (Required)
[system.reflection.assembly]::LoadWithPartialName(“Microsoft.SQLServer.Smo”) | Out-Null;

## – Connecting to SQL Server (Windows Authentication) and building you table object:
$MySQL = new-object(‘Microsoft.SqlServer.Management.Smo.Server’) SQLInstanceName;

[/sourcecode]

The first line you create a variable holding the SQL Server instance name, then loads the SQL Server assembly “Microsoft.SQLServer.SMO“, and then creating the variable holding the SQL Server objects.

The third line it’s what connect to the server using Windows Authentication.  Please be advice that, even you don’t have a Windows Authentication, it will not returned an error and it will return a Null object.

So, if you need to use SQL Server Authentication, you will need to add the following code after creating the “$MySQL” object:

[sourcecode language=”powershell”]
## – Uncomment code block within [#region – #endregion] to enable use of SQL Authentication:
#region – Changing from default Windows to SQL Authentication:

#   ## – Variables required to SQL UserID and SQLPassword:
$SQLUserName = “YourSQLUserID”; $sqlPwd = “YourSQLUSerPassword”;

## – Block of Code required to build SQL Authentication:
$MySQL.ConnectionContext.LoginSecure = $false;
$MySQL.ConnectionContext.set_Login($SQLUserName);
$SqlUserPwd = ConvertTo-SecureString $sqlPwd -AsPlainText -Force;
$MySQL.ConnectionContext.set_SecurePassword($SqlUserPwd);

[/sourcecode]

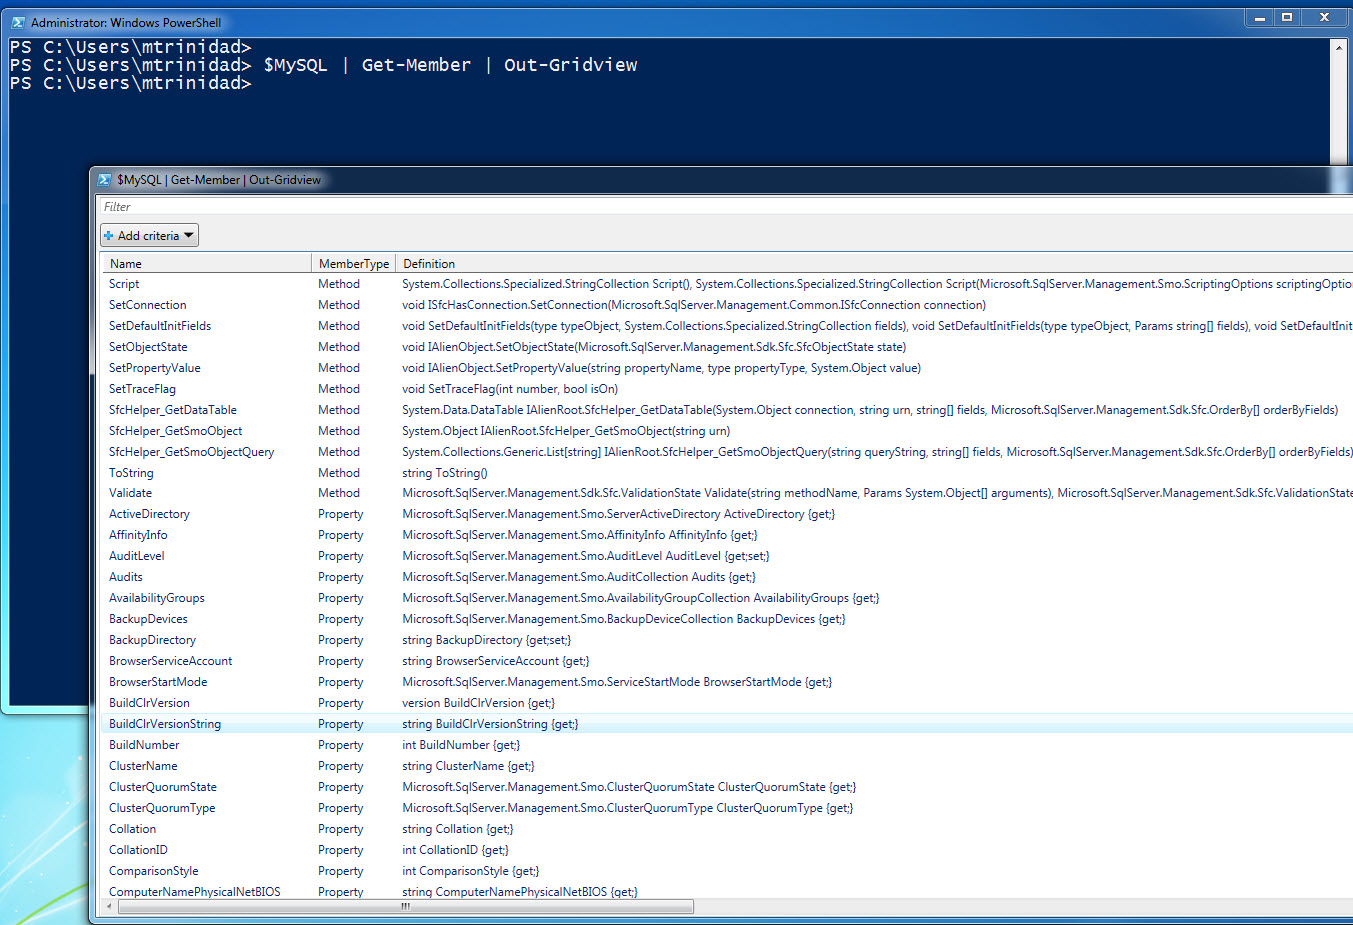
Now, that you’re connected to the SQL Server instance, you can check the content in the variable $MySQL.  To do this the following one-liner help in exploring your object members (Methods and Properties);

[sourcecode language=”powershell”]
$MySQL | Get-member | Out-GridView;

[/sourcecode]

Get-MemberSMO01_3-30-2015

For starters, you might be looking to display some information so you need to look for $MySQL members “Properties” which hold values you can display using the PowerShell “Select-Object” cmdlet.  For example, the following oneliner will display the following database properties: Name, Owner, CreateDate, FileGroup, and PrimaryFilePath.

[sourcecode language=”powershell”]
$MySQL.Databases | Select name, Owner, CreateDate, Filegroups, PrimaryFilePath | Format-Table -autosize;

[/sourcecode]

So, Get-Member is you best command to explore your PowerShell objects and understand its content.  Another very useful command is the “Out-Gridview” which will use more heavily in the next blog series.

Don’t forget for any of these PowerShell cmdlet you can use the “Get-Help” display the command documentation:

[sourcecode language=”powershell”]
Get-Help Get-Member -ShowWindow

[/sourcecode]

Have fun and Keep learning PowerShell!


Post on PowerShell SQLServer SMO simplicity

Stay tuned for a series of post and learn how to start using SQL Server SMO with PowerShell V4 (or greater). Collect information from your SQL Server with PowerShell starting with a few lines of code.  See shortcuts and string formatting working in your favor while manipulating your data.  The scripts will evolved as you learn to apply new techniques.

Yes! PowerShell is about evolution of your automation skills for productivity.

How far can we take this? From this code:

($MySQL.Databases) `
| Select-object Name, Owner, RecoveryModel, Size, DataSpaceUsage, SpaceAvailable `
| Ft -AutoSize;

to an HTML solution.

SqlHTML_01_3-17-2015

At the end, it’s all about reusable code.

We glad to welcome our new sponsor Devart with their product “dbForge” which is an excellent tool next to SQL Server Management Studio.  I’ll be briefly showcasing this product.

dbForge_01_3-17-2015


FLPSUG February 26th meeting “Azure Edition”

Join us tomorrow in this special edition of our Florida PowerShell User Group meeting.

Our topic: “PowerShell Building Azure Quick VMs” – This is a PowerShell Azure via to quickly create Virtual Machines in it’s basic form. It will give you a quick way to get you started with Microsoft Azure.  Live Sample demo will be shown.

This is the same topic already given at the SQL PASS Virtual PowerShell meeting last Thursday February 19th.

I added a few more content and code.  All audience are welcome but mainly oriented to new Azure DevOps.

To register: https://www.eventbrite.com/e/florida-powershell-user-group-monthly-meeting-february-2015-tickets-15921743363


Florida PowerShell User Group – New Year 2015 Resolutions

Lets Do THIS!!  Come and join us.  It’s free essential training for a couple of hours.

  • IT Skills
    Any IT Pro/DevOps resolution for this year should be to improve your skills.  You need to start getting into PowerShell because is the the main technology for automating your On-Premise, Cloud and/or Hybrid infrastructure.  If you don’t care about it then you need to pick to a different career.
  • More Azure Sessions
    This new year I’m going to extend my PowerShell session to include more Azure presentations.  If you are a newbie you’re welcome to join us.  Or, if you’re already working with Azure PowerShell, then join us and share your experience.
  • Get to know Microsoft Cloud
    This year, get to know Microsoft Azure and all its component because they are all manageable with PowerShell.  With PowerShell you’ll need to building your knowledge of working with DSC (Desired State Configurations), OneGet, and Runbooks for Azure Task Automation.  There’s plenty of information out there and still you need to connect the dots to make it work.
  • Learn about tools
    One thing for sure is that Windows ISE editor and PowerShell version 4.0 (or greater) plays an important roll when buidling scripts.  Also, when combining the free Visual Studio Community Edition will be a most when integrating PowerShell and providing source code management with Team Foundation Online or Github. This is a MOST to learn to use!
  • Extending meetings
    Here’s where our new coming Azure PowerShell meeting will start diving into the essential of using DSC as a foundation to improve our understanding of Desired State Configuration.  At the end, of this journey we’ll end up taking a look at CHEF tool.

So, our normal monthly FLPSUG meeting (3rd Thursday) will be inviting MVP’s speakers to showcase their expertise.  Then, on our new second FLPSUG meeting (starting in February) we’ll be strictly concentrating on PowerShell Azure for Cloud Task Automation and having MVP Adnan cartwright (co-hosting) in these series.

Let us Welcome New Year 2015!!

Join Us next meeting on January 22nd 6:30PM (EST): https://www.eventbrite.com/e/florida-powershell-user-group-monthly-meeting-january-2015-tickets-15120220988


Getting started with Windows 10 PowerShell v5.0 Preview

As we already know with the new version of Windows 10 comes PowerShell Version 5.0 PREVIEW loaded with more enhancements and new Cmdlets.  It also come with the PowerShell ISE (Integrated Scripting Environment) which has been enhanced.  But, how can we get started?

The same procedure needed to get started in previous PowerShell versions still applies:

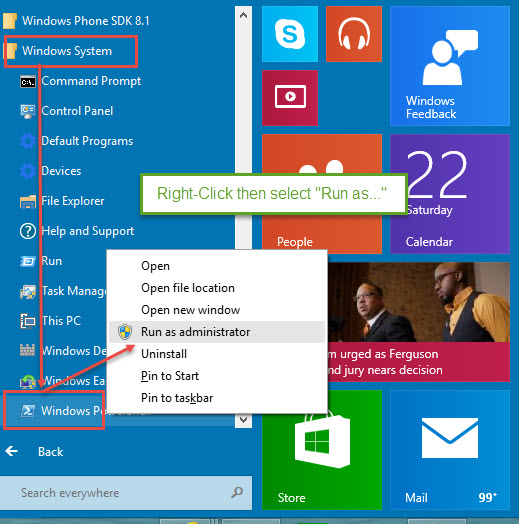
1. Add PowerShell on your “Start Menu” or just run it from the Windows System menu group.

ExecutePowerShellasAdiministrator

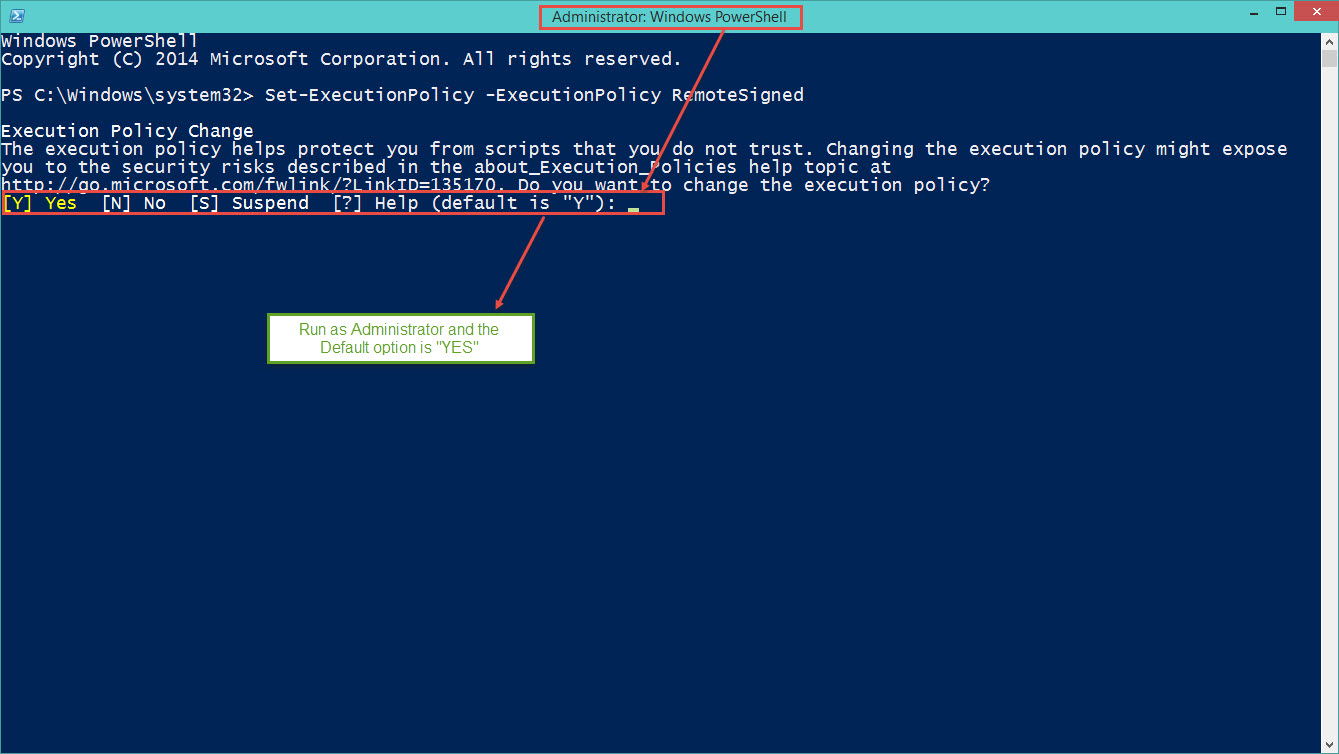
2. Open either of the PowerShell Console or the shell within the ISE then set the “ExecutionPolicy“.  Preferably executing “as Administrator“:

[sourcecode language=”powershell”]
Set-ExecutionPolicy -ExecutionPoilicy RemoteSigned

[/sourcecode]

ExecutePowerShellExecutionPolicy

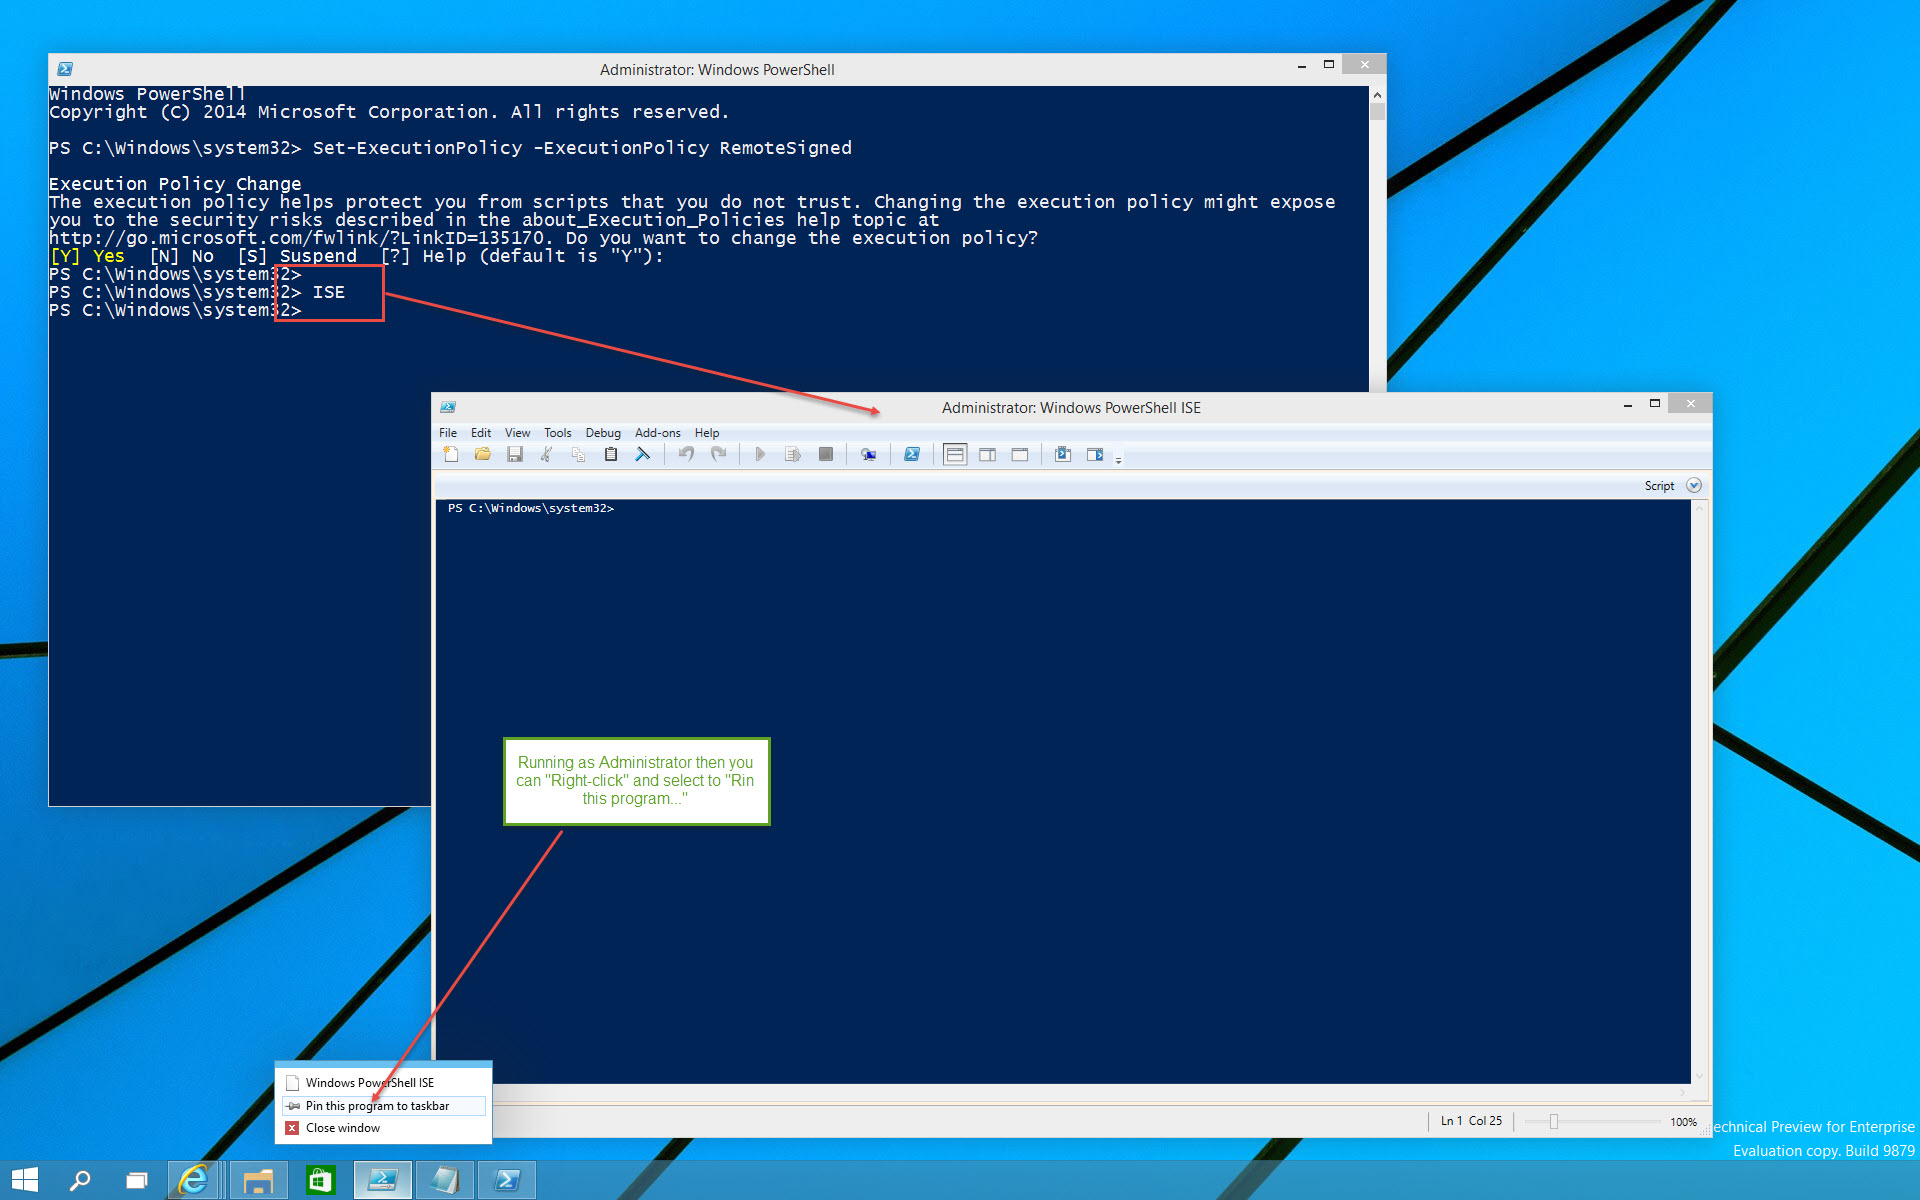
3. To start the Windows PowerShell ISE editor you will need to execute the “ISE” command from the PowerShell console.
Then when is open, you can do a right-click on the ISE task bar and do “Pin to Taskbar“.  ISE can’t be pinned to the “Start Menu” yet.

ExecutePowerShellISE

Although, without setting the ExecutionPolicy, you can still execute single command lines. But, failure to do so will cause a script file not to execute.

Next, If you don’t have the time to buy a book then take a look at the PowerShell Help “About_*” topics.   There are a additional step that update your PowerShell documentation on your machine.  Of course, Internet connection is required.

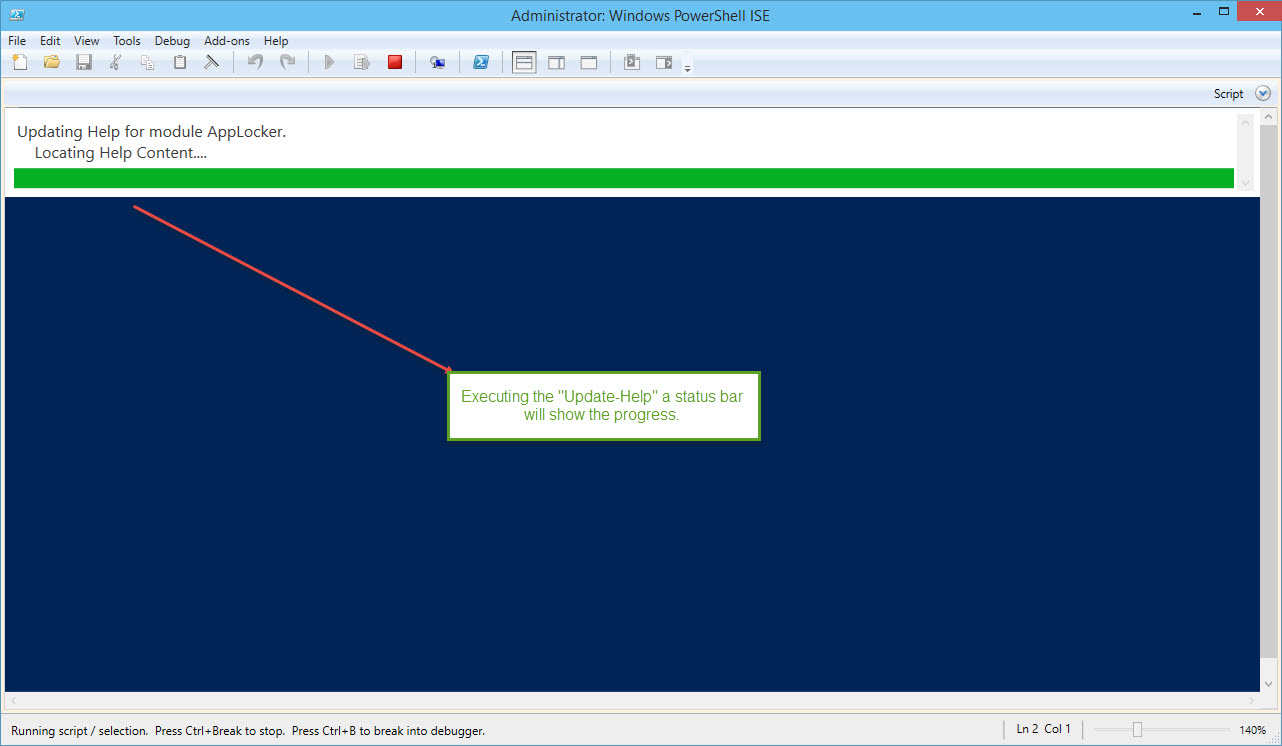
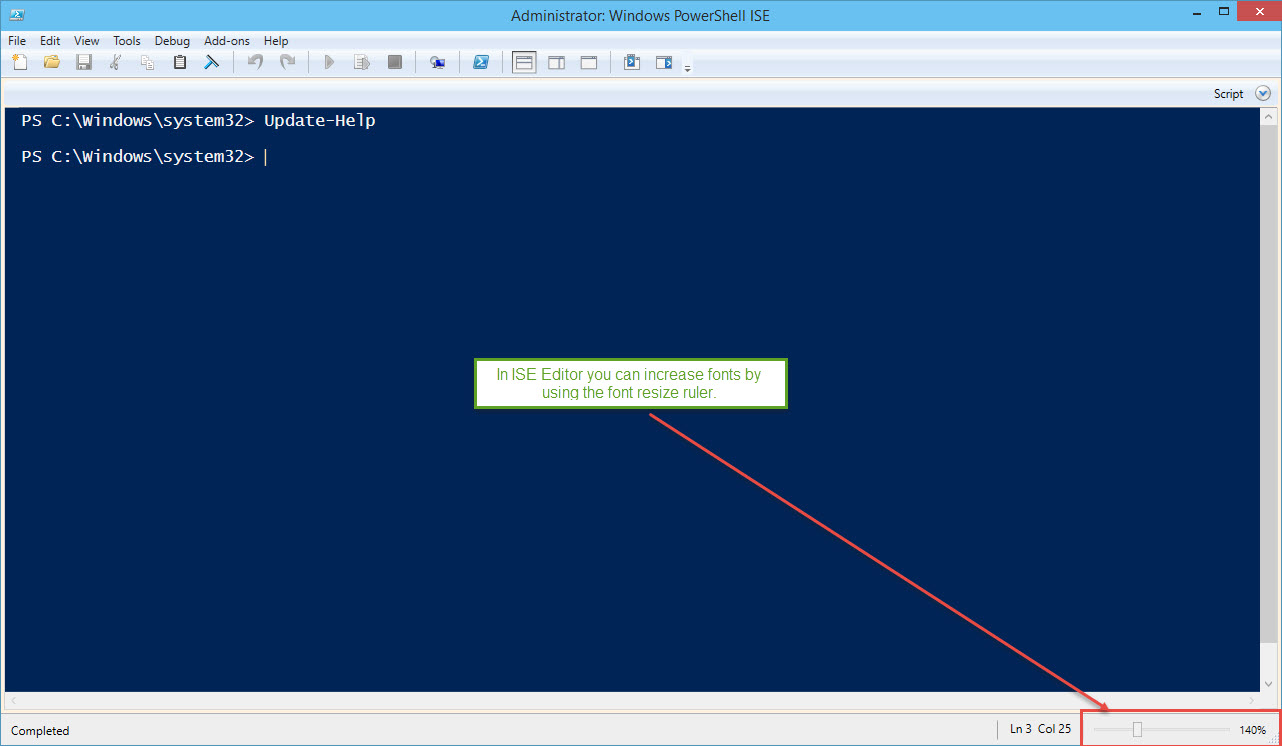
4. Open the PowerShell Console or the shell in ISE to run the following command “Update-Help”, and again preferably executing “as Administrator”:

[sourcecode language=”powershell”]
Update-Help

[/sourcecode]

ExecutePowerShellISE_02

ExecutePowerShellISE_01

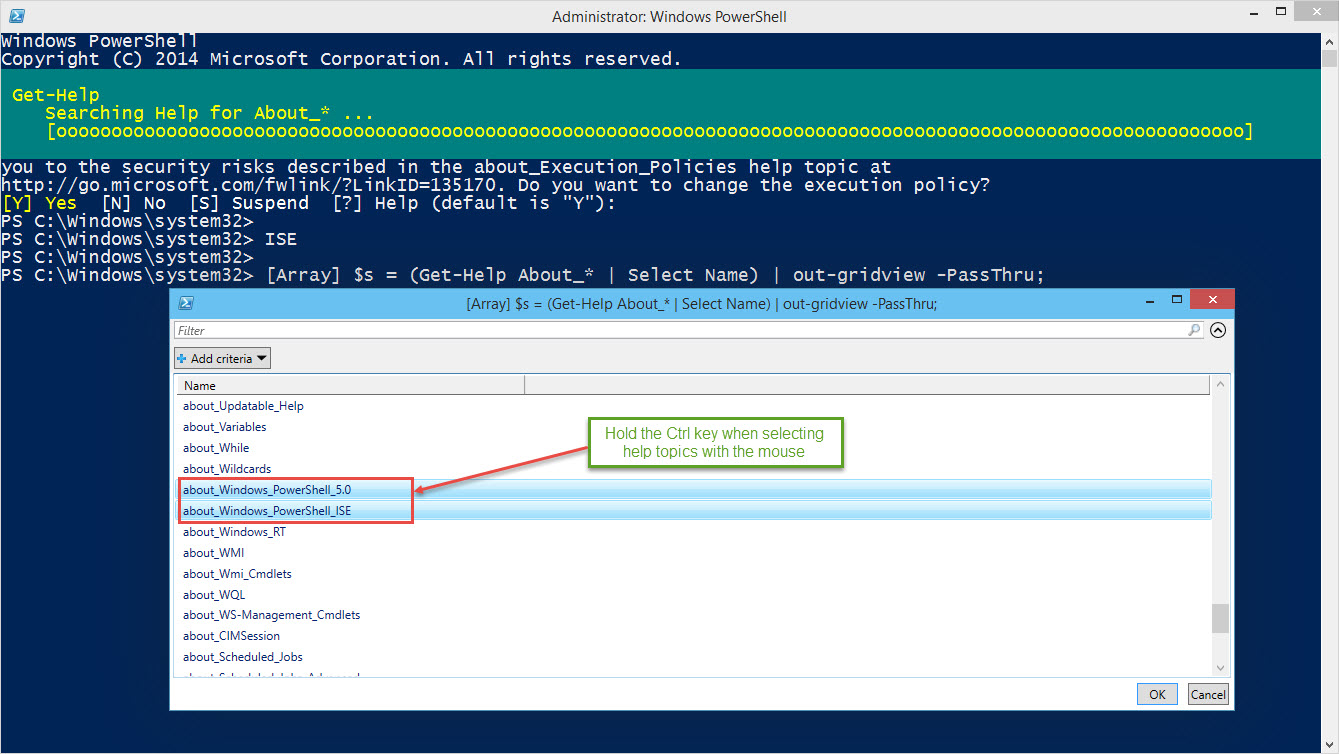
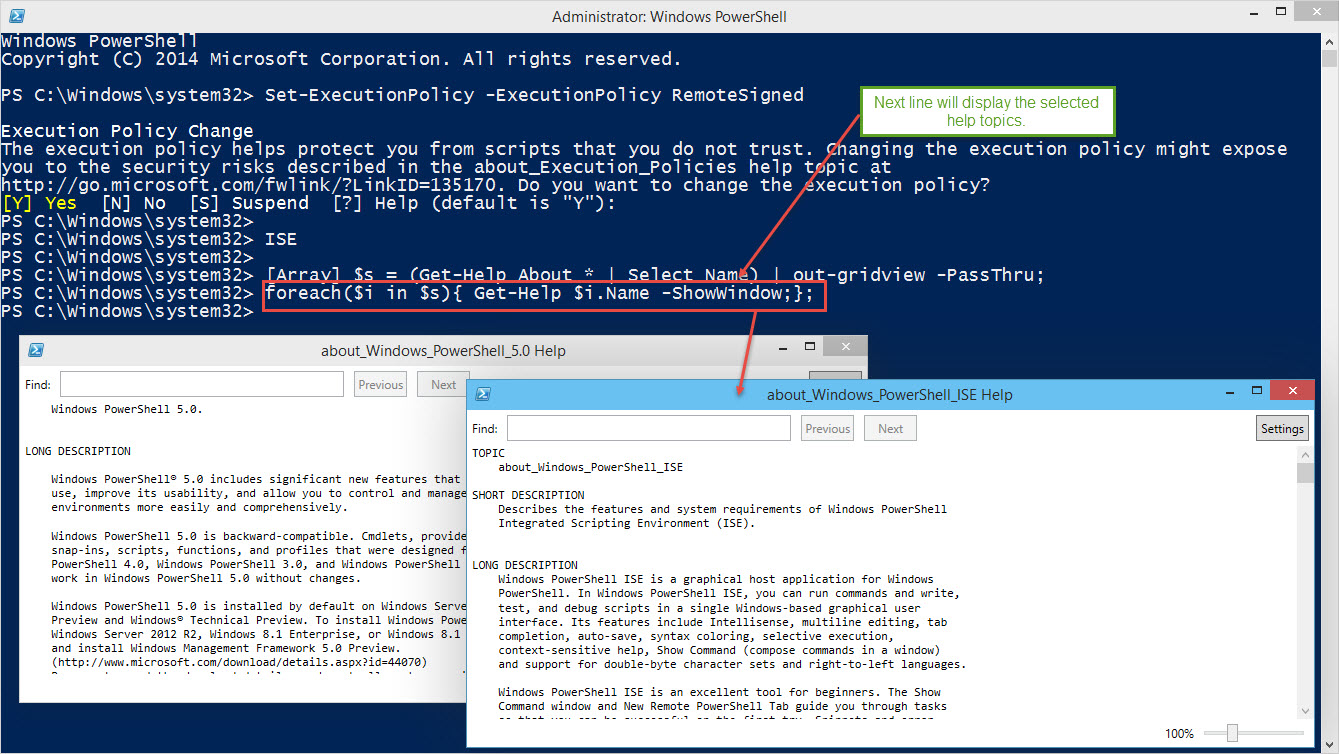
After you have updated all your PowerShell Version 5.0 documentation try usign the following command lines to list and select any of the existing help “About_*” topics:

[sourcecode language=”powershell”]
[Array] $s = (Get-Help About_* | Select Name) | out-gridview -PassThru;
foreach($i in $s){ Get-Help $i.Name -ShowWindow;};

[/sourcecode]

PowerShellColectingHelpTopic_01

PowerShellColectingHelpTopic_02

Basically, these two commands will help in listing all help About_* topics and using ‘Out-Gridview’ cmdlet with the  -Passthru’ parameter you can select multiple topics to read.  Just press the Ctrl key when selecting the topics.

I’ve create a help module if you want to give it a try to assist in your PowerShell journey.  Check this link:
https://gallery.technet.microsoft.com/DiscoverPowerShell-Module-1fbe9a5e

More Discover PowerShell – How about Help with PowerShell Variables?

4. When loading PowerShell modules the following folder “C:\Users\…\Documents\WindowsPowerShell\Modules” doesn’t exist.  So you will need to go to the User document folder create this folder.

This folder is where you install all you customs and/or add any existing on PowerShell modules (including the ones for ISE).  Below is a list of suggested PowerShell Add-on modules you may want to look at:

Make sure to read the ReadMe files and verify that the module(s) can run on this version of PowerShell.

Now, at this point, you’ll be ready to start using PowerShell v5.0.

FLPSUG October 16th Meeting PowerShell Excel Deep Dive…

Thanks to everyone who attend last Thursday meeting on “Quick Deep Dive to Excel with PowerShell” .   Here’s the demo sample scripts containing the following:

1. 0_TipsTrickResourceWithExcel.ps1 – Tips, Trick, and web resource information.
2. 1_TrapSystemLogData.ps1 – Sample script to build an PSObject with both Application/System errors and warning logs use to print the Excel report.
3. 2_CreateSystemLogReport.ps1 – Procedure that will generate the Eventlog results show grouped and count of errors in Excel format.
4. 3_Function_Convert-psObjectToExcel_01.ps1 – Another variation of creating a basic formatted Excel file from a PSObject.
5. 4_SMOGetdatabaseSize.ps1 – Sample script use to build a PSObject for the previous function.

Download Demo Scripts: