Trap missing IP Address for SQL Database Server Firewall Rule

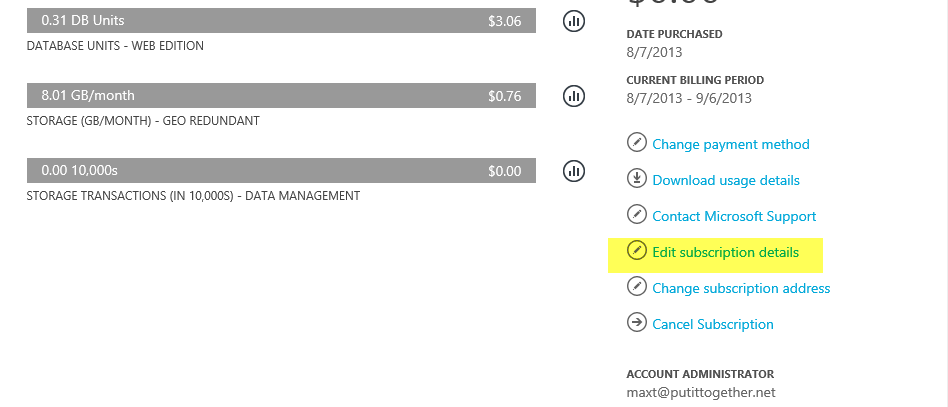
As I work on my second blog piece for the “Getting Ready with Windows Azure SQL Database Server PowerShell and SMO Part – 2/2“, I came up with a way to trap the current IP Address with PowerShell scripting.  When using the Portal for creating your SQL Database Server, it will ask you if you want to create the Firewall rule for you.  But you may want to automate this step using PowerShell and there’s no cmdlet to identify  the “current” IP Address of your Windows Azure connection.

Here’s an example of how the Portal message when is asking for the current IP Address to be added to the Firewall rules:

WindowsAzure2SQLdb

WindowsAzureMissingIPrule

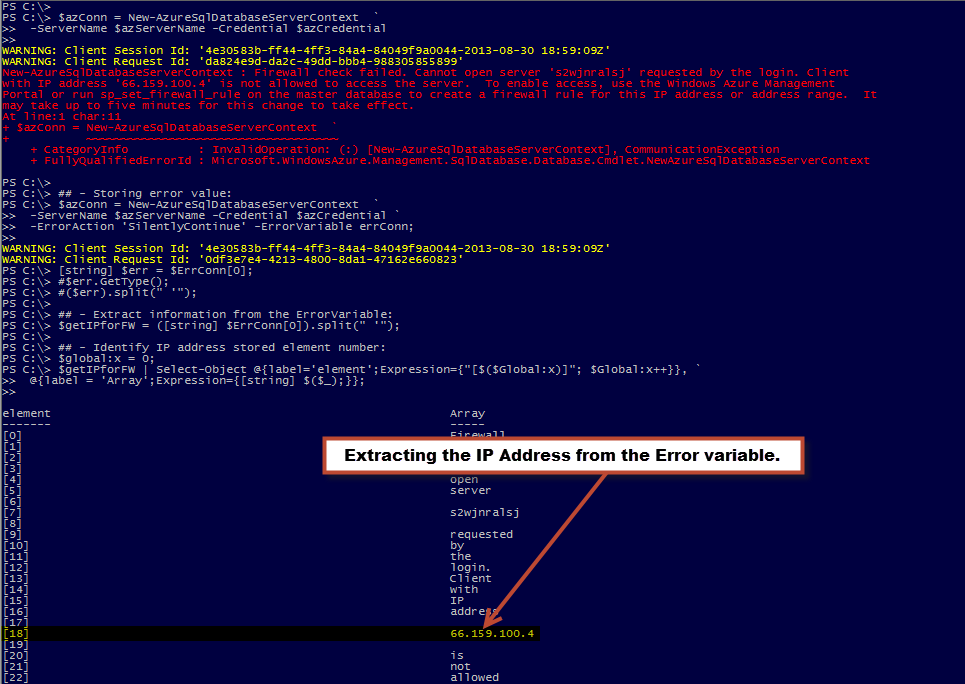
I’m going right to the point with this small blog piece.  Basically,  I’m trapping the error message from the “New-AzureSqlDatabaseServerContext” which will fail to connect to your Azure SQL Database. Then, I’m dissecting the string to get the IP Address in error.  This is my way of trapping the IP address.  I know there might be a better way but for now it works.

I’m assuming the connection to Windows Azure has already been established and you are trying to use the “New-AzureSqlDatabaseServerContext” for connecting to the database.  If you haven’t created the rule then it won’t connect.

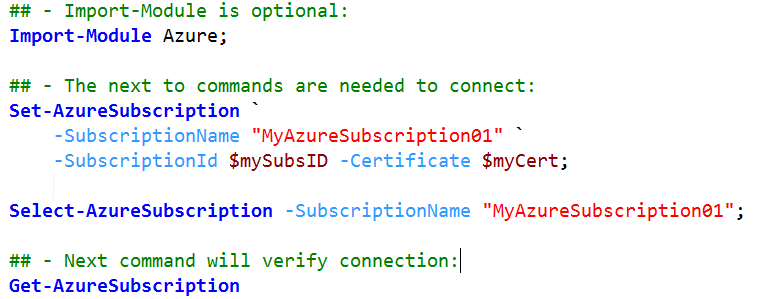
Note: Again, stay tuned for the next “Windows Azure SQL Database Server with PowerShell and SMO” blog part 2/2.

In the “New-AzureSqlDatabaseServerContext” I’m including the following two parameters: -ErrorAction ‘SilentlyContinue’ and -ErrorVariable errConn.  The “ErrorAction” results in not displaying the message.  The “ErrorVariable” define the PowerShell variable you will be storing the error message.  Notice the “ErrorVariable” name doesn’t include a “$” but its needed to view it (ie. $errConn).

[sourcecode language=”powershell”]
## – Storing error value:
$azConn = New-AzureSqlDatabaseServerContext  `
-ServerName $azServerName -Credential $azCredential `
-ErrorAction ‘SilentlyContinue’ -ErrorVariable errConn;
[/sourcecode]

The additional script code shown next will dissect the error message string from $errConn variable. It will take the string to create an array which will help identify the element position where the IP Address is stored.  In this case I’m assuming the error message will not change so the IP Address will always be located in the same place (Right!).  So the first time this code execute, it will find the IP Address in element #18.

Note: Please run first the code to identify the element position in case the “Culture” settings might change the location of the IP Address.

[sourcecode language=”powershell”]
## – Extract information from the ErrorVariable:
$getIPforFW = ([string] $ErrConn[0]).split(" ‘");

## – Display all variable stored in the array and identify where the IP address is stored:
$global:x = 0;
$getIPforFW | Select-Object @{label=’element’;Expression={"[$($Global:x)]"; $Global:x++}}, `
@{label = ‘Array’;Expression={[string] $($_);}};

## – Run once to confirm IP value is stored in element #18:
$getIPforFW[18].Trim();
[/sourcecode]

TrappingIPfromError

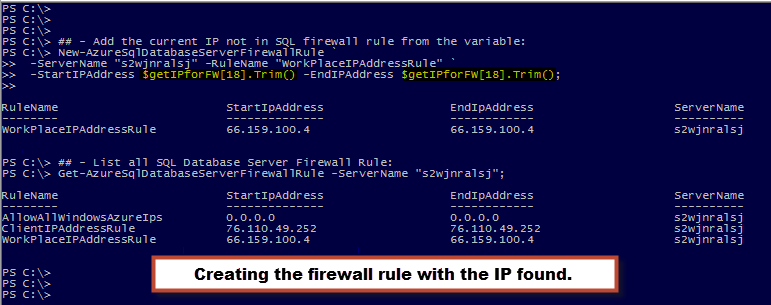
The rest is easy.  After extracting the IP value then you can use the “New-AzureSqlDatabaseServerFirewallRule” to create the firewall rule to include the current IP Address.

[sourcecode language=”powershell”]
## – Get current IP and added it to the SQL Database Firewall Rule:
New-AzureSqlDatabaseServerFirewallRule `
-ServerName "YourServerName" -RuleName "YourClientIPAddressRule" `
-StartIPAddress $getIPforFW[18].Trim() -EndIPAddress $getIPforFW[18].Trim();
[/sourcecode]

CreateFilewallfromIPfound

You can refine this script code to suit your need.  Just make sure to test a few times and verify you are getting the results you need.

Here’s a few more commands you could use to work with these rules.  The “Remove-AzureSqlDatabaseServerFirewallRule” to remove any existing rule(s) and the “Get-AzureSqlDatabaseServerFirewallRule” to list them all.

[sourcecode language=”powershell”]
## – List all your SQL Database Firewall Rules:
Get-AzureSqlDatabaseServerFirewallRule -ServerName "YourServerName";

## – Removing existing SQL Database Firewall Rule:
Remove-AzureSqlDatabaseServerFirewallRule `
-ServerName "YourServerName" -RuleName "YourClientIPAddressRule"";
[/sourcecode]

So, at the end, you will have the ability to automate the process without the need of using the Portal.  Most can be done using PowerShell scripting.

Stay tuned for more Windows Azure SQL Database Server.

That’s it for now!

Maximo Trinidad
Mr. PowerShell
🙂

Getting Ready with “Windows Azure SQL Database Server” PowerShell and SMO Part – 1/2

But before we start using PowerShell with “Windows Azure SQL Database Server” there a few more steps we need to be completed after you have started your subscription:

  1. Installing the most recent Windows PowerShell Azure module
  2. Rename Subscription name (Optional)
  3. Create the Certificate Key

These three items are important before connecting Windows Azure.  Then, will be using 3 PowerShell Azure cmdlets to connect to your subscription.

WindowsAzurePortal

Installing the recent PowerShell Azure module

I recently finish updating my new Windows 8.1 (booth-VHD) and loaded all my tools. So when I started to install Windows Azure PowerShell, I was expecting it won’t work with PowerShell 4.0.  Well, Good Job Microsoft!  It did installed and I got my Windows Azure PowerShell working with PowerShell 4.0.

The latest revision, dated July 31st 2013, will let you install Windows Azure PowerShell on you Windows 8.1 preview. This is exciting Good News.  A couple of months ago I try it on my Windows 8 but the installation failed because of PowerShell 3.0.

Before you start working with your Windows Azure subscription(s) with PowerShell, you need to download the most recent “Windows Azure PowerShell – July 31, 2013 edition”.  At the same time you may want to pick the “Windows Azure SDK for .NET”.  Go to the following link: http://www.windowsazure.com/EN-US/downloads/?sdk=net

Rename Subscription name

For renaming your subscription is better to use the Portal.  It make sense to change your subscription name from “Windows Azure MSDN – Visual Studio xxxxx” to something meaningful like, for example: “MyWindowsAzureSubscription30DaysLimit“.

Note: It is not required to change the subscription name.

If you want to change the name then there’s two ways to do it. Go to the Windows Azure main page and Click on “Account”: https://www.windowsazure.com/en-us/

WindowsAzureGoAcct

Or, at the Portal you can change it by clicking on the UserID, then “View my bill”.  This  will require to login again.

WindowsAzurePortalAcct

Finally, click on the “Edit subscription details” to change the name.

WindowsAzureAccessSubst

WindowsAzureEditSubst

WindowsAzureRenameSubst

For more information on the following link:

Creating the Certificate Key

Next, to create the Certificate key or you won’t be able to use PowerShell to connect to your Windows Azure. This is mandatory as is part of your Azure credentials.  You can find documentation on this topic at following links:

Tip: You need to have installed You could use Visual Studio in order to run the “Makecert.exe” command from the Visual Studio command shell. Or, download the “Windows Software Development Kit (SDK) for Windows 8” to get the “Makecert.exe”.

After creating the certificate key use PowerShell (non-Azure) commands to check its properties.  Here’s an example script lines to look at your existing Certificate keys:

Get-ChildItem cert:\\CurrentUser\My;

Or, to display more information:

Get-ChildItem cert:\\CurrentUser\My | Format-List;

PowerShellCertKey2

Finally, we need to upload the certificate key to Windows Azure.  On the Portal, go to the “Setting” option and add the Certificate key. Follow the screenshots:

WindowsAzureAddCertKey

WindowsAzureUpCert2

Now everything is set to use PowerShell with Windows Azure. There’s no need (for now) to use the Portal web GUI.

PowerShell connecting to Windows Azure

In the following script need to include the Certificate key information as this is part of the Windows Azure credential to connect to your subscription. This is why using the previously shown “Get-ChildItem cert:\\CurrentUser\My | Format-List;” one-liner help you understand about the Certificate(s) in your system.

First, need to prepare the Certificate key use in Windows Azure:

PSCercode

Here’s the list of the 3 Azure commands to connect to your Windows Azure:

PSAzureConnect

Note: Import-Module Azure is optional if working with PowerShell 3.0 or 4.0.

After verifying connectivity to Windows Azure was successful then we can process to build VM’s, SQL Databases, and more using PowerShell.

In my next blog I will be showing how to use PowerShell Azure commands to build a Windows Azure SQL Database, and use SMO with it.

QuickBlog – PowerShell function to get system last bootup time.

Here’s a simple function that will get your system last bootup time.  Also, notice that I’m using the ‘-ErrorVariable ‘ parameter wth a given variable name ‘MyError‘ to trap any error messages during the execution of the ‘Get-WMIobject’ command.  That the same time I’m including the ‘-ErrorAction SilentlyContinue‘ so my function won’t abort while executing.

For the only argument needed in this function, I’m validating that the passing argument is not null (or empty).  Then, to build my result I’m using the scriptblocks to customized the results to be displayed on screen.

At the end, I’m collecting all thre information into the ‘$SvrRebooted‘ variable so it can be diaplayed when done.

[sourcecode language=”powershell”]
function Get-SystemLastBootUpTime{
Param(
[Parameter(Mandatory=$True, Position=0)][ValidateScript({$_ -ne $null})] [Array] $ComputerName
)
[Array] $SvrRebooted = $null;

$SvrRebooted = foreach($name in $ComputerName)
{
$x = get-wmiObject -Class Win32_OperatingSystem -Computername $name `
-ErrorAction ‘SilentlyContinue’ -ErrorVariable MyError;

if($($MyError | Select exception) -eq $Null)
{
$x | Select-Object `
@{Label = ‘ComputerName’; Expression = {$_.csname}}, `
@{Label = ‘Operating System’; Expression = {[string] (($_.Name).Split(‘|’)[0]);}}, `
@{Label = ‘MyLastBootUpTime’; Expression = {$_.ConvertToDateTime($_.LastBootUpTime)};}, `
@{Label = ‘Status’; Expression = {"Success"}};
}
else
{
$name | Select-Object `
@{Label = ‘ComputerName’; Expression = {$name}}, `
@{Label = ‘Operating System’; Expression = {$null}}, `
@{Label = ‘MyLastBootUpTime’; Expression = {$null}}, `
@{Label = ‘Status’; Expression = {‘Failed – ‘ `
+([string]([string] $MyError[0]).split("`n")).split("(E")[0];}};
};
};

$SvrRebooted;
};
[/sourcecode]

This function builds an array object.  Then you can use the ‘Format-Table‘ or the ‘Format-List‘ at your discretion. To execute the ‘Get-SystemLastBootUpTime’ function look at the following one-liners:

[sourcecode language=”powershell”]
## – Running the function:
[array] $svrList = @("Server1","Desktop2");
Get-SystemLastBootUpTime -ComputerName $svrList | Format-Table -AutoSize;
## – or
Get-SystemLastBootUpTime -ComputerName $svrList | Format-List;
[/sourcecode]

Enjoy!

Great PowerShell sessions at SQLSaturday SoFla on June 29th 2013

Yes! On Saturday June 29th, I’ll be presenting two interesting PowerShell sessions:

1. DBA Track – PowerShell Working with XML

2. SSIS Track – Integrating PowerShell in a ScriptTask component

These session come full of demos and reference information.  The important one is the  “SSIS – Integrating PowerShell in a ScriptTask component” which help you to include your already existing PowerShell script file in a SSIS solution using SQL Data Tools 2012.

I’ll be show existing exciting tools such as SAPIEN Technologies:

1. PrimalXML 2012

2. PrimalSQL 2012

3. PrimalScript 2012

4. PowerShell Studio 2012

5. Open Source .NET development tool – SharpDevelop ( and you’ll see WHY!)

Also, I will be giving away some exciting stuff you don’t want to miss.

Please come and join us in this Great SQLSaturday event.  Here’s my presentation for both sessions.

PowerShell support Backup/Restore to Windows Azure Blob Storage service

#PowerShell to Backup Multiple Databases to Windows #Azure Blob Storage Service – Need #SQLServer 2012 SP1 CU4 installed: http://msdn.microsoft.com/en-us/library/dn223322.aspx

Includes new series of PowerShell cmdlets to handles credentials:

New-SQLCredentials
Set-SQLCredentials
Get-SQLCredentials
Remove-SQLCredentials

At the same time this cummulative update enables the use of Backup-SqlDatabase and Restore-SqlDatabase cmdlets.

This MSDN documentation provides plenty of PowerShell samples worth looking at right now.

Thanks to SQLOS Team for providing the heads up!
http://sqlblog.com/blogs/sqlos_team/archive/2013/05/31/blog-post-enhancements-to-sql-server-backup-to-cloud-in-sql-server-2012-sp1-cu4.aspx


New ISEBlox module for Comment Regions for ISE 3.0

The ability to comment/uncomment a block of code in ISE is one feature I’ve been fighting for a long time.  Please vote for it: http://connect.microsoft.com/PowerShell/feedback/details/711231/ise-v3-need-to-be-able-to-comment-a-series-of-lines-in-a-block-of-code

Thanks to Robert Robelo, he create an add-on that will allow you to comment/uncomment a block of code using the Comment Region feature in ISE 3.0.

Your can download this module from the Windows ISE Add-on library:
http://social.technet.microsoft.com/wiki/contents/articles/2969.windows-powershell-ise-add-on-tools.aspx

This is a *zip file which contains the module files. Make sure to read the  readme file to understand how to setup the add-on.

Basically, after creating the “ISEBlox” folder in your module folder which normally reside in your “C:\Users\..\Documents\WindowsPowerShell\Modules\ISEBlox”, you can proceed to extract the module files: *.psd1 and *.psm1.

***Very Important***
After downloading the *zip file you need to “Unblock” the file or you will get an error when trying to load the module.

To load the module in ISE manually run the following command in your ISE command prompt:

[sourcecode language=”powershell”]
Import-module ISEBlox
[/sourcecode]

Also, you could add this module into your ISE user profile.

Then, to comment/uncomment your code can be done in the following ways:
1. Use the menu option under “Add-ons | Editor”.
2. Or, to comment use “Alt-C” and uncomment use the “Alt-U”.

Feel free to follow Robert in twitter (@muisak) and provide feedback.

Going Crazy with Windows Azure PowerShell tonight

You’re all invited to attend FLPSUG online meeting on “Windows Azure PowerShell cmdlet” with MS Windows Azure Evangelist – Scott Klein?.

To register go here: http://flpsugmay2013online.eventbrite.com/

Don’t miss it! It will be both fun and informative.

Here’s an example of what has been trending in twitter recently.  Please notice that’s all been on Windows Azure.

Some of yesrterday (05/20/2013) “Window Azure PowerShell” links:

Automating Windows Azure Infrastructure Services (IaaS) Deployment with PowerShell – See more at:
http://blogs.technet.com/b/yungchou/archive/2013/05/20/automating-windows-azure-infrastructure-services-iaas-deployment-with-powershell.aspx?utm_source=feedburner&utm_medium=twitter&utm_campaign=Feed%3A+YungChouOnHybridCloud+%28Yung+Chou+on+Hybrid+Cloud%29#sthash.ibQad0aX.dpuf

Overview of Microsoft #WindowsAzure #Powershell for automated #Cloud Services:
http://mountainss.wordpress.com/2013/05/20/overview-of-microsoft-windowsazure-powershell-for-automated-cloud-services/

PowerShell script to migrate SharePoint to Azure IaaS
http://spiffy.sg/it-pros/powshell-script-to-migrate-sharepoint-to-azure-iaas/

PowerShell script to get username and password for FTP from Microsoft Azure publish settings
http://karl-henrik.se/powershell-script-to-get-username/?utm_source=buffer&utm_medium=twitter&utm_campaign=Buffer&utm_content=buffer08a3d

Application Management-Example-Deploying a Service to Your Private Cloud (Part 1)
http://blogs.technet.com/b/privatecloud/archive/2013/04/03/application-management-example-deploying-a-service-to-your-private-cloud-part-1.aspx

Application Management-Example-Deploying a Service to Your Private Cloud (Part 2)
http://blogs.technet.com/b/privatecloud/archive/2013/04/05/application-management-example-deploying-a-service-to-your-private-cloud-part-2.aspx

Azure does Powershell too
http://www.scarydba.com/2013/05/20/azure-does-powershell-too/?utm_source=feedburner&utm_medium=feed&utm_campaign=Feed%3A+HomeOfTheScaryDba+%28Home+of+the+Scary+DBA%29

Additional MSDN videos at Channel 9: MSDN Channel 9
http://channel9.msdn.com/WindowsAzure

If you missed last week Microsoft Virtual Academy on “Windows Azure for IT Professionals Jump Start”  check the recorded videos:
https://www.microsoftvirtualacademy.com/liveevents/Windows-Azure-for-IT-Professionals?CR_CC=200206715

Sample VHD migration image PowerShell script by David Aiken:

Here’s some of my personal notes from the “Windows Azure for the IT Pro – Jump Start”

Great Sessions today under the Microsoft Virtual Academy O “Windows Azure for IT Professionals Jump Start” with David Tesar and David Aiken today.

Azure AD
1. Azure AD thru a Windows Azure VM spin off.
2. Run on Windows Azure IaaS.
3. Network Gateway need to be defined before building the VM.
4. DC VM need an addition drive to store all the NTDS databases files.
5. DC Wizard NTDS section the folders need to point to the additional VM drive (don’t pick C:\).
6. Under the directory service panel, need to add a new site to point to the Windows Azure AD site.

AD to Windows Azure AD – Synch
1. Cloud Only / No integration
2. Directory Synch – using member server (no on DC) and only one way (can’t go back). Use “DirSynch”
3. Directory and Single Sign-On

Migrating VM (VHD) to Window Azure
1. you can use a Disk2VHD. Hint: Have one network card and set to use DHCP.
2. It will copy VHD size type from Dynamic to Fixed Disk format.
3. Cloud act as a Networking boundaries.
4. Only VHD format allowed (no VHDX).
5. Don’t use Static IP Address and remove PowerShell remoting.
6. Changes to system configuration: memory, network adapters, etc.

And, there’s more I wasn’t able to attend.

Don’t be left out!  Learn PowerShell now.

PowerShell v3 fun with Get-Help and Out-GridView

PowerShell comes loaded with help documentation, and in PowerShell V3 this documentation is updated via the internet.  Now, lets have some fun with the Get-help and the updated Out-Gridview command.

The Out-Gridview cmdlet have a ‘-passthru‘ parameter that gives you the ability to select items from the popup window and the pass these values to the next command.  This is neat!!

Copy/paste the code below into your PS console to load the “Get-HelpTopics“:

[sourcecode language=”powershell”]
Function Get-HelpTopics{
## – Have fun using PassThru switch to select item(s): (PowerShell V3 feature)
$HelpNames = (GET-HELP About_*) | select name;
foreach($i in ($HelpNames | Select name | Out-GridView -PassThru))
{
$i | Select @{Label = ‘Topic Selected’; Expression = {$_.Name}};
Get-Help $i.Name -ShowWindow;
}
};
[/sourcecode]

Then, to execute type “Get-HelpTopics” and the list of topics will be displayed in a popup window.

Hold the ‘Ctrl’ key to select/mark the topics you want to read, then click the ‘OK’ button when done.

As you can see you will get a series of popup windows documentation you can move around and read about PowerShell. At the same time you are seeing how helpful is the use of the ‘-passthru‘ parameter in the ‘Out-Gridview’, and the ‘-ShowWindow‘ parameter in the ‘Get-help’.

This is a fun way to start learning PowerShell.
** This is a Windows PowerShell V3 script **