Problem installing the latest Azure PowerShell Cmdlets with WMF v5.0 Preview

If you’re experiencing problems installing the latest Azure PowerShell cmdlets (0.8.0 – 04/03/2014)  after installing Windows Management Framework v5.0 Preview (WMF) then don’t worry.

You can go back the uninstall the WMF v5.0 Preview, then proceed to download/install the recent *Azure PowerShell cmdlets, and go back to re-install the WMF v5.0 Preview.  It will back be working like nothing happened.

Azure_WMF5_01

Looks like there are two Azure modules in this update:

  1. Azure
  2. AzureProfile

*Note: I’m this steps may need to be repeated until WMF v5.0 becomes RTM.

Azure_WMF5_02

🙂

Find your Windows Azure PowerShell cmdlets version.

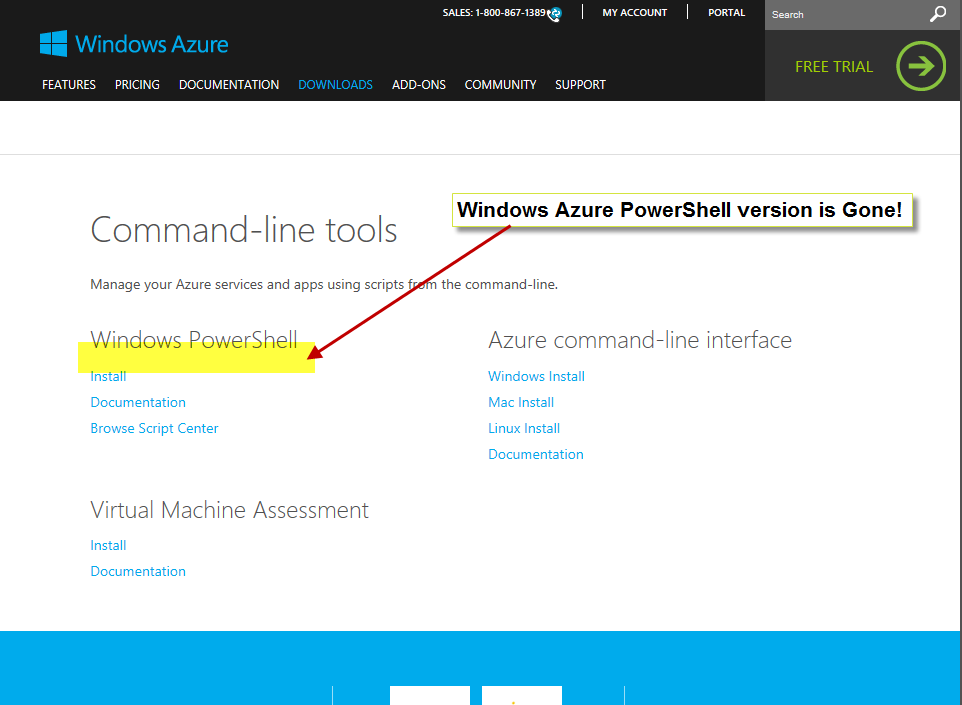
I don’t know if you notice when you go to download the latest version of Windows Azure PowerShell cmdlets, the version number is no longer displayed  on the Download page.  As you already know, Azure PowerShell commands gets updated sporadically, so you need to periodically check if there are new updates.  The download page was previously giving you the hint that there was an updated set of commands.

Last year Windows Azure Download page used to display the Azure PowerShell version which made it easy to check for the updated product:

Last year Windows Azure PowerShell version displayed

Currently, as of February 2014, the version number is Gone!

Windows Azure PowerShell version is Gone!

Well,  here’s where PowerShell comes to the rescue.

The following quick code can query both you current version and check for the latest version available on the Internet. And, Yes! This code can be improved and taken a little further.  But, this will give you a head start.

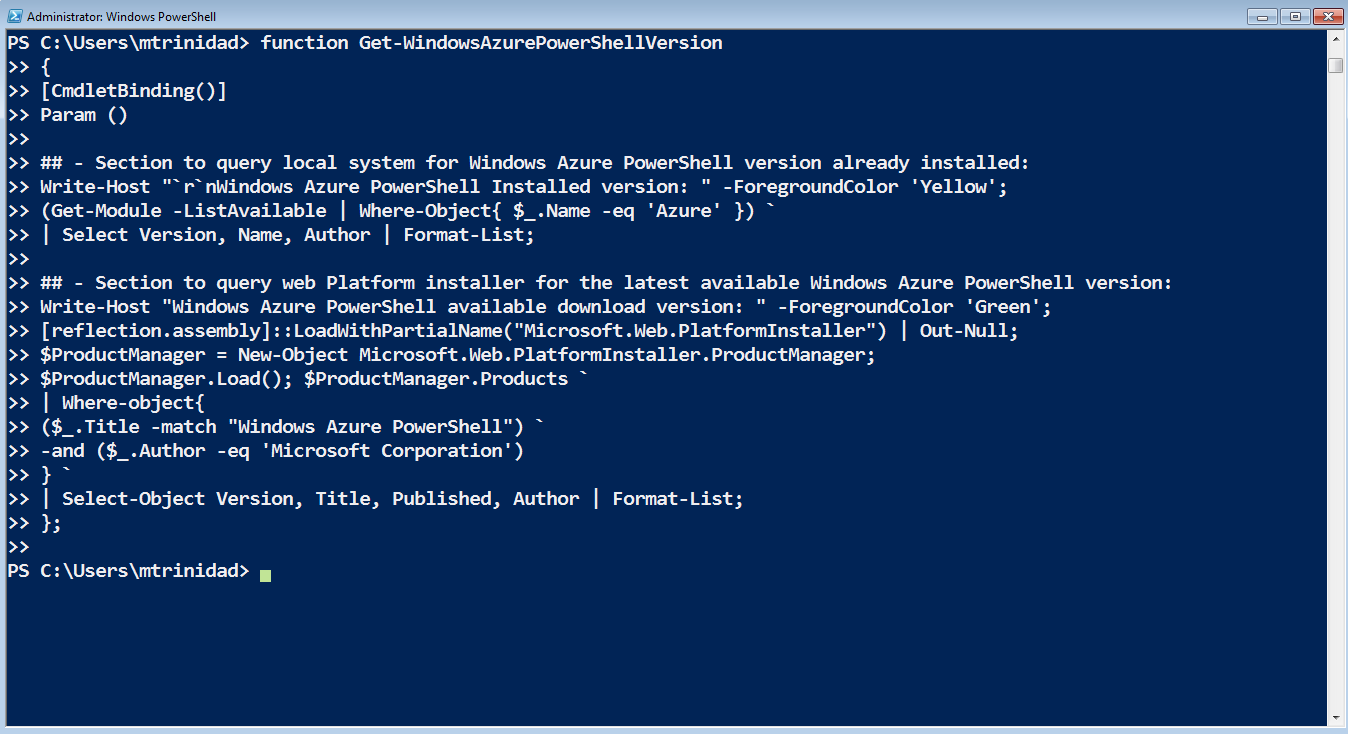
Get-WindowsAzurePowerShellVersion function:WindowsAzurePowerShell_00

Copy/Paste code in PowerShell Console.

WindowsAzurePowerShell_01

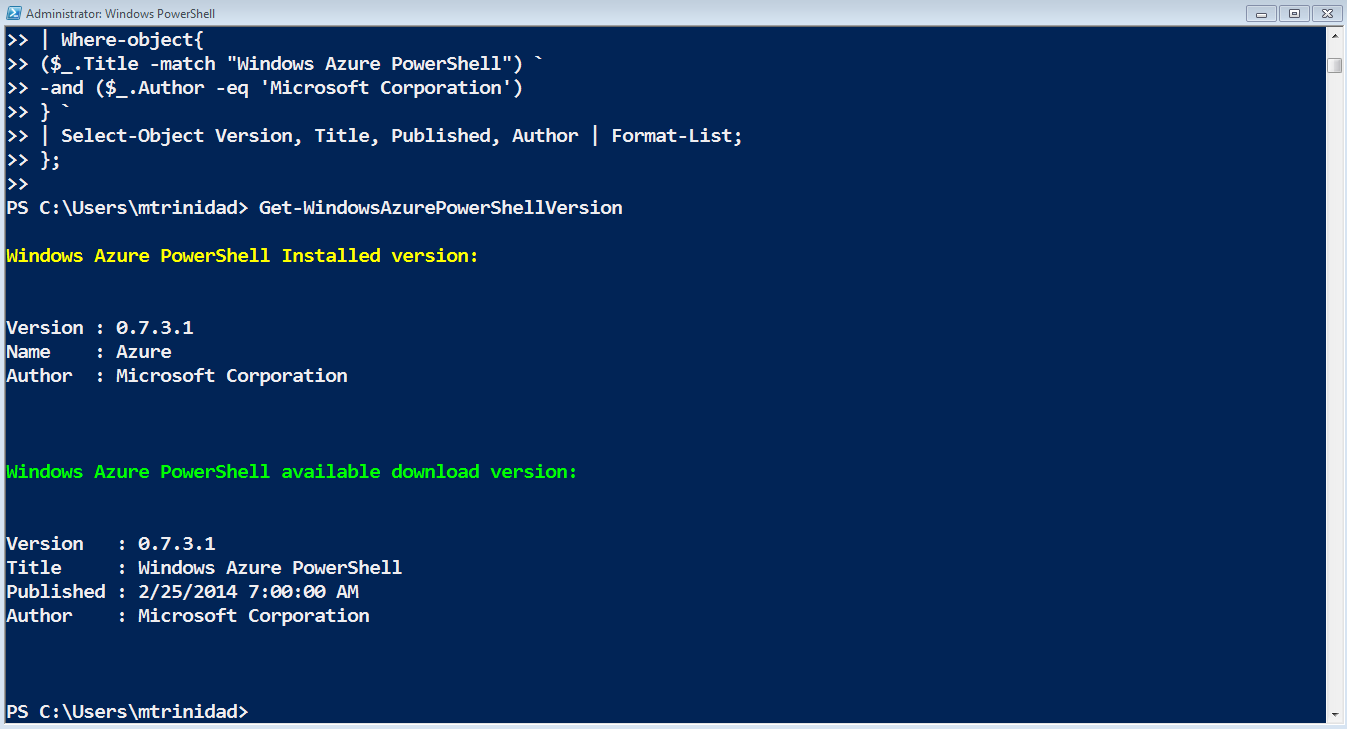
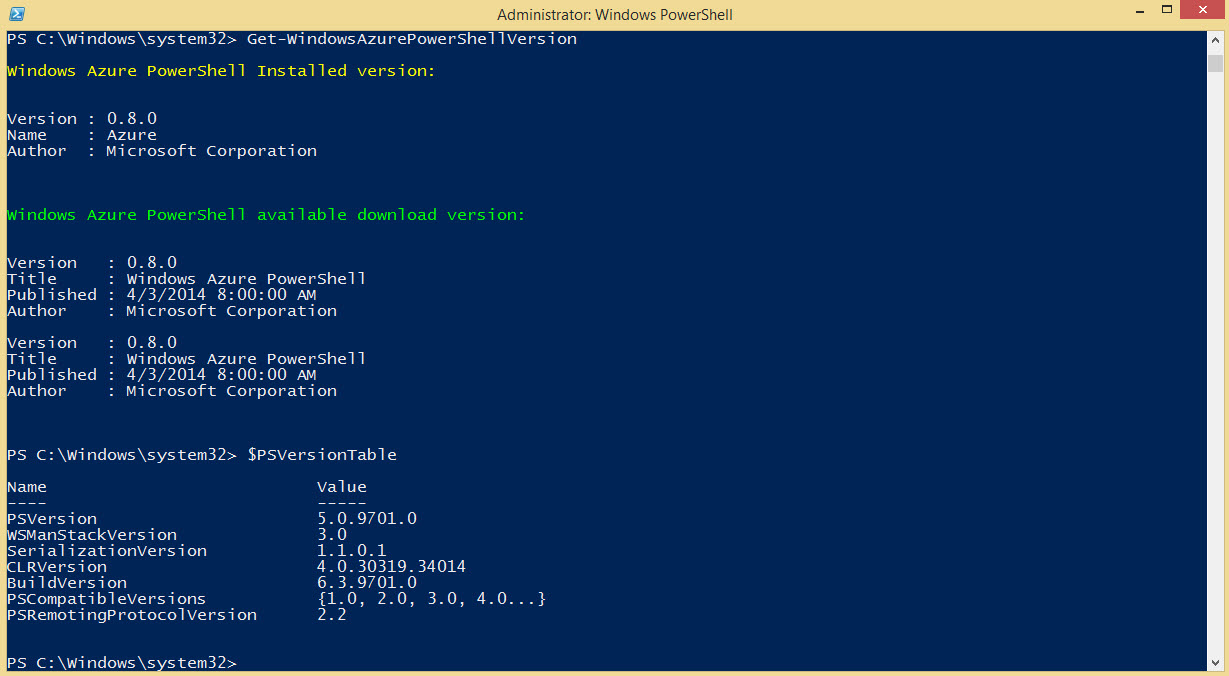
View Results.

WindowsAzurePowerShell_02

Notice the first portion of the code uses WMIWin32_Product” Class which will take a few minutes to query your system for what’s installed.  By a strong recommendation from my MVP college Aleksandar Nikolic I change the code from using the WMI Win32_Product class and instead use the Get-Module Version property. This way it will effectively provide the needed information.

Then, for the “Microsoft.Web.PlatformInstaller” piece, if you previously installed Windows Azure PowerShell (or any of the other options), this assembly will be already in your system.

Note: My college Aleksandar Nikolic suggested not to use Win32_Product. BAD IDEA!!  Check the following links why not to use “Win32_Product“:

So, I corrected the code below following Alek suggestion.

If you want to further learn to further automate your Azure PowerShell download and installation, I recommend you to read the following article at the “PowerShell Magazine“: http://www.powershellmagazine.com/2014/02/27/using-powershell-and-web-platform-installer-to-install-azure-powershell-cmdlets/

Keep learning PowerShell!

Script Code:

[sourcecode language=”powershell”]
function Get-WindowsAzurePowerShellVersion
{
[CmdletBinding()]
Param ()

## – Section to query local system for Windows Azure PowerShell version already installed:
Write-Host “`r`nWindows Azure PowerShell Installed version: ” -ForegroundColor ‘Yellow’;
(Get-Module -ListAvailable | Where-Object{ $_.Name -eq ‘Azure’ }) `
| Select Version, Name, Author | Format-List;

## – Section to query web Platform installer for the latest available Windows Azure PowerShell version:
Write-Host “Windows Azure PowerShell available download version: ” -ForegroundColor ‘Green’;
[reflection.assembly]::LoadWithPartialName(“Microsoft.Web.PlatformInstaller”) | Out-Null;
$ProductManager = New-Object Microsoft.Web.PlatformInstaller.ProductManager;
$ProductManager.Load(); $ProductManager.Products `
| Where-object{
($_.Title -match “Windows Azure PowerShell”) `
-and ($_.Author -eq ‘Microsoft Corporation’)
} `
| Select-Object Version, Title, Published, Author | Format-List;
};

[/sourcecode]

PowerShell User Group 2014 meeting date change…

Due to my current workload I decided to change my monthly PowerShell meetings to be on every third Thursday of the month starting February 20th at 6:30pm.

Next meeting I’ll be speaking on “SSIS – Integrating PowerShell in a Script Task Component”.  Register at: https://www.eventbrite.com/e/florida-powershell-user-group-monthly-meeting-february-2014-tickets-10610571505

Keep in mind, we start gathering at 6:30pm and the meeting will start at 7:00pm (EST).

See you next week!


PowerShell changing SQL Server Database properties with SMO part 1/2

This is a quick blog on how you can use PowerShell and SMO to change some of the SQL Server database  properties you may find useful.

In my scenario I’m working on some legacy SQL Server 2005 databases existing properties have the  following values:

1. “Recovery Model” = ‘FULL’.
2. “Compatibility Level” = ‘Version80’ (for SQL Server 2000).
3. “PageVerify” = ‘TornPageDetection’.

As a proof of concept I created a dummy database named ‘testdatabase’ with the above properties so I  can test my *PowerShell script and alter the values for all three properties.

*Note: If you have SQL Server Management Studio (SSMS) 2005 (or Greater), then you already have SMO  (SQL Server Management Objects) assemblies already installed in your machine.

First thing I needed to do is to list all databases that will meet the above criteria. This way we can  changes the following values to:

1. “Recovery Model” = ‘Simple’.
2. “Compatibility Level” = ‘Version90’ (for SQL Server 2005).
3. “Page Verify” = ‘CHECKSUM’.

The following script will list all databases meeting these criterias:

[sourcecode language=”powershell”]
## – Loads the SQL Server SMO Assembly and connect the your SQL Server instance:
[system.reflection.assembly]::LoadWithPartialName("Microsoft.SQLServer.Smo") | Out-Null;
$MySQL = new-Object Microsoft.SqlServer.Management.Smo.Server ‘YourSQLServerInstanceName’;

## – List all database meeting criteria:
$MySQL.Databases `
| where{ `
(($_.PageVerify -ne ‘Checksum’) `
-or ($_.CompatibilityLevel -ne ‘Version90’) `
-or ($_.RecoveryModel -ne ‘Simple’))} `
| Select-Object name, @{label=’dbSize(MB)’; `
Expression={($_.Size).ToString("###,###,###");}} `
,CompatibilityLevel, Pageverify `
| ft -AutoSize;

[/sourcecode]

Of course, this list let me know that in some of the databases not all three properties need to change.  (see sample list below)

Name dbSize(MB) RecoveryModel CompatibilityLevel PageVerify
—- ———- ————- —————— ———-
xxxxP 1,386,603 Simple Version80 TornPageDetection
xxw 700 Simple Version90 TornPageDetection
xxxxxxin 200 Simple Version80 None
xxxxxxxx_SZ 200 Simple Version80 None
testdatabase 20 Full Version80 TornPageDetection

I can proceed to test my PowerShell SMO script lines to make some database property value changes. As  you seen in the originating script I’ve created a PowerShell objects named ‘$MySQL’ which contains all  of my SQL Server instance objects. So, by navigating thru my Database objects I can go directly to my  ‘testdatabase’ properties and make the changes with the following lines:

[sourcecode language=”powershell”]
## – Changing the properties values:
$MySQL.Databases[‘testdatabase’].RecoveryModel = ‘Simple’;
$MySQL.Databases[‘testdatabase’].CompatibilityLevel = ‘Version90’;
$MySQL.Databases[‘testdatabase’].PageVerify = ‘CHECKSUM’;

## – Update database properties and refresh the database:
$MySQL.Databases[‘testdatabase’].Alter();
$MySQL.Databases[‘testdatabase’].Refresh();

[/sourcecode]

Now, I have succesfully updated the database properties on a fly and listed the updated properties with  the following script:

[sourcecode language=”powershell”]
## – list the updated properties:
$MySQL.Databases[‘testdatabase’].GetPropertySet() `
| where{ `
(($_.name -eq ‘PageVerify’) `
-or ($_.name -eq ‘CompatibilityLevel’) `
-or ($_.name -eq ‘RecoveryModel’))} `
| Select-Object name, value | Format-Table -AutoSize;

[/sourcecode]

Name Value
—- —–
CompatibilityLevel Version90
PageVerify Checksum
RecoveryModel Simple

In summary, after making my changes, I’ve used both SMO methods of ‘.Alter()‘ and ‘.Refresh()‘ to  secure the updated values. Also, is good to validate these changes by going back to SSMS application.

On my next part 2 of this blog, I’ll be creating a PowerShell function to automate this process so it  can be executed against multiple databases and SQL Servers.

Here’s full script to change all three properties on database ‘testdatabase’:

[sourcecode language=”powershell”]
## – Loads the SQL Server SMO Assembly:
[system.reflection.assembly]::LoadWithPartialName("Microsoft.SQLServer.Smo") | Out-Null;

## – Connect SQLServer instance:
$MySQL = new-Object Microsoft.SqlServer.Management.Smo.Server ‘YourSQLServerInstanceName’;

## – Changing properties in Databases:
$MySQL.Databases[‘testdatabase’].GetPropertySet() | Select-Object name, value | Format-Table -AutoSize;
$MySQL.Databases[‘testdatabase’].RecoveryModel = ‘Simple’;
$MySQL.Databases[‘testdatabase’].CompatibilityLevel = ‘Version90’;
$MySQL.Databases[‘testdatabase’].PageVerify = ‘CHECKSUM’;
$MySQL.Databases[‘testdatabase’].Alter();
$MySQL.Databases[‘testdatabase’].Refresh();

## – List the updated properties:
$MySQL.Databases[‘testdatabase’].GetPropertySet() `
| where{ `
(($_.name -eq ‘PageVerify’) `
-or ($_.name -eq ‘CompatibilityLevel’) `
-or ($_.name -eq ‘RecoveryModel’))} `
| Select-Object name, value | Format-Table -AutoSize;

[/sourcecode]

If you like to learn more about PowerShell working with SQL Server SMO, check my SQL Server Pro article at:
http://sqlmag.com/powershell/using-sql-server-management-objects-powershell

Bonus – Another way to list a database property names and values:

[sourcecode language=”powershell”]

## – Loads the SQL Server SMO Assembly and connect the your SQL Server instance:
[system.reflection.assembly]::LoadWithPartialName("Microsoft.SQLServer.Smo") | Out-Null;
$MySQL = new-Object Microsoft.SqlServer.Management.Smo.Server ‘YourSQLServerInstanceName’;

## – List everything:
$MySQL.Databases[‘testdatabase’].GetPropertySet();

## – Or, List the database only property: name and value:
$MySQL.Databases[‘testdatabase’].GetPropertySet() `
| Select-Object name, value | Format-Table -AutoSize;

[/sourcecode]

Two Great PowerShell Community Tools for Visual Studio

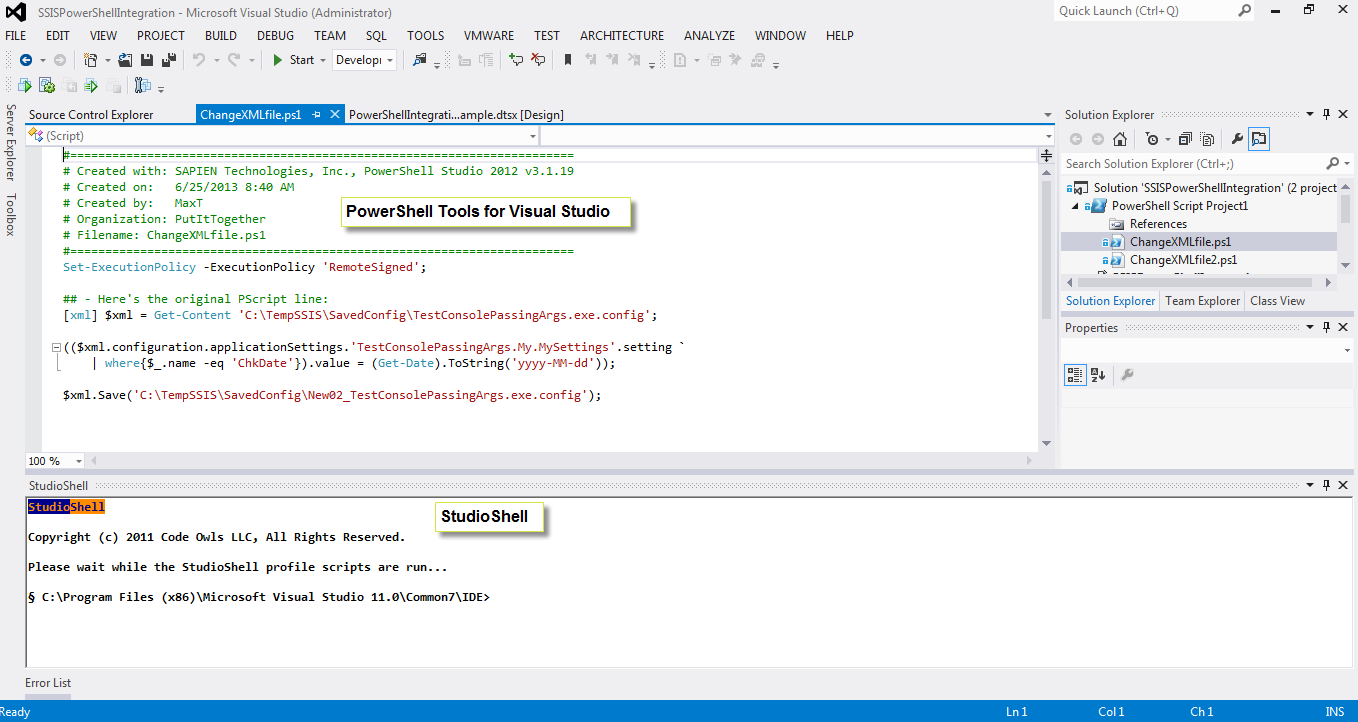
Here’s a shout out of two great tools you should try if you want (or planning) to integrate your PowerShell scripts into a Visual Studio solution.  Specially, if you’re using SQL Data BI Tools for Visual Studio or just build apps with Visual Studio full version.

  1. PowerShell Tools for Visual Studio” by Adam Driscoll (PowerShell MVP) – http://visualstudiogallery.msdn.microsoft.com/c9eb3ba8-0c59-4944-9a62-6eee37294597
  2. StudioShell” by Christopher Beefarino (PowerShell MVP) – http://studioshell.codeplex.com/

In my laptop I have both the SQL Data BI tools for Visual Studio 2012 (VS shell), and the full version of Visual Studio 2013.  One thing to point out, only the “PowerShell Tools for Visual Studio” will install in both versions: 2012, and 2013.  But, when using both at the same time, then you have both full editor features to write scripts and a practical PowerShell prompt so you can test one-liners.

PowerShell Tools loaded in both VS2012 and VS2013

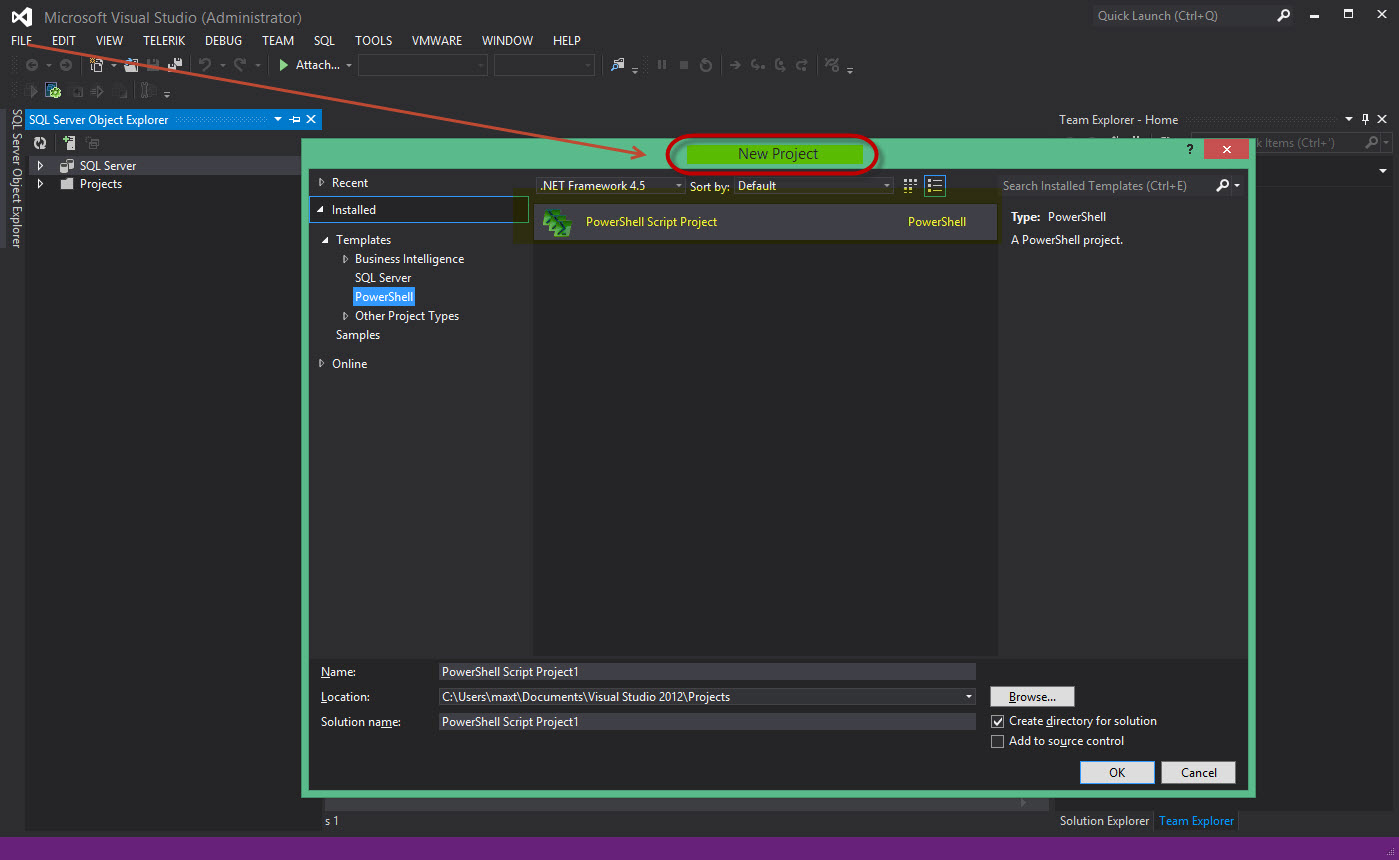
You can create either a PowerShell solution by adding a new PowerShell Project, or simple adding “a new item” to your existing solution.

Sample showing PowerShell project

Now we can work with Visual Studio and PowerShell from the cloud if we want.  Here’s an image of my physical laptop and my Surface 2 connected to my Windows Azure VM running Windows Server 2012 R2 with Visual Studio 2013 installed.

Sample showing a "Cloud" sample thru a Surface and "On Premise" laptop.
Sample showing a “Cloud” sample thru a Surface and “On Premise” laptop.

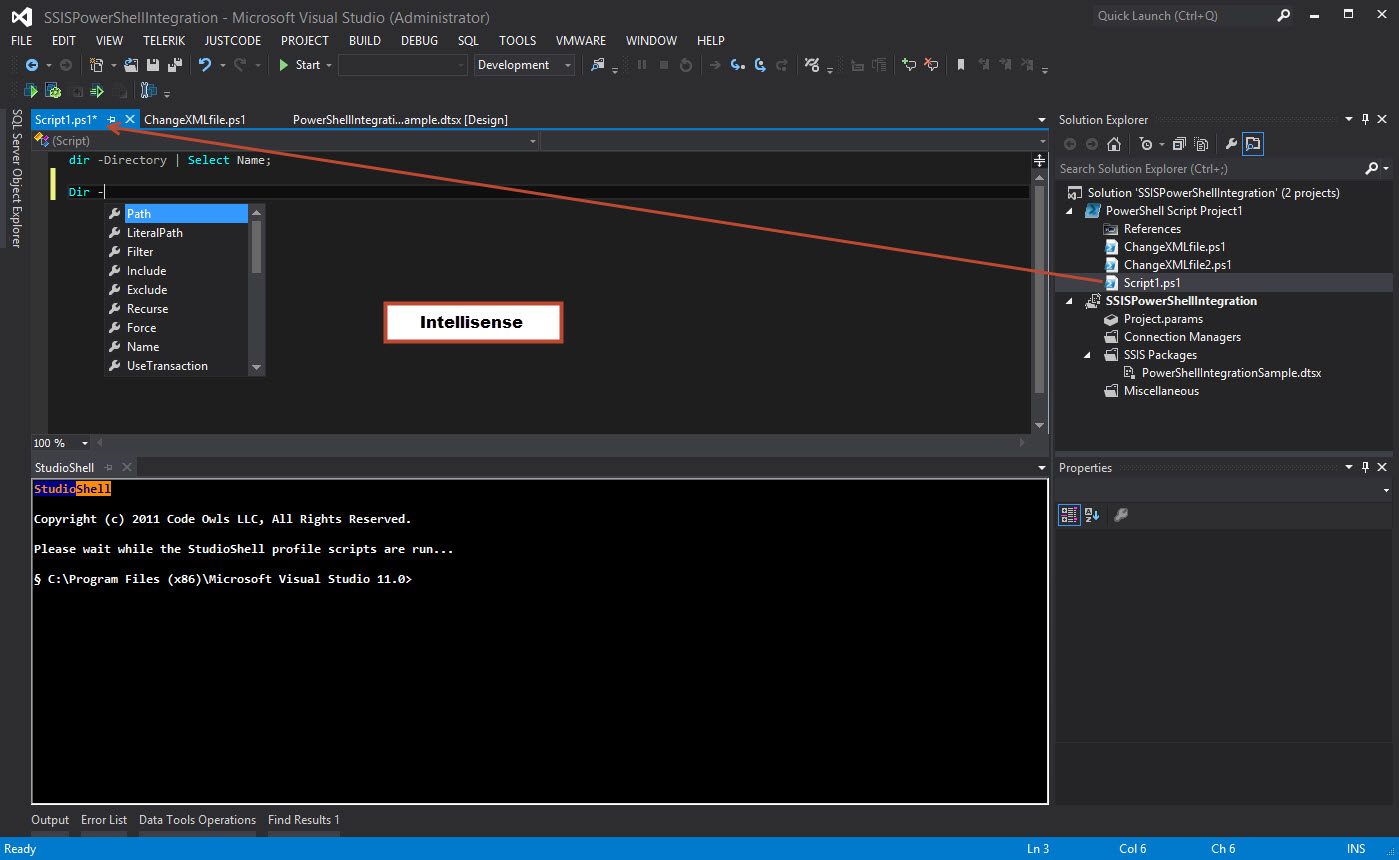
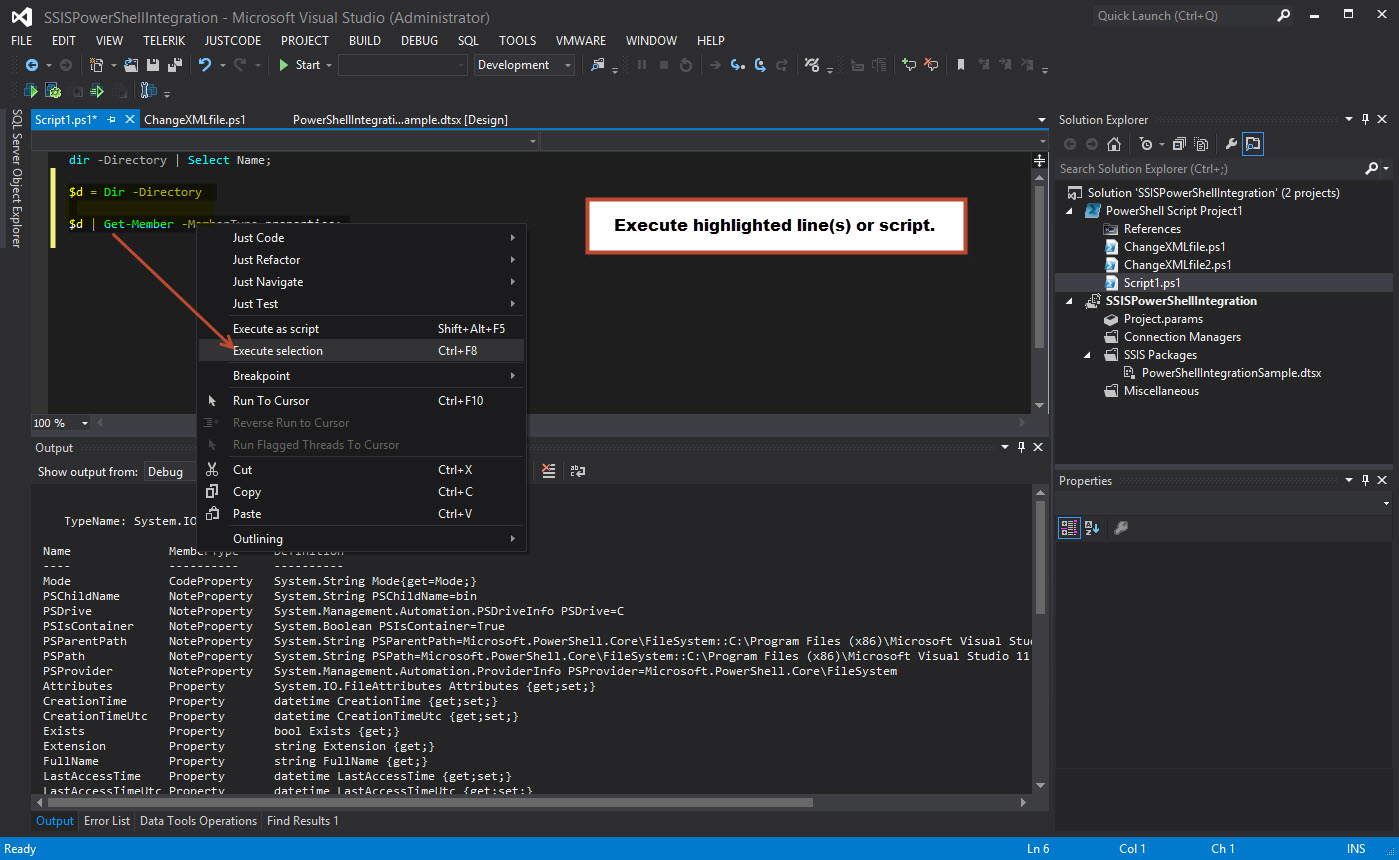
Notice when creating scripts Intellisense is available and you can execute the code from withing Visual Studio.

Intellisense is available.
Executing PowerShell script from Visual Studio.

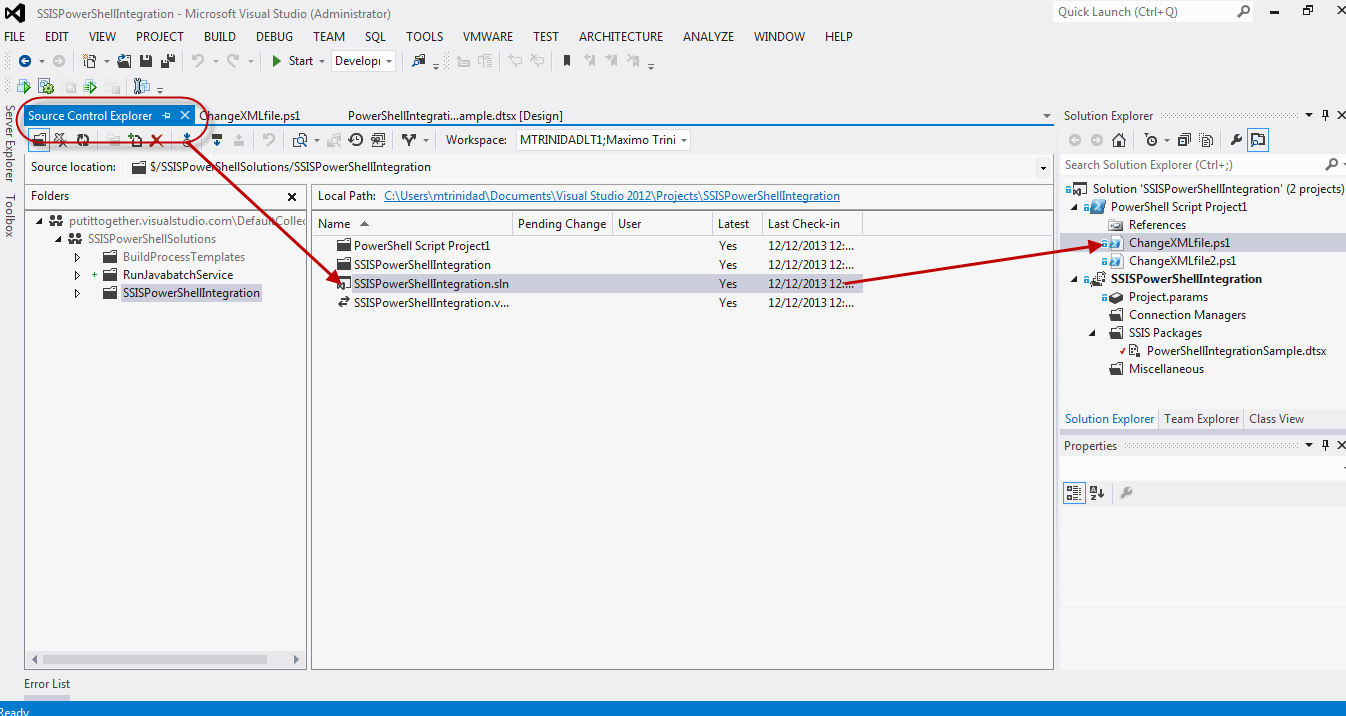
Next you may want to pay attention to Microsoft Team Foundation server either on-premise or cloud options.  So you can build your solution and do some source code versioning.

Team Foundation Server

Everything is about trying and evaluating these great community tools.  Give them your honest feedback so they can keep making enhancements and increase their value.

 Additional Information

Here’s some other important updates for Visual Studio 2012: Visual Studio 2012 Team Explorer 8/2/2012 – http://www.microsoft.com/en-us/download/details.aspx?id=30656 Visual Studio 2012 Update 4 11/12/2013 – http://www.microsoft.com/en-us/download/details.aspx?id=39305

Happy PowerShelling!!

IT Palooza South Florida Great Success – PowerShell Rules!

Great event on 12/12/2013 in South Florida with most IT Community User Groups showcasing their stuff. It was full of people and friends.

Florida PowerShell User Group represented!
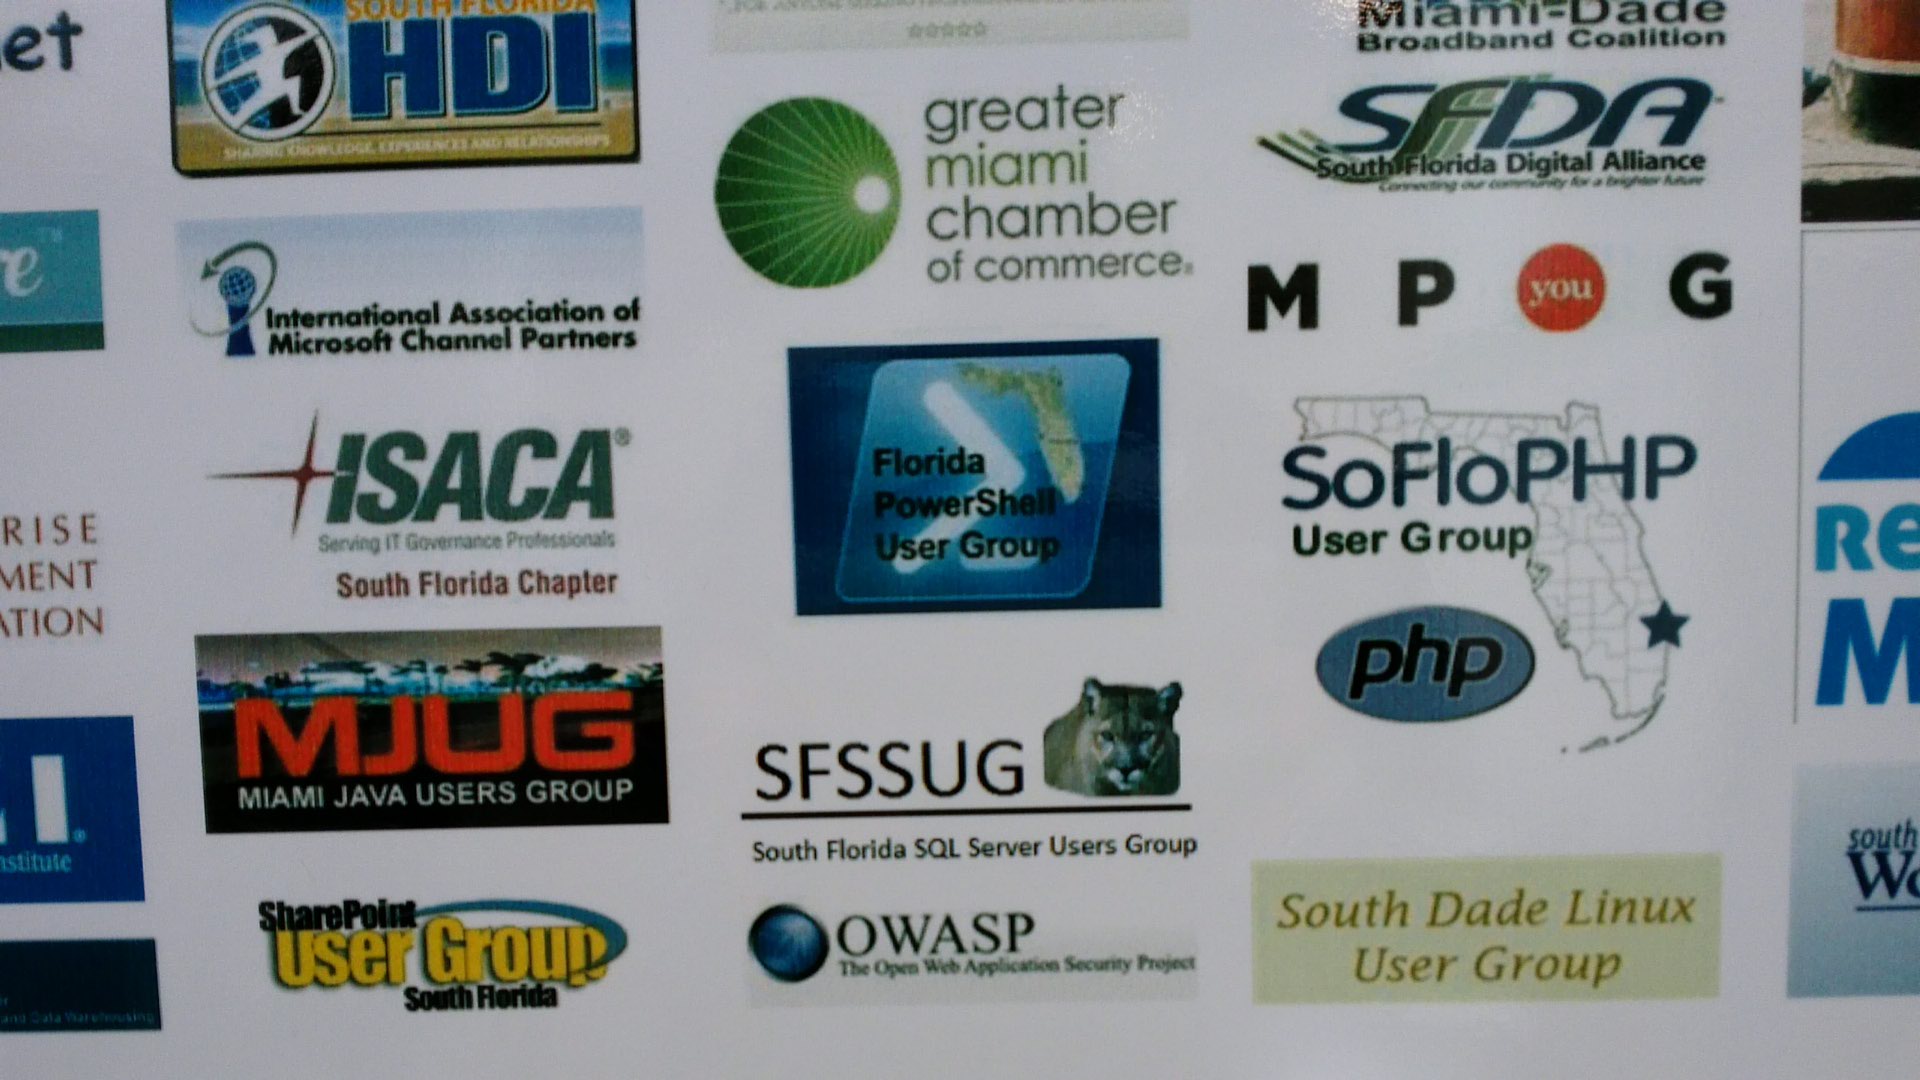
List of community IT User Groups
At Nova University, Davie FL.
At Nova Southeastern University, Davie FL.

Thanks to Nova Southeastern University and organizers (specially Alex Funkhouser) for having me as a speaker present a little bit of PowerShell.

Me with Microsoft IT Pro Evangelist Blain Barton.
Sharing table with Microsoft.

Also, thanks to all who attended my session on “Integrating PowerShell in SSIS Script Task“. It was a great to pass some knowledge and see everyone participating.

Thank You!

PowerShell Community Tools loaded in SQL Data Tools BI.

Here’s the presentation (fully loaded):

This presentation contains LOTS of goodies in it.

1. It contains a .NET console solution.
2. SSIS solution (no-NONsense).
3. Sample PowerShell scripts
4. Sample .NET code both C# and VB.NET (code snippets)

All this material so you can study it. Take your time and make it your own.

This folder (C:\TempSSIS) need to be copied to the root of the C:\ drive.

Things to pay attention too. Here’s some other important updates for Visual Studio 2012:
1. Visual Studio 2012 Team Explorer 8/2/2012 – http://www.microsoft.com/en-us/download/details.aspx?id=30656
2. Visual Studio 2012 Update 4 11/12/2013 – http://www.microsoft.com/en-us/download/details.aspx?id=39305

Don’t forget to Team Foundation Online (free up to 5 users): http://www.visualstudio.com/products/visual-studio-online-overview-vs

Plus two PowerShell community tools you should consider using with Visual Studio:
1. “PowerShell Tools for Visual Studio” by Adam Driscoll (PowerShell MVP) – http://visualstudiogallery.msdn.microsoft.com/c9eb3ba8-0c59-4944-9a62-6eee37294597
2. “StudioShell” by Christopher Beefarino (PowerShell MVP) – http://studioshell.codeplex.com/

Keep learning PowerShell!

PowerShell Working with Windows Azure VMs

This blog describe the essentials to get you started with building Windows Azure Virtual Machines.  This is slightly different from the previous blogs on Windows Azure SQL Database Servers.  As a refresher, in order to use PowerShell with Windows Azure, you need to create and install a Certificate key.  Then, it will enable PowerShell to work with Windows Azure commands.

Check the links provided for creating and uploading the Certificate Key on my previous blog: http://www.maxtblog.com/2013/08/getting-ready-with-windows-azure-sql-database-server-powershell-and-smo-part-12/

For most part, PowerShell can be use without going back the Azure web Portal.  Of course, the portal will be the first way to get you subscribe and start using Windows Azure.
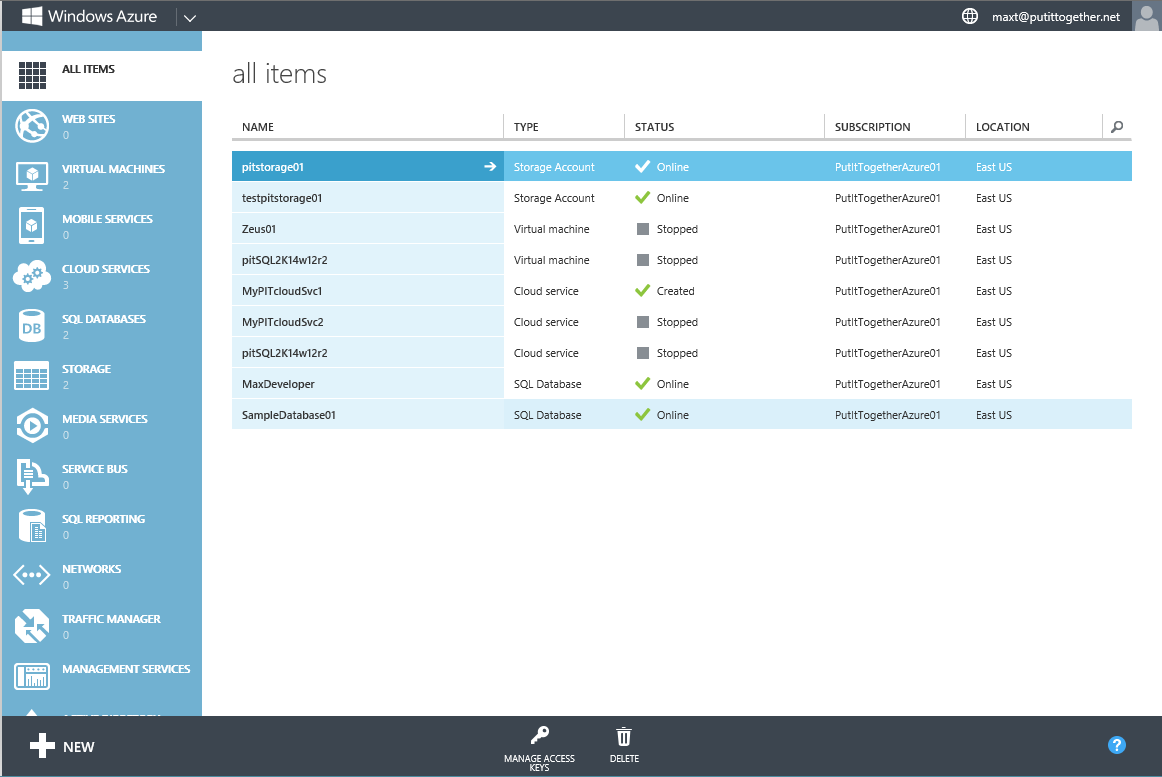
WindowsAzurePortal01

Then, you can try using PowerShell to automate some of it tasks.  Don’t forget to download the PowerShell Azure Command from the following link:
http://www.windowsazure.com/en-us/downloads/
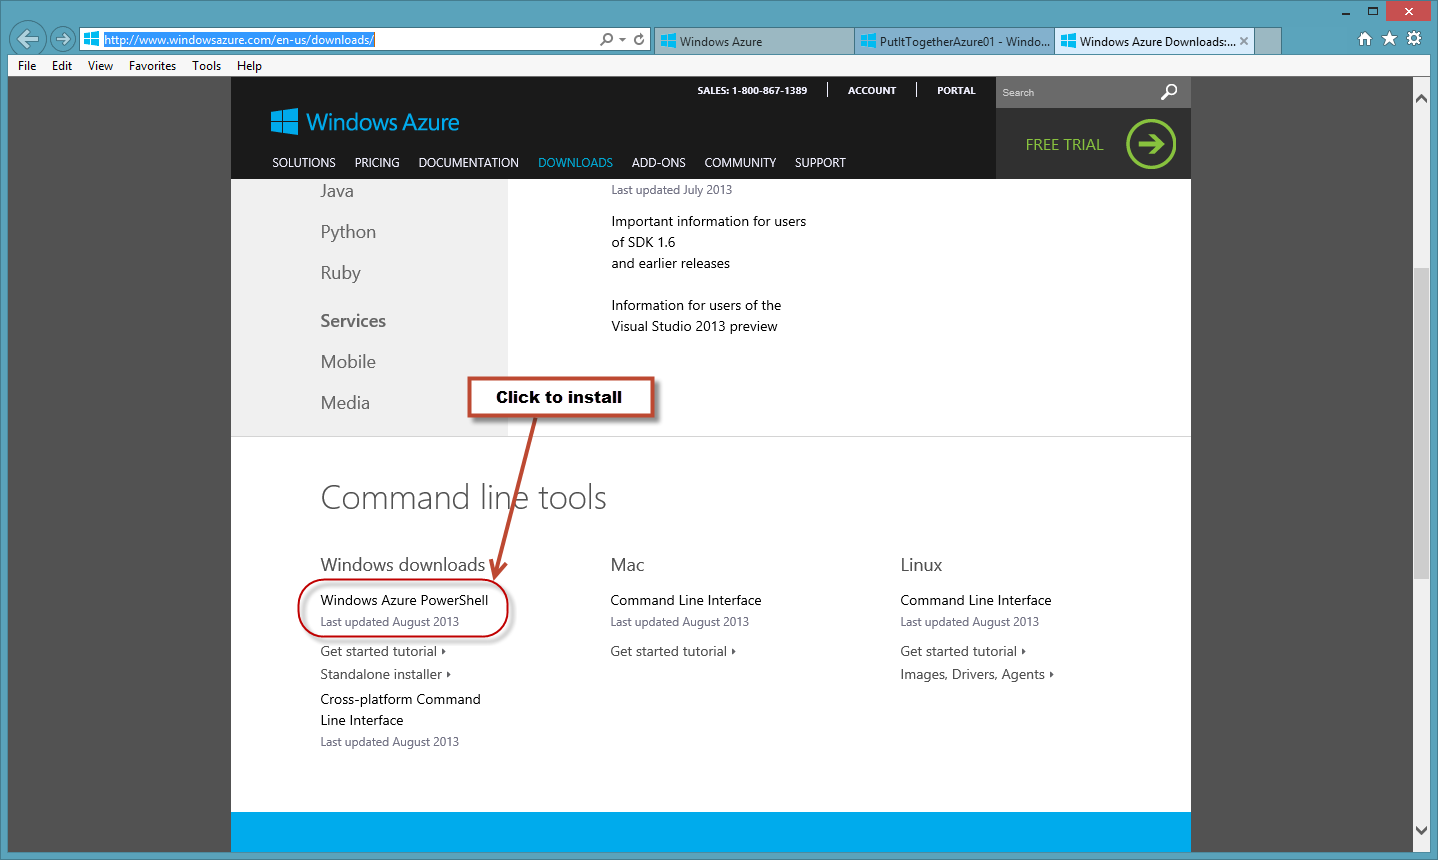
WindowsAzureDownloadPosh

So, after the Azure subscription has been activated and the certificate key uploaded to azure then PowerShell is all set.  Then, remember to check periodically for PowerShell Azure module updates.

When working with Powershell, loading the “Azure” module is not required. As you typed and execute the command, PowerShell by default will autoload the module.  This way there’s no need to use the “Import-Module xxxxx” command.

But, what’s the sequence for building an Azure VM using PowerShell?  I’m presenting the way I’ve done it.  This is just a suggestion.  Please feel free to use this as a possible guideline.

Here’s the order of the samples scripts I’m providing for building an Azure VM:

1. Create a new Storage Account.
2. Reconnect to Azure with the “Current Storage Account”.
3. Search and Select the Windows Azure pre-built VM.
4. Create the Azure VM.
5. Stopping the Azure VM.

The following scripts will get you started.  I recommend to read the help documentation for any of the PowerShell Azure commands shown in this blog.  It’s possible to find something that may be needed.

Create a new Storage Account

Before building a new Azure VM, an Storage Account need to be created first. One of the requirement for the account name is that it has to be in lowercase or the following message will be displayed:

[sourcecode language=”powershell”]
## – Create a Storage Container:
New-AzureStorageAccount `
-StorageAccountName "Testpitstorage01" `
-Label "TestPIT01" `
-Location "East US";
## – Error Message:
"New-AzureStorageAccount : "An exception occurred when calling the ServiceManagement API. HTTP Status Code: 400.
Service Management Error Code: BadRequest. Message: The name is not a valid storage account name. Storage account
names must be between 3 and 24 characters in length and use numbers and lower-case letters only.. Operation Tracking
ID: 983e38b290134b24a15b0ec46d89fc5a."
At line:1 char:1
+ New-AzureStorageAccount `
+ ~~~~~~~~~~~~~~~~~~~~~~~~~
+ CategoryInfo          : CloseError: (:) [New-AzureStorageAccount], ServiceManagementClientException
+ FullyQualifiedErrorId : Microsoft.WindowsAzure.Management.ServiceManagement.StorageServices.NewAzureStorageAccou
ntCommand"
[/sourcecode]

When this command runs successfully, it will also create the both Primary and Secondary “Azure Storage Account” keys automatically.
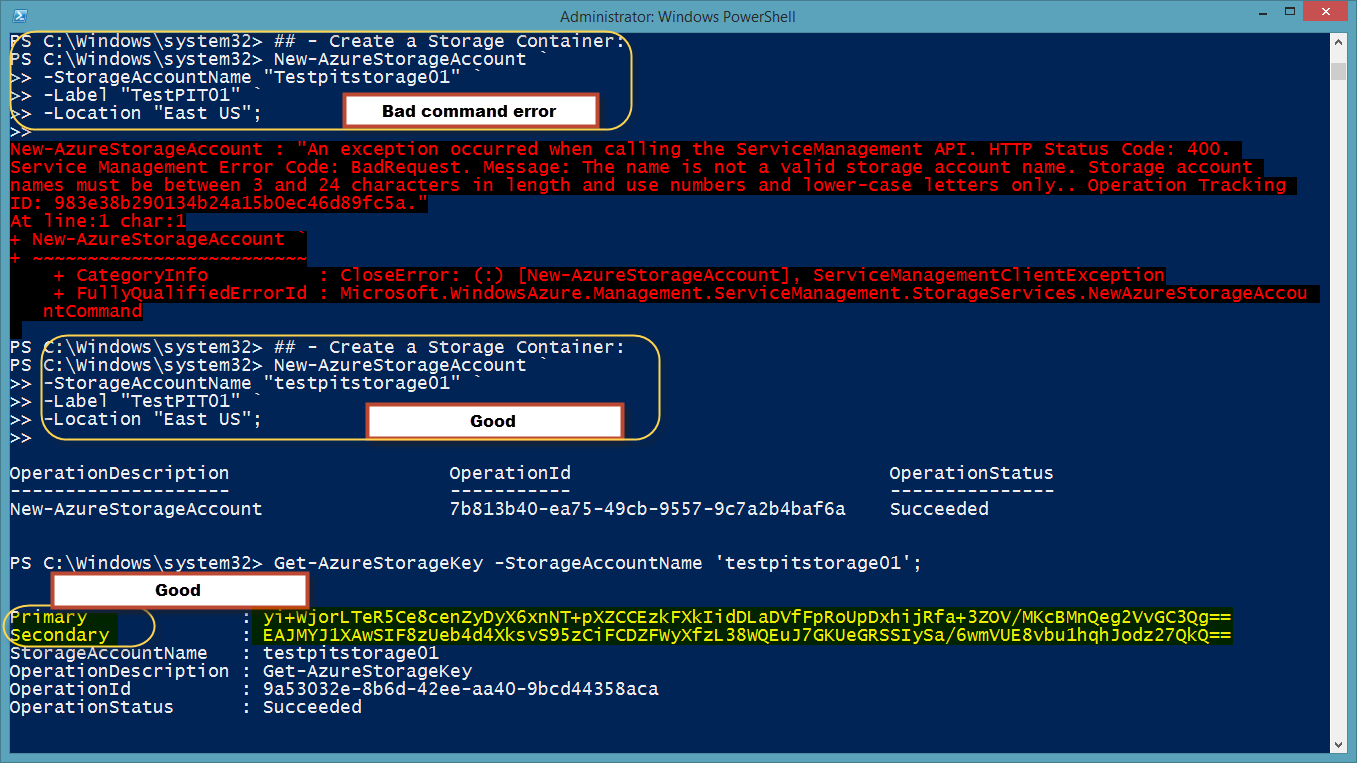
WindowsAzureStorageAcct

At the same time, don’t forget to pick the Windows Azure location where the Storage Account is going to be create.  To list all locations available use the “Get-AzureLocation” command.

[sourcecode language=”powershell”]
## list of all Azure locations:
Get-AzureLocation
[/sourcecode]
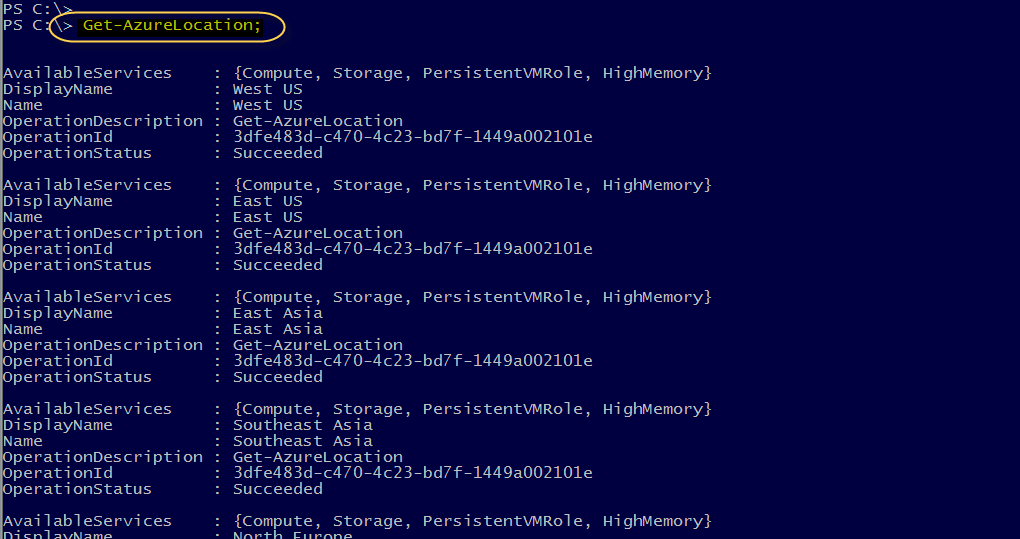
WindowsAzureLocations

If there’s a need to list all Storage Account then use the “Get-AzureStorageAccount” command using the

[sourcecode language=”powershell”]
## list of all Azure Storage Account(s):
Get-AzureStorageAccount
[/sourcecode]
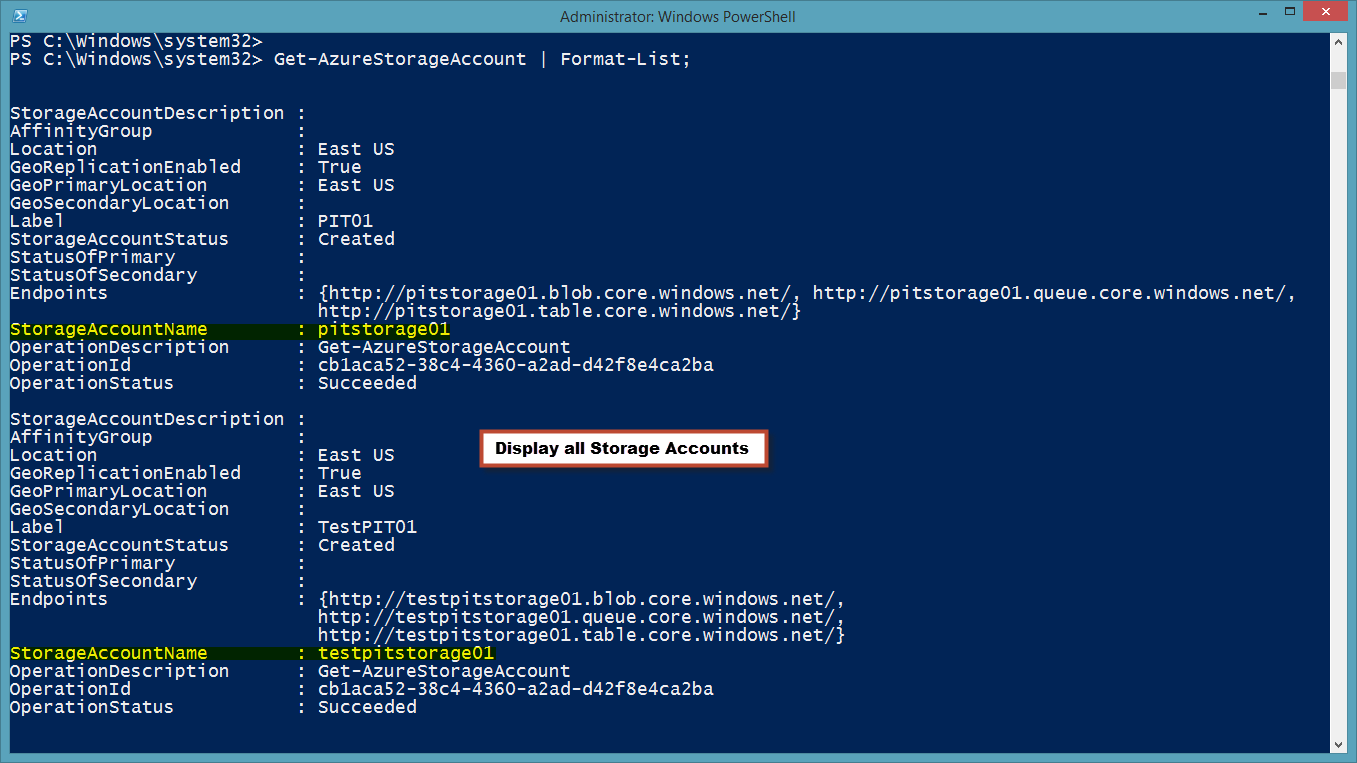
WindowsAzureStorageAcctlist

Reconnect to Azure with the “Current Storage Account”

After you got everything set for PowerShell to connect to Windows Azure then you need to create the “Storage Account “. There’s one noticeable difference between the Azure SQL and the Virtual machine.  Azure Virtual Machines need a  Storage Account.  This is done using the “Set-AzureSubscription” with the “-ContainerStorageAccount” parameter.

[sourcecode language=”powershell”]
Set-AzureSubscription `
-SubscriptionName "PutItTogetherAzure01" `
-SubscriptionId $subID -Certificate $myCert -CurrentStorageAccount ‘pitstorage01’;
[/sourcecode]

This section help set the Azure Subscription to the “Current Storage Account” which maybe optional.  I included this section because I started using my subscription to create only Azure SQL Database Server and I didn’t need any Storage Account.

Then, use the “Get-AzureSubscription” command to view all Azure Subscription values.
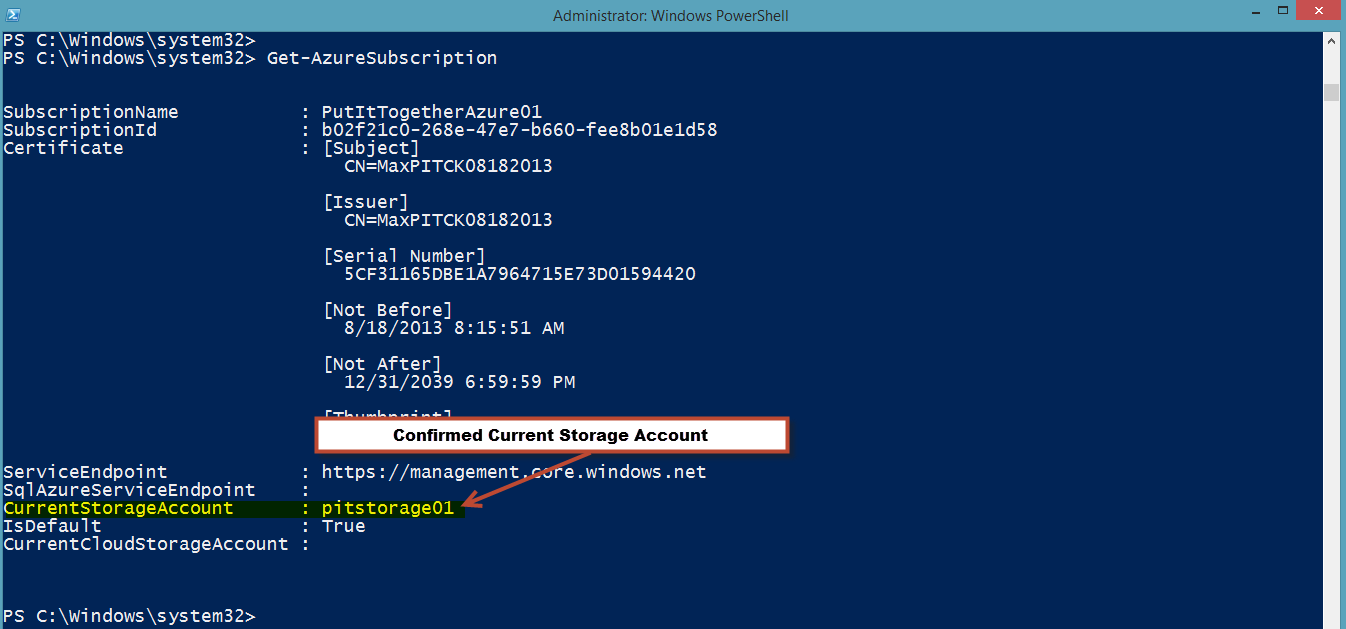
WindowsAzureSubscription

Search and Select the Windows Azure pre-built VM

For search the list of available Azure pre-built VM’s we use the “Get-AzureVMimage” command.  Here’s one creative approach for searching and select the VM imagename using the PowerShell V3 enhanced “Out-GridView” command with the ‘-PassThru’ parameter.  By creating a PowerShell variable “$x” we can store the value select from the “Out-GridView” and pass it to the “New-AzureQuickVM” command to build the VM.  Check the following example:

[sourcecode language=”powershell”]
## – Get and Select from the list of Azure VM Images:
$x = get-azurevmimage `
| Where-Object{$_.OS -match ‘WINDOWS’} `
| select label, imagename `
| Out-GridView -PassThru;
[/sourcecode]

This way we can pick and choose the image. Then, we use the variable with the member property that holds the name: $x.ImageName.   Remember to use the oneliner “$x | Get-Member” to view all variable member objects.

WindowsAzureGetMember

Create the Azure VM (Caution w/Service Name)

At the same time it will need to be provide a “Service Name”.  The “New-AzureQuickVM” help documentation mention that this is either a new one or existing one.  The following is an example of a new VM with a new ServiceName “MyPITcloudSvc2“:

[sourcecode language=”powershell”]
New-AzureQuickVM -Windows `
-AdminUsername ‘maxt’ -Password ‘$Mypwd01’ `
-ServiceName "MyPITcloudSvc2" -Name ‘Zeus01’ `
-ImageName $x.ImageName -Location "East US" `
-InstanceSize "Small";
[/sourcecode]

But, trying to use an existing ‘-ServiceName “MyPITcloudSvc1’ it gave the following error:

[sourcecode language=”powershell”]
## – Create a new ServiceName:
New-AzureService `
-ServiceName "MyPITcloudSvc1" `
-Label "MyPITcloudService" `
-Location "East US";

## – Create VM – It will create a new VM using an existing ServiceName:
## – (but it won’t work)
New-AzureQuickVM -Windows `
-AdminUsername ‘maxt’ -Password ‘$Mypwd01’ `
-ServiceName "MyPITcloudSvc1" -Name ‘Thor01’ `
-ImageName $x.ImageName
-Location "East US" `
-InstanceSize "Small";
## – Error Message:
">>New-AzureQuickVM : Service already exists, Location cannot be specified.
At line:1 char:1
+ New-AzureQuickVM -Windows `
+ ~~~~~~~~~~~~~~~~~~~~~~~~~~~
+ CategoryInfo          : CloseError: (:) [New-AzureQuickVM], ApplicationException
+ FullyQualifiedErrorId : Microsoft.WindowsAzure.Management.ServiceManagement.IaaS.PersistentVMs.NewQuickVM"
[/sourcecode]

It’s possible this is a bug!  In the help documentation shows that either a new of existing ServiceName can be use:

-ServiceName <string>
Specifies the new or existing service name.

Required?                    true
Position?                    named
Default value
Accept pipeline input?       false
Accept wildcard characters?  false

So, for now just provide a non-existing Service Name for the new Azure VM.

WindowsAzureVms

Stopping the Azure VM

Now during your Azure Trial version, if you want to slow down the charges, then you can stop the active VM(s) by executing the following two ways:

1. Just using the “Stop-AzureVM” command.

[sourcecode language=”powershell”]
## – Stop VM Service(s):
Stop-AzureVM -ServiceName "MyPITcloudSvc2" -Name "Zeus01";
[/sourcecode]

2. Or, by piping the result of “Get-AzureVM” to “Stop-AzureVM” command.

[sourcecode language=”powershell”]
## – Get-AzureVM to pipe to Stop VM Service(s):
Get-AzureVM -ServiceName "MyPITcloudSvc2" -Name "Zeus01" `
| Stop-AzureVM;
[/sourcecode]
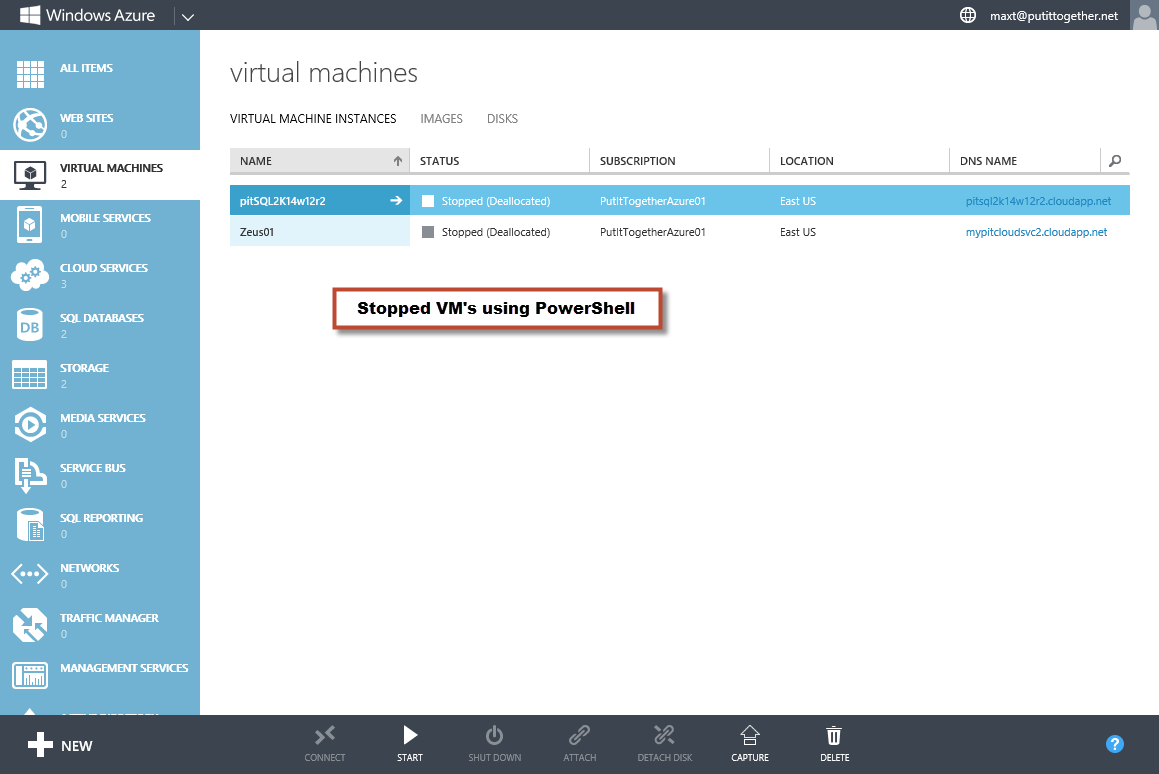
WindowsAzureStopVMs

Please keep in mind, that I haven’t discuss anything about the creating network items and/or affinity group to established connectivity between the Azure VMs.  At least this information will help in getting started.

I hope you all find this information useful!  There will be more coming soon.

Maximo Trinidad (MVP Windows PowerShell)
AKA Mr. PowerShell
Nice DOTNETZIP Integration with PowerShell

Let me share a script I built two years ago, and I just created a function for it named “New-ZipFile“. Basically, this PowerShell function script will create a blank zipped file and copy the files to it. At the same time if you run it again (after updating an existing file) will overwrite the file any existing files previously on the existing zipfile. Also, there’s no prompt.

This is an example of what PowerShell can provide at an excellent tool for providing creative solutions. Also the community is very active is helping everyone.

I agree that sometime is not easy but definitely not impossible. And there’s lots of other possible good alternative. But, using PowerShell let you customized your solution with an opportunity for enhancements giving you some level of control over what you want to accomplish.

I’m using the DOTNETZIP from Codeplex for this example. By the way, they provide good documentation on how to use the API’s. (hint: copy all the “Tools” folder to “Program Files (x86)\DotNetZip\..” folder)

You can download DOTNETZIP at the following link: http://dotnetzip.codeplex.com/

Here’s the sample script. Just change the variables values to your need, and make it your own:

[sourcecode language=”powershell”]
## – Beginning of Script:
Function New-ZipFile{
PARAM
(
[String] $SrcFolder,
[String] $DestFolder,
[string] $DestZipName,
[String] $FileExtToZip,
[string] $ZipPurpose,
[string] $StoredInZipFolder,
[string] $DeleteFiles = $null
)
#$TodaysDate = Get-Date -uformat "%Y-%m-%d-%Hh%Mm%Ss.zip";
#$ZipFileName = $ZipPurpose + "_" +$DestZipName + "_" + $TodaysDate;
$ZipFileName = $ZipPurpose + "_" +$DestZipName + ".zip";

if (Test-Path $DestFolder){
## – Create Zip file or it won’t work:
if (Test-Path ($DestFolder+"\"+$ZipFileName)) { del ($DestFolder+"\"+$ZipFileName) }
new-item ($DestFolder+"\"+$ZipFileName) -ItemType File
}
else
{
Write-Host "Destination Folder [$DestFolder] doesn’t exist" -ForegroundColor ‘Yellow’;
Break;
};

## – Loads the Ionic.Zip assembly:
[System.Reflection.Assembly]::LoadFrom("C:\Program Files (x86)\DotNetZip\Ionic.Zip.dll") |

out-null;
$zipfile = new-object Ionic.Zip.ZipFile

## – AddSelectedFiles with source folder path:
## – ($false grab files in source folder) & ($true grab files & subfolder files)
$zipfile.AddSelectedfiles($FileExtToZip,$SrcFolder,$true) | Out-Null;
## – UseZip64WhenSaving, when needed, will create a temp file compress large number of files:
$Zipfile.UseZip64WhenSaving = ‘AsNecessary’
$zipfile.Save($DestFolder+"\"+$ZipFileName)
$zipfile.Dispose()

If ($DeleteFiles.ToUpper() -eq ‘YES’){
## – Remove all backed up files:
Write-Host "Deleting files after zip!";
get-childitem ($SrcFolder+"\"+$FileExtToZip) | remove-item
}
};

### – variables:
$DestZipName = "BackupMyTempSSIS";
$FileExtToZip = "name = *.*";
$DestFolder = "C:\MyBackupZipFolder";
$SrcFolder = "C:\TempSSIS";
$DeleteFiles = $null;
$StoredInZipFolder = "MyBackupZip\";
$ZipPurpose = "BackUp";
#or $ZipPurpose = "Save";

New-ZipFile -DeleteFiles $DeleteFiles `
-DestFolder $DestFolder -DestZipName $DestZipName `
-FileExtToZip $FileExtToZip -SrcFolder $SrcFolder `
-StoredInZipFolder $StoredInZipFolder -ZipPurpose $ZipPurpose;

## – End of Script
[/sourcecode]

This is about having flexibility over what you want to do.  This is a good example how you can use an existing API with PowerShell.  As long there’s good API documentation then the rest just follows thru.

DotNETzip_APIDoc

In the above sample script you can have is Scheduled in either Task Scheduler or in SQL Server Agent. This code becomes portable.

This script the folder for the zipped file most exist or it will display a message that the folder doesn’t exist, and has the ability to delete the files after its done. (feel free to modify)

I hope you’ll find it useful!

Maximo Trinidad (MVP – Windows PowerShell)
Mr. PowerShell

QuickBlog: PowerShell Working with Windows Azure

As I venture into the realm of learning some PowerShell Automation in Windows Azure, its interesting the things you learn by just trying things out.  On my previuos blogs I mention, in order to use PowerShell, you need to create and install the certificate in the portal.  After that, you can use following commands to connect to Azure:

1. Import-Module Azure (*Optional – Autoload module is already set to “On”)
2. Set-AzureSubscription
3. Select-AzureSubscription

*Note: The ‘Import-Module Azure’ is more of a habit to do it.  Powershell 3.0/4.0 will search and automatically load a module the first time the cmdlet is been executed.

I just realized, after the Certificates Keys are installed in Azure, then you don’t need to execute the above commands Set-AzureSubscription and Select-AzureSubscription everytime I open the PowerShell Console.  Yes! I can start typing away and work with Azure commands.

Just try it!  If you already loaded the certificate keys, then Open a PowerShell console session and type “Get-AzureVMimage” to display the list of available Azure VM images:

WindowsAzrureValidAccess

If there’s no certificates installed, the you’ll get the following message: (on another PC)

WindowsAzureInvalidAccess

So that you know, when working with Windows Azure SQL Database Server(s), you don’t need to set up a Storage (Container) Account nor a Azure Cloud Service. Definitely you will need them when working with Windows Azure VM’s.

Next, I will be blogging on “PowerShell working with Windows Azure VM’s”.

That’s it for now,

Maximo Trinidad (MVP Windows PowerShell)
AKA Mr. PowerShell