Executing PowerShell Core from Windows PowerShell

Yes! It is possible to execute PowerShell Core in Windows PowerShell in a very creative way.  Of course, this is just a Proof-Of-Concept and fun to experiment.

In this scenario, the goal is to be able to rebuild the PowerShell Core PSObject in Windows PowerShell. and see the results.

What’s required?

First, if PowerShell Core is already installed, then that’s all we needed. The ingredient are there and we are the chef to create the recipe.

There are four main cmdlets to make receipe works:

1. Start-Process – This cmdlet will run PowerShell Core non-interactive.
2. Export-Clixml – This cmdlet will export to an XML file the PSObject from PowerShell Core session.
3. Import-Clixml – This cmdlet will import from an XML file to recreate the PowerShell Core PSObject in Windows PowerShell.
4. Select-Object – This cmdlet is use to display the output of that object.

Think of the *-Clixml cmdlets as the disconnected way to reuse PSObject in a disconnected way, is like saving the state of the object for testing.

The Recipe

Basically, Start-Process is where the PowerShell Core is run to execute the script. Now, within the PowerShell Core script, it is required to include the Export-Clixml cmdlet. This is where the PowerShell Core Object created in the script will export to an XML file. Finally, importing the same XML file in Windows PowerShell to be worked on and the displaying the PowerShell Core results in Windows PowerShell session.

Now, it’s very important to study and understand the PowerShell PSObject.  Also, do all necessary test to see if there are any limitations in this process.

The Code

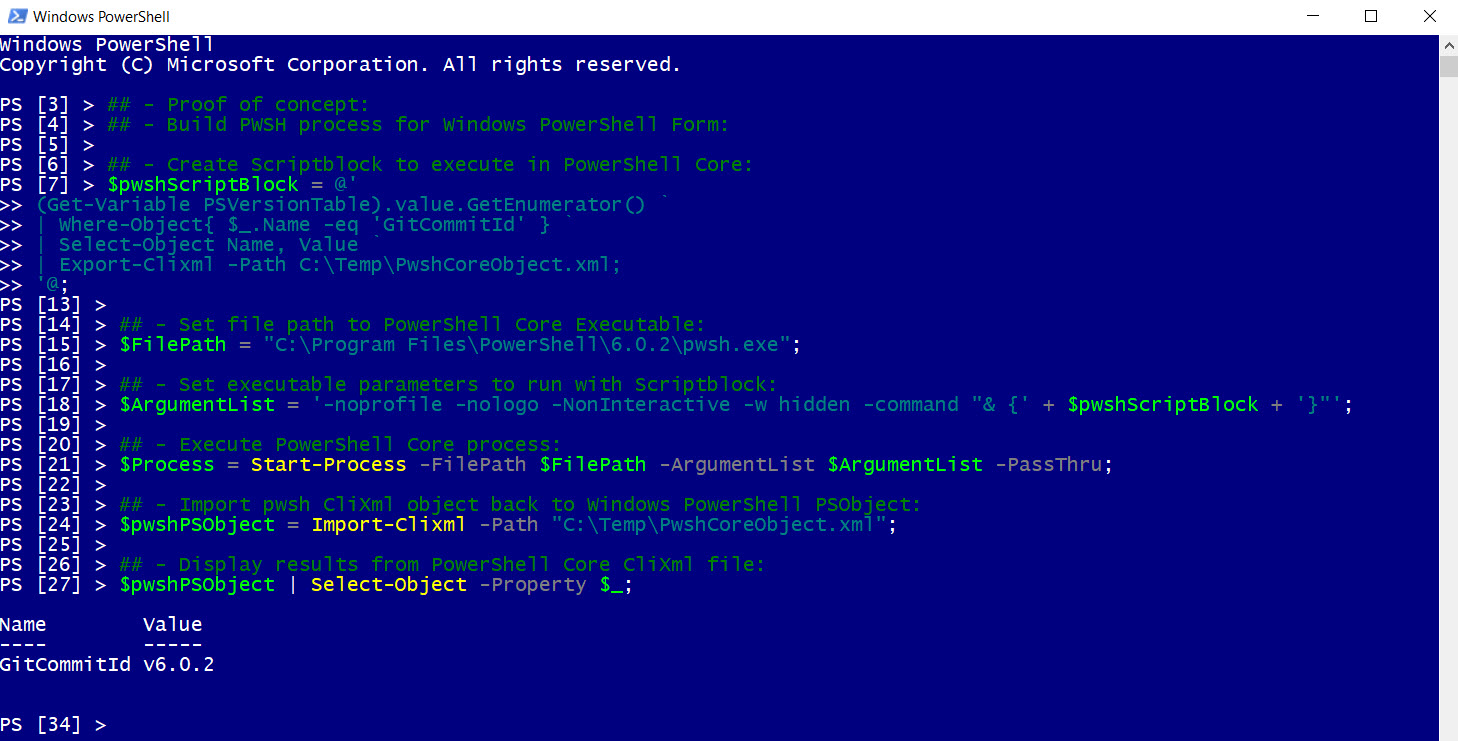
Here’s the basic code to accomplish this Proof-Of-Concept:

[sourcecode language=”powershell”]
## ————— Proof of concept ————— ##
## – Build PWSH process for Windows PowerShell Form:

## – Create Scriptblock to execute in PowerShell Core:
$pwshScriptBlock = @’
(Get-Variable PSVersionTable).value.GetEnumerator() `
| Where-Object{ $_.Name -eq ‘GitCommitId’ } `
| Select-Object Name, Value `
| Export-Clixml -Path C:\Temp\PwshCoreObject.xml;
‘@;

## – Set file path to PowerShell Core Executable:
$FilePath = "C:\Program Files\PowerShell\6.0.2\pwsh.exe";

## – Set executable parameters to run with Scriptblock:
$ArgumentList = ‘-noprofile -nologo -NonInteractive -w hidden -command "& {‘ + $pwshScriptBlock + ‘}"’;

## – Execute PowerShell Core process:
$Process = Start-Process -FilePath $FilePath -ArgumentList $ArgumentList -PassThru;

## – Import pwsh CliXml object back to Windows PowerShell PSObject:
$pwshPSObject = Import-Clixml -Path "C:\Temp\PwshCoreObject.xml";

## – Display results from PowerShell Core CliXml file:
$pwshPSObject | Select-Object -Property $_;

[/sourcecode]

The code is executed from a Windows PowerShell session. Try it, experiment, and test. See if it’s fit your need in any way.

Conclusion

Please, I’m not saying that this the way to go. But, it just showing one way to handle sharing results between Windows PowerShell and PowerShell Core. Again this is just for fun, and at the same time learning more about PowerShell.

The possibilities are endless! (Teaser)

Be Bold!! Learn PowerShell Core!!

PowerShell in South SQL Saturday 379 was a Great Success

SQLSaturdaySoFlorida2015

Once again I’m thankful to the organizers to have me speak at this “Awesome” event.  I appreciate the all whom attend my session meking it a Great Success and they got more.  My “PowerShell with Visual Studio SQL Data Tools” session became also a “SMO Simplicity Recap” session. They got two session in one.

SQLSat379_02


Session highlights

1. Visual Studio Community 2013 is the environment to use for integrated development by including Microsoft and Third-Party tools like:
a. PowerShell Tools for Visual Studio
b. Python Tools for Visual Studio
c. SQL Data Tools – Business Intelligent Developement
d. PowerShell Studio 2015  – call from within Visual Studio
e. PrimalXML 2015 – Call from within Visual Studio
d. And many more can be added…

SQLSat379_03

2. Visual Studio integration with either Team Foundation and Github repositories.

3. A quick dive in XML objects.

4. PowerShell error trapping in integrated solution.

SQLSat379_06

5. PowerShell SMO embedding and executing T-SQL code.

SQLSat379_05

During my presentation I demo for the first time how Visual Studio can trap PowerShell errors from within a SSIS Script Task component. And, everyone dropped their mounth. Beside the fact that you can also run and trap script errors by executing by itself.

SQLSat379_04

In the SMO session, I show how useful the ScriptBlock can be when embedding and running T-SQL code while PowerShell reads one object at a time.

To download my presentation and demo files are all available under South Florida SQLSaturday Schedule page:
http://www.sqlsaturday.com/379/Sessions/Schedule.aspx

Once again, THANKS to everyone for your attendance and support.

Great PowerShell sessions at SQLSaturday SoFla on June 29th 2013

Yes! On Saturday June 29th, I’ll be presenting two interesting PowerShell sessions:

1. DBA Track – PowerShell Working with XML

2. SSIS Track – Integrating PowerShell in a ScriptTask component

These session come full of demos and reference information.  The important one is the  “SSIS – Integrating PowerShell in a ScriptTask component” which help you to include your already existing PowerShell script file in a SSIS solution using SQL Data Tools 2012.

I’ll be show existing exciting tools such as SAPIEN Technologies:

1. PrimalXML 2012

2. PrimalSQL 2012

3. PrimalScript 2012

4. PowerShell Studio 2012

5. Open Source .NET development tool – SharpDevelop ( and you’ll see WHY!)

Also, I will be giving away some exciting stuff you don’t want to miss.

Please come and join us in this Great SQLSaturday event.  Here’s my presentation for both sessions.

Add from one XML data to another existing XML file

This topic came up after my SQLSaturday presentation in Tampa last weekend. In an scenario when (for some reason) someone is supplying an single XML file containing one series of information, or I should say, one record at the time. Maybe we can’t have the client to provide us with an XML file containing a series of records. This will force us to be creative and build a solution to accumulate and/or append all the individual XML files.Well, here’s how I think it can be done. I’m creating two PowerShell XML objects with one single record containing two fields: FirstName and LastName.

Here’s an image showing how to load an XML into a PowerShell object:

Notice I’m using the “xml” (inside square-brackets) accelerator to create the object of type ‘XML’. To verify the type of object use the following .NET object method ‘.GetType()‘.

PS C:\Users\Max> $y.gettype()

IsPublic IsSerial Name BaseType
——– ——– —- ——–
True False XmlDocument System.Xml.XmlNode

If you want to find more information about the PowerShell object you created use the ‘Get-Member‘ command to all of its Methods and Properties.

$x | Get-Member;

Now we have our two XML objects created: $x and $y. We want to add the record information from $y into $x. First, we need to make sure that the XML structure are the same in both objects:

PS C:\Users\Max> $x.Root.Table.Record

FirstName LastName
——— ——–
Maximo Trinidad

PS C:\Users\Max> $y.Root.Table.Record

FirstName LastName
——— ——–
John Kennedy

As you can see both XML objects contains the “Record” elements content: FirstName and LastName.

So, instead of processing these two objects separately, we are going the extract the “Record” elements from $y and inserted into $x. We can accomplish this process in two steps:

1. Creating another object that will hold the extracted elements:

$z = $x.ImportNode(($y.root.table.Record), $true);

2. Use the ‘.AppendChild()‘ method to add the extracted elements to the destination XML object (ie. $x):

$x.Root.Table.AppendChild($z);

Or, you can simply create a oneliner command to do this:

$x.Root.Table.AppendChild($x.ImportNode(($y.root.table.Record), $true));

To verify that all the “Record” elements from $y has been included in $x we can use the following command:

PS C:\Users\Max> $x.Root.Table.Record

FirstName LastName
——— ——–
Maximo Trinidad
John Kennedy

As you can see, we have successfully added the “Record” elements data.

Now, all this information have been modified in memory. To save this object to a file, then we use the ‘.Save()‘ method:

$x.Save(‘C:\Temp\XML\MultiRecord.xml’);

Finally, to display the content of the file, use the ‘ii‘ which is the Alias for ‘Invoke-Item‘ command:

ii ‘C:\Temp\XML\MultiRecord.xml’;

As you can see we have added new records from one XML into another. Here’s the end result: