Finally got this last function working in order and created a new module: “DiscoverPowershell” with all three Show-Help* functions:
1. Show-HelpPowerShellCommand – Meant to select one module at the time and then multiple commands.
2. Show-HelpAboutPowerShellTopic – Multi-select can be applied.
3. Show-HelpPowerShellObject (New) – Multi-select can be applied.
Check out the first two functions on my previous blog.
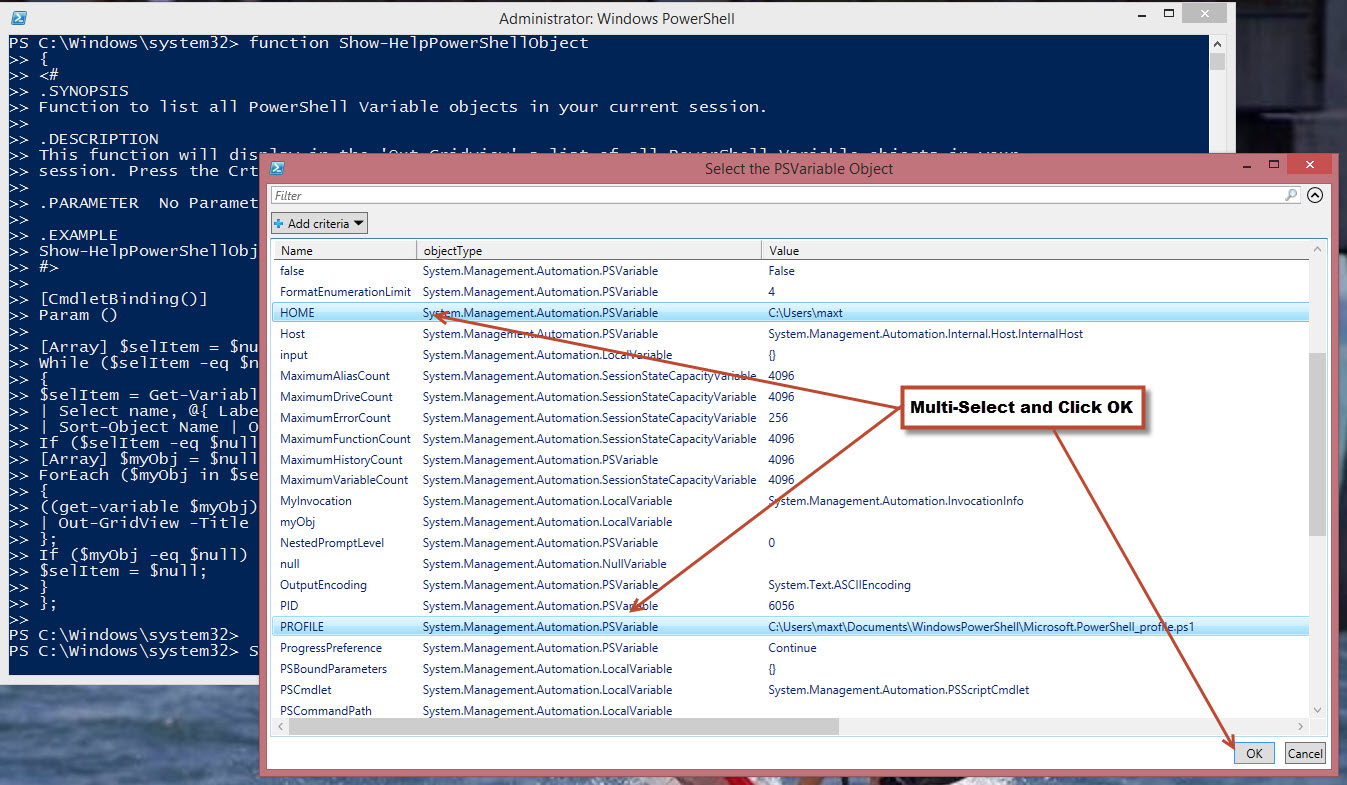
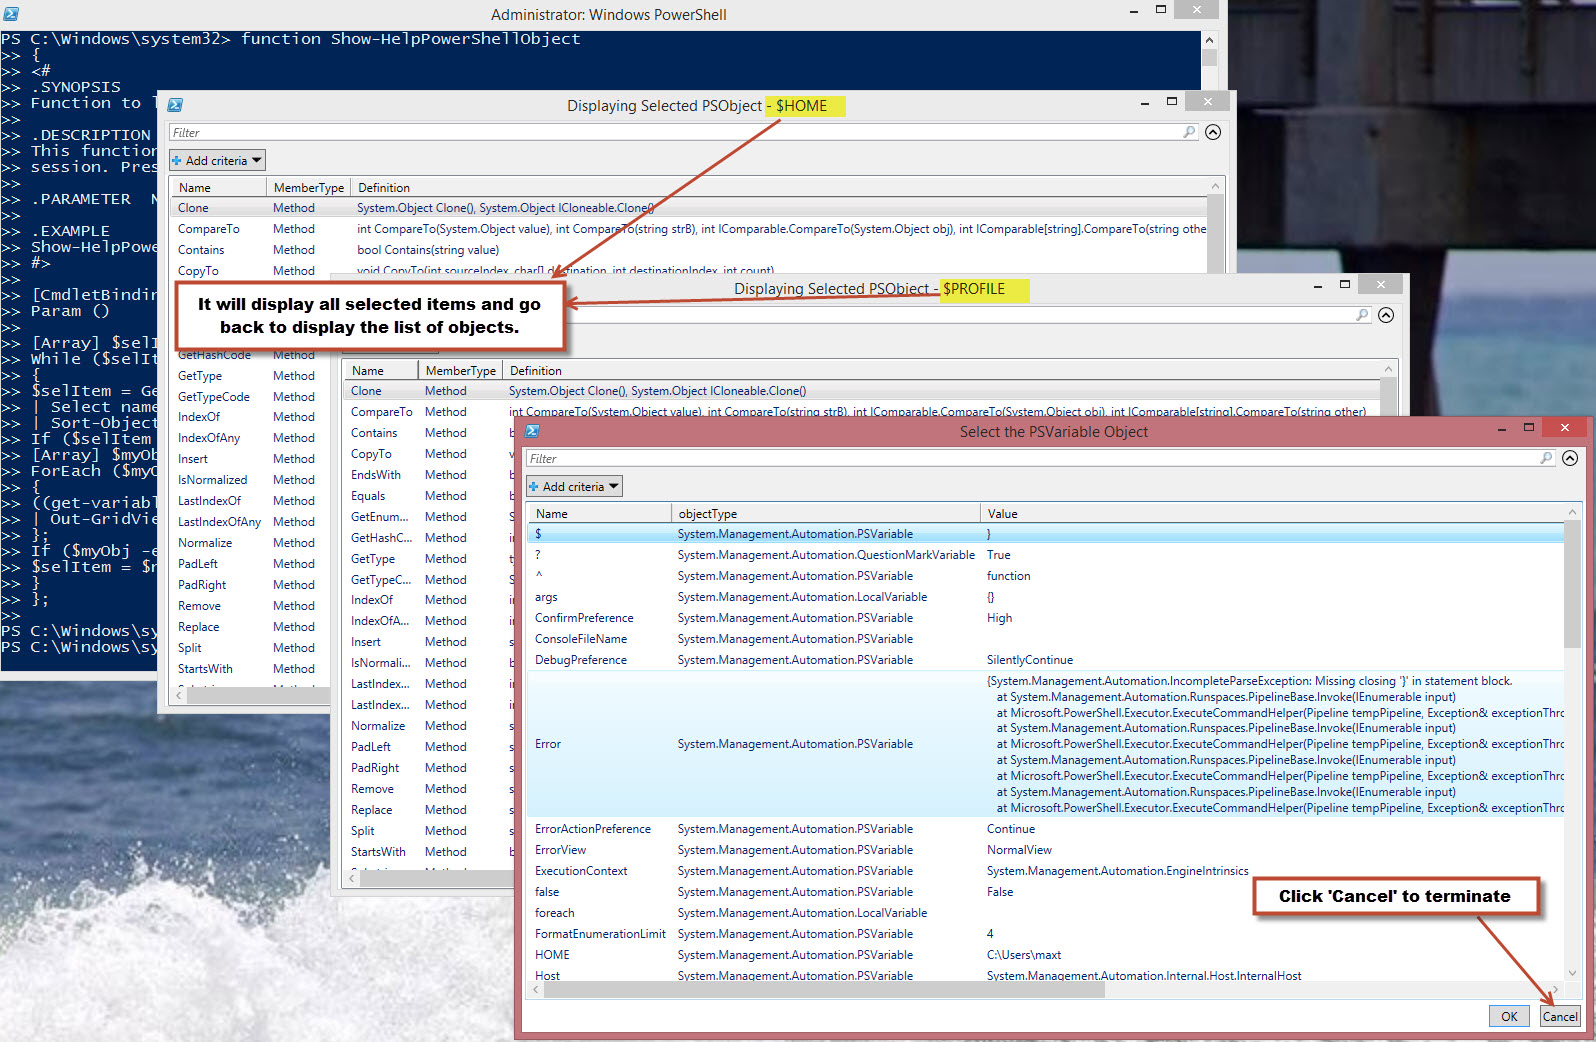
In the module I tweak is just a little bit but the functionality stay the same. Basically, you can select multiple Item(s) in the Out-Gridview and display the results.
*Note: Module requirements: PowerShell V4 (or greater) on Windows 7, Windows 8.1 and Windows 2012 R2.
Here’s the third function: Show-HelpPowerShellObject
[sourcecode language=”powershell”]
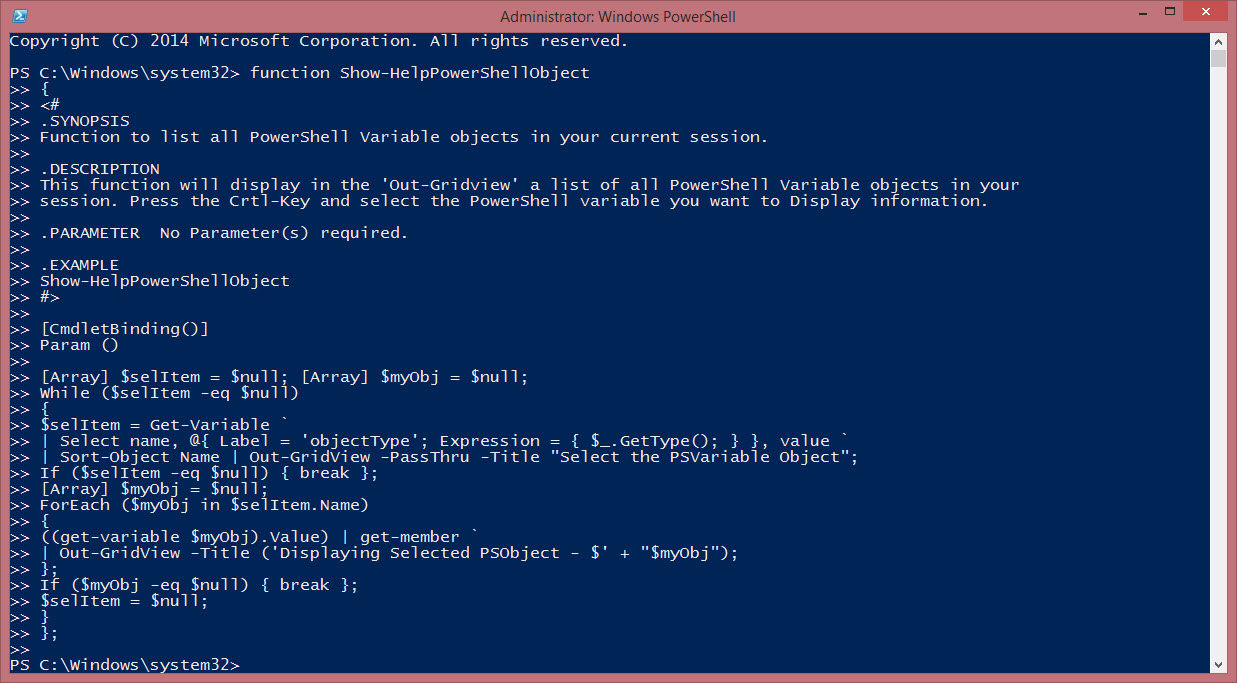
function Show-HelpPowerShellObject
{
<#
.SYNOPSIS
Function to list all PowerShell Variable objects in your current session.
.DESCRIPTION
This function will display in the ‘Out-Gridview’ a list of all PowerShell Variable objects in your
session. Press the Crtl-Key and select the PowerShell variable you want to Display information.
As I work on my second blog piece for the “Getting Ready with Windows Azure SQL Database Server PowerShell and SMO Part – 2/2“, I came up with a way to trap the current IP Address with PowerShell scripting. When using the Portal for creating your SQL Database Server, it will ask you if you want to create the Firewall rule for you. But you may want to automate this step using PowerShell and there’s no cmdlet to identify the “current” IP Address of your Windows Azure connection.
Here’s an example of how the Portal message when is asking for the current IP Address to be added to the Firewall rules:
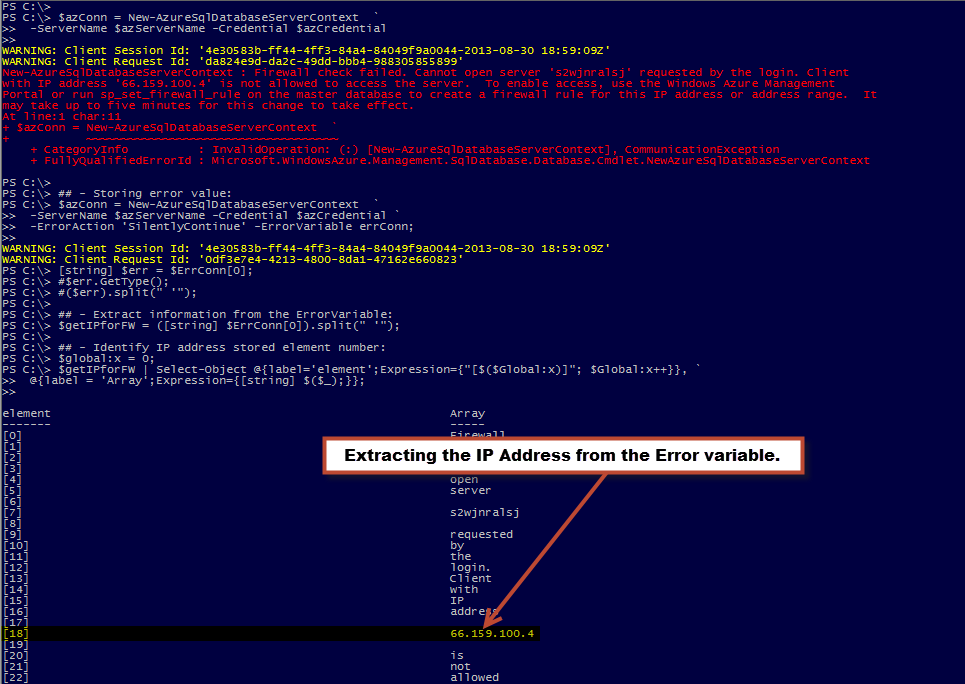
I’m going right to the point with this small blog piece. Basically, I’m trapping the error message from the “New-AzureSqlDatabaseServerContext” which will fail to connect to your Azure SQL Database. Then, I’m dissecting the string to get the IP Address in error. This is my way of trapping the IP address. I know there might be a better way but for now it works.
I’m assuming the connection to Windows Azure has already been established and you are trying to use the “New-AzureSqlDatabaseServerContext” for connecting to the database. If you haven’t created the rule then it won’t connect.
Note: Again, stay tuned for the next “Windows Azure SQL Database Server with PowerShell and SMO” blogpart 2/2.
In the “New-AzureSqlDatabaseServerContext” I’m including the following two parameters: -ErrorAction ‘SilentlyContinue’ and -ErrorVariable errConn. The “ErrorAction” results in not displaying the message. The “ErrorVariable” define the PowerShell variable you will be storing the error message. Notice the “ErrorVariable” name doesn’t include a “$” but its needed to view it (ie. $errConn).
The additional script code shown next will dissect the error message string from $errConn variable. It will take the string to create an array which will help identify the element position where the IP Address is stored. In this case I’m assuming the error message will not change so the IP Address will always be located in the same place (Right!). So the first time this code execute, it will find the IP Address in element #18.
Note: Please run first the code to identify the element position in case the “Culture” settings might change the location of the IP Address.
[sourcecode language=”powershell”]
## – Extract information from the ErrorVariable:
$getIPforFW = ([string] $ErrConn[0]).split(" ‘");
## – Display all variable stored in the array and identify where the IP address is stored:
$global:x = 0;
$getIPforFW | Select-Object @{label=’element’;Expression={"[$($Global:x)]"; $Global:x++}}, `
@{label = ‘Array’;Expression={[string] $($_);}};
## – Run once to confirm IP value is stored in element #18:
$getIPforFW[18].Trim();
[/sourcecode]
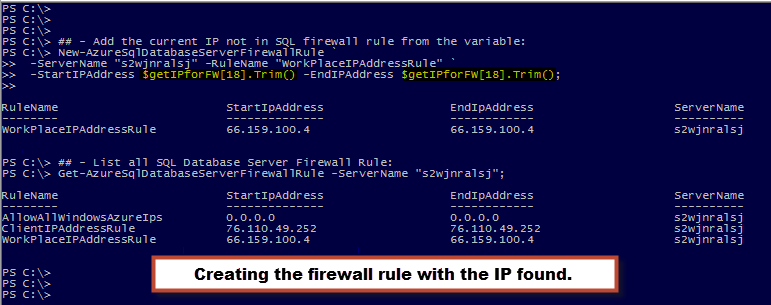
The rest is easy. After extracting the IP value then you can use the “New-AzureSqlDatabaseServerFirewallRule” to create the firewall rule to include the current IP Address.
[sourcecode language=”powershell”]
## – Get current IP and added it to the SQL Database Firewall Rule:
New-AzureSqlDatabaseServerFirewallRule `
-ServerName "YourServerName" -RuleName "YourClientIPAddressRule" `
-StartIPAddress $getIPforFW[18].Trim() -EndIPAddress $getIPforFW[18].Trim();
[/sourcecode]
You can refine this script code to suit your need. Just make sure to test a few times and verify you are getting the results you need.
Here’s a few more commands you could use to work with these rules. The “Remove-AzureSqlDatabaseServerFirewallRule” to remove any existing rule(s) and the “Get-AzureSqlDatabaseServerFirewallRule” to list them all.
[sourcecode language=”powershell”]
## – List all your SQL Database Firewall Rules:
Get-AzureSqlDatabaseServerFirewallRule -ServerName "YourServerName";
Here’s a simple function that will get your system last bootup time. Also, notice that I’m using the ‘-ErrorVariable ‘ parameter wth a given variable name ‘MyError‘ to trap any error messages during the execution of the ‘Get-WMIobject’ command. That the same time I’m including the ‘-ErrorActionSilentlyContinue‘ so my function won’t abort while executing.
For the only argument needed in this function, I’m validating that the passing argument is not null (or empty). Then, to build my result I’m using the scriptblocks to customized the results to be displayed on screen.
At the end, I’m collecting all thre information into the ‘$SvrRebooted‘ variable so it can be diaplayed when done.
This function builds an array object. Then you can use the ‘Format-Table‘ or the ‘Format-List‘ at your discretion. To execute the ‘Get-SystemLastBootUpTime’ function look at the following one-liners:
Thanks to all South Florida IT Pro Camp organizers for having present at their event. Here’s the PowerShell presentation and demo scripts all consolidated into zipped file.
Feel free to contact me via email if you have any questions.
Thank once again to the Palm Beach IT User Group for having my presenting live my session “PowerShell for the Administrator – All About The Language” on May 14th evening. http://itportalregulus.blogspot.com/
The group had the opportunity to see the evolution from a single one-liner command, to a script file, a function, and a brief taste to a module. Also, the scripts supplied has an abundant of code snippets that can be reused.
Also, giving example of reusing and modifying a community script (Thx, Jefferey Hicks for his contributions) so you can make it your own.
## – Set variable (no function):
$htmlTitle=’Server Drive(s) Report’
## – Configuring the HTML CSS Style sheet for the HTML code: (#FFFFCC)
## – When using Here-String/Splatting you must begin in the first position.
## – The use of Tab is invalid.
$head = @"
$($htmlTitle)
"@
## – Define the HTML Fragments as an Array type, add the header and title object:
[Array] $HTMLfragments = $null; $HTMLfragments += $head;
$HTMLfragments+="</pre>
<h1>Server Disk Space</h1>
<pre>
";
## – Build WMI Disk information object and group results by ComputerNames:
$SystemNames = get-wmiobject -Class Win32_logicaldisk -computer $ComputerNames `
| Group-Object -Property SystemName;
## – This is the graph character code:
[string] $gCode = [char] 9608;
## – Loop through each computer object found and create html fragments:
ForEach ($System in $SystemNames)
{
## – Get the System name:
$HTMLfragments+="</pre>
<h2>$($System.Name)</h2>
<pre>
"
## – Replacing replace the tag place holders: (Jefferey’s hack at work)
$html=$html -replace ‘xlt’,’
## – Add the Disk information results to the HTML fragment:
$HTMLfragments+=$html;
## – Insert a line break for each computer it find:
$HTMLfragments+="
";
}
## – Add a footer to HTML code:
$footer=("
<em>Report run {0} by {1}\{2}<em>" -f (Get-Date -displayhint date),$env:userdomain,$env:username)
$HTMLfragments+=$footer
## – Write HTML code to a file on disk:
ConvertTo-Html -head $head -body $HTMLfragments | Out-File $ReportPath;
While working on my PowerShell demo scripts today, I decided to create a simple function to display my scripts during my presentations. Here’s my new and simple Show-PSDemo function:
[sourcecode language=”powershell”]
#========================================================================
# Created with: SAPIEN Technologies, Inc., PowerShell Studio 2012 v3.1.15
# Created on: 1/13/2013 9:07 AM
# Created by: Maximo Trinidad
# Organization: PutItTogether
# Filename: Show-PSDemo_function.ps1
# Version: 0.1
#========================================================================
function Show-PSDemo{
Param([String] $FileLocation)
## – Verify for a valid file location:
if((Test-Path -Path $FileLocation) -ne $true)
{
Write-Host "No script files to execute!" `
-ForegroundColor ‘Yellow’;
Break;
}
else
{
[Array] $executethis = Get-Content $FileLocation;
};
It has one parameter “-FileLocation” which is you full folder and file location. The file extension doesn’t matter as long is a text file with PowerShell code in it.
It allows to:
1. The use of Comments lines.
2. The use of the “$_” in a “Select-Object“.
3. Allows the use of the “`” tick which identify a line continuation.
4. A “Pause” is included after executing each line or block of code.
The PowerShell community has done an Excellent job in providing LOTs of sample codes. But sometime can be very intimidating for a beginner to understand. Well, PowerShell can be both simple, and complicated but not impossible to learn.
Is good to know there are other ways other to get the same or similar result. And I’m not against it because you can even integrate those solutions into PowerShell.
BUT, you need to realized this is a SKILL you need nowadays. PowerShell can’t be ignore any more. If you don’t build up this skill then you’re probably going to lose a job opportunity.
Now, here’s a series of oneliners to assist you in getting the computer BootUp time information:
[sourcecode language=”powershell”]
## – Simple way to start knowing your PSobject
$x = get-wmiObject -Class Win32_OperatingSystem -Computername "YourComputerName";
## – Discovering you PSobject content:
$x | get-member;
## – Sample getting the PSObject ‘Property’ names for computername and Lastboottime:
$x | Select csname, LastBootUpTime;
## – Need to use the "ConvertToDateTime" script method which is in your PSobject $x:
$x.ConvertToDateTime($x.LastBootUpTime);
## – Wee need to create a one-liner to display the date/time correctly
## – using scriptblock expression:
$x | Select csname, `
@{label=’MyLastBootUpTime’;Expression={$_.ConvertToDateTime($_.LastBootUpTime)};} `
| format-table -autosize;
## – Now, pay attention to the Get-member results and you’ll find the following methods:
# Reboot()
# SetDateTime()
# Shutdown()
# Win32Shutdown()
# Win32ShutdownTracker()
## – You will realized the PSObject you just created can be use to perform
## – task such as: reboot or shutdown.
## – This is an example to create an Array list of servernames:
$srvList = @("Server1","Server2","Server3");
###### BUILDING A SCRIPT with above onliners ########
## – Now we need to loop through each of the servers in the array with ‘Foreach’
## – and display the results on screen:
This is your starting code block. This code can be improved to suite your need by adding more PSobject properties and/or routing the results to an output file.
I hope this can give some insight on how PowerShell can help in your admin tasks.
There’s no need to install SQL Server to create PowerShell SMO scripts. So, how I do this? You need three stand-alone packages from the “Microsoft® SQL Server® 20xx Feature Pack”. Notice the “xx” in the SQL Server version. This is because the
“feature packs” has been available since SQL Server Version 2005. In my scenario I decided to use the “Microsoft® SQL Server® 2012 Feature Pack”: http://www.microsoft.com/en-us/download/details.aspx?id=29065
You need to installed them in the following order:
Microsoft® System CLR Types for Microsoft® SQL Server® 2012
*Microsoft® Windows PowerShell Extensions for Microsoft® SQL Server® 2012
Make sure to pick the right package for your system: (x86) or (x64).
When you’re done with the installation then you are ready to start scripting with SMO. Also, you will notice that the SQL Server SQLPS module will get installed in your system.
Use the “Get-Module -ListAvailable” command and look for the SQLPS module in the bottom of the screen.
Now we can create the following PowerShell SMO script:
[sourcecode language=”powershell”]
## – Loading the SQL Server SMO Assembly"
[System.Reflection.Assembly]::loadwithPartialName("Microsoft.SQLServer.SMO");
## – Build SQL Server object connecting using default Windows Authentication:
$SQLSvr = ‘WIN2K3SQL1’;
$MySQL = new-object(‘Microsoft.SqlServer.Management.Smo.Server’) $SQLSvr;
## – Changing from default Windows to SQL Authentication:
$MySQL.ConnectionContext.LoginSecure = $false;
$MySQL.ConnectionContext.set_Login(‘User1’);
$SqlUPwd = ConvertTo-SecureString ‘$Pwd01!’ -AsPlainText -Force;
$MySQL.ConnectionContext.set_SecurePassword($SqlUpwd);
## – Get some information:
$MySQL.Information | Select-Object Parent, Version, Edition | fl;
[/sourcecode]
Here’s the results: Notice I installed my three “SQL Server 2012 feature” packages and created to use a PowerShell SMO script to access a SQL Server 2000 Engine. But, Keep In Mind, that SQL Server SMO 2012 will work for most parts to extract information off SQL Server 2000. Just by trial and error you will notice some limitations. Also, although I have the SQLPS module available but I didn’t have to use it yet.
Go ahead and give it a try!
Here’s the link of others SQL Server Features Pack:
The Truth, it wasn’t easy. I look around some blogs but they always failed to mention what was done prior to the actual installation of SQL Server on a Server Core machine. But, installing SQL Server on a Server Core 2012 makes it better if you have installed the Minimal-Server interface. Yes! The new Server Core gives you the flexibility to partially add and remove the GUI shell.
Here’s what I did to get my SQL Server on a Server Core 2012 installed in a Virtual Machine. Remember, when using Hyper-V, you can use the shapshot feature to create a point of recovery state in case you need to go back and start over.
Setting up Server Core 2012 with Minimal-Server Interface
First, I need to make sure Server Core has all the components in place. In my test building a virtual machine I found that I needed to have:
1. Connection to the internet or some features will fail to install.
2. I need to assign a static IP Address (so I can join my domain).
3. Add an admin user account to the local administrator group (Workgroup or Domain admin user account).
4. Configure Remote Management.
5. Configure Remote Desktop.
To get this done I use the vbscript application “SConfig” tool to assist configuring my Server Core. It’s a great tool, and it can be executed from PowerShell prompt too.
Configuring Server Core 2012 with VBScript "SConfig" Tool
Now, keep in mind you need to meet some requirements before installing SQL Server. Most important is installing .NET Framework 3.5. But, if you successfully install the following Windows Features to enable the Minimal-Server interface on Server Core 2012 then you should be fine for setting up SQL Server. Again, connection to the internet is mandatory (at least in my scenario).
Here’s the features required to *install and enabled the Minimal-Server interface:
Yes! You can use PowerShell. Just type *PowerShell as soon as the command prompt shows up and you can continue building the you Server Core. A restart of the server will be needed.
Tip: To start PowerShell in Server Core 2012 DOS command prompt, type “PowerShell” and press Enter . Then, to get back to DOS command prompt, type the “Exit” and press Enter.
To get a list of all installed features, use the following PowerShell command:
Get-WindowsFeature
Use the above command verify the .NET Framework 3.5 features has been enabled. Of course, after rebooting the server you will notice the Server Manager GUI will be displayed along with the command prompt. This is a good indication .NET Framework is in place.
After rebooting, you will get the Minimal-Server Interface.
Server Core 2012 with Minimal-Server interface
Installing SQL Server 2012 on Server Core 2012
Now, I’m are ready to install SQL Server 2012. I have attached the SQL Server 2012 ISO image to my virtual machine. Here’s the *Setup command to install: SQLEngine, AS, IS, and Conn. For more information: http://msdn.microsoft.com/en-us/library/hh231669.aspx
A Word of Caution. I’ve experience that sometimes the setup will finished with no indication that everything completed successfully. To find later that the SQLEngine wasn’t installed
I had to verify the SQL Server instance was installed by looking at the Microsoft SQL Server folder under “C:\Program Files\Microsoft SQL Server” and use the PowerShell command “Get-Service” to see all services were active.
Now, I need to configure the SQL Remote Access to option “1” using the “SQLCMD -A” command from the “C:\Program Files\Microsoft SQL Server\110\tools\binn” folder with the following T-SQL lines:
EXEC sys.sp_configure N’remote access’, N’1′
GO
RECONFIGURE WITH OVERRIDE
GO
Exit
Using SQLCMD -A command
Test SQL Server connection remotely
Now, before trying to connect from another machine, I need to configure the Windows *Firewall rule to allow access to my SQL Server by executing the following line in the DOS command prompt:
netsh firewall set portopening protocol = TCP port = 1433 name = SQLPort mode = ENABLE scope = SUBNET profile = CURRENT
Setting Firewall SQL Server rule
*Note: This command will execute but read the warning message
The moment of Truth! Testing that I can connect to SQL Server on Server Core 2012 from a Windows 8 Desktop using SSMS.
Windows 8 client Virtual Machine connecting to SQL on Server Core 2012
Conclusion
In this blog I have accomplished the following in a virtual machine:
1. Build a Server Core 2012 with Minimal-Shell interface.
2. Use the VBScript “SConfig” to help configuring my server.
3. Install SQL Server 2012: Engine, Analysis Services, and Integration Services.
4. Verify remote connectivity using SSMS from a desktop machine.