PowerShell Core Ubuntu 18.04 Using Docker Containers

Containers have been popular for some time now in the industry. It’s becoming as important as learning PowerShell.  Have you try it?

Installing Docker

While learning about Docker Container, I notice that is much easier to installed on a Linux system. In Windows, Hyper-V is a requirement to install Docker, and specially if you want to use the “Windows Subsystem in Linux” WSL feature, there’s more setup to complete. So, I’m not using Hyper-V, I’m using VMware Workstation.  To keeping simple, I created an Ubuntu 18.04 VM using VMWare Workstation.

You can find the Docker CE installation instructions in the following link.

If you’re using Ubuntu 18.04. make sure to install Curl, as it isn’t included in the OS.

$ sudo apt install curl

After the Docker CE installation completes, make sure to run the “hello-world” to test the container runs.

If  you have Hyper-V and you’re interested in pursuing making Docker CE works in Windows 10 WSL (Windows Subsystem for Linux), check the following link on “running-docker-on-bash-on-windows“.

Use PowerShell Core

Make sure you have the latest PowerShell Core installed. If it was previously installed, then use the “$ sudo apt upgrade” to get the latest version. Of course, this all depends on which installation method you previously chose to install PowerShell

Or, just go to the Github PowerShell page to get the latest version(s) for either GA (Generally Available) or the Preview.

Now, before starting to working with Docker as a non-root user, you will need to add the current user to the “Docker” group, by using the following command line:

$ sudo usermod -aG docker your-userid

Then, open a PowerShell Core session to start working with Docker containers.

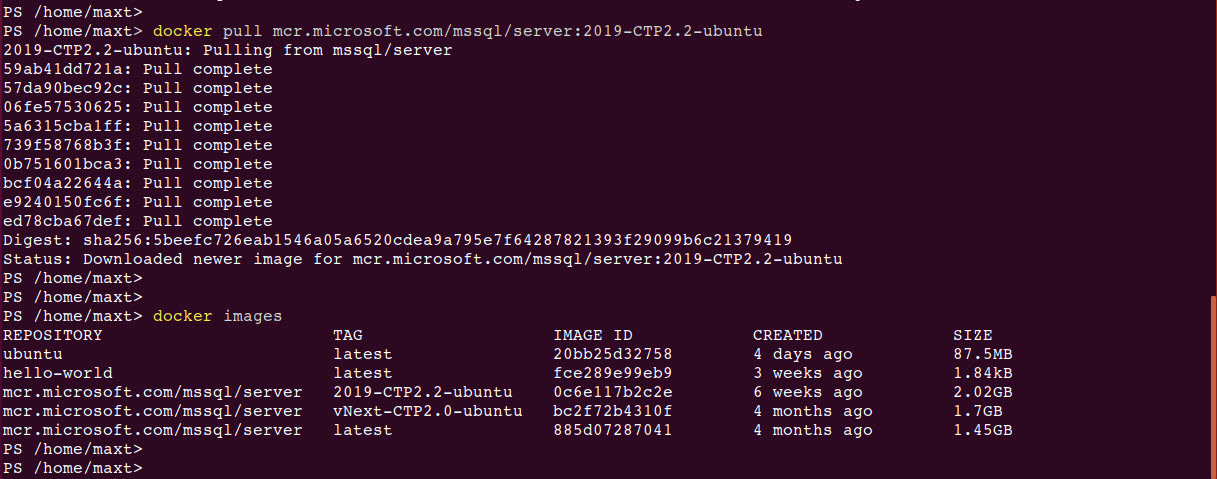
The following docker commands are the essentials to work with containers and can be executed from within the PowerShell Core session:

1. Listing active container

PS /> docker ps -a

2. Listing images in your system

PS /> docker images

3. Get an container image

PS /> docker pull image-name (not GUID)

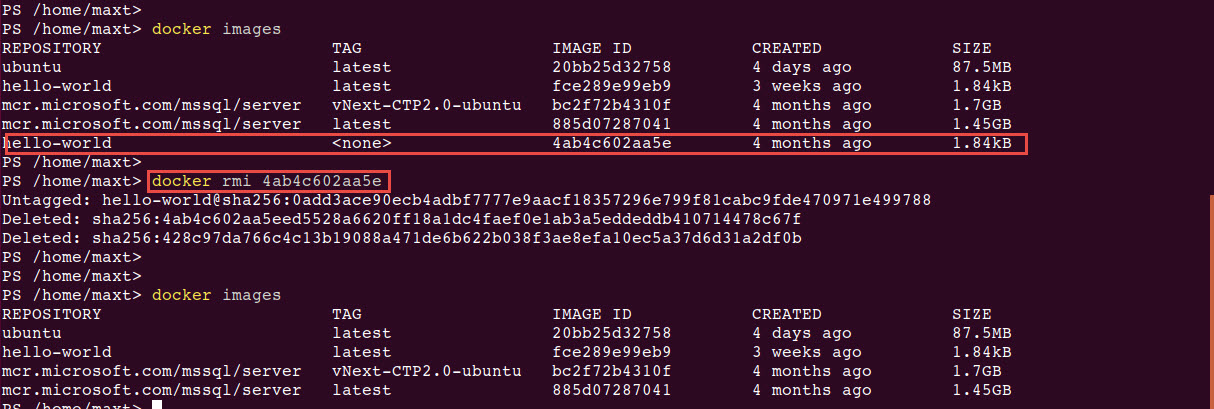
4. Image(s) cleanup

PS /> docker rmi image-GUID

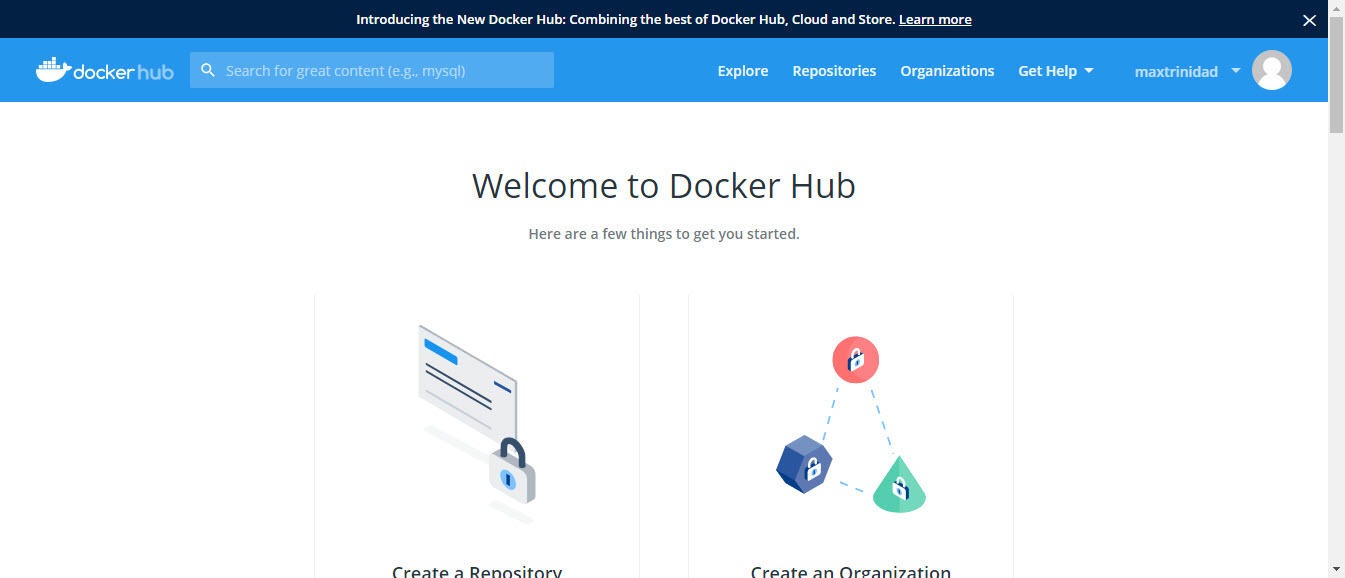
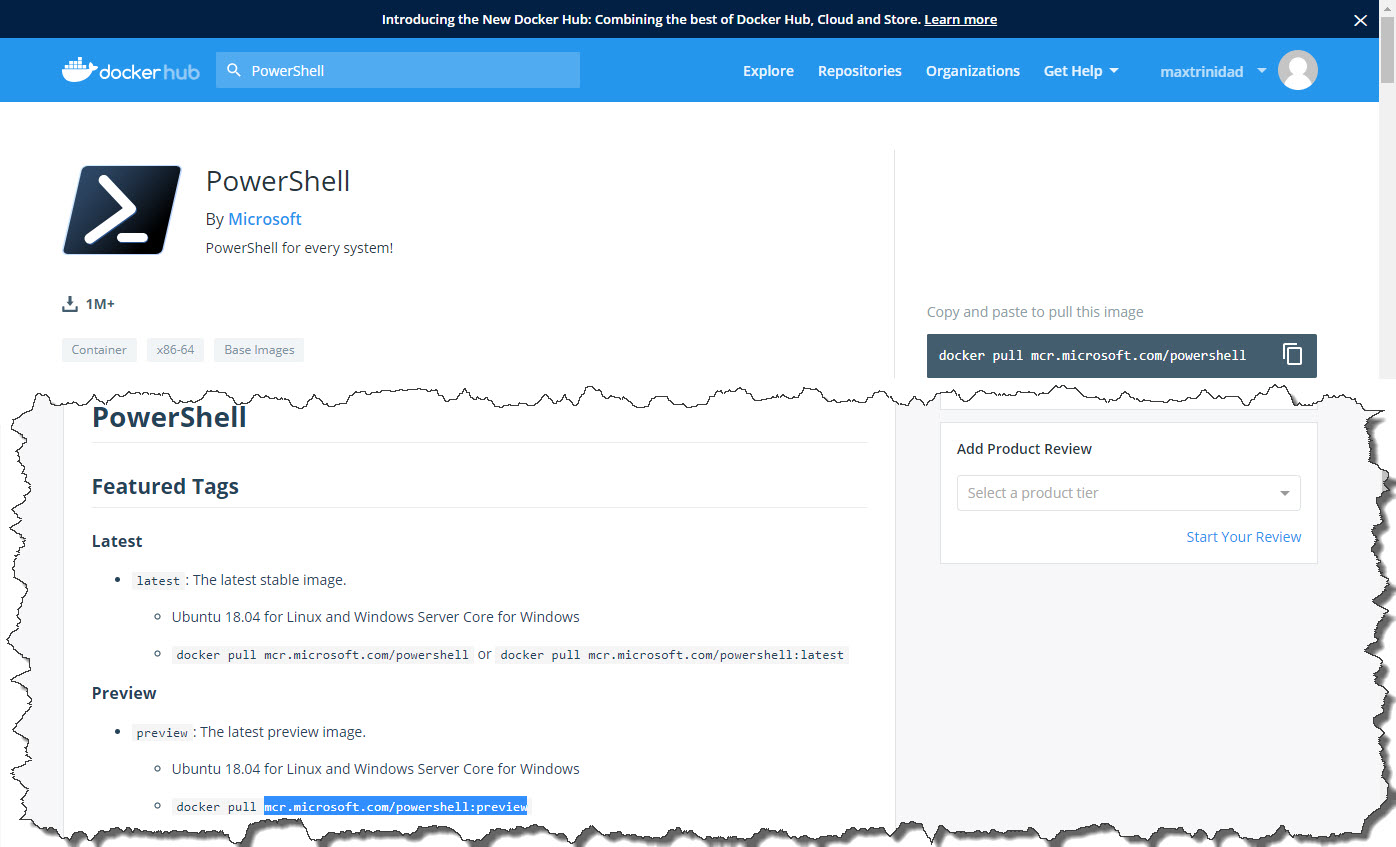
If you want to find a particular image, then go to Docker Hub site. An account is required in order to login to the Docker Hub.  In there you’ll find certified images that can download using the “docker pull <imagename>” command line.

Docker PowerShell Containers

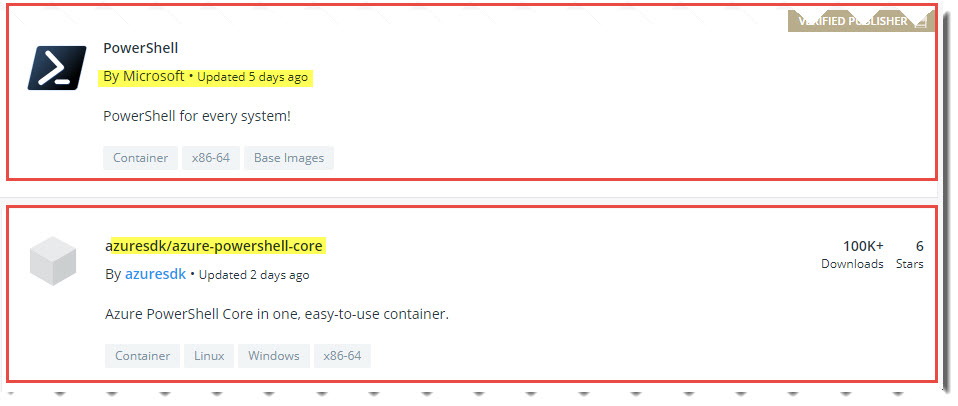
Interesting enough, while doing a search in Docker Hub, I found ta couple of PowerShell Core containers available that caught my attention.

1. “PowerShell” (Verified Publisher).

2. “azuresdk/azure-powershell-core”.

Also, “PowerShell-Preview” is available under the PowerShell Core container page

To try them out, just execute the following command:

1. PowerShell – Read documentation. Then execute the following command line to pull the container to your system.

PS /> docker pull mcr.microsoft.com/powershell

2. Azure-PowerShell-Core – As of now, current documentation is out-dated. (

PS /> docker pull azuresdk/azure-powershell-core

3. PowerShell-Preview

PS /> docker pull mcr.microsoft.com/powershell:preview

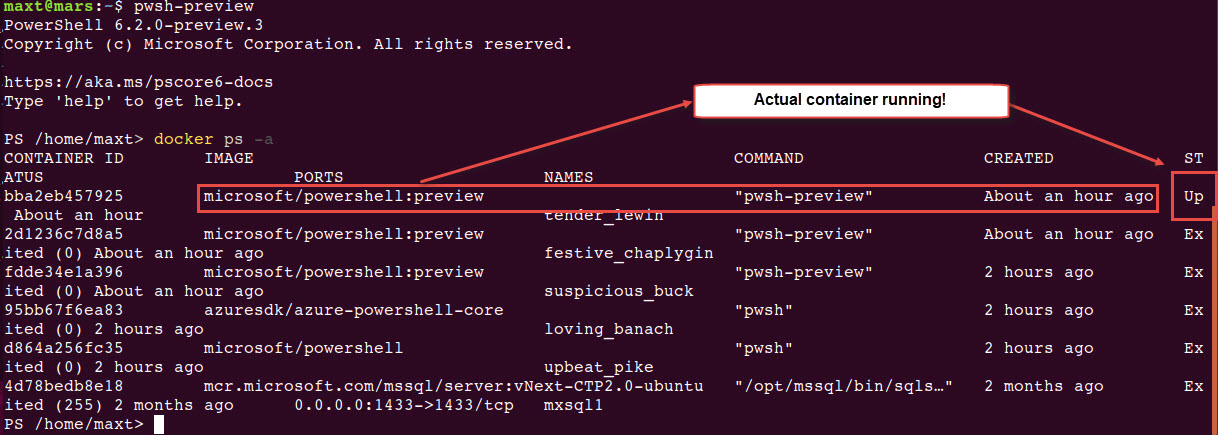
After completing pulling the docker images, then we are ready to check the containers by executing the following command:

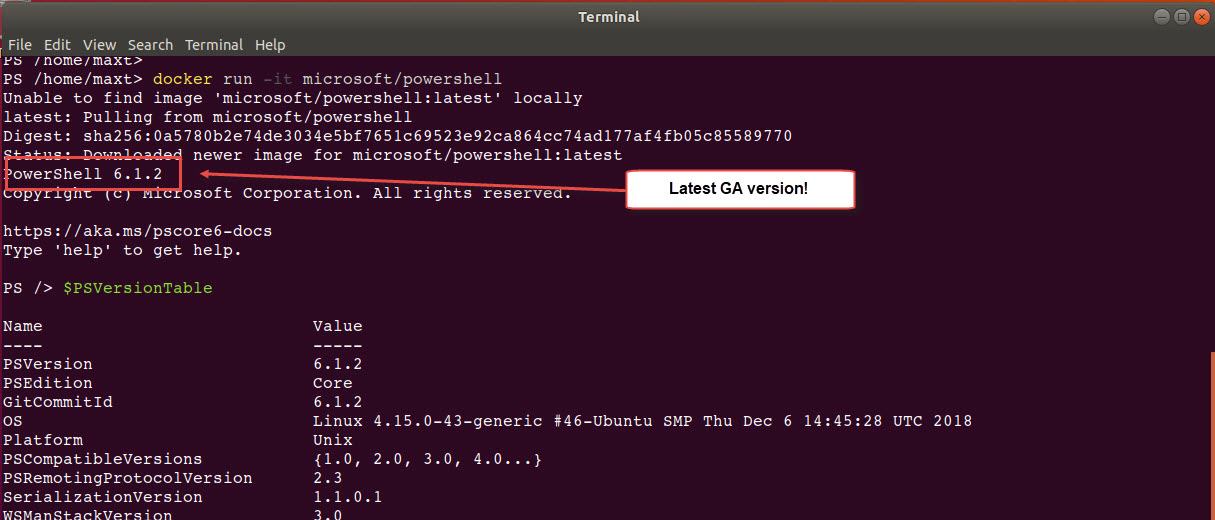
1. Execute PowerShell Core GA

docker run -it microsoft/powershell

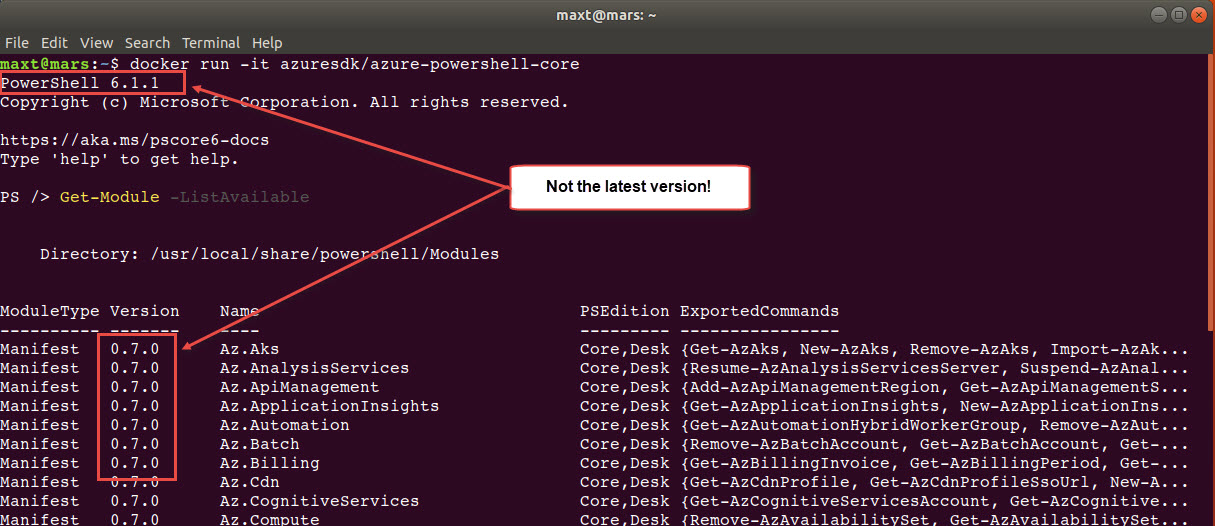
2. Execute *Azure-PowerShell

docker run -it azuresdk/azure-powershell-core

3. Execute PowerShell Core Preview (latest)

docker run -it microsoft/powershell:preview

Note: It seems the Azure-PowerShell container is not currently up-to-date for both PowerShell Core GA and the Azure modules version. Just check for upcoming updates on these repositories later.

Summary

As you can see, working with Docker containers and PowerShell makes it a convenient test environment. Either way, if you’re want to use Linux terminal session with or without PowerShell, there’s no reason why not to try it.  So, after you have created the linux VM and complete the installation of Docker CE, you’ll get it working in minutes.
 

Useful PowerShell Azure Connect CLI Options with Az Module Version 1.0

Recently, Microsoft Azure team release the new version of the AzureRM Module can be install in both Windows PowerShell and PowerShell Core. Now, with the new version renamed from AzureRM to ‘Az‘, Microsoft is encouraging everyone to download and start using this refreshed module moving forward. Just make sure to keep reporting any issues on this module.

Don’t forget to check out the recent blog about the Azure PowerShell ‘Az’ Module version 1.0.

One of the most important fix was the issue experiencing with the TokenCache Initialization when using the cmdlet Import-AzContext. This issue was causing many DevOps to go back and use older version of the AzureRM module to get their script to work again.

The “TokenCache initialization” issue was reported in Github for some time, and finally it has been fixed.

Now, let’s take a look on how to connect to Azure.

Azure Connection CLI options

The following cmdlets can assist you with Azure connectivity:

  • Connect-AzAccount
  • Save-AzContext
  • Import-AzContext
  • Enable-AzContextAutoSave
  • Disable- AzContextAutoSave

All of these cmdlets belongs to the “Az.Account” module which is included in the Az Module. Here’s where you can use find different ways to connect to Azure.

Below is the full list of all Az modules installed from the PowerShell Gallery:

PS [118] > Get-Module -ListAvailable Az.* | Select Name, Version

Name Version
---- -------
Az.Accounts 1.0.0
Az.Aks 1.0.0
Az.AnalysisServices 1.0.0
Az.ApiManagement 1.0.0
Az.ApplicationInsights 1.0.0
Az.Automation 1.0.0
Az.Batch 1.0.0
Az.Billing 1.0.0
Az.Cdn 1.0.0
Az.CognitiveServices 1.0.0
Az.Compute 1.0.0
Az.ContainerInstance 1.0.0
Az.ContainerRegistry 1.0.0
Az.DataFactory 1.0.0
Az.DataLakeAnalytics 1.0.0
Az.DataLakeStore 1.0.0
Az.DevTestLabs 1.0.0
Az.Dns 1.0.0
Az.EventGrid 1.0.0
Az.EventHub 1.0.0
Az.HDInsight 1.0.0
Az.IotHub 1.0.0
Az.KeyVault 1.0.0
Az.LogicApp 1.0.0
Az.MachineLearning 1.0.0
Az.MarketplaceOrdering 1.0.0
Az.Media 1.0.0
Az.Monitor 1.0.0
Az.Network 1.0.0
Az.NotificationHubs 1.0.0
Az.OperationalInsights 1.0.0
Az.PolicyInsights 1.0.0
Az.PowerBIEmbedded 1.0.0
Az.RecoveryServices 1.0.0
Az.RedisCache 1.0.0
Az.Relay 1.0.0
Az.Resources 1.0.0
Az.ServiceBus 1.0.0
Az.ServiceFabric 1.0.0
Az.SignalR 1.0.0
Az.Sql 1.0.0
Az.Storage 1.0.0
Az.StreamAnalytics 1.0.0
Az.TrafficManager 1.0.0
Az.Websites 1.0.0

PS [169] >

There’s a total of 45 ‘Az‘ modules are installed in your system.

Simple Connection

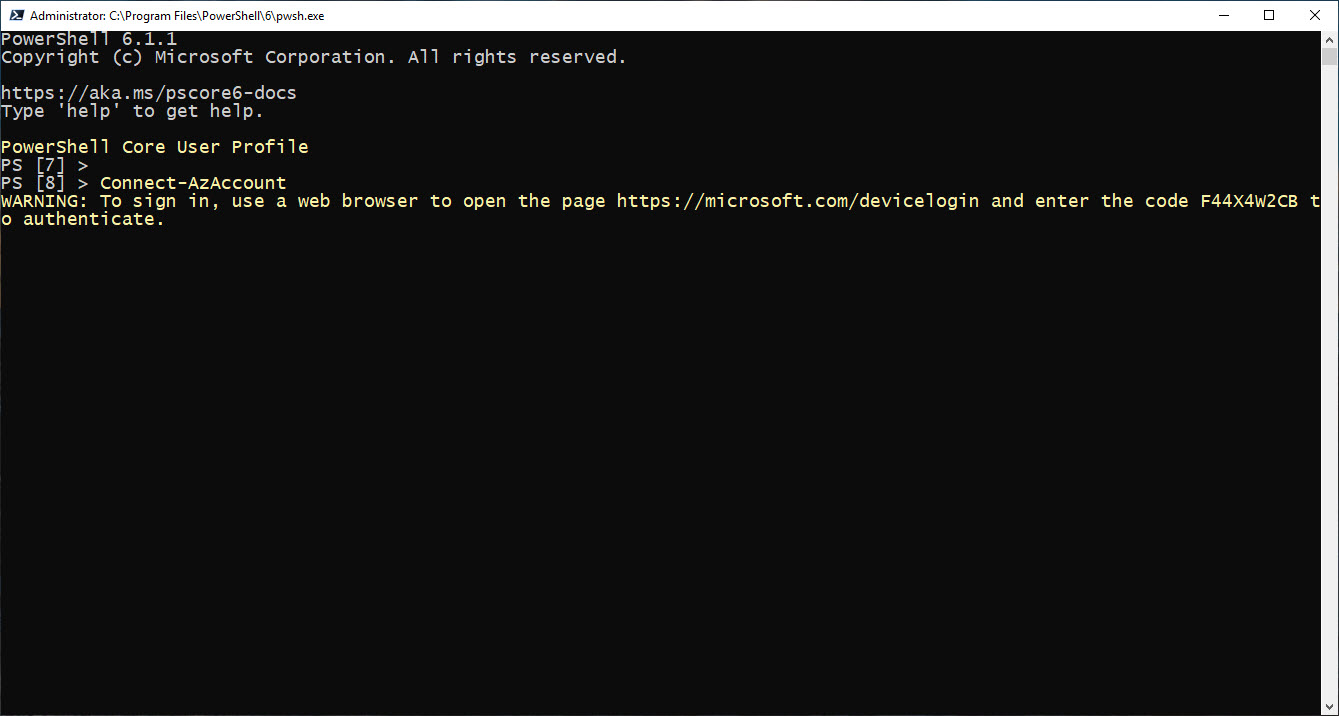
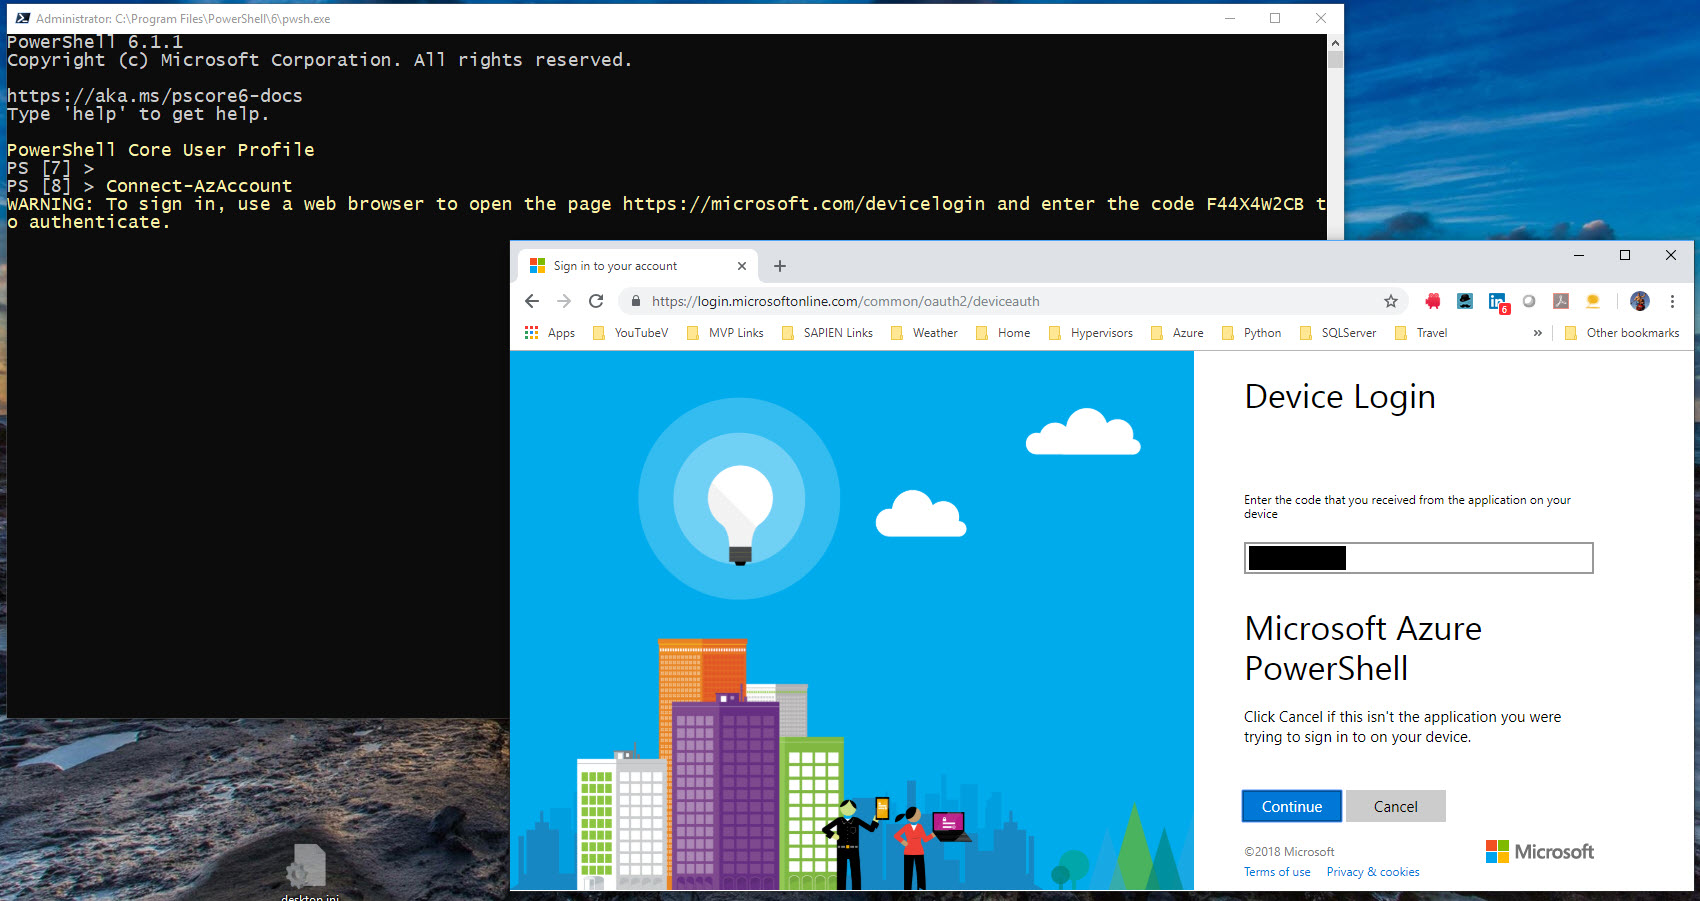
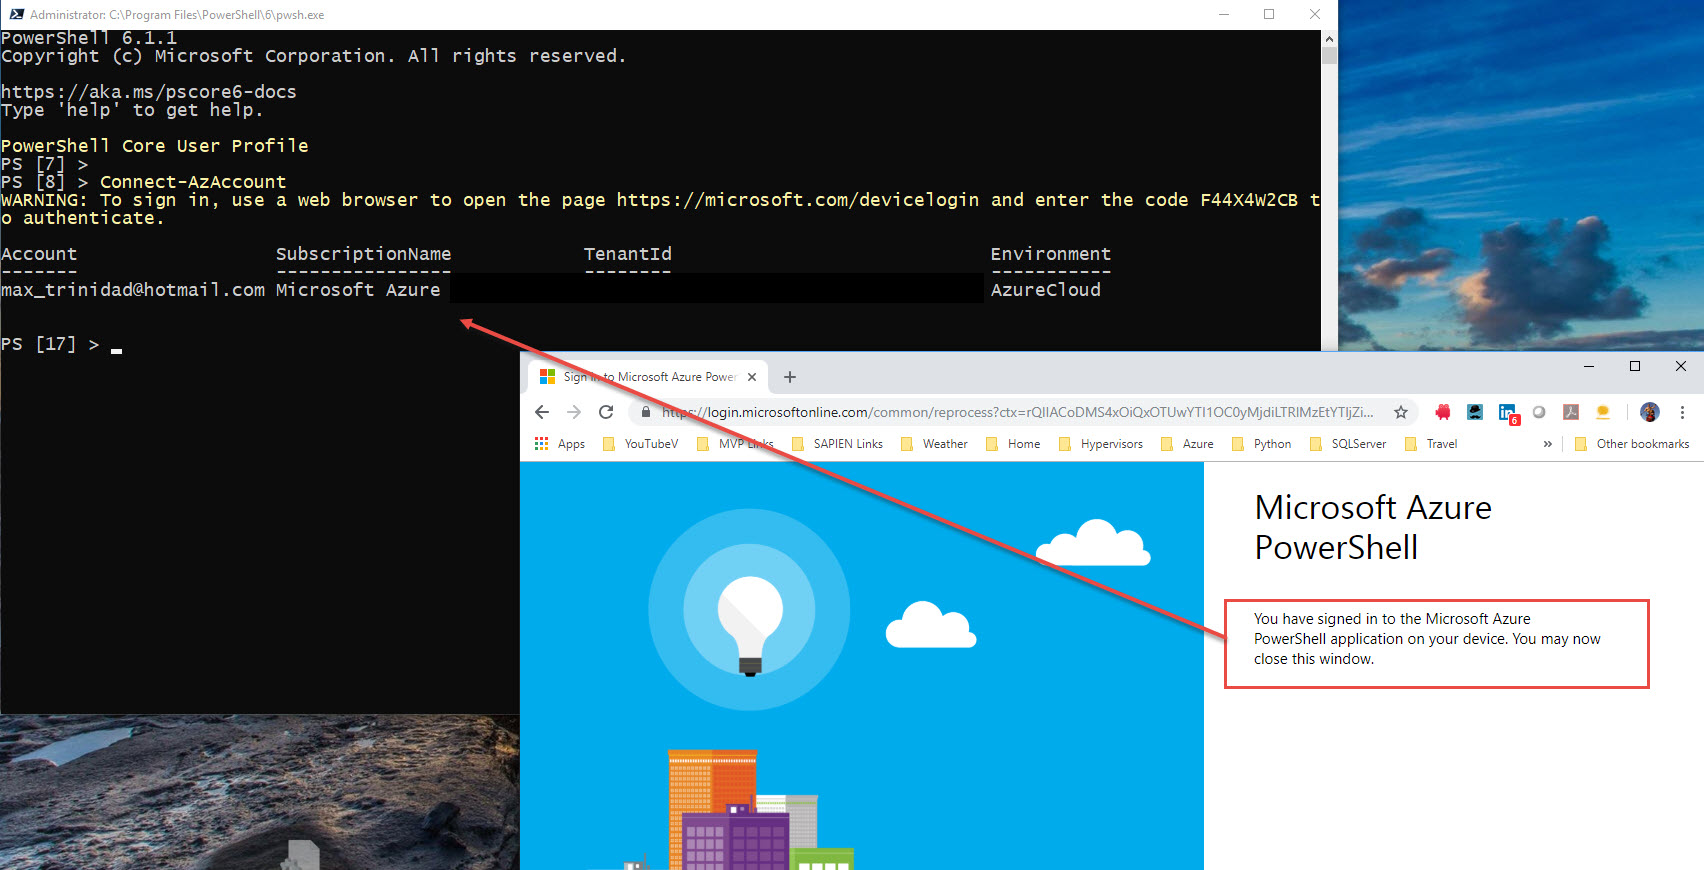
First time connecting to your Azure subscription, you’ll use the “Connect-AzAccount” cmdlet. This cmdlet will asked you to open a browser, then copy/paste a URL and a code that will authorized your device to connect to azure.

So, after the device has been authorized, you can start start working with Azure commands from any of the PowerShell Consoles.

Now, using this cmdlet will create the “.Azure” folder under the user profile directory containing the following files:

c:\Users\username\.Azure
AzInstallationChecks.json
AzurePSDataCollectionProfile.json
AzureRmContext.json
AzureRmContextSettings.json
TokenCache.dat

But, using the Connect-AzAccount cmdlet, the connection only last while your PowerShell session is active. So, as soon as you close the console, and you’ll have to repeat the whole process to connect to Azure again.

Reusing Azure Authentication

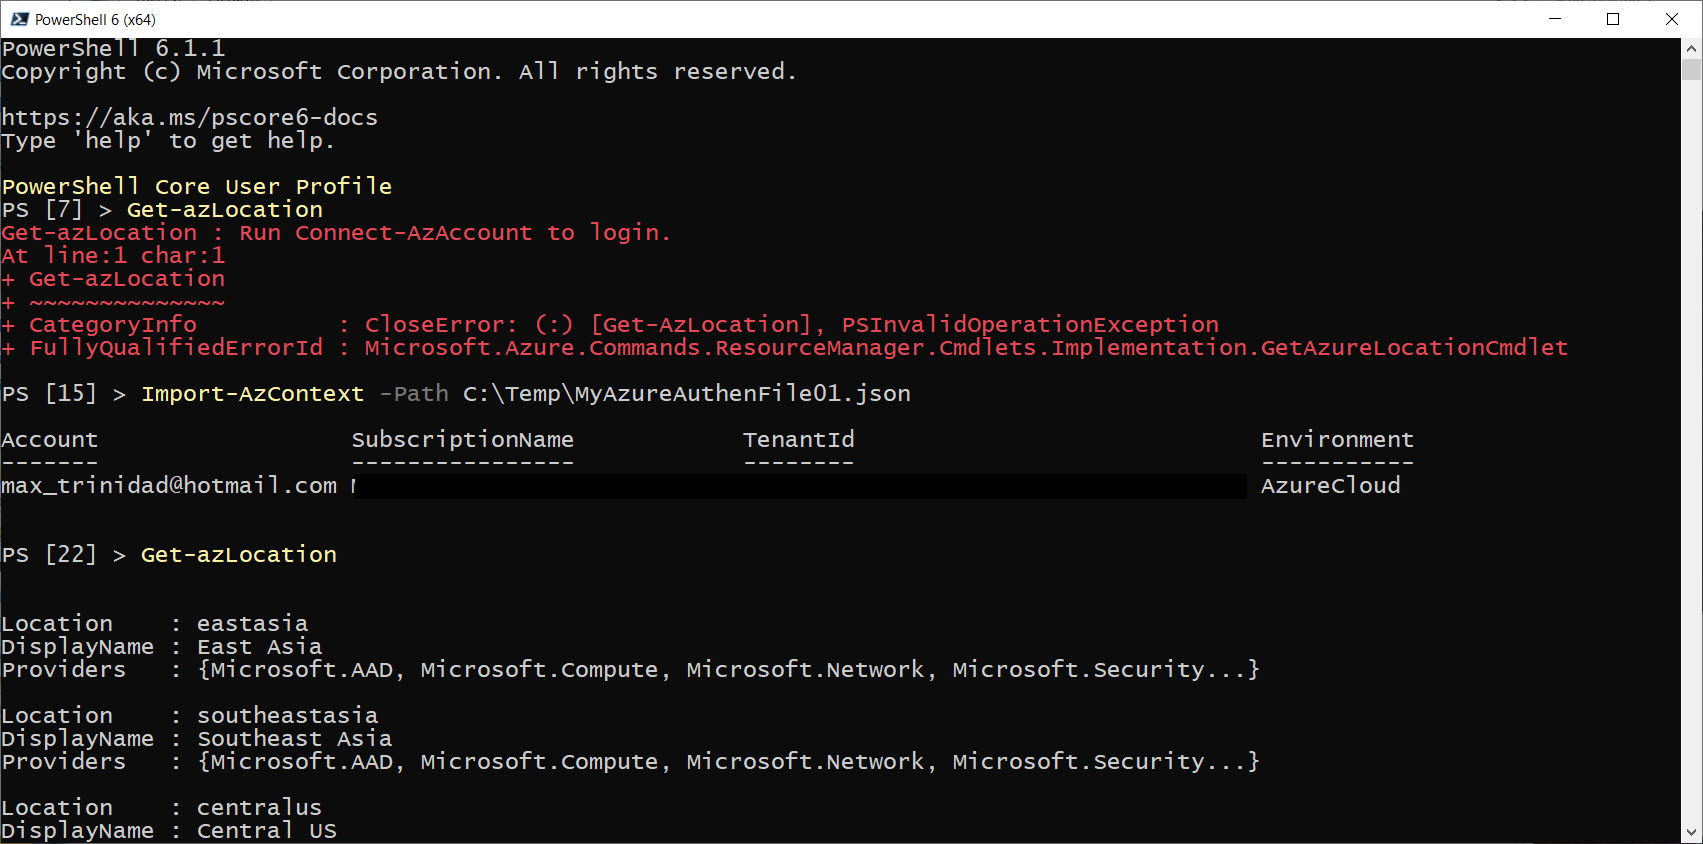
We can reuse Azure Authentication in order to avoid the steps of re-opening the browser. Using the following cmdlets: Save-AzContext and Import-AzContext. These two cmdlets are very useful, as the Import-AzContext loads Azure authentication information from a JSON previously saved when using the Save-AzContext cmdlet.

So, as soon as initially set the connection with the Connect-AzAccount and setup all the necessary configuration (resource groups, storage accounts, Availability Sets…), proceed to use the Save-AzContext to save the Azure Authentication information to a folder location of your choosing.

Then, after exiting your PowerShell session, in order to reconnect again, just use the Import-AzContext cmdlet. I’m sure this one of the way many Azure DevOps are using the Import-AzContext to automate script in PowerShell.

Just make sure to occasionally refresh the file as you’ll be making changes the Azure account(s) by adding/removing resources.

Staying Connected to Azure Account

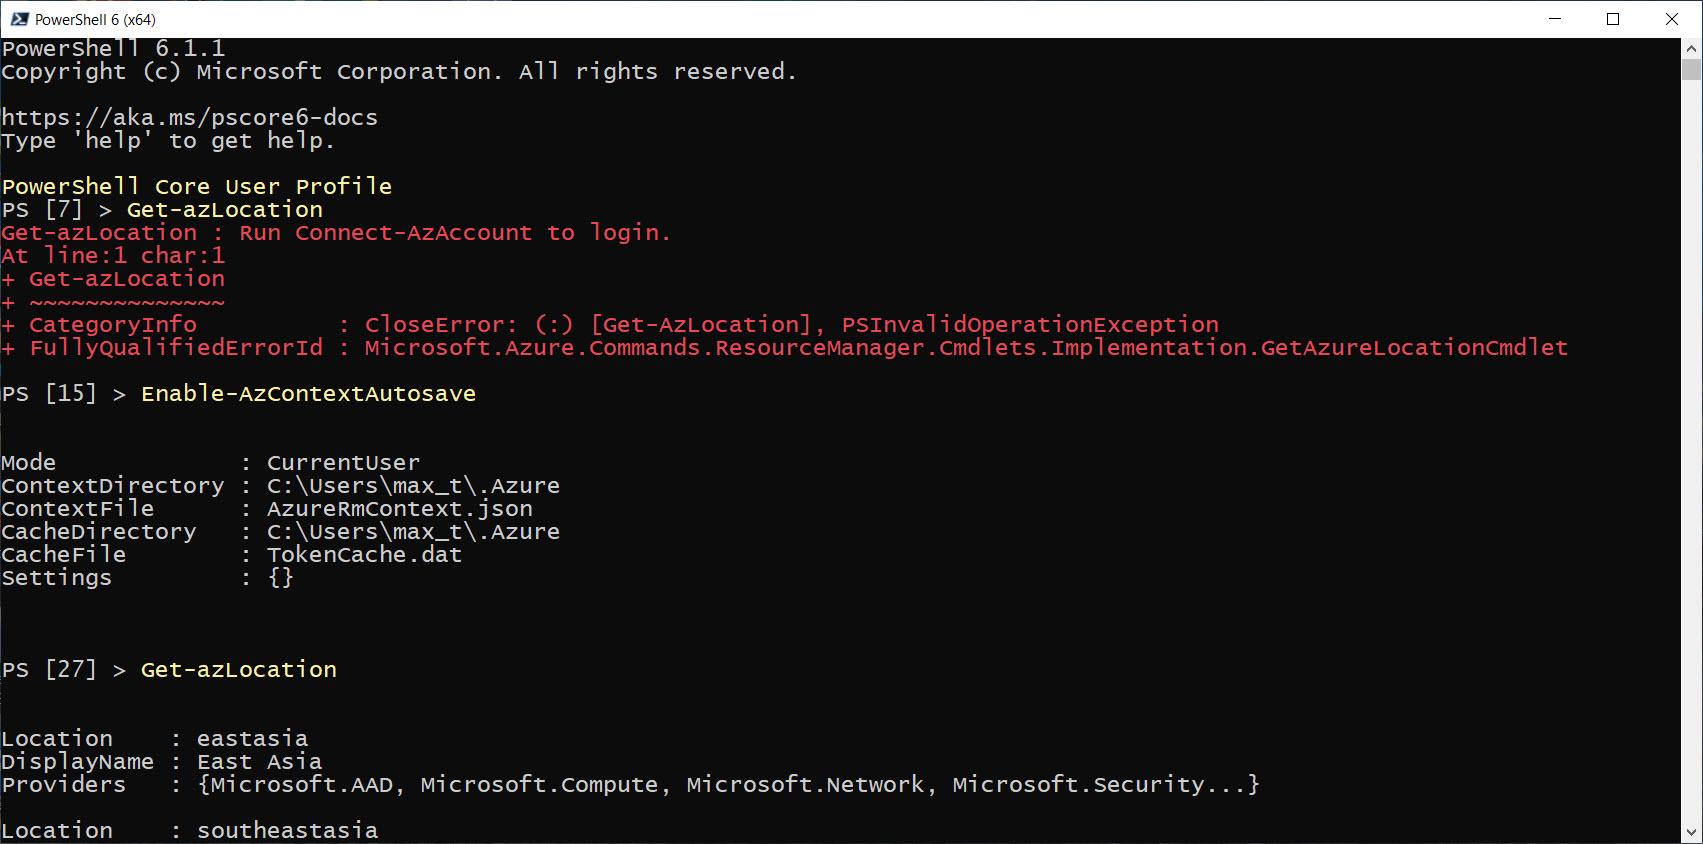
Now, this has been available for awhile using the cmdlets: Enable-AzContextAutoSave, and Disable-AzContextAutoSave. So, if you want to stay connected to your Azure Account, every time you close and reopen a PowerShell Console, you can start working with Azure cmdlets without any delays.

And, because you probably have been working with the Azure modules for some time, just execute the Enable-AzContextAutoSave cmdlet.

That’s it!

Now, you can close and re-open PowerShell Console and immediately start working with Azure.  This will make you feel like you are using the Cloud Shell on your desktop.

Just remember, in order to disable this functionality, just run the Disable-AzContextAutoSave cmdlet and exit the PowerShell Console.

Summary

As you can see, there are many ways to get connected from any system cross-platform to your Azure Account(s) to suit your need. This will work from anywhere from any system!

Just go ahead, experiment and find your own way to work proactive with Azure.

PowerShell Preview.3 Not Starting after upgrading from previous version

Just in case you haven’t try to install PowerShell Core Preview.3, in Windows, which became available on the evening of the 10th of December. If are doing a clean installation, meaning that it was previously manually uninstall, or that this is your first installation, then you are fine.

The issue with installing PowerShell Core Preview.3 is when you do an upgrade over a previous version: either Preview.1 or Preview.2.

Fail To Start

Simple! Although the installation will complete without any failures, PowerShell Core will fail to start.

Even if you try to execute PowerShell Core Preview.3 from DOS command prompt executing “pwsh.exe from the installed location, will give the following error:

C:\Program Files\PowerShell\6-preview>pwsh
Error:
An assembly specified in the application dependencies manifest (pwsh.deps.json) was not found:
package: 'System.Private.ServiceModel', version: '4.5.3'
path: 'runtimes/win/lib/netstandard2.0/System.Private.ServiceModel.dll'
Error starting PowerShell Core Preview.3 from DOS Command prompt

What is the Workaround?

This issue is when upgrading from previous version prior Preview.3. So, there are only two ways to fix it:

  1. Using the Control Panel,”Add/Remove Programs”, uninstalling then reinstalling PowerShell Core.
  2. Or, run again the Preview.3 installation, but select “Repair”.
Run the PowerShell Core Preview.3 installation again then select the “Repair” option

Either options seems to fix the issue of PowerShell Core Preview.3 not to start.

Read the Release Notes

PowerShell Core Version 6.2.0 Preview.3 – Release Notes. This release includes the “Experimental Features”. Go ahead, try it!  Be ahead of everyone with this new version.
For more information about PowerShell Core Experimental Features, check the PowerShell-RFC0029 document.

Please, any PowerShell Core issues can be reported in Github.

PowerShell Core 6.1.0 GA (Generally Available) for Anything Anywhere

Any System, Anywhere

Finally the next PowerShell Core GA (Generally Available) at: PowerShell Core 6.1.0. Thanks to the strong effort of both the Microsoft Team and the PowerShell Community has help reach this milestone achievement with the next generation of PowerShell.


Announcing PowerShell Core 6.1

Check Jeffrey Snover (Inventor of PowerShell) at MS Ignite 2018 comments about PowerShell (theCube-video)

PowerShell Core will continue to grow providing new features and performance improvements. This version is fully supported.

Anyone can join and contribute at the Microsoft PowerShell Team – Monthly PowerShell Community Call every third Thursday of the month.

To download and install PowerShell Core, go to their Github Repository.

Install Anywhere

Instructions on how to installed it are also available under Microsoft Documentation for both Windows and non-Window systems: MacOS, Ubuntu, Red Hat, CentOS, Fedora, and others Linux distributions.

For more information about installing PowerShell Core, check it out on Microsoft Doc site

For now, this next generation of PowerShell, Windows PowerShell Snap-ins are no longer supported, and the Out-Gridview cmdlet won’t work.

Reporting Issues

Any PowerShell Core feedback should be submitted to its Github repository. And, any Windows PowerShell issues need to be submitted to the UserVoice forum.

Check the Github PowerShell Core landing page, under the “Windows PowerShell vs PowerShell Core” section.

Modules Availability

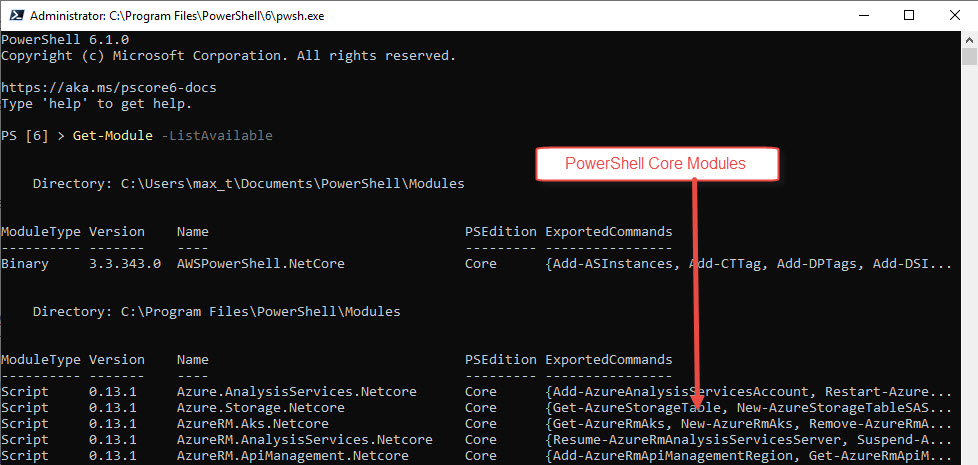
Only in Windows Systems, Windows PowerShell modules are also available for PowerShell Core. This means that you can open PowerShell Core console and use the existing Microsoft Windows PowerShell modules.
Now, there’s no excuses for not to try using PowerShell Core in Windows Systems.
In the PowerShell Core console, just execute the following command line to list all modules listed in Windows:

Get-Module -ListAvailable

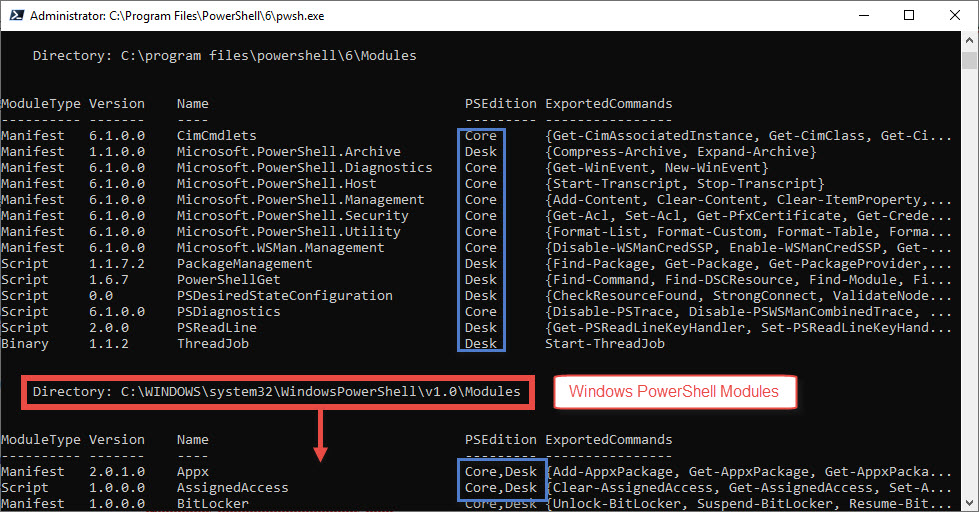
You’ll notice there’s a new column “PSEdition”, which identifies for which version of PowerShell the module will work:
1. Core – for PowerShell Core any system, any where.
2. Desk – for Windows PowerShell.
3. Core\Desk – for PowerShell Core and Windows.

PowerShell Modules location are listed:

1. Users Modules: C:\Users\max_t\Documents\PowerShell\Modules or C:\Users\max_t\Documents\WindowsPowerShell\Modules
2. General Modules for PowerShell Core: C:\Program Files\PowerShell\Modules or C:\program files\powershell\6\Modules
3. General use Modules for Windows PowerShell: C:\WINDOWS\system32\WindowsPowerShell\v1.0\Modules

Things are changing quickly in the PowerShell Gallery, which was recently update. Any PowerShell Module author has the responsibility to make the necessary update to their modules. Notice that some PowerShell Core modules are still labeled “Desk” when in fact should be both “Core\Desk”, like the “SQLServer” module.

Just make sure to check the module information for which version of PowerShell the module was created for.

Azure Cloud Shell GA (Generally Available)

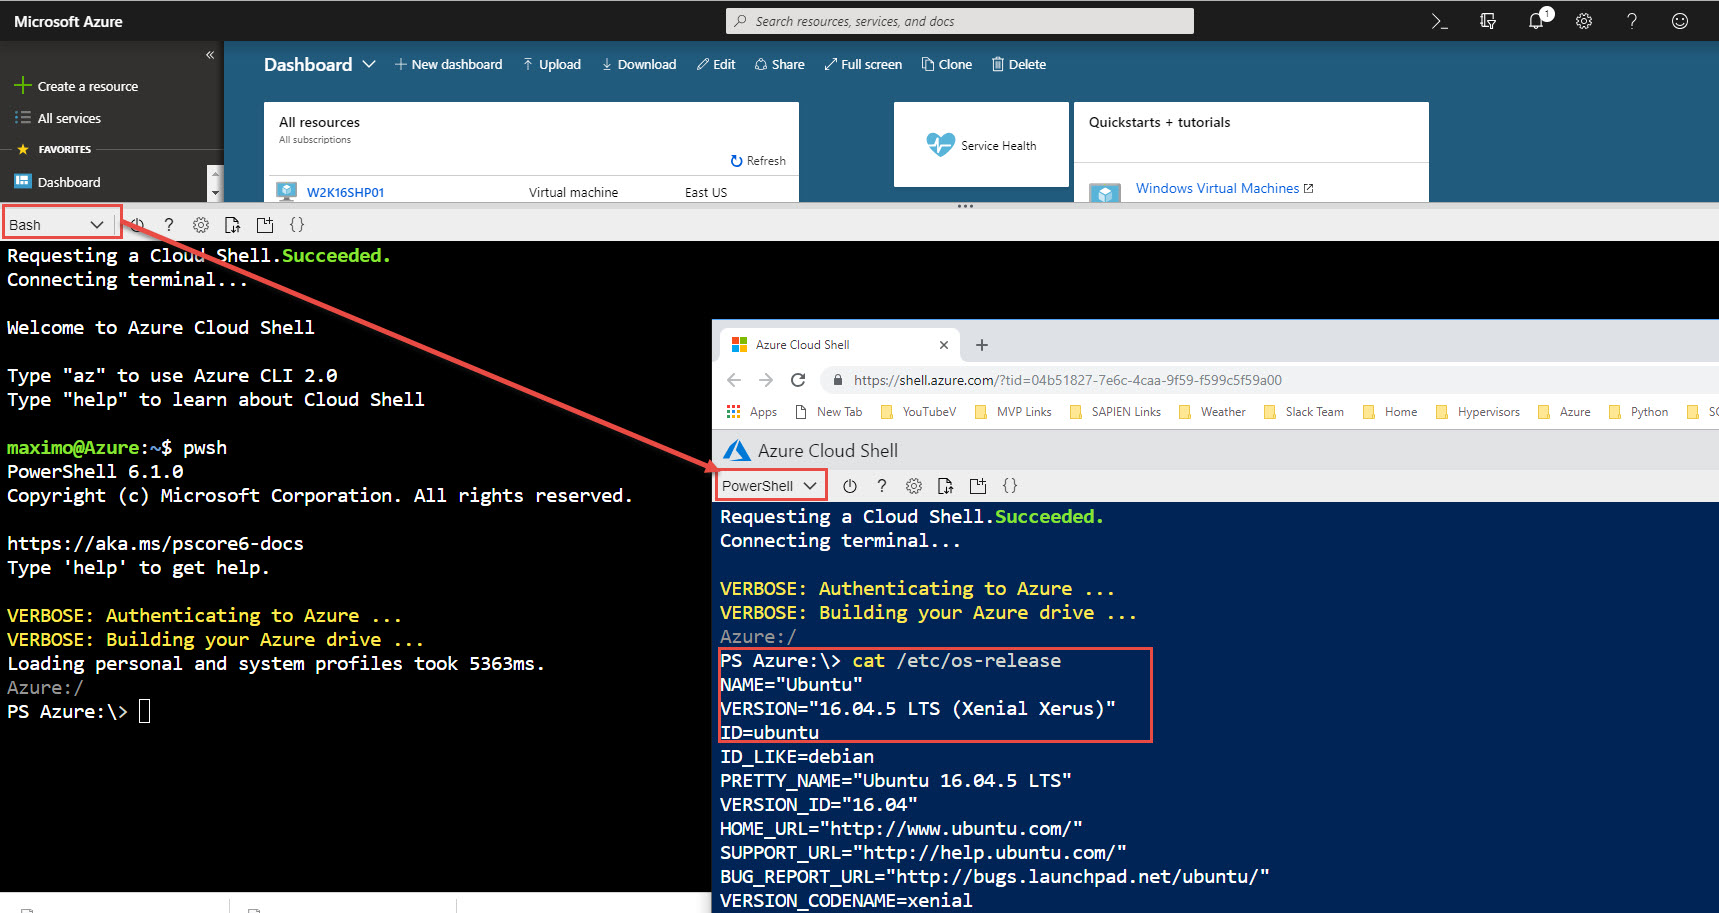
Yes! Microsoft Cloud Shell has been updated to have PowerShell Core 6.1.0 GA, and is on Linux.


This shows the commitment of having cloud reliable solutions running anywhere on any systems.

  • User either Bash or PowerShell in Linux
  • Drag/Drop files into the Browser session
  • AzureRM Module already installed and updated to latest version
  • AzureRM Modules build on .Net Core

In summary

  • PowerShell Core is the next iteration of PowerShell built using .NET Core
  • Run self-contained, side-by-side in Windows systems with Windows PowerShell
  • Cross-platform availability for managing Anything, Anywhere.
  • Microsoft Open Source and Community-support
  • Azure Cloud support

MS Ignite 2018 – PowerShell Videos

Here’s just a couple of interesting videos from the Microsoft Ignite 2018 event in Orlando about PowerShell Core:

Go ahead and try PowerShell Core 6.1 GA! Embrace the change!

Installing MS SQL Server in Ubuntu 18.04

This has been an issue for sometime until now. I found the following link that help me install SQL Server on the latest Ubuntu 18.04:

https://askubuntu.com/questions/1032532/how-do-i-install-ms-sql-for-ubuntu-18-04-lts

But, there are few missing steps which can help ease the burden of errors. At the same time, the information is a little out-dated.

But, it works with the following adjustments.

Please Understand!!  This is NOT approved by Microsoft.  Use this method for Test Only!!

Create Your Installation

The following instructions help you download and get the dpkg package ready for you Ubuntu 18.04 SQL Server installation:

  • Create the folders to extract, and make changes to repackage the dpkg SQL Server installation:
cd ${HOME} && mkdir -p tmp/mssql/newpkg/DEBIAN/ && cd tmp/mssql
  • Download the latest version of SQL Server dpkg to the current folder location: (dpkg SQLServer date: 20-Jun-2018 18:03)
wget https://packages.microsoft.com/ubuntu/16.04/mssql-server-2017/pool/main/m/mssql-server/mssql-server_14.0.3029.16-1_amd64.deb
  • Extract the dpkg package:
dpkg-deb -x mssql-server_14.0.3029.16-1_amd64.deb newpkg/
dpkg-deb -e mssql-server_14.0.3029.16-1_amd64.deb newpkg/DEBIAN/
  • Next step will change the OpenSSL version to avoid failure during SQL Server installation:
sed -i -e 's#openssl (<= 1.1.0)#openssl (<= 1.1.0g-2ubuntu4.1)#g' newpkg/DEBIAN/control
cat newpkg/DEBIAN/control | grep openssl
  • Next step it to Repackage the SQL Server installation:
sudo dpkg-deb -b newpkg/ 18.04-mssql-server_14.0.3029.16-1_amd64.deb

At this stage you could try to install SQL Server, but it might failed.  This is needed in order to check what dependencies are missing. Then, make the necessary dependencies installation.

Additional Steps

As of today, July 5th, I went thru a series of trial-and-error to get my SQL Server running on my Ubuntu 18.04.

After executing the following command:

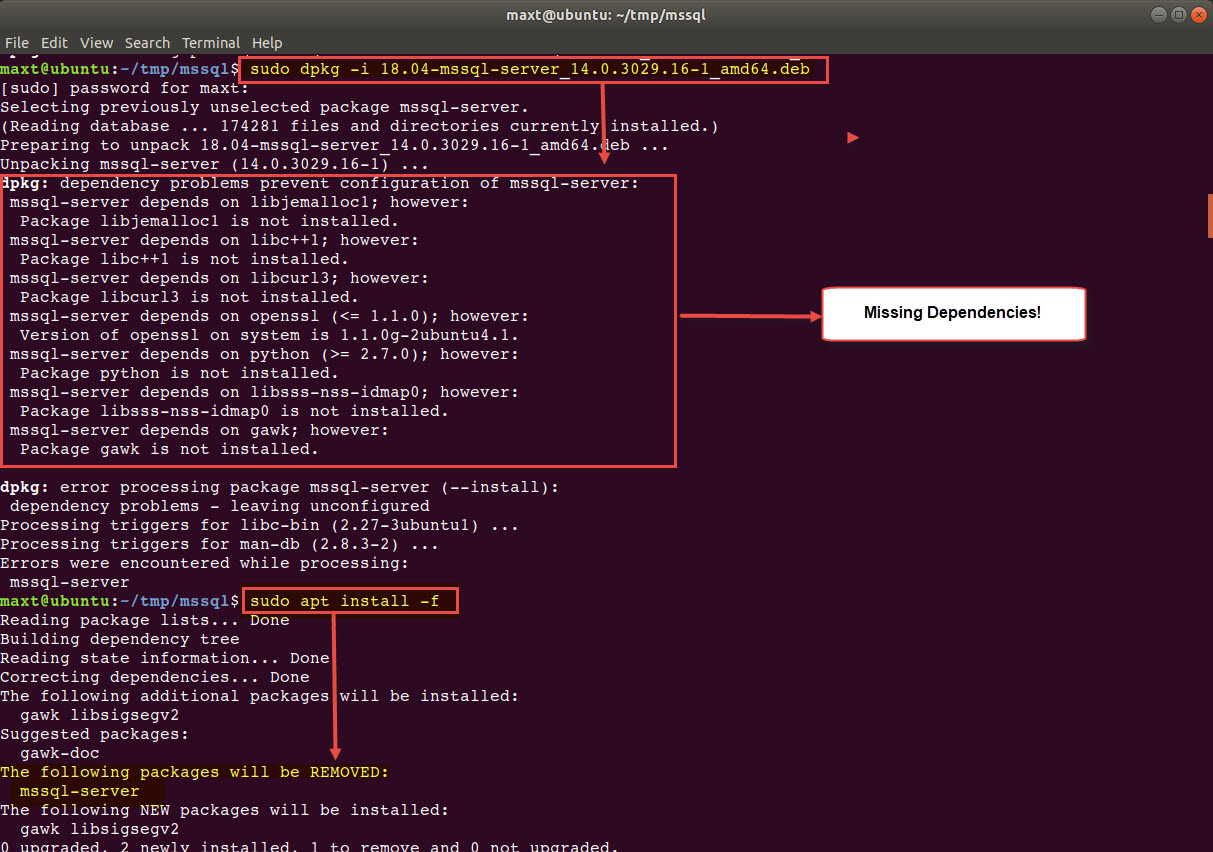
sudo dpkg -i 18.04-mssql-server_14.0.3029.16-1_amd64.deb

But, I got errors:

The following is the list of all my missing dependencies on Ubuntu 18.04 for the SQL Server installation:

dpkg: dependency problems prevent configuration of mssql-server:
mssql-server depends on libjemalloc1; however:
Package libjemalloc1 is not installed.
mssql-server depends on libc++1; however:
Package libc++1 is not installed.
mssql-server depends on libcurl3; however:
Package libcurl3 is not installed.
mssql-server depends on openssl (<= 1.1.0); however: Version of openssl on system is 1.1.0g-2ubuntu4.1. mssql-server depends on python (>= 2.7.0); however:
Package python is not installed.
mssql-server depends on libsss-nss-idmap0; however:
Package libsss-nss-idmap0 is not installed.
mssql-server depends on gawk; however:
Package gawk is not installed.

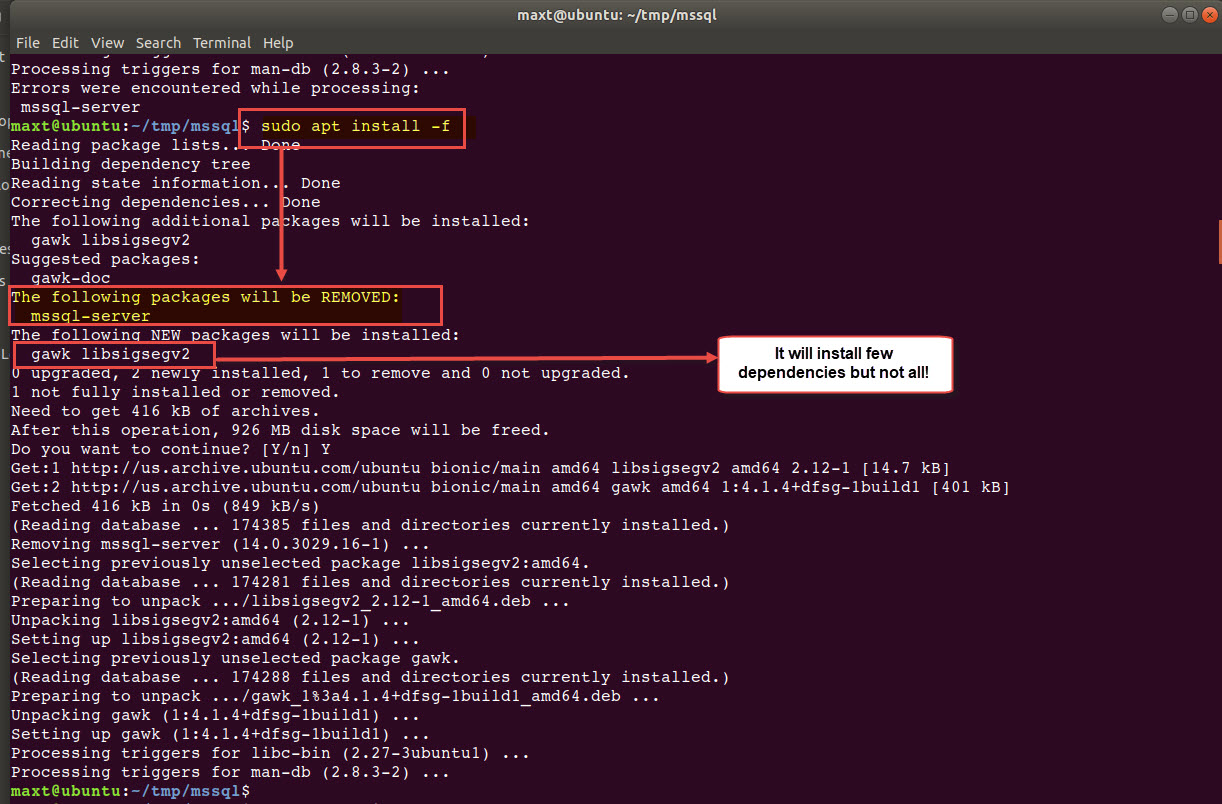
Now, one thing to understand, if you execute the following command:

sudo apt install -f

It will clear/remove SQL Server installation components, but it also try to install some, but not all of the dependencies.

As is shown in the image, only two of the listed dependencies were installed: “gawk“, and “libsigsegv2” (this one might be from another package not for SQLServer).

So, identifying the missing dependencies can alleviate the burden of more fail attempts to install SQLServer.

The following command will install all on the listed failed dependencies, excluding OpenSSL because another version is already installed.

## - Adding the missing dependencies:
sudo apt install python libjemalloc1 libc++1 libcurl3 libsss-nss-idmap0

After all the missing dependencies are installed than I can proceed to rerun the re-package SQL Server installation for my Ubuntu 18.04. By the way, I already took care of the OpenSSL in the “Create Your Installation” step where I change the version number.

About Python Dependency?

Yes! In Ubuntu 18.04, Python version 3.6.5 is the one installed with the OS. So, Python 2.7 is not installed.

Try running the command: python –version, then python3 –version at the Terminal Console.

In order to install SQL Server in Linux, it need Python 2.7 installed in order for the installation to work. This is why I included Python in the “sudo apt install …” command to be installed with the other missing dependencies.

Finally Ready

So, finally all the dependencies have been installed. Now, I can rerun the SQL Server installation:

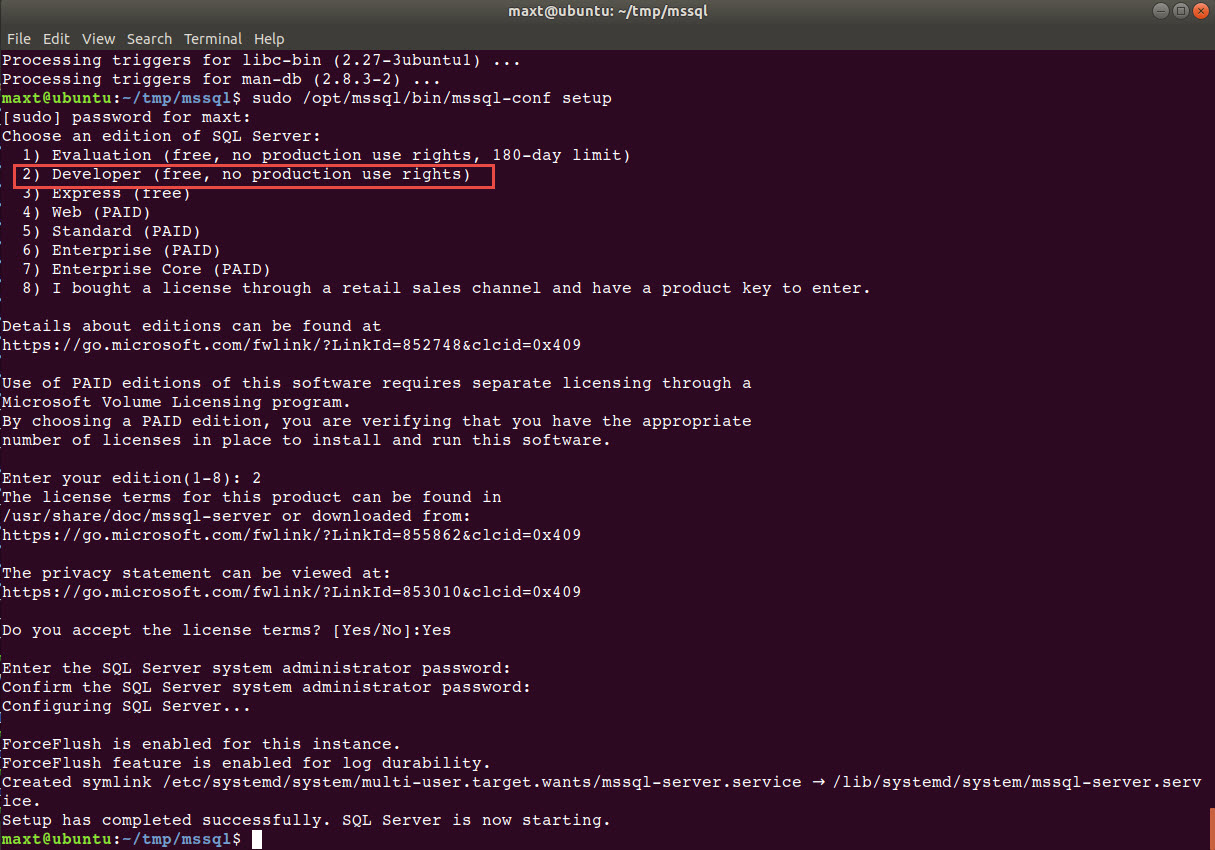
sudo dpkg -i 18.04-mssql-server_14.0.3029.16-1_amd64.deb

This time the installation completes without any error.

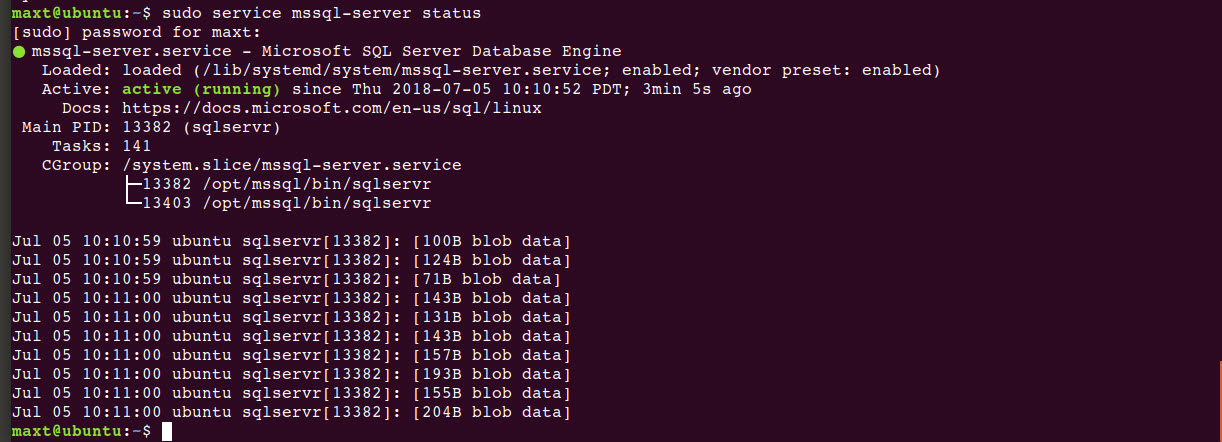
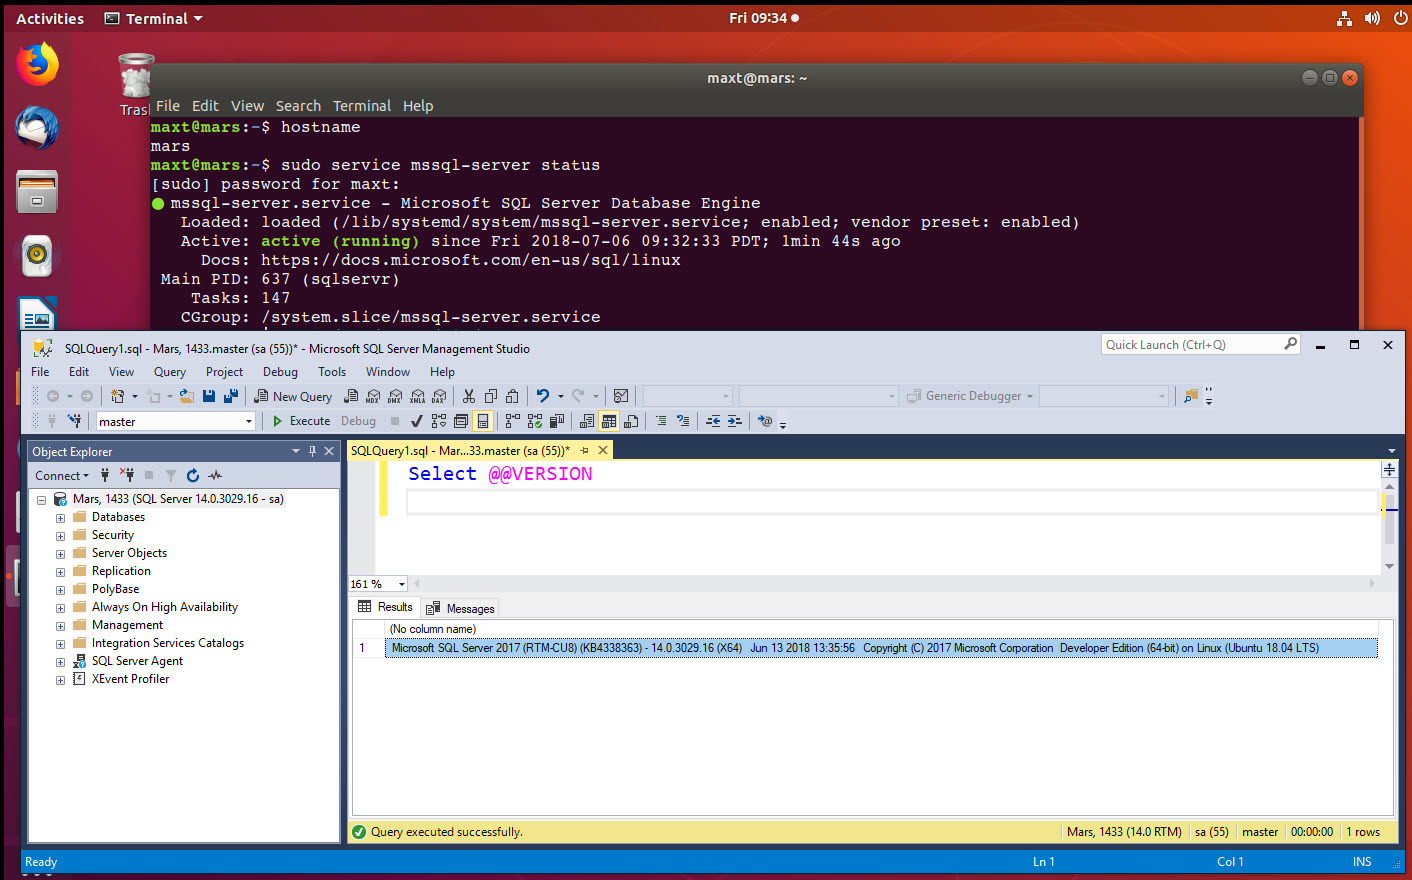
To verify that SQL Server is running, execute to following command:

sudo service mssql-server status

Next, verify from your Windows client and open SQL Server Management Studio to verify that the Ubuntu 18.04 SQL Server is accessible.

What’s Next?

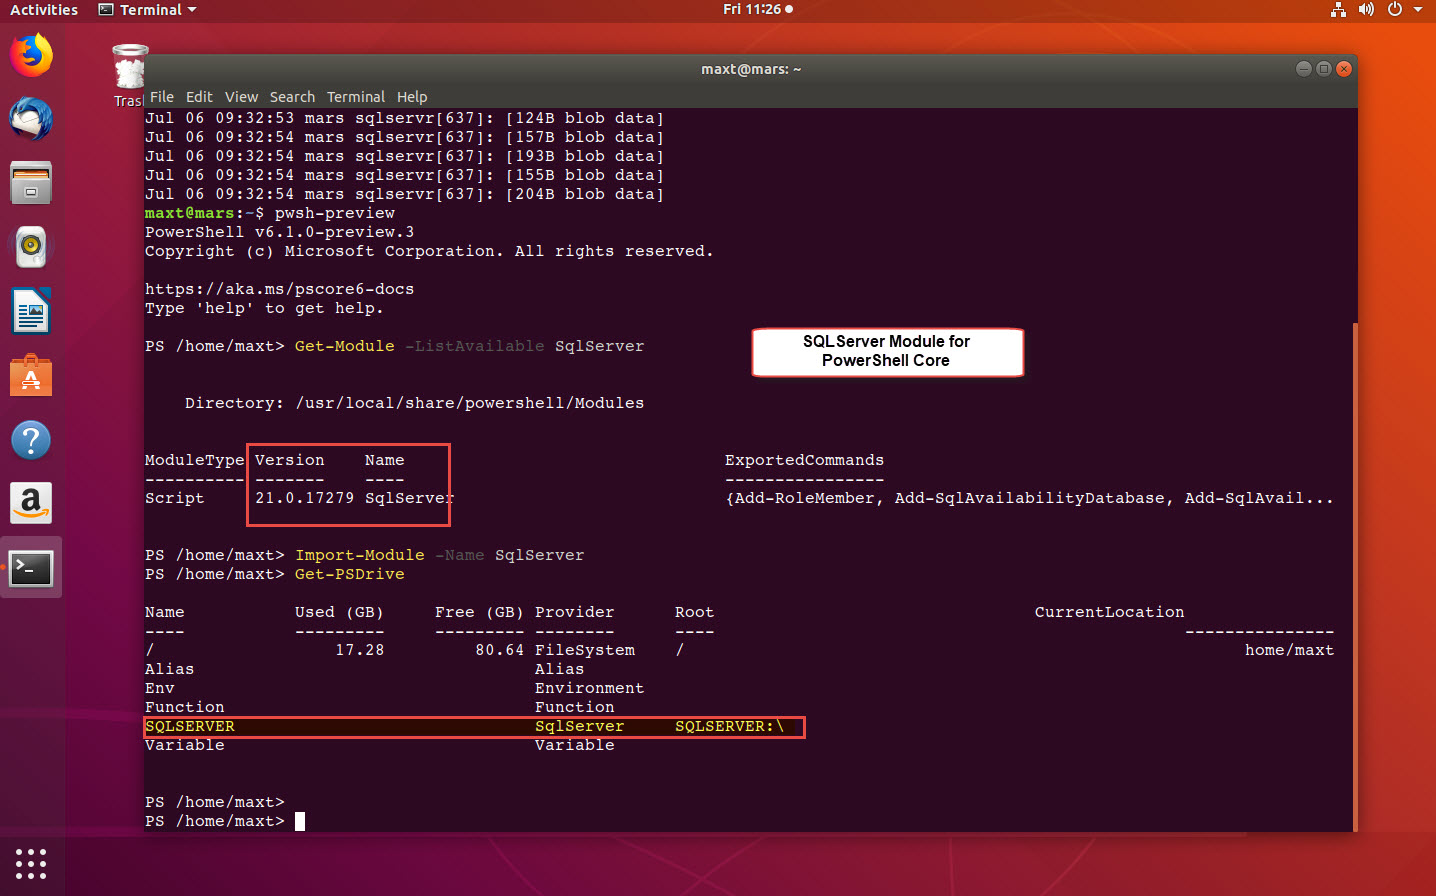
Well, if you got PowerShell Core installed, then get the SQLServer Module and start to play around working with both the available cmdlets and/or start coding SMO (SQL Server Management Object) PowerShell Core scripts.

Be creative!  Check out my previous blog post “PSCore6 – SQLServer Module Expanding The Barrier Cross-Platform” for more information.

In Summary

This is a hacking technique to be able to install SQL Server in Ubuntu 18.04.  This is not supported by Microsoft, but you will be able to make it work. Basically, is a matter of installing all the missing dependencies, and change the package required OpenSSL version number to the one installed in Ubuntu 18.04.  Then, repackaging the SQL Server installation dpkg file will allow the installation to work.

Special Thanks to the contributor in the UbuntuAsk forum, as without it I won’t have figured out, and made it work


Windows 10 Insider Build 17704 missing PowerShell PSReadLine Module

There has been some noise around “Whatever happened to PSReadLine on this build?“. Well, its a very vague comment. And, due to I’ve been working more with PowerShell Core then I’m starting to stop paying attention to Windows PowerShell.

What did happened with Build 17704?

OK!! So, Windows PowerShell in Build 17704 is missing the PSReadLine Module. So, the workaround is simple to download it from the PowerShell Gallery.

Except! That you need version 2.0.0 (not 1.2).

Check the link: https://www.powershellgallery.com/packages/PSReadLine/2.0.0-beta2

This is good thing because you can install and uninstall module when version 2.0.0 final release get published.
You don’t want to use version 1.2.

Installing PSReadLine in Windows PowerShell

The following command will install the 2.0.0-beta2:

Install-Module -Name PSReadLine -AllowPrerelease -Repository PSGallery

I’m hoping this will help!


There’s no issues with PowerShell Core and PSReadLine Module!


PSCore6 – Creating a Hybrid Cross-platform SQLServer Script

There’s some discussion around scripting on using Windows PowerShell vs PowerShell Core. So, just pick one? No.
Just think about supporting a cross-platform environment. Use both!

Following my recent post on “PSCore6 – SQLServer Module Expanding The Barrier Cross-Platform“, here’s a sample Hybrid-Script for cross-platform use.

Why not!

We all know the next generation (or evolution) of PowerShell is PowerShell Core. That’s it!
You are still using PowerShell, and Windows PowerShell is not going to be dropped nor removed any time soon.

So, why not start working towards, what I call, “Hybrid-scripting”? Powershell Core provides the necessary elements to help with cross-platform scripting.

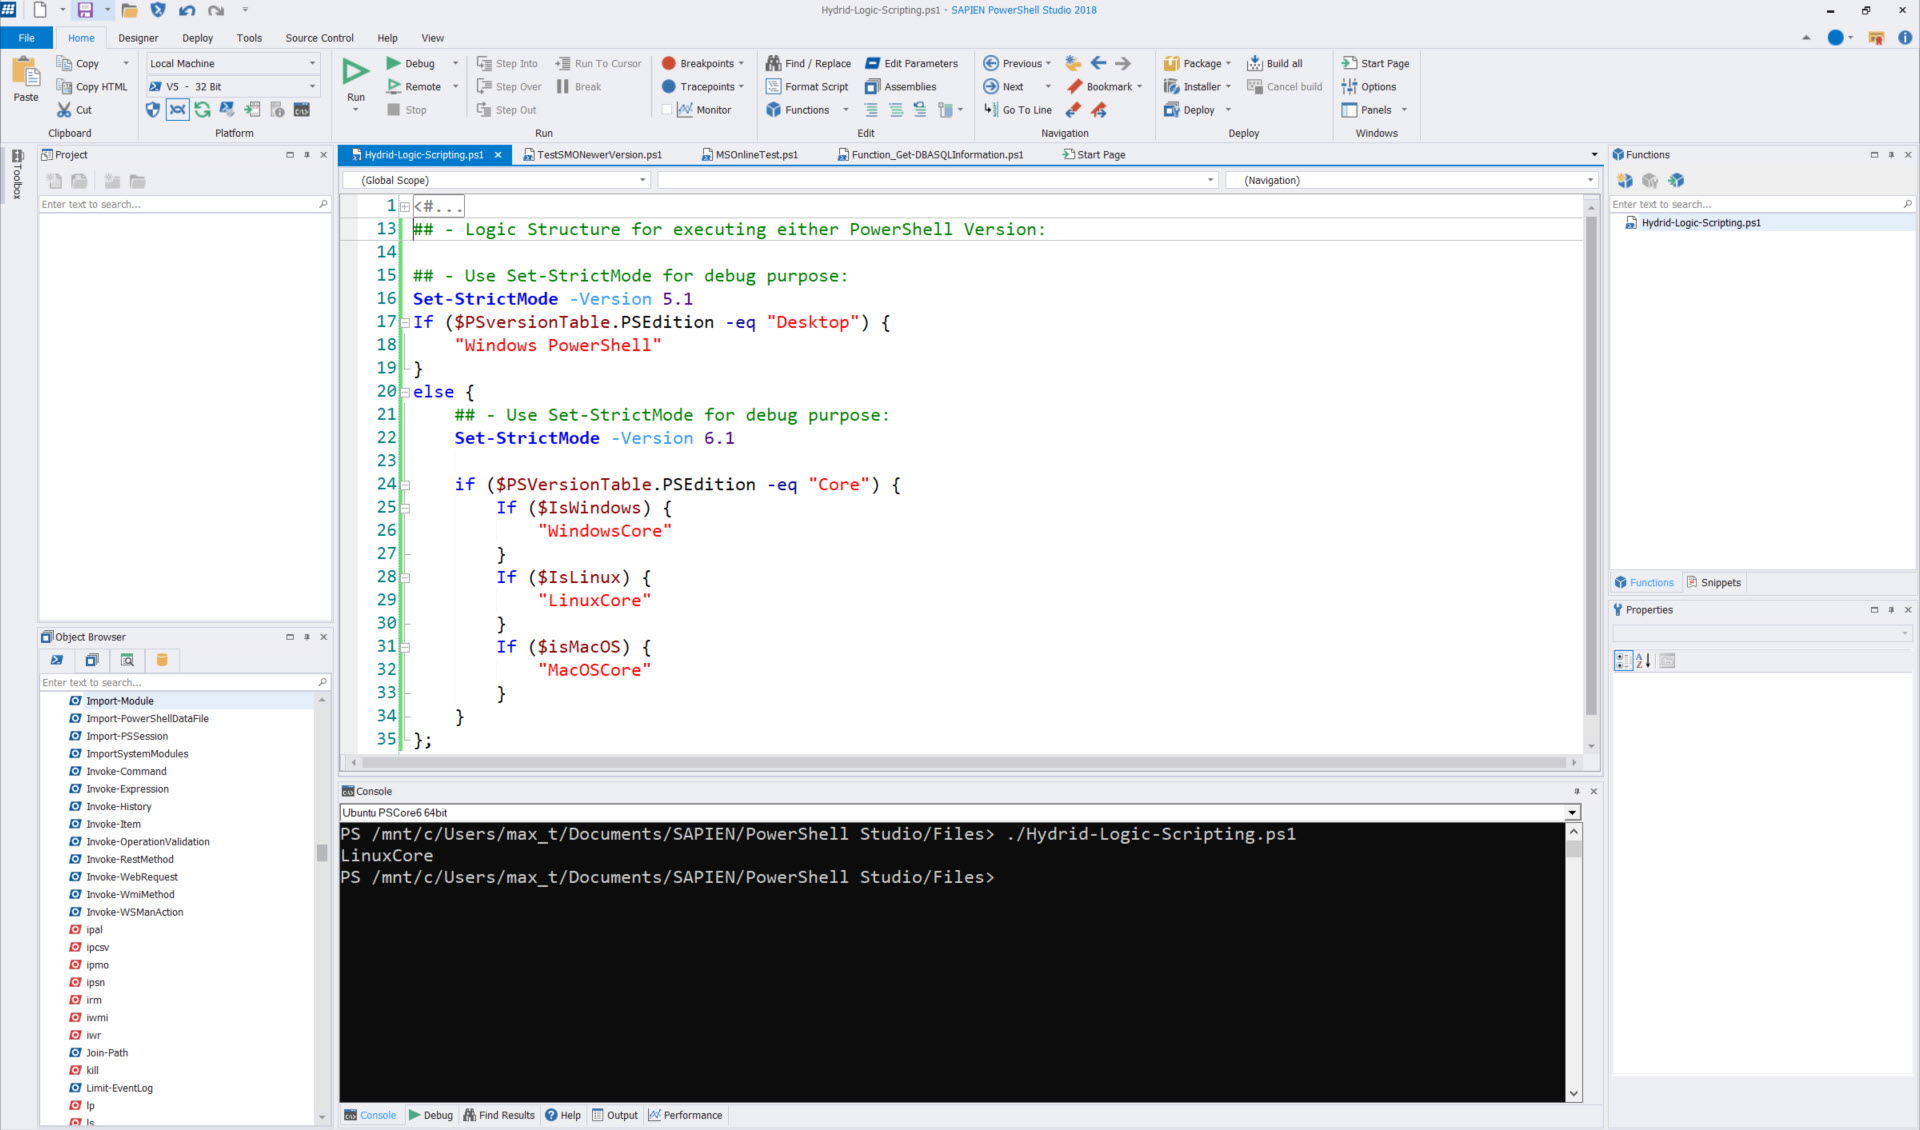
In it’s basic code form, could look be something like this:

[sourcecode language=”powershell”]

## – Logic Structure for executing either PowerShell Version:

## – Use Set-StrictMode for debug purpose:
Set-StrictMode -Version 5.1

If ($PSversionTable.PSEdition -eq "Desktop") {
"Windows PowerShell"
}
else {
## – Use Set-StrictMode for debug purpose:
Set-StrictMode -Version 6.1

if ($PSVersionTable.PSEdition -eq "Core") {
If ($IsWindows) {
"WindowsCore"
}
If ($IsLinux) {
"LinuxCore"
}
If ($isMacOS) {
"MacOSCore"
}
}
};

[/sourcecode]

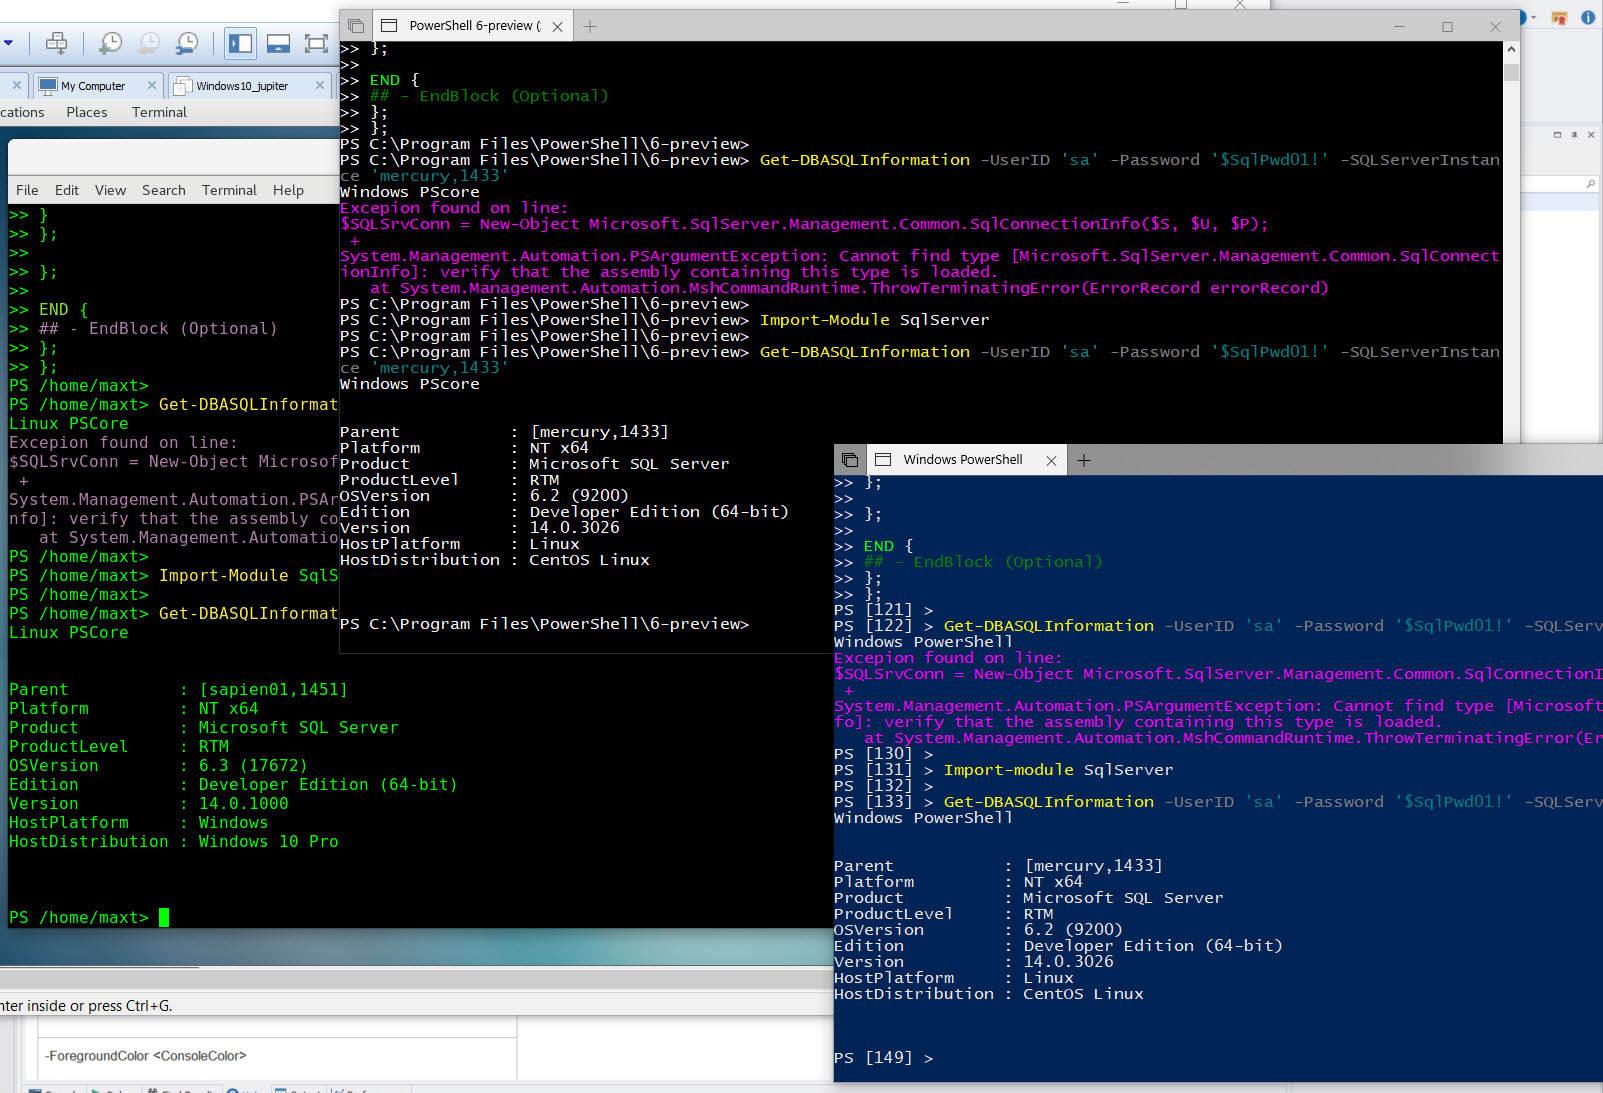
Now, let’s apply this code to a practical sample.

Sample Hybrid-Script

In the following sample script, includes Help information, begin-process-end and with try-catch code structure.
At the same time, the script will output the exception to the screen console with the failed line.

Script function name: Get-DBASQLInformation

[sourcecode language=”powershell”]
Function Get-DBASQLInformation {</pre>
<#
.SYNOPSIS
This is a cross-platform function to Get SQL Server Information.

.DESCRIPTION
This is a cross-platform function to Get SQL Server Information using SQL Authentication.

.PARAMETER UserID
Enter SQL Authentication UserID parameter.

.PARAMETER Password
Enter SQL Authentication Password parameter.

.PARAMETER SQLServerInstance
Enter SQLServerInstance name parameter.

.EXAMPLE
PS> Get-DBASQLInformation -UserID ‘sa’ -Password ‘$SqlPwd01!’ -SQLServerInstance ‘mercury,1433’

.NOTES
===========================================================================
Created with: SAPIEN Technologies, Inc., PowerShell Studio 2018 v5.5.152
Created on: 5/25/2018 8:27 AM
Created by: Maximo Trinidad
Organization: SAPIEN Technologies, Inc.
Filename: Function_Get-DBASQLInformation.ps1
===========================================================================
#>
<pre>[CmdletBinding()]
[OutputType([psobject])]
param
(
[Parameter(Mandatory = $true,
Position = 0)]
[string]
$UserID,
[Parameter(Mandatory = $true,
Position = 1)]
[string]
$Password,
[Parameter(Mandatory = $true,
Position = 2)]
[string]
$SQLServerInstance
)

BEGIN {

## – Internal function:
function GetSqlInfo {
param
(
[parameter(Mandatory = $true, Position = 0)]
[string]
$U,
[parameter(Mandatory = $true, Position = 1)]
[string]
$P,
[parameter(Mandatory = $true, Position = 2)]
[string]
$S
)
Try {
## – Prepare connection passing credentials to SQL Server:
$SQLSrvConn = New-Object Microsoft.SqlServer.Management.Common.SqlConnectionInfo($S, $U, $P);
$SQLSrvObj = new-object Microsoft.SqlServer.Management.Smo.Server($SQLSrvConn);

## – SMO Get SQL Server Info:
$SQLSrvObj.Information `
| Select-Object parent, platform, product, productlevel, `
OSVersion, Edition, version, HostPlatform, HostDistribution `
| Format-List;

}
catch {
## – Write Exception to Console:
Write-Host `
"Excepion found on line:`r`n$($error[0].InvocationInfo.line)"+ `
"`r`n$($Error[0].Exception)" `
-ForegroundColor Magenta;

}
}

};

PROCESS {

## – Cross-platform logic:
If ($PSversionTable.PSEdition -eq "Desktop") {
Write-Host "Windows PowerShell"
GetSqlInfo -U $UserID -P $Password -S $SQLServerInstance;
}
else {

if ($PSVersionTable.PSEdition -eq "Core") {
If ($IsWindows) {
Write-Host "Windows PScore";
}
If ($IsLinux) {
Write-Host "Linux PSCore";
}
If ($isMacOS) {
Write-Host "MacOS PSCore";
}
## – execute on non-Windows:
GetSqlInfo -U $UserID -P $Password -S $SQLServerInstance;
}
};

};

END {
## – EndBlock (Optional)
};
};

[/sourcecode]

The heart of the code are stored in the “Begin” section as a Internal-Function GetSQLInfo(). The internal-function will be only executed if it the criteria for each of the different platforms. The Try-Catch is just to trap the error if the SMO connection failed, or to indicate the SMO .NET wasn’t loaded.

Go ahead! Create a script file, copy/paste this code, and load this function. Give it a try cross-platforms: Windows, Linux, and MacOS.

Remember, SQLServer module is a replacement for SQLPS module. I won’t recommend having both modules installed unless you use the namespace_module/cmdlet to identify which module is going to execute the cmdlet.

So make sure to always test your scripts.

What’s Next!

This function still need to worked on, but is functional enough to test-drive and see the results. So, it be modified to support Windows Authentication. Once you start scripting and building functions, you won’t stop thinking what else can be added.

Just keep working on it and learning from the PowerShell Community.

Go Bold! Learn PowerShell Core!

PSCore6 – SQLServer Module Expanding The Barrier Cross-Platform

If you haven’t heard yet! The SQLServer Module is available for Windows, Linux, and MacOS. Yes!
And, with it,now you can even expand your scripting using .NET SQL Server Management Objects to manage your SQL Server Engine cross-platform.

How to get it!

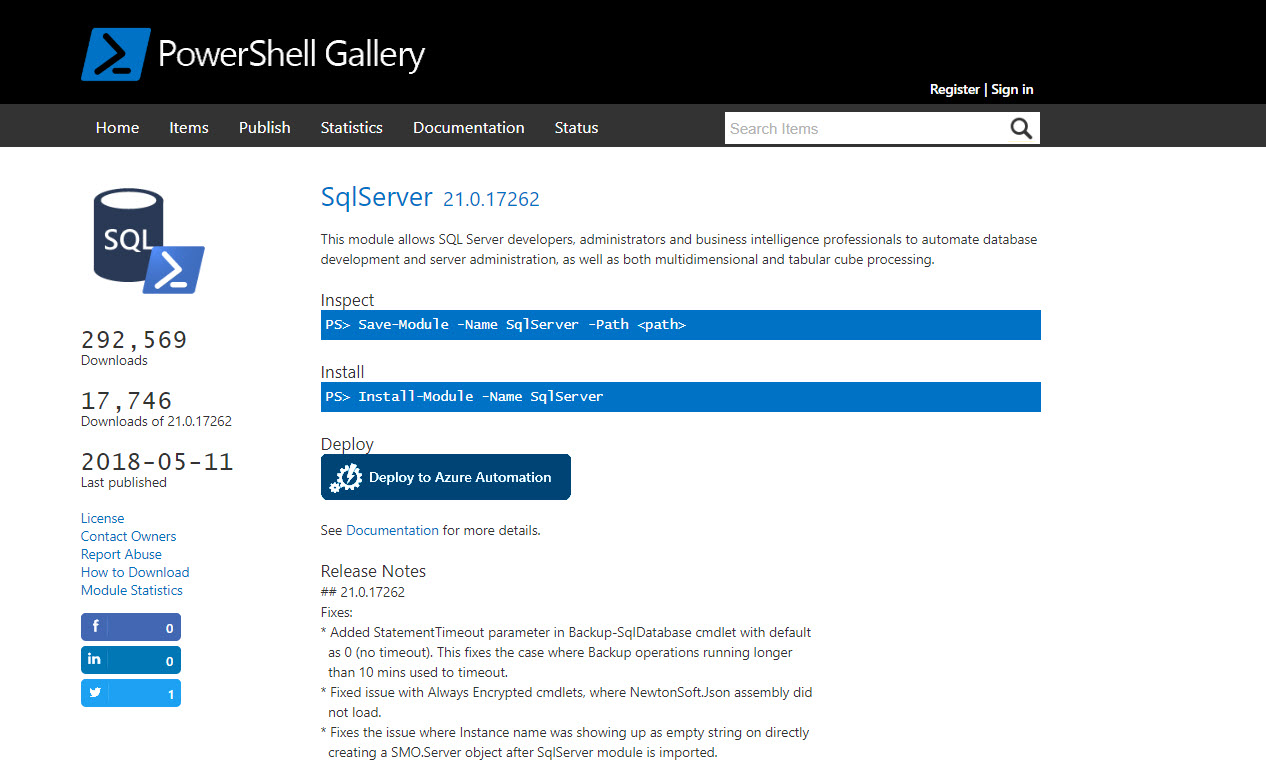
It’s available in PowerShell Galley. Just run the following command to install the module in Windows PowerShell and PowerShell Core.
Yes, you read it! Install in PowerShell Core for Windows, Linux, and MacOS.

[sourcecode language=”powershell”]

Install-Module -Name SQLServer -Force -Scope AllUsers

[/sourcecode]

What’s in it?

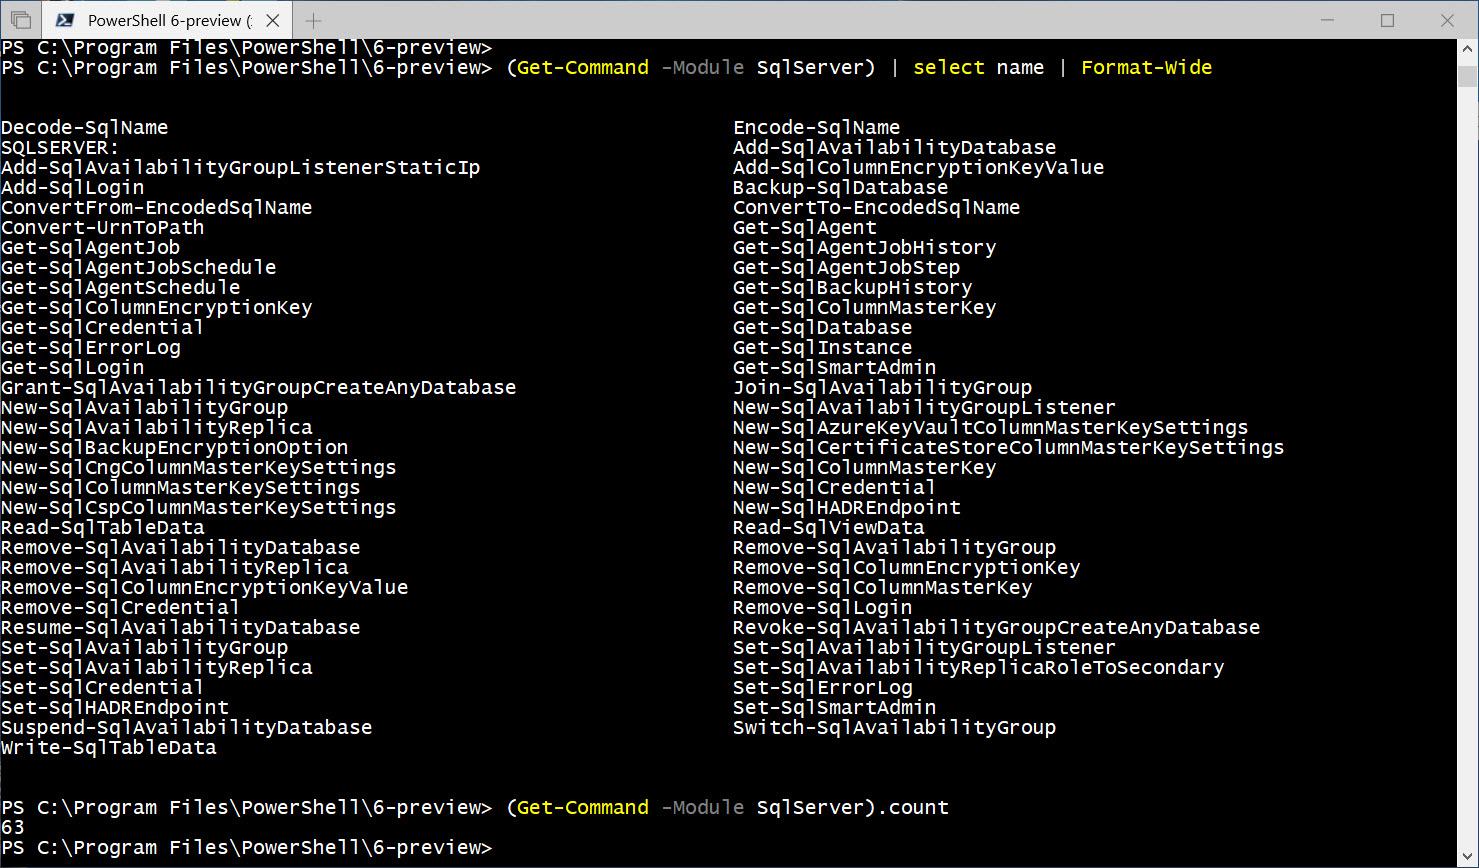
Contains all of the SQL Server Management Objects .NET assemblies that will work in both Windows and non-Windows Systems. At the same time, it contains a total of 63 commands. This will support all existing SQL Server 2017(and older) on your network. Of course, there will be some limitations because there might be some features lacking in older features. But, for most use it will work.

It also includes the ability to provision the SQLSERVER: drive when you import the module.

[sourcecode language=”powershell”]

Import-Module SQLServer

Get-PSDrive

[/sourcecode]

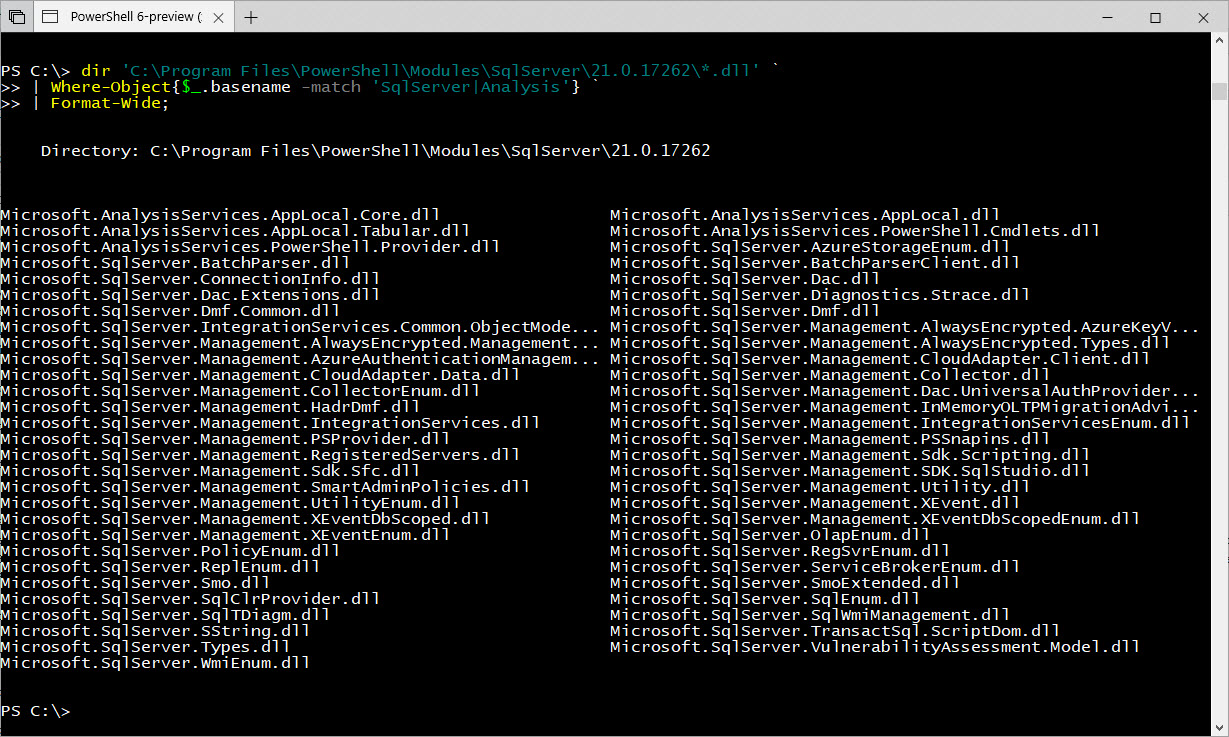
If you care for what SMO .NET Assemblies are installed, execute the following commands:

[sourcecode language=”powershell”]

## – Get the SQLServer Module path:
(Get-MOdule -ListAvailable SQLServer).path

## – List of all SQLServer and Analysis Services DLL’s:
dir ‘C:\Program Files\PowerShell\Modules\SqlServer\21.0.17262\*.dll’ `
| Where-Object{$_.basename -match ‘SqlServer|Analysis’} `
| Format-Wide;

## Linux CentOS – Total of SQLServer and Analysis Services DLL’s:
(Get-ChildItem ‘/usr/local/share/powershell/Modules/SqlServer/21.0.17262/*.dll’ `
| Where-Object{ $_.basename -match ‘SqlServer|Analysis’ }).count

[/sourcecode]

Using the SQLServer: Drive

Although, I’m not a fan of using SQLServer: drive. This will allow you to navigate thru the SQL Engine like a file system from the console prompt.

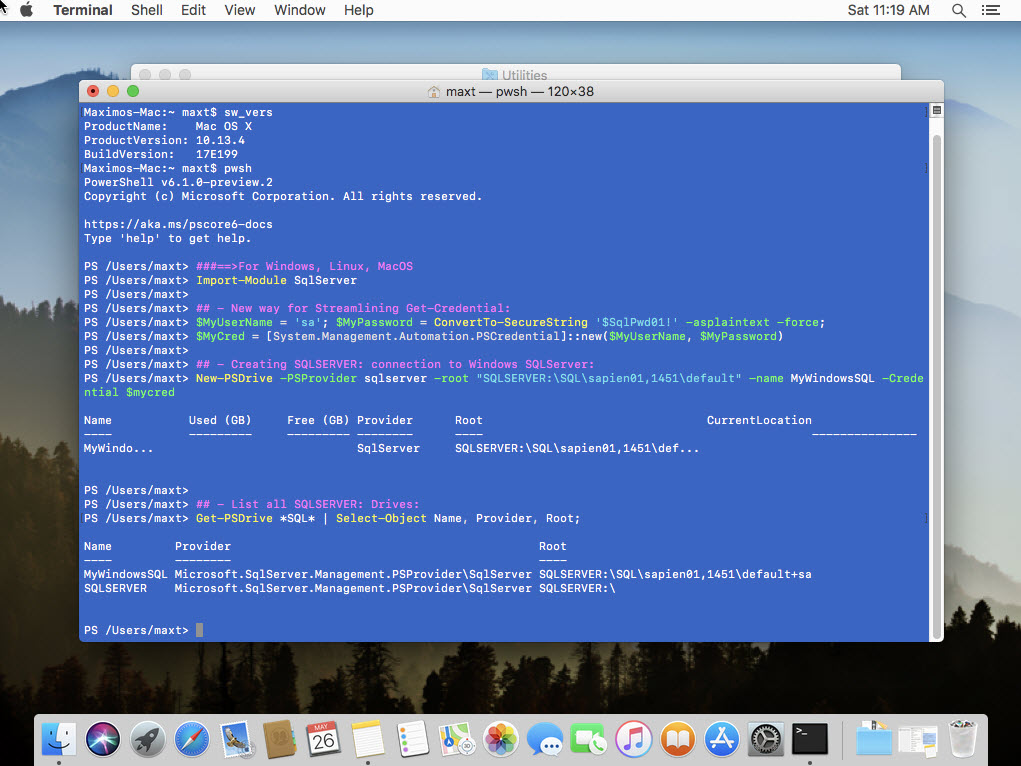
In order to use the drive, it need to be recreated with the proper credentials for cross-platform use.
Below steps will create additional SQLServer: drives to another SQLServer on the *network.

[sourcecode language=”powershell”]
###==>For Windows, Linux, MacOS
Import-Module SqlServer

## – New way for Streamlining Get-Credential:
$MyUserName = ‘sa’; $MyPassword = ConvertTo-SecureString ‘$SqlPwd01!’ -asplaintext -force;
$MyCred = [System.Management.Automation.PSCredential]::new($MyUserName, $MyPassword)

## – Creating SQLSERVER: connection to Windows SQLServer:
New-PSDrive -PSProvider sqlserver -root “SQLSERVER:\SQL\sapien01,1451\default” -name MyWindowsSQL -Credential $mycred

## – List all SQLSERVER: Drives:
Get-PSDrive *SQL* | Select-Object Name, Provider, Root;

[/sourcecode]


Note: In this example, I’m using SQL Authentication.

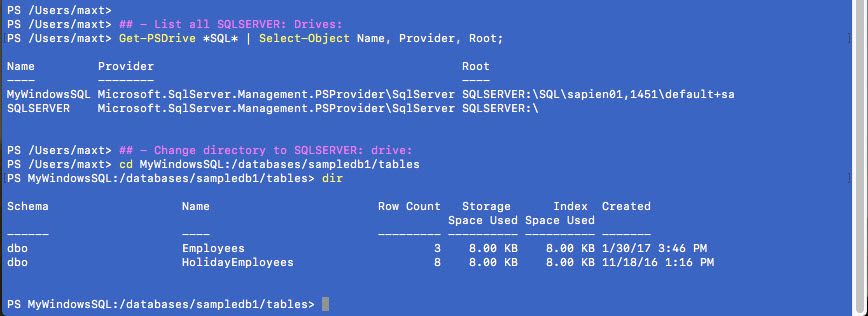
Now, I can navigate thru my SQLServer objects like a filesystem.

[sourcecode language=”powershell”]

## – Change directory to SQLSERVER: drive:
cd MyWindowsSQL:/databases/sampledb1/tables
dir

[/sourcecode]

Wait! Did you notice I’ve created a SQLServer Drive in MacOS? This is Awesome!
By the way, there’s no Docker involved in here. The fun doesn’t stop here!

What about using SMO scripting?

If anyone have been following me recently, everytime I’ve created the SMO script, I always have to load the assemblies before I can connect to the SQLServer.

[sourcecode language=”powershell”]

## – When using the ‘Microsoft.SqlServer.SqlManagementObjects’package installed from Nuget
## – Help find and save the location of the SMO dll’s in a PowerShell variable: ver.14.17224
$smopath = Join-Path ((Get-Package Microsoft.SqlServer.SqlManagementObjects).Source `
| Split-Path) (Join-Path lib netstandard2.0);

# Add types to load SMO Assemblies only:
Add-Type -Path (Join-Path $smopath Microsoft.SqlServer.Smo.dll);
Add-Type -Path (Join-Path $smopath Microsoft.SqlServer.ConnectionInfo.dll);

[/sourcecode]

The above code is not needed if the SQLServer module had been previously imported.
This way you will code less.

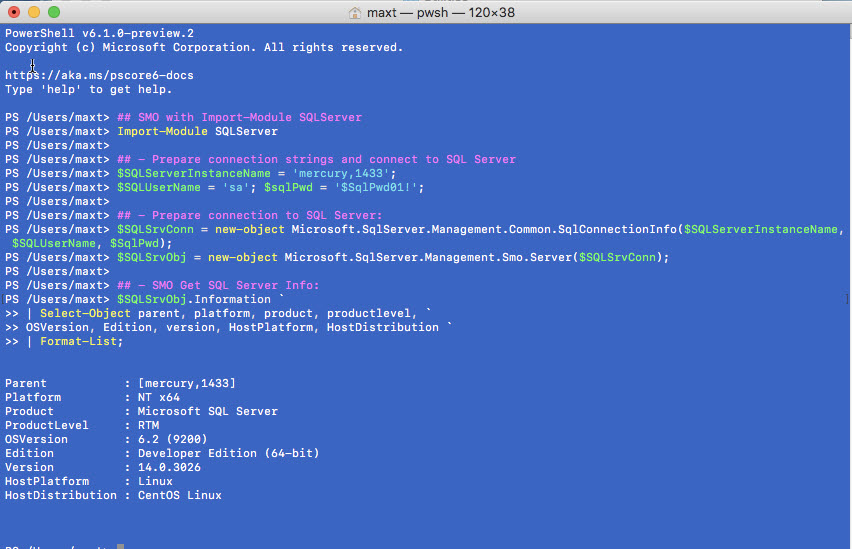
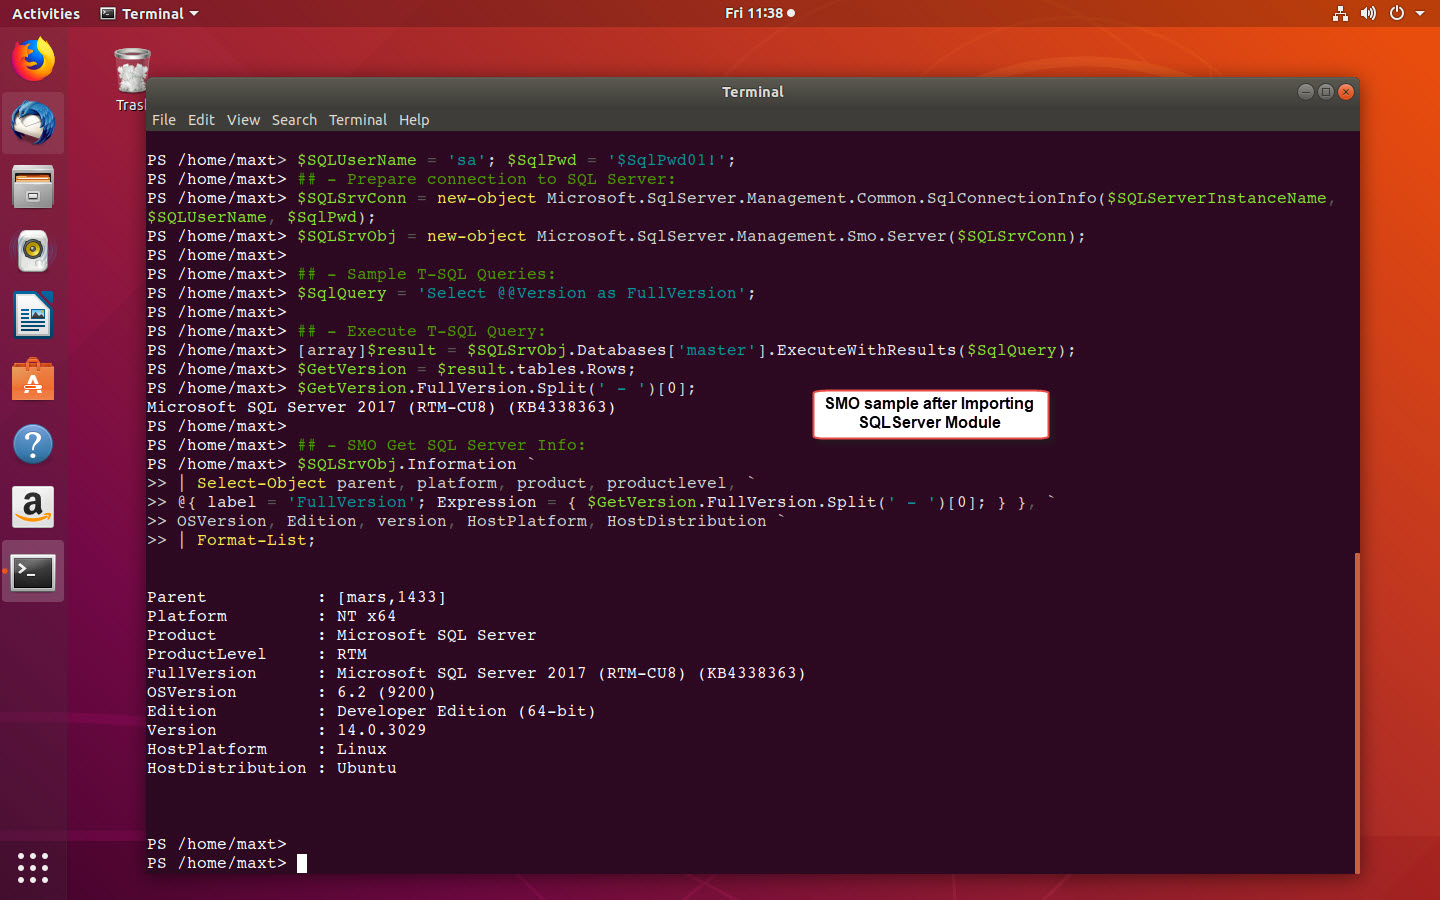
Here’s a small SMO script example for getting SQLServer information using SQL Authentication:

[sourcecode language=”powershell”]

## SMO with Import-Module SQLServer
Import-Module SQLServer

## – Prepare connection strings and connect to SQL Server
$SQLServerInstanceName = ‘mercury,1433’;
$SQLUserName = ‘sa’; $sqlPwd = ‘$SqlPwd01!’;

## – Prepare connection to SQL Server:
$SQLSrvConn = new-object Microsoft.SqlServer.Management.Common.SqlConnectionInfo($SQLServerInstanceName, $SQLUserName, $SqlPwd);
$SQLSrvObj = new-object Microsoft.SqlServer.Management.Smo.Server($SQLSrvConn);

## – SMO Get SQL Server Info:
$SQLSrvObj.Information `
| Select-Object parent, platform, product, productlevel, `
OSVersion, Edition, version, HostPlatform, HostDistribution `
| Format-List;

[/sourcecode]

As you can see, there’s no reason why not try and experiment using PowerShell Core with SQL Server.  Next blog post I’ll be creating this script code in the hybrid-script function that can be executed cross-platform. I mean, on any PowerShell version too.

What’s in the future!

Now that PowerShell SQLServer Module is available cross-platform, I will see others Community SQL modules (DBATools, DBAReports) making their way to PowerShell Core. Of course, it will take some before it becomes available!

In the meantime, you can use SMO to build your own PowerShell SQL Scripts. Why not! Go and Expand your horizon!!

Be Bold! Learn PowerShell Core!

PSCore6 – Export-CSV cmdlet difference

Yes! There’s a change, and is a good one. While checking out some recent blog post on Export-Csv command, I took it a little further. And, I ended up finding that the parameters have change in this cmdlet.

Difference

Export-Csv – Windows Powershell parameter names:

[sourcecode language=”powershell”]
((Get-help Export-Csv).Parameters).parameter.name
Append
Confirm
Delimiter
Encoding
Force
InputObject
LiteralPath
NoClobber
NoTypeInformation
Path
UseCulture
WhatIf

[/sourcecode]

Export-Csv – PowerShell Core parameter names:

[sourcecode language=”powershell”]
((Get-help Export-Csv).Parameters).parameter.name
Append
Confirm
Delimiter
Encoding
Force
IncludeTypeInformation
InputObject
LiteralPath
NoClobber
NoTypeInformation
Path
UseCulture
WhatIf

[/sourcecode]

Notice in PowerShell Core, there’s a new parameter: “-IncludeTypeInformation“.

Our prayer answered!

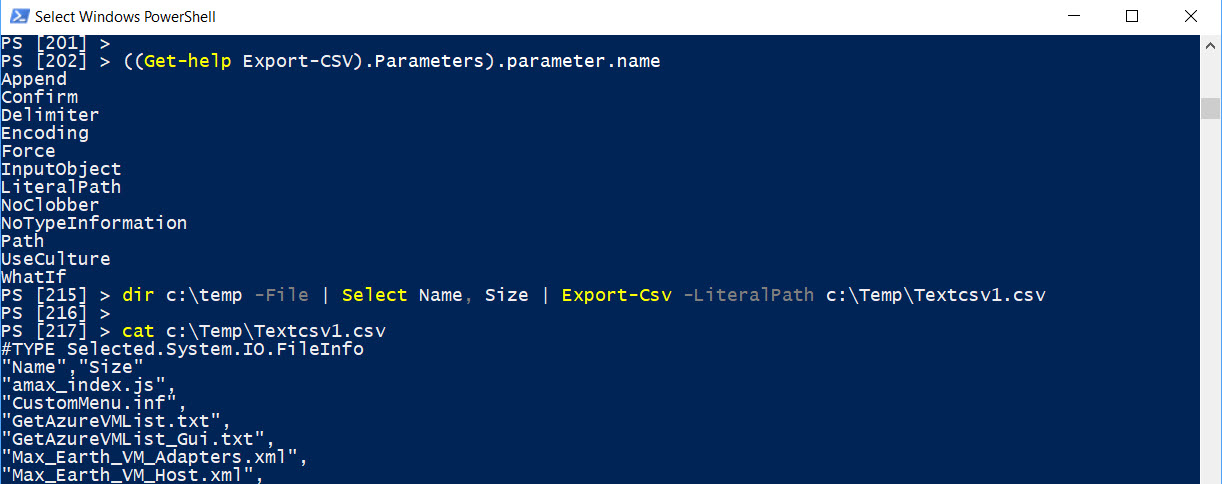
For a long time, in Windows PowerShell, we had to add the parameter “-NoTypeInformation“, so the “#TYPE …” line on the first row of the *CSV would not be included.

So, in Windows PowerShell executing the command without the “-NoTypeInformation” parameter, will produce the following result:

Now, using the same command in PowerShell Core without the “-NoTypeInformation” parameter, will produce a different result:

Moving forward with PowerShell, there’s no need to include the “-NoTypeInformation” parameter. Apparently, seems like the “-NoTypeInformation” parameter is the default when is not use in the cmdlet. So, no changes are needed to any previous developed scripts.

Clean Data

There is one thing we’ve learn thru time, is to always provide clean data. Knowing that a *CSV file is a text data set with columns and rows, always provide the columns name(s). This way the data structure looks nice and well defined.

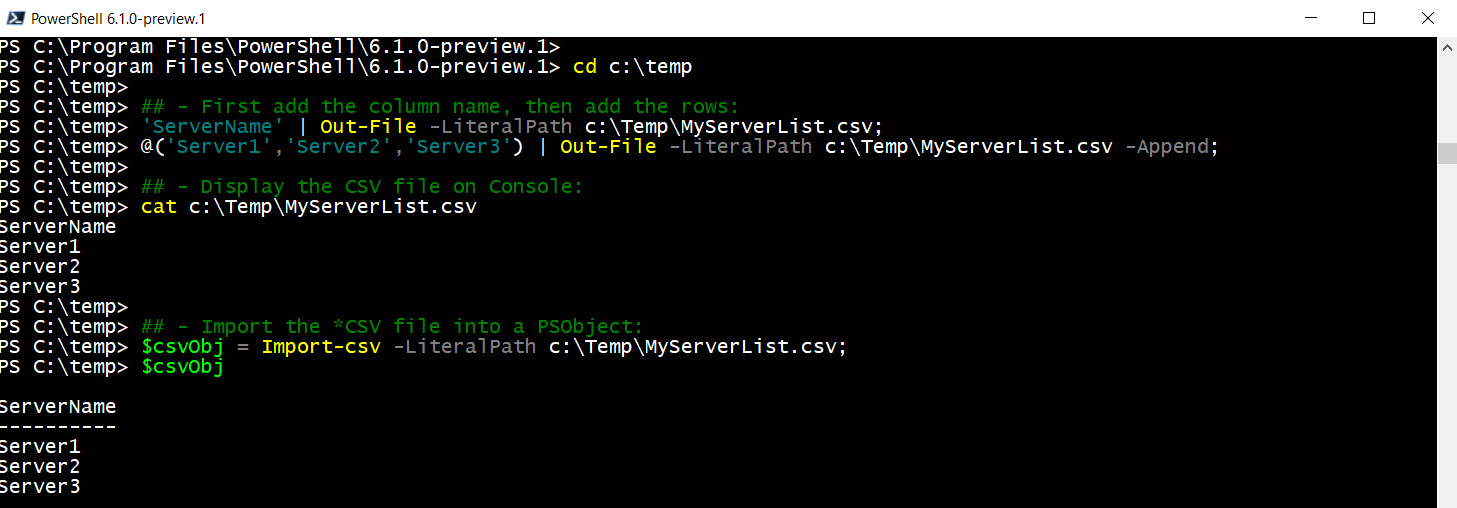
Here’s just an example of how to manually create a one column list: (PowerShell Core)

[sourcecode language=”powershell”]
## – First add the column name, then add the rows:
‘ServerName’ | Out-File -LiteralPath c:\Temp\MyServerList.csv;
@(‘Server1′,’Server2′,’Server3’) | Out-File -LiteralPath c:\Temp\MyServerList.csv -Append;

## – Display the CSV file on Console:
cat c:\Temp\MyServerList.csv

## – Import the *CSV file into a PSObject:
$csvObj = Import-Csv -LiteralPath c:\Temp\MyServerList.csv;
$csvObj

ServerName
———-
Server1
Server2
Server3
[/sourcecode]

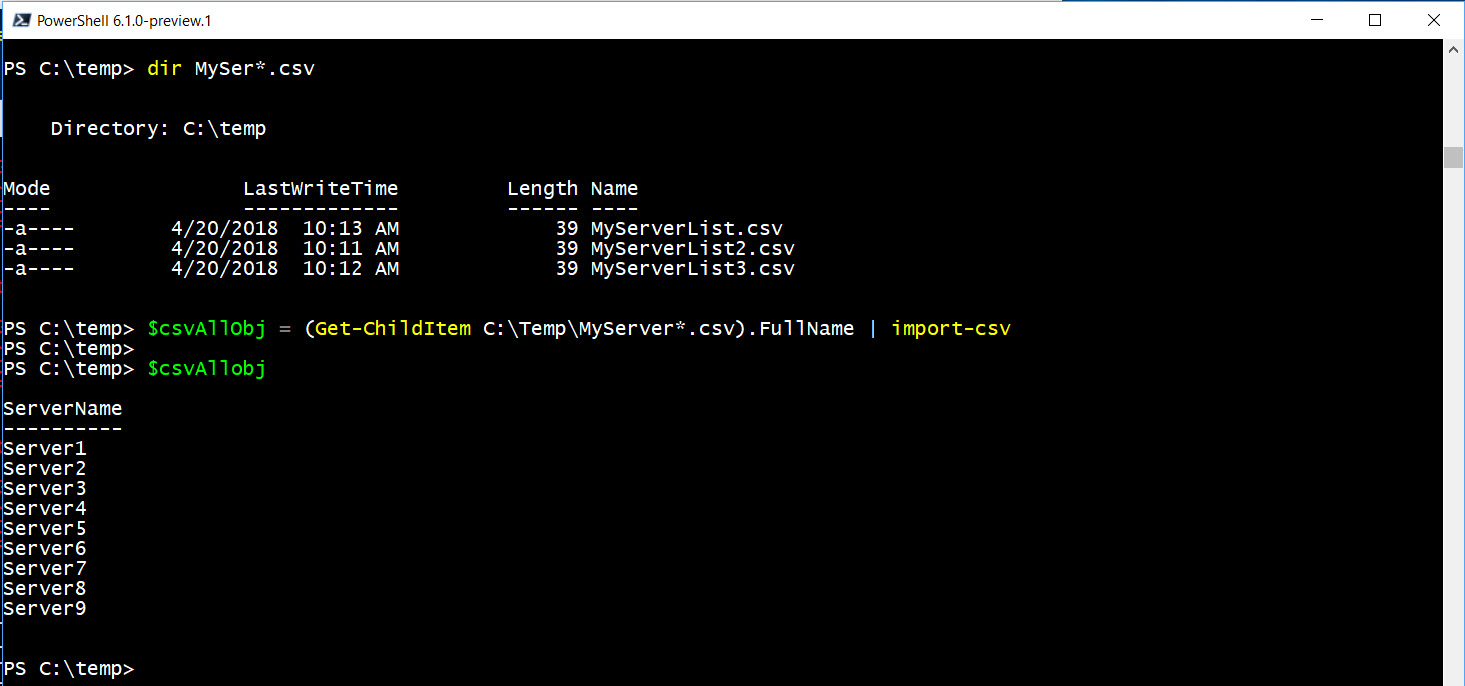
It is better to use the Out-File cmdlet in this scenario. Also, let say you got multiple *CSV file with the same data structure, meaning the same column name(s). To merge into a single object the following one-liner can solve the problem:

[sourcecode language=”powershell”]
## – Display on screen before creating the PSObject:
(Get-ChildItem C:\Temp\MyServer*.csv).FullName | import-csv

## – Build the PSObject:
$csvAllObj = (Get-ChildItem C:\Temp\MyServer*.csv).FullName | import-csv
$csvAllObj
[/sourcecode]

Export PSObject to CSV

Now, the PSObject was created, go back and use the Export-Csv to create the *CSV file.

[sourcecode language=”powershell”]
$csvAllObj | Export-csv -LiteralPath c:\Temp\MyPSObjectServerList.csv

cat c:\Temp\MyPSObjectServerList.csv
"ServerName"
"Server1"
"Server2"
"Server3"
"Server4"
"Server5"
"Server6"
"Server7"
"Server8"
"Server9"
[/sourcecode]

Finally, a *CSV file was properly created!

Bottom line

The Export-Csv is meant to be use with well-structured PSObjects and is not meant to be use from a text file.

Of course, there are many other ways to get things done with PowerShell and that’s the beauty of it.
There’s always a way!

Be Bold!! Learn PowerShell Core!!

Executing PowerShell Core from Windows PowerShell

Yes! It is possible to execute PowerShell Core in Windows PowerShell in a very creative way.  Of course, this is just a Proof-Of-Concept and fun to experiment.

In this scenario, the goal is to be able to rebuild the PowerShell Core PSObject in Windows PowerShell. and see the results.

What’s required?

First, if PowerShell Core is already installed, then that’s all we needed. The ingredient are there and we are the chef to create the recipe.

There are four main cmdlets to make receipe works:

1. Start-Process – This cmdlet will run PowerShell Core non-interactive.
2. Export-Clixml – This cmdlet will export to an XML file the PSObject from PowerShell Core session.
3. Import-Clixml – This cmdlet will import from an XML file to recreate the PowerShell Core PSObject in Windows PowerShell.
4. Select-Object – This cmdlet is use to display the output of that object.

Think of the *-Clixml cmdlets as the disconnected way to reuse PSObject in a disconnected way, is like saving the state of the object for testing.

The Recipe

Basically, Start-Process is where the PowerShell Core is run to execute the script. Now, within the PowerShell Core script, it is required to include the Export-Clixml cmdlet. This is where the PowerShell Core Object created in the script will export to an XML file. Finally, importing the same XML file in Windows PowerShell to be worked on and the displaying the PowerShell Core results in Windows PowerShell session.

Now, it’s very important to study and understand the PowerShell PSObject.  Also, do all necessary test to see if there are any limitations in this process.

The Code

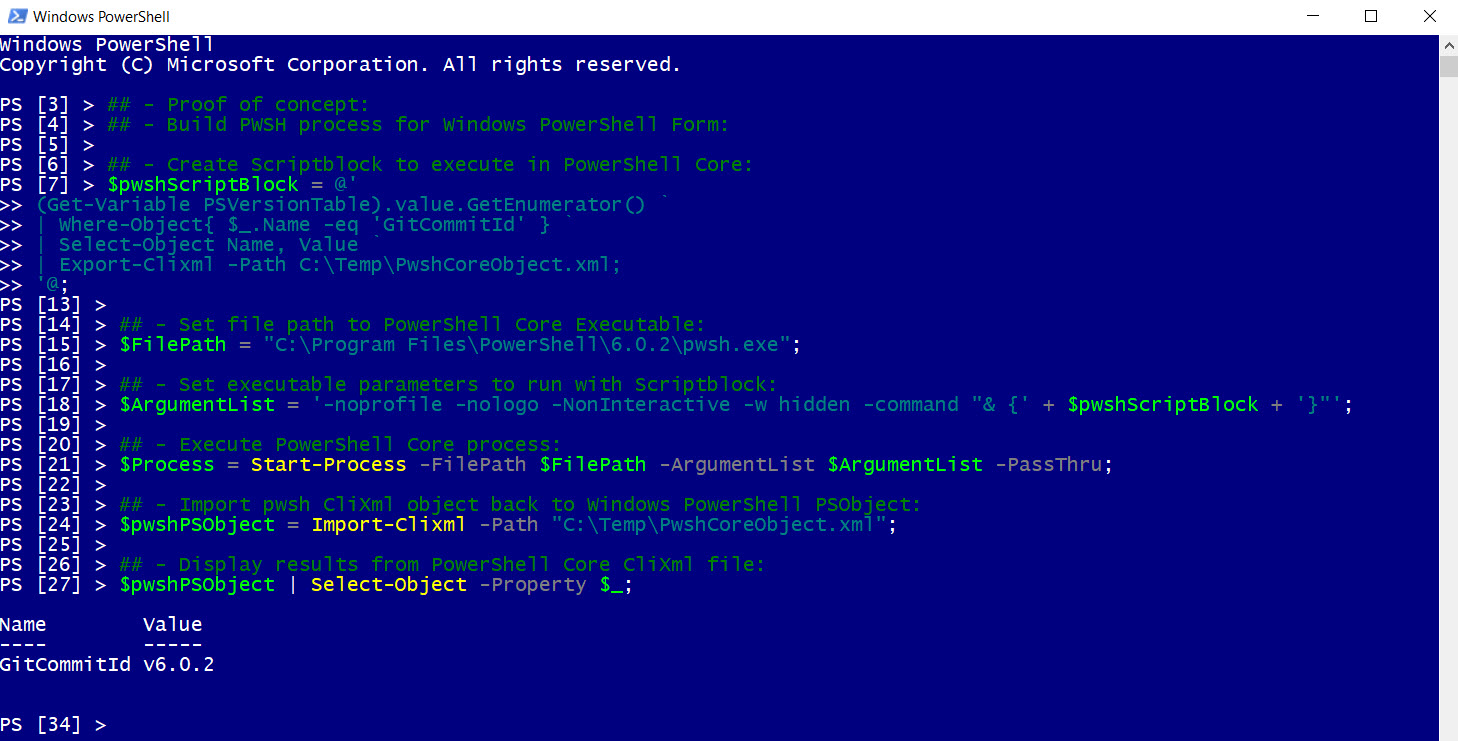
Here’s the basic code to accomplish this Proof-Of-Concept:

[sourcecode language=”powershell”]
## ————— Proof of concept ————— ##
## – Build PWSH process for Windows PowerShell Form:

## – Create Scriptblock to execute in PowerShell Core:
$pwshScriptBlock = @’
(Get-Variable PSVersionTable).value.GetEnumerator() `
| Where-Object{ $_.Name -eq ‘GitCommitId’ } `
| Select-Object Name, Value `
| Export-Clixml -Path C:\Temp\PwshCoreObject.xml;
‘@;

## – Set file path to PowerShell Core Executable:
$FilePath = "C:\Program Files\PowerShell\6.0.2\pwsh.exe";

## – Set executable parameters to run with Scriptblock:
$ArgumentList = ‘-noprofile -nologo -NonInteractive -w hidden -command "&amp; {‘ + $pwshScriptBlock + ‘}"’;

## – Execute PowerShell Core process:
$Process = Start-Process -FilePath $FilePath -ArgumentList $ArgumentList -PassThru;

## – Import pwsh CliXml object back to Windows PowerShell PSObject:
$pwshPSObject = Import-Clixml -Path "C:\Temp\PwshCoreObject.xml";

## – Display results from PowerShell Core CliXml file:
$pwshPSObject | Select-Object -Property $_;

[/sourcecode]

The code is executed from a Windows PowerShell session. Try it, experiment, and test. See if it’s fit your need in any way.

Conclusion

Please, I’m not saying that this the way to go. But, it just showing one way to handle sharing results between Windows PowerShell and PowerShell Core. Again this is just for fun, and at the same time learning more about PowerShell.

The possibilities are endless! (Teaser)

Be Bold!! Learn PowerShell Core!!