PSCore 6.0.0 – Upgrading/Uninstalling OpenSSH in Windows

This is all done with Chocolatey Package Manager for Windows. The following commands are important to know:

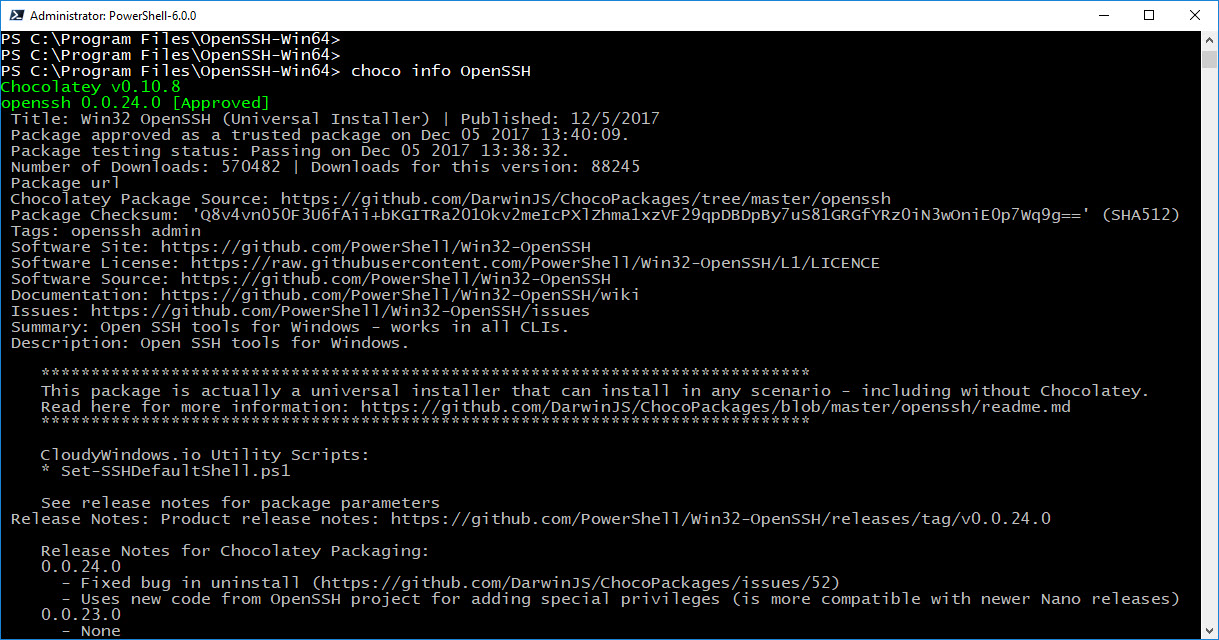
1. Information about the package:
choco info OpenSSH

2. Upgrade installed package:
choco upgrade OpenSSH

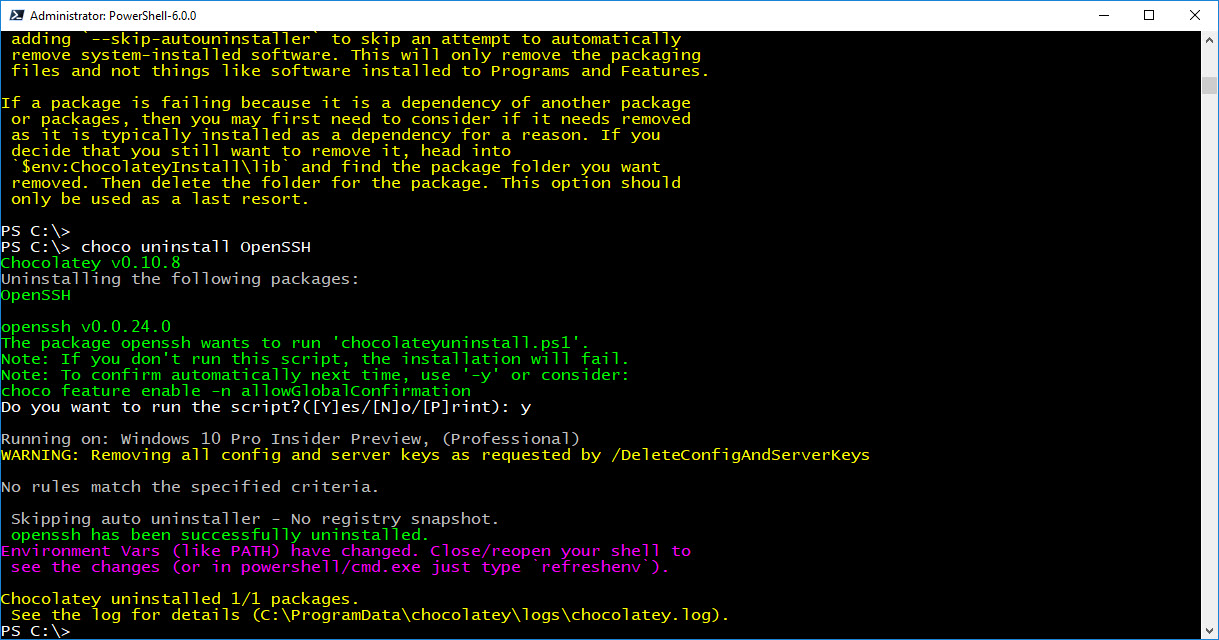
3. Remove installed package:
choco uninstall OpenSSH

4. Seach for a package:
choco search OpenSSH

Now, this is very important to know as these packages gets update without any notice and avoiding upgrades could impact the system.

As of the writing of this post, the latest version of Win32 OpenSSH is v0.0.24.0.

[sourcecode language=”powershell”]
## – Chocolatey package information command:
choco info OpenSSH

[/sourcecode]

Keep in mind, all these steps need to be executed with administrator privileges.

Upgrading Win32 OpenSSH

The upgrade process should be enough to get the package to the latest build. Now, I notice my latest upgrade step, I found files that shouldn’t be in the folder.

[sourcecode language=”powershell”]
## – Chocolatey upgrade package command:
choco upgrade OpenSSH

[/sourcecode]

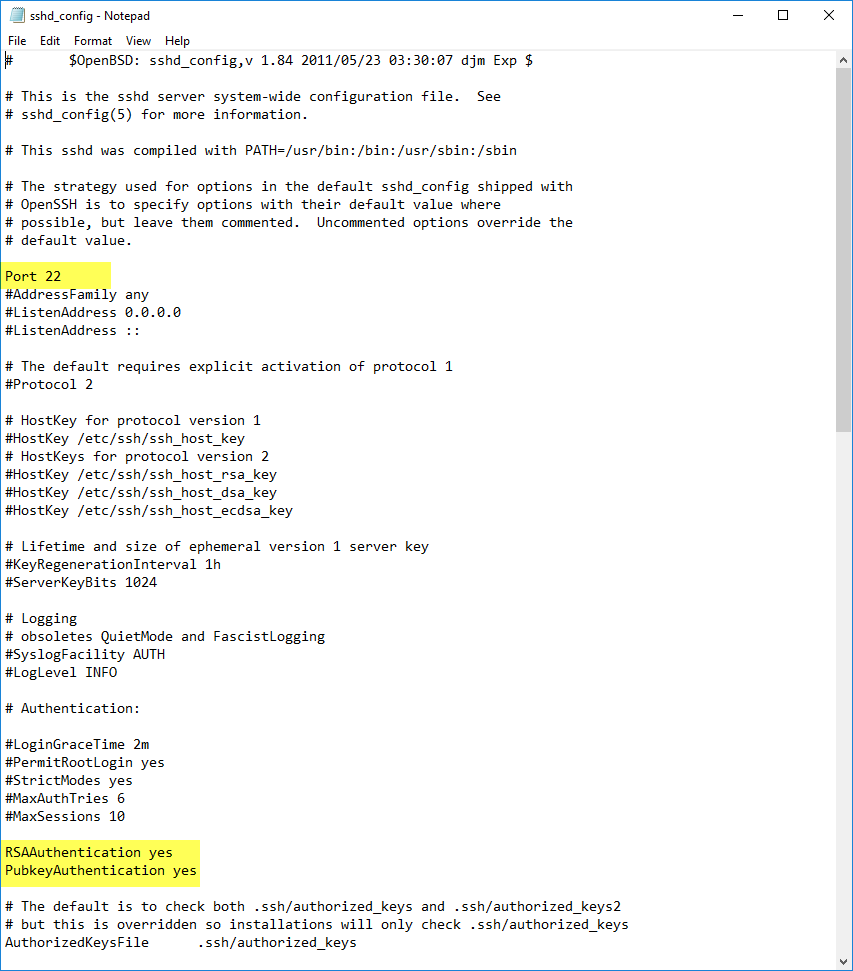
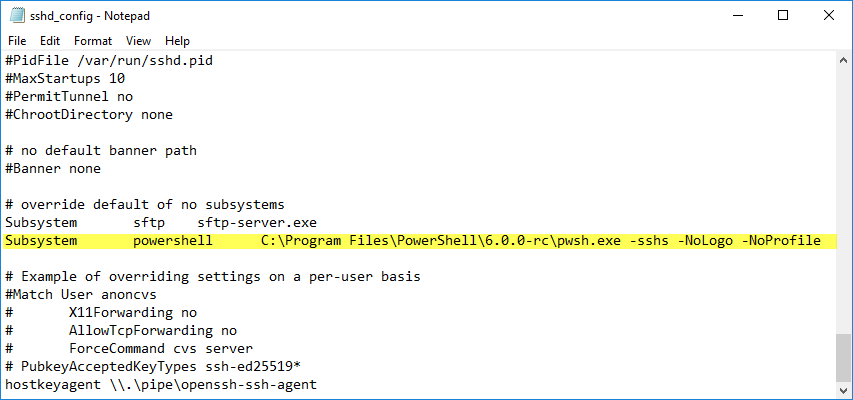
So, take the time to verify and confirm everything is installed as expected. Don’t forget to document and/or save any file, such as: sshd_config.

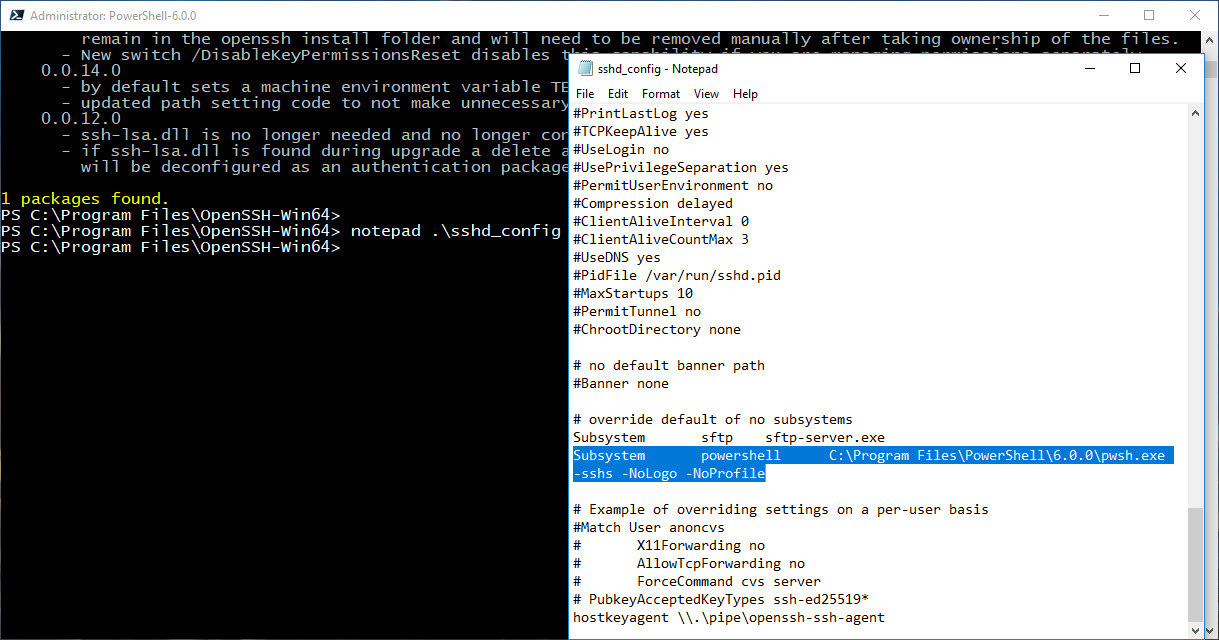
Uninstalling/Installing Win32 OpenSSH

In the other hand, it doesn’t hurt to uninstall everything, check there are no files left in the folder, and that event the folder was removed. In other words, a clean installation will be perfect.

Before uninstalling, I would recommend a few extra steps, such as:

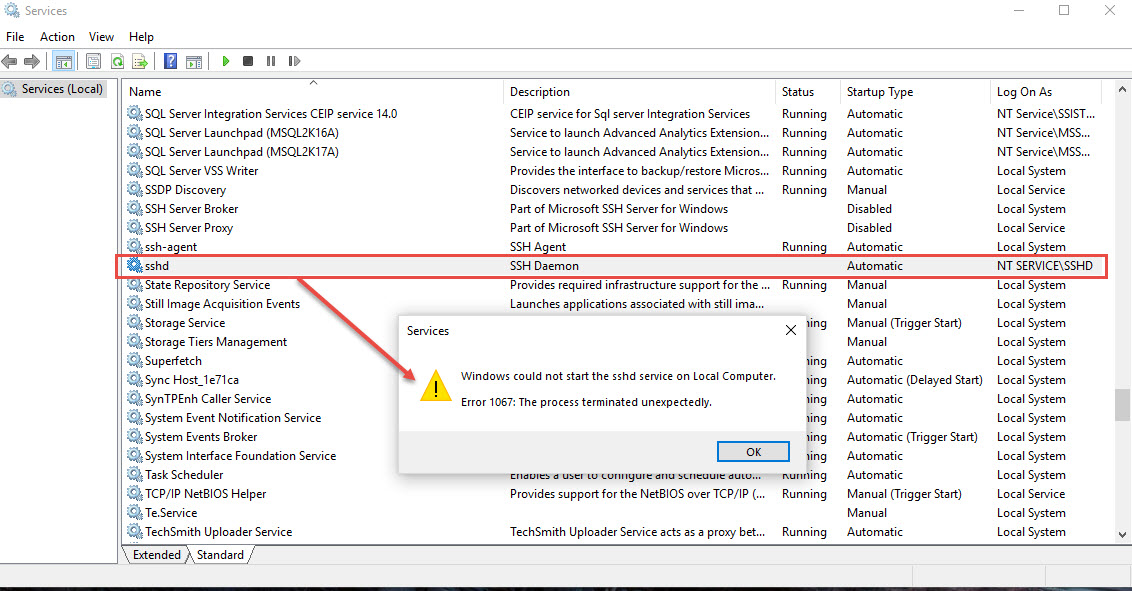
1. Stop SSH services: sshd and ssh-agent

[sourcecode language=”powershell”]
## – Stopping SSH Services:
Stop-Service sshd
Stop-Service ssh-agent

[/sourcecode]

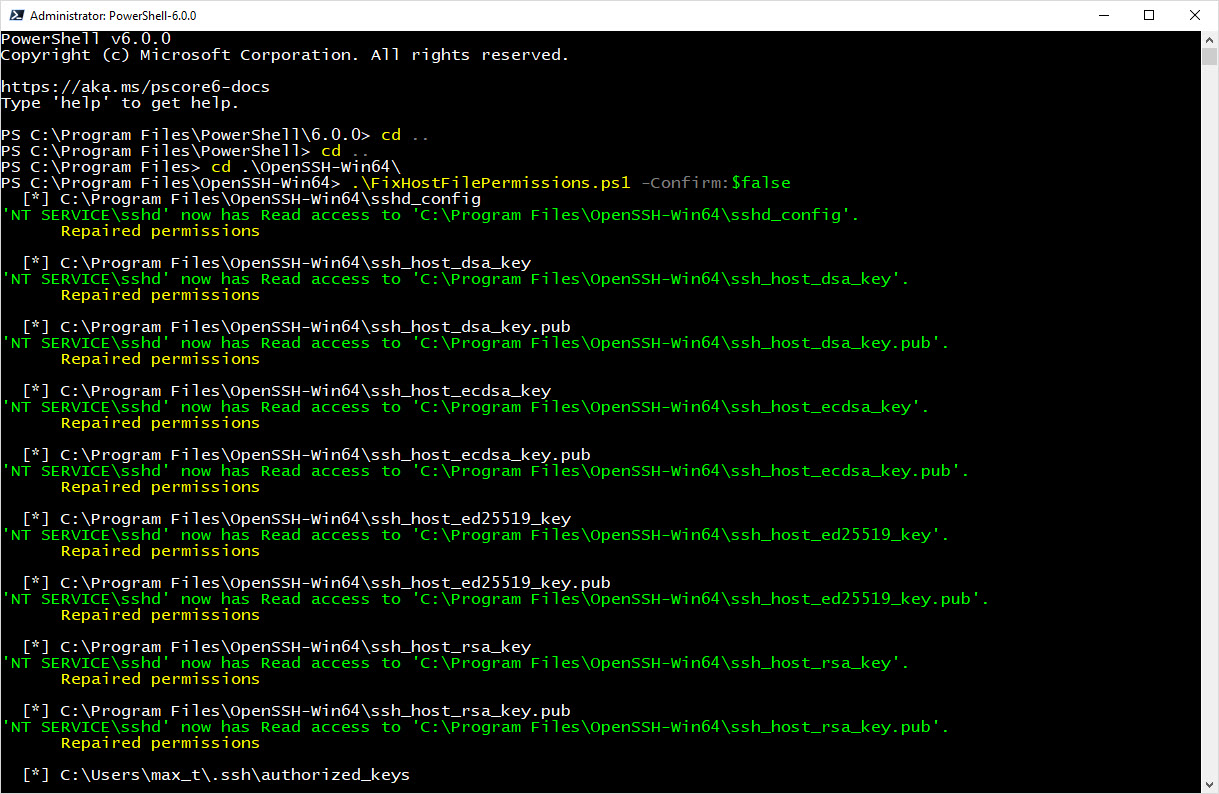
2. Proceed to uninstall SSH services and change directory:

[sourcecode language=”powershell”]
## – Execute uninstall ssh services script from the OpenSSH folder:
.\uninstall-sshd.ps1
cd c:\
[/sourcecode]

3. Before, doing the uninstall step, make sure there are no process using OpenSSH that may have open file(s).

[sourcecode language=”powershell”]
## – Execute uninstall command:
choco uninstall OpenSSH

[/sourcecode]


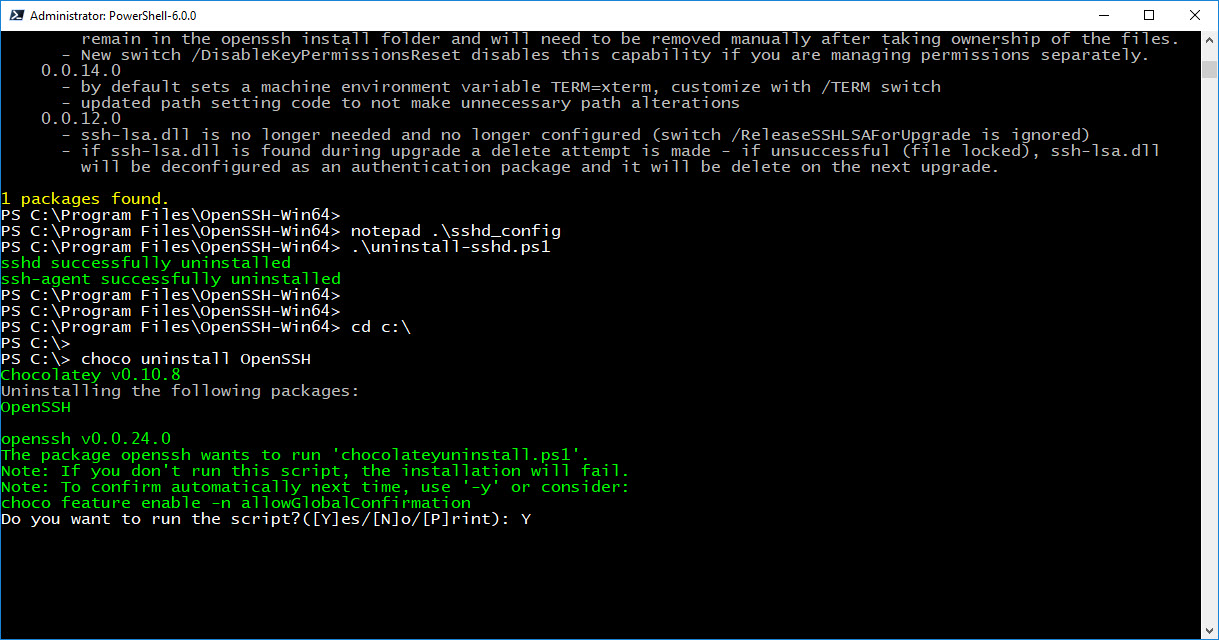
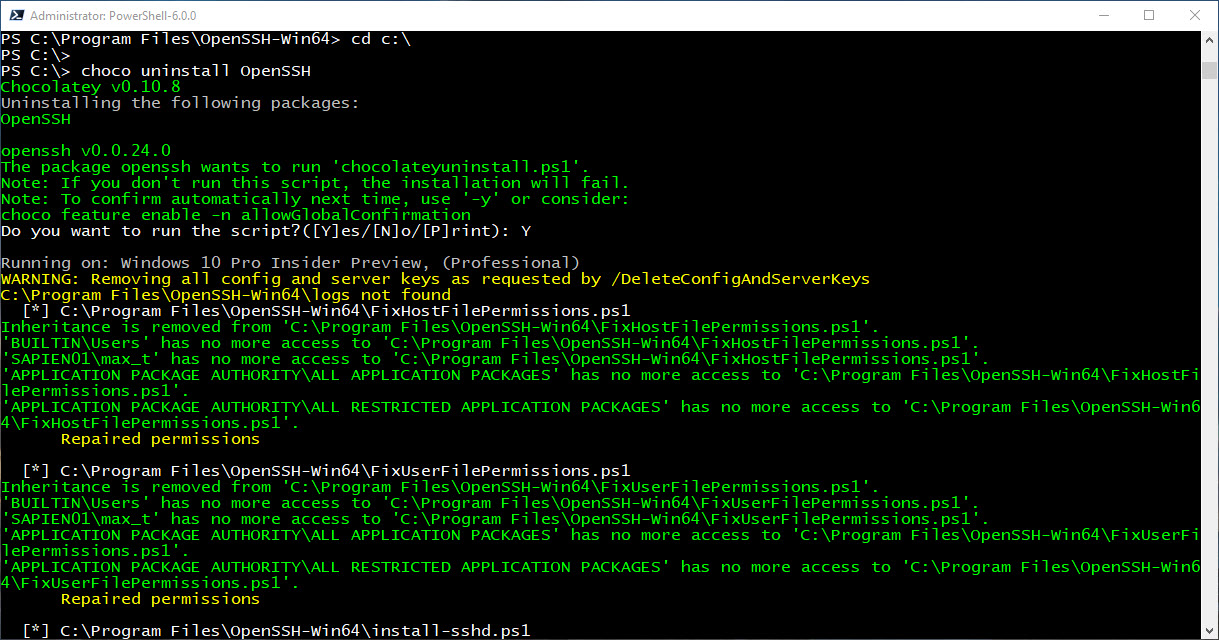
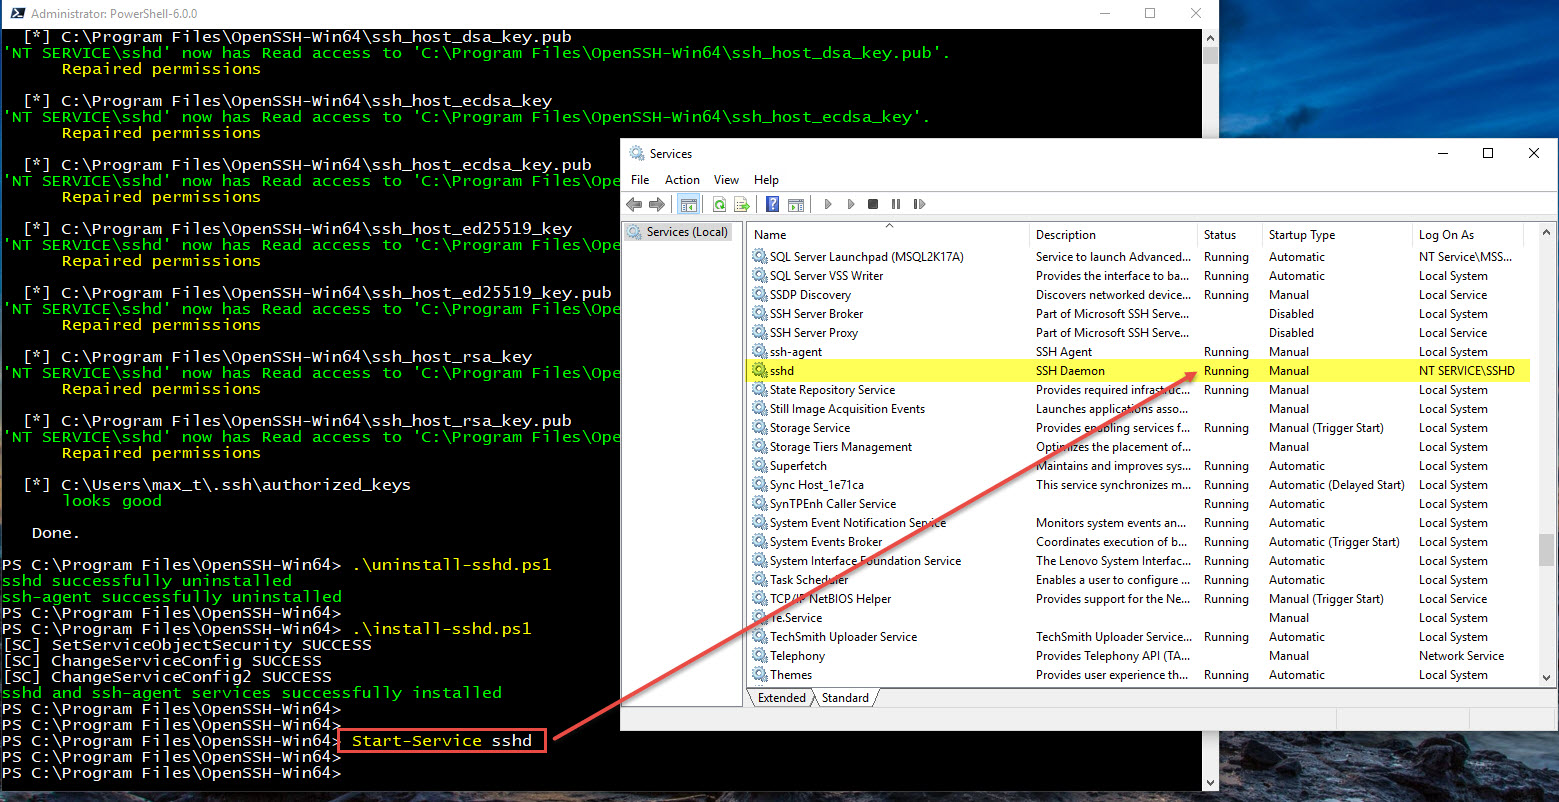
Sample of the uninstall error due to an open file:

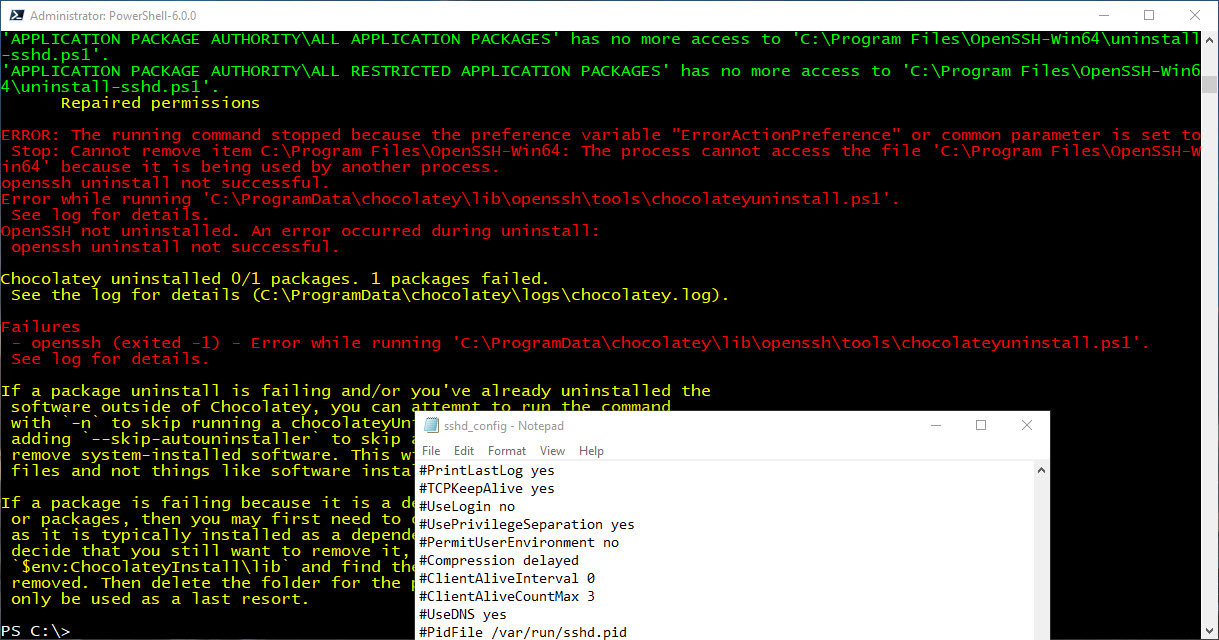
In this case, just rerun the uninstall step. The goal is to have everything removed including folders.

Now, you’re ready to do a clean installation of Win32 OpenSSH.
Please refer to the following blog post which I have recently added few thing I missed last time: http://www.maxtblog.com/2017/12/powershell-core-updated-setup-openssh-in-windows-and-linux/

For information about Chocolatey The package manager for Windows:
https://chocolatey.org/

Be Bold!! Learn PowerShell Core!!

Welcome PowerShell Core 6.0.0 GA

Yes! Today the Microsoft PowerShell Team with the help of the community has made PowerShell CoreGenerally Available” and “Supported“. Feel free to read their blog post at:
https://blogs.msdn.microsoft.com/powershell/2018/01/10/powershell-core-6-0-generally-available-ga-and-supported/

Get It Now

Of course, there are little housekeeping to do, such as download links still pointing to the older version. But, while they fix the links, you go straight to the “Release” page to individually download the file: https://github.com/PowerShell/PowerShell/releases

Also, on the Linux distribution side, I found out that the auto upgrade stop working. So the following steps will help you install PowerShell Core 6.0.0 in Linux Ubuntu found in the Github “How To Install” link.

Ubuntu Power

Windows 10 WSL

If you have Windows 10 WSL (Ubuntu) install use the same instruction for Ubuntu 16.04:

[sourcecode language=”bash”]
# Import the public repository GPG keys
curl https://packages.microsoft.com/keys/microsoft.asc | sudo apt-key add –

# Register the Microsoft Ubuntu repository
curl https://packages.microsoft.com/config/ubuntu/16.04/prod.list | sudo tee /etc/apt/sources.list.d/microsoft.list

# Update the list of products
sudo apt-get update

# Install PowerShell
sudo apt-get install -y powershell

# Start PowerShell
pwsh

[/sourcecode]

So, in either Windows or Linux, must important is to remove/uninstall the previous version. Then, install PowerShell Core 6.0.0.

Remember

Please file any PowerShell Core issues (not Windows PowerShell) in Github at: https://github.com/PowerShell/PowerShell/issues

So, in order to properly address any Windows PowerShell issues, has to be reported on UserVoice at: https://windowsserver.uservoice.com/forums/301869-powershell

As stated in the landing page under “Windows PowerShell vs PowerShell Core” section.

Follow PowerShell Core in Tweeter using #PSCore6 tag.

PowerShell Core–Updated setup OpenSSH in Windows and Linux

It’s been over a year since my last post on “PowerShell Open Source – Windows PSRemoting to Linux with OpenSSH”. A lot has change, so here’s the updated version.

Linux OpenSSH installation

In Linux (Ubuntu), open a terminal (Bash) session.

Install the following *packages:

sudo apt install openssh-server
sudo apt install openssh-client

*Note: The system will let you know if they already exist.

Need to configure the OpenSSH config file:

sudo gedit /etc/ssh/sshd_config

The, add following line in the “subsystem” area:

Subsystem powershell pwsh.exe -sshs -NoLogo -NoProfile

Proceed to save the file.

Now, execute the following lines:

sudo ssh-keygen –A

Restart the ‘ssh’ service by executing the following command:

sudo service ssh restart

Windows OpenSSH installation

In *Windows Client or Server, open Services to ‘Stop‘/’Disable‘ both SSH Broker and SSH Proxy.

*Note: Latest Windows Insider Builds having the following services previously installed: SSH Broker and SSH Proxy

Open PowerShell Core Console (Run as Administrator):

[sourcecode language=”powershell”]
pwsh

[/sourcecode]

First thing, make sure Chocolatey is installed in PowerShell Core: https://chocolatey.org/install

[sourcecode language=”powershell”]
iex ((New-Object System.Net.WebClient).DownloadString(‘https://chocolatey.org/install.ps1’)

[/sourcecode]

*note: Chocolatey Install instructions will run ‘Set-ExecutionPolity Bypass’. The problem is, it won’t change it back to the previous setting.
Make sure to run “Get-ExecutionPolicy” to verify current settings.

Installing OpenSSH package from Chocolatey:

[sourcecode language=”powershell”]
choco install openssh

[/sourcecode]

Close/Reopen PowerShell Core (Run as Administrator), and execute the following command:

[sourcecode language=”powershell”]
refreshenv

[/sourcecode]

Change Directory to the OpenSSH folder:

[sourcecode language=”powershell”]
cd ‘C:\Program Files\OpenSSH-Win64\’

[/sourcecode]

Now, we need to make changes to the sshd_config file with Notepad:

[sourcecode language=”powershell”]
Notepad sshd_config

[/sourcecode]

Need to enabled the following commented out lines:

[sourcecode language=”text”]
Port 22
PasswordAuthentication yes
PubkeyAuthentication yes

[/sourcecode]

Finally, add the subsystem line to include PowerShell Core path:

[sourcecode language=”text”]
Subsystem     powershell    C:/Program Files/PowerShell/6.0.0-rc.2/pwsh.exe -sshs -NoLogo –NoProfile

[/sourcecode]

Save the file and we are ready to configure the firewall rule for port 22.

Windows Firewall Port 22 Setup

Next, confirm that there are no other TCP ports using port 22:

[sourcecode language=”powershell”]
netstat -anop TCP

[/sourcecode]

Now, add the SSH firewall rule for using port 22:

[sourcecode language=”powershell”]
netsh advfirewall firewall add rule name=SSHPort22 dir=in action=allow protocol=TCP localport=22

[/sourcecode]

Open Firewall app and verify it’s added.

Completing Windows OpenSSH Installation

The following steps are essential for the sshd service to start without any issues. Make sure to be at the OpenSSH folder:

[sourcecode language=”powershell”]
## – Generate SSH keys:
ssh-keygen -A

## – Execute both fix permissions scripts:
.\FixHostFilePermissions.ps1 -confirm:$false
.\FixUserFilePermissions.ps1

## – Install both ssh services: sshd and ssh-agent:
.\install-sshd.ps1

[/sourcecode]

Then, set both sshd and ssh-agent services set to start automatically.

[sourcecode language=”powershell”]
Set-Service sshd -StartupType Automatic
Set-Service ssh-agent -StartupType Automatic

[/sourcecode]

At this point, only start service sshd which will turned on the ssh-agent service.

[sourcecode language=”powershell”]
Start-Service sshd
#Start-Service ssh-agent (optional)

[/sourcecode]

Must important, open the *Services MMC console and verify that all running.

*Note: On the server will be needed to set the credential as Local System (see below).

Now, proceed to test connectivity between two system using PowerShell Core.  To test connectivity could use the following command:

Enter-PSSession -hostname systemname -username UsenameHere

Additional Note:

I found an issue when been a member of a domain but the Domain is Off. Trying to restart ssh service, I get the following error:

[sourcecode language=”powershell”]
PS C:\Program Files\OpenSSH-Win64> Start-Service sshd
Start-Service : Failed to start service ‘sshd (sshd)’.
At line:1 char:1
+ Start-Service sshd
+ ~~~~~~~~~~~~~~~~~~
+ CategoryInfo          : OpenError: (System.ServiceProcess.ServiceController:ServiceController) [Start-Service], ServiceCommandException
+ FullyQualifiedErrorId : StartServiceFailed,Microsoft.PowerShell.Commands.StartServiceCommand

[/sourcecode]

Or trying to manually start the “sshd” service using the Services MMC:

This error was due to missing a step in the installation:

Resolution: Thanks to Github Win32-OpenSSH @bagajjal provided the following steps:

[sourcecode language=”powershell”]
## – Fixing sshd service not starting with the NET Service credentials:
.\FixHostFilePermissions.ps1 -Confirm:$false
.\uninstall-sshd.ps1
.\install-sshd.ps1
[/sourcecode]

This resolved the sshd start failure. (see below)

Streamlining SQL Server Management Objects (SMO) in PowerShell Core

I’ve been recently posting about getting SQL Server Management Objects (SMO) Framework to work in PowerShell Core in both Windows and Linux Systems. So, here’s the revised blog post as the method has kept improving. This way you can start creating some cross-platform SMO PowerShell Core scripts in your environments.

It will works the following way:
1. Windows connecting to Windows SQL Server.
2. Windows connecting to Linux SQL Server.
3. Linux connecting to Linux SQL Server.
4. *Linux connecting to Windows SQL Server.

*Note: Any issues with firewall connecting from Linux to Windows, can be solved by creating the inbound rule for Linux in Windows Firewall.

How to get the SMO for PowerShell Core?

It’s easy! You can get it from NuGet Gallery using PowerShell Core Console. Just make sure you open PowerShell Core as an Administrator to avoid any installation issues.

You could use the following one-liners to find and install the recent SMO package. The following “if-else” code snippet can execute in either Windows or Linux PowerShell Core console.

[sourcecode language=”powershell”]

# Register NuGet package source, if needed
# The package source may not be available on some systems (e.g. Linux)
if (-not (Get-PackageSource | Where-Object{$_.Name -eq ‘Nuget’}))
{
Register-PackageSource -Name Nuget -ProviderName NuGet -Location https://www.nuget.org/api/v2
}else{
Write-Host “NuGet Already Exist! No Need to install.”
}

[/sourcecode]

Installing SMO from NuGet Gallery

After we verified NuGet Package Management is already installed in our system, then we can proceed in Find/Install “SQL Server Management Objects (SMO) Framework“. The current version is “140.17199.0”.

Execute the following one-liner by using the Find-Package to make sure is available. Then, do the install-package command

[sourcecode language=”powershell”]

## – Check that the NuGet feed is available and has the SMO package:
Find-Package -Name Microsoft.SqlServer.SqlManagementObjects

## – Install latest SMO package from NuGet:
Install-Package -Name Microsoft.sqlserver.SqlManagementObjects -Scope CurrentUser

## – Next Line Confirmed Installation:
Get-Package Microsoft.SqlServer.SqlManagementObjects

[/sourcecode]

As of today (November 6th, 2017), the current version of Microsoft.SqlServer.SqlManagementObjects is 140.17199.0. And, it can be installed on either Windows and Linux systems from NuGet.

For more NuGet information about the SMO package, click on the following link: https://www.nuget.org/packages/Microsoft.SqlServer.SqlManagementObjects

Locating SMO Assemblies and connect to SQL Server

In order to use SMO in PowerShell, we need to know where they are installed. The next one-liner gets the NuGet location to build the path of the SMO installed assemblies.

[sourcecode language=”powershell”]

## – Help find and save the location of the SMO dll’s in a PowerShell variable:
$smopath = Join-Path ((Get-Package Microsoft.SqlServer.SqlManagementObjects).Source `
| Split-Path) (Join-Path lib netcoreapp2.0)

[/sourcecode]

The SMO path is saved. We are ready to load the needed SMO assemblies, to connect and work with SQL Server. The code snippet below will load the SMO assemblies, connect to SQL Server providing necessary credentials:

[sourcecode language=”powershell”]

# Add types to load SMO Assemblies only:
Add-Type -Path (Join-Path $smopath Microsoft.SqlServer.Smo.dll)
Add-Type -Path (Join-Path $smopath Microsoft.SqlServer.ConnectionInfo.dll)

## – Prepare connection and credential strings for SQL Server:
## – (Connection to Linux SQL Server single instance sample)
$SQLServerInstanceName = ‘lxSql00’; $SQLUserName = ‘sa’; $sqlPwd = ‘$Pswrd1!’;

## – (Connection to Windows SQL Server multi-instance sample)
$SQLServerInstanceName = ‘winSql01,1450’; $SQLUserName = ‘sa’; $sqlPwd = ‘$Pswrd1!’;

## – Prepare connection passing credentials to SQL Server:
$SQLSrvConn = New-Object Microsoft.SqlServer.Management.Common.SqlConnectionInfo($SQLServerInstanceName, $SQLUserName, $SqlPwd);
$SQLSrvObj = new-object Microsoft.SqlServer.Management.Smo.Server($SQLSrvConn);

[/sourcecode]

In the previous code sample, I included some variance in providing the SQl Server instance for cross-platform use:
1. In Linux, either using the “SqlServername” or, “IP-Address“.
2. In Windows, either using the “SqlServerName“, or “IP-Address“, or in the case of mutliple instance “SqlServerName,Port“.

Now that the SMO connection to the SQL Server has been established, then we can continue to explore our options using .NET SMO Framework. The Code snippet below shows how to display some of the SQL Server SMO information .NET properties:

[sourcecode language=”powershell”]
## – SMO Get SQL Server Info:

$SQLSrvObj.Information `
| Select-Object parent, platform, product, productlevel, `
OSVersion, Edition, version, HostPlatform, HostDistribution `
| Format-List;

## – End of Code

[/sourcecode]

More SMO Options…

There are additioanl sources providing SMO dll’s:
1.NuGet SMO: https://www.nuget.org/packages/Microsoft.SqlServer.SqlManagementObjects/#
2.GitHub SQLToolService: https://github.com/Microsoft/sqltoolsservice
3.Installing SQL Server mssql-scripter(Python-based): https://github.com/Microsoft/sql-xplat-cli

I’ve been using GitHub “SqlToolsService” for some time now and it works closs-platform. At the same time, I’ve been keeping it up-to-date:
https://github.com/Microsoft/sqltoolsservice/releases

Conclusion

I dare to say! Using .NET SQL Server Management Objects (SMO) Framework, let you be flexible adding control over your scripting. Keep in mind, this is well documented in Microsoft MSDN site: https://docs.microsoft.com/en-us/sql/relational-databases/server-management-objects-smo/sql-server-management-objects-smo-programming-guide

My number one choice is to use NuGet Package Management. Although, you can play around with the GitHub SqlToolsService version as it gets frequent updates. The trick in using the GitHub version, is to add the path to where the Dll’s are stored and you’re good to go.

Just Dare to Experiment! Keep learning PowerShell!

Special Thanks to Microsoft: Matteo Taveggia and  David Shiflet for providing me with Nuget PowerShell code piece. I just change it a little!

PowerShell Core useful cross-platform variables

In PowerShell Core, there are three useful variable you can use in a cross-platform scripts. Then, the script can have the necessary logic to response based on the environment it is running.

Use the cmdlet Get-Variable to find them, and keep in mind, these variables are not found in Windows PowerShell 5.x.

Get-Variable Is*

Although, the results will display four variable, but let’s pay attention to three of them. Below are the variables with their default values:

IsLinux                            False
IsOSX                              False
IsWindows                    True

These three variables can help in identifying which Operating System the script are been executed.  This way just adding the necessary logic, in order to take the correct action.

For example, you can want to execute a Python code on different systems.

In Windows, if Anaconda (Python 3.6) was installed then Python executable is located at: C:\ProgramData\Anaconda3\python.exe

In Ubuntu Linux, Anaconda (Python 3.6) may be found on user Home folder, then it can be located at:  /home/username/anaconda3/bin/python

Of course, Python location may vary if different versions are installed, and/or installation default location was change.

Sample Cross-platform Code Snippet

Here’s a simple script code logic to accomplished cross-platform behavior.  In my environment the sample code was executes in a Windows system.

[sourcecode language=”powershell”]
if ($IsLinux -eq $true)
{
Write-Host “Executing in Linux – $($psversionTable.platform.ToString())” -ForegroundColor Green;
#Linux Python path:
if ((Test-Path ‘/home/maxt/anaconda3/bin/python’) -eq $true)
{
Write-Host “Linux Python Path Validated” -ForegroundColor Yellow;
}
}
else
{
if ($IsWindows -eq $true)
{
Write-Host “Executing in Windows – $($psversionTable.platform.ToString())” -ForegroundColor Green;
#Windows Python path:
if ((Test-Path ‘C:\ProgramData\Anaconda3\python.exe’) -eq $true)
{
Write-Host “Windows Python Path Validated” -ForegroundColor Yellow;
}
}
else
{
Write-Host “Can’t execute under this OS!”;
};
};

[/sourcecode]

Go ahead and try the same code in Linux PowerShell Core. Of course, this code can be improved, but let’s leave it to your creativity. Start simple and grow!

By the way, did you know you can use SAPIEN Technologies PrimalScript to execute PowerShell Core scripts. Yes! It is possible!

Check the following SAPIEN Blog post about it: https://www.sapien.com/blog/2017/09/15/using-powershell-core-in-primalscript/

SAPIEN PowerShell Tools at Orlando Microsoft Ignite Conference 2017

As I started a new role working for SAPIEN Technologies as their Technology Evangelist in September, I had the opportunity to be working with them a the Microsoft Ignite Conference in Orlando.

Greatly appreciate this opportunity and the chance the meet everyone interested in PowerShell as well as our SAPIEN PowerShell Tools at the event.

Feel free to reach out, keep asking about our product, product services, and must important, give us feedback on how to make it better.

Don’t forget to check out our blog posts, support forums, YouTube videos, and specially the “Information Center” under the following link: https://www.sapien.com/support


PowerShell Core Stable SQL Server SMO Assemblies and DataRow objects

Yes! Just recently I downloaded the latest SQL Server SMO assemblies that can be use with PowerShell Core in both Linux and Windows. You can find them in Github under Microsoft SqlToolsService. But, you’ll need to extract only the necessary DLL’s before you can start creating your PowerShell Core SMO scripts. There’s no installation program, as this is installed manually.

There’s one requirement I would suggest to do. Download and install .NET Core 2.0.
To download click this link: https://www.microsoft.com/net/download/core

Manual SMO Installation

The latest SqlToolsService version can be found at this Github link: https://github.com/Microsoft/sqltoolsservice/releases
I’m currently using is V1.1.0-alpha.31.

Just download the file for the OS you’re working:

1. In Windows, download the zip file “Microsoft.SqlTools.ServiceLayer-win-x64-netcoreapp2.0.zip
a. Open the zip file.
b. In the zip app, select only the following dll’s:

Microsoft.SqlServer.ConnectionInfo.dll
Microsoft.SqlServer.Management.Dmf.dll
Microsoft.SqlServer.Management.Sdk.Sfc.dll
Microsoft.SqlServer.Management.SmoMetadataProvider.dll
Microsoft.SqlServer.Management.SqlScriptPublishModel.dll
Microsoft.SqlServer.Smo.dll
Microsoft.SqlServer.SmoExtended.dll
Microsoft.SqlServer.SqlEnum.dll
Microsoft.SqlServer.SqlParser.dll
NetCoreGlobalization.dll

c. Extract all selected dll’s into your *PowerShell Core Beta folder “C:\Program Files\PowerShell\6.0.0-beta.x”.

2. In Ubuntu Linux, download the tar file “Microsoft.SqlTools.ServiceLayer-ubuntu16-x64-netcoreapp2.0.tar.gz“.
a. To open the file, use either Desktop Nautilus, or use the command-line tar command.
b. In your home folder, create a folder for the dll’s you’re going to extract (for example: mkdir sqltoolsservice).
c. In the tar app, Select only the following dll’s:

Microsoft.SqlServer.ConnectionInfo.dll
Microsoft.SqlServer.Management.Dmf.dll
Microsoft.SqlServer.Management.Sdk.Sfc.dll
Microsoft.SqlServer.Management.SmoMetadataProvider.dll
Microsoft.SqlServer.Management.SqlScriptPublishModel.dll
Microsoft.SqlServer.Smo.dll
Microsoft.SqlServer.SmoExtended.dll
Microsoft.SqlServer.SqlEnum.dll
Microsoft.SqlServer.SqlParser.dll
NetCoreGlobalization.dll

d. Extract the files into the folder you created.

Definitely, using the GUI tar or zip application seems better as you can use the Ctrl key to individually highlight the files to extract.

*Note: Keep in mind, when you add these dll’s into the PowerShell Core folder, uninstalling PowerShell beta won’t removed them. You must manually delete them and the folder.

Verifying SMO Works

In order to test SQLServer Management Objects working with PowerShell Core, we are going to use the following PowerShell Core script snippet:

[sourcecode language=”powershell”]
# – Windows Hack:
cd ‘C:\Program Files\PowerShell\6.0.0-beta.x’

# – Linux Hack:
cd /home/username/SqlToolsServices

# – Loading necessary SMO Assemblies:
$Assem = (“Microsoft.SqlServer.Management.Sdk.Sfc”, `
“Microsoft.SqlServer.Smo”, `
“Microsoft.SqlServer.ConnectionInfo”,
“Microsoft.SqlServer.SqlEnum”);
Add-Type -AssemblyName $Assem

# – Prepare variables for connection strings to SQL Server using SQL Authentication:
$SQLServerInstanceName = ‘Sql01,1451’;
$SQLUserName = ‘sauser’; $sqlPwd = ‘$MyPwd99!’;

## – Prepare connection to SQL Server:
$SQLSrvConn = new-object Microsoft.SqlServer.Management.Common.SqlConnectionInfo($SQLServerInstanceName, $SQLUserName, $SqlPwd);
$SQLSrvObj = new-object Microsoft.SqlServer.Management.Smo.Server($SQLSrvConn);

## – SMO sample 1
## -> Get SQL Server Info:
$SQLSrvObj.Information `
| Select-Object parent, platform, product, productlevel, `
OSVersion, Edition, version, HostPlatform, HostDistribution `
| Format-List;

## – SMO sample 2
## -> To execute T-SQL Query:

# – Prepare query string variable:
$SqlQuery = “SP_WHO2”;

# – Execute T-SQL Query:
[array]$result = $SQLSrvObj.Databases[‘master’].ExecuteWithResults($SqlQuery);

# – Display T-SQL Query results:
$result.tables.Rows | Select-object -first 10 $_ | Format-Table -AutoSize;

[/sourcecode]

When executing the code both Windows and Linux, make sure you are in the folder you installed the dll’s files or it won’t execute.

In Window, in PowerShell Core console stays in folder: “C:\Program Files\PowerShell\6.0.0-beta.x”.

In Ubuntu Linux, in PowerShell Core console, change directory to “SqlToolsService”.

The above script will verify your manual installation of the SMO dll’s in PowerShell Core was successful. Now, you can use SMO in PowerShell Core in both Linux and Windows. And, most important, the previous issue I describe in my previous blog post “PowerShell Core – Getting SQL Server using ADO.NET Data provider” about the DataRow object has been cleared. So, there’s no need for adding code to fix the object to display data columns and values correctly.

Please, go ahead the give it a try! It’s great that now we can use PowerShell Core in Linux to create .NET object we can use and take advantage of this technology.

FLPSUG goes live at Keiser University Port St. Lucie

Yes, its finally happening! Thanks to Leslie Haviland (Director of Student Services), Dewan Persaud (Program Chair Information Technology), and staff to help me setting this meeting at their Port St. Lucie location.

Everyone is welcome to attend no matter what’s your skill level. I’m hoping that this will be first of many upcoming meetings as this technology is finally On-Demand in the industry. Keep in mind, PowerShell is also available Open Source running on Linux and Mac OS’s.

Most important! Is never too late to start learning about PowerShell.

Please, come over or register at: bit.ly/2u6unrs

Event Address:
Keiser University – Port St. Lucie
9400 SW Discovery Way
(Room 106)
Port St. Lucie, FL 34987

Hope to see you all there!

FLPSUG – Next Online meeting July 26th 2017

I’m working on getting a meeting with Keiser University to allow me to host my Florida PowerShell User Group Monthly meetings at their Port St. Lucie Campus location.  But, in the meantime, I setup July’s Online meeting for Wednesday 26th at 6:30pm (EST).

This month topic:

Working with SQL Server for Linux Cross-Platform

You’re welcome to explore the latest build of SQL Server for Linux, including everything you need to install and connect to SQL Server. He will also look into the tools that are available to use from Linux and / or Windows. Maximo will provide samples on querying for database information using Python/Java and PowerShell between two environments. This will be a demo intensive session you will not want to miss!

To register, click on the following Eventbrite link: https://www.eventbrite.com/e/florida-powershell-user-group-monthly-meeting-july-2017-tickets-36113308879?ref=estw

I hope you can joined me in this exciting session!

South Florida SQLSaturday – Working with SQL Server in Linux session

First! Thanks to the organizers, and specially the attendees as they waited patiently to the attend my last session of the day “Working with SQL Server for Linux Cross-Platform”. It proves to be good. Love their interaction and the will to embrace technology.

As, I almost didn’t make it to the event, due to car problem, I one my coworker gave me ride to the event at Nova Southeastern University. I missed giving the early session “SQL Server working with PowerShell and Python” so I ended up merging both sessions into one.

For my surprise, the last session went better than I expected. I ran everything from Azure Cloud which work like a charm, and the attendee were awesome.

Both presentation and all demo scripts were uploaded to the SQLSaturday #627 event site. I hope you all take advantage of the resource link I provided.

In the demo it’s interesting we covered the following on PowerShell Core, Python 3.6 (Anaconda), and SQL Server 2017 (Linux):

* In Window 10, using SSMS v17.1 connecting to SQL Server 2017 in Linux
* In Linux, connect to a Windows Shared folders
* In Windows, using SSMS to restore a Windows Database into Linux SQL Server.
* Sample script using Python tk (Gui) w/pyodbc (SQL connector), and PowerShell displaying PowerShell object in a Gridview.
* Using SMO in Linux with PowerShell.

And, we did covered a lot in a short time.

By the way, I will be giving the same session at IDERA’s Geek Synch webinar, on July 12th, at 11:00am CT/12:00pm ET:

Geek Sync – I Working with SQL Server for Linux Cross-Platform
https://register.gotowebinar.com/register/9138484624537412611

Once again Thanks to everyone!

I’ll see you all in Orlando SQLSaturday #678 on October 7th!