Checking for PowerShell Core latest version in non-Windows Systems

I’m not sure who don’t get desperate to get the latest version of PowerShell Core when it becomes available. I do!
Sometimes I’m lucky enough to check Github PowerShell repository to find out it has been recently out.

But, this doesn’t means that is available in any of the other repositories! And, it may take a few more hours after it’s released. So, what would you do?

Repository Availability

Let’s take a look at how to check for PowerShell latest version on different non-Windows Systems.

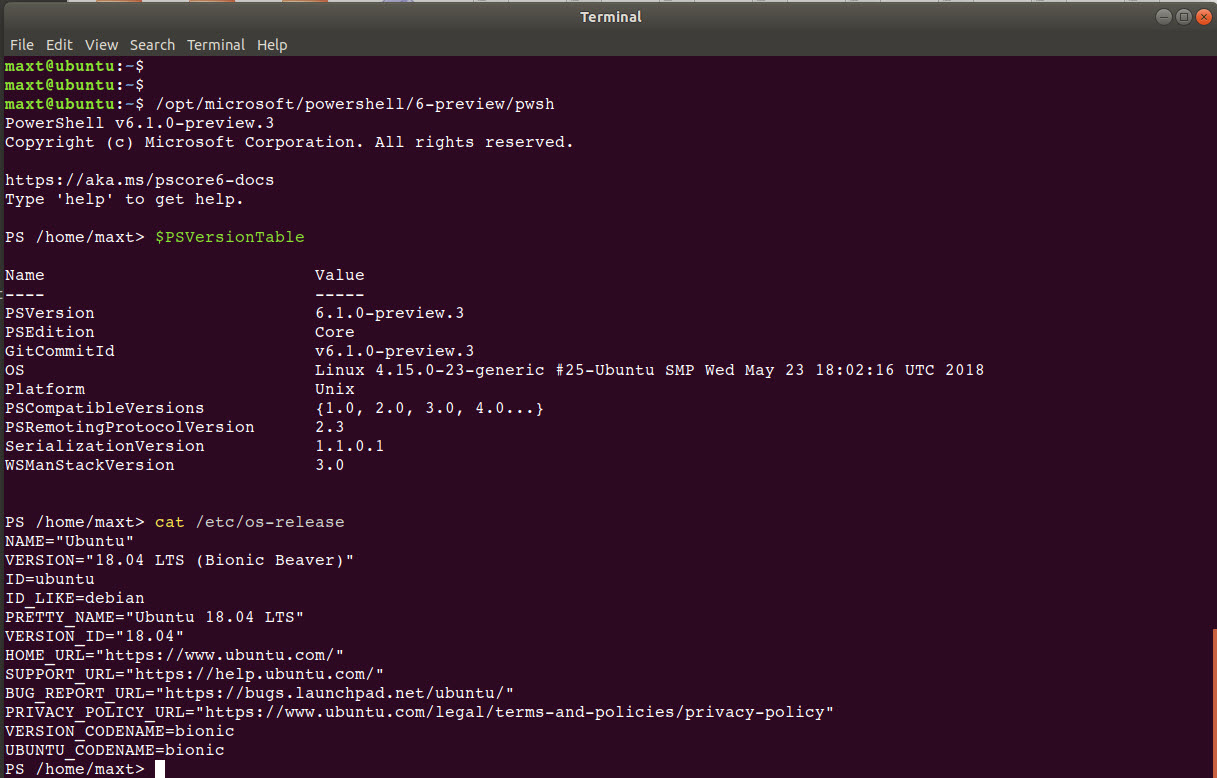
Ubuntu:
apt-cache policy powershell #-> Or, powershell-preview

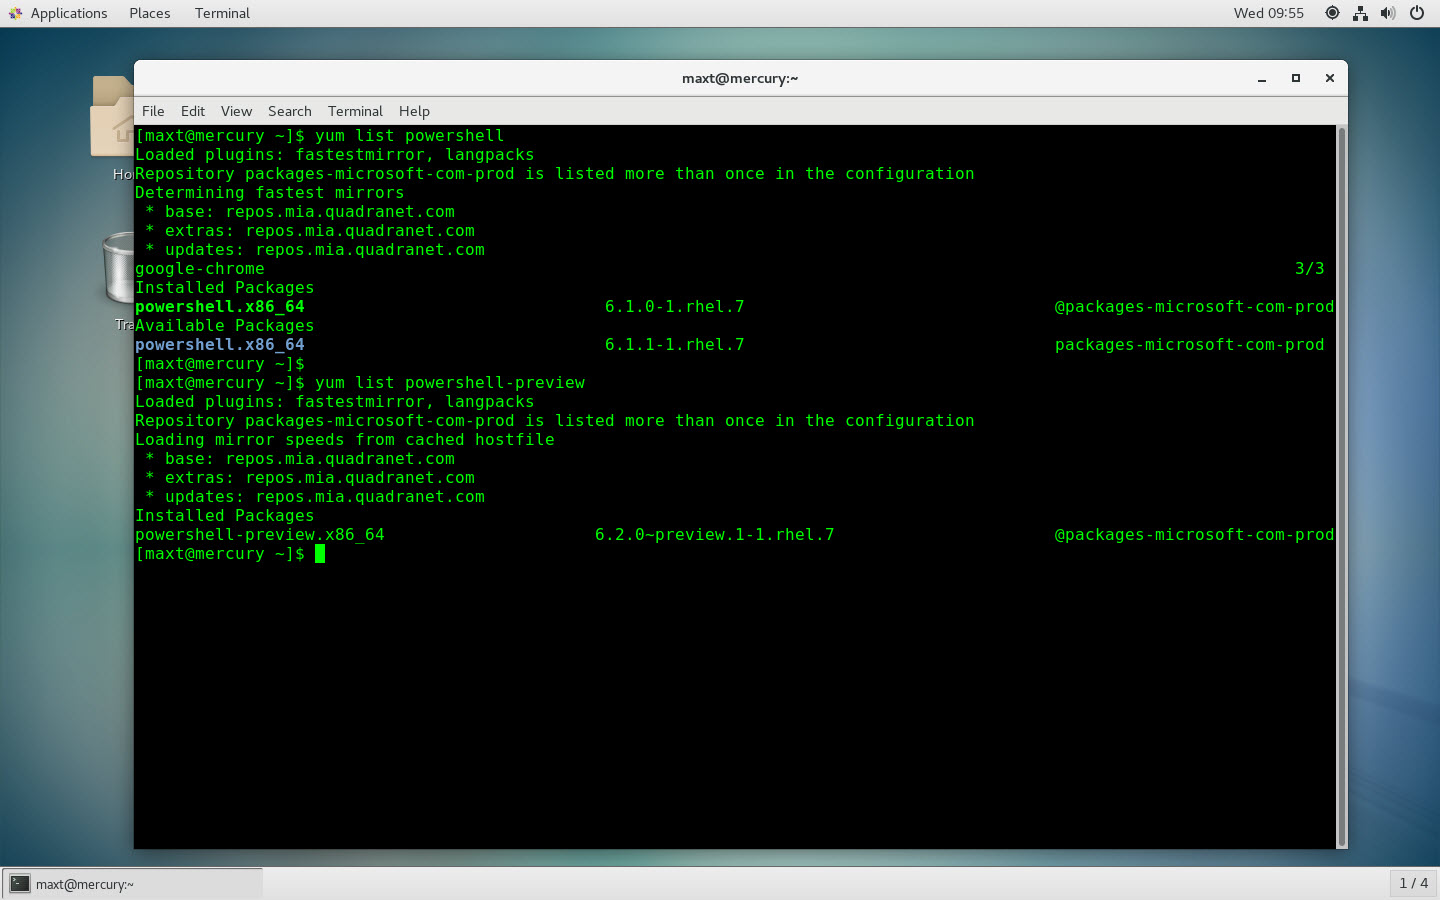
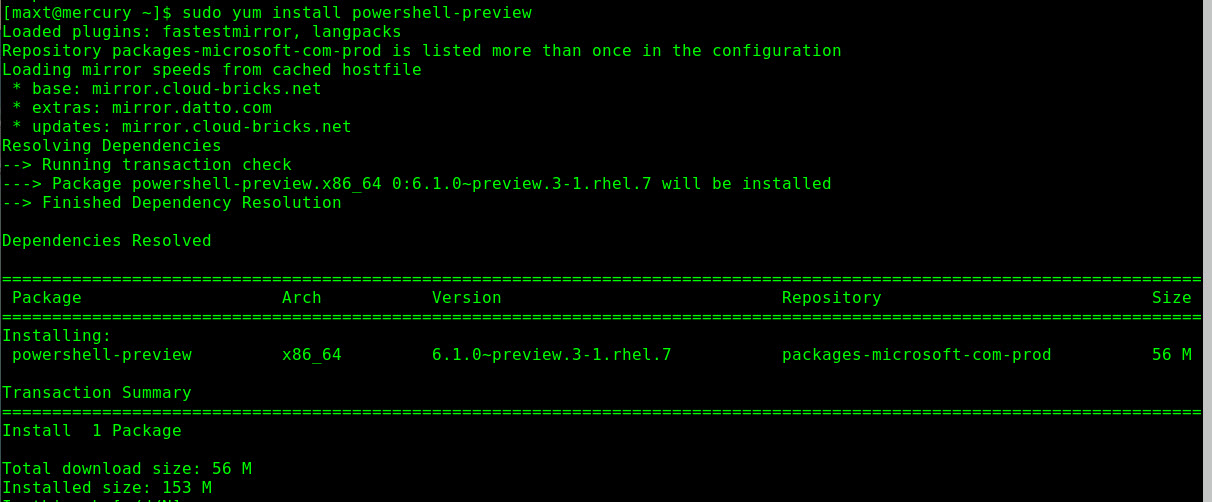
CentOS:
yum list powershell #-> Or, powershell-preview

MacOS:
## - Display installed current information.
brew cask info powershell

## - Seems when is current it will not display anything.
brew cask list powershell

## - Intended to show if app is outdated:
brew cask outdated powershell

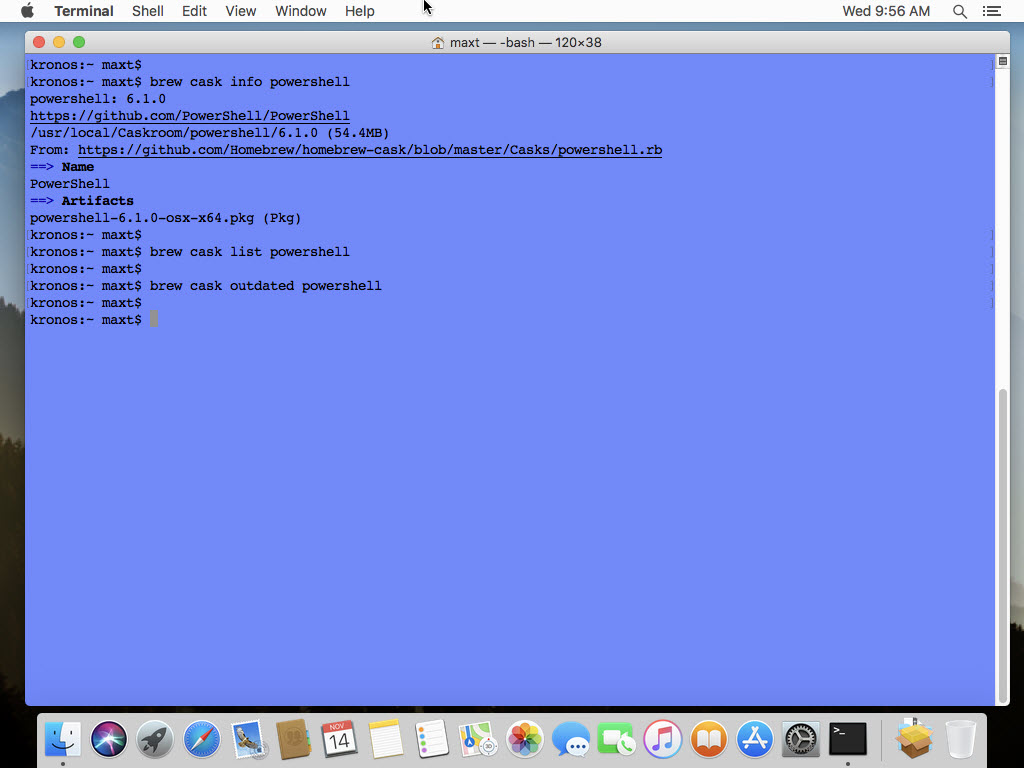
MacOS Home Brew always takes longer for the new release to be available.

Get It Now!

So, if PowerShell Core isn’t available in the package repository, with a few steps you can download and install PowerShell. But, the first thing I do is to remove it before installing.
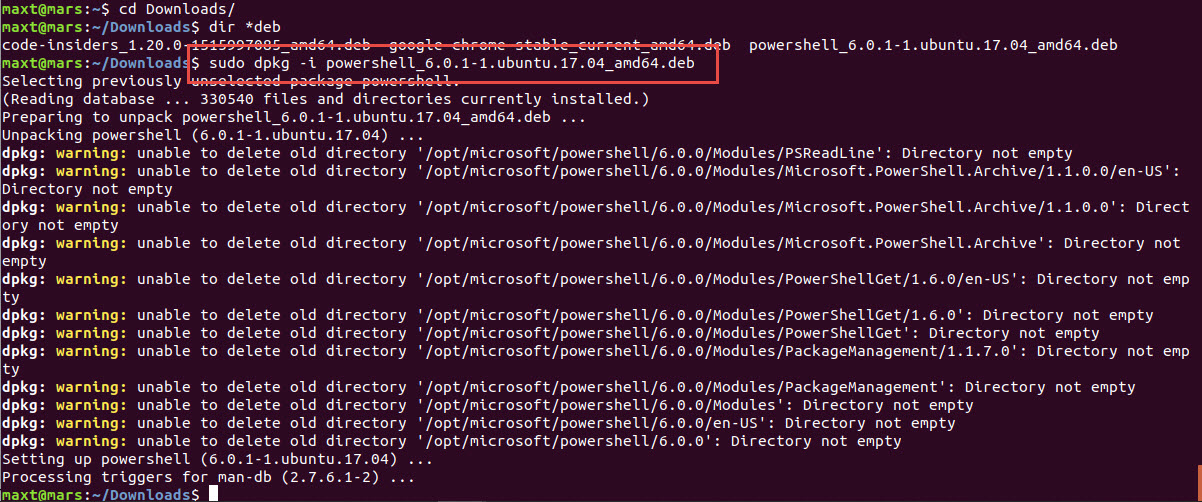
Ubuntu

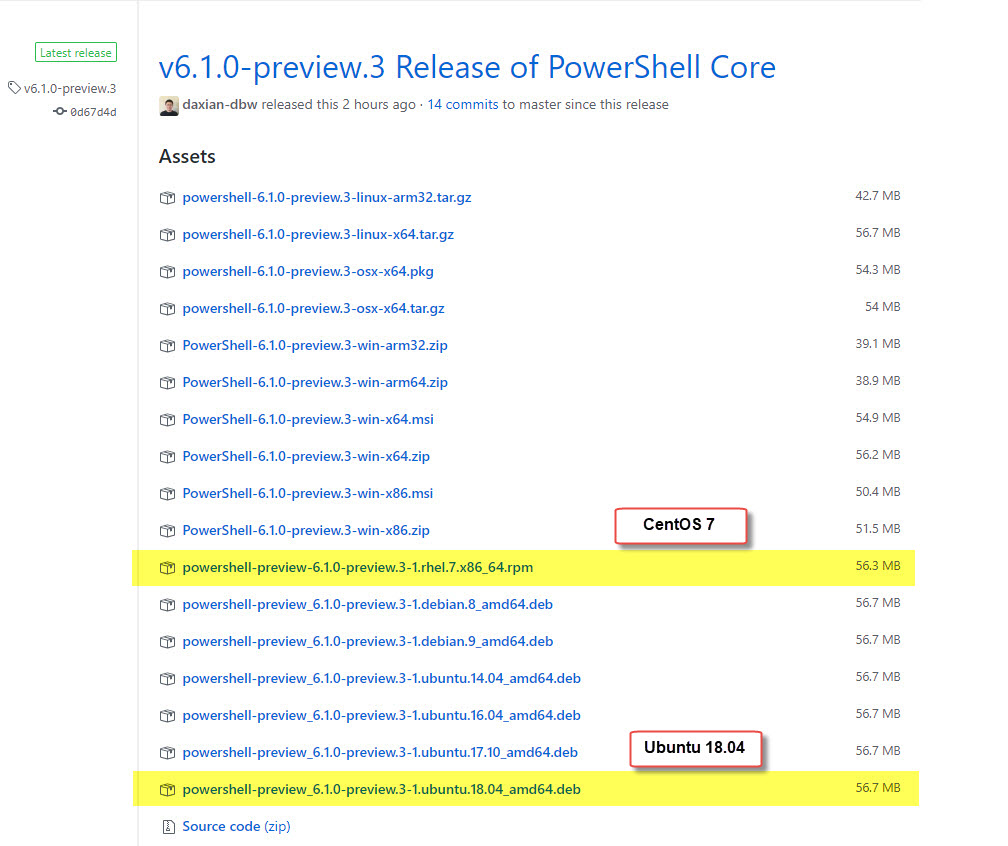
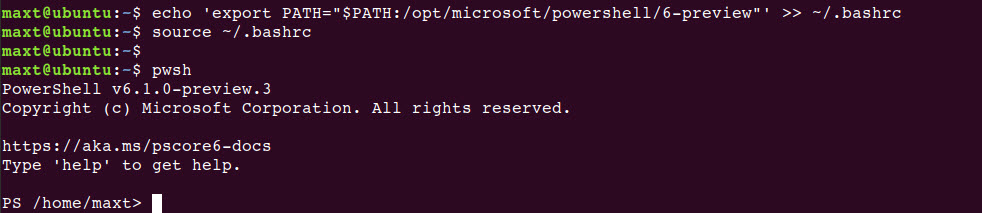
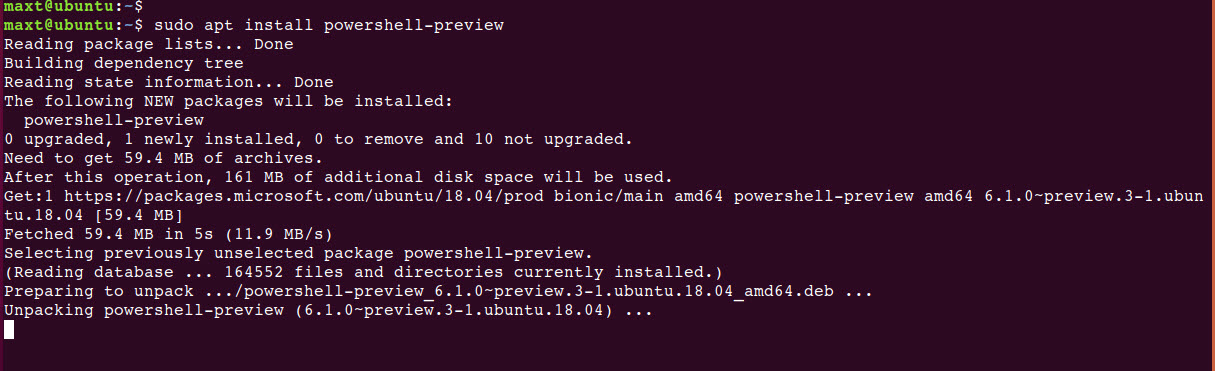
## - When PowerShell Core isn't available in their repository: (download and execute install)
cd Downloads
wget https://github.com/PowerShell/PowerShell/releases/download/v6.1.1/powershell_6.1.1-1.ubuntu.18.04_amd64.deb
sudo dpkg -i powershell_6.1.1-1.ubuntu.18.04_amd64.deb

## - When available in Apt/Apt-Get repository:
sudo apt install -y powershell #-> Or, powershell-preview

CentOS

## - When PowerShell Core isn't available in their repository: (download and execute install)
## - Before removing PowerShell - use Invoke-WebRequest cmdlet.
pwsh
invoke-webrequest https://github.com/PowerShell/PowerShell/releases/download/v6.1.1/powershell-6.1.1-1.rhel.7.x86_64.rpm
sudo yum install powershell-6.1.0-1.rhel.7.x86_64.rpm

## - When available in Yum repository:
sudo yum install powershell #-> or, powershell-preview

MacOS

## - When PowerShell Core isn't available in their repository: (download and execute install)
## - Before removing PowerShell - use Invoke-WebRequest cmdlet.
pwsh
invoke-webrequest https://github.com/PowerShell/PowerShell/releases/download/v6.1.1/powershell-6.1.1-osx-x64.pkg
sudo installer -pkg powershell-6.1.0-osx-x64.pkg -target /

## - When available in Home Brew repository:
brew cask install powershell #-> Or, powershell-preview

Make sure, when in doubt, to check the package management documentation for any of the non-Windows Systems.

Currently Available

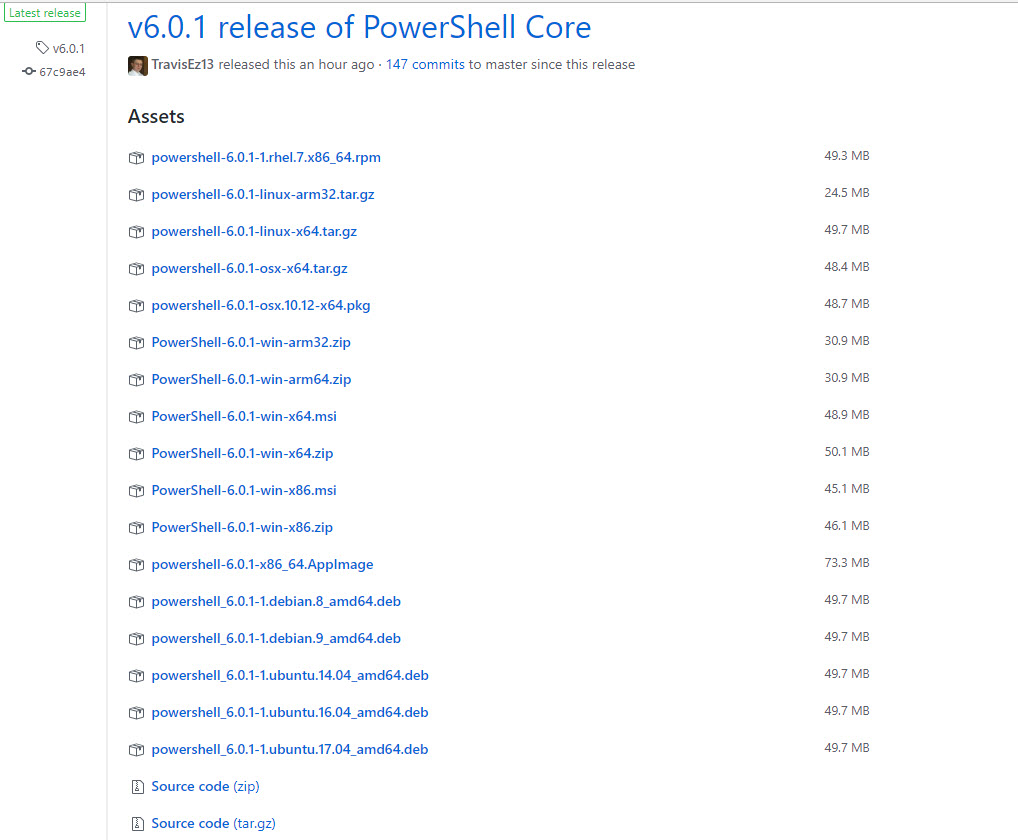
As of now, at the time of writing this blog post, the following PowerShell Core versions are available:

  • PowerShell Core (GA) Version 6.1.1 – Release on 11/13/2018
  • PowerShell Core Preview Version 6.2.0-preview.2 – Release on 11/15/2018 (Updated)

More Information

Don’t forget to check the installation instruction for PowerShell Core installation in Github at this link.

Go ahead and give it a try!

PowerShell Core 6.1.0 GA (Generally Available) for Anything Anywhere

Any System, Anywhere

Finally the next PowerShell Core GA (Generally Available) at: PowerShell Core 6.1.0. Thanks to the strong effort of both the Microsoft Team and the PowerShell Community has help reach this milestone achievement with the next generation of PowerShell.


Announcing PowerShell Core 6.1

Check Jeffrey Snover (Inventor of PowerShell) at MS Ignite 2018 comments about PowerShell (theCube-video)

PowerShell Core will continue to grow providing new features and performance improvements. This version is fully supported.

Anyone can join and contribute at the Microsoft PowerShell Team – Monthly PowerShell Community Call every third Thursday of the month.

To download and install PowerShell Core, go to their Github Repository.

Install Anywhere

Instructions on how to installed it are also available under Microsoft Documentation for both Windows and non-Window systems: MacOS, Ubuntu, Red Hat, CentOS, Fedora, and others Linux distributions.

For more information about installing PowerShell Core, check it out on Microsoft Doc site

For now, this next generation of PowerShell, Windows PowerShell Snap-ins are no longer supported, and the Out-Gridview cmdlet won’t work.

Reporting Issues

Any PowerShell Core feedback should be submitted to its Github repository. And, any Windows PowerShell issues need to be submitted to the UserVoice forum.

Check the Github PowerShell Core landing page, under the “Windows PowerShell vs PowerShell Core” section.

Modules Availability

Only in Windows Systems, Windows PowerShell modules are also available for PowerShell Core. This means that you can open PowerShell Core console and use the existing Microsoft Windows PowerShell modules.

Now, there’s no excuses for not to try using PowerShell Core in Windows Systems.

In the PowerShell Core console, just execute the following command line to list all modules listed in Windows:

Get-Module -ListAvailable

You’ll notice there’s a new column “PSEdition”, which identifies for which version of PowerShell the module will work:
1. Core – for PowerShell Core any system, any where.
2. Desk – for Windows PowerShell.
3. Core\Desk – for PowerShell Core and Windows.

PowerShell Modules location are listed:

1. Users Modules: C:\Users\max_t\Documents\PowerShell\Modules or C:\Users\max_t\Documents\WindowsPowerShell\Modules
2. General Modules for PowerShell Core: C:\Program Files\PowerShell\Modules or C:\program files\powershell\6\Modules
3. General use Modules for Windows PowerShell: C:\WINDOWS\system32\WindowsPowerShell\v1.0\Modules

Things are changing quickly in the PowerShell Gallery, which was recently update. Any PowerShell Module author has the responsibility to make the necessary update to their modules. Notice that some PowerShell Core modules are still labeled “Desk” when in fact should be both “Core\Desk”, like the “SQLServer” module.

Just make sure to check the module information for which version of PowerShell the module was created for.

Azure Cloud Shell GA (Generally Available)

Yes! Microsoft Cloud Shell has been updated to have PowerShell Core 6.1.0 GA, and is on Linux.


This shows the commitment of having cloud reliable solutions running anywhere on any systems.

  • User either Bash or PowerShell in Linux
  • Drag/Drop files into the Browser session
  • AzureRM Module already installed and updated to latest version
  • AzureRM Modules build on .Net Core

In summary

  • PowerShell Core is the next iteration of PowerShell built using .NET Core
  • Run self-contained, side-by-side in Windows systems with Windows PowerShell
  • Cross-platform availability for managing Anything, Anywhere.
  • Microsoft Open Source and Community-support
  • Azure Cloud support

MS Ignite 2018 – PowerShell Videos

Here’s just a couple of interesting videos from the Microsoft Ignite 2018 event in Orlando about PowerShell Core:

Go ahead and try PowerShell Core 6.1 GA! Embrace the change!

Installing PowerShell Core 6-Preview.3 in Ubuntu 18.04 and CentOS 7

As you may notice, only the deb package for PowerShell 6-Preview.3 is available for installation. So, only when it becomes GA (Generally Available), then we’ll see the repository documentation included for Ubuntu 18.04 and CentOS 7 installation.

But, don’t worry! Below are some undocumented steps for installing PowerShell Core Preview.3 release.

Installing PowerShell Core 6-Preview.3

1. Download PowerShell Core dpkg *deb for Linux Ubuntu 18.04 or the *rpm package for CentOS 7 from the Release page, and look:
https://github.com/PowerShell/PowerShell/releases/tag/v6.1.0-preview.3

2. Then, execute the next two lines because the first one will not complete successfully:

-For Ubuntu 18.04 dpkg *deb package-

sudo dpkg -i powershell-preview_6.1.0-preview.3-1.ubuntu.18.04_amd64.deb
sudo apt-get install -f

-For CentOS-

sudo yum install powershell-preview-6.1.0-preview.3-1.rhel.7.x86_64.rpm

In either Ubuntu and CentoOS, the installation will seems that will complete without any failures. But, when typing pwsh will not work.

Use the following workarounds if you feel is convenient to use.  Please skip to the “Things Are Changing!” and check out “Undocumented Tips” section.

Execute PowerShell Core – Workaround #1

Type the full path, and PowerShell Core will start:

/opt/microsoft/powershell/6-preview/pwsh

But, of course we don’t want to do this every time.

Execute PowerShell Core – Workaround #2

So, let Just add the PowerShell Core path to the user ~/.bashrc file, follow with reloading Bashrc:

echo ‘export PATH=”$PATH:/opt/microsoft/powershell/6-preview”‘ >> ~/.bashrc
source ~/.bashrc

After all this done, now we can start PowerShell Core from the Ubuntu 18.04 terminal.

Things Are Changing!  (Added – 06/14/2018)

Please make sure to read the PowerShell Core v6.1.0-preview.3 Release Notes.  It announce changes to the PowerShell Core executable for both Linux Distro and MacOS. So, although the above workaround mention works, you can just open PowerShell Core Console by typing “pwsh-preview”.

Undocumented Tips  (Added 06/16/2018)

Repo installation is available!

Most important to be aware of these few tips. You won’t find PowerShell 6.1.0-Preview.3 in any repository. But, there is a PowerShell-Preview.

Now, uninstalling PowerShell Core if you got the PowerShell 6.1.0-Preview.2 installed, then it need to:

  • Ubuntu

sudo apt remove powershell

  • CentOS 7

sudo yum remove powershell

But, in the case you need to remove or reinstall PowerShell Core Preview.3 in either Ubuntu and CentOS then use:

  • Ubuntu 

sudo apt remove powershell-preview

  • CentOS 7

sudo yum remove powershell-preview

Now, to install PowerShell Core Preview.3, beside been able to use either the dpkg *deb package for Ubuntu or the *rpm package to install it, you can use the following command:

  • Ubuntu

sudo apt install powershell-preview

  • CentOS 7

sudo yum install powershell-preview

It works!

These instruction was not documented at the time of the release of PowerShell Core Preview.3.

Thanks for the PowerShell Core Github Community for all the information available about PowerShell Core installation. I know this documentation will be eventually updated in due time.


Be Bold! Learn PowerShell Core!

PSCore6 – Creating a Hybrid Cross-platform SQLServer Script

There’s some discussion around scripting on using Windows PowerShell vs PowerShell Core. So, just pick one? No.
Just think about supporting a cross-platform environment. Use both!

Following my recent post on “PSCore6 – SQLServer Module Expanding The Barrier Cross-Platform“, here’s a sample Hybrid-Script for cross-platform use.

Why not!

We all know the next generation (or evolution) of PowerShell is PowerShell Core. That’s it!
You are still using PowerShell, and Windows PowerShell is not going to be dropped nor removed any time soon.

So, why not start working towards, what I call, “Hybrid-scripting”? Powershell Core provides the necessary elements to help with cross-platform scripting.

In it’s basic code form, could look be something like this:

[sourcecode language=”powershell”]

## – Logic Structure for executing either PowerShell Version:

## – Use Set-StrictMode for debug purpose:
Set-StrictMode -Version 5.1

If ($PSversionTable.PSEdition -eq "Desktop") {
"Windows PowerShell"
}
else {
## – Use Set-StrictMode for debug purpose:
Set-StrictMode -Version 6.1

if ($PSVersionTable.PSEdition -eq "Core") {
If ($IsWindows) {
"WindowsCore"
}
If ($IsLinux) {
"LinuxCore"
}
If ($isMacOS) {
"MacOSCore"
}
}
};

[/sourcecode]

Now, let’s apply this code to a practical sample.

Sample Hybrid-Script

In the following sample script, includes Help information, begin-process-end and with try-catch code structure.
At the same time, the script will output the exception to the screen console with the failed line.

Script function name: Get-DBASQLInformation

[sourcecode language=”powershell”]
Function Get-DBASQLInformation {</pre>
<#
.SYNOPSIS
This is a cross-platform function to Get SQL Server Information.

.DESCRIPTION
This is a cross-platform function to Get SQL Server Information using SQL Authentication.

.PARAMETER UserID
Enter SQL Authentication UserID parameter.

.PARAMETER Password
Enter SQL Authentication Password parameter.

.PARAMETER SQLServerInstance
Enter SQLServerInstance name parameter.

.EXAMPLE
PS> Get-DBASQLInformation -UserID ‘sa’ -Password ‘$SqlPwd01!’ -SQLServerInstance ‘mercury,1433’

.NOTES
===========================================================================
Created with: SAPIEN Technologies, Inc., PowerShell Studio 2018 v5.5.152
Created on: 5/25/2018 8:27 AM
Created by: Maximo Trinidad
Organization: SAPIEN Technologies, Inc.
Filename: Function_Get-DBASQLInformation.ps1
===========================================================================
#>
<pre>[CmdletBinding()]
[OutputType([psobject])]
param
(
[Parameter(Mandatory = $true,
Position = 0)]
[string]
$UserID,
[Parameter(Mandatory = $true,
Position = 1)]
[string]
$Password,
[Parameter(Mandatory = $true,
Position = 2)]
[string]
$SQLServerInstance
)

BEGIN {

## – Internal function:
function GetSqlInfo {
param
(
[parameter(Mandatory = $true, Position = 0)]
[string]
$U,
[parameter(Mandatory = $true, Position = 1)]
[string]
$P,
[parameter(Mandatory = $true, Position = 2)]
[string]
$S
)
Try {
## – Prepare connection passing credentials to SQL Server:
$SQLSrvConn = New-Object Microsoft.SqlServer.Management.Common.SqlConnectionInfo($S, $U, $P);
$SQLSrvObj = new-object Microsoft.SqlServer.Management.Smo.Server($SQLSrvConn);

## – SMO Get SQL Server Info:
$SQLSrvObj.Information `
| Select-Object parent, platform, product, productlevel, `
OSVersion, Edition, version, HostPlatform, HostDistribution `
| Format-List;

}
catch {
## – Write Exception to Console:
Write-Host `
"Excepion found on line:`r`n$($error[0].InvocationInfo.line)"+ `
"`r`n$($Error[0].Exception)" `
-ForegroundColor Magenta;

}
}

};

PROCESS {

## – Cross-platform logic:
If ($PSversionTable.PSEdition -eq "Desktop") {
Write-Host "Windows PowerShell"
GetSqlInfo -U $UserID -P $Password -S $SQLServerInstance;
}
else {

if ($PSVersionTable.PSEdition -eq "Core") {
If ($IsWindows) {
Write-Host "Windows PScore";
}
If ($IsLinux) {
Write-Host "Linux PSCore";
}
If ($isMacOS) {
Write-Host "MacOS PSCore";
}
## – execute on non-Windows:
GetSqlInfo -U $UserID -P $Password -S $SQLServerInstance;
}
};

};

END {
## – EndBlock (Optional)
};
};

[/sourcecode]

The heart of the code are stored in the “Begin” section as a Internal-Function GetSQLInfo(). The internal-function will be only executed if it the criteria for each of the different platforms. The Try-Catch is just to trap the error if the SMO connection failed, or to indicate the SMO .NET wasn’t loaded.

Go ahead! Create a script file, copy/paste this code, and load this function. Give it a try cross-platforms: Windows, Linux, and MacOS.

Remember, SQLServer module is a replacement for SQLPS module. I won’t recommend having both modules installed unless you use the namespace_module/cmdlet to identify which module is going to execute the cmdlet.

So make sure to always test your scripts.

What’s Next!

This function still need to worked on, but is functional enough to test-drive and see the results. So, it be modified to support Windows Authentication. Once you start scripting and building functions, you won’t stop thinking what else can be added.

Just keep working on it and learning from the PowerShell Community.

Go Bold! Learn PowerShell Core!

PSCore6 – Installing Latest OpenSSH-Win64 v1.0.0.0beta

This next version of OpenSSH bring more changes and here’s how to configured it.
So, let’s refresh the installation steps so we can remote connect from Windows to Windows, or any other non-Windows Systems using ssh protocol.

For now, this applies to Microsoft Windows [Version 10.0.16299.248].

Where To Get It

Use Chocolatey package manager for Windows to install OpenSSH-Win64. On a new windows system, it will need to be install. Make sure to open PSCore6 console “Run as administrator“.

Then, in PowerShell, execute the following command to install Chocolatey Package Manager for Windows:

[Sourcecode language=”powershell”]
Set-ExecutionPolicy Bypass -Scope Process -Force; iex ((New-Object System.Net.WebClient).DownloadString(‘https://chocolatey.org/install.ps1’))
[/Sourcecode]

When the installation is completed, make sure to exit and open again a PSCore6 console “Run as administrator

Next, check what OpenSSH version is available by execute the following command in PowerShell:

[Sourcecode language=”powershell”]
choco info openssh
[/Sourcecode]

The result on screen will provide with the latest version available with the release notes for this package. One of the fixes, clears the issue with setting the ssh services permission it is set back to “Local System“.

Installing OpenSSH from Chocolatey

After verifying and reading the release notes, continue with installing the package. The following command will install OpenSSH-Win64 on the new system.

[Sourcecode language=”powershell”]
choco install openssh
[/Sourcecode]

Now that we got the module installed, we need to make some configuration changes before installing the ssh services.

Check Configuration settings

On this latest OpenSSH version 1.0.0.0beta there has been changes to the configuration file. There are two configuration files available:

1. sshd_config-default – located on: “C:\Program Files\OpenSSH-Win64“.

The second configuration file will be available after complete the script ssh installation:

2. sshd_config – located on: “C:\ProgramData\ssh”

3. Also, all security key files are copied over from the “C:\Program Files\OpenSH-Win64” folder into the “C:\ProgramData\ssh“.

Remember, before the ssh services installation, the folder “C:\ProgramData\ssh” doesn’t exist.

Remember that any changes to the sshd_config file will requires both ssh services to be restarted.

Steps for Installing SSH Services

So, before executing the “Install-sshd.ps1” script. I’ll make the needed changes are in place in the sshd_config_default file using Notepad:

1. Enable: Port 22
2. Enable: PubkeyAuthentication yes
3. Enable: PasswordAuthentication yes
4. Add PSCore6 Subsystems:

[sourcecode language=”text”]
Subsystem powershell C:\Program Files\PowerShell\6.0.1\pwsh.exe -sshs -NoLogo -NoProfile

[/sourcecode]

Also, if it doesn’t already exist, add the Firewall Rule for Port 22:

[sourcecode language=”powershell”]
netsh advfirewall firewall add rule name=SSHPort22 dir=in action=allow protocol=TCP localport=22

[/sourcecode]

Now, we can proceed with the installation of the SSH Services. And, this installation will include the SSH-Agent Service.

[sourcecode language=”powershell”]
## – Install both ssh services: sshd and ssh-agent:
.\install-sshd.ps1 /SSHAgentFeature

[/sourcecode]

Both the ssh and the ssh-agent service are installed but remains stopped.

The installation also created a ssh folder under “C:\ProgramData” and the sshd_config file with the change we did previously to the sshd_config_default file.

Now, to complete the OpenSSH setup, we execute the following commands:

[sourcecode language=”powershell”]
## – Generate SSH keys:
./ssh-keygen -A

## – Execute both fix permissions scripts:
.\FixHostFilePermissions.ps1 -confirm:$false
.\FixUserFilePermissions.ps1

[/sourcecode]

Notice, now we got the folder “C:\ProgramData\ssh” populated with all the ssh keys need for connectivity.

We are ready to work with the installed SSH Services.

Starting SSH Services

Here are some final adjustments to make sure both SSH Services will start automaticaly after the system reboots.

[sourcecode language=”powershell”]
## – Set from the Service Startup from “Manual” to “Automatic”:
Set-Service sshd -StartupType Automatic
Set-Service ssh-agent -StartupType Automatic

## – Start the SSH services:
Start-Service sshd
Start-Service ssh-agent

[/sourcecode]

Finally, we are ready to test SSH connection to another system.

Testing OpenSSH Connectivity

The installation is complete and both SSH Services are running. In order to test, we open PSCore6 console and use the “Enter-PSSession” command to connect to a Linux system or Windows system using SSH protocol.

[sourcecode language=”powershell”]
## – Connecting to Windows:
Enter-PSSession -HostName sapien01 -UserName max_t

## – Connecting to Windows:
Enter-PSSession -HostName mars -UserName maxt

[/sourcecode]

Now, we are successfully connected to another system using OpenSSH.

Word Of Caution!

All Windows System need to have the same version of OpenSSH in order to connect via ssh protocol, or the connection will failed with the following error message: “Enter-PSSession : The background process reported an error with the following message: The SSH client session has ended with error message: Connection reset by 192.168.164.128 port 22.”

Be Bold!! Learn PowerShell Core!!

PowerShell Get-AzureRMNetworkInterface Customize View

This is an example that can be use in both Windows PowerShell and PowerShell Core to customize the result information from the “Get-AzureRmNetworkInterface” cmdlet. Showing the importance of using the Script-block Expression in the Select-Object statement when querying PowerShell .Net Object.

Executing Get-AzureRmNetworkInterface

After successfully signing on the Azure from, in this case my Windows 10 Ubuntu PowerShell Core prompt, executing the “Get-AzureRmNetworkInterface” command will return lots of information:

[sourcecode language=”powershell”]
Get-AzureRmNetworkInterface

[/sourcecode]

Now, to document this information in a proper format, a custom script need to be created.

Thought Process

First identifying which properties are going to be displayed. Let’s pick the following:
1. AdapterName
2. Virtual Machine name
3. Private IPAdress
4. Private IP Allocation Method
5. MAC Address

Now, looking at the previous results of the command, lets look at the ‘VirtualMachine‘ property:

[sourcecode language=”powershell”]
(Get-AzureRmNetworkInterface).VirtualMachine.Id

[/sourcecode]

This will display all Virtual Machine network interface in your subscription. But, I’m just interested in getting the Virtual Machine name.

Notice the common separator is the forward-slash ‘/’. We can use the .NET split() method to extract the *Virtual Machine name value.

[sourcecode language=”powershell”]
(Get-AzureRmNetworkInterface).VirtualMachine.Id.split(‘/’)

[/sourcecode]

*Note: Notice the use of single-quote forward-slash

This way we can list all the separate values belonging to the “*.Id” property.
So, in order to access the Virtual Machine name, we count the listed values from 0 thru 7. We found the name is on #6, then use the number to extract the value.

[sourcecode language=”powershell”]
(Get-AzureRmNetworkInterface).VirtualMachine.Id.split(‘/’)[7]

[/sourcecode]

How About The Ip Configutation section?

in the case of extracting information from the “IpConfiguration” property, we can execute the following line to list all available properties and its values:

[sourcecode language=”powershell”]
(Get-AzureRmNetworkInterface).IpConfigurations

[/sourcecode]

This makes it much easier to extract information by just pick and chose properties.

Custom script code

Now that we know how to extract value, the block of code would look like:

[sourcecode language=”powershell”]
## – Get VM Physical Machines IPAddress:
$IpConfig = `
Get-AzureRmNetworkInterface `
| Select-Object @{ label = "AdapterName"; Expression = { $_.Name } },
@{ label = "VMname"; Expression = { $_.VirtualMachine.Id.Split(‘/’)[8] } },
@{ label = "PrivateIpAddress"; Expression = { $_.IpConfigurations.PrivateIpAddress } },
@{ label = "PrivateIpAllocMethod"; Expression = { $_.IpConfigurations.PrivateIpAllocationMethod } },
MacAddress;

$IpConfig | Format-Table -AutoSize;

[/sourcecode]

In the above sample code, the results are saved into a PowerShell variable for better output formatting.

Conclusion

Although I’m only showing extracting information from the Get-AzureRMNetworkInterface command, this can apply to any PowerShell cmdlet that provide such complex properties values. This can apply to both Windows PowerShell and PowerShell Core.

Be Bold!! Learn PowerShell Core!!

Listing SQL Server 2017 Installed Anaconda Packages Using PowerShell

SQL Server 2017 comes with the option to include Python (Anaconda) during SQL Server installation. It will install Anaconda with a small set of python packages for the purpose of creating Data Science solution that sre executed within T-SQL statement(s). Unfortunately, there’s no documentation of what Anaconda packages are installed with SQL Server.

Much Easier with Full Installation

Doing the full Anaconda installation, gives the necessary commands to query what has been installed in your system. This makes it much easier to list all existing installed packages.

In the full installation of Anaconda, done separate from SQL Server, you can use the following command to list all packages installed:

[sourcecode language=”powershell”]
conda info
[/sourcecode]

But, with SQL Server 2017 is a different story.

Where’s my SQL Server Anaconda packages?

These packages are found in the default installation location: “C:\Program Files\Microsoft SQL Server\”YourSQLServerInstanceName”\PYTHON_SERVICES\conda-meta

All packages are of file type *json. Each Anaconda package will named with: the package name, package version, and python version number. But, this makes it hard to view using “File Explorer“.

So, solution to list the SQL Server Anaconda packages in a proper format will be needed.

PowerShell To The Rescue

So, here’s a PowerShell function that will list all installed Anaconda packages in SQL Server 2017. This will required to enter some parameters, such as: SQL Server Installation Location, and SQL Server Instance name.

[sourcecode language=”powershell”]
function Get-SQLServerAnacondaPkgList
{
[CmdletBinding()]
Param (
[string]
$SQLServerInstallationDrive = ‘C:’,
[string]
$SQLServerInstanceName
)

$SQLServerInstallationLocation = "$($SQLServerInstallationDrive)\Program Files\Microsoft SQL Server\MSSQL14.$($SQLServerInstanceName)\PYTHON_SERVICES\conda-meta"
$SqlAnaconda = Get-ChildItem $SQLServerInstallationLocation -File *.json;

[array]$global:SqlCondaPkgList = $null;
[array]$global:SqlCondaPkgList = foreach ($Pkg in $SqlAnaconda.name)
{
## – Build PSCustomObject:
[PSCustomObject]$PkgList = New-Object PSObject -Property @{
PackageName = $Pkg.Split(‘-‘)[0];
PackageVersion = $Pkg.Split(‘-‘)[1];
PackageLocation = $SQLServerInstallationLocation;
}; $PkgList;
};
$global:SqlCondaPkgList;
}

## To execute function:
$SQLServerInstallationDrive = ‘C:’
$SQLServerInstanceName = "MSQL2K17A"

Get-SQLServerAnacondaPkgList -SQLServerInstallationDrive $SQLServerInstallationDrive `
-SQLServerInstancename $SQLServerInstanceName;

## – Or, after executing the function, go back to use
## – the existing global variable:
$global:SqlCondaPkgList | Select-Object PackageName, PackageVersion

[/sourcecode]

Bottom line

Executing Anaconda within T-SQL seems only available on Windows version. But, you can still create the Python code and do some testing on Linux.

The total number of packages provided with Microsoft SQL Server 2017 is about 146. Now, in the full version of Anaconda, there is a total of about 217 python packages.

Full listing of all Anaconda Packages installed for SQL Server 2017 (See below):

[sourcecode language=”text”]
PackageName PackageVersion
———– ————–
alabaster 0.7.10
babel 2.4.0
blaze 0.10.1
bleach 1.5.0
bokeh 0.12.5
bottleneck 1.2.0
bzip2 1.0.6
cffi 1.9.1
chest 0.2.3
click 6.7
cloudpickle 0.2.2
colorama 0.3.7
conda 4.3.22
conda env
configobj 5.0.6
console_shortcut 0.1.1
cryptography 1.7.1
curl 7.52.1
cycler 0.10.0
cython 0.25.2
cytoolz 0.8.2
dask 0.14.1
datashape 0.5.4
decorator 4.0.11
dill 0.2.5
docutils 0.13.1
entrypoints 0.2.2
et_xmlfile 1.0.1
flask 0.12.1
flask cors
freetype 2.5.5
h5py 2.7.0
hdf5 1.8.15.1
heapdict 1.0.0
html5lib 0.999
icu 57.1
idna 2.2
imagesize 0.7.1
ipykernel 4.6.0
ipython_genutils 0.2.0
ipython 5.3.0
ipywidgets 6.0.0
itsdangerous 0.24
jdcal 1.3
jinja2 2.9.6
jpeg 9b
jsonschema 2.5.1
jupyter_client 5.0.1
jupyter_console 5.1.0
jupyter_core 4.3.0
jupyter_kernel_gateway 2.0.0
jupyter 1.0.0
libpng 1.6.27
libtiff 4.0.6
llvmlite 0.16.0
locket 0.2.0
lxml 3.7.3
markupsafe 0.23
matplotlib 2.0.0
menuinst 1.4.2
mistune 0.7.4
mkl 2017.0.1
mkl service
mpmath 0.19
multipledispatch 0.4.9
nbconvert 5.1.1
nbformat 4.3.0
networkx 1.11
nltk 3.2.2
notebook 5.0.0
numba 0.31.0
numexpr 2.6.2
numpy 1.12.1
numpydoc 0.6.0
odo 0.5.0
olefile 0.44
openpyxl 2.4.1
openssl 1.0.2k
pandas 0.19.2
pandas datareader
pandasql 0.7.3
pandocfilters 1.4.1
partd 0.3.7
path.py 10.1
pathlib2 2.2.1
patsy 0.4.1
pickleshare 0.7.4
pillow 4.1.0
pip 9.0.1
prompt_toolkit 1.0.14
psutil 5.2.1
py 1.4.33
pyasn1 0.2.3
pycosat 0.6.1
pycparser 2.17
pycrypto 2.6.1
pycurl 7.43.0
pygments 2.2.0
pyodbc 4.0.16
pyopenssl 16.2.0
pyparsing 2.1.4
pyqt 5.6.0
pytables 3.2.2
pytest 3.0.7
python 3.5.2
python dateutil
pytz 2017.2
pywavelets 0.5.2
pywin32 220
pyyaml 3.12
pyzmq 16.0.2
qt 5.6.2
qtconsole 4.3.0
requests 2.13.0
requests file
ruamel_yaml 0.11.14
scikit image
scikit learn
scipy 0.19.0
seaborn 0.7.1
setuptools 27.2.0
simplegeneric 0.8.1
sip 4.18
six 1.10.0
snowballstemmer 1.2.1
sphinx 1.5.4
sqlalchemy 1.1.9
sqlparse 0.1.19
statsmodels 0.8.0
sympy 1.0
testpath 0.3
tk 8.5.18
toolz 0.8.2
tornado 4.4.2
traitlets 4.3.2
unicodecsv 0.14.1
vs2015_runtime 14.0.25123
wcwidth 0.1.7
werkzeug 0.12.1
wheel 0.29.0
widgetsnbextension 2.0.0
win_unicode_console 0.5
xlrd 1.0.0
xlsxwriter 0.9.6
xlwt 1.2.0
zlib 1.2.8
[/sourcecode]

So, there’s plenty of room to learn with Python Data Science and SQL Server 2017.

Be Bold! Learn PowerShell Core!

SSMS Version 17.4 no more SQLPS Module

It was just a matter of time, as it was already mention in previous SSMS (SQL Server Management Studio) documentation that SQLPS module was going to be deprecated and replace with the new SQLServer module.

See SSMS download information at: https://docs.microsoft.com/en-us/sql/ssms/download-sql-server-management-studio-ssms

After SSMS Version 17.4 was release back in December, SQLPS module is no longer available. So, if you try to use the “Start PowerShell” from any of the database object, you’ll get the message “No SQL Server cmdlets found…” popup message.

New SQLServer PowerShell Module

But, no worries! Both the SSMS link and the popup message tell you where to get the new *SQLServer PowerShell module as is a separate installation from the PowerShell Gallery.

PowerShell Gallery SQLServer PowerShell Module, Get here: https://www.powershellgallery.com/packages/SqlServer/21.0.17199

One thing to point out, this module is only meant to be use on Windows PowerShell.

In other words, it will not work in PSCore6.

Housekeeping Needed

Now, there’s the chance previous SSMS installations have left the older SQLPS PowerShell Module in the system.

As is shown in the previous image, the variable $env:PSModulePath contains the path to the existing SQLPS module(s).

Either, remove the path manually using PowerShell, or thru the GUI System “Environment Variable“.

Or better yet, if you’re using SAPIEN Technologies, Inc. “PowerShell Studioproduct, the n use the Cache Editor feature to manage your existing PowerShell Modules. Check out the blog post and video about this feature at:
https://www.sapien.com/blog/2017/12/07/powershell-studio-feature-nugget-refreshing-local-cache-powershell-cmdlets-and-modules/

Video featuring PowerShell Studio Cache Editor

Option for PSCore

The only way to use PSCore6 to work with SQLServer cross-platform, is using the SMO (SQLServer Management Objects) for .NETCore, which is available in NuGet. For more information in how to install it, check my blog post at:
http://www.maxtblog.com/2017/11/streamlining-sql-server-management-objects-smo-in-powershell-core/

The only downside, you need to create the script from scratch. There’s plenty of documentation about SMO to overcome this hurdle. Most important, you are  sharpen your PowerShell scripting skills.

Don’t forget that before install any artifacts from PowerShell Gallery, NuGet, or Chocolatey the console shell need to be open “as an Administrator“.

Be Bold!! Learn PowerShell Core!!

PSCore6 – Version 6.0.1 is out of the oven!

Yes! Go and get while it still hot.  The Microsoft PowerShell Team is making it happen and they are not stopping.

Need to know more about the PSCore Roadmap, the check this link: https://blogs.msdn.microsoft.com/powershell/2018/01/24/powershell-core-6-1-roadmap/

Keep mind, that it always take few hour for some of the links to be update.  So, the quick way to download the latest version is to go directly to the “Release“page: https://github.com/PowerShell/PowerShell/releases

Then, select the OS version for PSCore.

While we await for Ubuntu (or other) Repositories gets the latest update, you can use the debian installation format after downloading the file :

sudo dpkg -i *.deb 

Don’t forget to always update the help documentation using “Update-Help -force” with Administrator privileges.

Also, notice that previously installed PowerShellGalley Modules remains installed.

Be Bold!! Learn PowerShell Core!!


PSCore6 – Nuget Microsoft.SqlServer.SqlManagementObjects latest Package (v140.17218.0) Broken

This is the SMO (SqlServer Management Objects) package use to create PSCore6 scripts to connect and manage SQL Server on Windows, Linux, and Azure.

But today, I found out the latest version “140.17218.0″ is broken. I had to rolled back to use an older version “140.17199.0” to get it to work again.

You can find the information about this package in this link:
https://www.nuget.org/packages/Microsoft.SqlServer.SqlManagementObjects

This NuGet SMO package version is built on .NETCore 2.0 for PSCore6, and will not install in Windows PowerShell.

Installing SMO Package

To *install the previous SMO package version “140.17199.0“, use the following command:

[sourcecode language=”powershell”]
Install-Package Microsoft.SqlServer.SqlManagementObjects -RequiredVersion ‘140.17199.0’

[/sourcecode]

*Note: Need to install as an Administrator.

If  the newer SMO version “140.17218.0” is installed then it will not connect. There are no errors, or failures displayed.  (See image)

This issue has been reported to NuGet SMO owners and hopefully will be resolved soon.

Testing SMO in PSCore6

Here’s the PSCore6 script for SMO testing. The script will work in both Windows and Linux.

[sourcecode language=”powershell”]
## – Help find and save the location of the SMO dll’s in a PowerShell variable:
$smopath = `
Join-Path ((Get-Package Microsoft.SqlServer.SqlManagementObjects).Source `
| Split-Path) (Join-Path lib netcoreapp2.0)

# Add types to load SMO Assemblies only:
Add-Type -Path (Join-Path $smopath Microsoft.SqlServer.Smo.dll)
Add-Type -Path (Join-Path $smopath Microsoft.SqlServer.ConnectionInfo.dll)

## – Prepare connection and credential strings for SQL Server:
## – (Connection to Windows SQL Server multi-instance sample)
$SQLServerInstanceName = ‘System01,1451’; $SQLUserName = ‘sa’; $sqlPwd = ‘$Mypwd01!’;

## – Turn ON below for Linux:
## – (Connection to Linux SQL Server multi-instance sample)
# $SQLServerInstanceName = ‘LinuxSystem02’; $SQLUserName = ‘sa’; $sqlPwd = ‘$Mypwd01!’;

## – Prepare connection passing credentials to SQL Server:
$SQLSrvConn = New-Object Microsoft.SqlServer.Management.Common.SqlConnectionInfo($SQLServerInstanceName, $SQLUserName, $SqlPwd);
$SQLSrvObj = new-object Microsoft.SqlServer.Management.Smo.Server($SQLSrvConn);

## – SMO Get SQL Server Info:
$SQLSrvObj.Information `
| Select-Object parent, platform, product, productlevel, `
OSVersion, Edition, version, HostPlatform, HostDistribution `
| Format-List;

## – End of Code

[/sourcecode]

Most Important

In order for this to work, NuGet needs to be installed first. The following *code block will help to check if it’s already installed. And, if not, then it will install NuGet in PSCore6.

[sourcecode language=”powershell”]
# Register NuGet package source, if needed
# The package source may not be available on some systems (e.g. Linux)
if (-not (Get-PackageSource | Where-Object{$_.Name -eq ‘Nuget’}))
{
Register-PackageSource -Name Nuget -ProviderName NuGet -Location https://www.nuget.org/api/v2
}else{
Write-Host "NuGet Already Exist! No Need to install."
}

[/sourcecode]

*Note: Thanks to the SMO guys for providing this code block to get me started testing.

Also, if you already installed the buggy NuGet SMO version, remember to use the following command to uninstall the package:

[sourcecode language=”powershell”]
uninstall-package Microsoft.SqlServer.SqlManagementObjects

[/sourcecode]

I’m hoping this blog post will help in any way.

Be Bold!! Learn PowerShell Core!!