Using a PowerShell executable w/Param() in SSIS
Here’s where the fun begins. It took me a few hours to figure something out in order to my SSIS package pass some values into my PowerShell executable. So, here’s a sample solution where I found out that my Flat file source record didn’t match the record layout provide by another Internet source. Yes, believe or not, sometimes documentation out there might be way out of day. But, Thanks to SSIS “..Source Error Output“, you can redirect these records error to a destination object. Then you can later analysis these bad records.
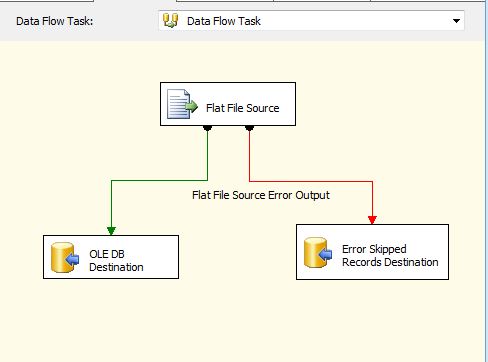
So, if you work creating SSIS packages, then everyone should know how to use the “Data Flow component” to help you define your data Source, and Destination objects. Now, in cases when you need to isolate records that are causing your package to fail, then you need to add a second Destination object to deal with them later. In my example, my second Destination object will be to a new SQL table called “CompanyData_SkippedRecords“.
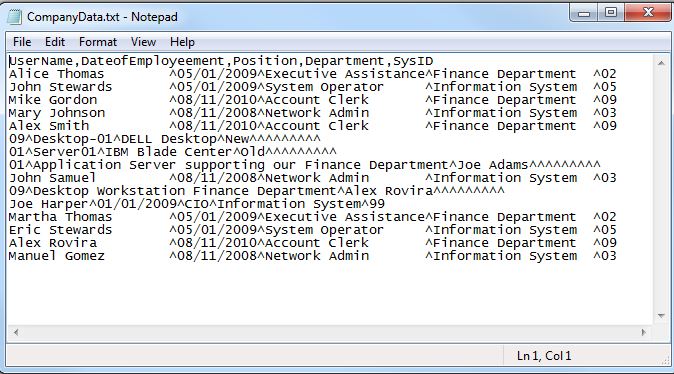
Here’smy sample Text file to be process by my SSIS package: “CompanyData.txt”
Notice, the first line are the columns, but some of the data in this file won’t match the column layout. If I run this solution with the Source and Destination objects defined, this package will fail.
Now, we can add your another Destination component to isolate these unmatching records. Connect the Source component by dragging the “Red Arrow” to the second Destination Component handling the errors.
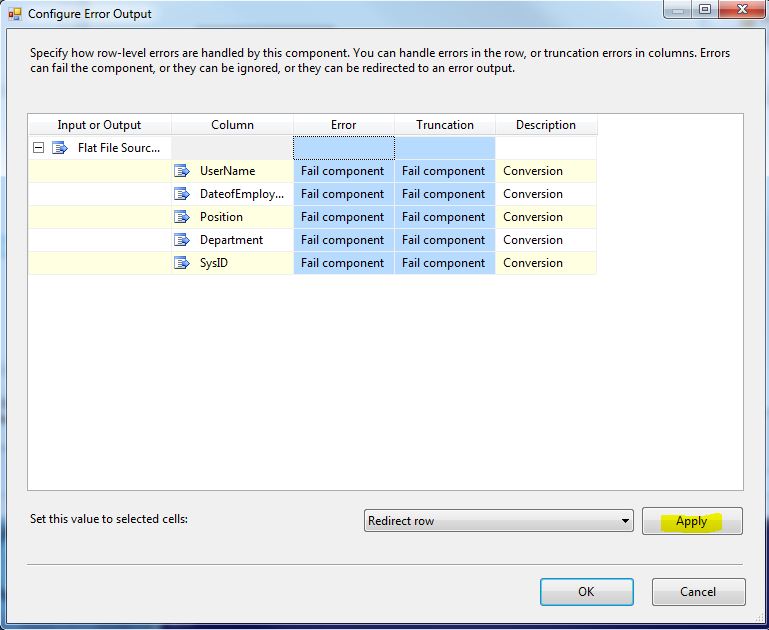
A “Configure Error Output” windows will popup, change the “Set this value to selected cells:” to “Redirect row“. Then, highlight all fields in both “Error” and “Truncation” columns, and Click “Apply” to change the “Fail Component” to “Redirect row“.
Click “OK” when you confirmed that all fields has “Redirect row“.
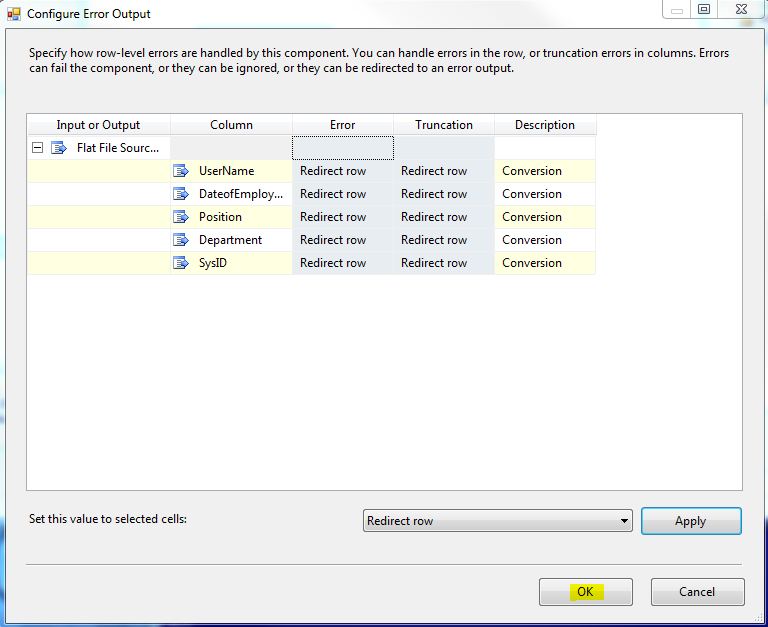
These changes are in place for our Flat File Source “Error Output” section.
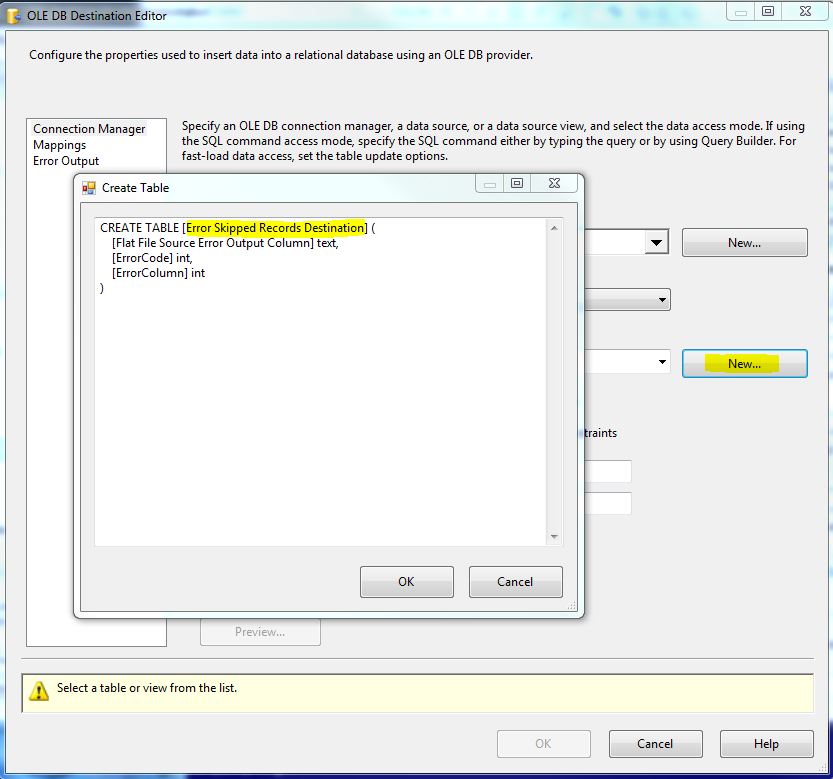
Now, we need to complete setting up out second destination component labeled “Error Skipped Records Destination” where our Error Records will be dropped into our new SQL table.
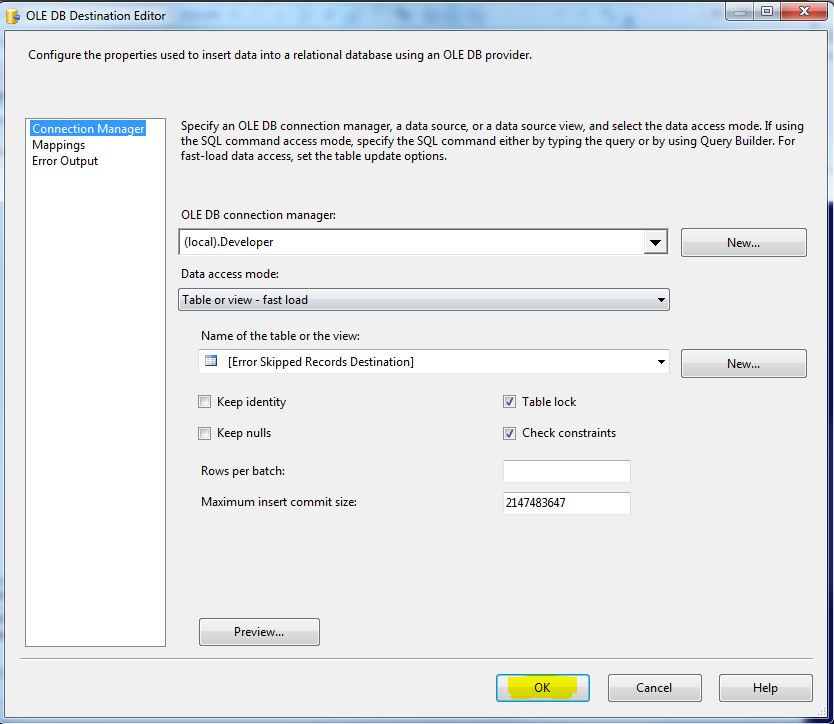
Open our Error Destination component. For now, we are going to use the default, the new table will be named “[Error Skipped Records Destination]”. So, all bad records will be stored in this table.
Then, click “OK” to exit.
At this step we are done with our Import and Error/Mismatch records handling, and we are ready to run our solution. At the end of this step will have bad records table.
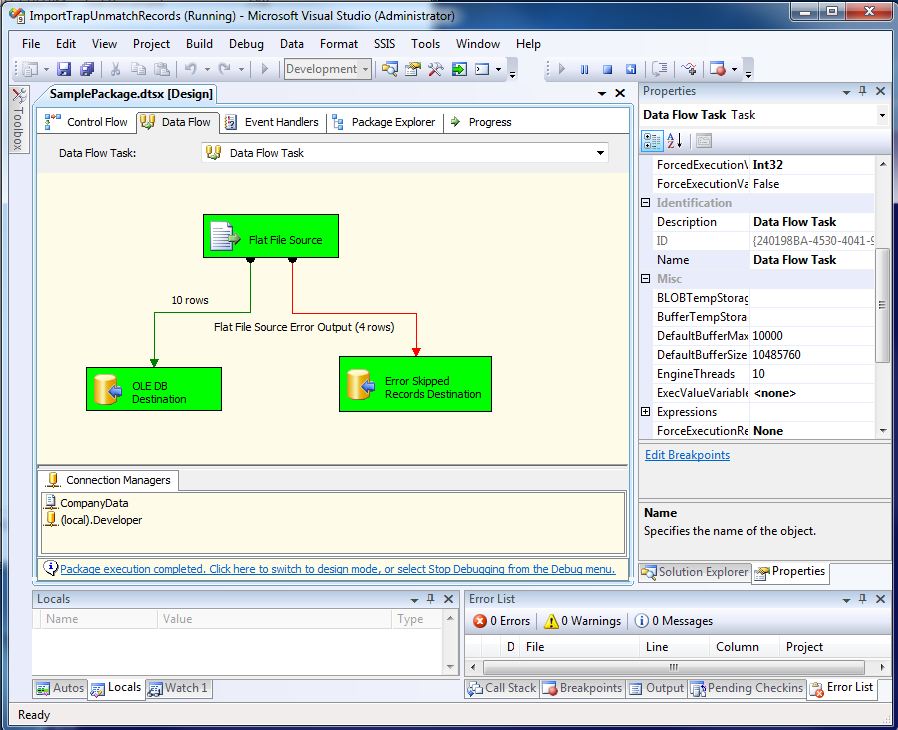
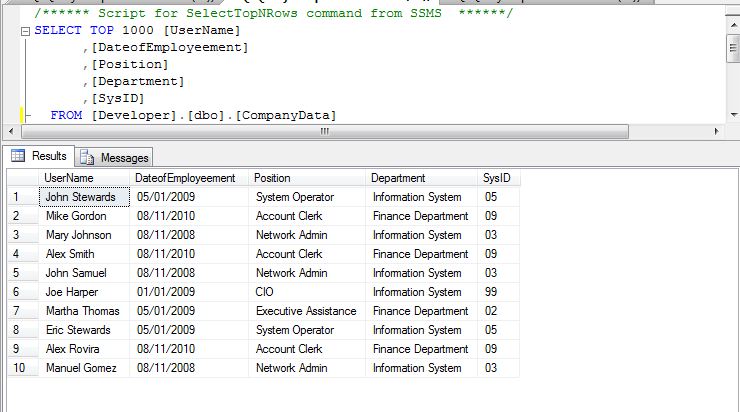
Here’s our good data:
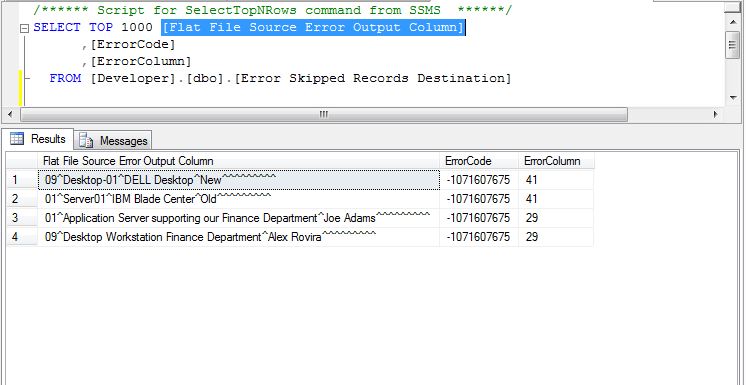
And, this is Error Records table:
Now, the next step, I need to a table to consolidate all my mismatched records. I will be reading from my “[Error Skipped Records Destination]” and selecting the “[Flat File Source Error Output Column]” field as “DataSkipped” into a new table called “CompanyData_SkippedRecords“.
Here’s the new table layout:
[sourcecode language=”sql”]
USE [Developer]
GO
/****** Object: Table [dbo].[CompanyData_SkippedRecords]
Script Date: 08/18/2011 12:27:15
*****/
SET ANSI_NULLS ON
GO
SET QUOTED_IDENTIFIER ON
GO
SET ANSI_PADDING ON
GO
CREATE TABLE [dbo].[CompanyData_SkippedRecords](
[DataSkipped] [text] NOT NULL,
[ErrRecordsLength] [varchar](7) NOT NULL,
[TotalFieldsPerRecords] [varchar](5) NOT NULL,
[FileGroupSource] [varchar](4) NOT NULL,
[ProcessDate] [datetime] NOT NULL,
) ON [PRIMARY] TEXTIMAGE_ON [PRIMARY]
GO
SET ANSI_PADDING OFF
GO
[/sourcecode]
As you may notice, this table is very different than the we one createdto store the errors. And here’s where we integrate our PowerShell script solution into our SSIS Package.
PowerShell Script
In this new table out of the 5 fields 4 will be genrated by PowerShell , and two of them are coming from parameters:
- DataSkipped – comes from the our Err table.
- ErrRecordsLength – Count of the length of each records skipped.
- TotalFieldsPerRecords – Count the number of fields per records (using the delimiter -1).
- FileGroupSource – Denominates the type of records that was imported (ie.Comp).
- ProcessDate – Date that this Err table was process.
The purpose of this PowerShell executable it to generate this additional fields to help analyzing what’s wrong with my Text file. This process will read one Err Record at a time, generate the addition values, and insert into the new table.
One requirement: You need to have the SQLPS module installed in your “MyDocument\WindowsPowerShell\Modules” folder were the user is running this SSIS package, or will not run. If you’re usign SQL Server 2008 R2, then download the SQLPS module from Chad’s Miller blogsite:http://sev17.com/2010/07/making-a-sqlps-module/(SQL Denali CTP3 already has it). max
Here’s the Script (don’t be scare!), to be compiled with PrimalForms 2011:
[sourcecode language=”powershell”]
# =============================================================
# Microsoft PowerShell Source File — Created with SAPIEN Technologies PrimalScript 2011
# NAME: AnalyzeSkippedRecords.ps1
# AUTHOR: Max.Trinidad ,
# DATE : 8/18/2011
#
# COMMENT: PowerShell Script to Analyze the Data Skipped for processing and update the Skipped
# table with additional information.
# =============================================================
PARAM([String] $Arg1, [String] $Arg2, [String] $Arg3)
#Imput: $Arg1="Err*"; $Arg2 = "Developer"; $Arg3 = "YourComputer"
Import-Module SQLPS -DisableNameChecking;
[DateTime] $ProcessDate = (get-date).month.ToString("00")+"/"+(get-date).Day.ToString("00")`
+"/"+(get-date).Year.ToString()
$MySQL = new-object(‘Microsoft.SqlServer.Management.Smo.Server’) $Arg3
$SchemaTableList = $MySQL.Databases[$Arg2].tables | where {$_.name -like $Arg1} | `
select @{Label="Schema_Tablename";Expression={$_.Schema+".["+$_.Name+"]"};};
foreach($table in $SchemaTableList)
{
$tblName = $table.Schema_TableName;
$sqlqry1 = @"
USE $Arg2
GO
select
[Flat File Source Error Output Column] as DataSkipped
from $tblName
"@;
$rdSkipData = Invoke-Sqlcmd -ServerInstance $Arg3 -Query $sqlqry1;
$recCount = 0;
Do
{
$getInfo = $rdSkipData[$recCount] | select DataSkipped., `
@{Label="ErrRecordslength";Expression={($_.DataSkipped).Length};}, `
@{Label="TotalFieldsPerRecord";Expression={(($_.DataSkipped).split("^")).count};};
$DataSkipped = $rdSkipData[$recCount].DataSkipped.ToString().Replace("’","").Replace(‘"’,”).Trim();
$ErrRecordsLength = $getInfo.ErrRecordsLength;
$TotalFieldsPerRecord = $getInfo.TotalFieldsPerRecord;
$FileGroupSource = $Arg1;
$sqlqry2 = @"
USE $Arg2
GO
INSERT INTO [dbo].[CompanyData_SkippedRecords]
VALUES(
‘$DataSkipped’
,’$ErrRecordsLength’
,’$TotalFieldsPerRecord’
,’$FileGroupSource’
,’$ProcessDate’
)
GO
"@;
Write-Host $sqlqry2
Invoke-Sqlcmd -ServerInstance $Arg3 -Query $sqlqry2;
$recCount++
} Until($recCount -eq $rdSkipData.Count);
}
[/sourcecode]
Notice this script was meant to search for multiple error tables based of the type of File groups (ie. ADB1, ADB2, and ADB*). Now, using the steps from Passing Parameter to a PowerShell executable – Part – 1 on the previous blog, i compiled my script and create my executable. Keep in mind, the you will need to move this executable to the machine you are running this SSIS Package. Thanks to SAPIEN for this Great product!
Create SSIS Variables for input Parameters for the PowerShell Executable
This part took me a few hour to figure out how to pass parameters using the SSIS variables in combination with “Expressions”. Yes!! That was the keyword “Expressions”. I couldn’t fine a blog out there that will properly explain this process. Just one that I will give some credit because this keyword got my attention: http://dennyglee.com/2006/05/12/ssis-global-variables-and-execute-process-task/ – “..you can modify the Execute Process Task at the point of the Property Expression attribute..”. Unfortunately, thsi blog didn’t show a step-by-step on how this done. But, lucky you, I’m blogging about it.
Here’s how is done:
Create three variable that will hold some parameters values to be injected into the executable:
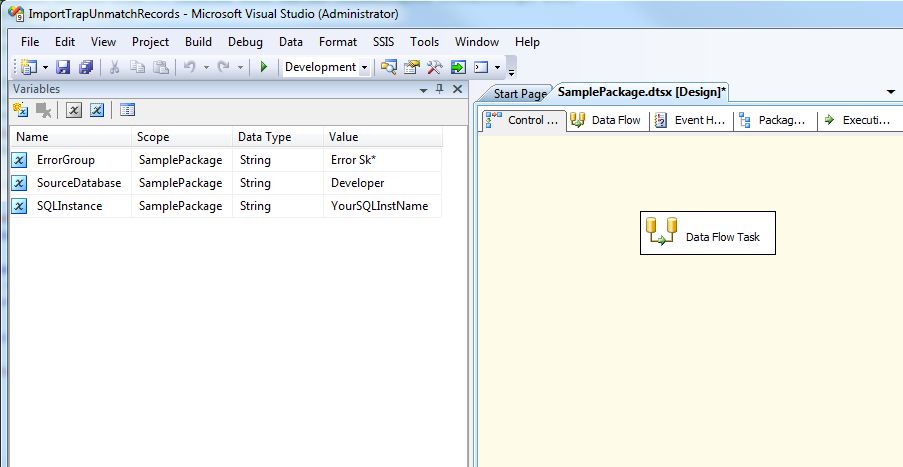
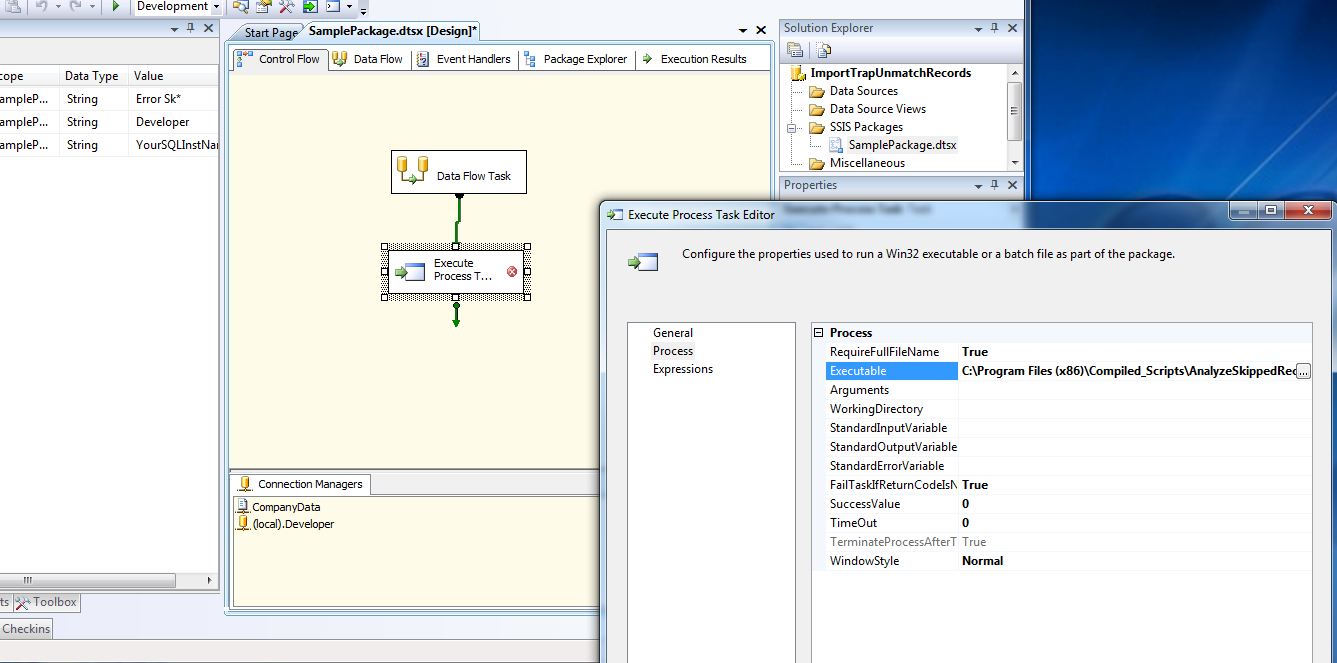
Now, we add the “Execute Process Task” component, connect the “Data Flow Task”, and double-click on the “Execute Process Task”. In the “Execute Process Task Editor”, go to the “Process” section and in “Executable” add the executable name “AnalyzeSkippedRecords.exe”.
And now,… to setup your input parameters, Go to the “Expressions” section:
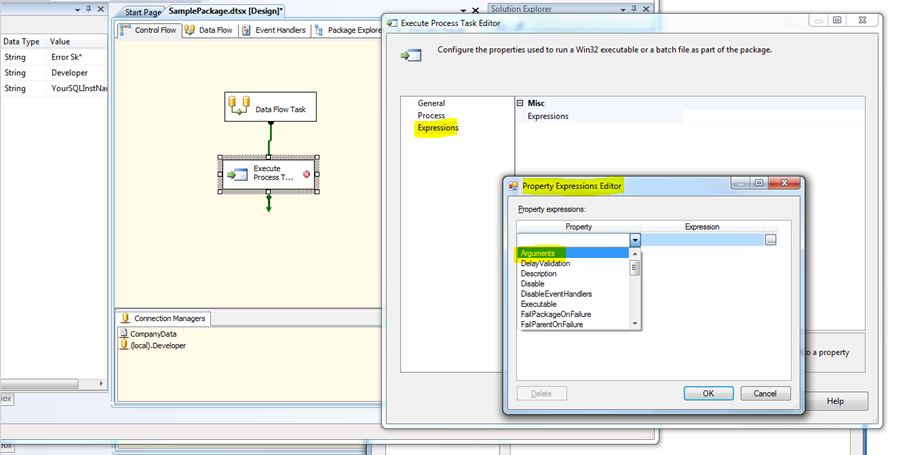
Here’s where you define the input Argument(s) for your executable(s). Under “Property expressions”, you select the property “Argument”, and then click on the “…” to build the expresions:
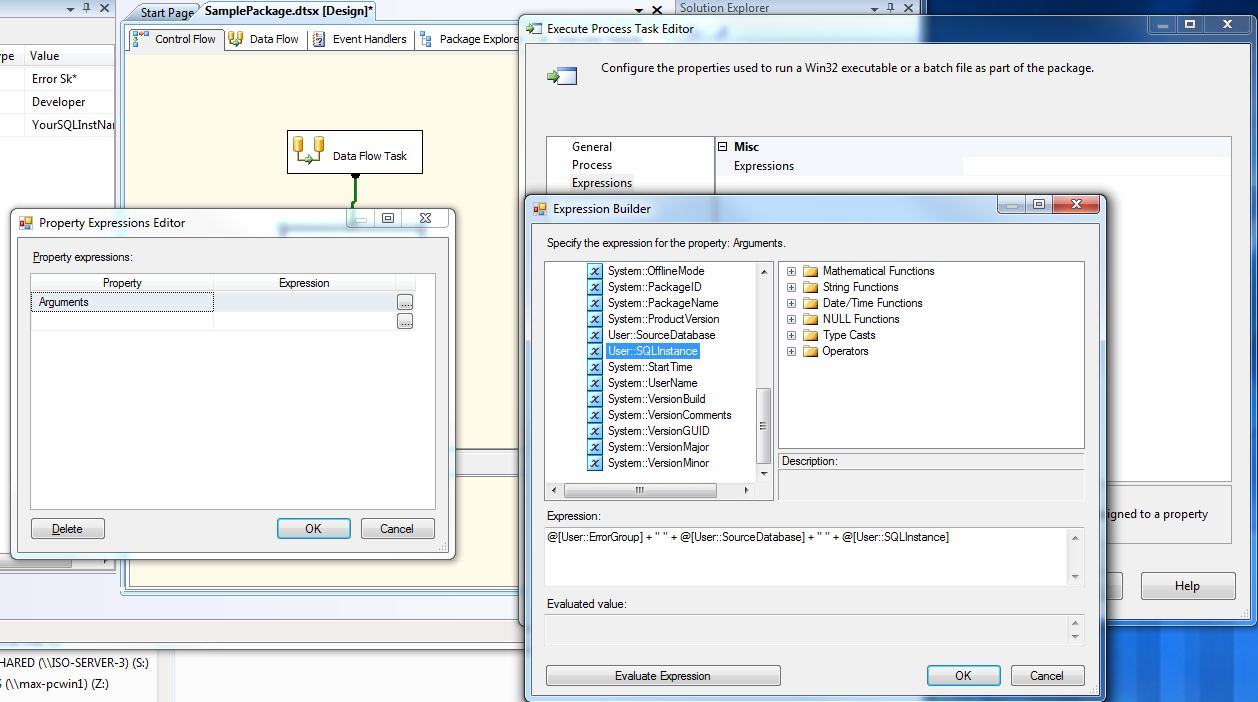
Yes!! This is the money maker: ( there’s a space between the double-quotes )
@[User::ErrorGroup] + ” ” + @[User::SourceDatabase] + ” ” + @[User::SQLInstance]
Now, click “OK” twice to save the changes, and we ready to run our full SSIS package.
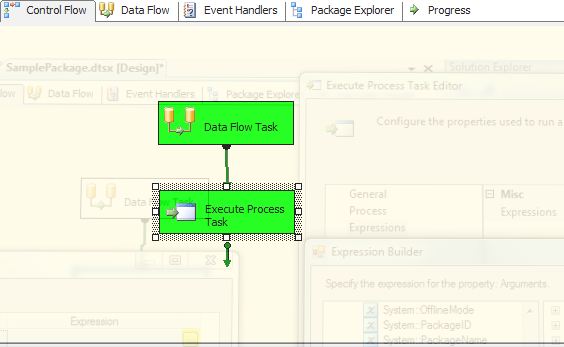
Success!! This solution works.
Check my “CompanyData_SkippedRecords” table:
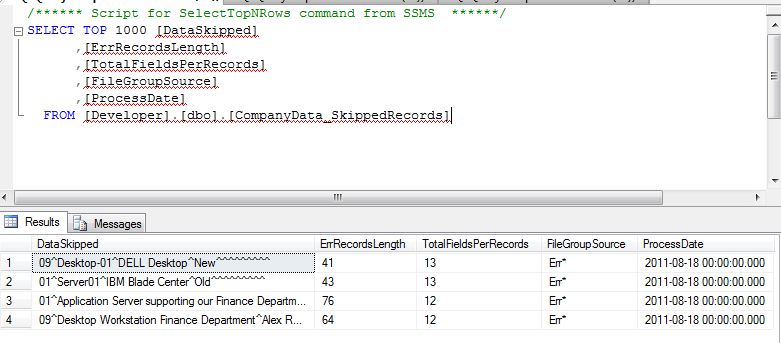
Now, I can keep working on analyzing this data with PowerShell, and/or other tools.
Couple of Pointers:
In the “Execute Process Task Editor”, you can troubleshoot your executable session if you leave the setting “WindowStyle” to Normal. This way you can see the console popup. Then, when everything is working correctly, change it back to Hidden“.
Also, if you’re having some problem with the PowerShell executable failing, you can add the “Write-Host ‘Pause’; Start-Sleep -second 10;” oneliner command to pause the session and give you time to see the error when leaving the “WindowsStyle” as Normal.
Download this SSIS_PowerShell_sample solution at:
